Instruction Manual | Levenhuk Nelson Binoculars | Optics Trade
•
0 likes•202 views

https://www.optics-trade.eu/en/binoculars/shopby/manufacturer-levenhuk/binoculars_series-levenhuk_nelson.html

Recommended
More Related Content
What's hot
What's hot (19)
Similar to Instruction Manual | Levenhuk Nelson Binoculars | Optics Trade
Similar to Instruction Manual | Levenhuk Nelson Binoculars | Optics Trade (20)
More from Optics-Trade
More from Optics-Trade (20)
Recently uploaded
Recently uploaded (20)
Instruction Manual | Levenhuk Nelson Binoculars | Optics Trade
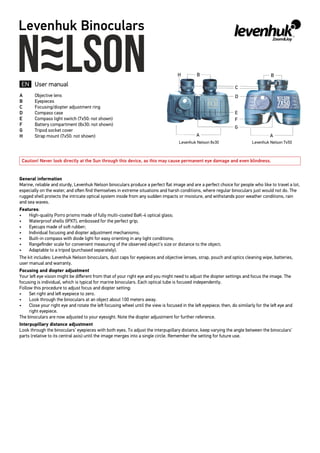
- 1. Levenhuk Binoculars User manual Objective lens Eyepieces Focusing/diopter adjustment ring Compass case Compass light switch (7x50: not shown) Battery compartment (8x30: not shown) Tripod socket cover Strap mount (7x50: not shown) A B C D E F G H Caution! Never look directly at the Sun through this device, as this may cause permanent eye damage and even blindness. General information Marine, reliable and sturdy, Levenhuk Nelson binoculars produce a perfect flat image and are a perfect choice for people who like to travel a lot, especially on the water, and often find themselves in extreme situations and harsh conditions, where regular binoculars just would not do. The rugged shell protects the intricate optical system inside from any sudden impacts or moisture, and withstands poor weather conditions, rain and sea waves. Features: • High-quality Porro prisms made of fully multi-coated BaK-4 optical glass; • Waterproof shells (IPX7), embossed for the perfect grip; • Eyecups made of soft rubber; • Individual focusing and diopter adjustment mechanisms; • Built-in compass with diode light for easy orienting in any light conditions; • Rangefinder scale for convenient measuring of the observed object’s size or distance to the object; • Adaptable to a tripod (purchased separately). The kit includes: Levenhuk Nelson binoculars, dust caps for eyepieces and objective lenses, strap, pouch and optics cleaning wipe, batteries, user manual and warranty. Focusing and diopter adjustment Your left eye vision might be different from that of your right eye and you might need to adjust the diopter settings and focus the image. The focusing is individual, which is typical for marine binoculars. Each optical tube is focused independently. Follow this procedure to adjust focus and diopter setting: • Set right and left eyepiece to zero. • Look through the binoculars at an object about 100 meters away. • Close your right eye and rotate the left focusing wheel until the view is focused in the left eyepiece; then, do similarly for the left eye and right eyepiece. The binoculars are now adjusted to your eyesight. Note the diopter adjustment for further reference. Interpupillary distance adjustment Look through the binoculars’ eyepieces with both eyes. To adjust the interpupillary distance, keep varying the angle between the binoculars’ parts (relative to its central axis) until the image merges into a single circle. Remember the setting for future use. Levenhuk Nelson 8x30 Levenhuk Nelson 7x50 EN
- 2. Using eyecups We recommend setting the eyepieces in the lowest position for observations while wearing eyeglasses. For observation without glasses, set the eyepieces in the upper position. Fold down the soft part of the eyecup inside or outside of the eyepiece (for lower position); pull out the soft part of the eyecup (for upper position). Do not apply excessive pressure as this may damage the eyecups. Using the compass Your binoculars are equipped with a directional compass. If you look into the eyepieces, you will see a scale in degrees (350...360...) at the lower edge of your field of view. The directional compass show orientations in terms of angles, where the North is represented as 360°, East as 90°, South as 180° and West as 270°. Each graduation represents 1°. Example: If 360 is exactly at the centre of the scale you are looking directly to the north (if 180, to the south). Having the object centered with the rangefinder scale in the field of view, read the graduation. The orientation of the object can be identified from the reading. Note: The north indicated by the directional compass is “magnetic north”, which is different from “true north”. The true north is the same no matter where you are located around the world. The magnetic north varies depending on your location. By using the binoculars, together with a map and an angle meter, you will then be able to locate precisely your position. Example: On a boat sailing, the arrow shows the direction your boat is heading for (fig. 1). In Fig.2, by reading the compass in the binoculars, you read 190° from the boat to the buoy. (The counter-directional angle, 190°−180°=10°, from the buoy to the boat.) To locate your position precisely, you need to have a second reference. In Fig.3, by using the lighthouse as the second reference, the direction from the lighthouse to the boat is 120° (300°−180°=120°) and the buoy (10°). Compass lighting In the dark, turn on the compass diode lighting by lightly pressing the light switch. The lighting stays on as long as the switch is depressed. The lighting powers by two batteries. If the light becomes faint, change the batteries. Remove the plastic battery compartment cover by raising it gently. Open the compartment by turning the latch with a coin and change the batteries matching the correct polarity. Reading the rangefinder scale To accurately use the rangefinder scale, you will need to know either the size or distance of the object. Lighthouse Lighthouse Lighthouse N N N Buoy Buoy Buoy Boat Boat 120° 300° 19 0° 19 0° 10 ° Fig. 1 Fig. 2 Fig. 3 Fig. 4
- 3. 1) Levenhuk Nelson 7x50 model Nelson 7x50 has three concentric circles of numbers on an objective tube. The inner circle represents the rangefinder scale reading. The outer circle of number represents the distance. The circle of numbers in between represents the object size. Turn the rotatable zone of the plate and stop when the arrow points to the number of the rangefinder reading. If you already know the object size, find the number of the object size on the plate, and the corresponding number of the outer circle is the distance to the object. If you already know the distance, find the number of distance on the plate, and the corresponding number of the middle circle is the object size. Example: To determine the distance to an object you must first know its size (height). Look at it and measure the image height on the reticule. A building reaches to 3.9 on the scale (fig. 4). Turn the scale ring until the white mark points to 3.9 on the upper scale (A, fig. 5). The lower scale on the ring is the object size. Here, the number 12 (B, fig. 5) stands for the known height of the tower and is exactly below the number 400 (C, fig. 5) on the distance scale. Therefore, the building is 400m away from you. When you know the distance to the object, you can determine its size (height). Example: The building is 300m away from you. Look at it and measure the image height on the reticle. It reaches to 3.9 on the vertical scale. Now turn the scale ring until the white triangle points to 3.9 on the upper scale. Over “300” on the distance scale is the number 9 on the object size scale. The building height is therefore 9m. 2) Levenhuk Nelson 8x30 model For Nelson 8x30, you can use formulas to calculate the distance to the object (when you know its size) or the object’s size (when you know the distance.) When you know the object’s size (in centimeters), calculate the distance to the object (in meters): Example: Object size (you know) is 51cm, rangefinder scale reading is 1.7 units. Calculate the distance to the object: 100 × 51 / 1.7 = 3000m. When you know the distance to the object, calculate the object size (height): Example: Distance (you know) is 3000m, rangefinder scale reading is 1.7 units. Calculate the object height: 3000 × 1.7 / 100 = 51cm. Fig. 5 A B C Size = Distance = 100 rangefinder scale reading distance × rangefinder scale reading 100 × size 1 2 140 200 300 400 600 3 4 5 6 7 8 9 10 12 14 16 0·4 0·8 0·6 0·3 50 60 70 80 100 1·2 1·6 2·5 2 3
- 4. Nelson 8x30 Nelson 7x50 Prism type Porro Porro Prism material BaK-4 BaK-4 Optics fully multi-coated fully multi-coated Objective lens construction 4 elements in 3 groups 3 elements in 2 groups Eyepiece lens construction 2 elements in 1 group 2 elements in 1 group Magnification 8x 7x Objective lens diameter (aperture) 30mm 50mm Field of view 8° 139ft/1000yds 139m/1000m 7° 122ft/1000yds 122m/1000m Exit pupil diameter 3,75mm 5mm Eye relief 18mm 23mm Relative brightness 14 51 Twilight factor 15.49 18.7 Resolution threshold 6.5" 5.5" Interpupillary distance 56–76mm 56–76mm Focusing individual for each eyepiece individual for each eyepiece Close focus 10ft 3m 13ft 4m Eyecups foldable foldable Diopter adjustment ±5 ±5 Waterproof + + Nitrogen-filled + + Adaptable to a tripod + + Operating temperature range −4… +130 °F −20… +55 °C −4… +130 °F −20… +55 °C Body material plastic plastic Built-in compass + + Batteries type (compass light) LR44 (2pcs) LR936 (2pcs) The manufacturer reserves the right to make changes to the product range and specifications without prior notice.
- 5. Care and maintenance • Never, under any circumstance, look directly at the Sun, another bright source of light or at a laser through this device, as this may cause PERMANENT RETINAL DAMAGE and may lead to BLINDNESS. • Take necessary precautions when using the device with children or others who have not read or who do not fully understood these instructions. • Do not try to take the device apart on your own. For repairs of any kind, please contact your local specialized service center. • Do not touch the optical surfaces with your fingers. You can use a soft napkin or a cleaning wipe, dipped in ether or absolute alcohol, to clean lenses. We recommend using special optics cleaning fluids from Levenhuk. Do not use any corrosive or acetone-based fluids to clean the optics. • Abrasive particles, such as sand, should not be wiped off lenses, but instead blown off or brushed away with a soft brush. • Do not apply excessive pressure when adjusting focus. • Protect the device from sudden impacts and excessive mechanical force. • Store the device in a dry, cool place away from hazardous acids and other chemicals, away from heaters, open fire and other sources of high temperatures. Do not use the device for lengthy periods of time, or leave it unattended in direct sunlight. Always store the device in a special case. • We recommend keeping the silicate gel pack, if included in the kit. • During long storage, a thin white film may appear on the rubber armor. You can wipe it clean with a clean napkin. • Seek medical advice immediately if a small part or a battery is swallowed. Battery safety instructions • Always purchase the correct size and grade of battery most suitable for the intended use. • Always replace the whole set of batteries at one time; taking care not to mix old and new ones, or batteries of different types. • Clean the battery contacts and also those of the device prior to battery installation. • Make sure the batteries are installed correctly with regard to polarity (+ and -). • Remove batteries from equipment that is not to be used for an extended period of time. • Remove used batteries promptly. • Never attempt to recharge primary batteries as this may cause leakage, fire, or explosion. • Never short-circuit batteries as this may lead to high temperatures, leakage, or explosion. • Never heat batteries in order to revive them. • Remember to switch off devices after use. • Keep batteries out of the reach of children, to avoid risk of ingestion, suffocation, or poisoning. • Do not disassemble batteries. • Utilize used batteries as prescribed by your country laws. Levenhuk International Lifetime Warranty All Levenhuk telescopes, microscopes, binoculars and other optical products, except for accessories, carry a lifetime warranty against defects in materials and workmanship. Lifetime warranty is a guarantee on the lifetime of the product on the market. All Levenhuk accessories are warranted to be free of defects in materials and workmanship for six months from date of retail purchase. The warranty entitles you to free repair or replacement of the Levenhuk product in any country where a Levenhuk office is located if all warranty conditions are met. For further details please visit our web site: www.levenhuk.com/warranty/ If warranty problems arise, or if you need assistance in using your product, contact the local Levenhuk branch. Levenhuk, Inc. 924-D East 124th Ave. Tampa, FL 33612 USA Levenhuk® is a registered trademark of Levenhuk, Inc. © 2019 Levenhuk, Inc. All rights reserved. www.levenhuk.com 20181225