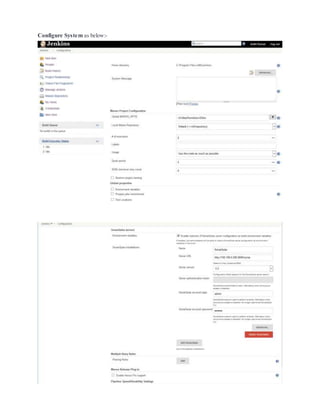
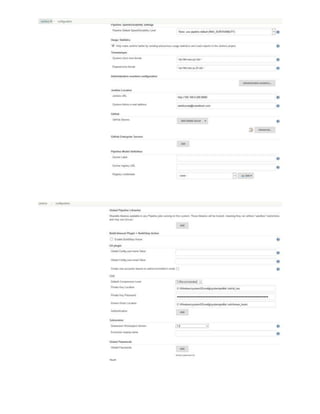
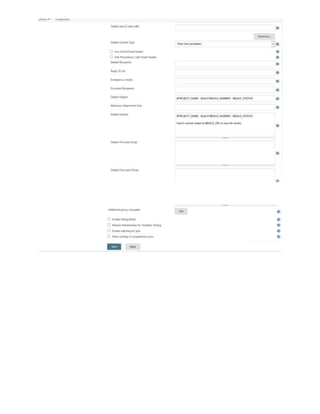
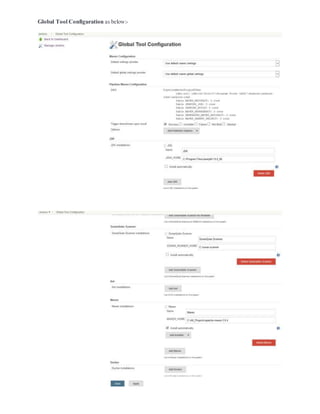
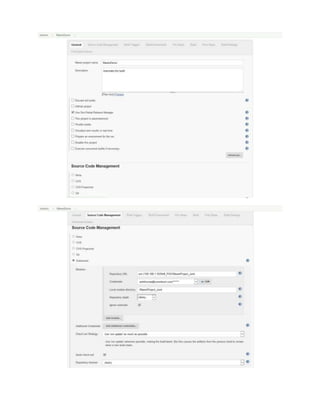
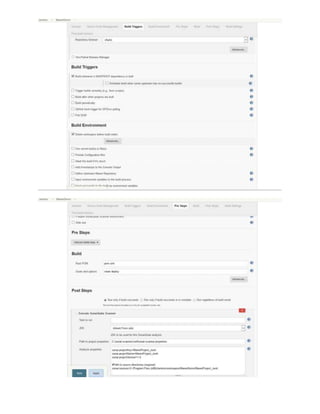
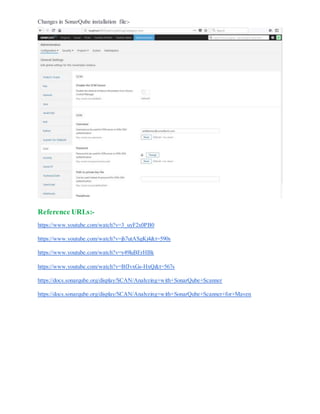
Install Jenkins in Windows system
1. Before installing Jenkins into our system we must be having Java JDK should be installed and
JAVA_HOME & path should be set.
2. Then go to URL “https://jenkins.io/download/” and download the Jenkins zip file based on your OS type.
Here I’ll show you about “How to install Jenkins in windows system completely”.
3. Then extract the jenkins-2.89.4.zip file into a folder and run jenkins.msi file and install.
After Finish it will open a page like below.
4. Go to the folder mentioned in the screenshot above “C:Program Files
(x86)JenkinssecretsinitialAdminPassword” and copy the password from that file, provide here and
continue.
5. Select “Install suggested plugins” and continue.
6. After this the “Getting started” page will come as below, fill those details and click on “Save and
Finish”
7. We will see a message as “Jenkins is ready!” Click on “start using Jenkins”.
8. Now go to login page and provide the login credentials and login into it. And click on “Manage Jenkins”
9. Click on “Manage Plugins” and “Available” tab
10. Search for the items which we want to install in, select and then click “install without restart”
E.g.:- SonarQube Scanner, JUnit Realtime Test Reporter, Subversion Plug-in, GitHub, Junit, CVS
11. Then click on the check mark at “Restart Jenkins when installation is complete and no jobs are
running”
PART 2 (installation of SonarQube and integration with Jenkins):-
Now install SonarQube in the same server where Jenkins is running by using below steps:-
Download “sonarqube-7.0.zip” and extract it into a folder and then go to bin folder of respective system
type (e.g. C:sonarqube-7.0binwindows-x86-64StartSonar.bat) and run “StartSonar.bat”. Then the
SonarQube server will start
Once server is up, test it by hitting the URL as http://localhost:9000/
After this, configure the Jenkins with SonarQube. So click “Manage Plugins” and then “Configure
System”
Then configure the SonarQube details as below and save:-
Now extract sonarQube scanner “sonar-scanner-cli-3.0.3.778-windows.zip” and configure the details in
Jenkins as below
Go to “Manage Plugins” and then “Global Tool Configuration” as below
Configure “SonarQube Scanner” as below and save
Configure JDK,Maven setup also under same “Global Tool Configuration” as below:-
Configure Global security as below:-
Configure System as below:-
Global Tool Configuration as below:-
Changes in SonarQube installation file:-
Reference URLs:-
https://www.youtube.com/watch?v=3_uyF2x0PB0
https://www.youtube.com/watch?v=jh7utASgKj4&t=590s
https://www.youtube.com/watch?v=y49luBErHBk
https://www.youtube.com/watch?v=BfJvxGs-HxQ&t=567s
https://docs.sonarqube.org/display/SCAN/Analyzing+with+SonarQube+Scanner
https://docs.sonarqube.org/display/SCAN/Analyzing+with+SonarQube+Scanner+for+Maven

Install jenkins and sonar qube integration

  • 1.
    Install Jenkins inWindows system 1. Before installing Jenkins into our system we must be having Java JDK should be installed and JAVA_HOME & path should be set. 2. Then go to URL “https://jenkins.io/download/” and download the Jenkins zip file based on your OS type. Here I’ll show you about “How to install Jenkins in windows system completely”. 3. Then extract the jenkins-2.89.4.zip file into a folder and run jenkins.msi file and install. After Finish it will open a page like below.
  • 2.
    4. Go tothe folder mentioned in the screenshot above “C:Program Files (x86)JenkinssecretsinitialAdminPassword” and copy the password from that file, provide here and continue.
  • 3.
    5. Select “Installsuggested plugins” and continue. 6. After this the “Getting started” page will come as below, fill those details and click on “Save and Finish”
  • 4.
    7. We willsee a message as “Jenkins is ready!” Click on “start using Jenkins”. 8. Now go to login page and provide the login credentials and login into it. And click on “Manage Jenkins”
  • 5.
    9. Click on“Manage Plugins” and “Available” tab
  • 6.
    10. Search forthe items which we want to install in, select and then click “install without restart” E.g.:- SonarQube Scanner, JUnit Realtime Test Reporter, Subversion Plug-in, GitHub, Junit, CVS 11. Then click on the check mark at “Restart Jenkins when installation is complete and no jobs are running”
  • 7.
    PART 2 (installationof SonarQube and integration with Jenkins):- Now install SonarQube in the same server where Jenkins is running by using below steps:- Download “sonarqube-7.0.zip” and extract it into a folder and then go to bin folder of respective system type (e.g. C:sonarqube-7.0binwindows-x86-64StartSonar.bat) and run “StartSonar.bat”. Then the SonarQube server will start Once server is up, test it by hitting the URL as http://localhost:9000/ After this, configure the Jenkins with SonarQube. So click “Manage Plugins” and then “Configure System”
  • 8.
    Then configure theSonarQube details as below and save:- Now extract sonarQube scanner “sonar-scanner-cli-3.0.3.778-windows.zip” and configure the details in Jenkins as below Go to “Manage Plugins” and then “Global Tool Configuration” as below
  • 9.
    Configure “SonarQube Scanner”as below and save Configure JDK,Maven setup also under same “Global Tool Configuration” as below:-
  • 10.
  • 11.
  • 14.
  • 17.
    Changes in SonarQubeinstallation file:- Reference URLs:- https://www.youtube.com/watch?v=3_uyF2x0PB0 https://www.youtube.com/watch?v=jh7utASgKj4&t=590s https://www.youtube.com/watch?v=y49luBErHBk https://www.youtube.com/watch?v=BfJvxGs-HxQ&t=567s https://docs.sonarqube.org/display/SCAN/Analyzing+with+SonarQube+Scanner https://docs.sonarqube.org/display/SCAN/Analyzing+with+SonarQube+Scanner+for+Maven