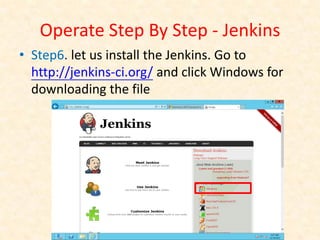
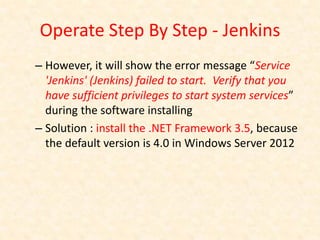
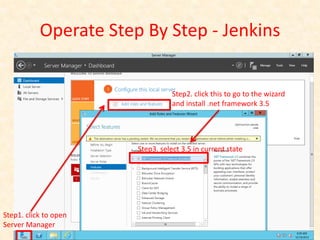
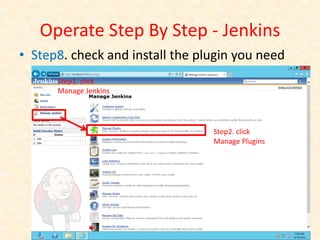
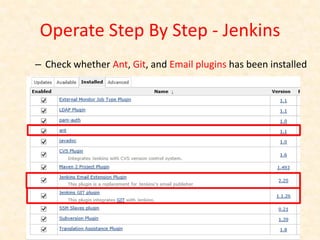
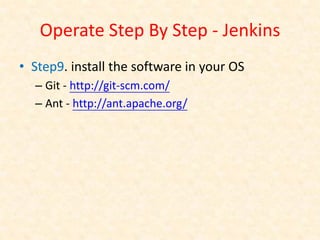
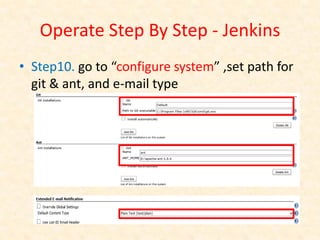
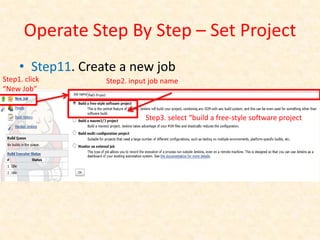
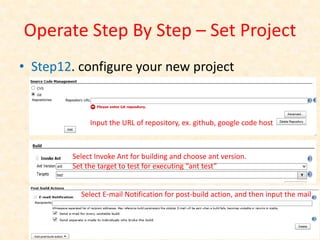
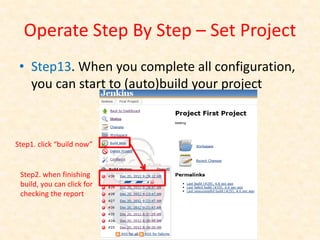
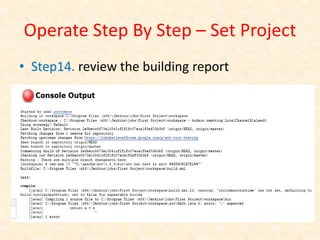
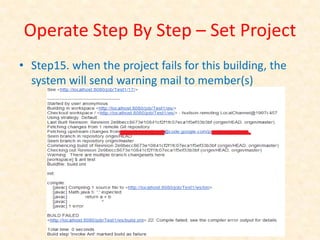
Continuous Integration Tool -
         Jenkins

        主講者 : 李承峻
      指導教授 : 莊坤達 教授
Environment
• Available OS
  – Unix/Linux、Windows
• Requirement
  – Before running Jenkins, minimally you need to
    have JRE 1.5 or later
Operate Step By Step - Azure
• We take Window Server 2012, October 2012 in
  Window azure for example
• Step1. go to the following address and login in
  by your hotmail account :
  http://www.windowsazurepass.com/?pageMo
  de=AcademicApply&campid=01659DD9-B156-
  E111-B18B-1CC1DEEA5779
Operate Step By Step - Azure
• Step2. key in the free serial number and any
  other information to complete the applying
Operate Step By Step - Azure
• Step3. When you re-login the azure, you’ll see
  the following page site, and then click “New” :
Operate Step By Step - Azure
• Step4. Now you can create a new VM with image of
  Window Server 2012, 1.75G RAM, and DNS name
  you want


                                                     Create
Operate Step By Step - Azure
• Step5. Congratulation, you can connect to
  your VM
Operate Step By Step - Jenkins
• Step6. let us install the Jenkins. Go to
  http://jenkins-ci.org/ and click Windows for
  downloading the file
Operate Step By Step - Jenkins
– However, it will show the error message “Service
  'Jenkins' (Jenkins) failed to start. Verify that you
  have sufficient privileges to start system services”
  during the software installing
– Solution : install the .NET Framework 3.5, because
  the default version is 4.0 in Windows Server 2012
Operate Step By Step - Jenkins


                                  Step2. click this to go to the wizard
                                  and install .net framework 3.5


                       Step3. select 3.5 in current state


Step1. click to open
Server Manager
Operate Step By Step - Jenkins
• Step7. When the Jenkins has been successfully installed, we
  can open the browser and input “localhost:8080” to connect
  the main page of Jenkins service
Operate Step By Step - Jenkins
• Step8. check and install the plugin you need
      Step1. click
      Manage Jenkins


                                 Step2. click
                                 Manage Plugins
Operate Step By Step - Jenkins
– Check whether Ant, Git, and Email plugins has been installed
Operate Step By Step - Jenkins
• Step9. install the software in your OS
  – Git - http://git-scm.com/
  – Ant - http://ant.apache.org/
Operate Step By Step - Jenkins
• Step10. go to “configure system” ,set path for
  git & ant, and e-mail type
Operate Step By Step – Set Project
     • Step11. Create a new job
Step1. click       Step2. input job name
“New Job”


                              Step3. select “build a free-style software project
Operate Step By Step – Set Project
• Step12. configure your new project


             Input the URL of repository, ex. github, google code host


        Select Invoke Ant for building and choose ant version.
        Set the target to test for executing “ant test”


          Select E-mail Notification for post-build action, and then input the mail
Operate Step By Step – Set Project

         Set build triggers for starting the build
Operate Step By Step – Set Project
 • Step13. When you complete all configuration,
   you can start to (auto)build your project


Step1. click “build now”


 Step2. when finishing
 build, you can click for
 checking the report
Operate Step By Step – Set Project
• Step14. review the building report
Operate Step By Step – Set Project
• Step15. when the project fails for this building, the
  system will send warning mail to member(s)
Reference
• Jenkins - http://jenkins-ci.org/
• Git - http://git-scm.com/
• Ant - http://ant.apache.org/
• JDK download -
  http://140.116.86.246:14120/jdk.exe
• Window azure -
  http://www.windowsazure.com/zh-tw/

Jenkins hand in hand

  • 1.
    Continuous Integration Tool- Jenkins 主講者 : 李承峻 指導教授 : 莊坤達 教授
  • 2.
    Environment • Available OS – Unix/Linux、Windows • Requirement – Before running Jenkins, minimally you need to have JRE 1.5 or later
  • 3.
    Operate Step ByStep - Azure • We take Window Server 2012, October 2012 in Window azure for example • Step1. go to the following address and login in by your hotmail account : http://www.windowsazurepass.com/?pageMo de=AcademicApply&campid=01659DD9-B156- E111-B18B-1CC1DEEA5779
  • 4.
    Operate Step ByStep - Azure • Step2. key in the free serial number and any other information to complete the applying
  • 5.
    Operate Step ByStep - Azure • Step3. When you re-login the azure, you’ll see the following page site, and then click “New” :
  • 6.
    Operate Step ByStep - Azure • Step4. Now you can create a new VM with image of Window Server 2012, 1.75G RAM, and DNS name you want Create
  • 7.
    Operate Step ByStep - Azure • Step5. Congratulation, you can connect to your VM
  • 8.
    Operate Step ByStep - Jenkins • Step6. let us install the Jenkins. Go to http://jenkins-ci.org/ and click Windows for downloading the file
  • 9.
    Operate Step ByStep - Jenkins – However, it will show the error message “Service 'Jenkins' (Jenkins) failed to start. Verify that you have sufficient privileges to start system services” during the software installing – Solution : install the .NET Framework 3.5, because the default version is 4.0 in Windows Server 2012
  • 10.
    Operate Step ByStep - Jenkins Step2. click this to go to the wizard and install .net framework 3.5 Step3. select 3.5 in current state Step1. click to open Server Manager
  • 11.
    Operate Step ByStep - Jenkins • Step7. When the Jenkins has been successfully installed, we can open the browser and input “localhost:8080” to connect the main page of Jenkins service
  • 12.
    Operate Step ByStep - Jenkins • Step8. check and install the plugin you need Step1. click Manage Jenkins Step2. click Manage Plugins
  • 13.
    Operate Step ByStep - Jenkins – Check whether Ant, Git, and Email plugins has been installed
  • 14.
    Operate Step ByStep - Jenkins • Step9. install the software in your OS – Git - http://git-scm.com/ – Ant - http://ant.apache.org/
  • 15.
    Operate Step ByStep - Jenkins • Step10. go to “configure system” ,set path for git & ant, and e-mail type
  • 16.
    Operate Step ByStep – Set Project • Step11. Create a new job Step1. click Step2. input job name “New Job” Step3. select “build a free-style software project
  • 17.
    Operate Step ByStep – Set Project • Step12. configure your new project Input the URL of repository, ex. github, google code host Select Invoke Ant for building and choose ant version. Set the target to test for executing “ant test” Select E-mail Notification for post-build action, and then input the mail
  • 18.
    Operate Step ByStep – Set Project Set build triggers for starting the build
  • 19.
    Operate Step ByStep – Set Project • Step13. When you complete all configuration, you can start to (auto)build your project Step1. click “build now” Step2. when finishing build, you can click for checking the report
  • 20.
    Operate Step ByStep – Set Project • Step14. review the building report
  • 21.
    Operate Step ByStep – Set Project • Step15. when the project fails for this building, the system will send warning mail to member(s)
  • 22.
    Reference • Jenkins -http://jenkins-ci.org/ • Git - http://git-scm.com/ • Ant - http://ant.apache.org/ • JDK download - http://140.116.86.246:14120/jdk.exe • Window azure - http://www.windowsazure.com/zh-tw/