Odoo E-learning module can be used to create courses, configure quizzes and earn badges while attending courses. This is helpful for conducting internal training at the company for employees and helps in easy onboarding. Integrated gamification makes it a more joyful
Odoo E-Learning is a new module introduced in Odoo 13 version. The main vision of Odoo by this module is that which enables the user to manage and publish an E-Learning platform. Odoo E-learning module is use to create courses, configure quizzes and earn badges while attending courses.
Media that has been previously uploaded to an existing Blackboard course can be copied over to a new Blackboard course. This feature is especially useful when an instructor requests a course copy for a course that they have taught in a previous semester. By following these steps the process can be completed in a quick and easy manner.
Training presentation for senior management and faculty members teaching online.
Although customized to BellsTech, Theme structure is same across MOODLE and Microsoft 365 and can be used by educators in other institutions.
Training Asset 4 How to Work With the Kaltura Media Galler.docxMARRY7
Training Asset 4: How to Work With the Kaltura Media Gallery
1- In this session, we will learn the functions of your Kaltura Media Gallery and how to
place the videos created in the Media Gallery into your Sakai Classroom.
2- Start by selecting Media Gallery on the left hand navigation menu.
3- The Media Gallery is where you can manage and edit your uploaded or recorded
multimedia. The tabs Site Library, Collections, and My Media, are the three visible tabs,
and all have different functions.
4- Site Library is your where you can see videos that have already been uploaded to the
APUS Course. These videos have already been placed into the course via the Kaltura
icon within a rich text editor into either the Forums, Assignments, Announcements, or
Lessons.
5- Collections is where you can make packages of multiple videos for easy importing,
storage, or grouping. Creating a collection is an effective way to group multiple videos
relating to the same course / subject together for easy management.
6- My Media is where you can see all of the uploaded and recorded files you have made
using Kaltura.
7- Now that the tabs are explained, let’s go into Site Library, so we can view the various
options present on the toolbar.
8- Downloading, Embedding, Editing the Details, Clipping & Editing the Media, Removing,
and Adding are all available underneath of the video frame. Editing clips via the Site
Library will affect all instances of the video in the course.
9- Once again, the Media Gallery is where you can manage all of your videos. In order to
place the videos you have uploaded or created in your Media Gallery, you will still have
to go to an instance of the rich text editor and place the video using the Kaltura button.
Think of the Media Gallery as the location to manage and edit your videos, while the
Kaltura button in the rich text editor as the way to place them.
Training Asset 3: How to Edit Videos Using Kaltura
1- In this session, we will learn how to edit Kaltura webcam recordings and videos to
shorten the length of a selected clip.
2- To begin, select “Media Gallery” on the left hand menu.
3- Once within the Media Gallery, you can view multimedia you have either created or
uploaded. To edit a clip, select the item on the right hand side, then select “Clip Media”.
4- To begin editing, move the arrow selector to the point where you want to begin your
new clip, then select “Add New Clip”.
5- This will bring up a grey editing bar, which denotes the beginning and ending of your
new clip. If you do not want to use the manual slider, you can also select the start / stop
timers on the top right, and enter in the values for the start and end times. Remember
to also check “Add to Site Library” to get your video to display in your media gallery
menu.
6- When you are completed with your edit, select “Save” on the bottom to create ...
As we all know Odoo is basically a web based open source platform which act as a solution for all business requirements and Odoo module is a set of business logic which helps to enhance the excessive functionality or to add some new functionality in order.
How to Make a Field invisible in Odoo 17Celine George
It is possible to hide or invisible some fields in odoo. Commonly using “invisible” attribute in the field definition to invisible the fields. This slide will show how to make a field invisible in odoo 17.
Read| The latest issue of The Challenger is here! We are thrilled to announce that our school paper has qualified for the NATIONAL SCHOOLS PRESS CONFERENCE (NSPC) 2024. Thank you for your unwavering support and trust. Dive into the stories that made us stand out!
Welcome to TechSoup New Member Orientation and Q&A (May 2024).pdfTechSoup
In this webinar you will learn how your organization can access TechSoup's wide variety of product discount and donation programs. From hardware to software, we'll give you a tour of the tools available to help your nonprofit with productivity, collaboration, financial management, donor tracking, security, and more.
We all have good and bad thoughts from time to time and situation to situation. We are bombarded daily with spiraling thoughts(both negative and positive) creating all-consuming feel , making us difficult to manage with associated suffering. Good thoughts are like our Mob Signal (Positive thought) amidst noise(negative thought) in the atmosphere. Negative thoughts like noise outweigh positive thoughts. These thoughts often create unwanted confusion, trouble, stress and frustration in our mind as well as chaos in our physical world. Negative thoughts are also known as “distorted thinking”.
Students, digital devices and success - Andreas Schleicher - 27 May 2024..pptxEduSkills OECD
Andreas Schleicher presents at the OECD webinar ‘Digital devices in schools: detrimental distraction or secret to success?’ on 27 May 2024. The presentation was based on findings from PISA 2022 results and the webinar helped launch the PISA in Focus ‘Managing screen time: How to protect and equip students against distraction’ https://www.oecd-ilibrary.org/education/managing-screen-time_7c225af4-en and the OECD Education Policy Perspective ‘Students, digital devices and success’ can be found here - https://oe.cd/il/5yV
The Roman Empire A Historical Colossus.pdfkaushalkr1407
The Roman Empire, a vast and enduring power, stands as one of history's most remarkable civilizations, leaving an indelible imprint on the world. It emerged from the Roman Republic, transitioning into an imperial powerhouse under the leadership of Augustus Caesar in 27 BCE. This transformation marked the beginning of an era defined by unprecedented territorial expansion, architectural marvels, and profound cultural influence.
The empire's roots lie in the city of Rome, founded, according to legend, by Romulus in 753 BCE. Over centuries, Rome evolved from a small settlement to a formidable republic, characterized by a complex political system with elected officials and checks on power. However, internal strife, class conflicts, and military ambitions paved the way for the end of the Republic. Julius Caesar’s dictatorship and subsequent assassination in 44 BCE created a power vacuum, leading to a civil war. Octavian, later Augustus, emerged victorious, heralding the Roman Empire’s birth.
Under Augustus, the empire experienced the Pax Romana, a 200-year period of relative peace and stability. Augustus reformed the military, established efficient administrative systems, and initiated grand construction projects. The empire's borders expanded, encompassing territories from Britain to Egypt and from Spain to the Euphrates. Roman legions, renowned for their discipline and engineering prowess, secured and maintained these vast territories, building roads, fortifications, and cities that facilitated control and integration.
The Roman Empire’s society was hierarchical, with a rigid class system. At the top were the patricians, wealthy elites who held significant political power. Below them were the plebeians, free citizens with limited political influence, and the vast numbers of slaves who formed the backbone of the economy. The family unit was central, governed by the paterfamilias, the male head who held absolute authority.
Culturally, the Romans were eclectic, absorbing and adapting elements from the civilizations they encountered, particularly the Greeks. Roman art, literature, and philosophy reflected this synthesis, creating a rich cultural tapestry. Latin, the Roman language, became the lingua franca of the Western world, influencing numerous modern languages.
Roman architecture and engineering achievements were monumental. They perfected the arch, vault, and dome, constructing enduring structures like the Colosseum, Pantheon, and aqueducts. These engineering marvels not only showcased Roman ingenuity but also served practical purposes, from public entertainment to water supply.
Home assignment II on Spectroscopy 2024 Answers.pdf
Importing content
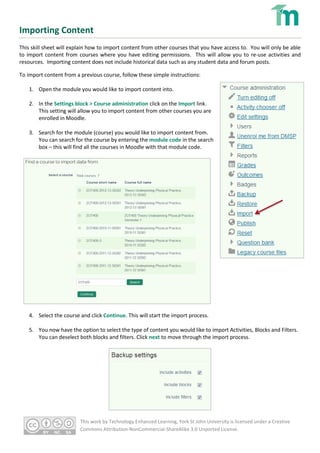
1. This work by Technology Enhanced Learning, York St John University is licensed under a Creative
Commons Attribution-NonCommercial-ShareAlike 3.0 Unported License.
Importing Content
This skill sheet will explain how to import content from other courses that you have access to. You will only be able
to import content from courses where you have editing permissions. This will allow you to re-use activities and
resources. Importing content does not include historical data such as any student data and forum posts.
To import content from a previous course, follow these simple instructions:
1. Open the module you would like to import content into.
2. In the Settings block > Course administration click on the Import link.
This setting will allow you to import content from other courses you are
enrolled in Moodle.
3. Search for the module (course) you would like to import content from.
You can search for the course by entering the module code in the search
box – this will find all the courses in Moodle with that module code.
4. Select the course and click Continue. This will start the import process.
5. You now have the option to select the type of content you would like to import Activities, Blocks and Filters.
You can deselect both blocks and filters. Click next to move through the import process.
2. This work by Technology Enhanced Learning, York St John University is licensed under a Creative
Commons Attribution-NonCommercial-ShareAlike 3.0 Unported License.
6. Now select the activities you would like to copy over – you may not want/need to copy all the content and
resources over from the previous year. Do not import old assignments, they contain out of date
information and settings. Create a new assignment(s) once the import process has finished. Click next to
continue.
7. You will now see the Confirmation and review page – this page highlights the content you have selected to
copy over. The resources with a green tick next to them are the ones you have selected to copy.
8. Once you are happy you have selected the correct resources to import – click the Perform import button.
This will start the import process – you will get a confirmation message when the import process is
complete.
9. Spend some time reviewing the imported content and make sure that the information is up-to-date and
accurate.