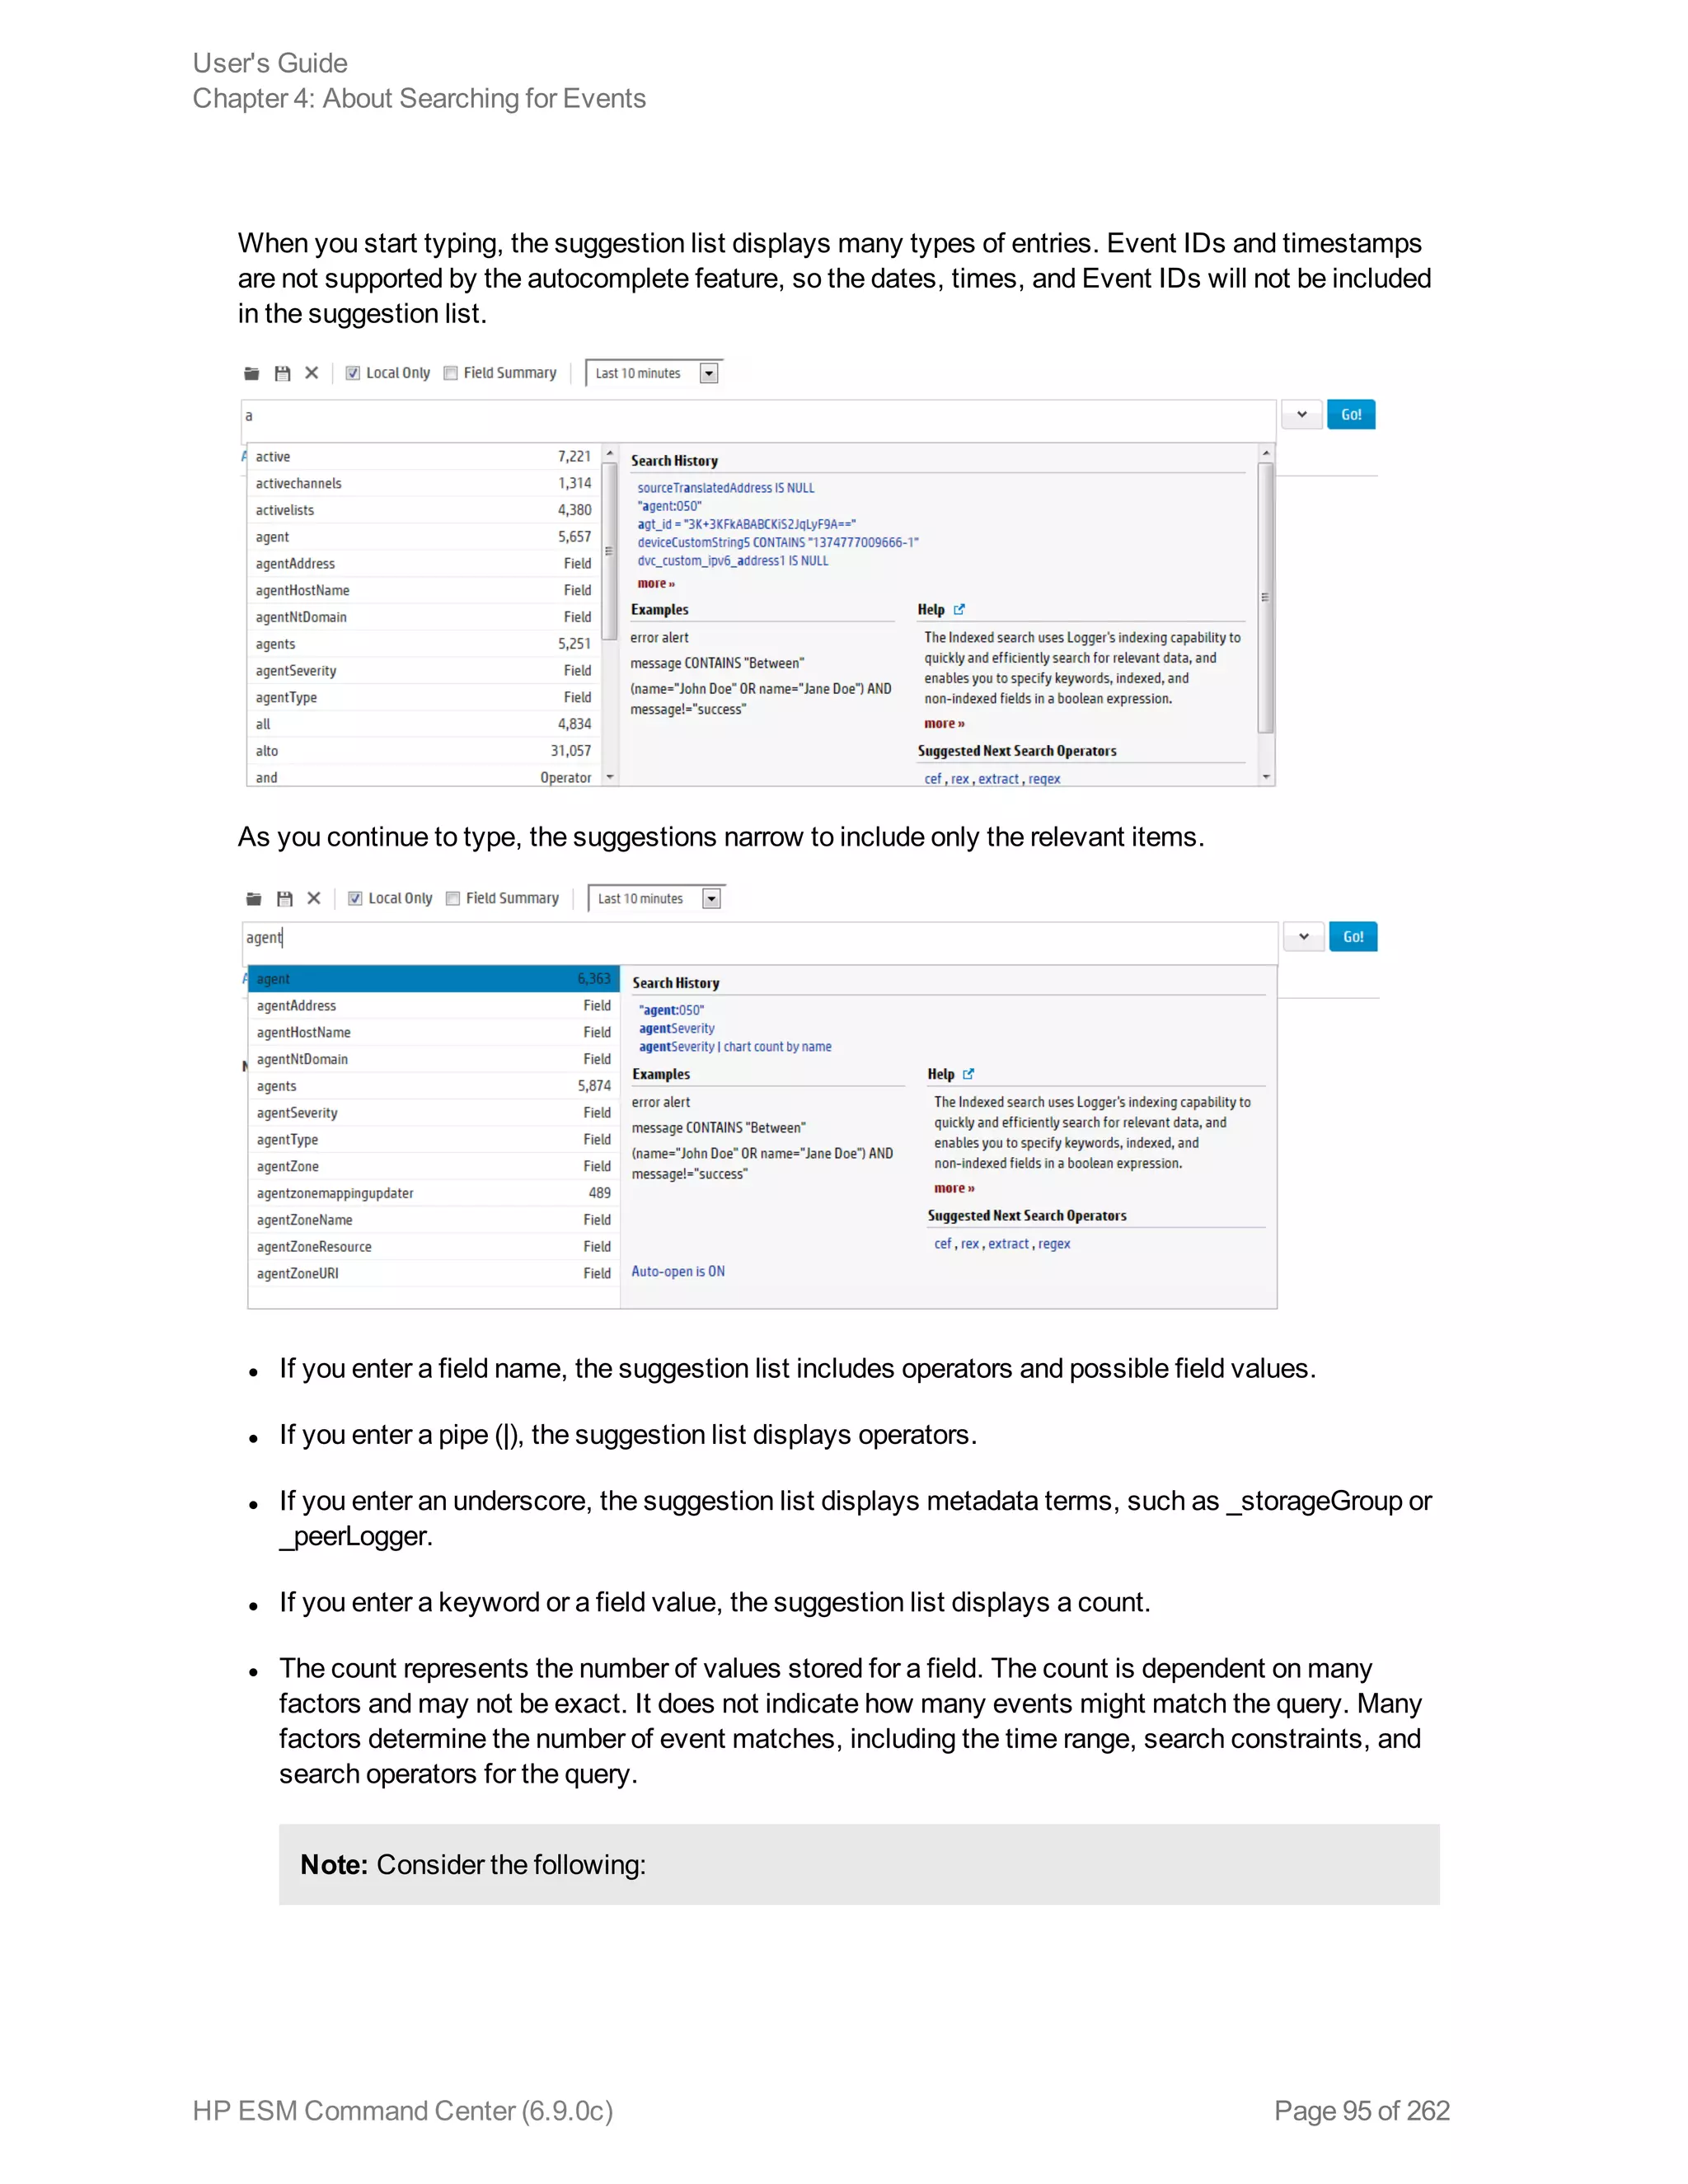
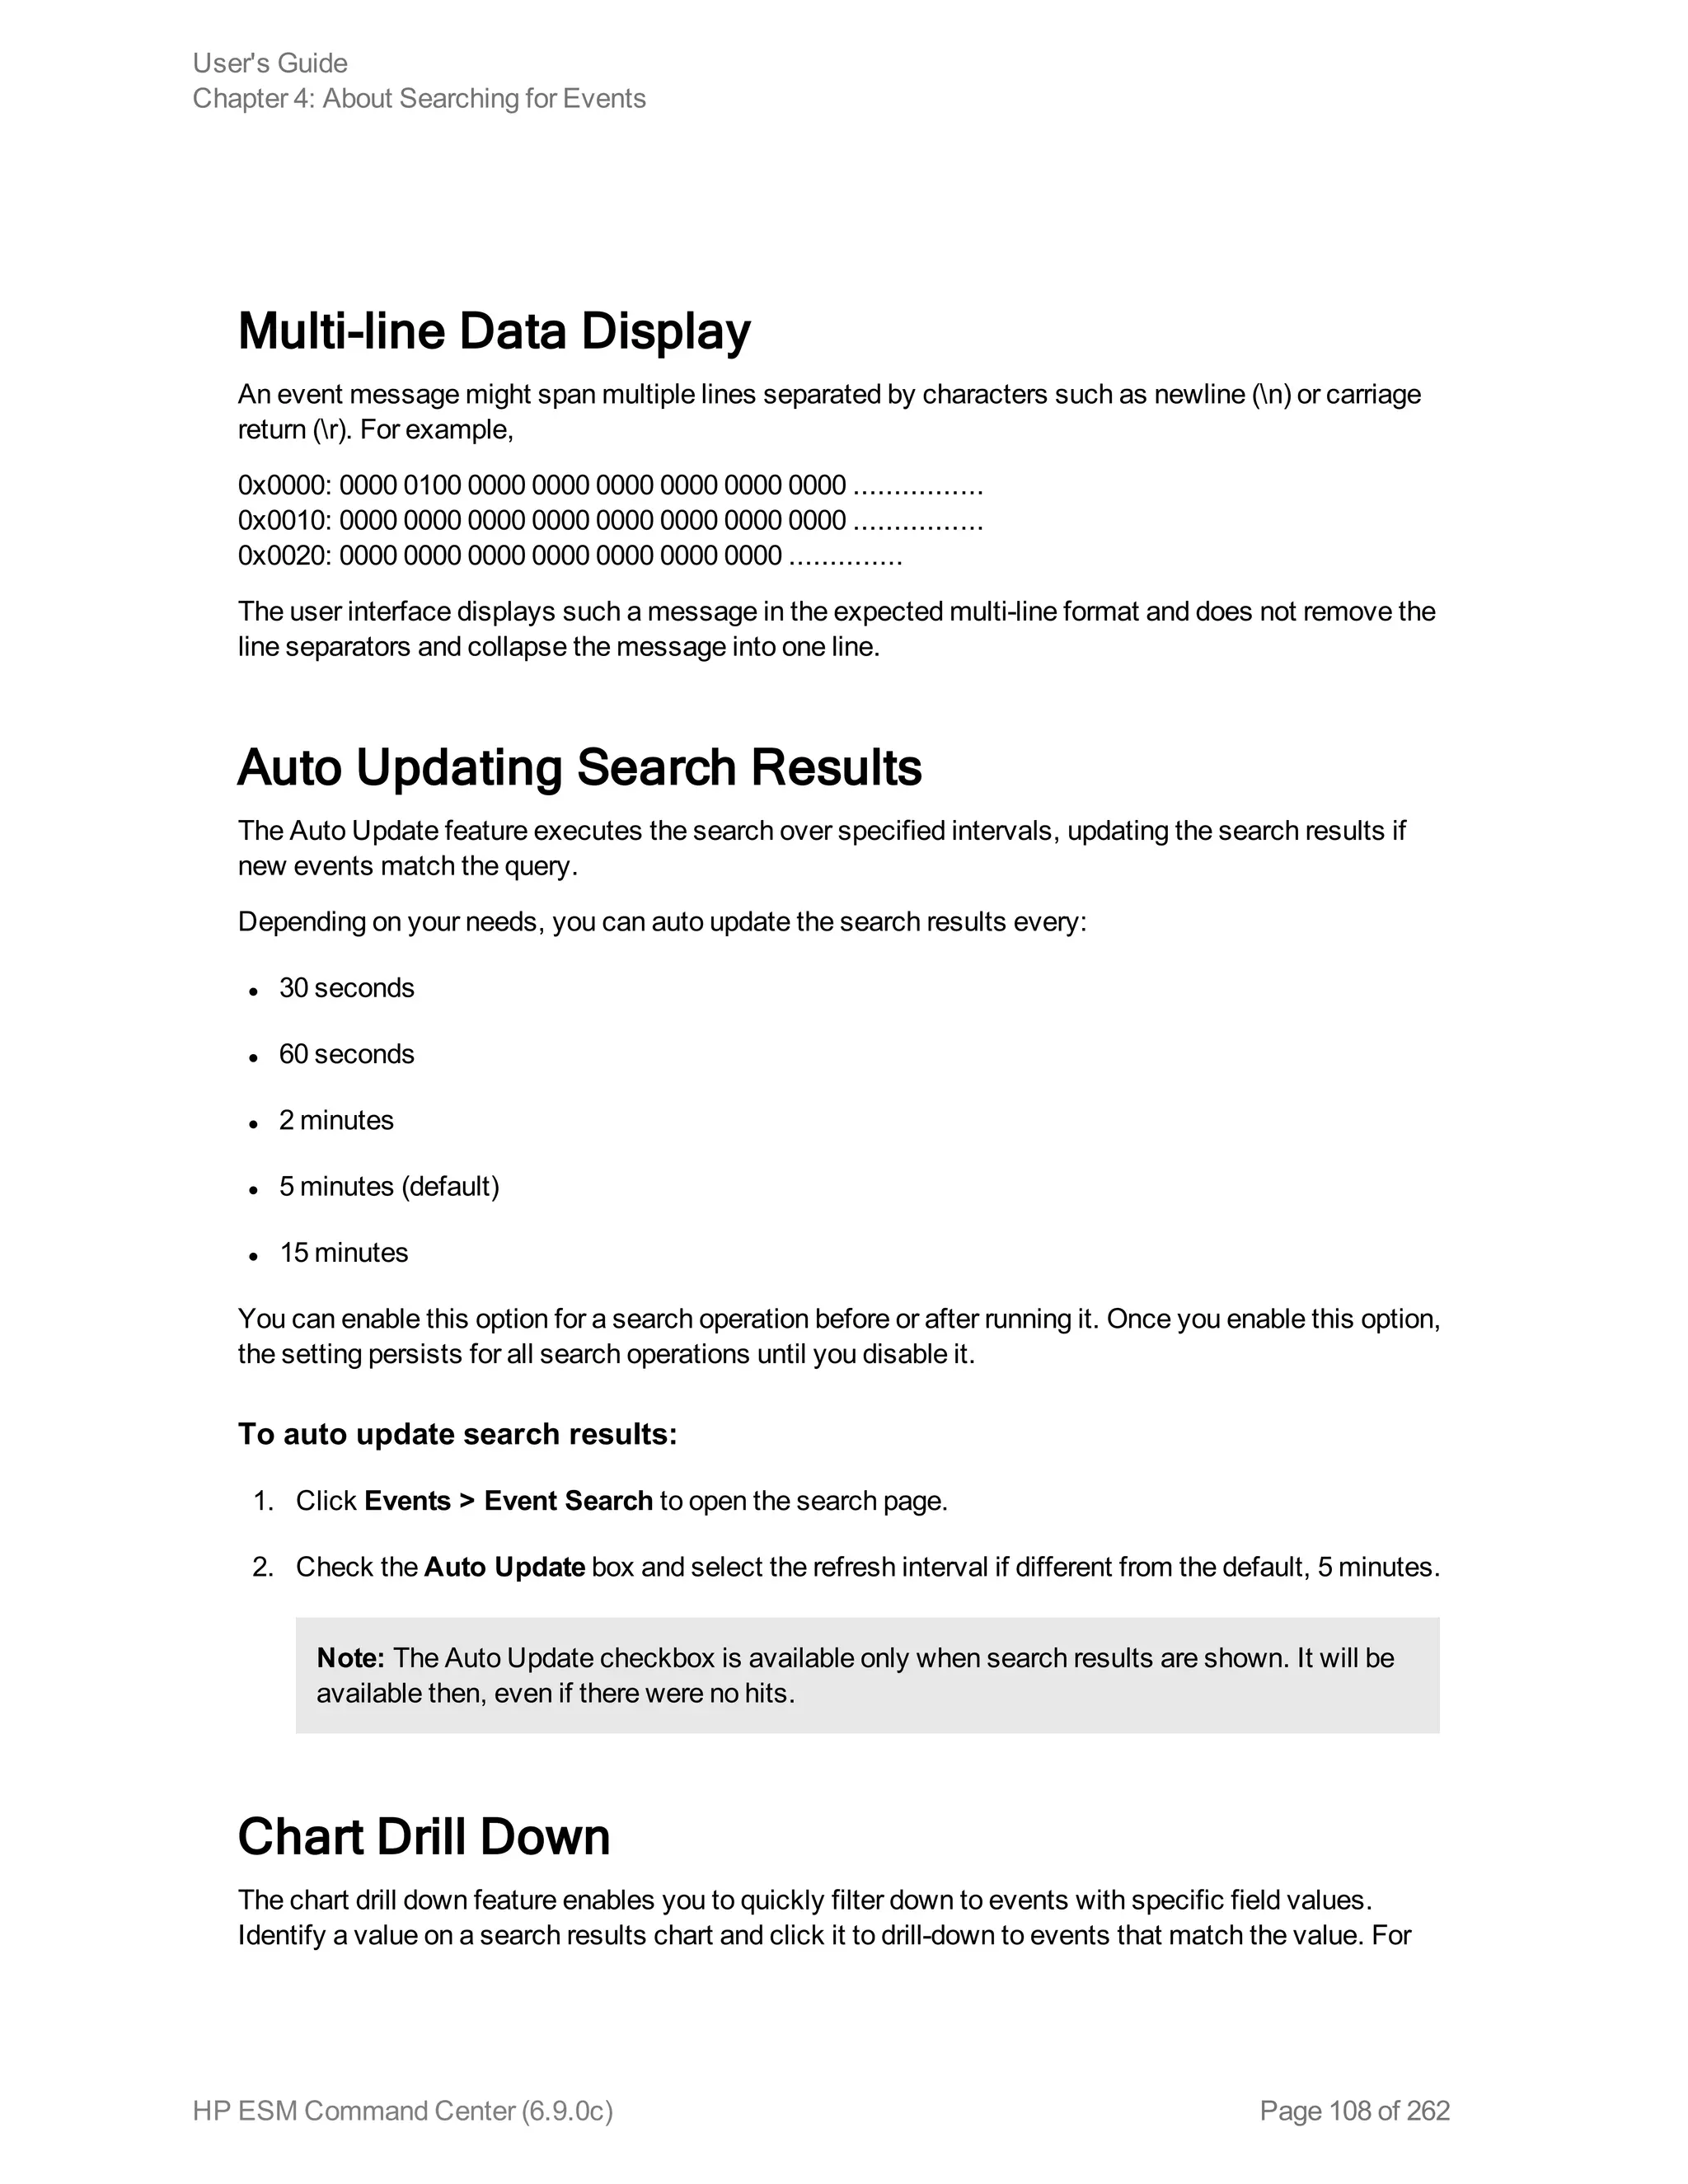
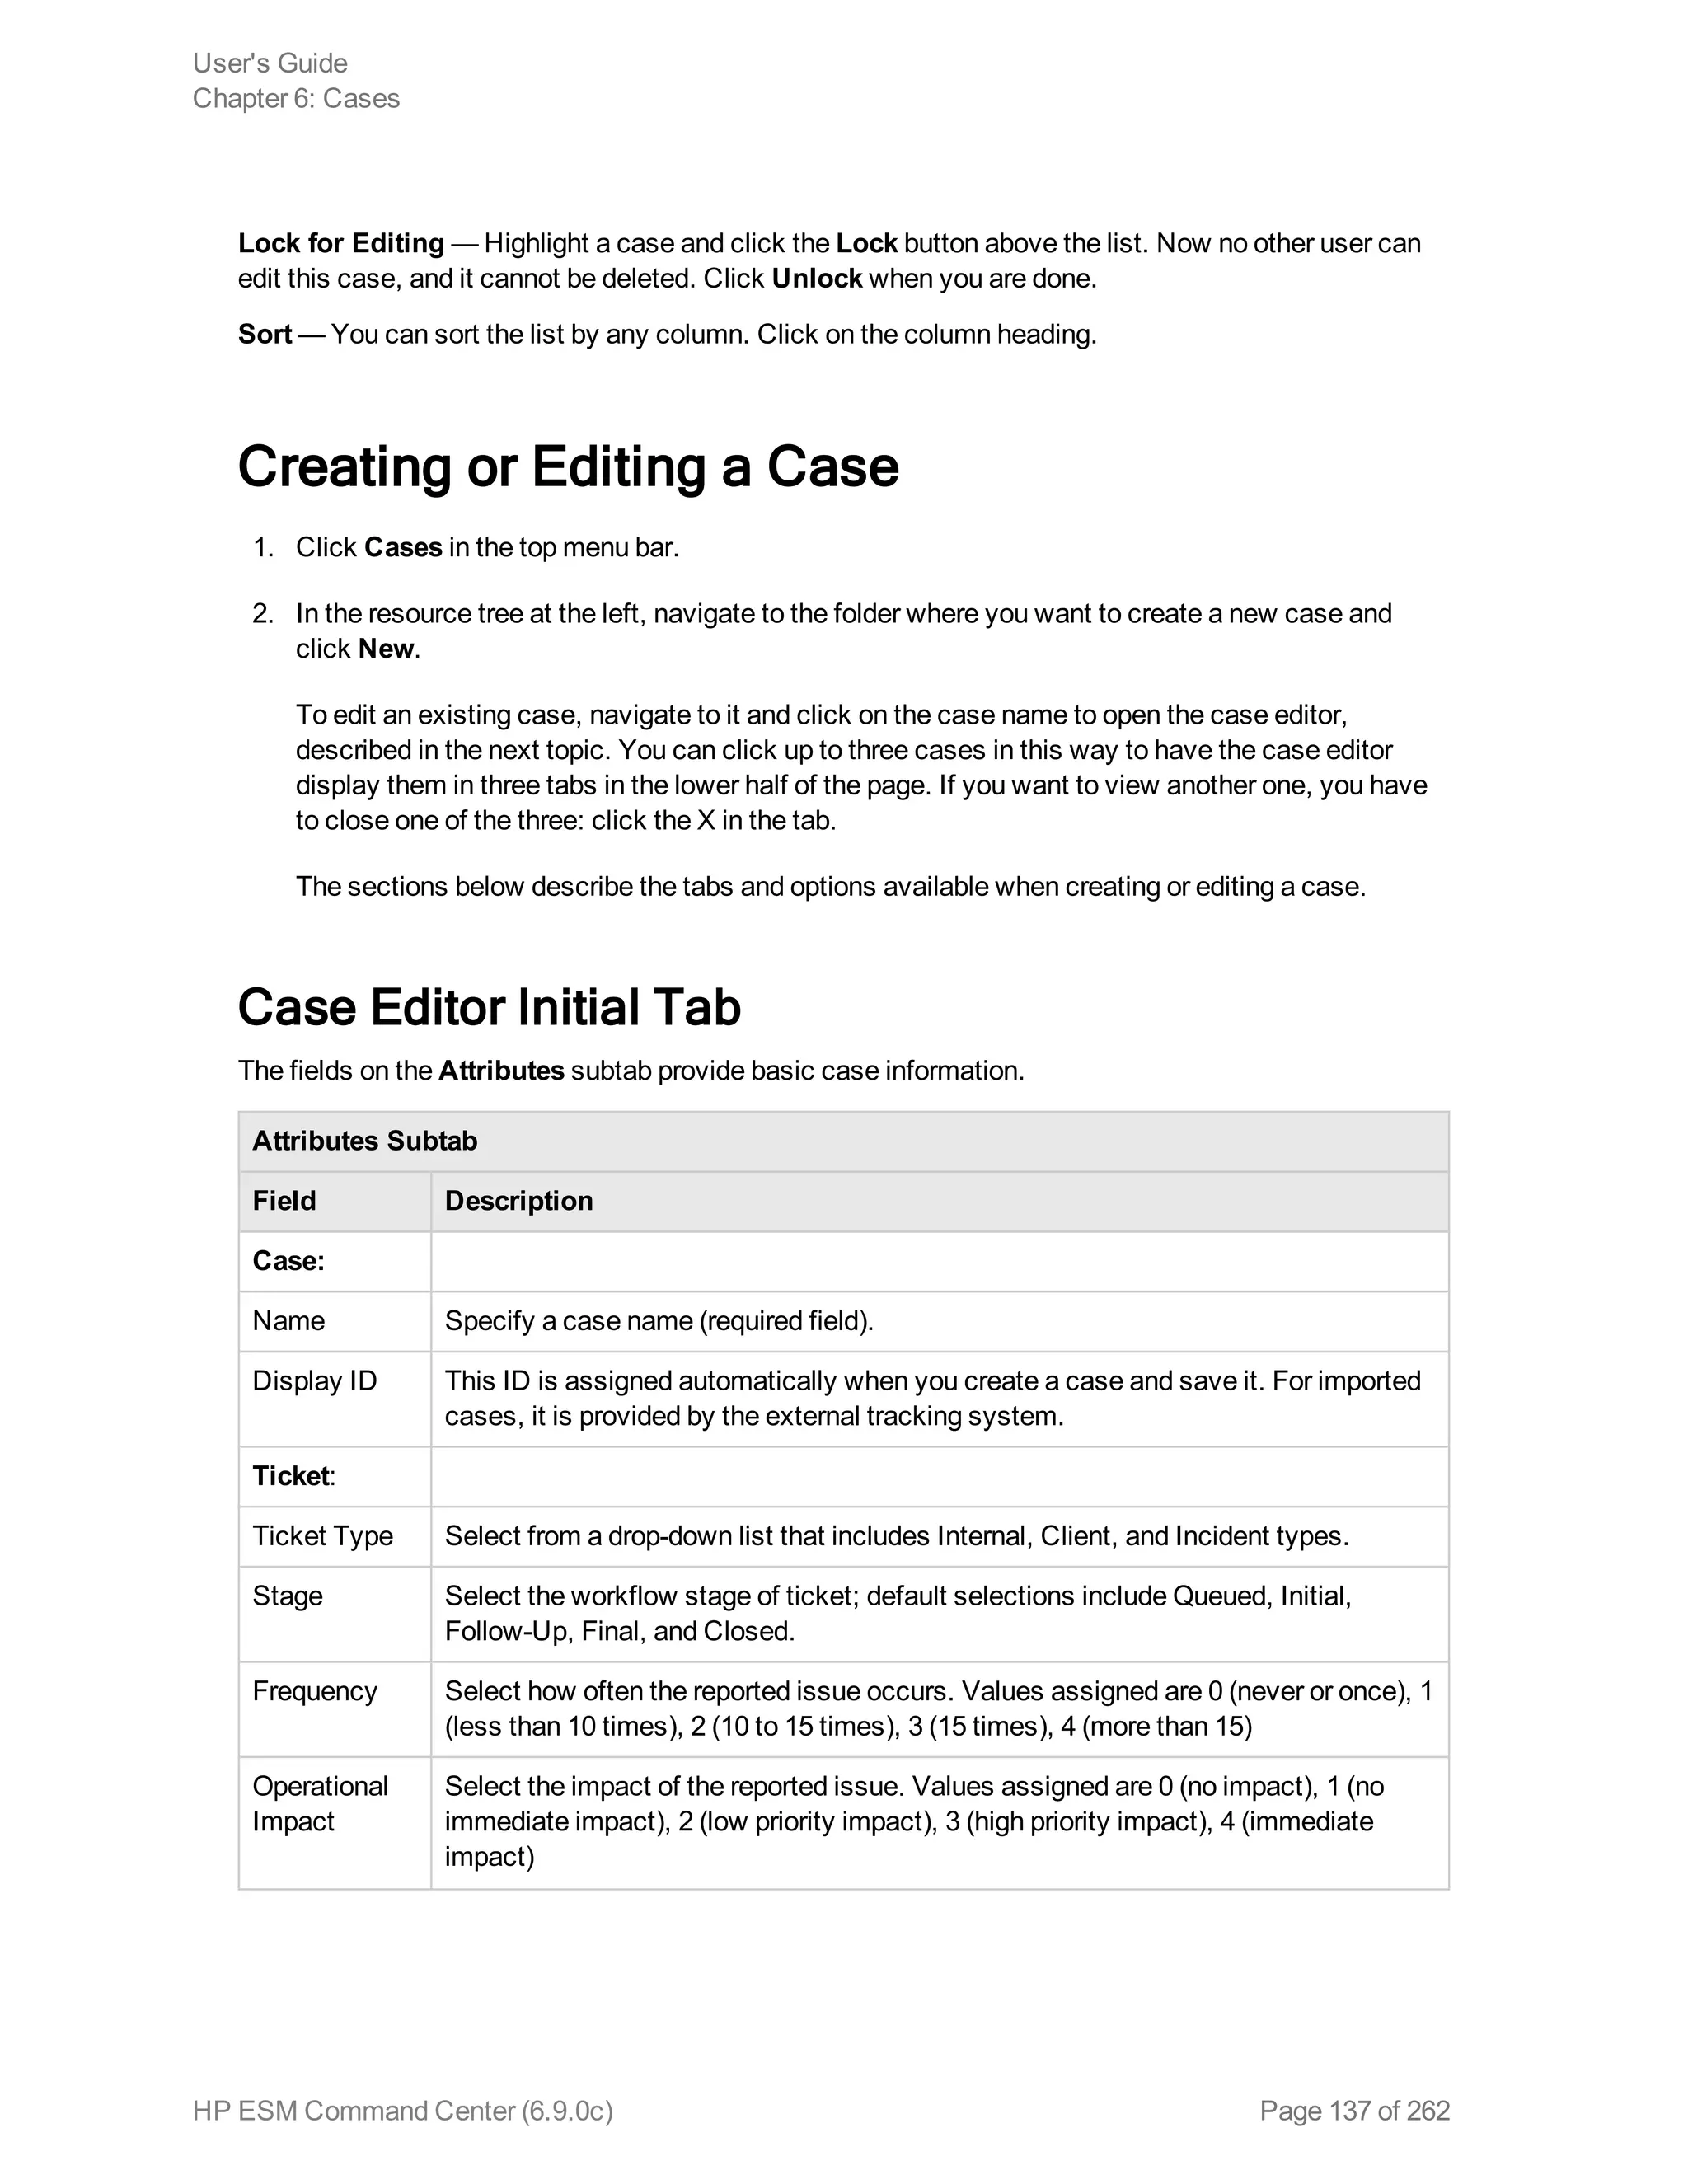
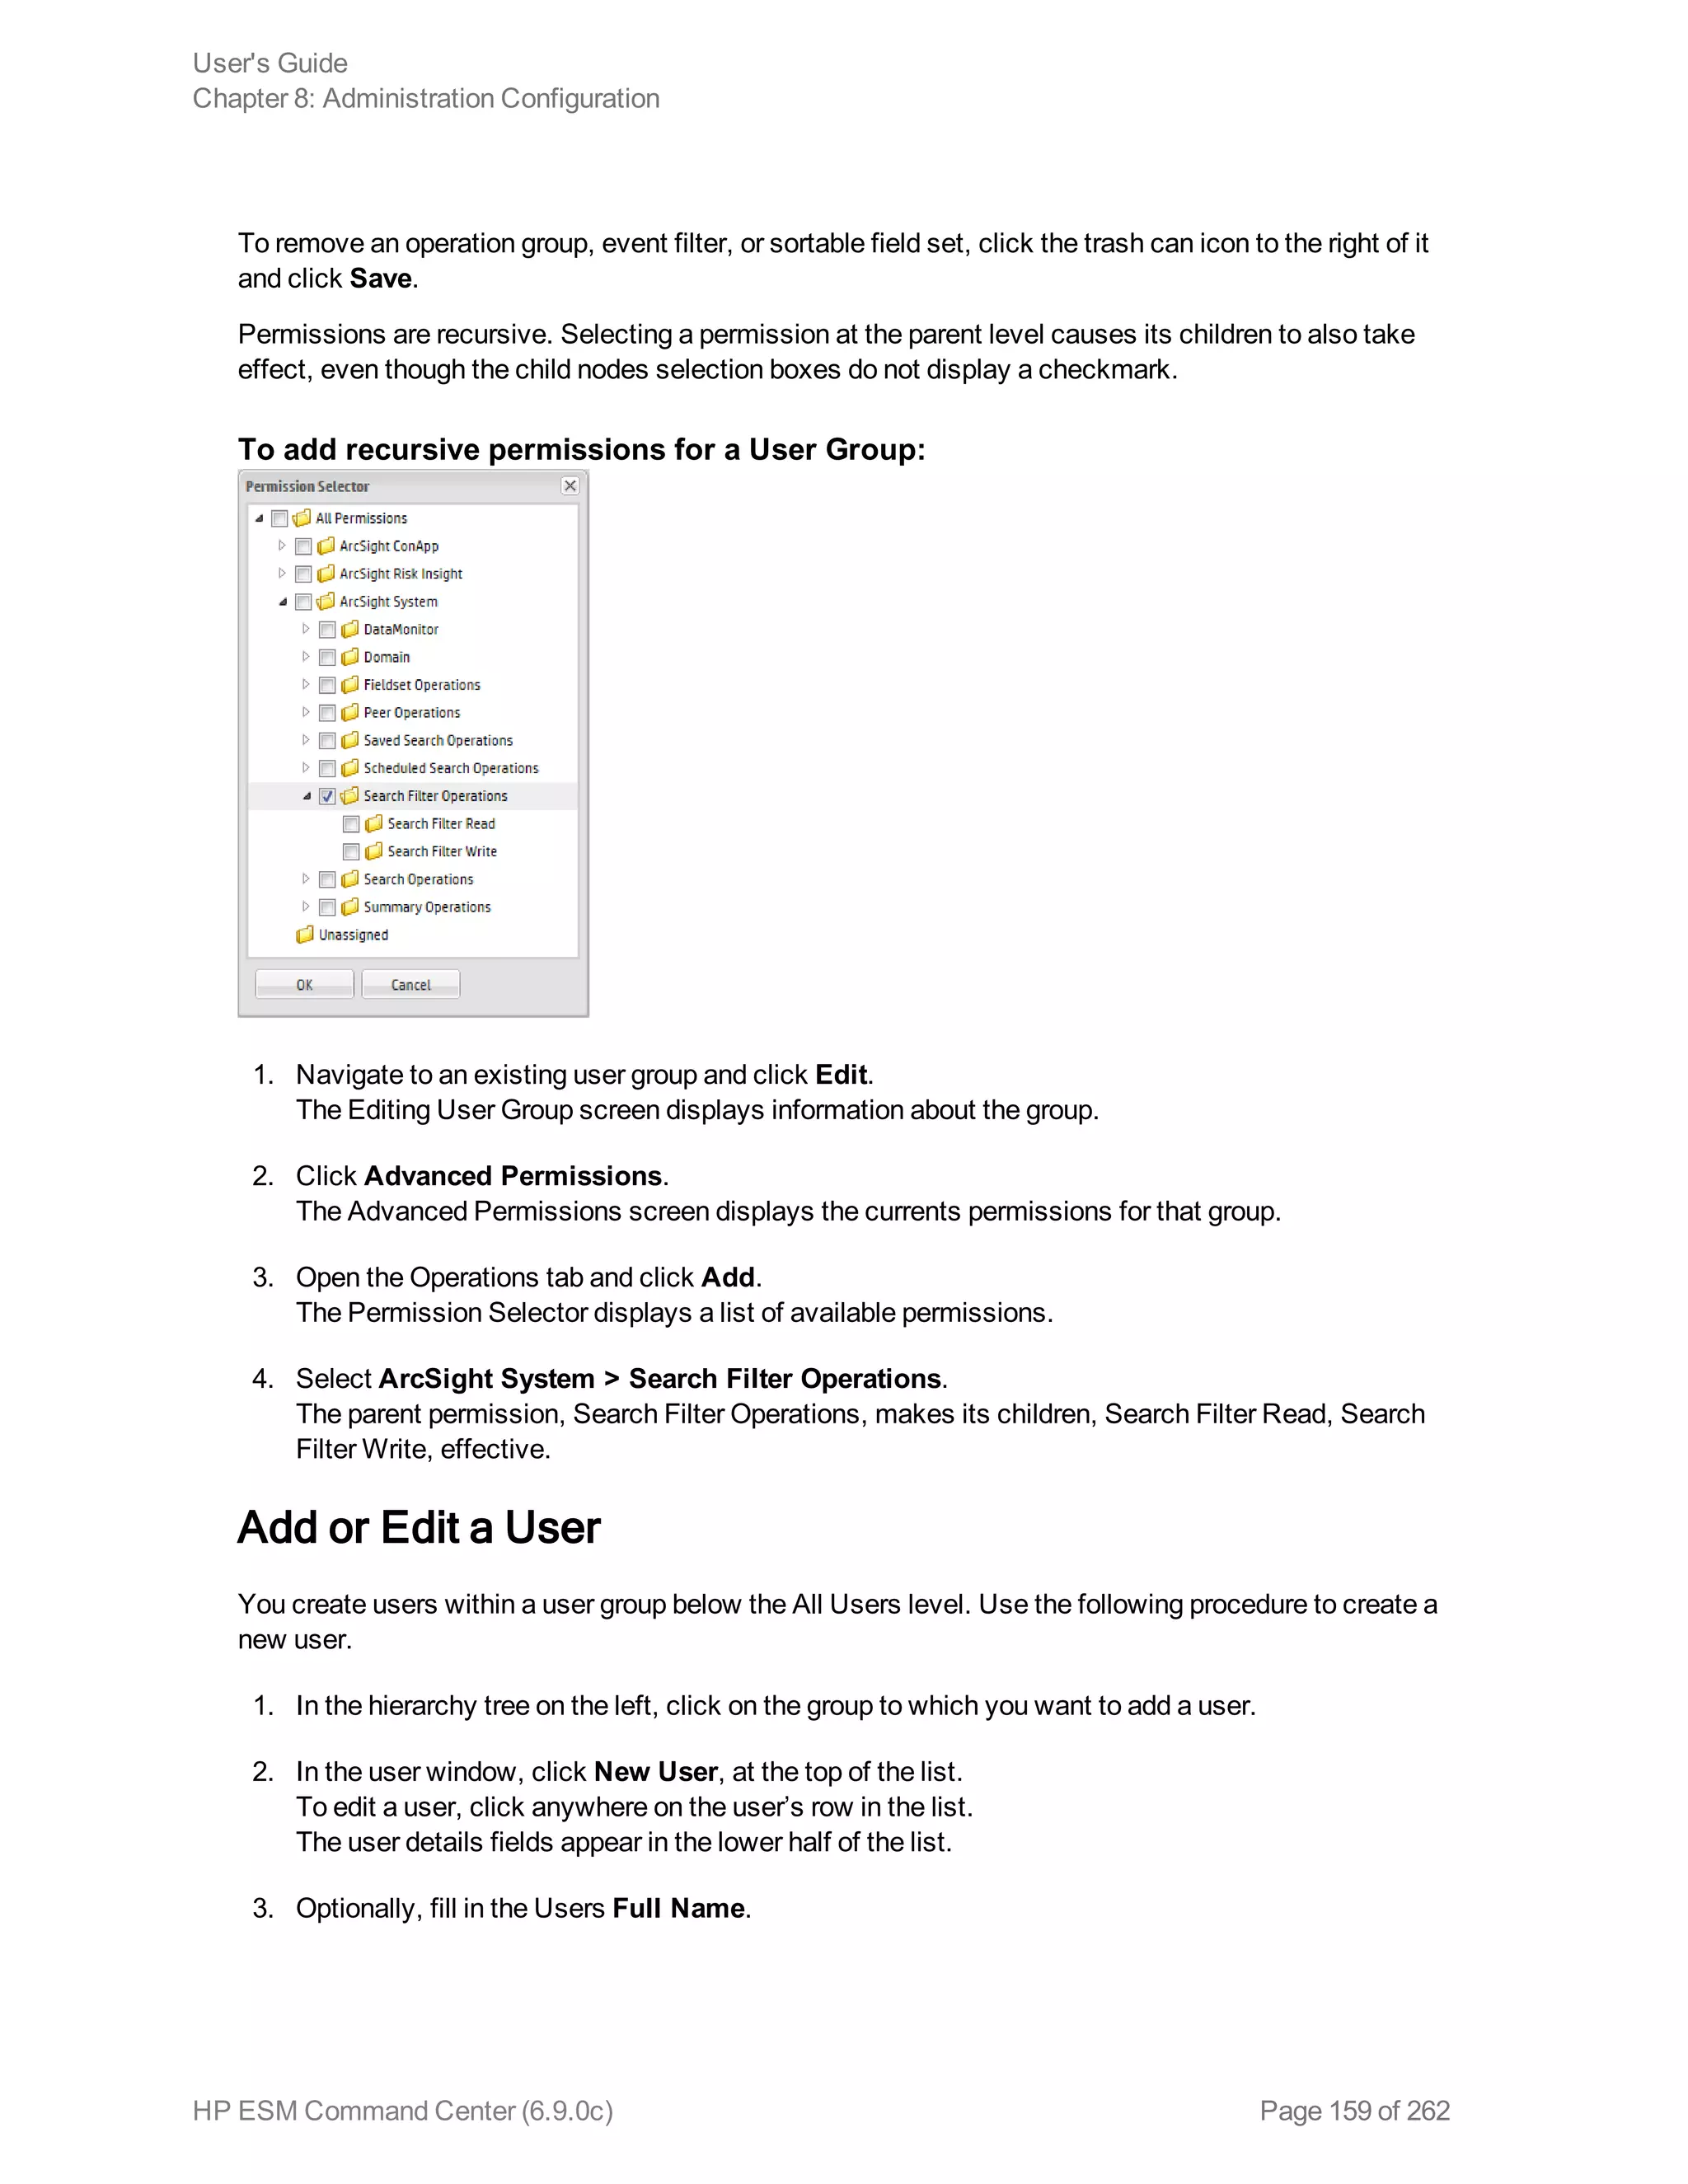
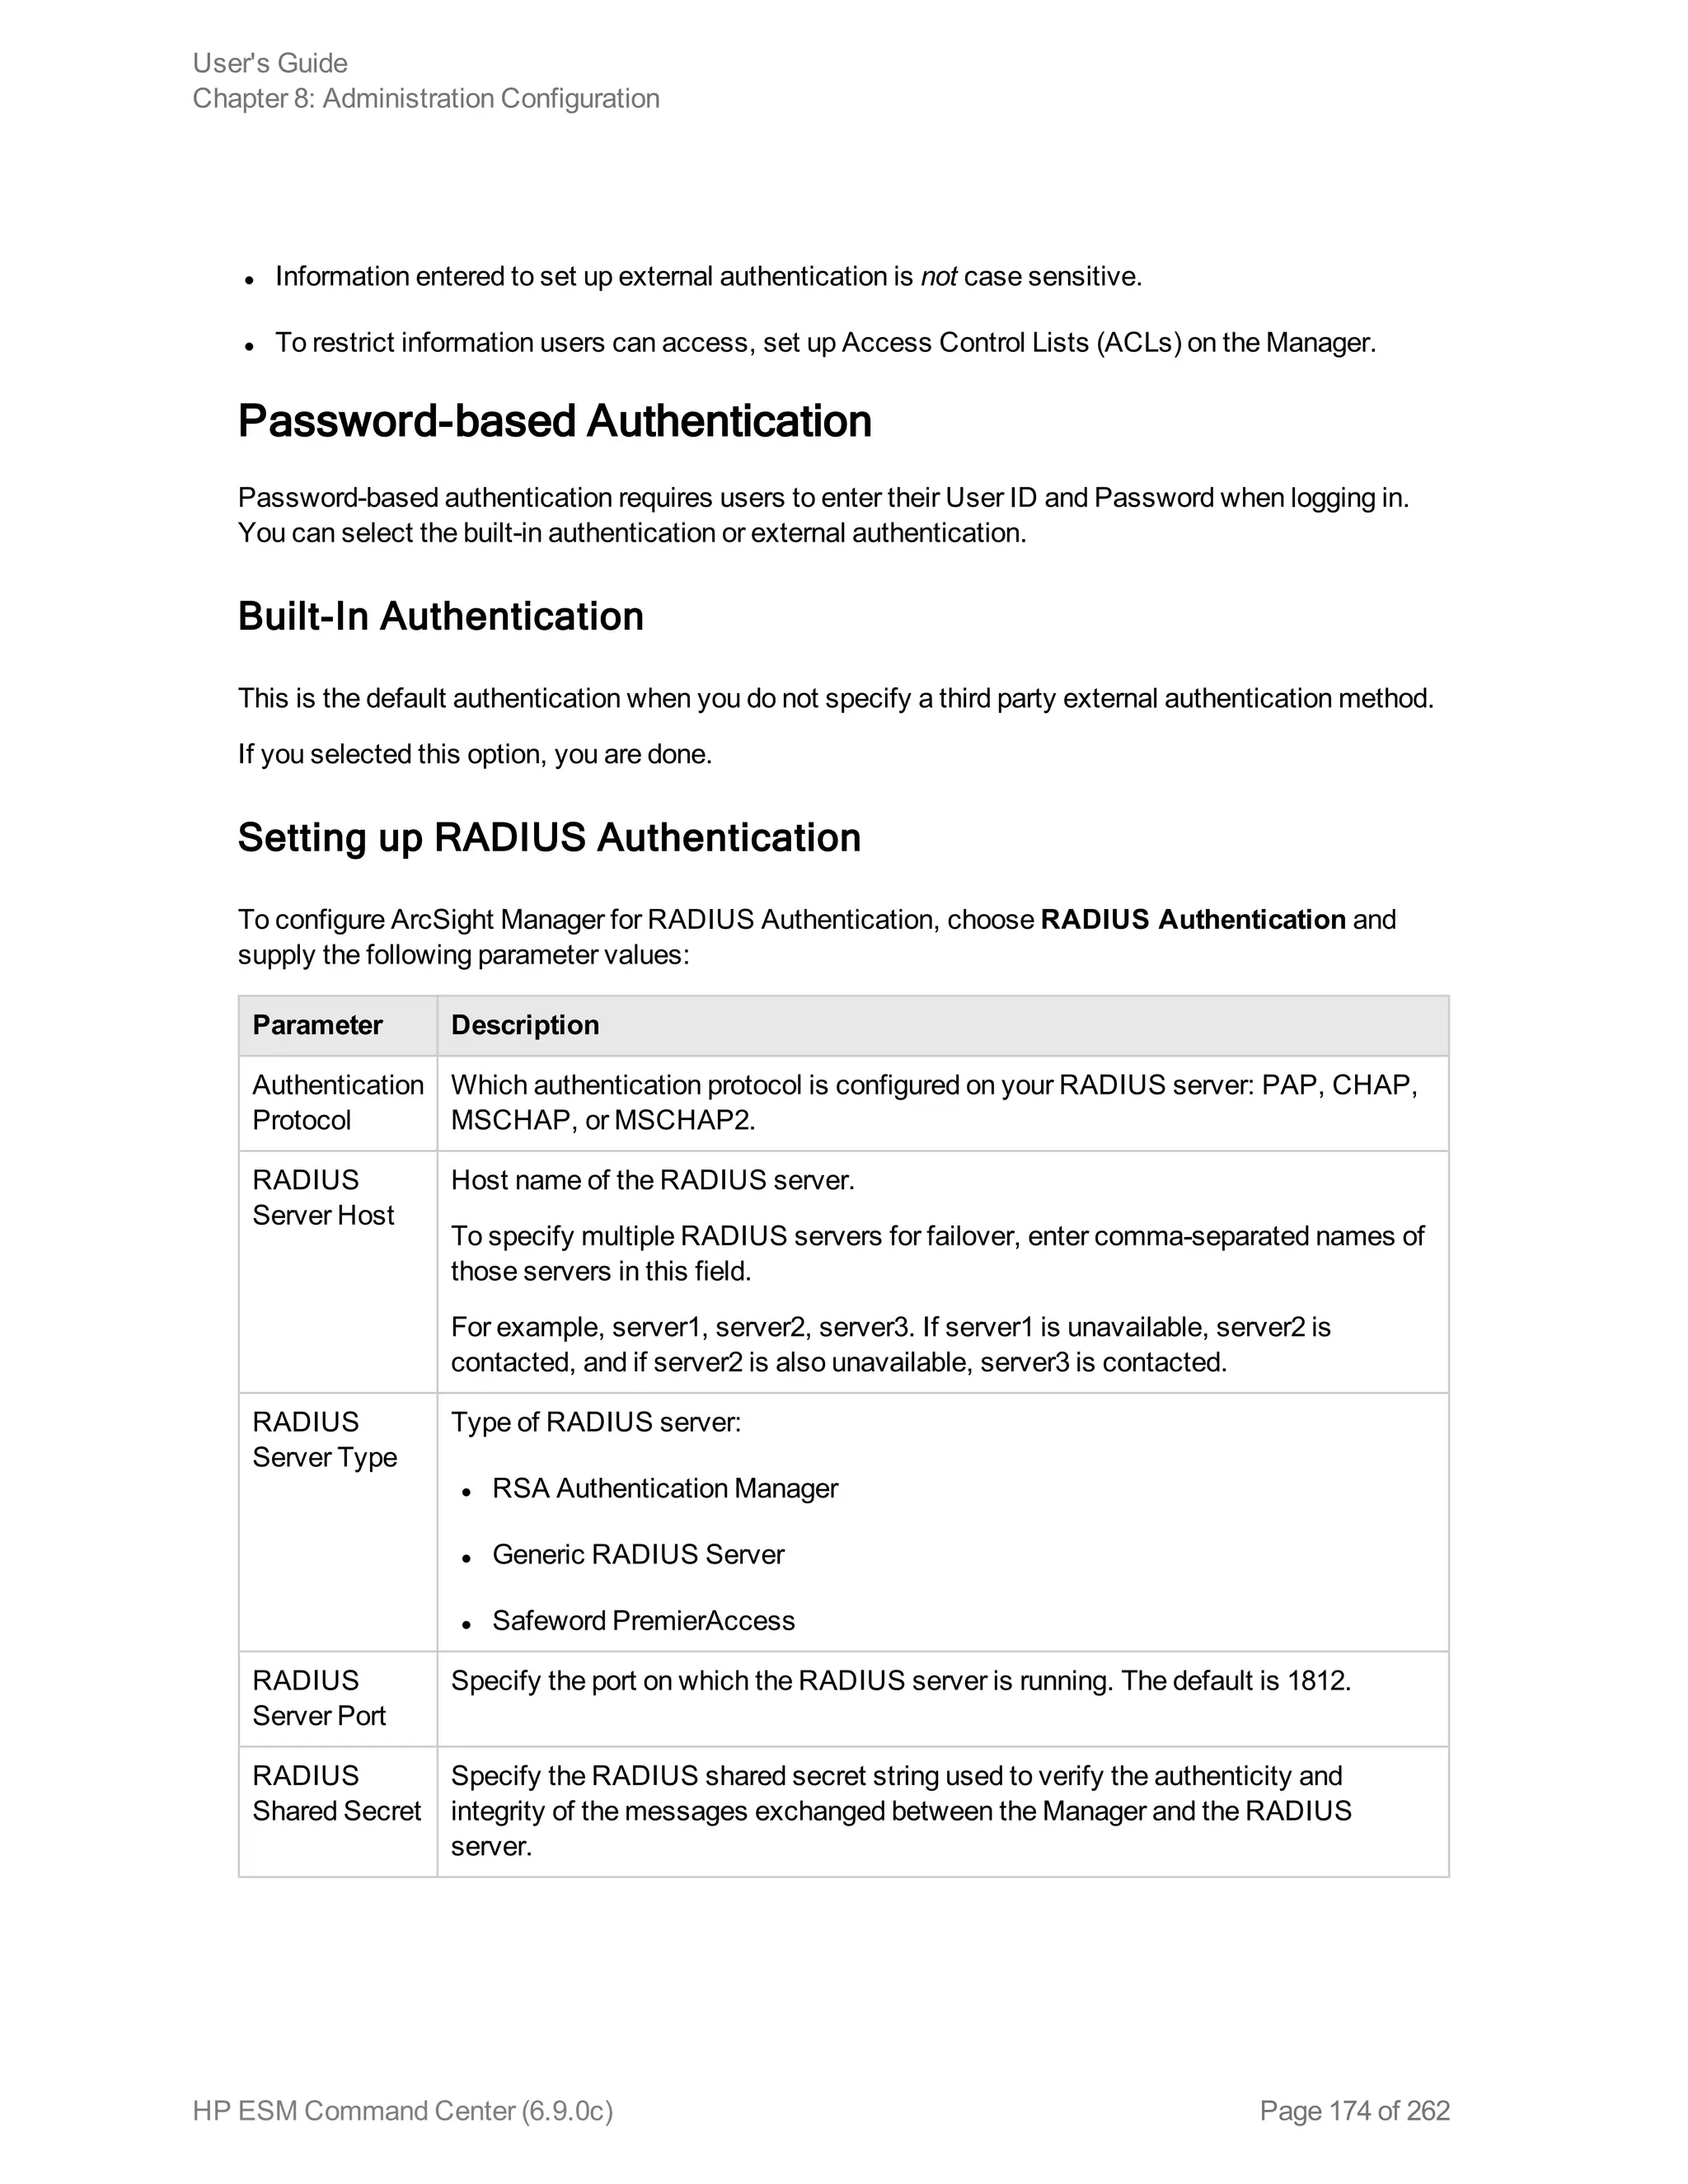
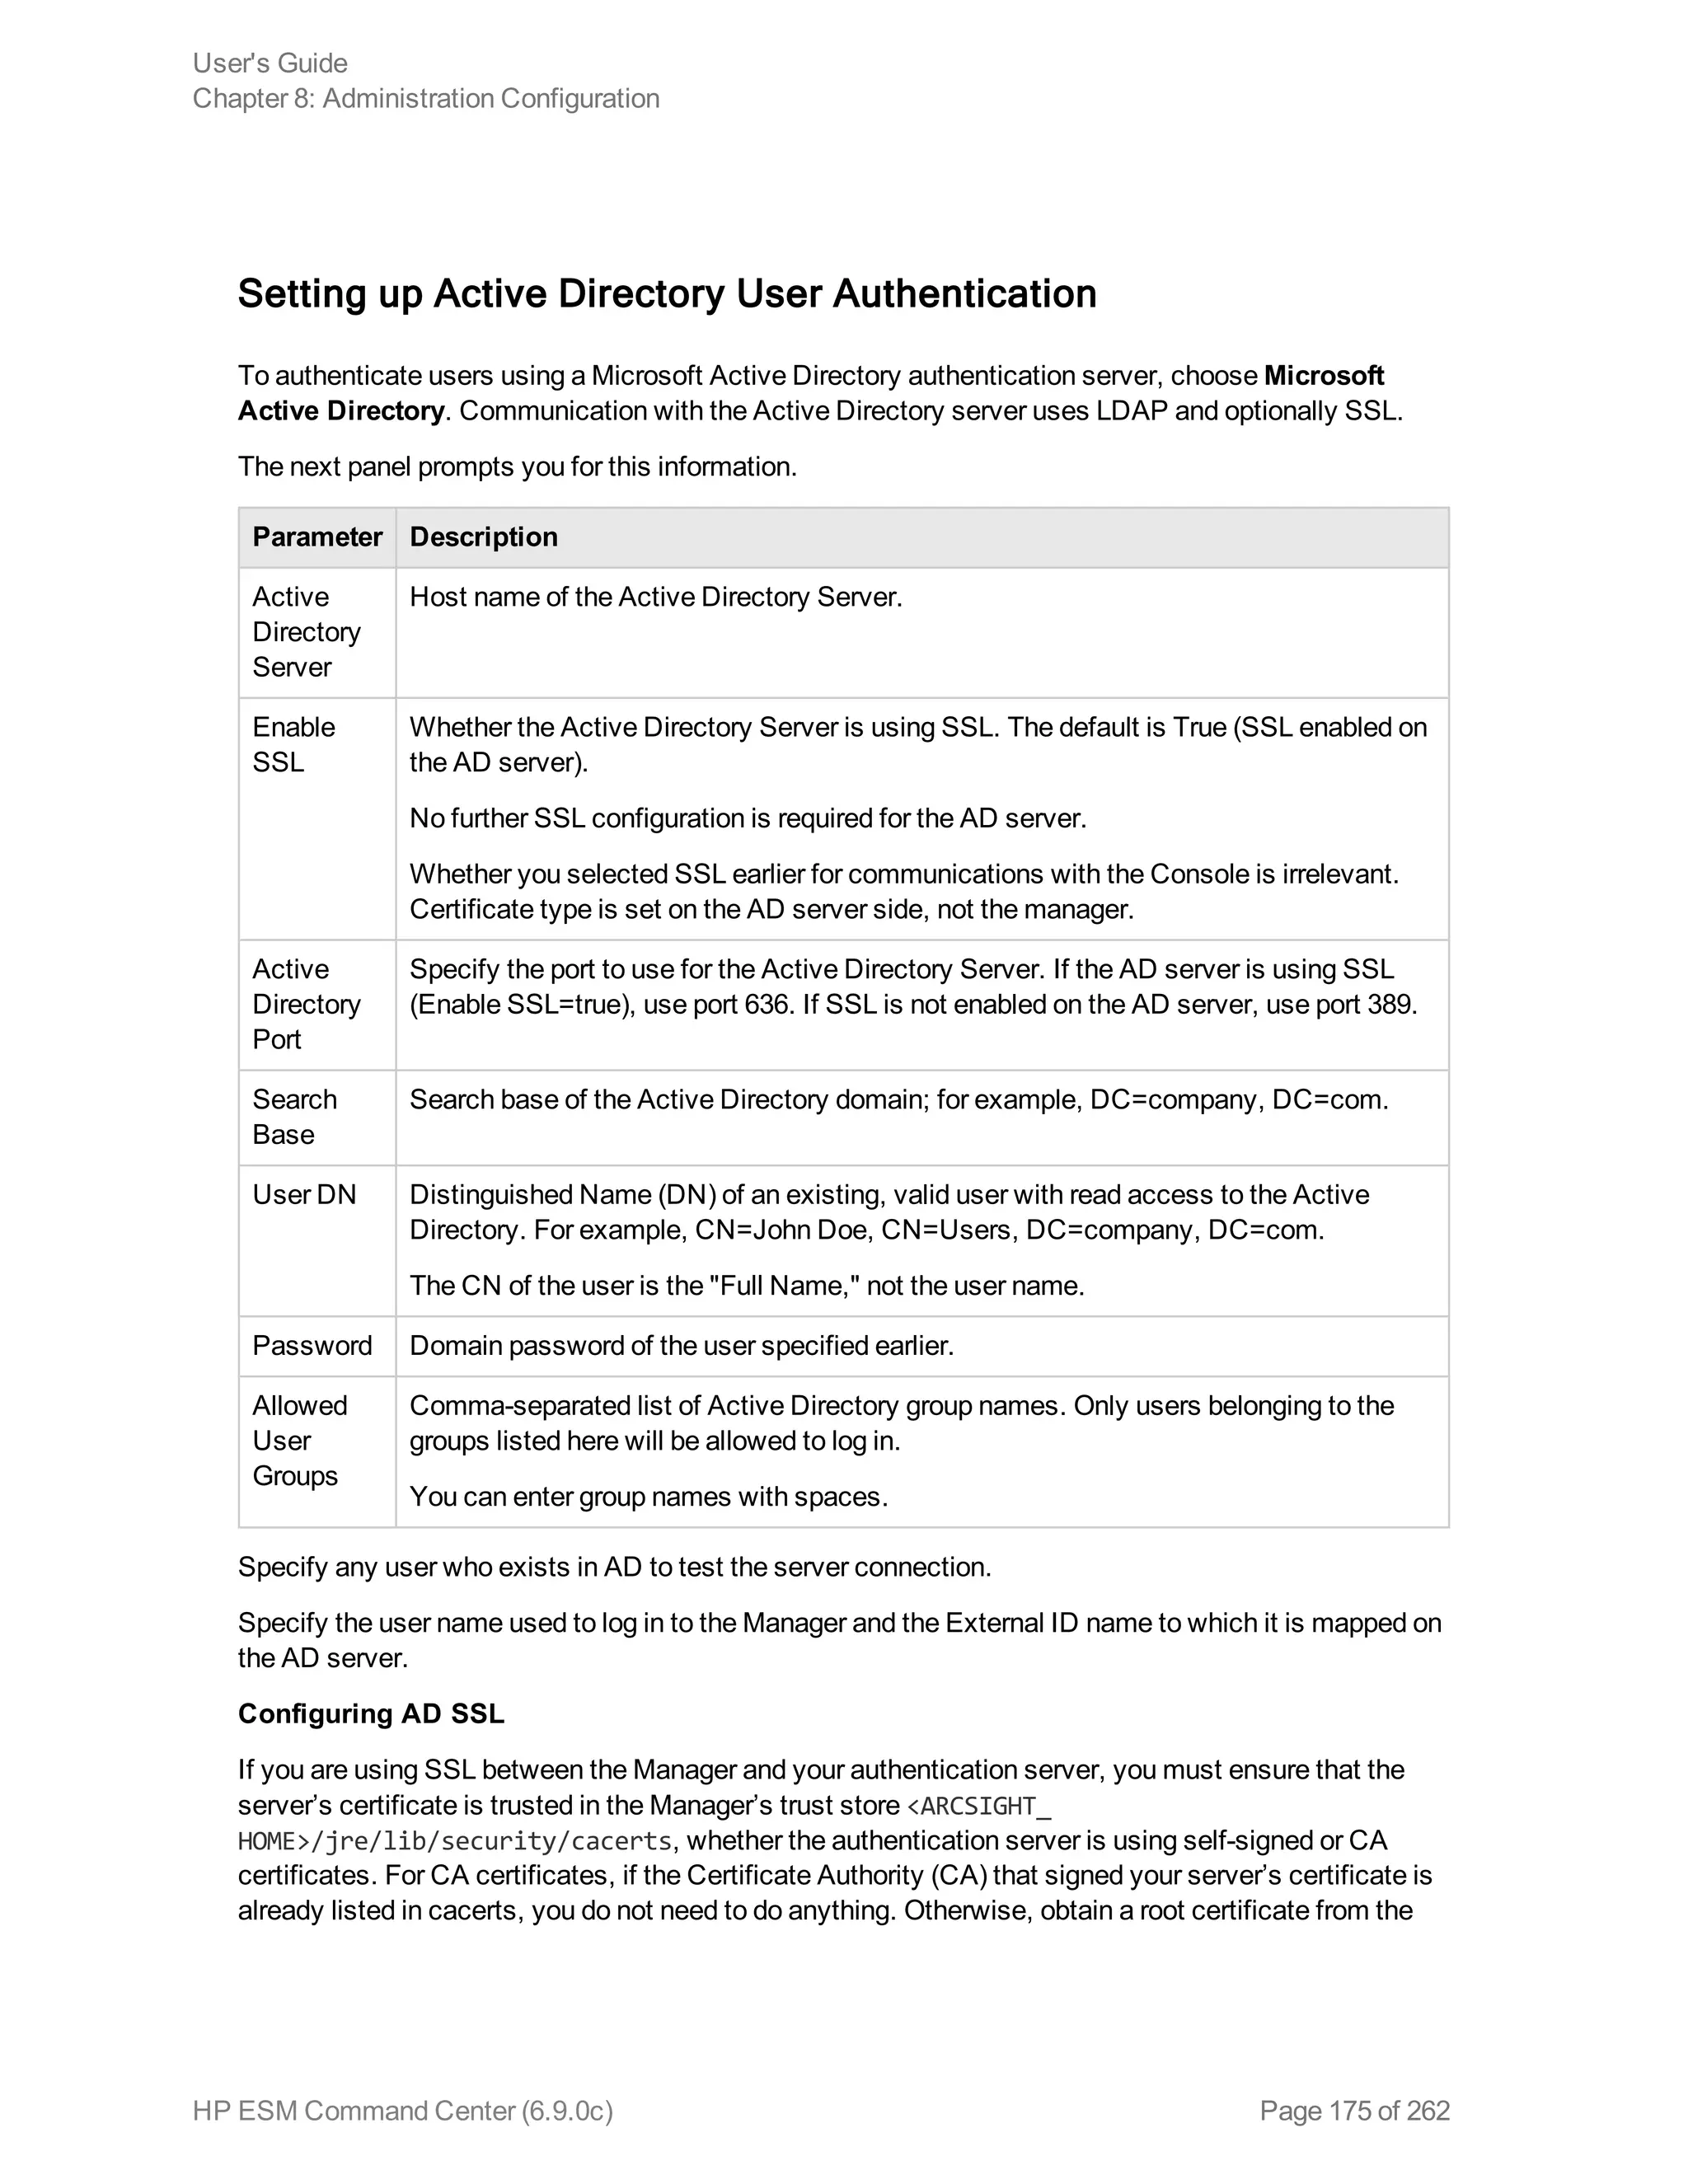
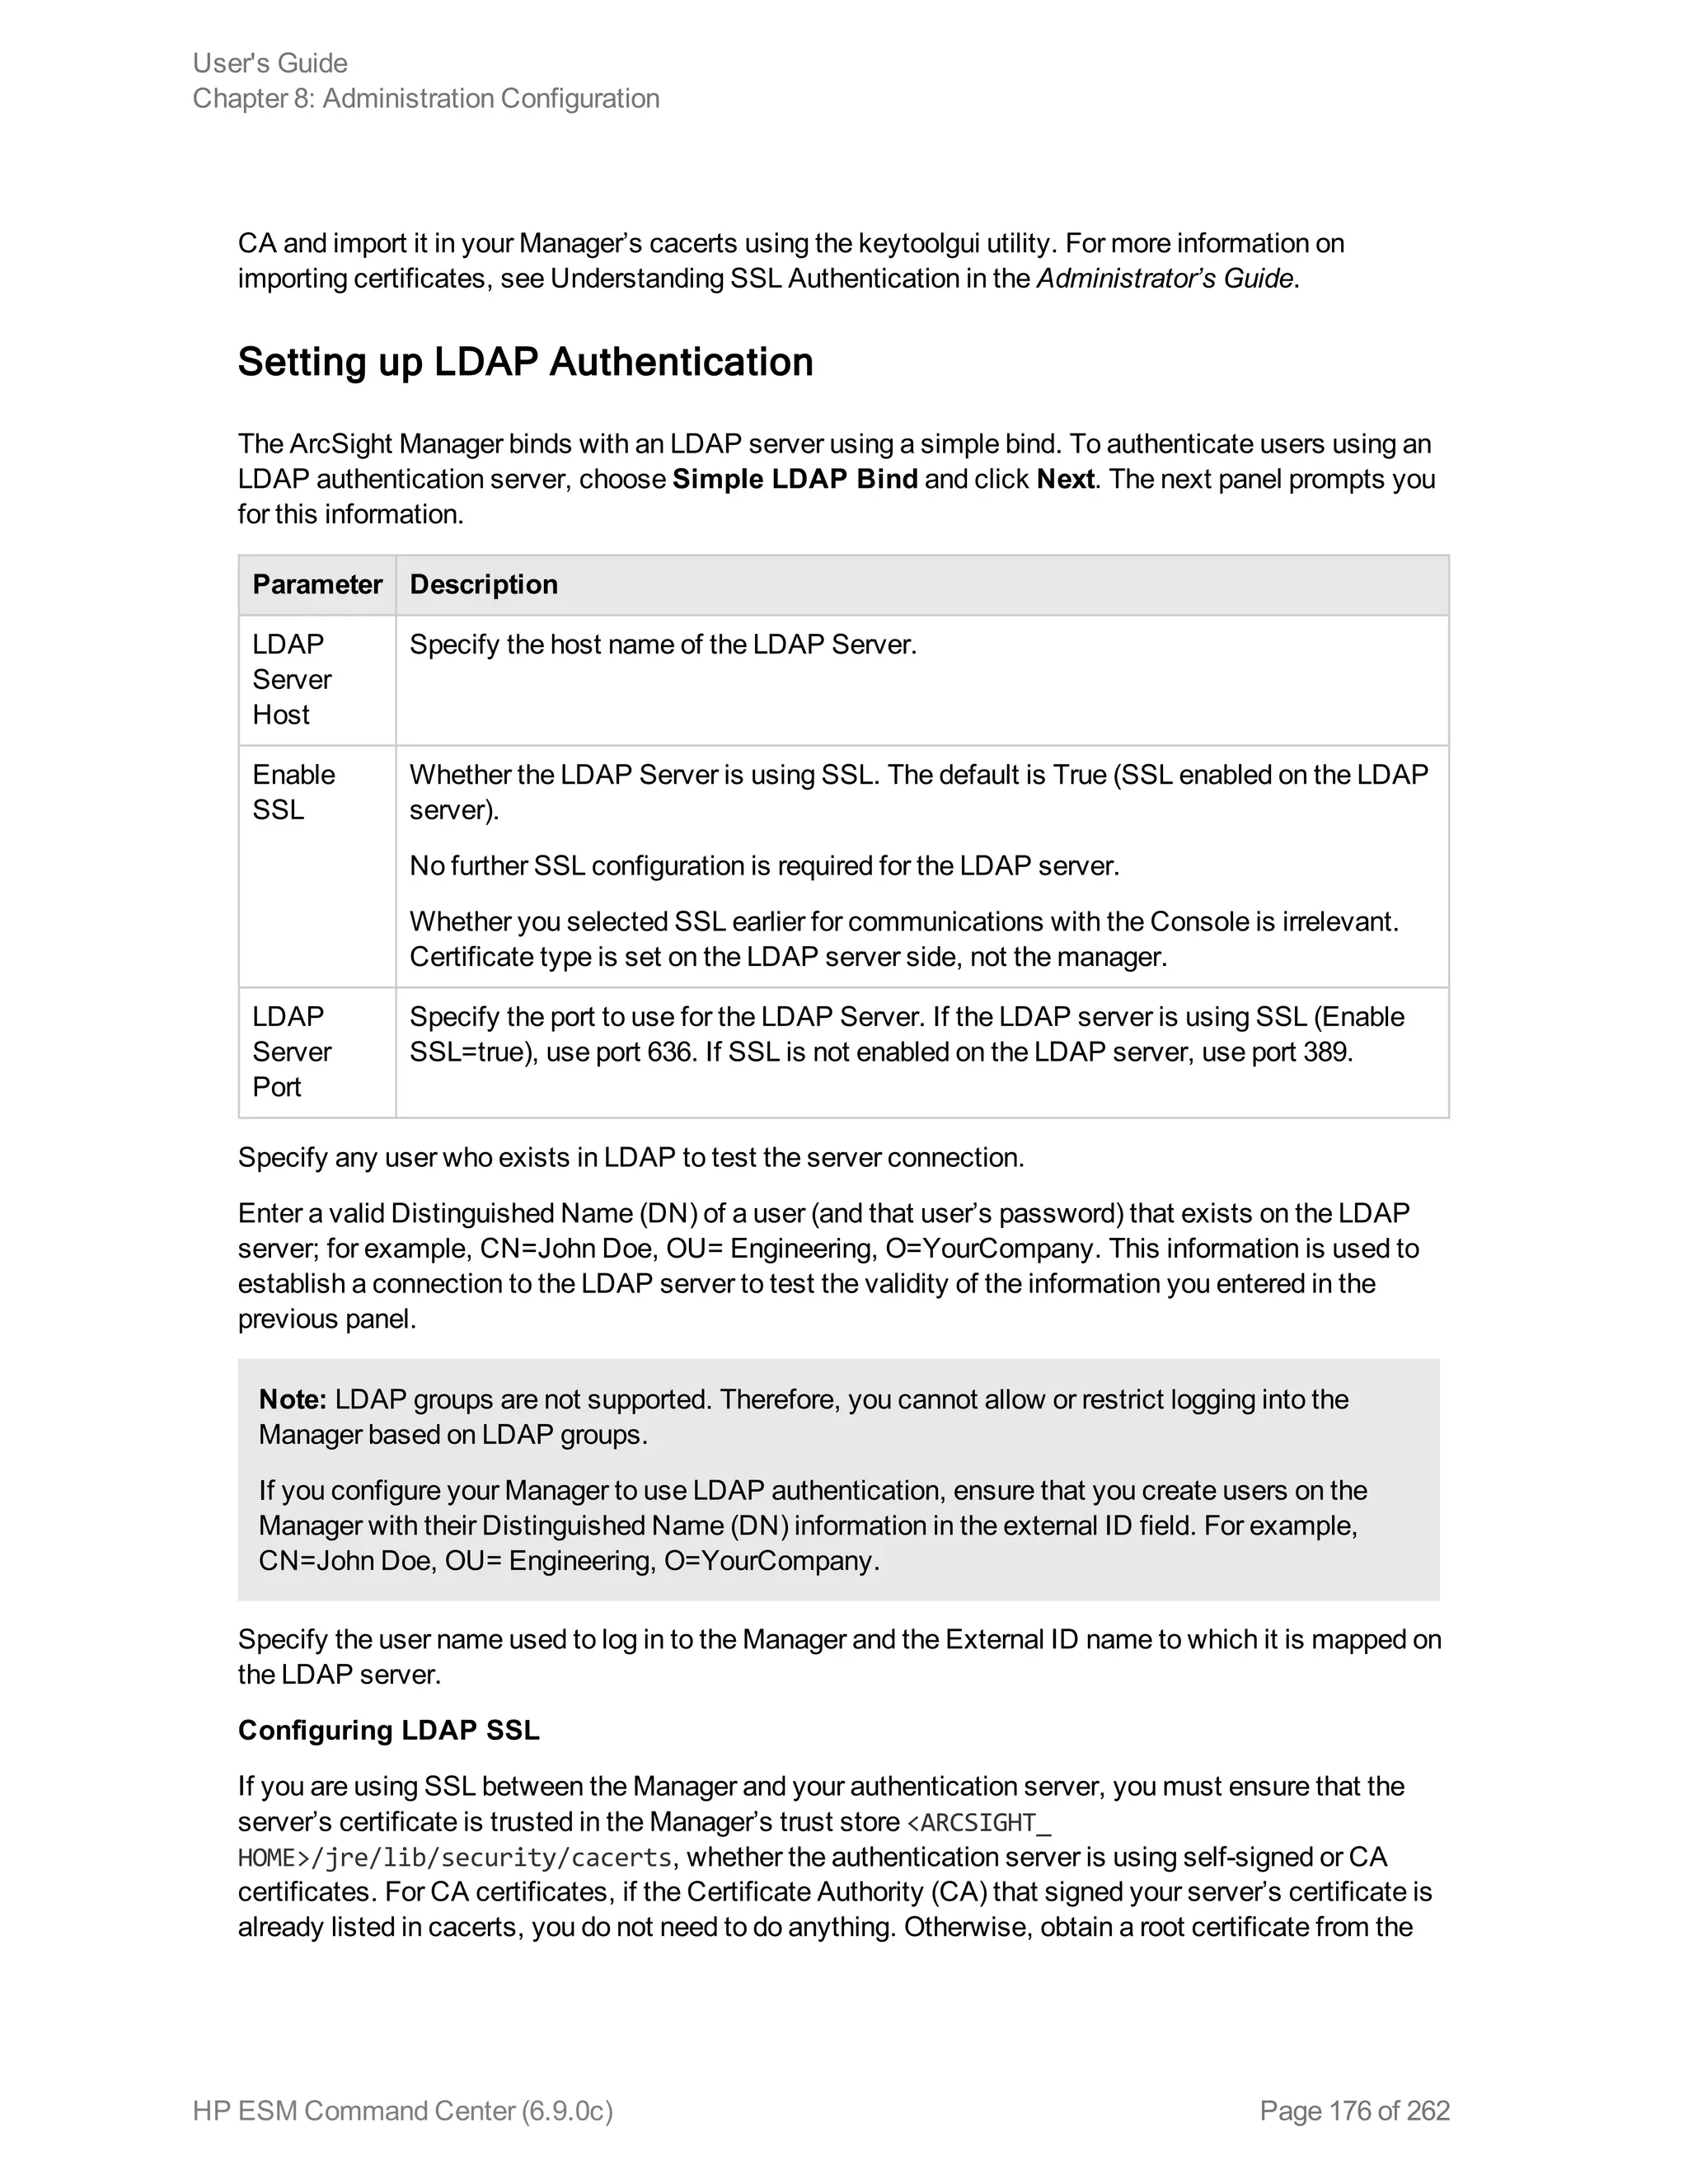
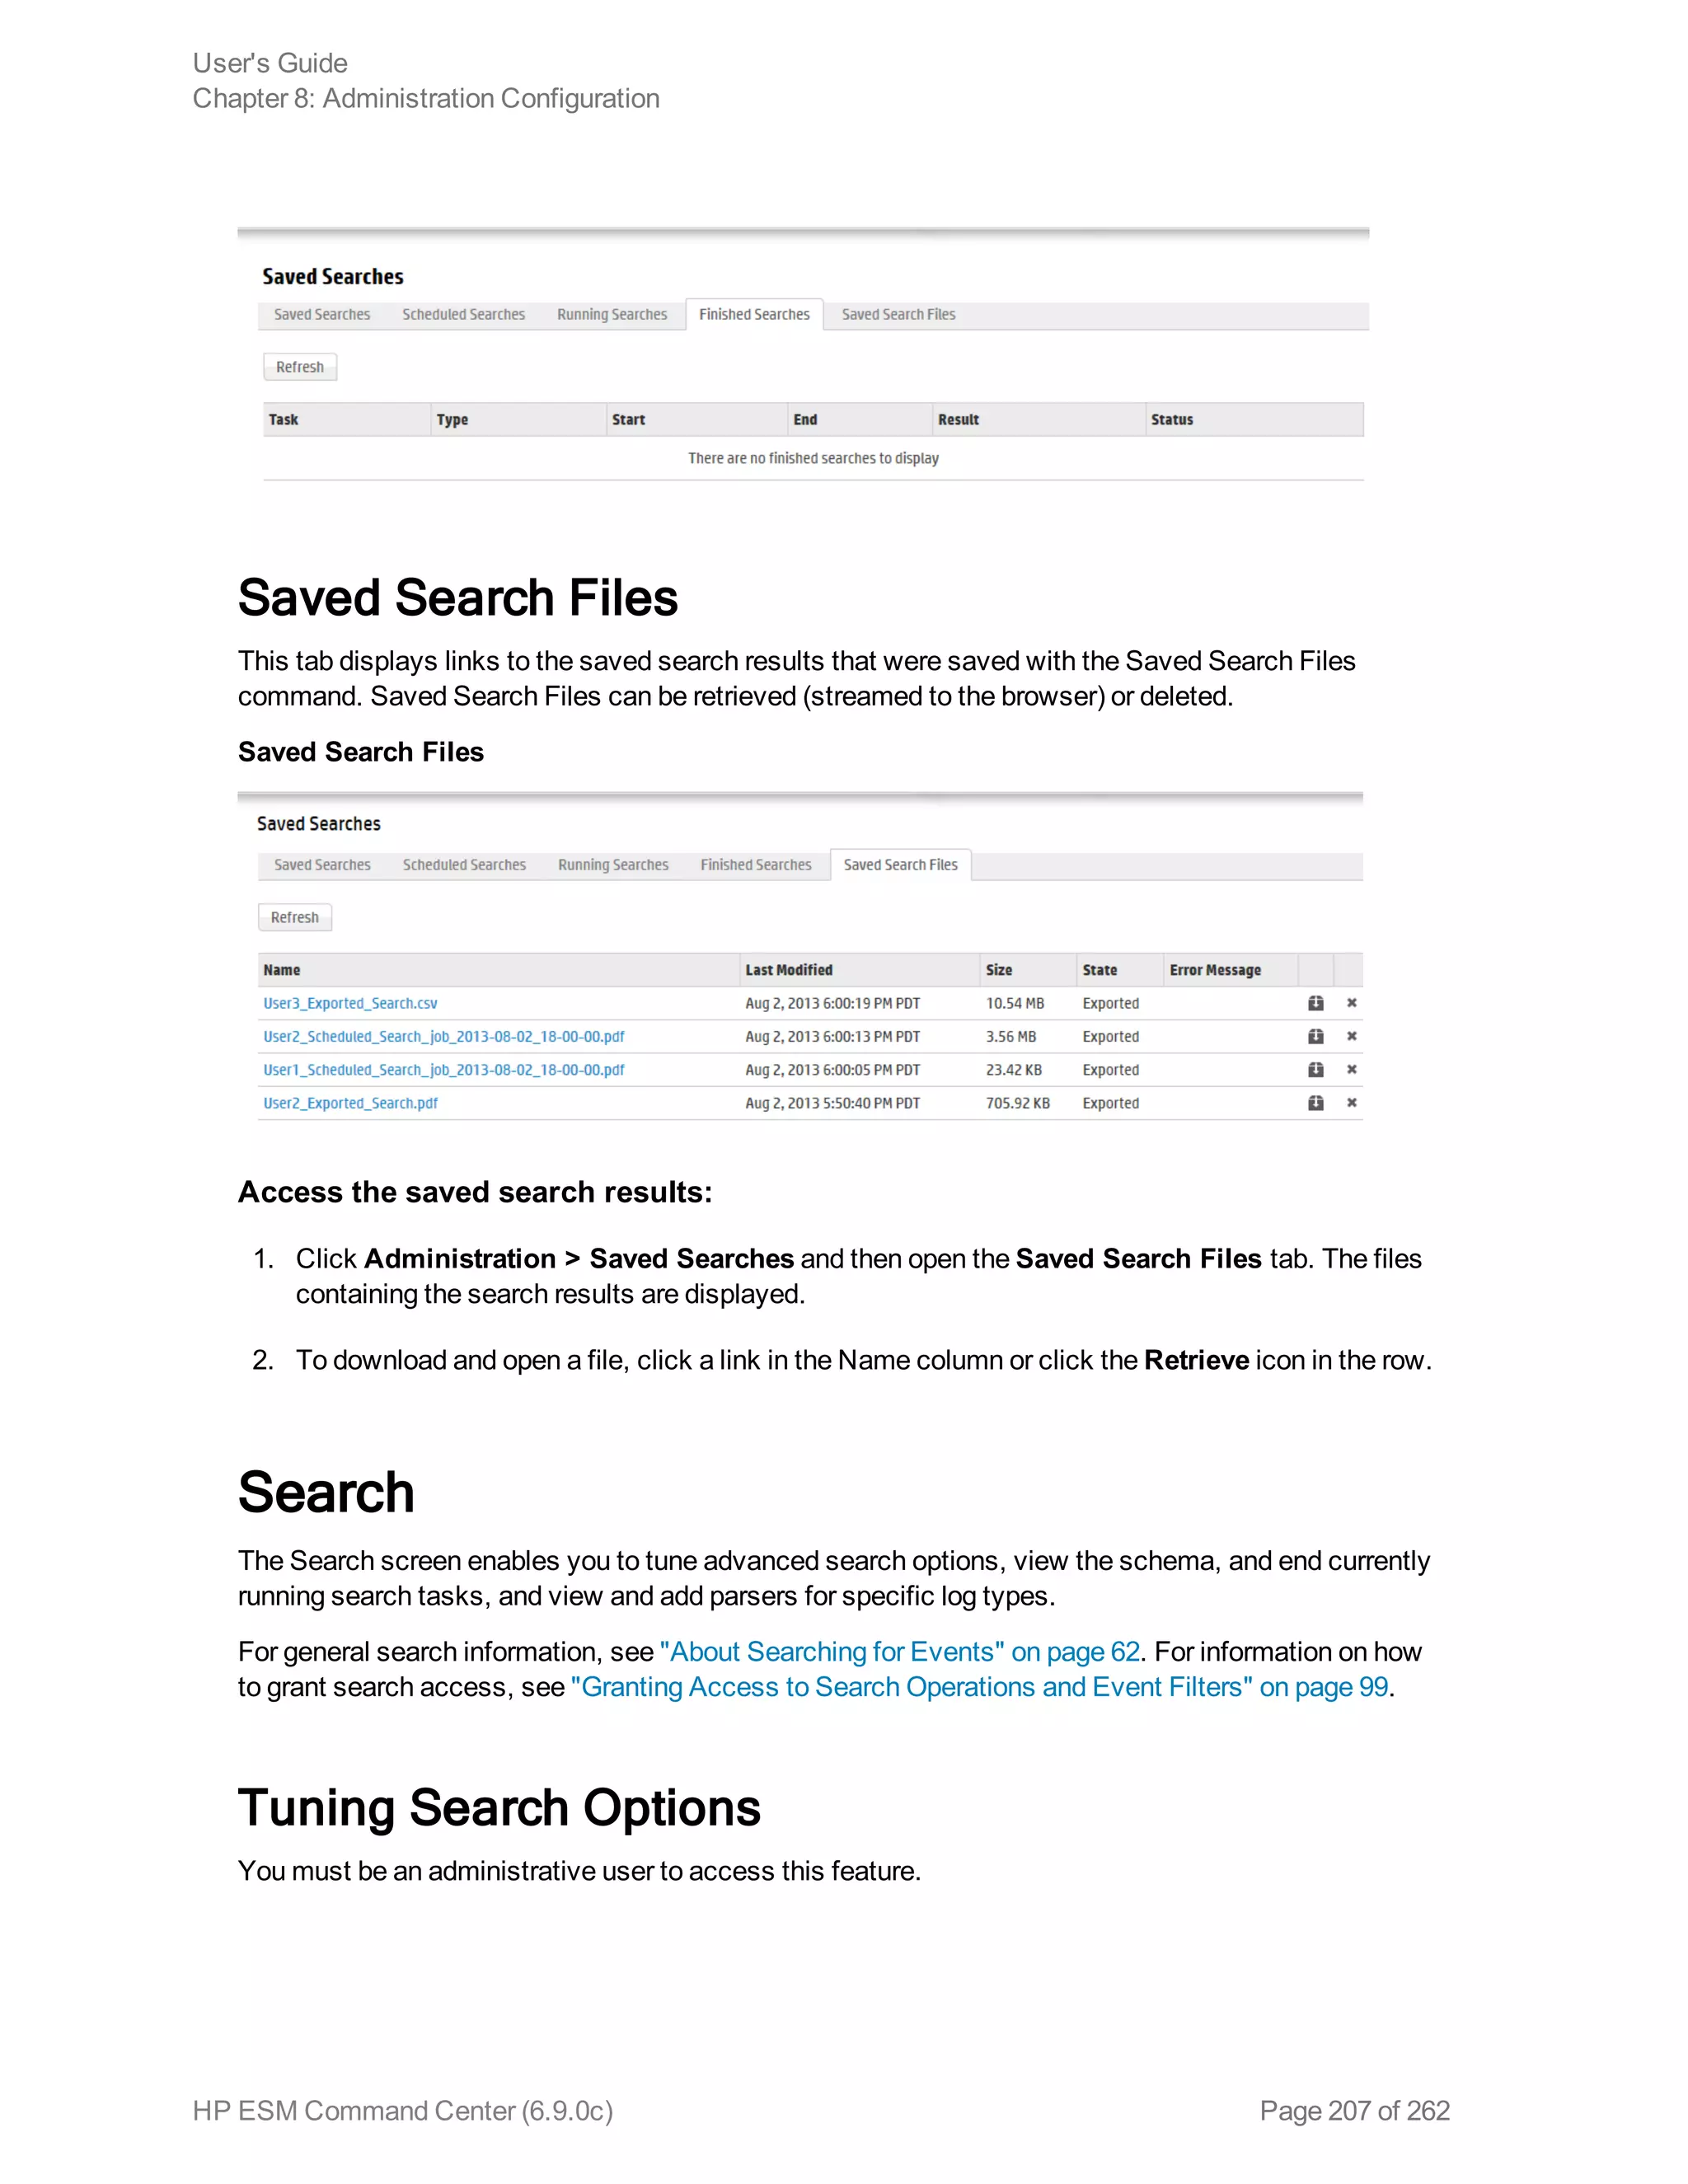
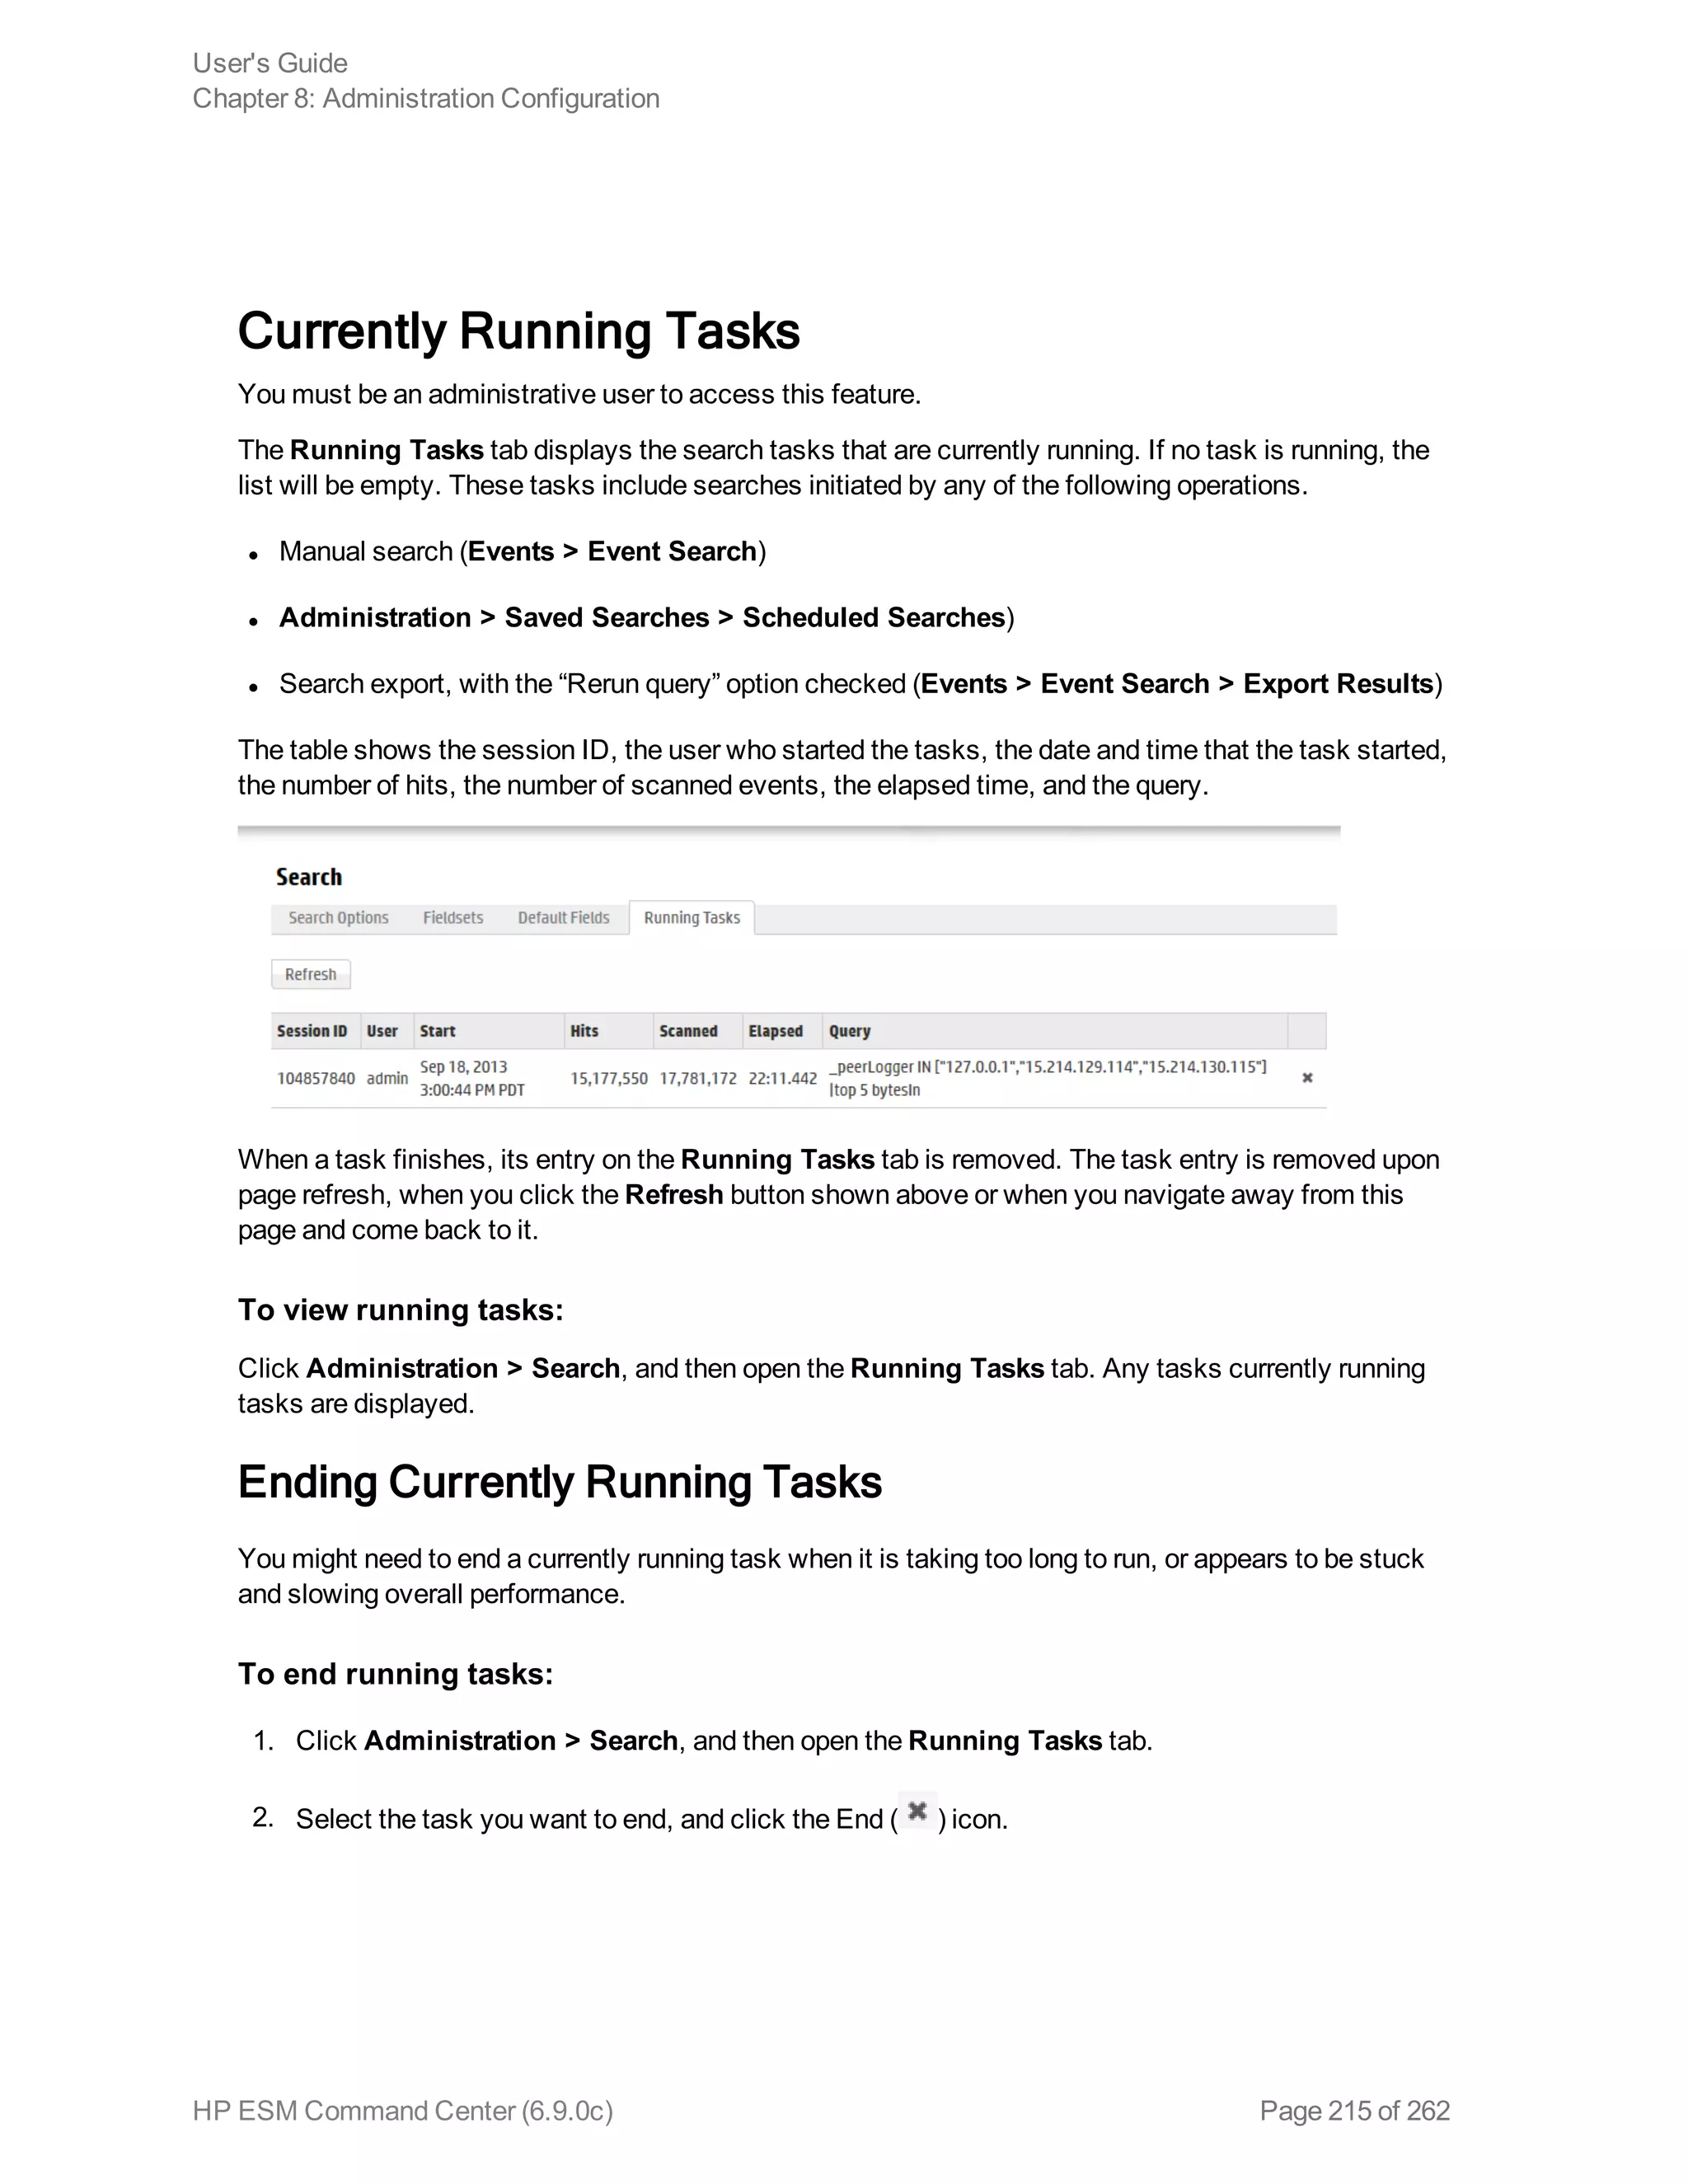
This document is the user's guide for HP ArcSight ESM Command Center version 6.9.0c. It provides information on using the Command Center interface to view system information, monitor events through active channels, search for events, use reports and cases, and configure administrative settings. The guide covers topics such as dashboards, event channels, search queries, content management, storage configuration, and authentication settings. It also includes appendices with details on search operators and using the rex search operator.
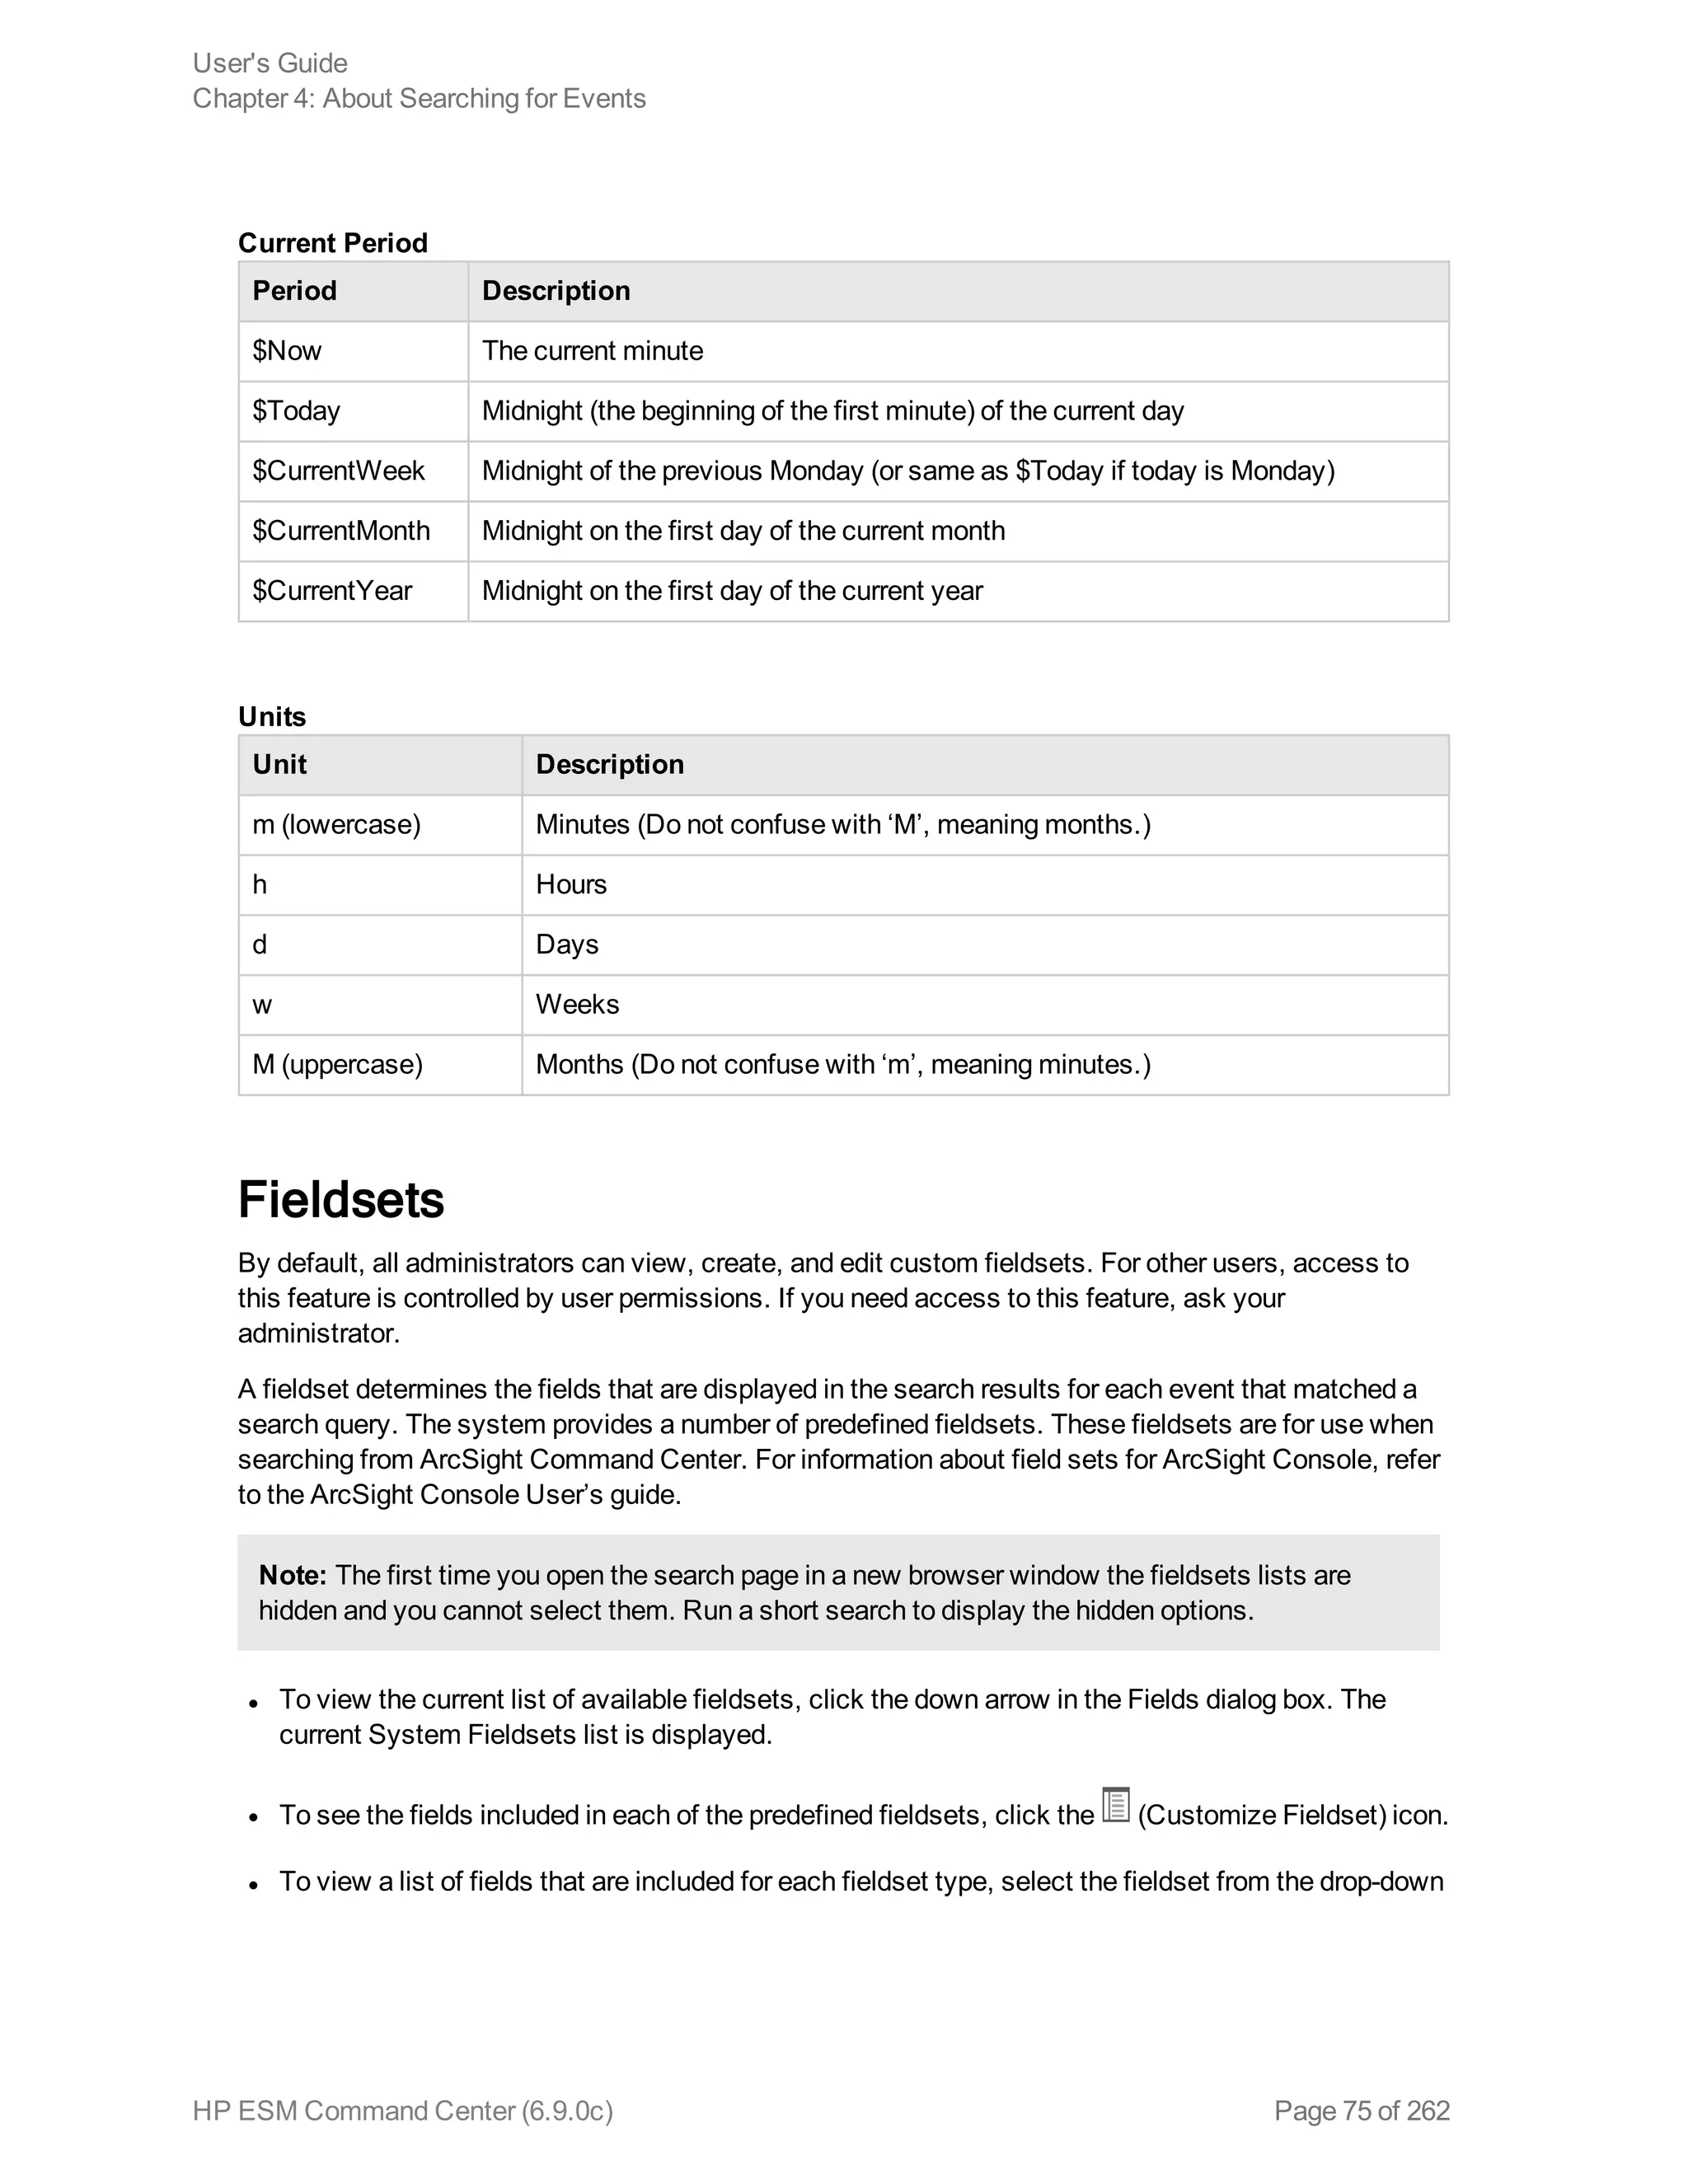
![Contents
Chapter 1: Introduction 11
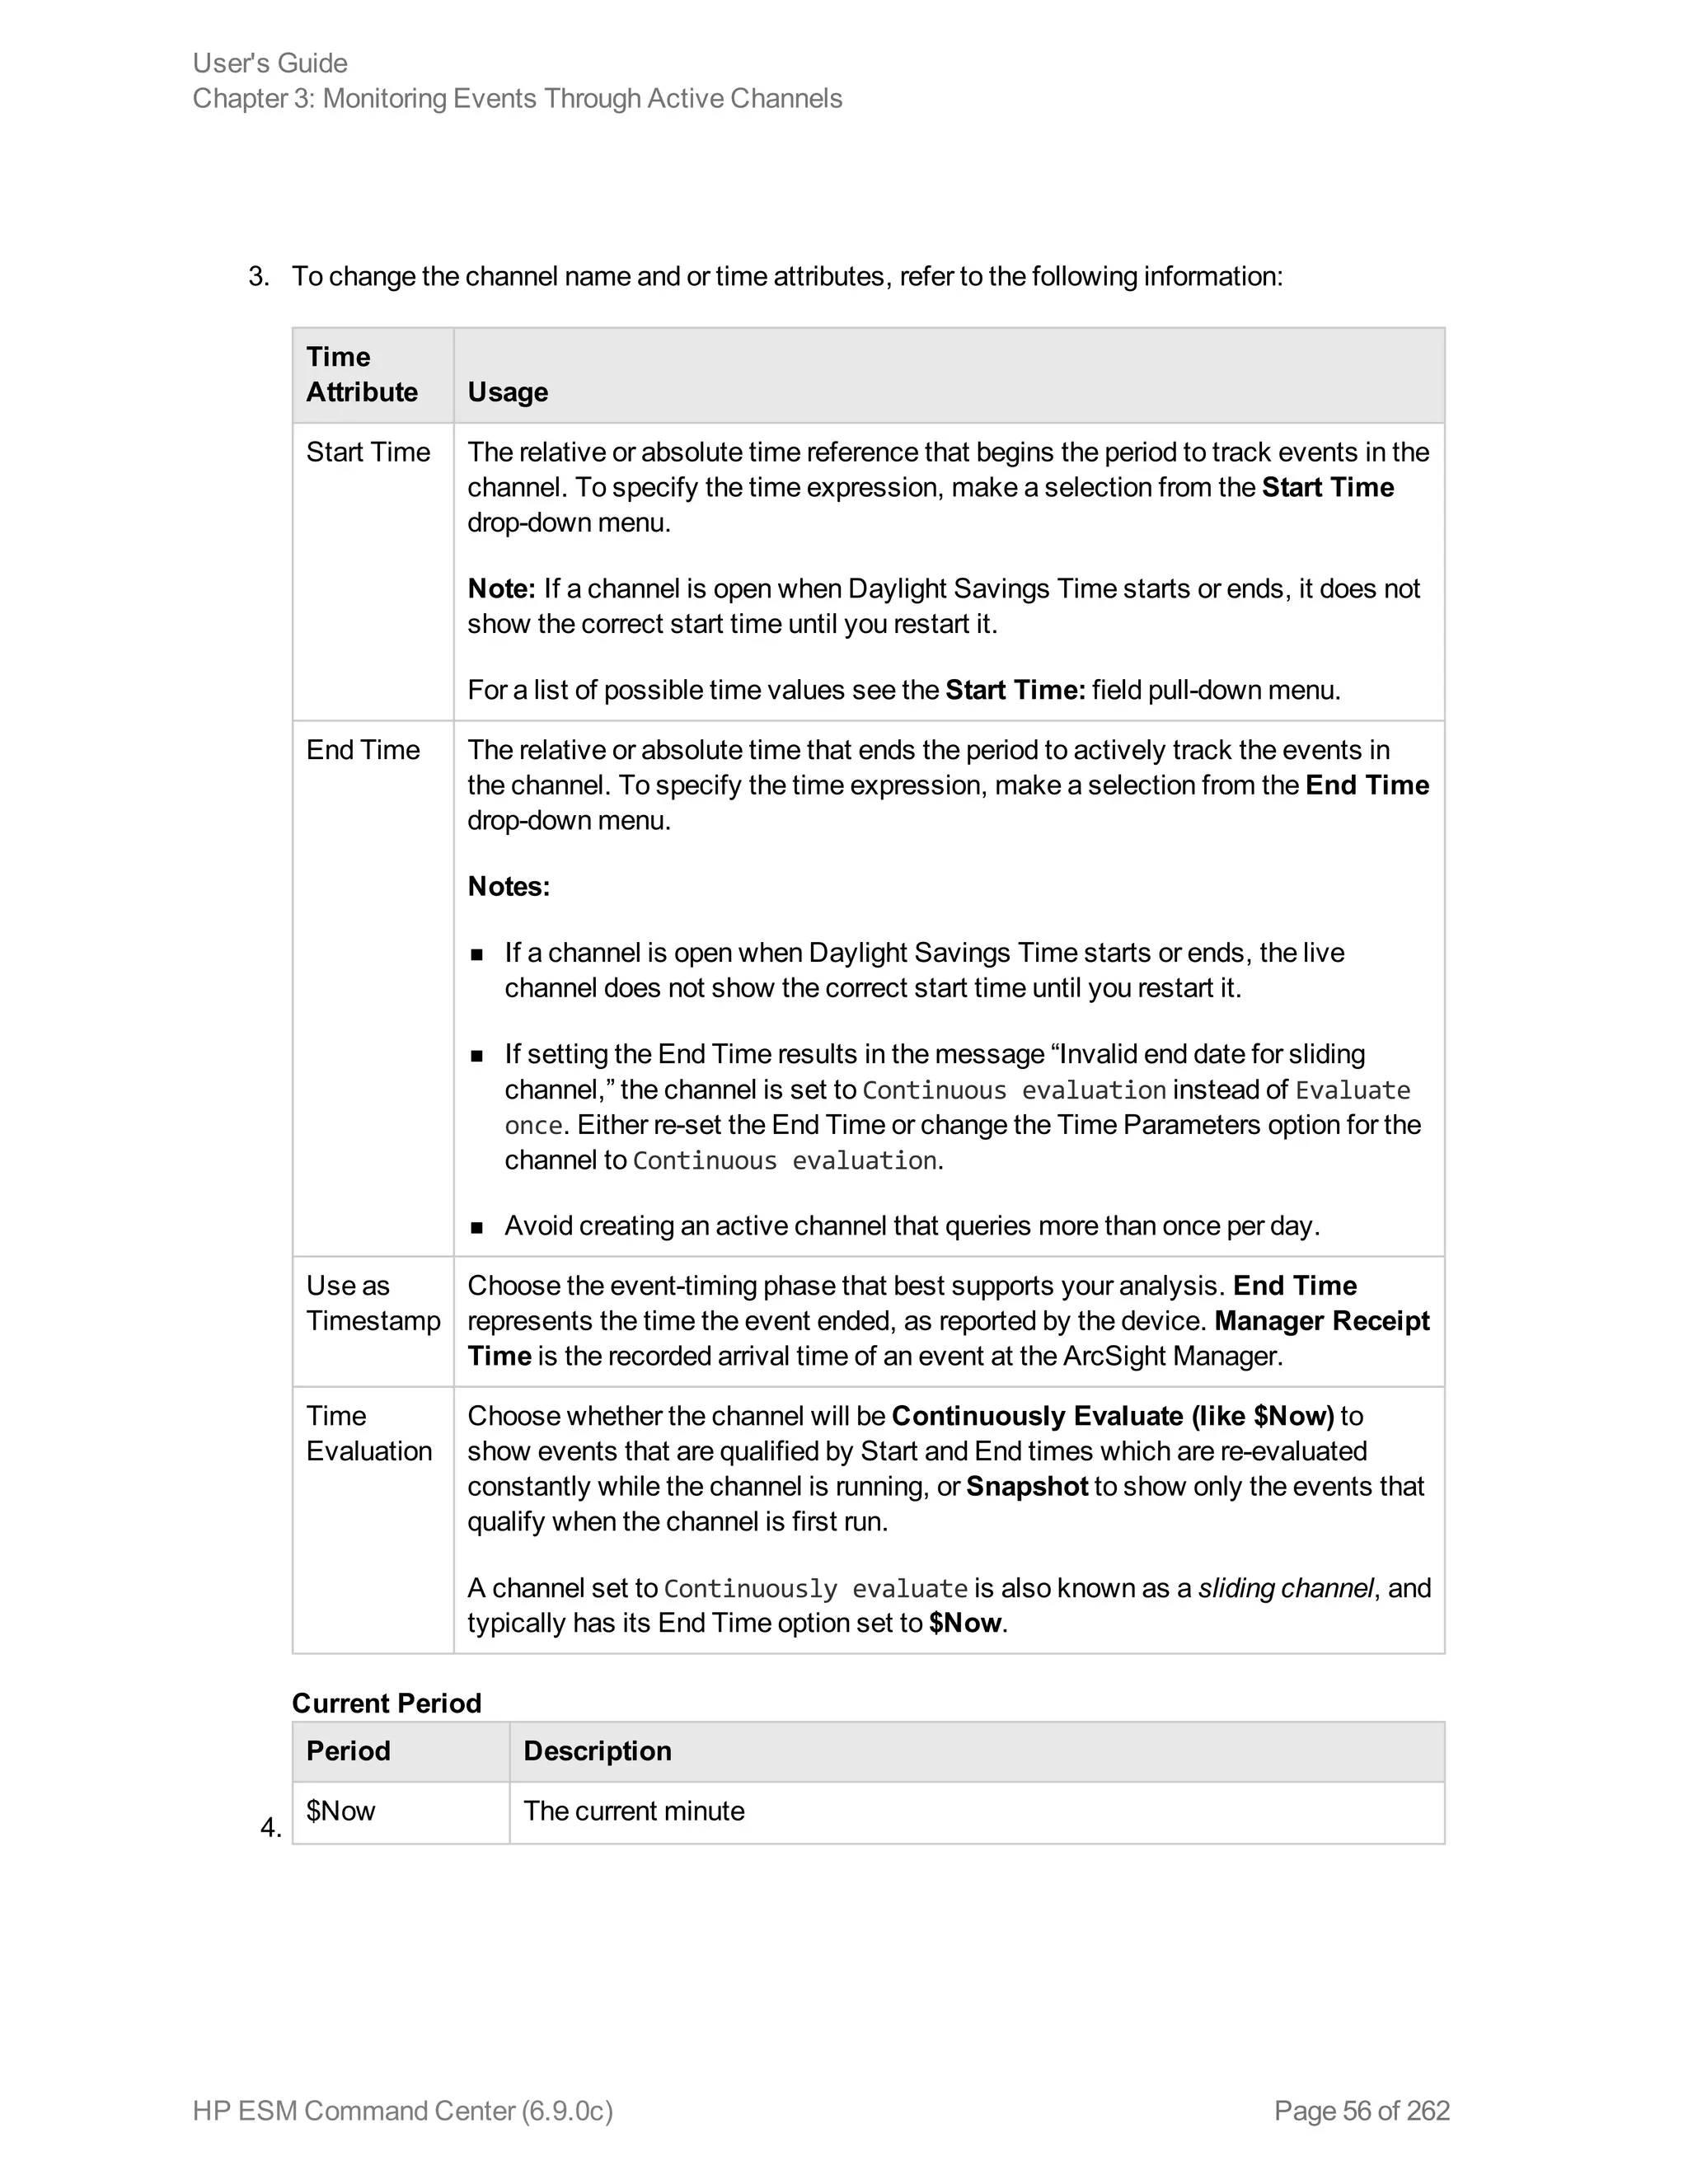
Starting the ESM Command Center 11
Configuring Your Browser 11
Launching ESM Command Center 11
Logging in to ESM Command Center 11
Basic Navigation 12
Using the Site Map 13
Monitoring Traffic Volume [BETA Feature] 13
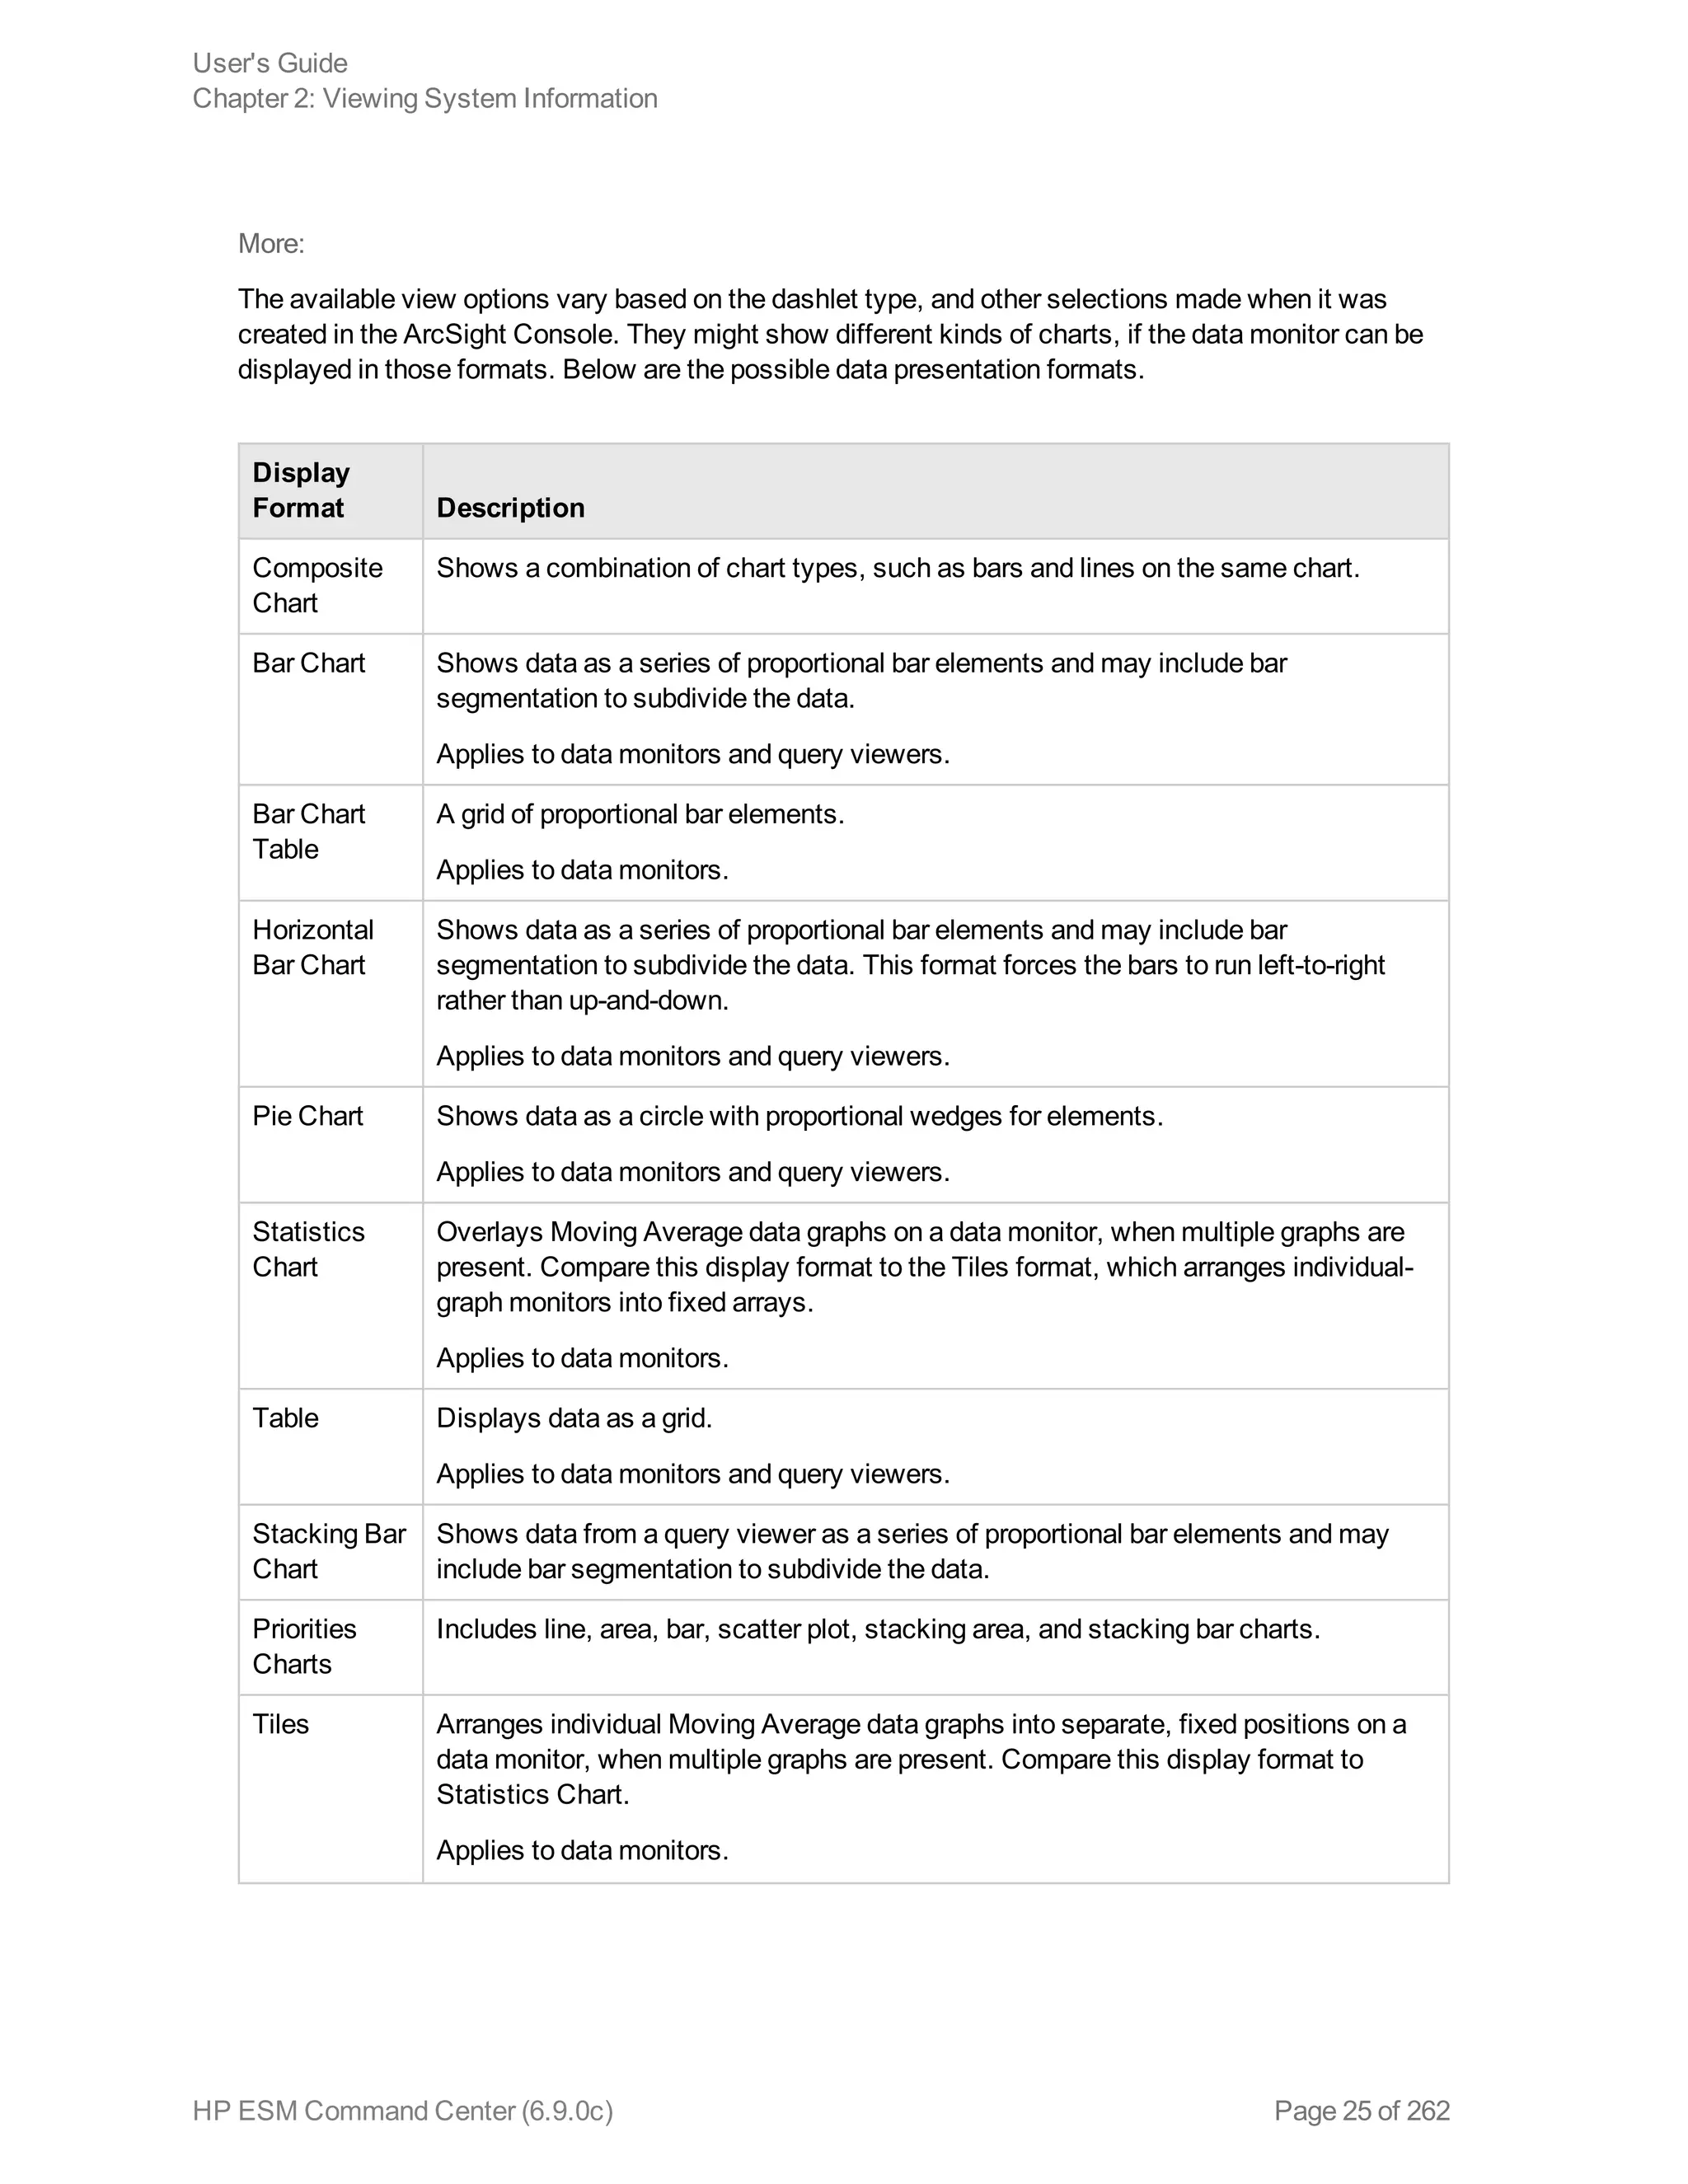
Chapter 2: Viewing System Information 15
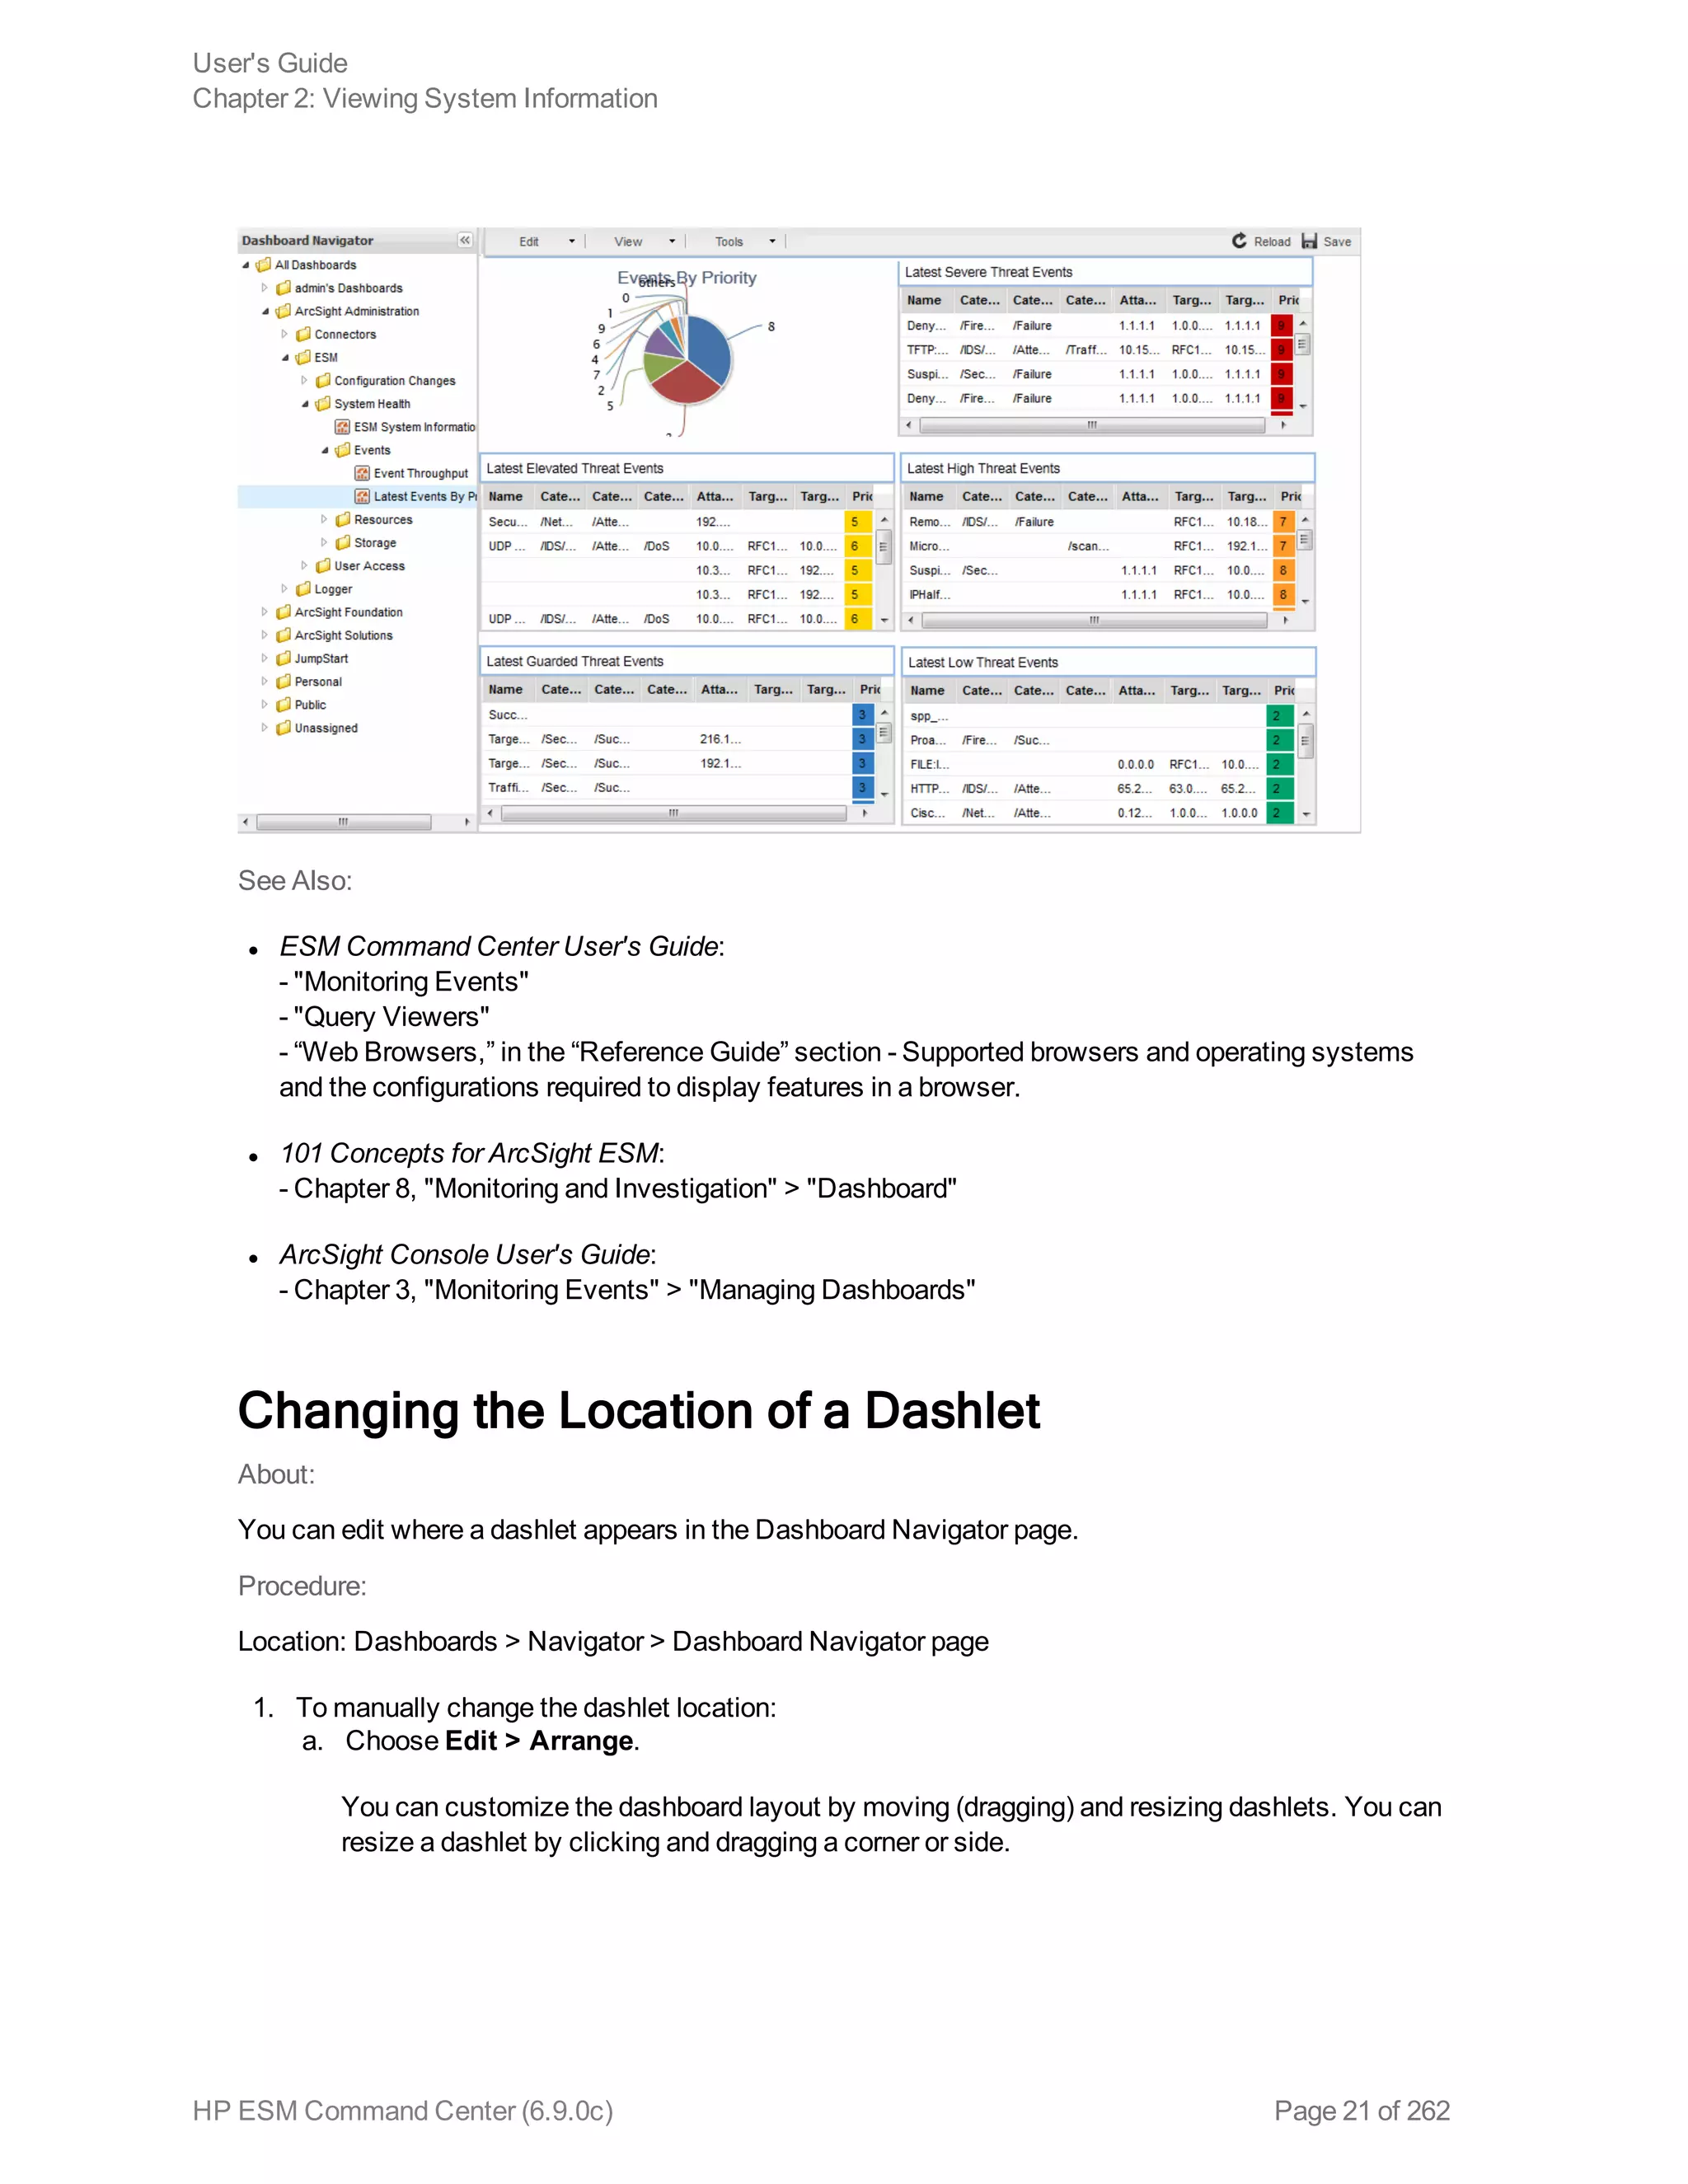
Managing Dashlets in the Dashboard Page 15
Adding a Data Monitor Dashlet to the Dashboards Page 15
Adding the My Cases Dashlet to the Dashboard Page 16
Adding My Dashboards to the Dashboard Page 17
Adding My Notifications to the Dashboards Page 18
Adding a Query Viewer to the Dashboards Page 19
Changing the Dashboards Layout 20
Managing Dashlets in the Dashboard Navigator Page 20
Changing the Location of a Dashlet 21
Changing the Background of a Dashlet 22
Showing and Hiding a Dashlet in a Dashboard 24
Specifying a Dashlet Chart Type 24
Specifying Animation and Auto-Refresh Rate for a Dashlet 26
Disabling a Data Monitor Dashlet 27
Accessing a Dashboard from a Dashlet 27
Chapter 3: Monitoring Events Through Active Channels 29
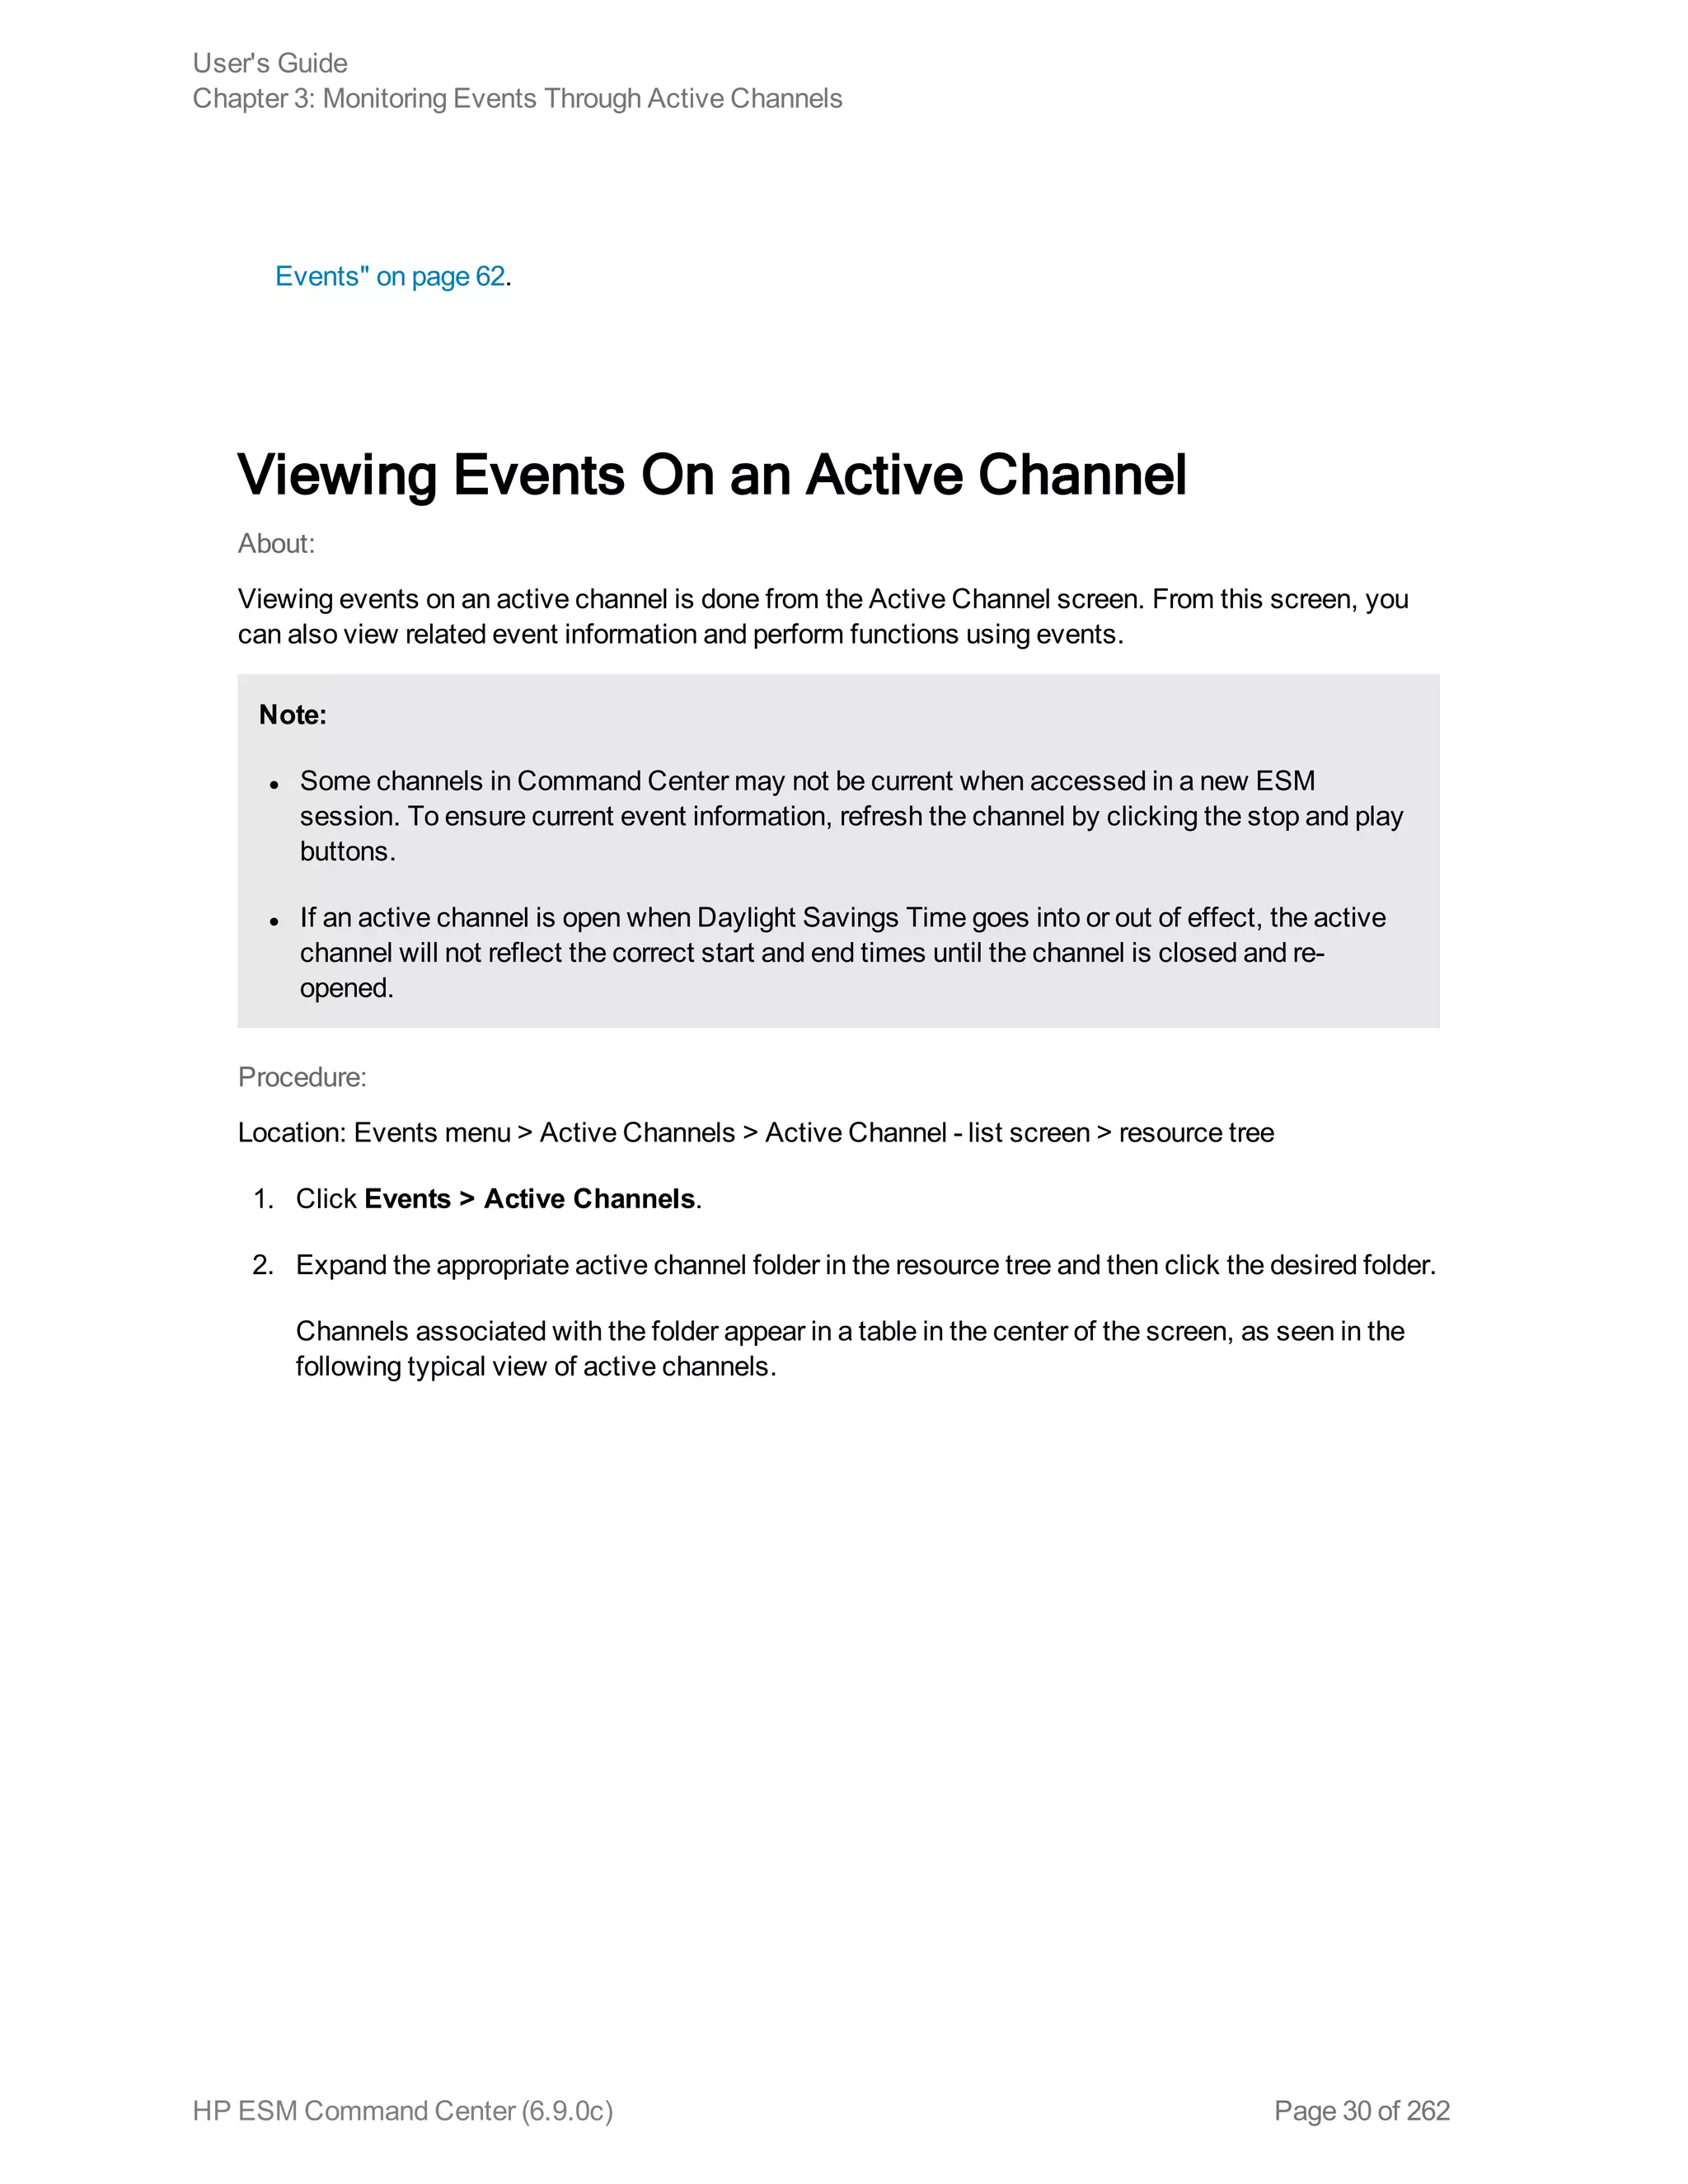
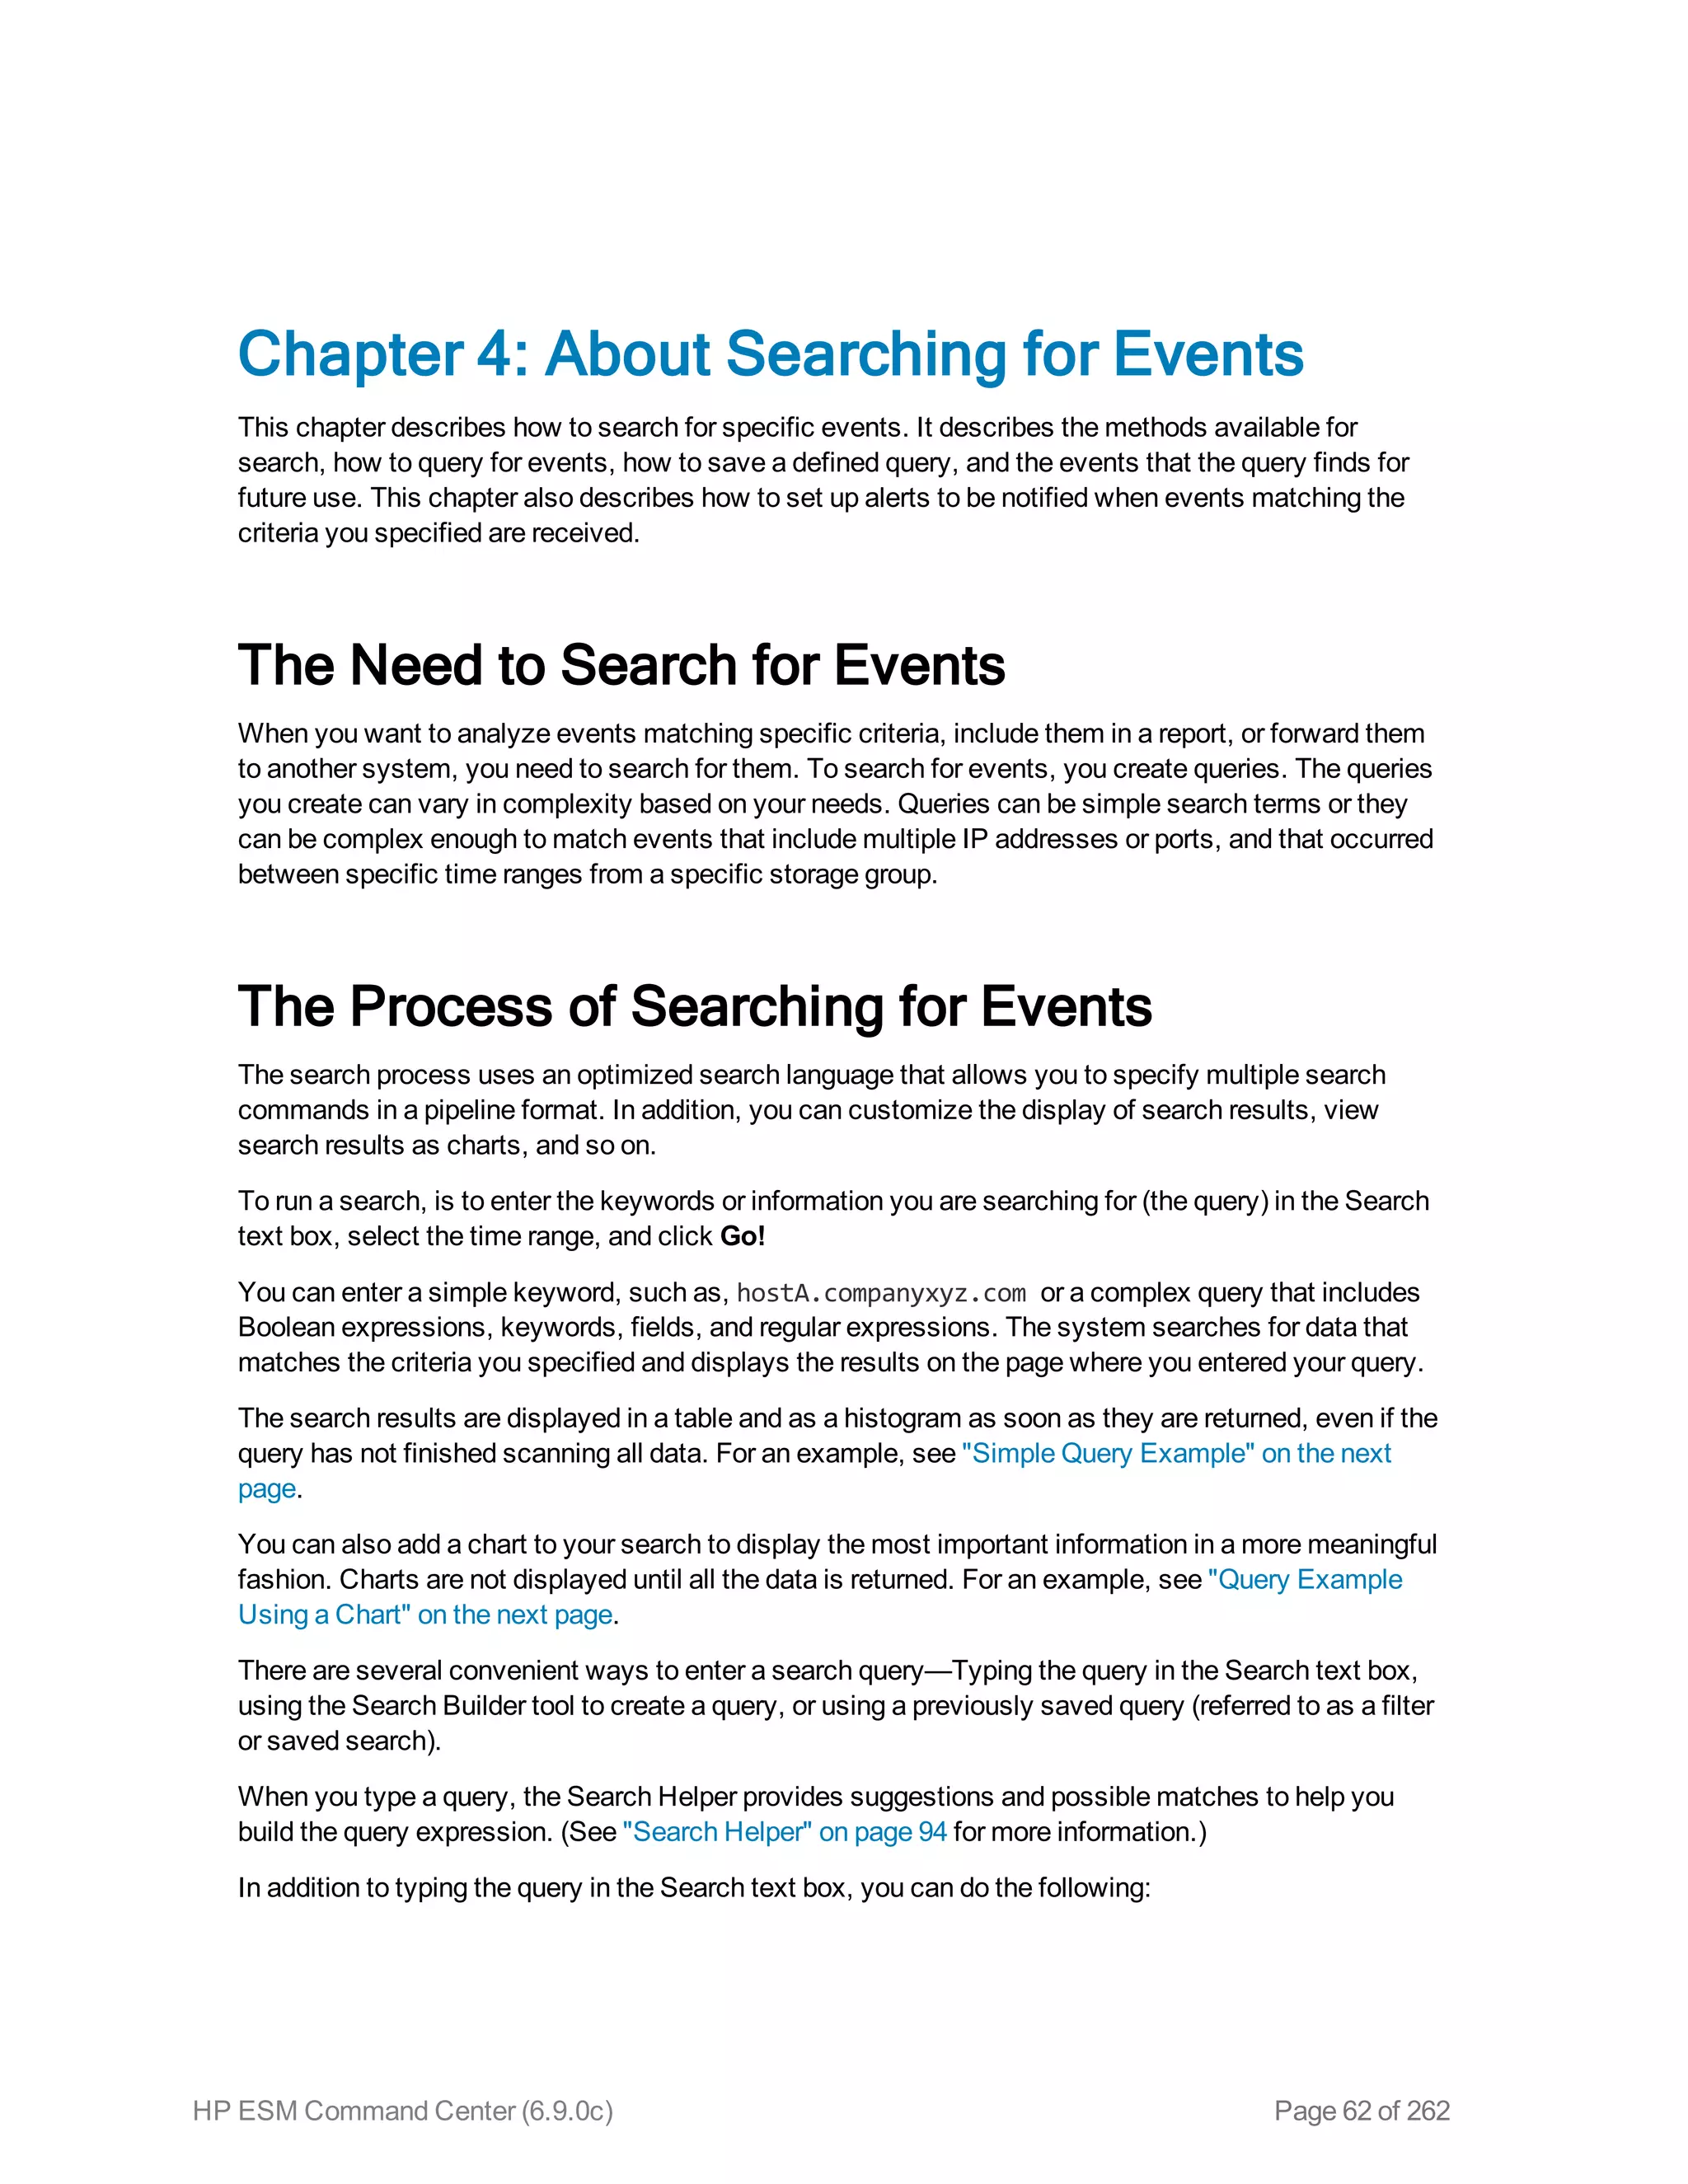
Viewing Events On an Active Channel 30
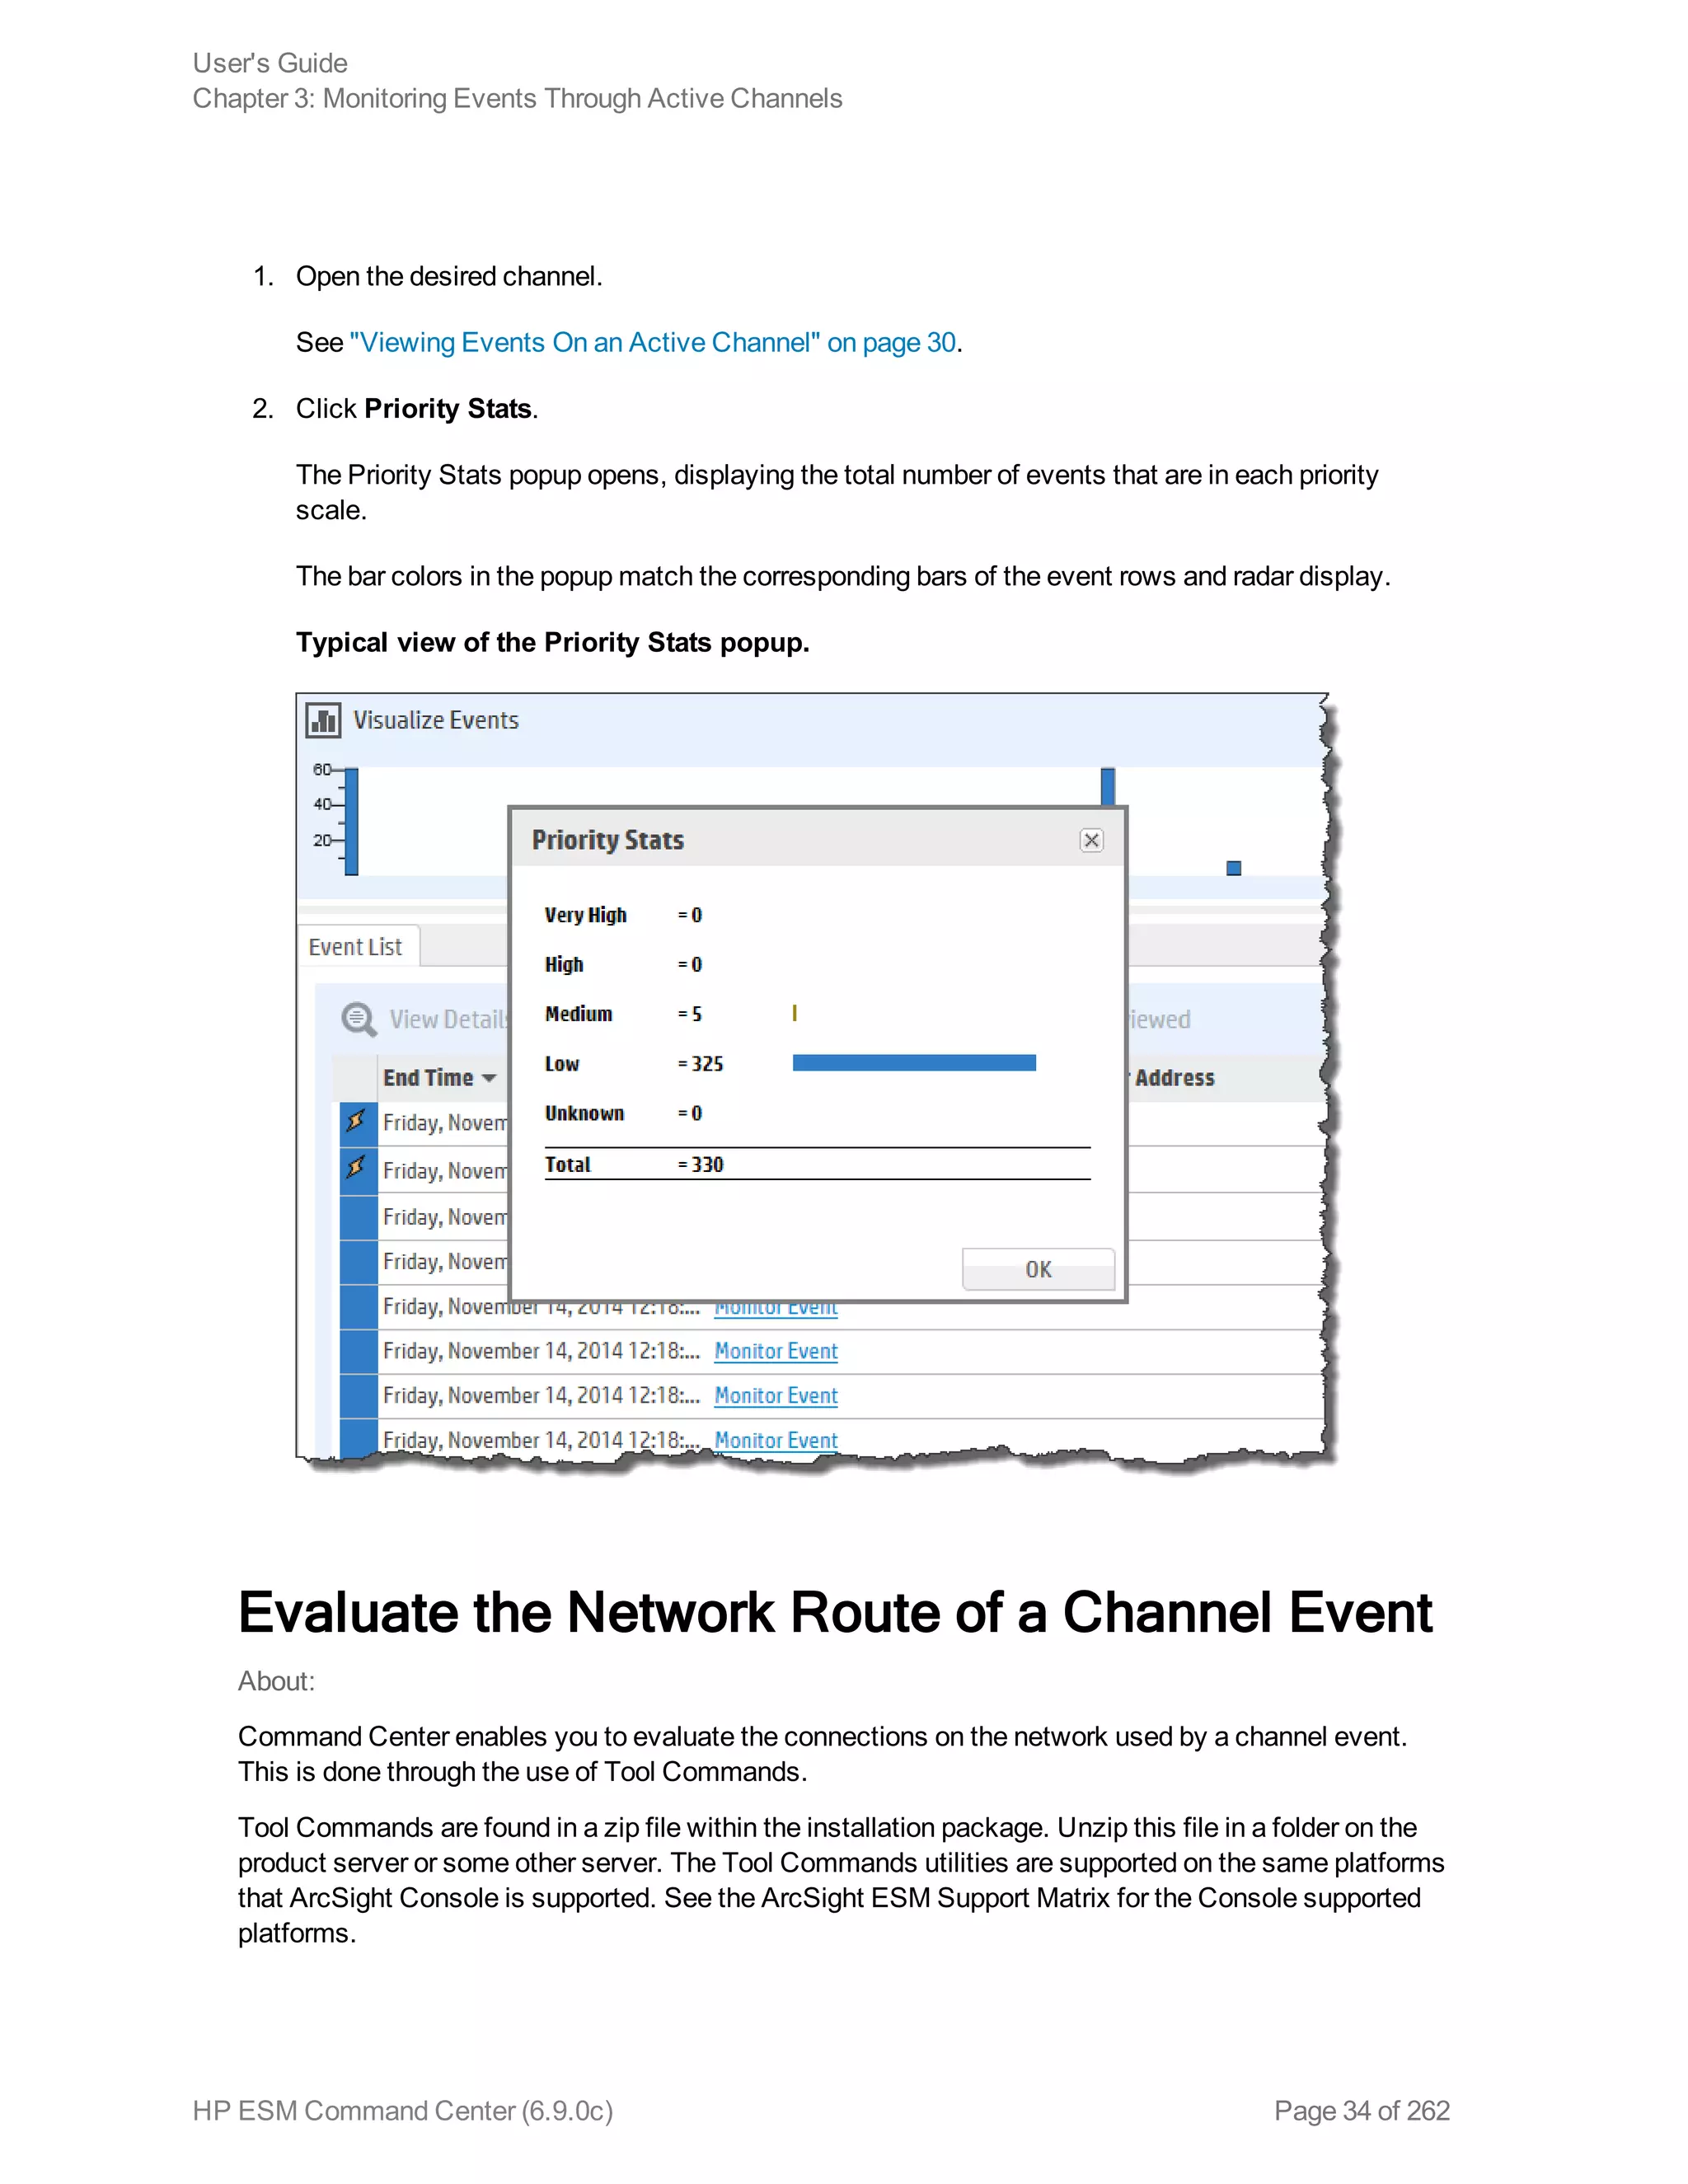
Viewing a Channel Condition Summary 32
Viewing the Event Priority for a Channel 33
Evaluate the Network Route of a Channel Event 34
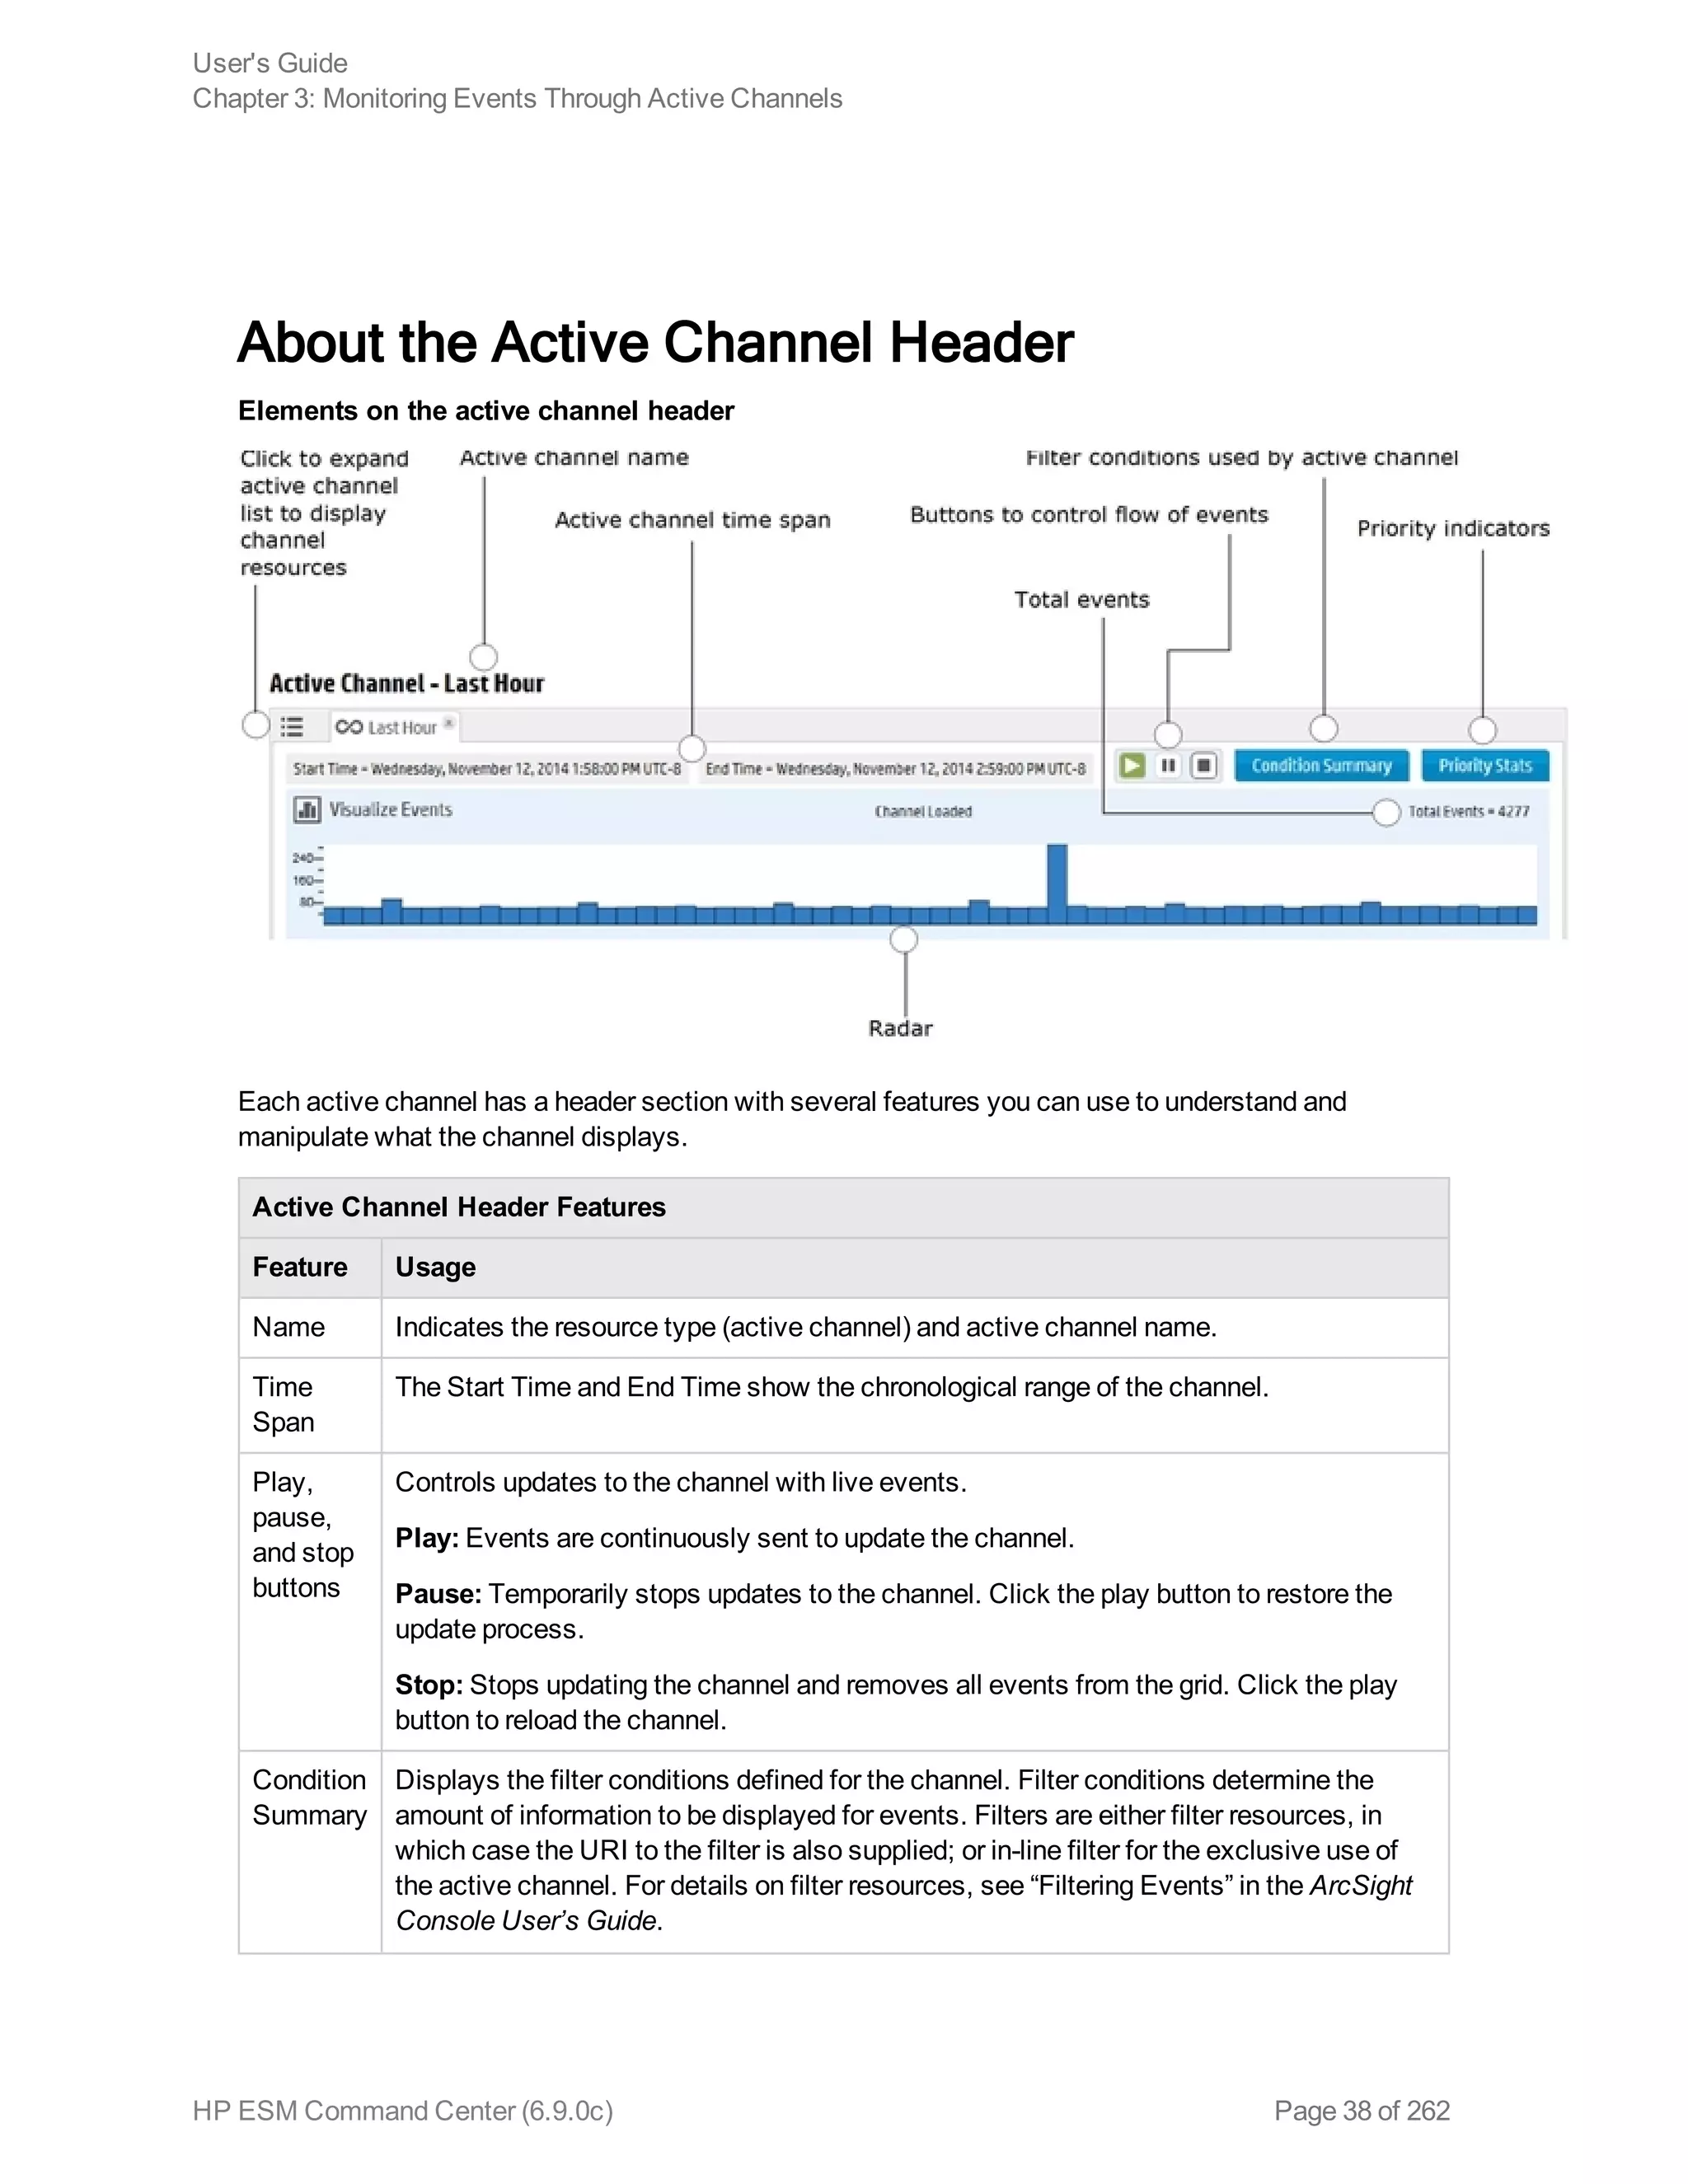
About the Active Channel Header 38
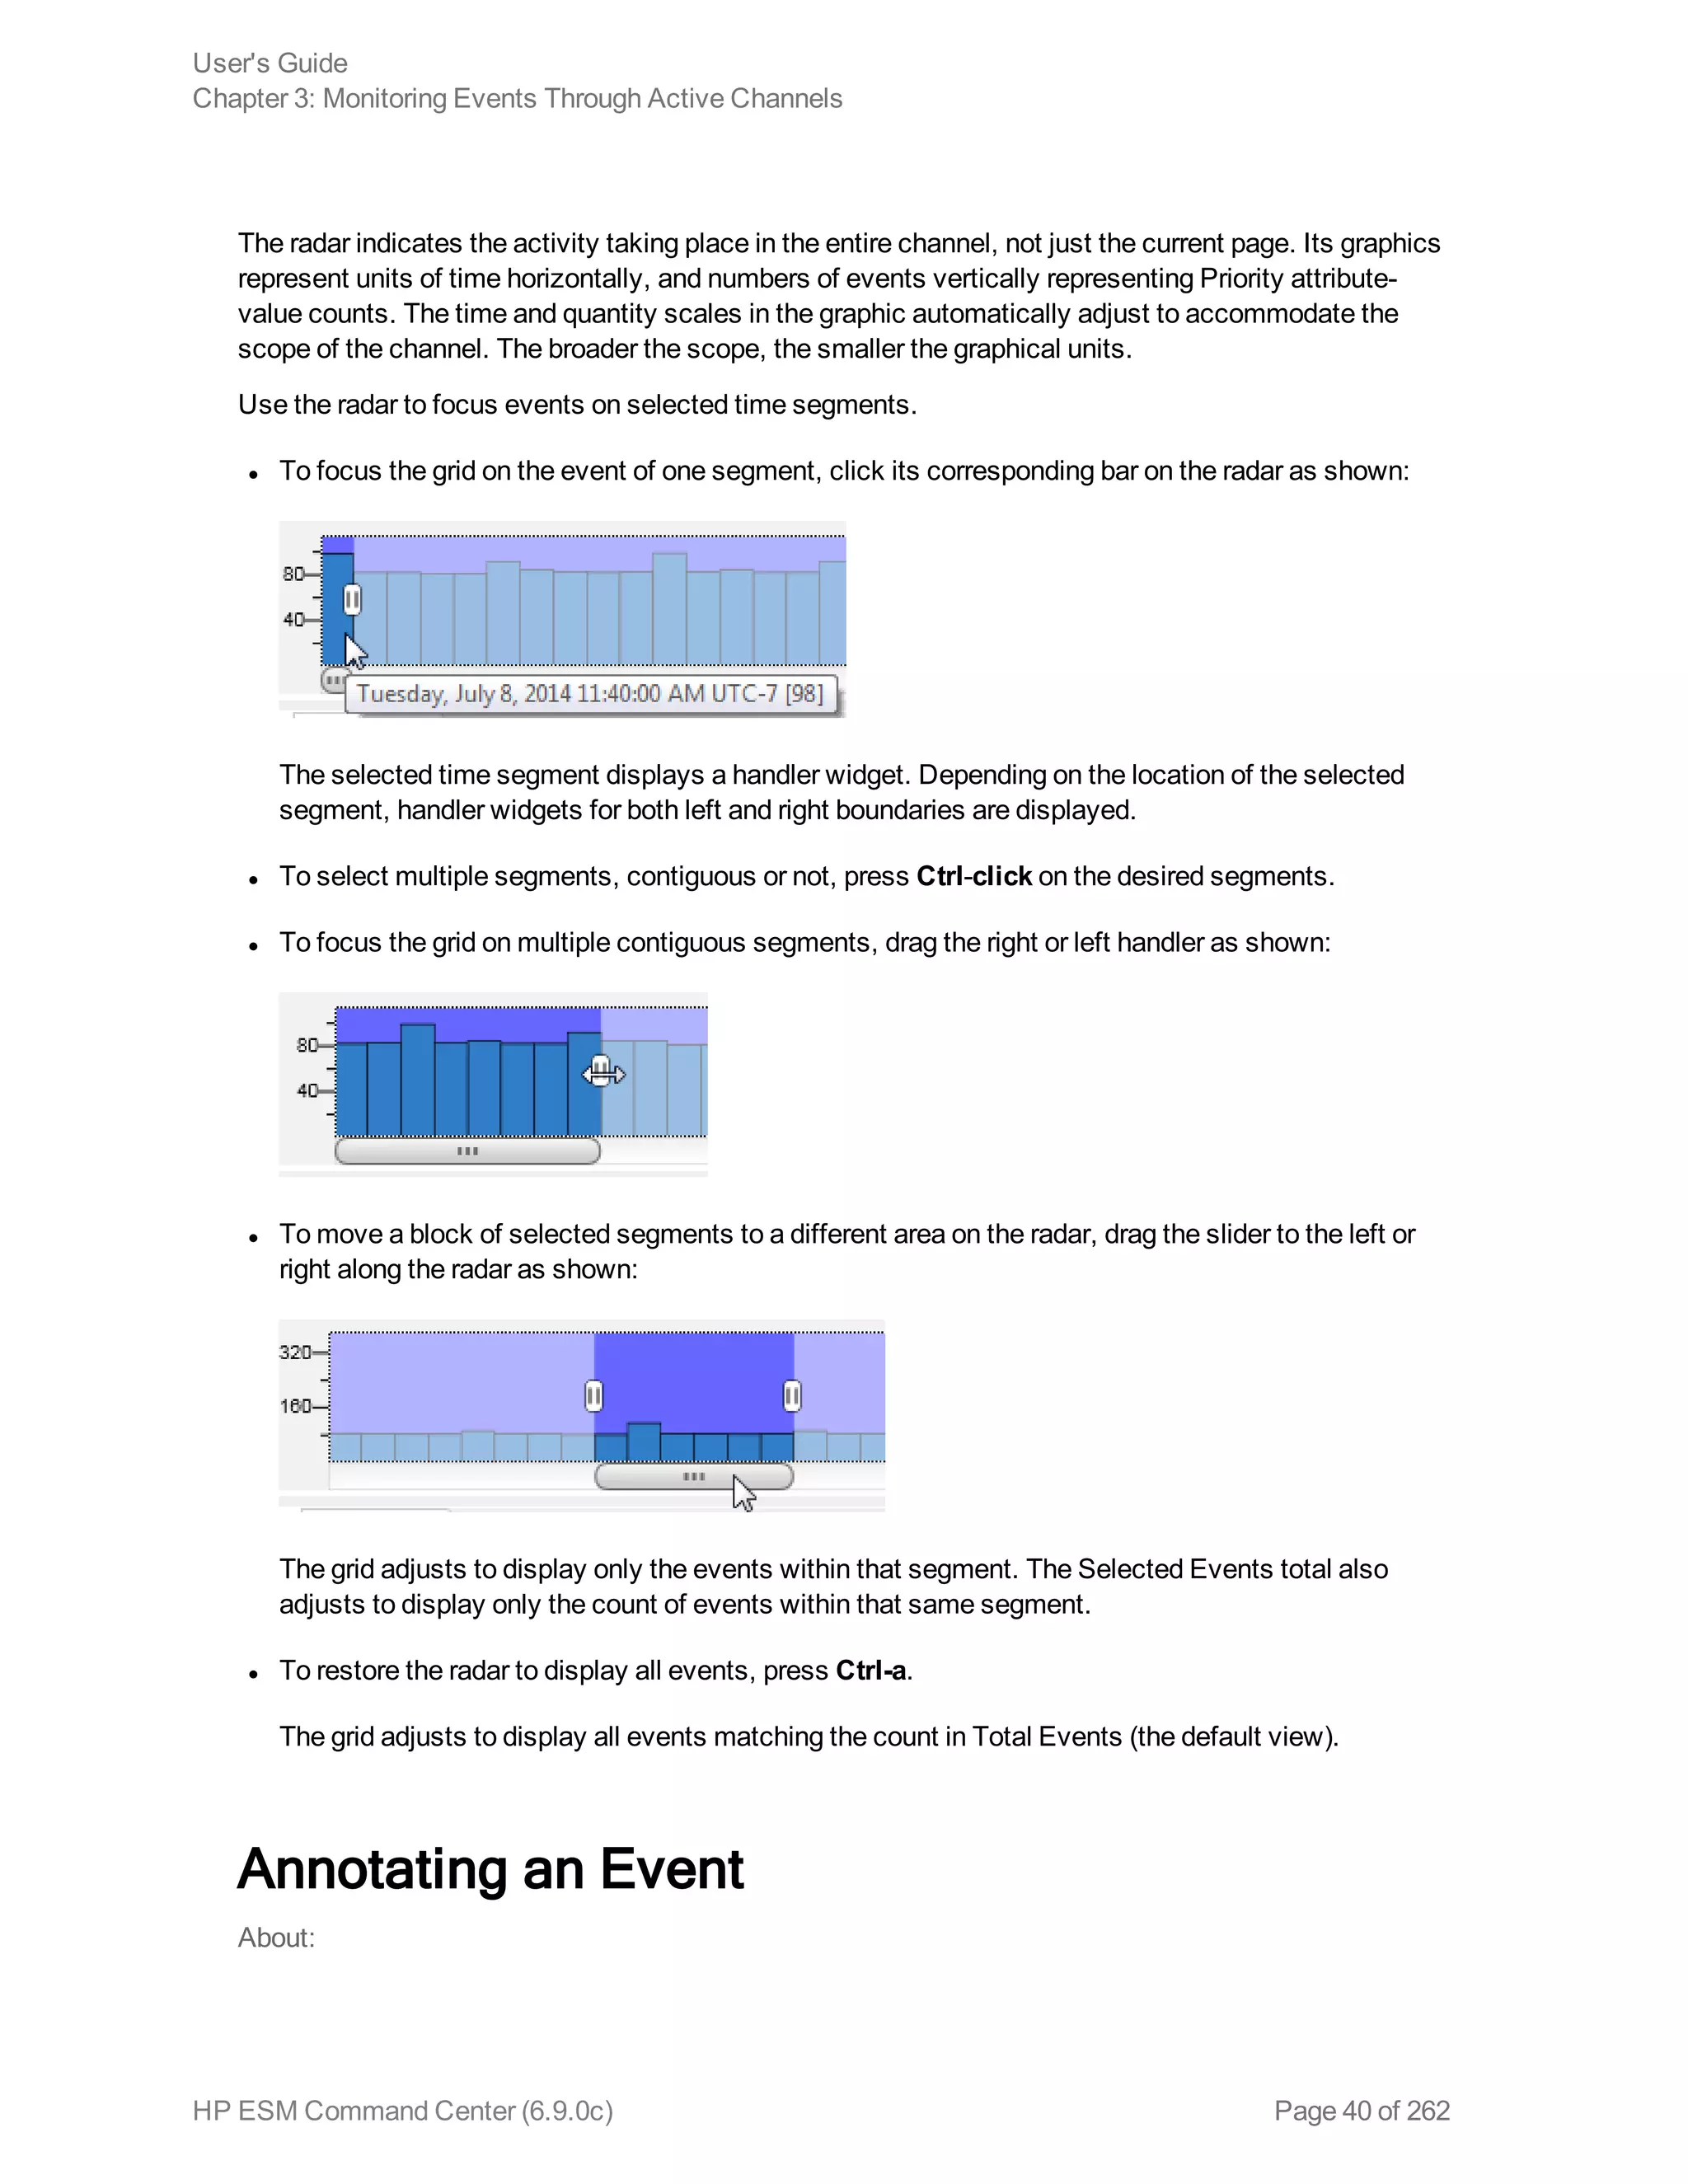
Using the Active Channel Radar 39
HP ESM Command Center (6.9.0c) Page 3 of 262](https://image.slidesharecdn.com/esmcommandcenterguide6-170530061619/75/ESM_CommandCenterGuide_6-9-0-pdf-3-2048.jpg)

![groups and change your password.
n Help
Click Help to get context-sensitive help for the page you are viewing.
The online help for integrated applications such as Risk Insight (if licensed) is separate. The help
for those applications is accessible from the Help link when you view the integrated application
from the Applications tab. Such help has its own appearance and navigation.
Hover over the Help link to see a list of options.
n What’s New — displays the online help system open to a list of new features in this release.
n Documentation — displays the main online documentation page, with a description of each book
and a table of contents in the left panel.
The online documentation navigation and controls are described in the online help itself, under
“FAQs About Online Help.”
n Online Support — takes you to the HP online support web site in a separate window.
n About — displays the current ESM product version number.
n Logout
Log out of the current session and display the login dialog. You can log in again or browse
elsewhere. If you leave the client idle for a period of time, you may need to log in again because of
an automatic security time-out.
l Stats: Displays Traffic Volume metrics as Events per Second and GB data per day.
l Site Map: Provides a mechanism to access ACC primary landing pages using keyboard-navigation
only.
To access any ESM document as an Adobe Acrobat PDF document, go to https://protect724.hp.com.
Using the Site Map
The Site Map link provides a mechanism to access ACC pages using keyboard-navigation only. The
Site Map link opens the Site Map page which displays a list of links to the primary landing pages in the
ESM Command Center.
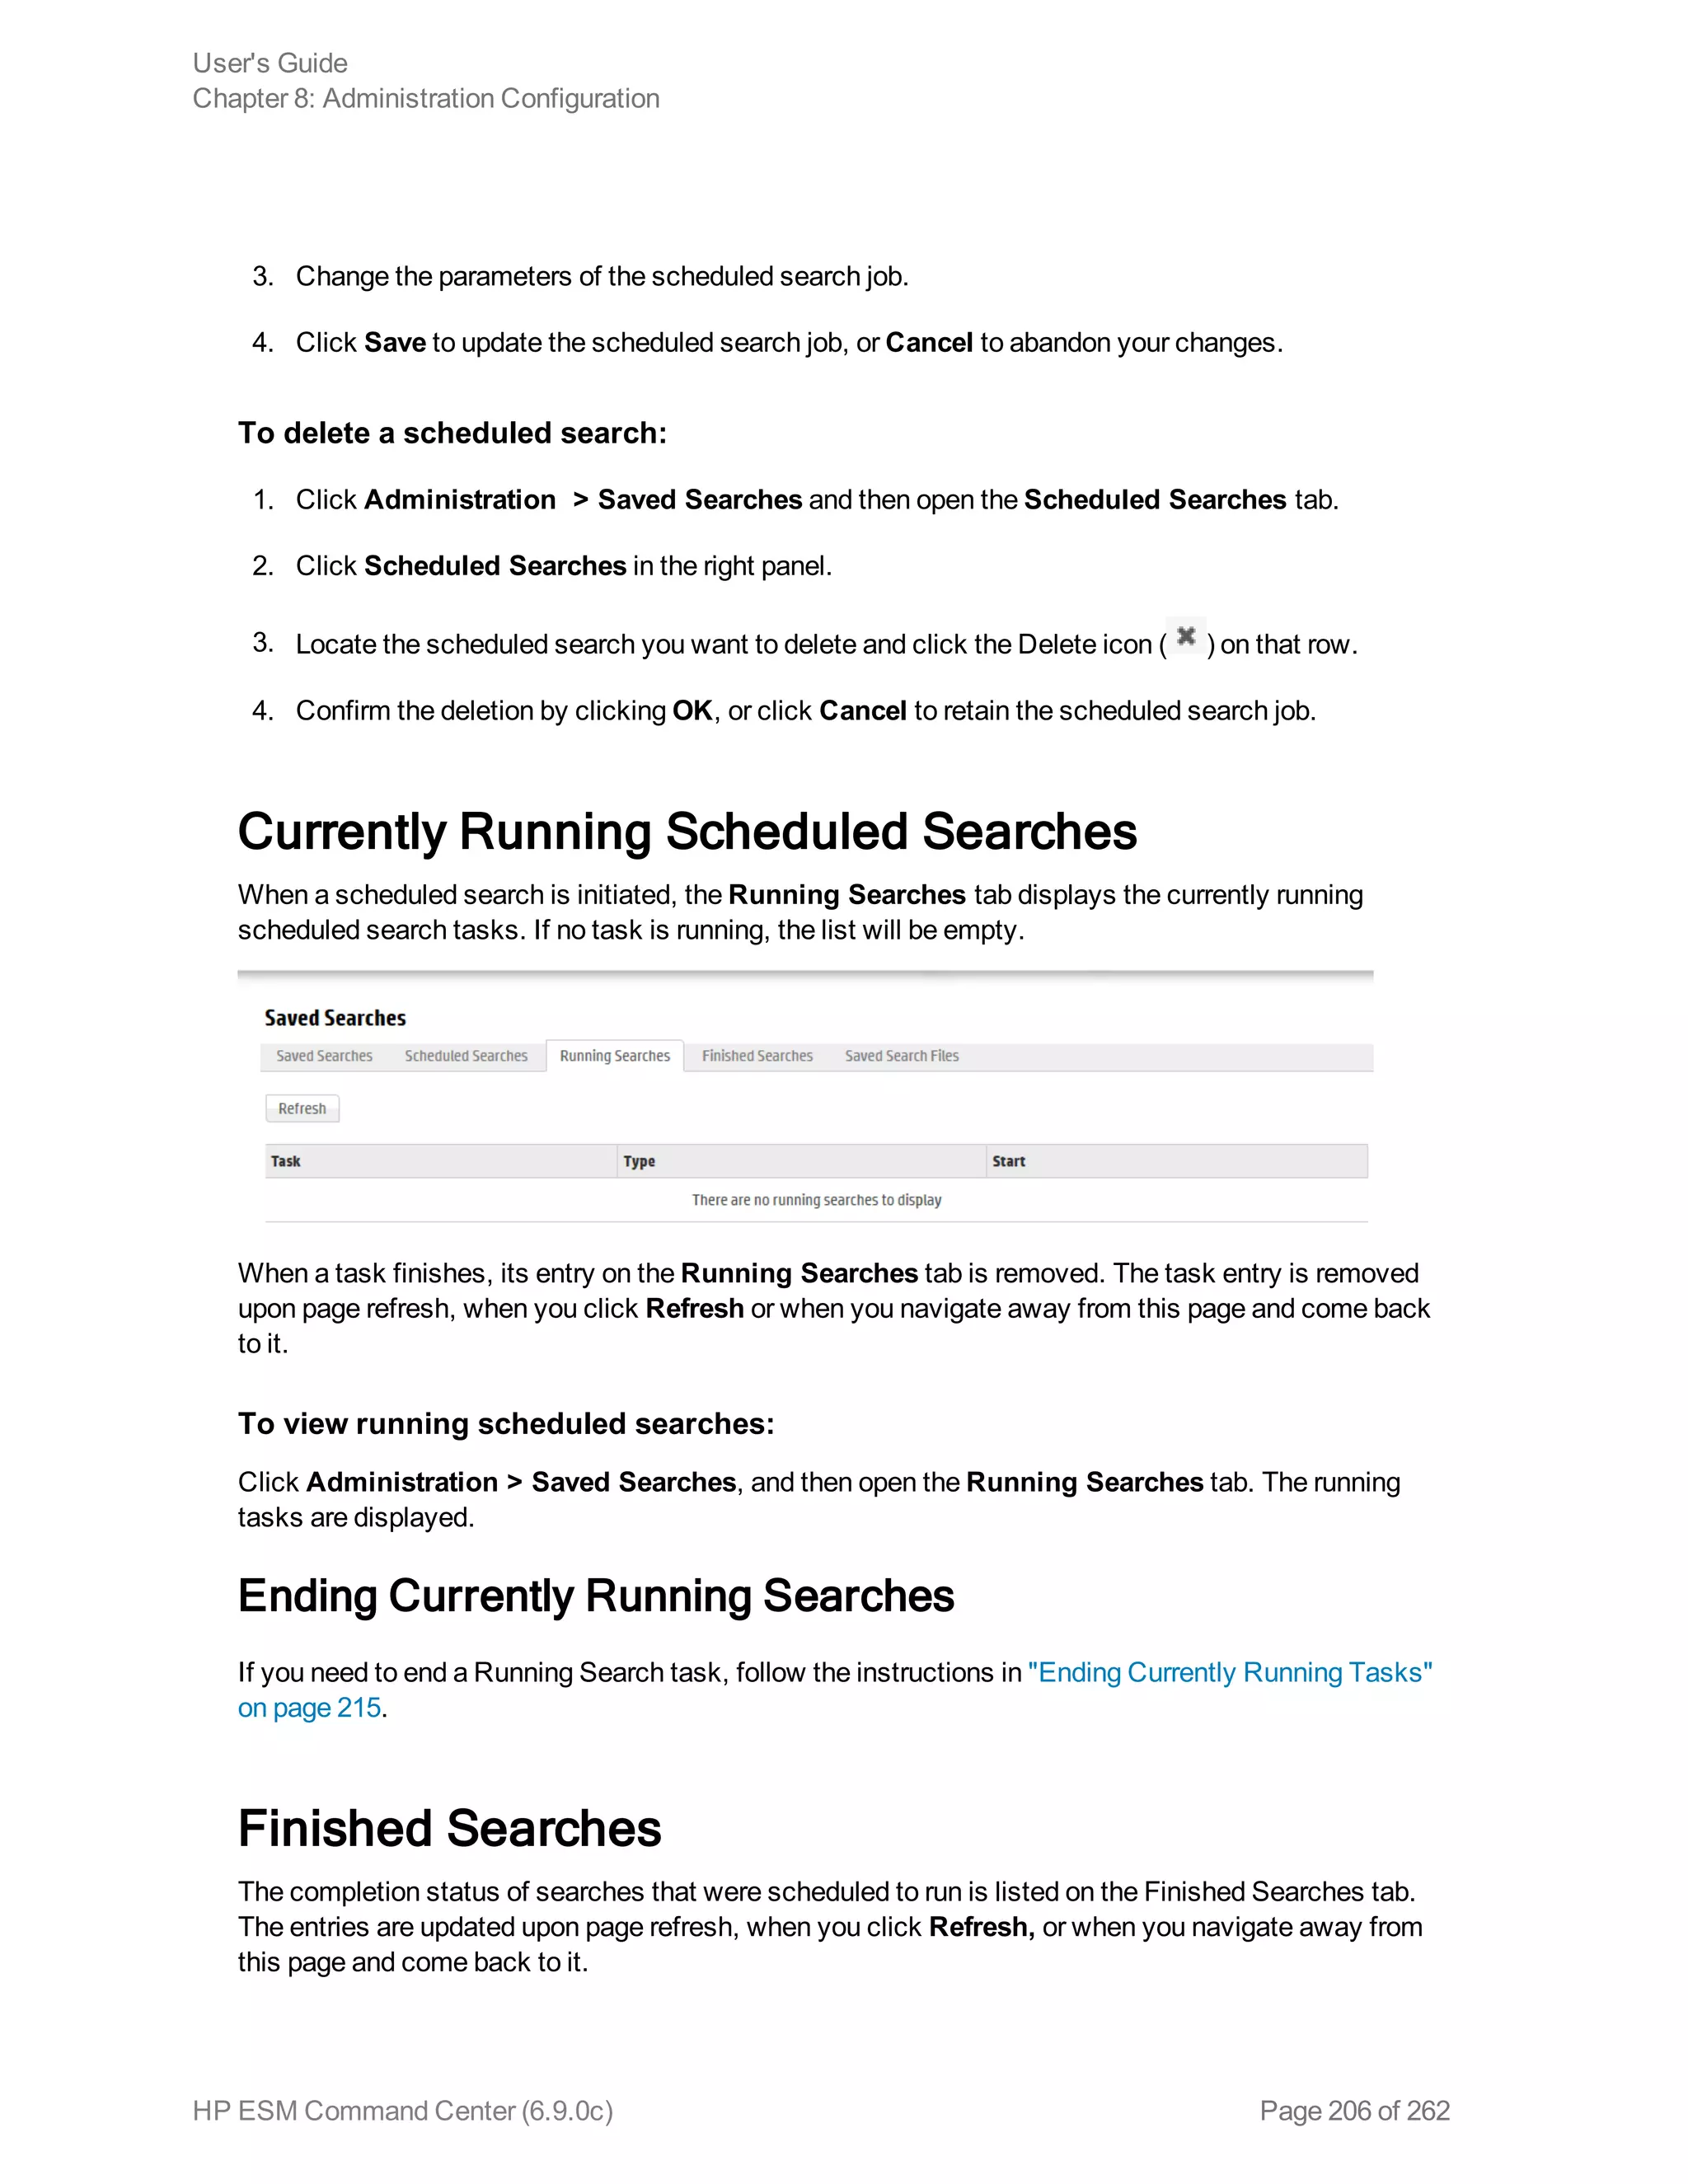
Monitoring Traffic Volume [BETA Feature]
NOTE: The capability provided in this release is a Beta version of the traffic volume metrics
feature.
User's Guide
Chapter 1: Introduction
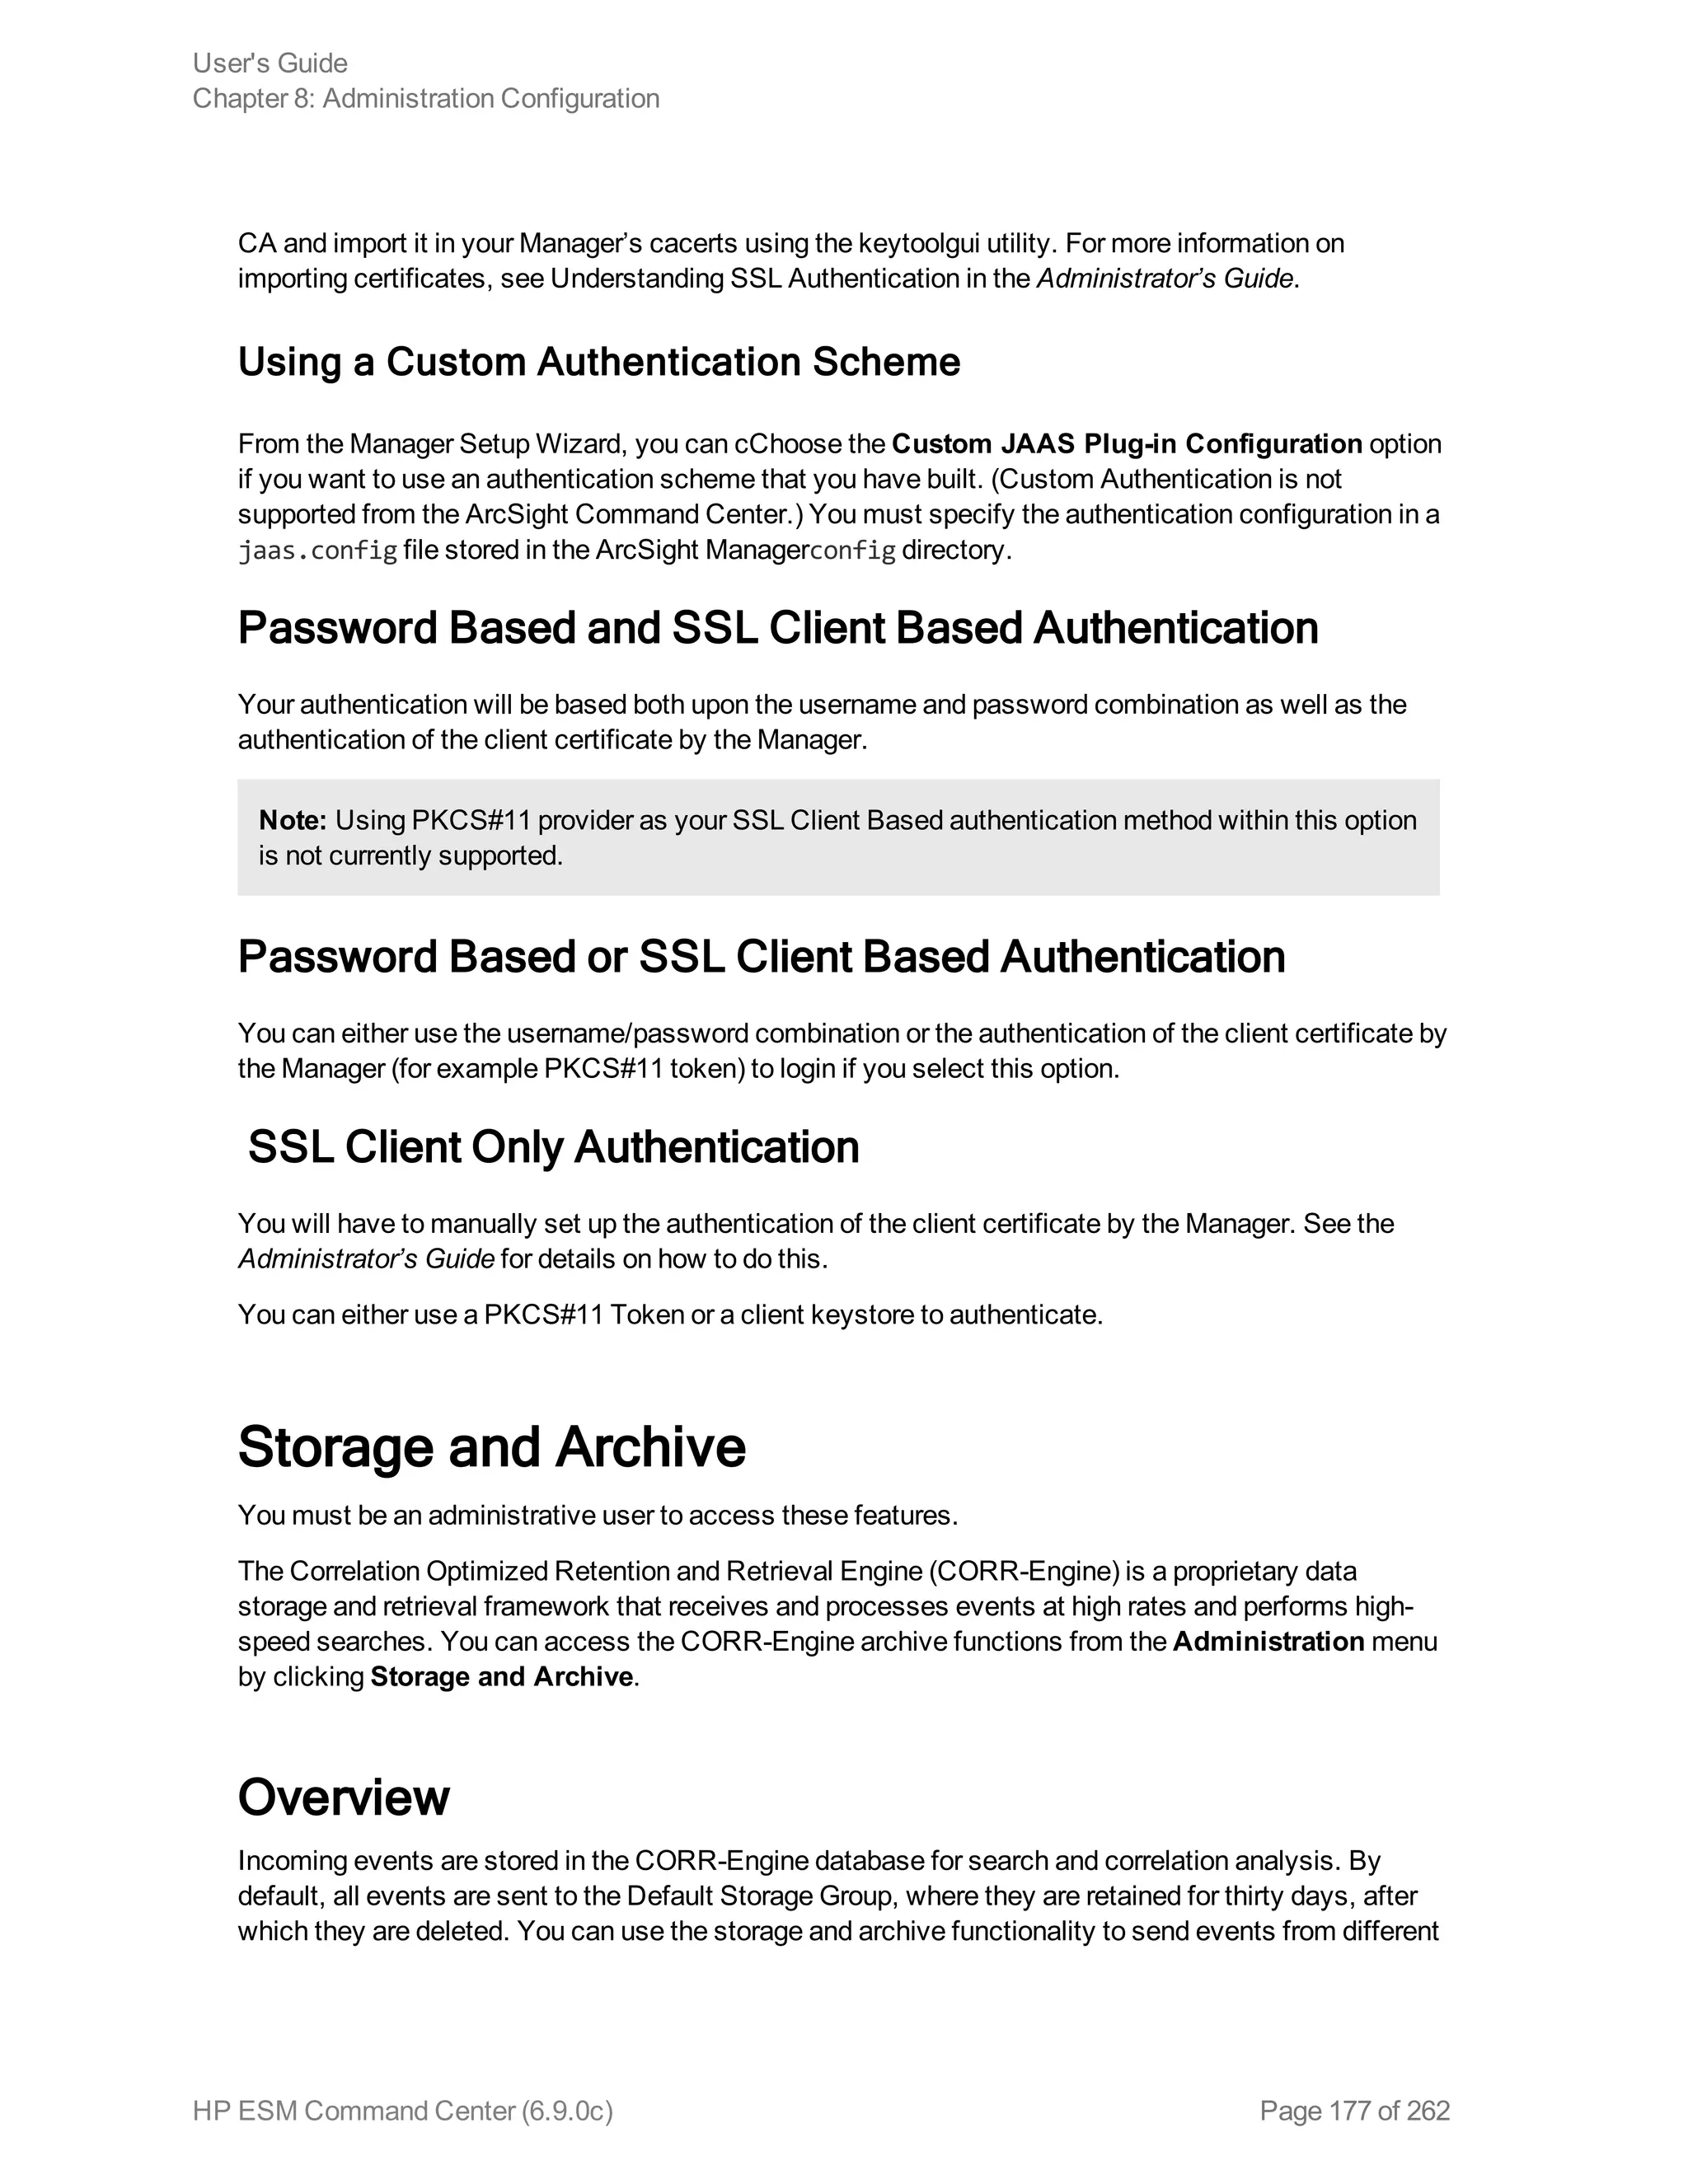
HP ESM Command Center (6.9.0c) Page 13 of 262](https://image.slidesharecdn.com/esmcommandcenterguide6-170530061619/75/ESM_CommandCenterGuide_6-9-0-pdf-13-2048.jpg)


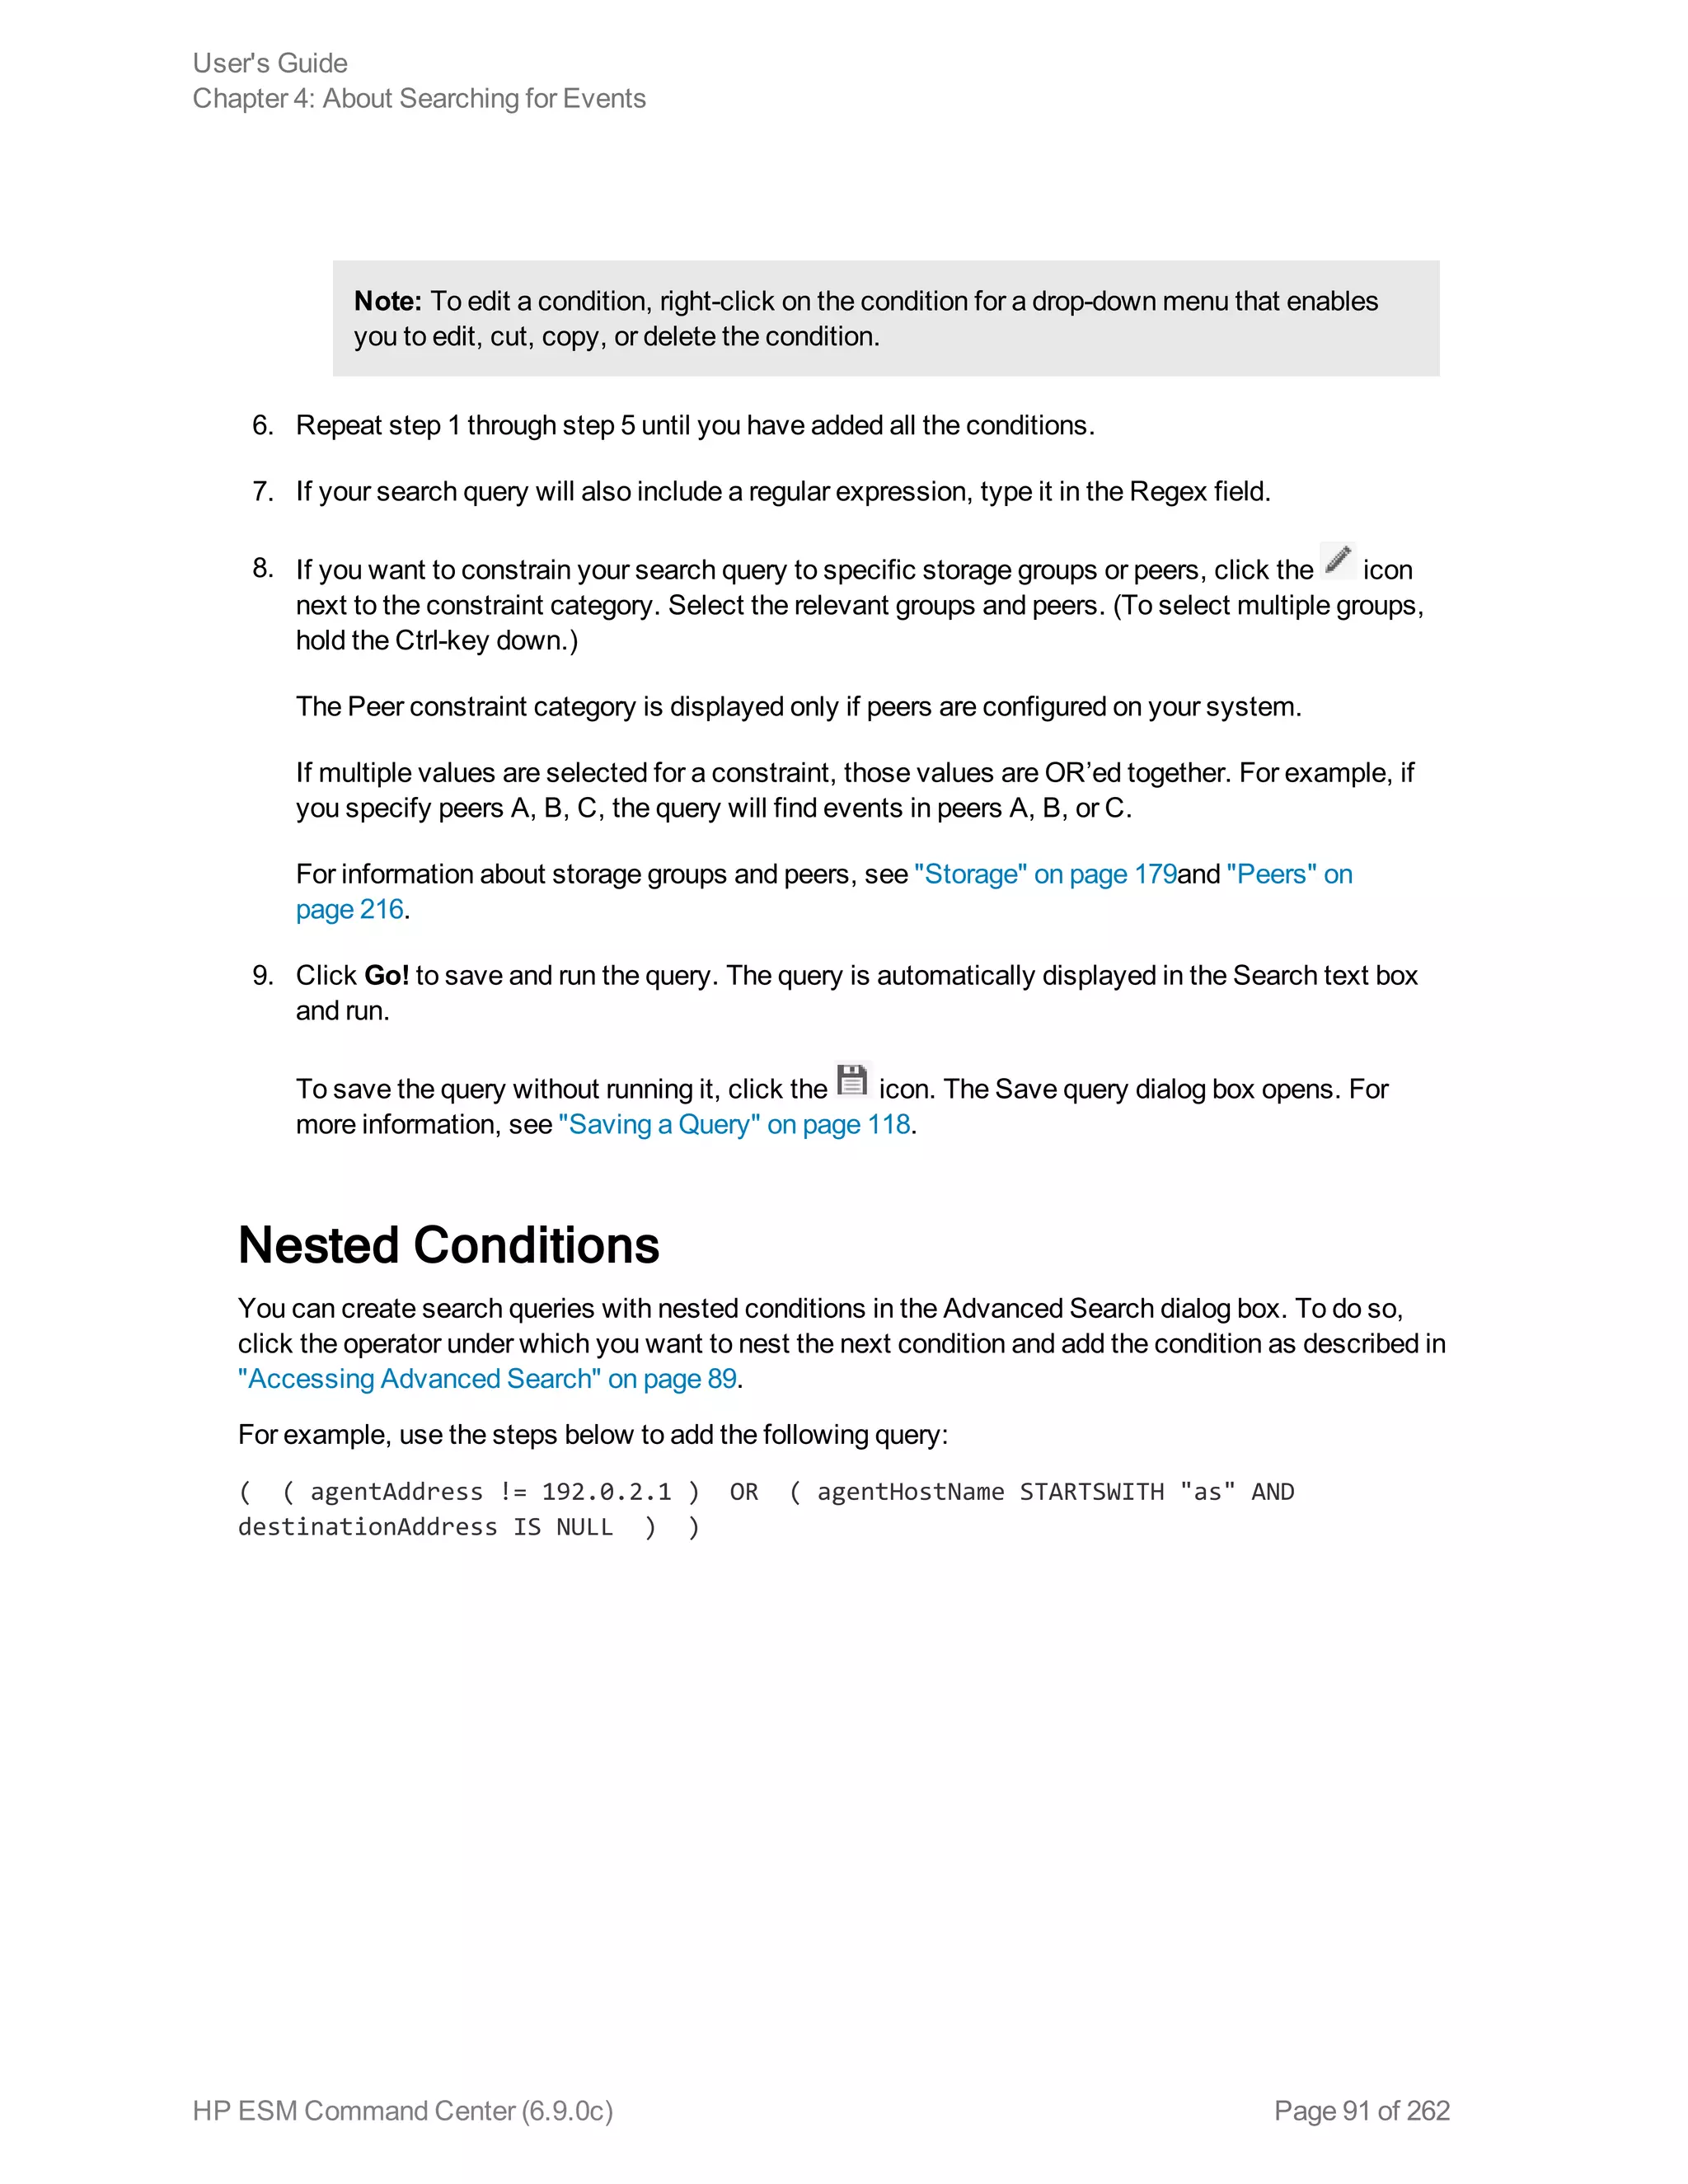
![the channel in the "[user]'s Active Channel" folder, by default. NOTE: The [user] value is the
currently logged in username.
2. Do one of the following:
n Click New.
The New Channel popup opens.
n From the channel table, select the desired channel without clicking the Display Name link, and
then click Edit.
The Edit Channel popup opens.
3. Click Configure Filter.
The Common Conditions Editor (CCE) opens in the lower half of the popup, where you specify the
conditions for the channel filter. You can refine your view of a channel to show only the events you
want to see. For instance, suppose you have an active channel that includes both system and
non-system events, but you want to see only the non-system events. You can filter out the
system events.
From the CCE, Boolean logic is represented in a user-friendly manner, giving you the ability to
easily create conditions.
Since the filter is created within the channel, the filter works only for the channel.
To edit a Condition in the filter, double-click on the condition. The statement editor will appear in
the popup.
4. From the CCE, add a logical operator from the Logical Operator button area.
You must include an Operator if you create two or more condition statements in the filter. An
Operator is not required if the filter contains one condition statement only. Use the AND, OR, and
NOT operators to define the full condition statement.
Logical
Operator Name Use
{} New Event
Definition
Creates a new condition tree.
& AND The new condition has to occur in addition to existing
conditions.
User's Guide
Chapter 3: Monitoring Events Through Active Channels
HP ESM Command Center (6.9.0c) Page 49 of 262](https://image.slidesharecdn.com/esmcommandcenterguide6-170530061619/75/ESM_CommandCenterGuide_6-9-0-pdf-49-2048.jpg)

![A new view that is a subset of the main active channel is created. Note that the total events count
is less than the parent channel’s total.
Option Use
Create Channel
[attribute=value]
Show only those events in which the selected attribute matches the
value in the selected event.
Create Channel
[attribute!=value]
Show only those events in which the selected attribute does not match
the value in the selected event.
Add [attribute=value]
to Channel
Show only those events that match both the prior and new filter
elements.
Add [attribute!=value]
to Channel
Show only those events that do not match both the prior and new filter
elements.
4. To save the new channel, click Save As and do one the following in the Save Channel As dialog:
n Accept the default channel location - Specify the channel name and accept “admin’s Active
Channels” in the Location drop-down.
n Specify an alternate channel location - Specify the channel name, click the Location drop-
down and then make the appropriate selection from the Select popup.
Note: If you choose a folder that has a parent, you must first select the parent folder from
the left folder navigation and then select the child folder from the "Display Name" column.
Direct selection of a child folder is not supported. This design helps to simplify the
selection of a child folder that is multiple levels deep in a folder structure.
5. Click OK.
6. To view the new channel in the default folder, or alternative folder that you may have specified,
click the resource tree tab.
See Also:
"Editing an Event Channel" on the next page
"Creating an Event Channel" on page 45
User's Guide
Chapter 3: Monitoring Events Through Active Channels
HP ESM Command Center (6.9.0c) Page 54 of 262](https://image.slidesharecdn.com/esmcommandcenterguide6-170530061619/75/ESM_CommandCenterGuide_6-9-0-pdf-54-2048.jpg)


![Character Usage
Space
Tab
Newline
,
;
(
)
[
]
{
}
“
|
*
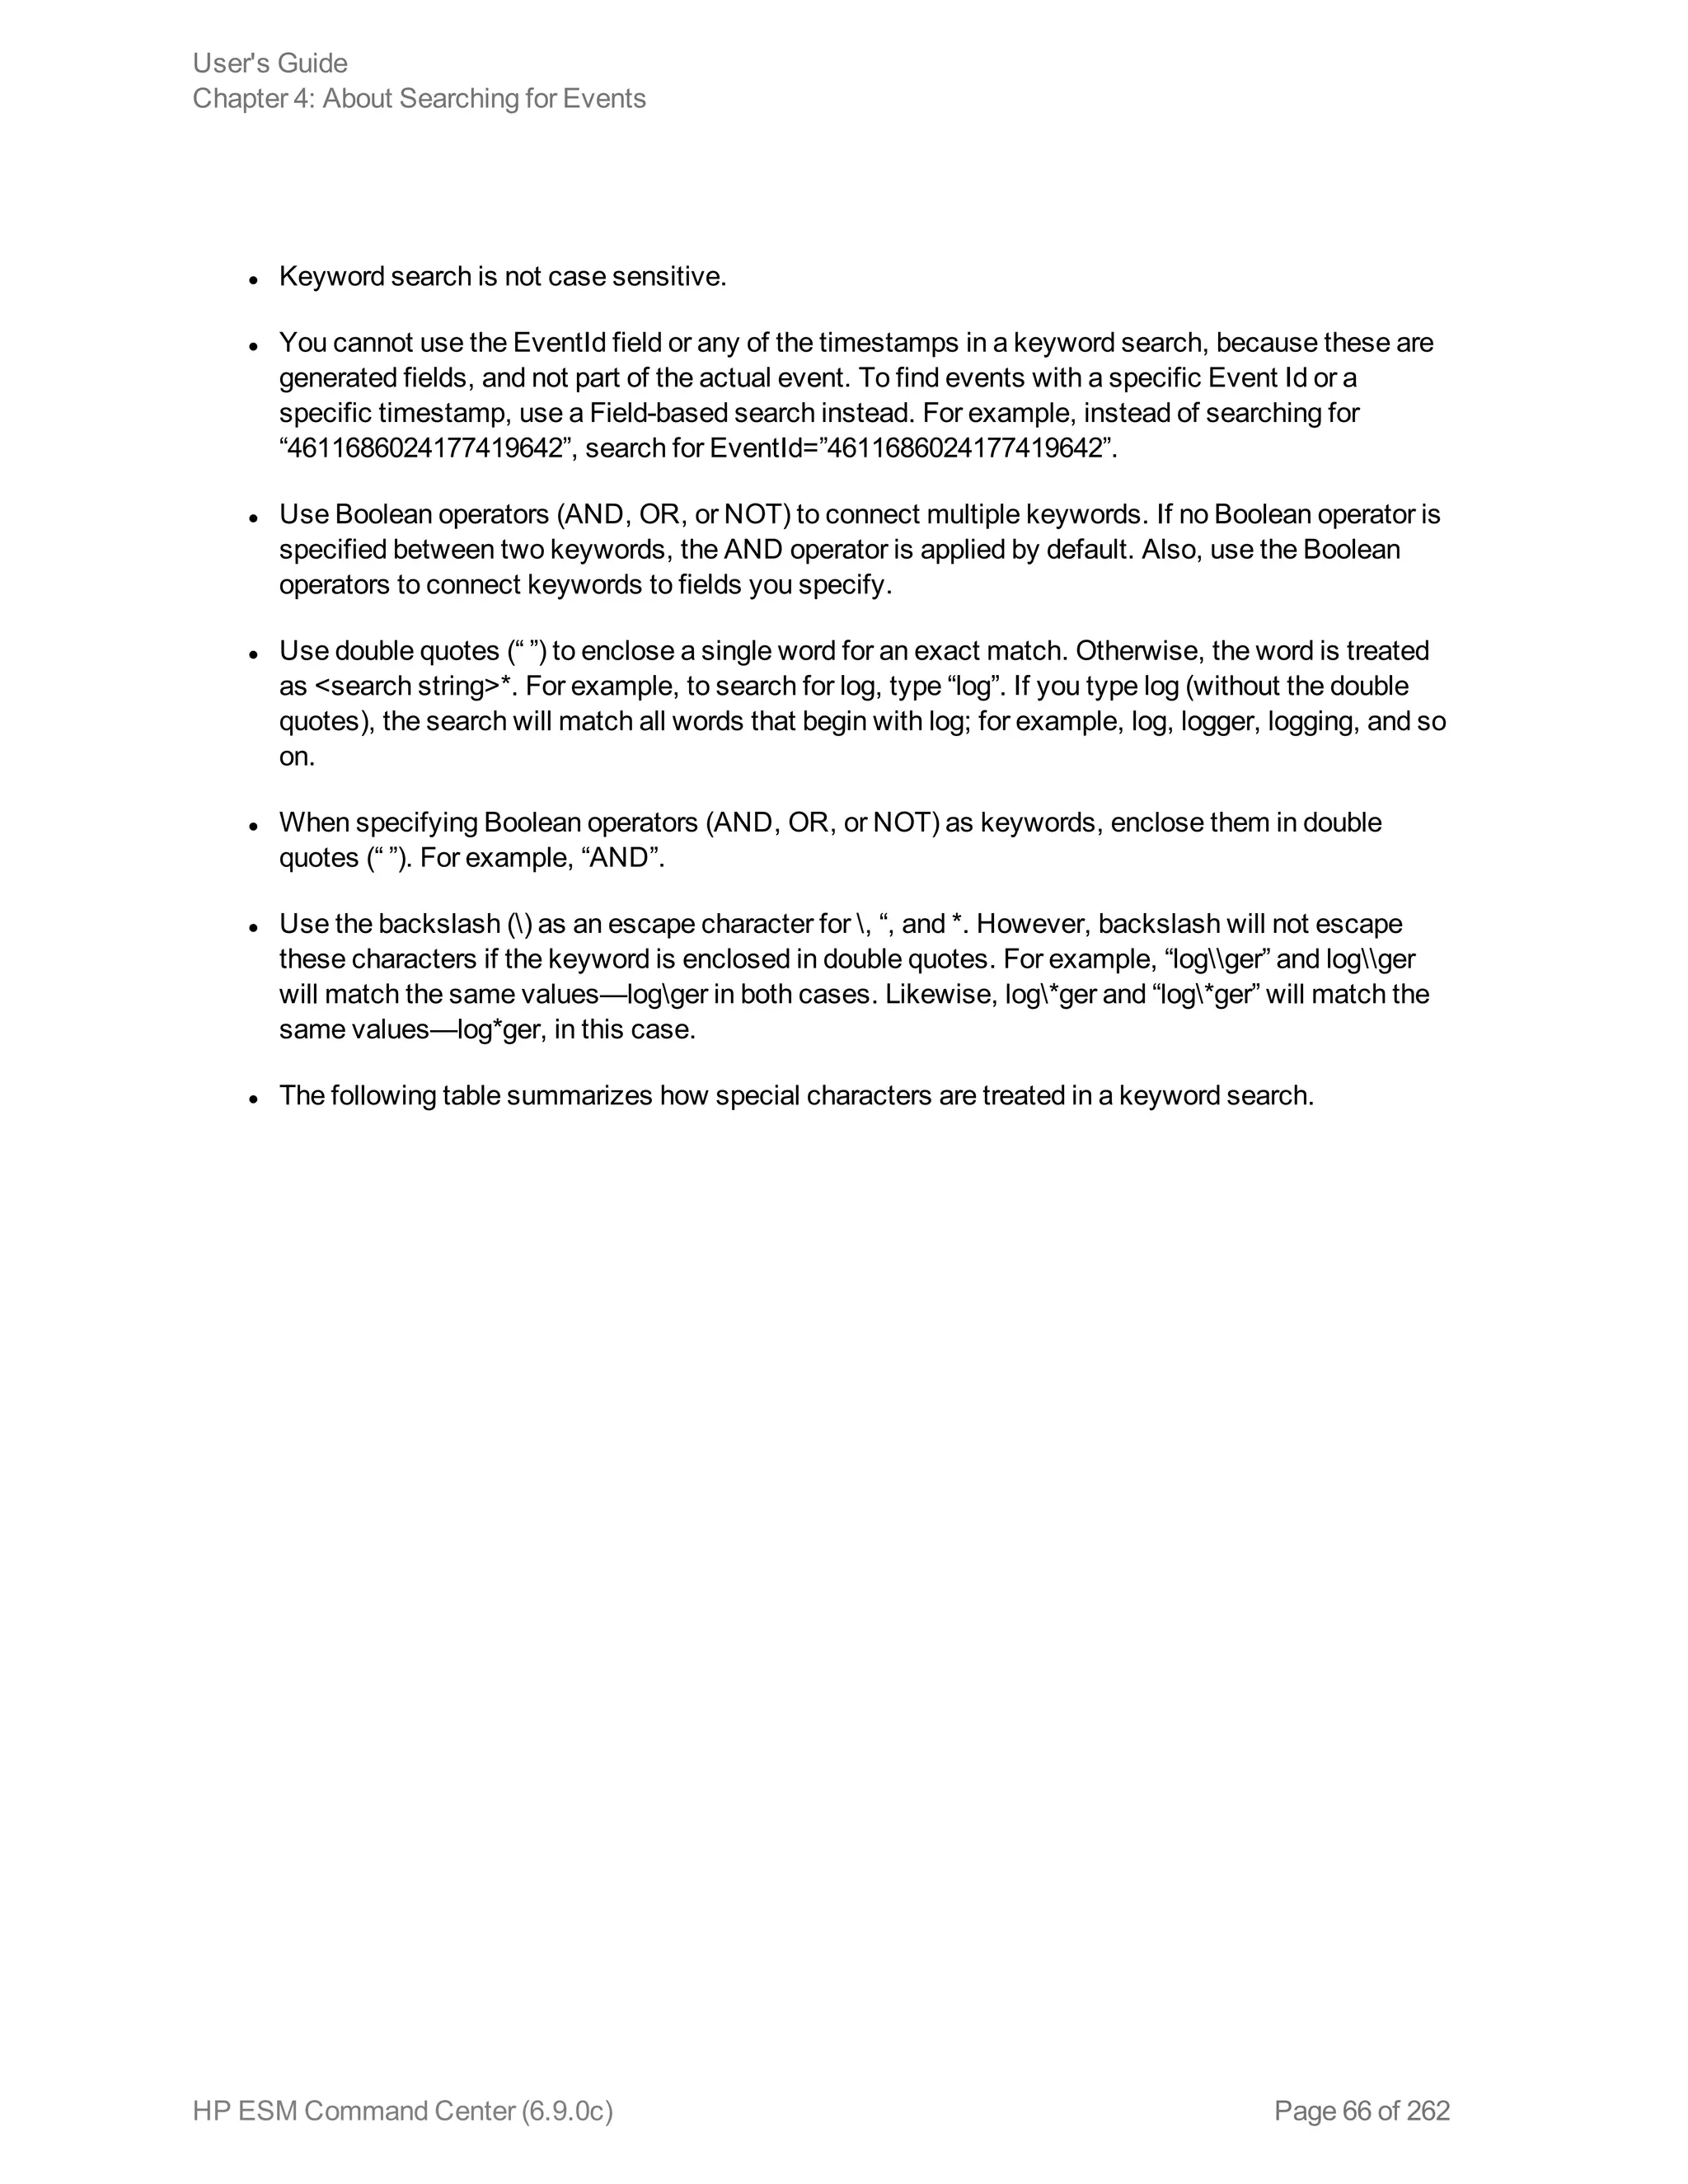
You cannot specify keywords that contain the characters in the left column.
Therefore, to search for a phrase such as failed login, enter “failed” AND
“login”.
Note: * is a valid character for wildcard character searches.
User's Guide
Chapter 4: About Searching for Events
HP ESM Command Center (6.9.0c) Page 67 of 262](https://image.slidesharecdn.com/esmcommandcenterguide6-170530061619/75/ESM_CommandCenterGuide_6-9-0-pdf-67-2048.jpg)
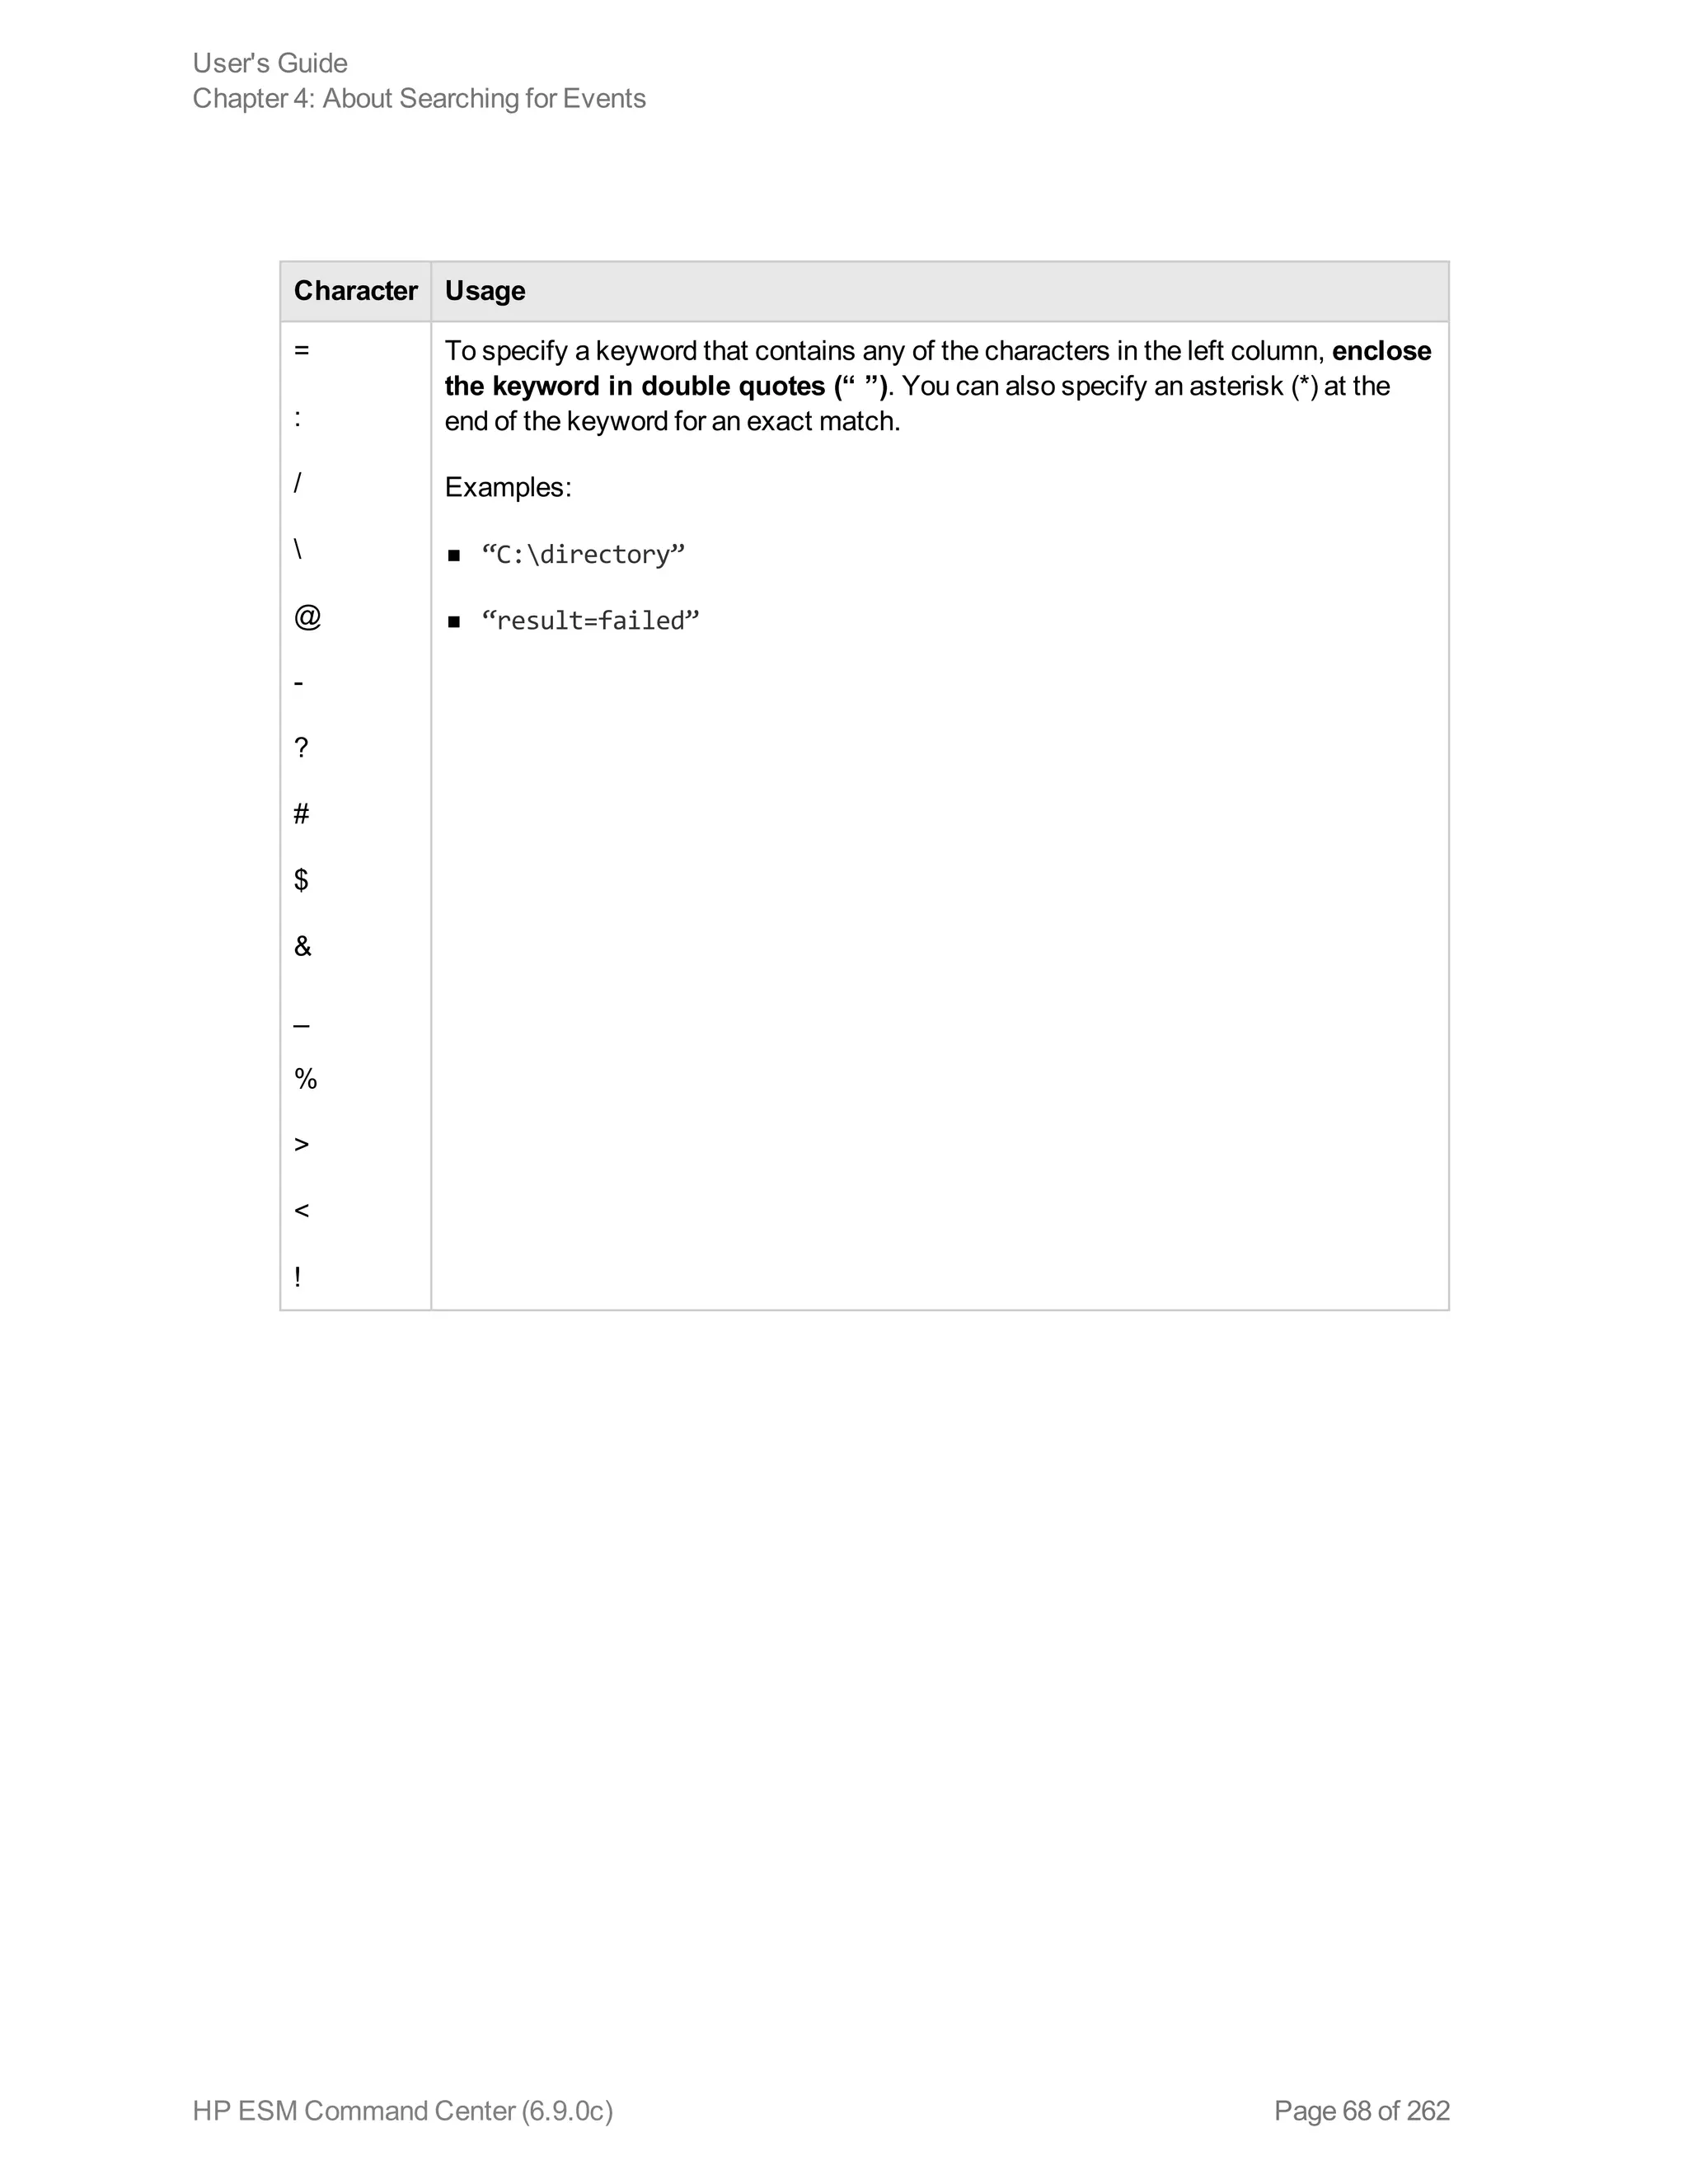
![Character Usage
* You can use the wildcard character asterisk (*) to search for keywords, however, the
wildcard cannot be the leading character in the keyword. Therefore, the following
usage is valid:
n log*
n "log*"
n log*
n log*
n log*app
n log*app*app
However, the following usage is not valid:
n *log
n *log*app*
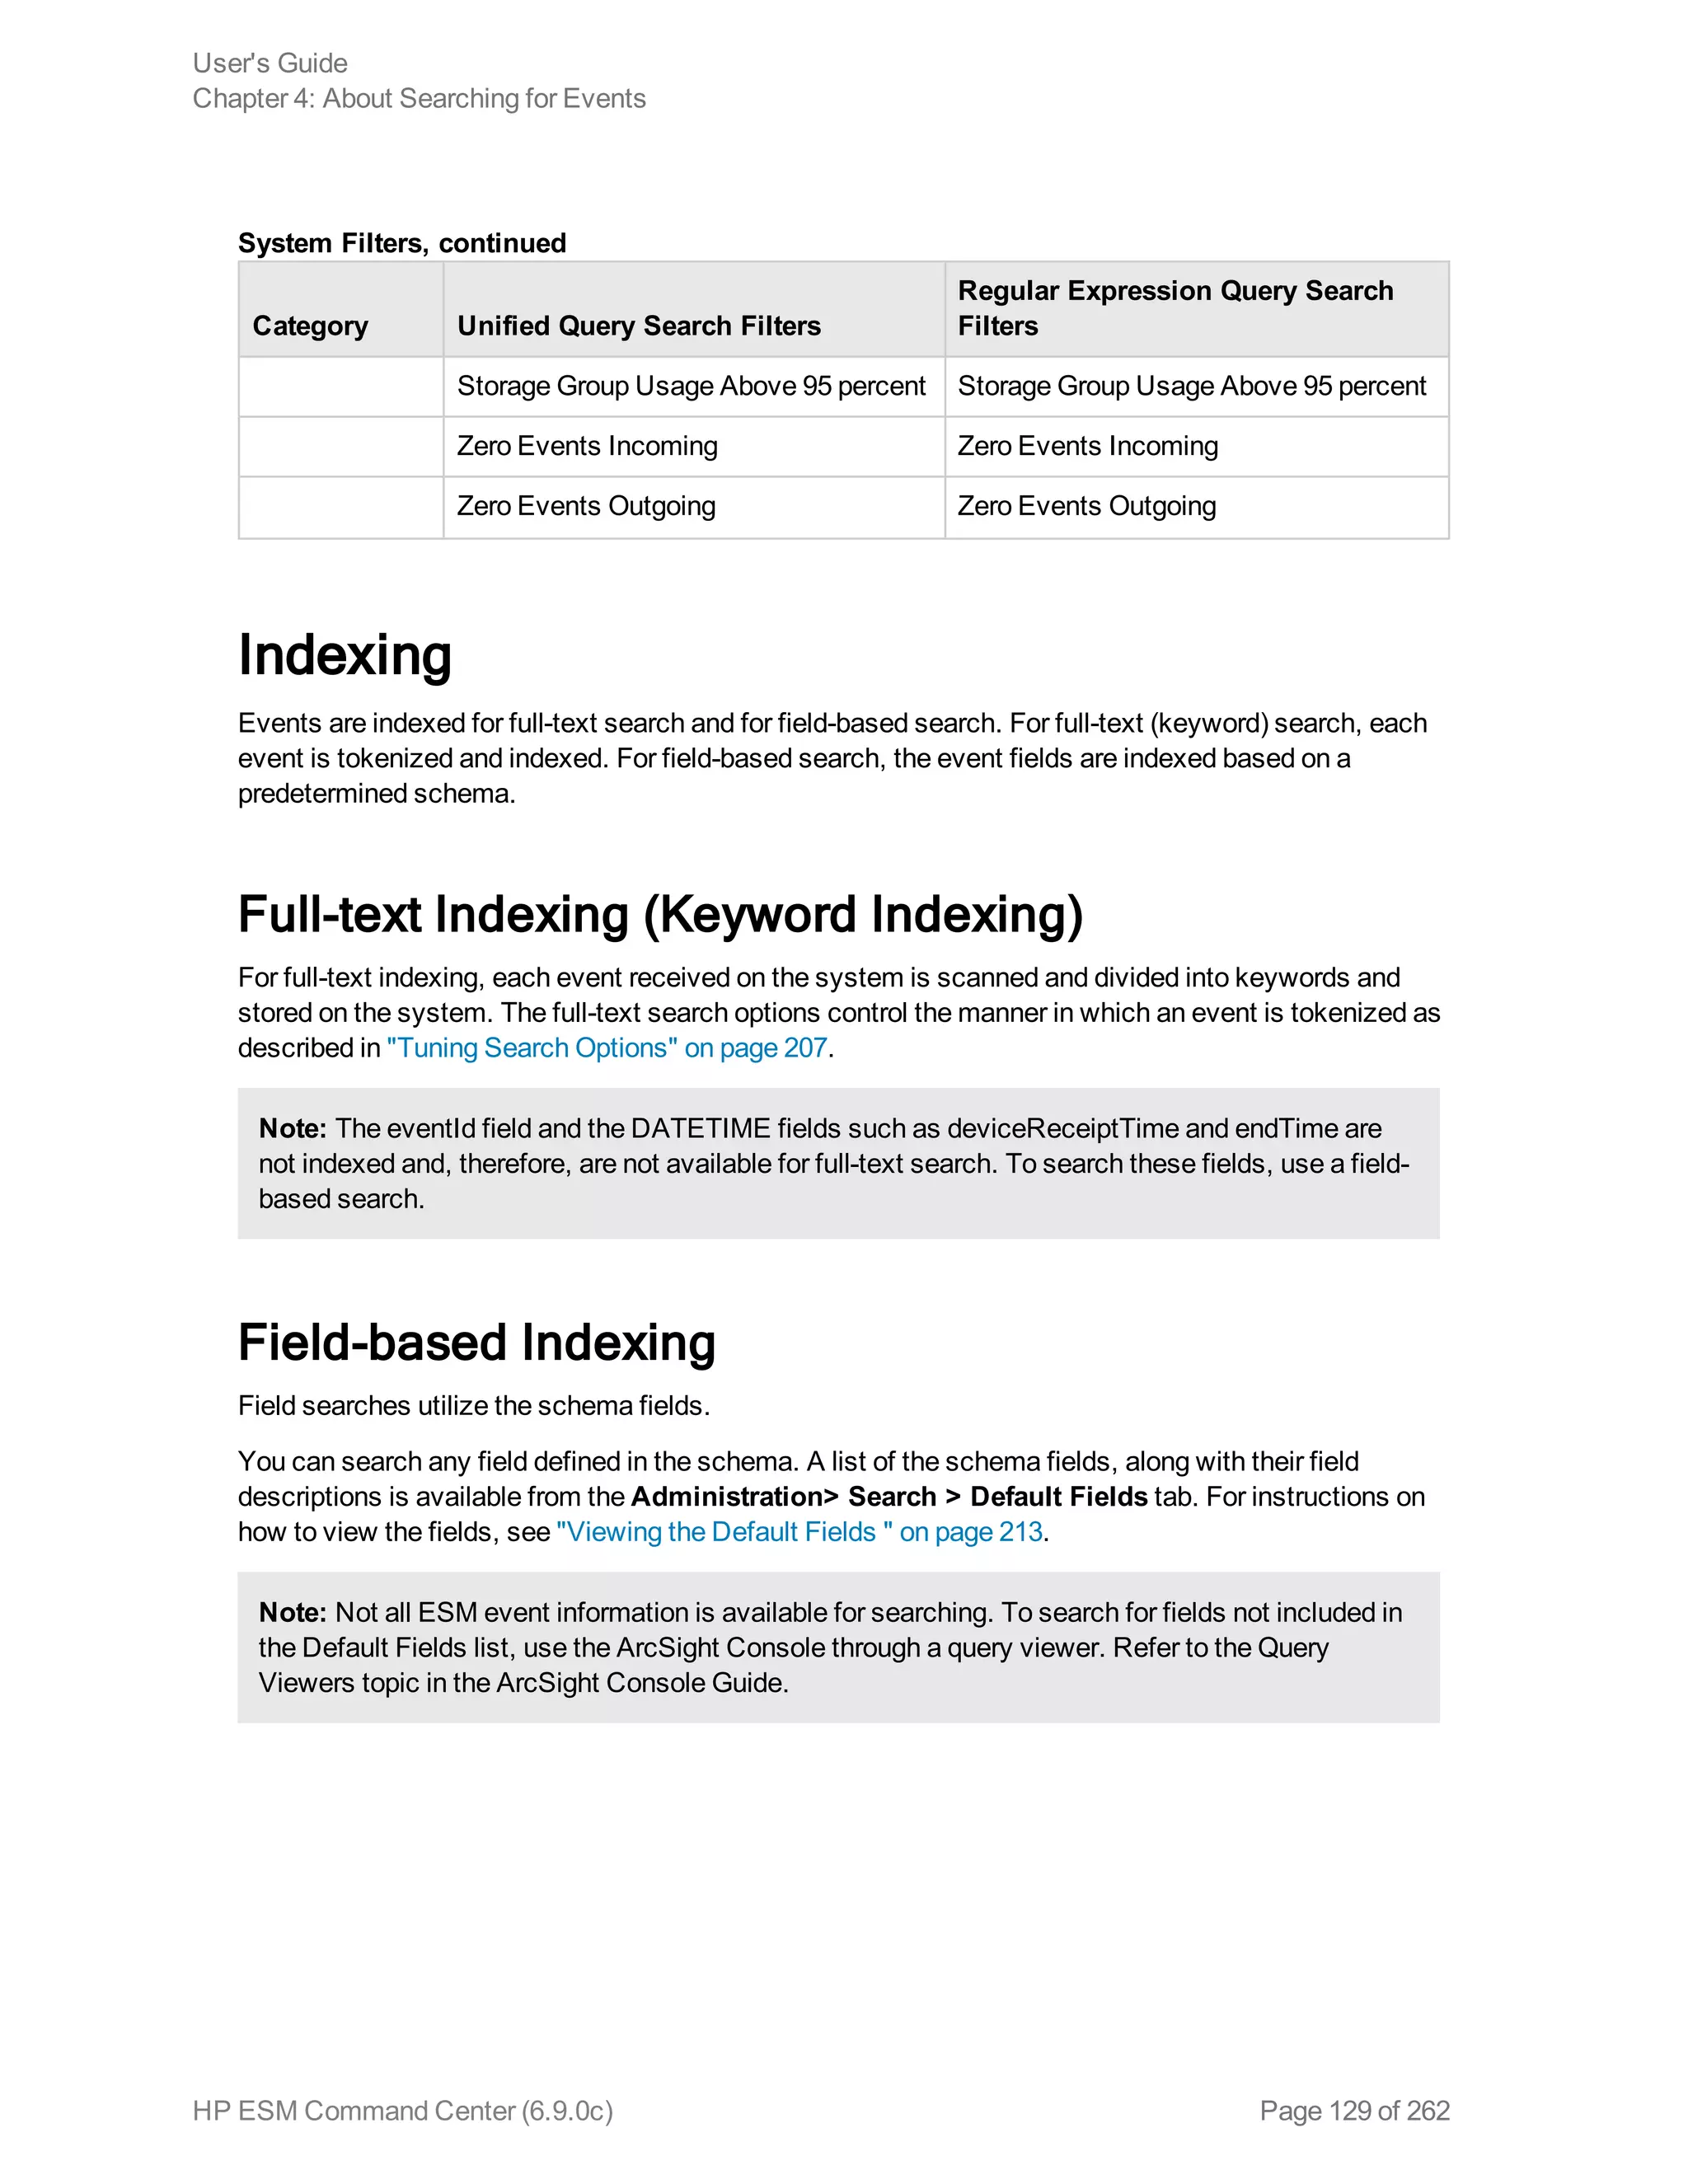
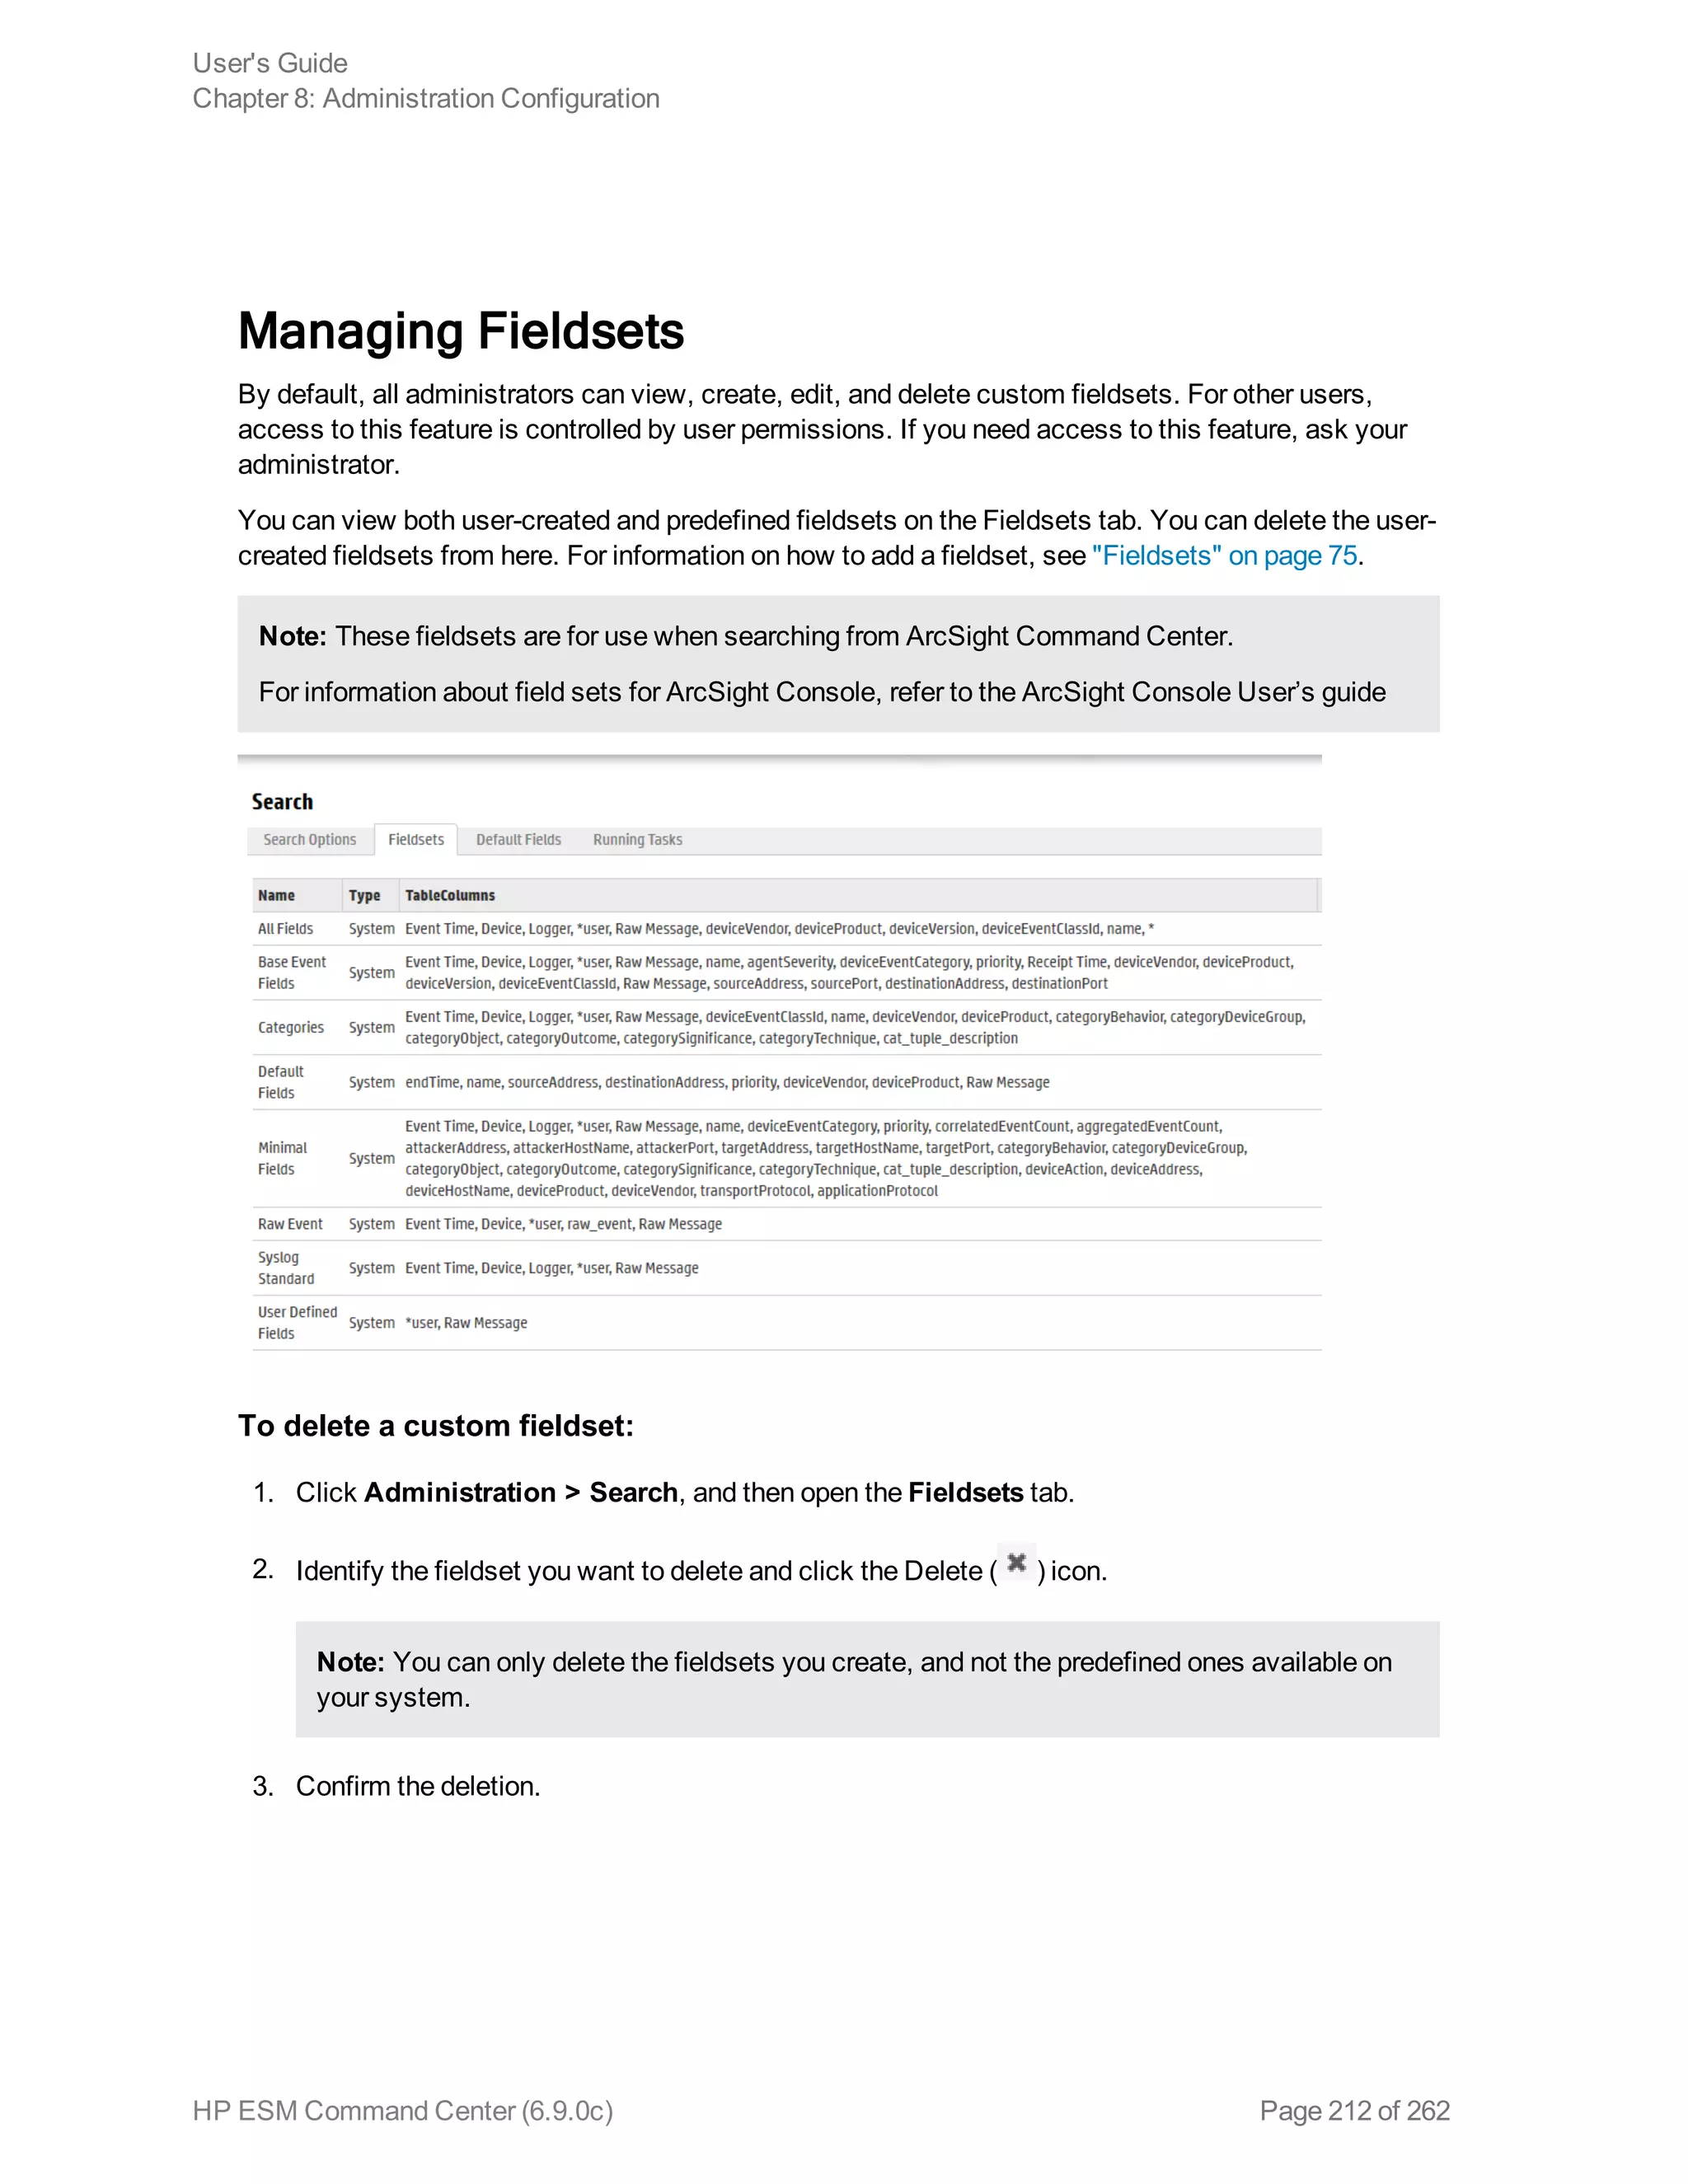
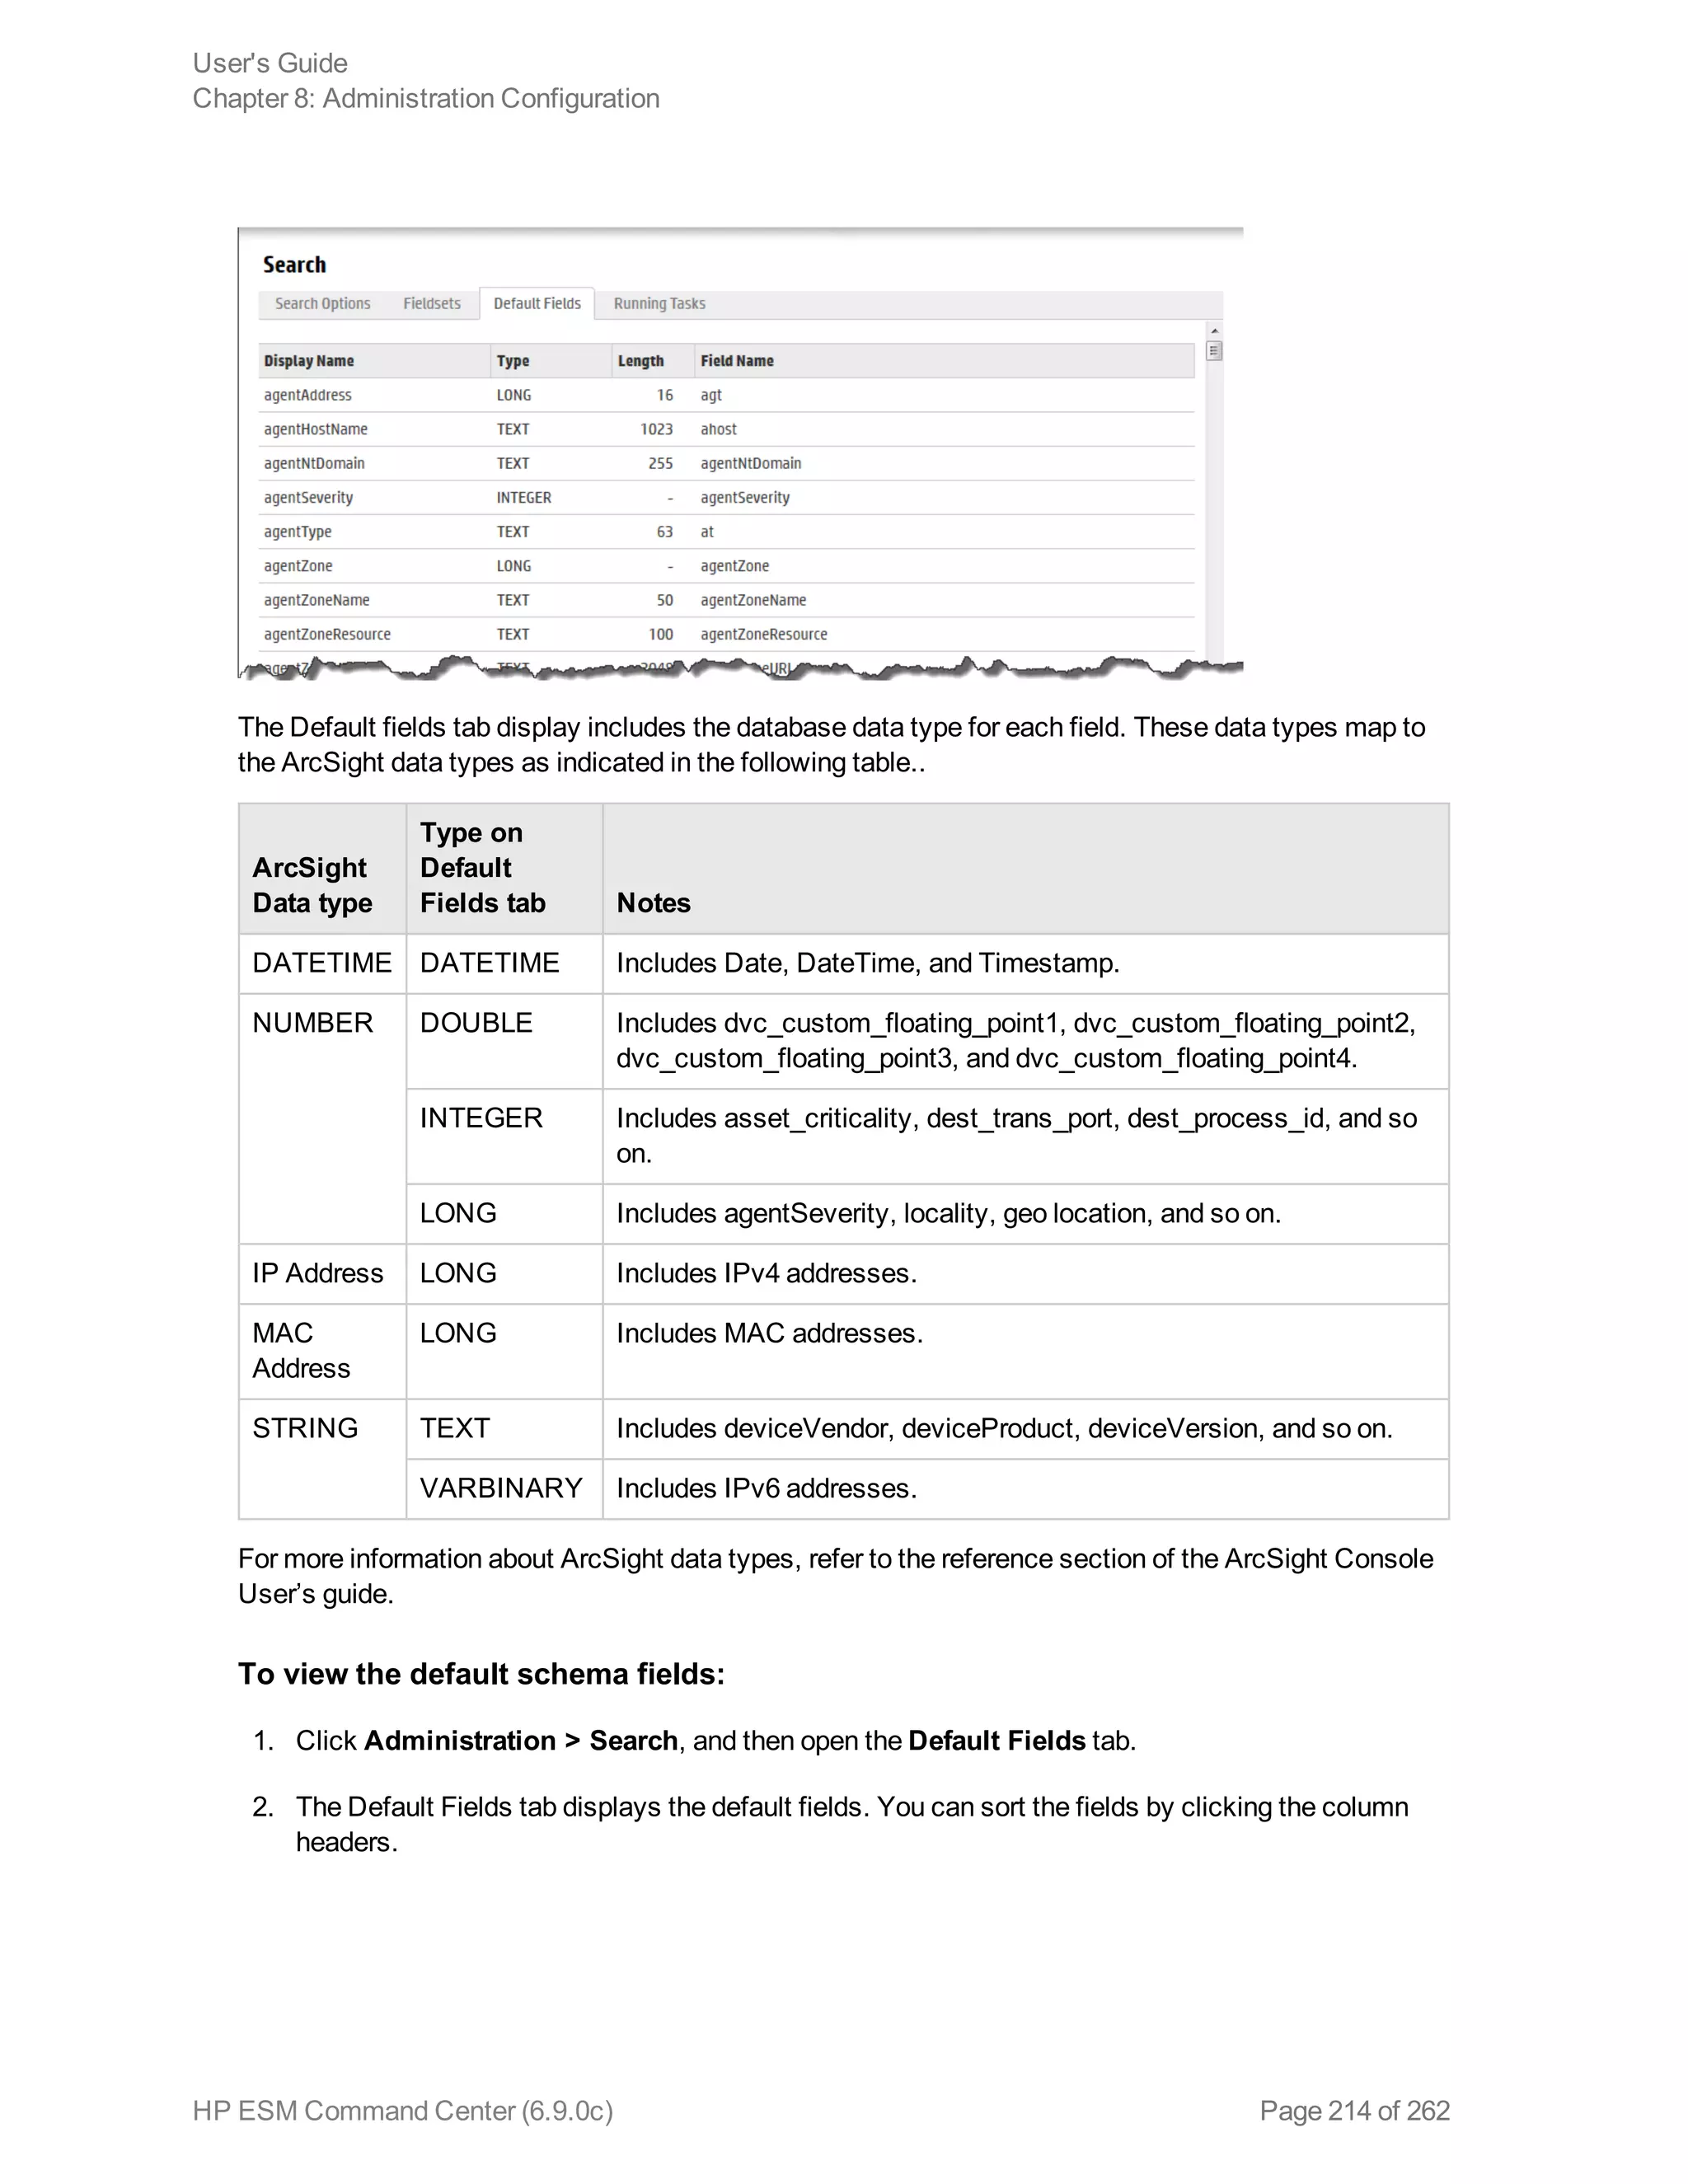
Field-based Search
You can search any field defined in the schema. A list of the schema fields, along with their field
descriptions is available from the Administration > Search > Default Fields tab.
For instructions on how to view the fields, see "Viewing the Default Fields " on page 213.
Note: Not all ESM event information is available for searching. To search for fields not included in
the Default Fields list, use the ArcSight Console through a query viewer. Refer to the Query
Viewers topic in the ArcSight User’s Console Guide.
You can specify multiple field conditions and also connect keywords to field conditions in a query
expression; when doing so, connect them with Boolean operators. For example, the following query
searches for events with keyword “failed” (without double quotes) or events with “name” fieldset to
“failed login” (lowercase only; without double quotes) and the message field not set to “success”
(lowercase only; without double quotes):
failed OR (name=“failed login” AND message!=“success”)
Note: If a query includes the Boolean operator OR and the metadata identifiers (discussed in
"Constraints" on page 79), the expression to be evaluated with OR must be enclosed in
parentheses, as shown in this example:
(success OR fail) _storageGroup IN [“Default Storage Group”]
User's Guide
Chapter 4: About Searching for Events
HP ESM Command Center (6.9.0c) Page 69 of 262](https://image.slidesharecdn.com/esmcommandcenterguide6-170530061619/75/ESM_CommandCenterGuide_6-9-0-pdf-69-2048.jpg)
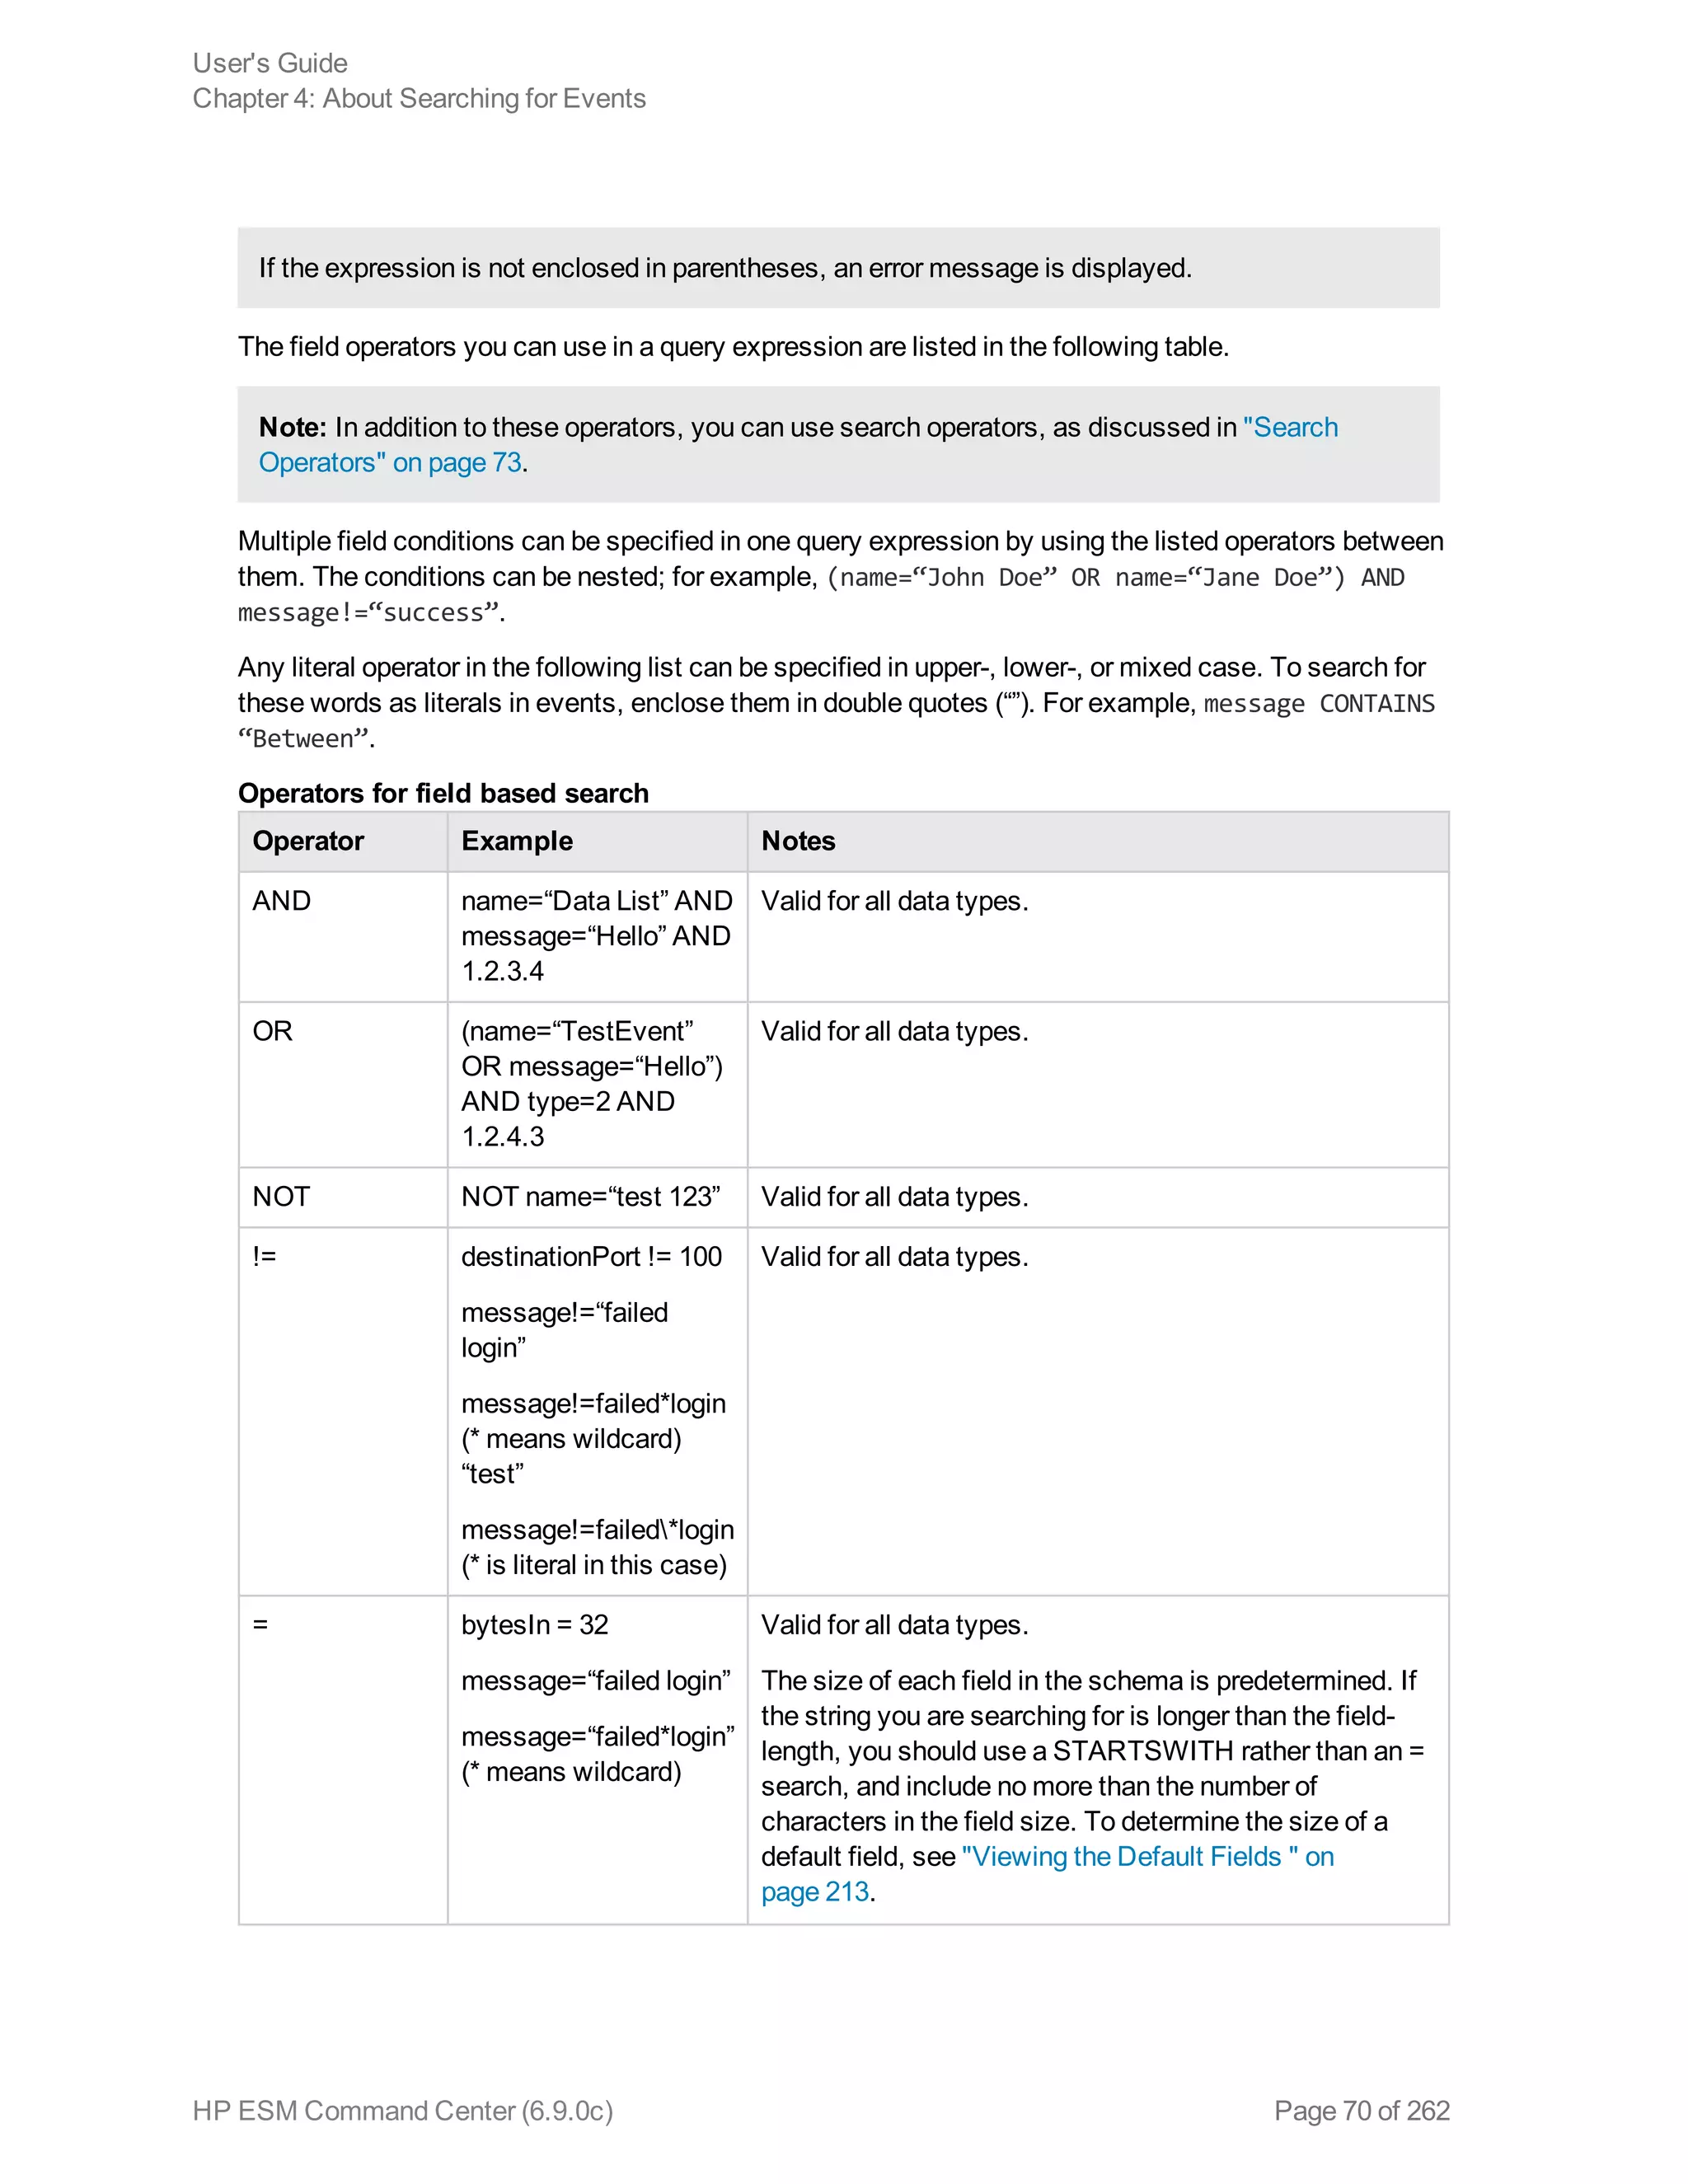
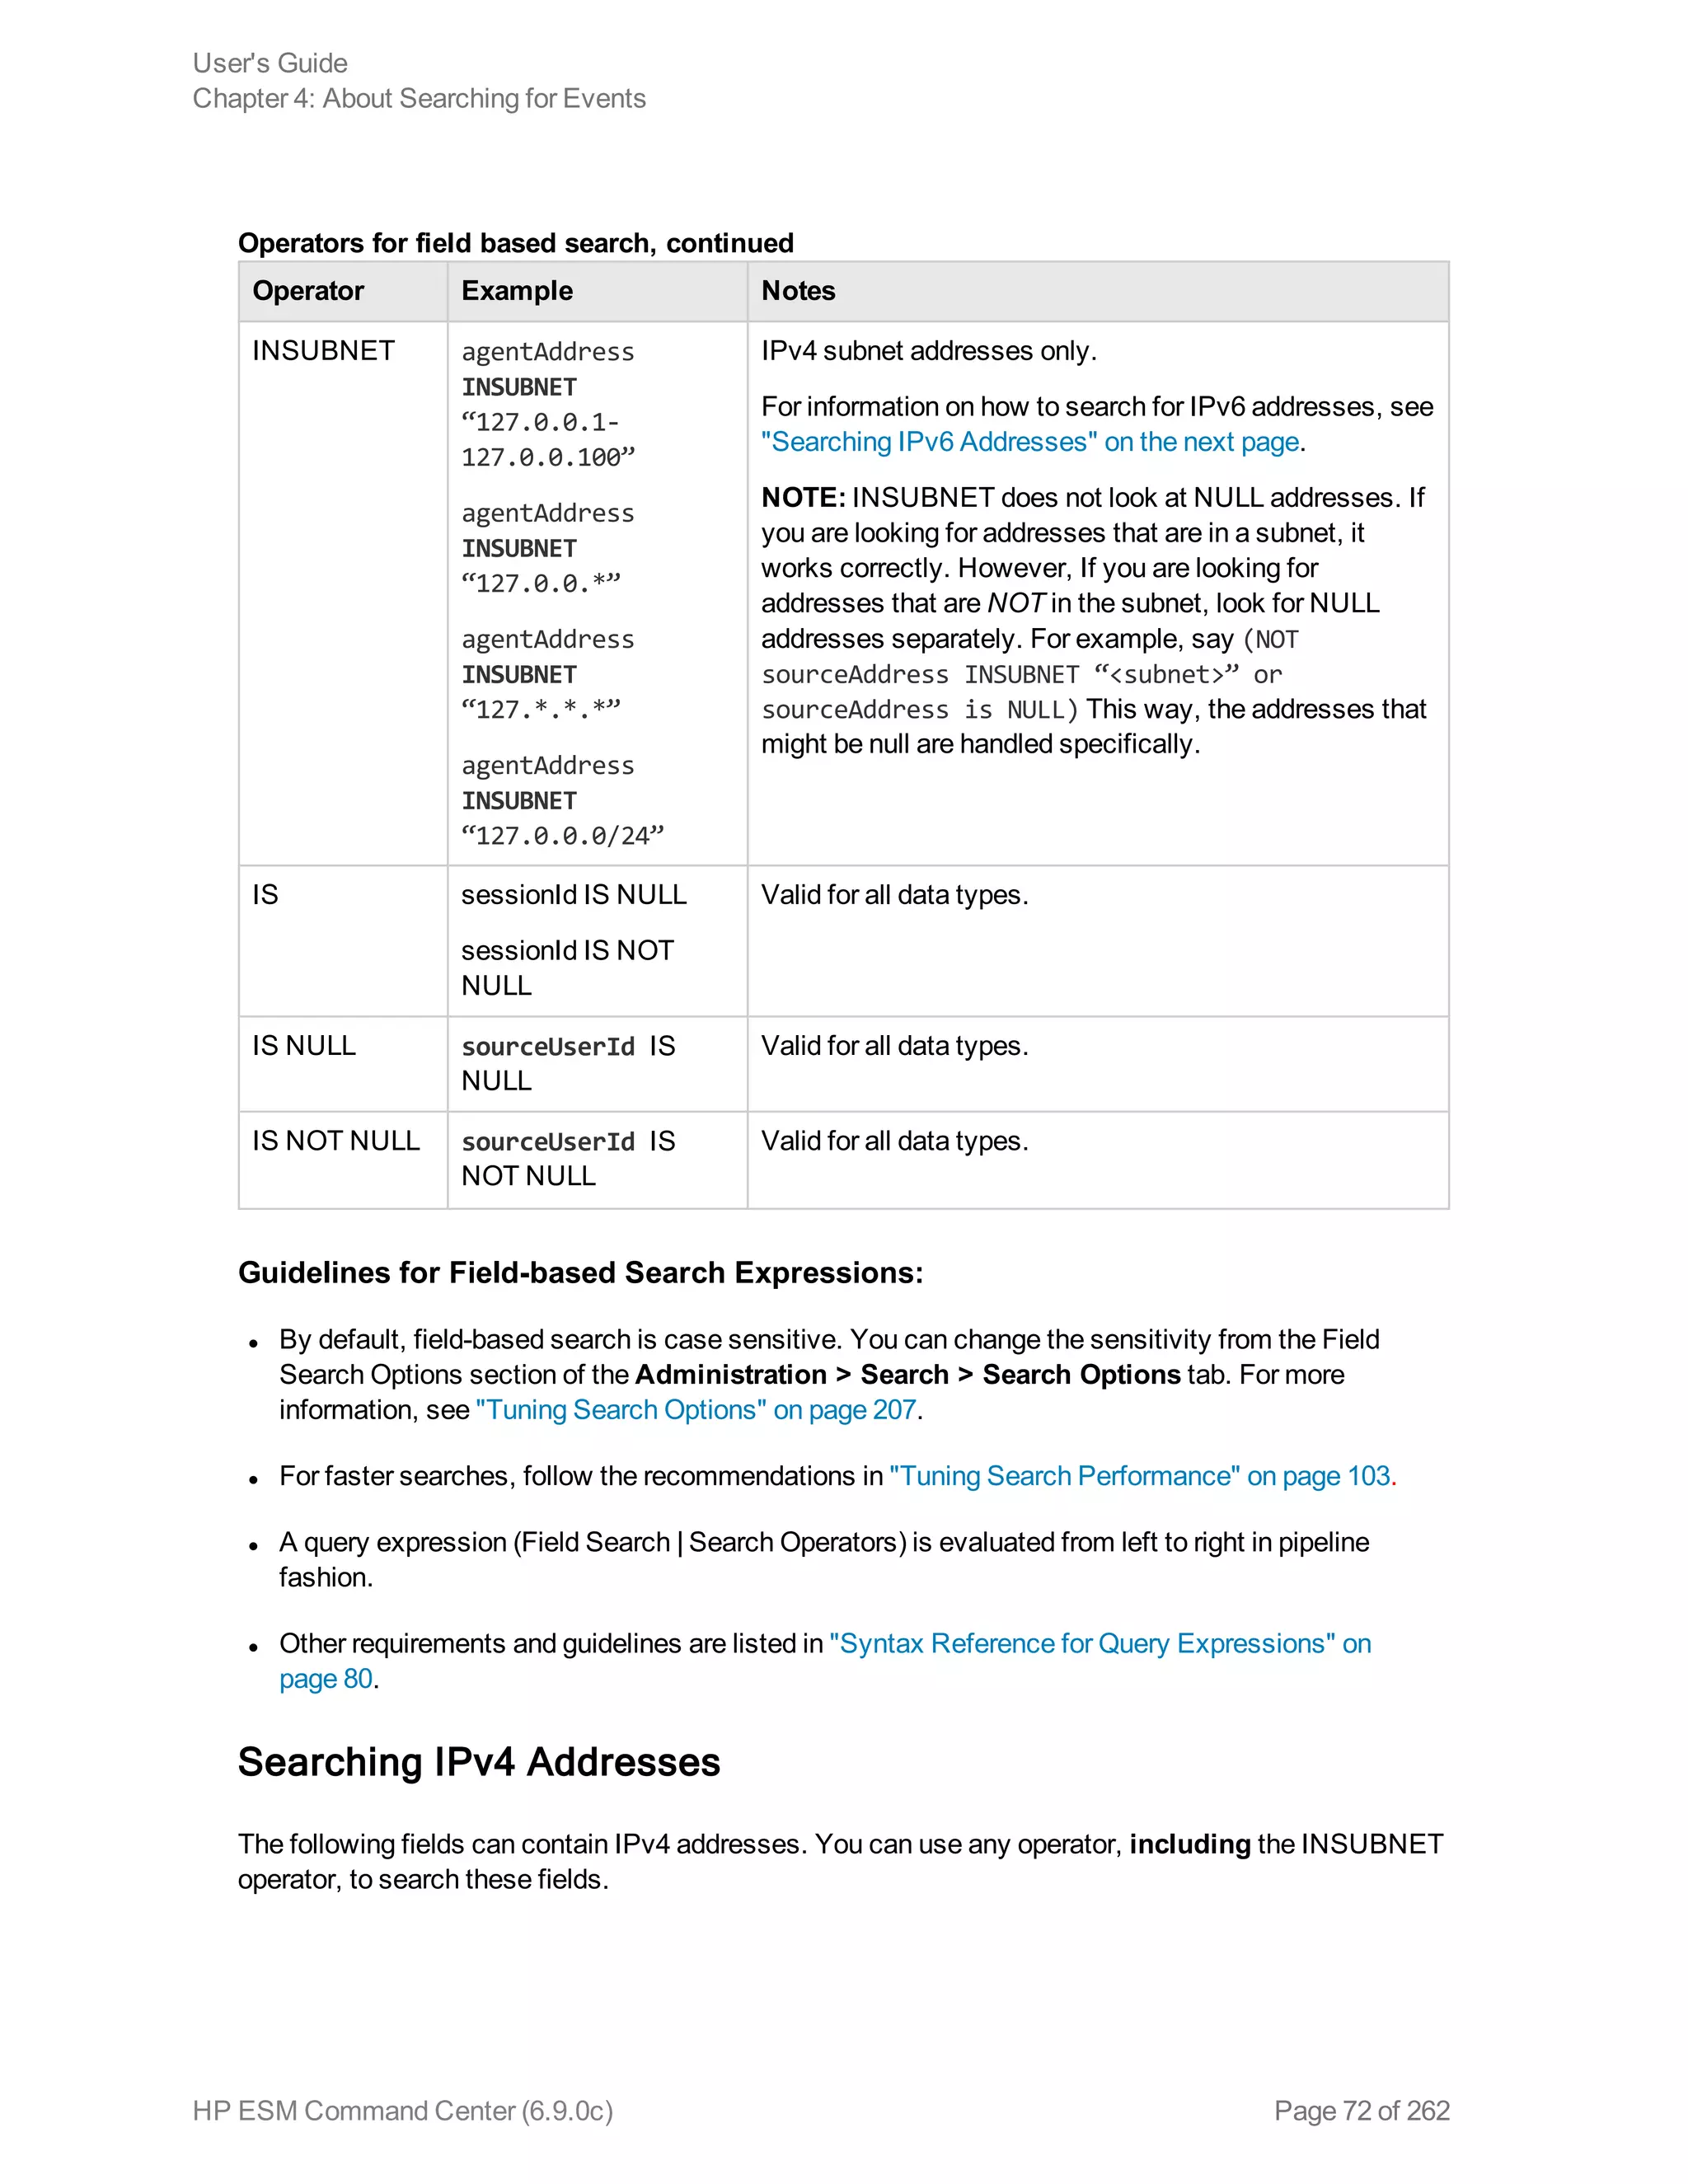
![Operator Example Notes
>* bytesIn > 100 Valid for all data types.
* These operators evaluate the condition
lexicographically. For example, deviceHostName
BETWEEN AM AND EU searches for all devices whose
names start with AM, AMA, AMB, AN, AO, AP and so
on, up to EU. Therefore, any device whose name starts
with AK, AL, and so on is ignored. Similarly, devices with
names EUA, EUB, FA, GB, and so on will be ignored.
<* startTime <“$Now - 1d”
>=* endTime
>=“01/13/2009
07:07:21”
endTime
>=“2009/13/01
00:00:00 PDT”
endTime >=“Sep 10
2009 00:00:00 PDT”
<=* startTime <=“$Now -
1d”
IN* priority IN [2,5,4,3]
destinationAddress IN
[“10.0.20.40”,
“209.128.98.147”]
_deviceGroup IN
[“DM1”]
_storageGroup NOT
IN [“Internal Event
Storage Group”, “SG1”]
_peerLogger IN
[“192.0.2.10”,
“192.0.2.11”]
BETWEEN* priority BETWEEN 1
AND 5
STARTSWITH message
STARTSWITH “failed”
Valid for all String data types only.
To determine the data type of a field, see "Viewing the
Default Fields " on page 213.
ENDSWITH message ENDSWITH
“login”
Valid for all String data types only.
CONTAINS message CONTAINS
“foobar”
Valid for all String data types only.
Operators for field based search, continued
User's Guide
Chapter 4: About Searching for Events
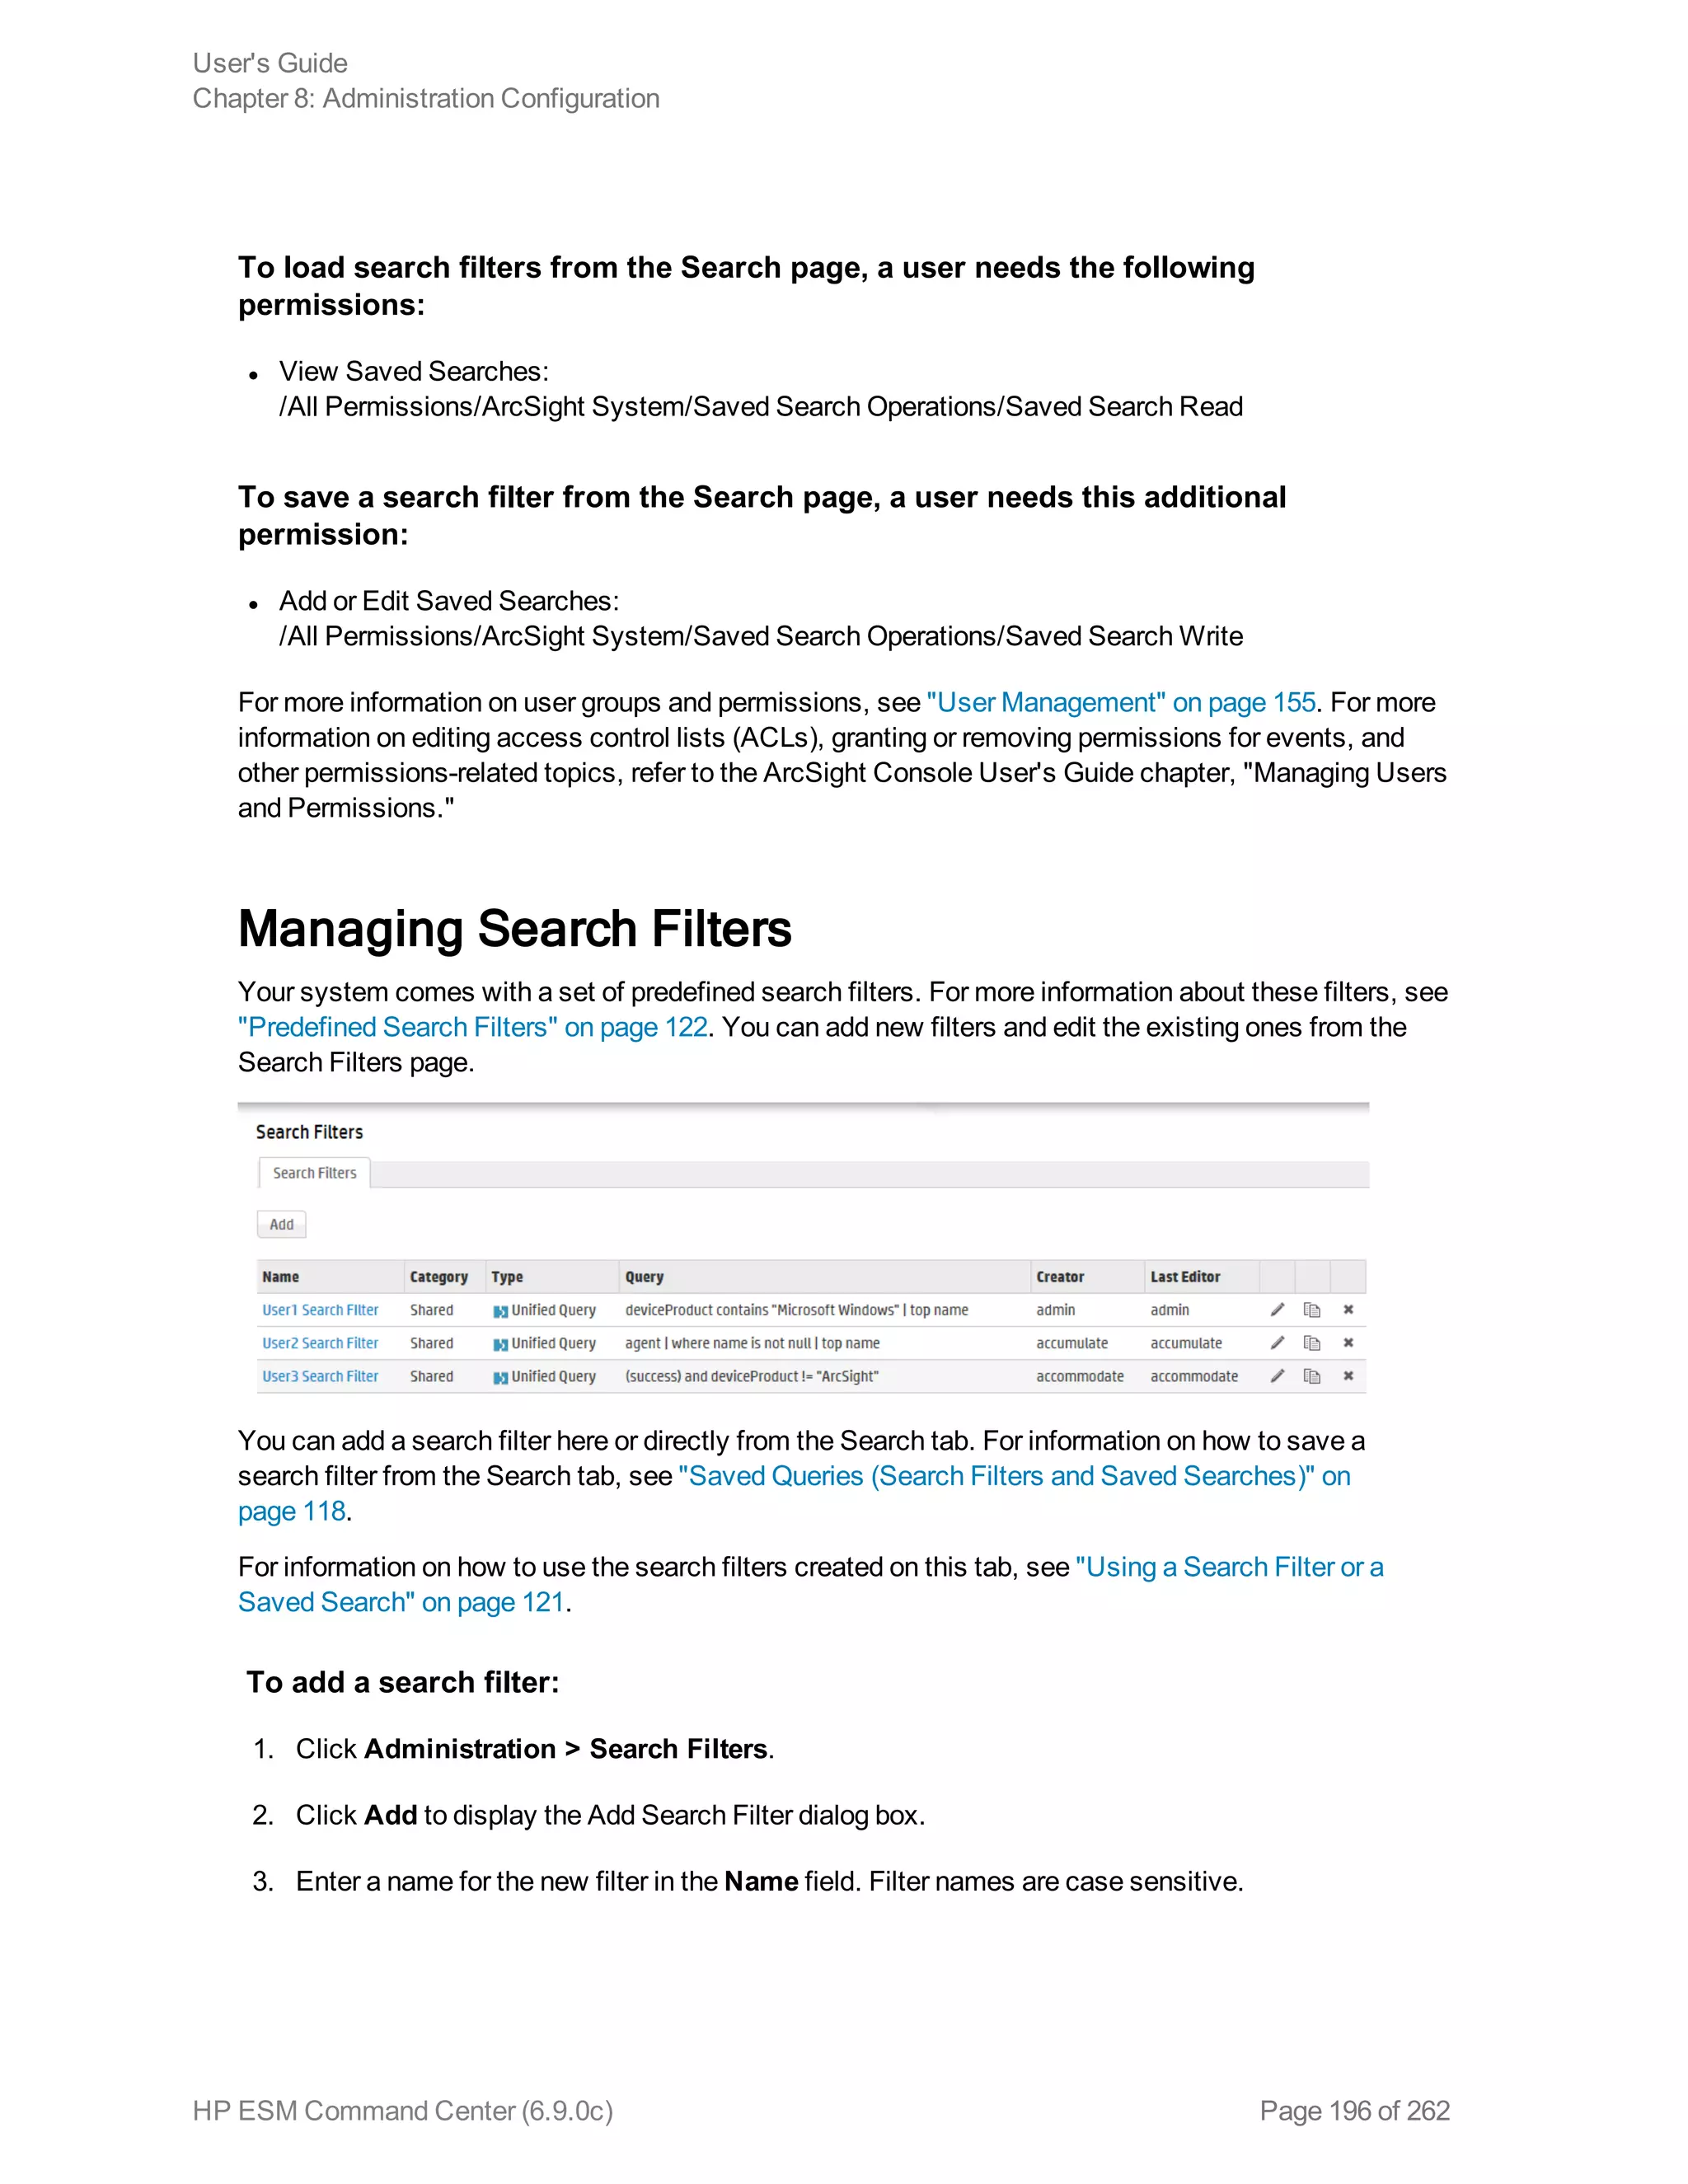
HP ESM Command Center (6.9.0c) Page 71 of 262](https://image.slidesharecdn.com/esmcommandcenterguide6-170530061619/75/ESM_CommandCenterGuide_6-9-0-pdf-71-2048.jpg)
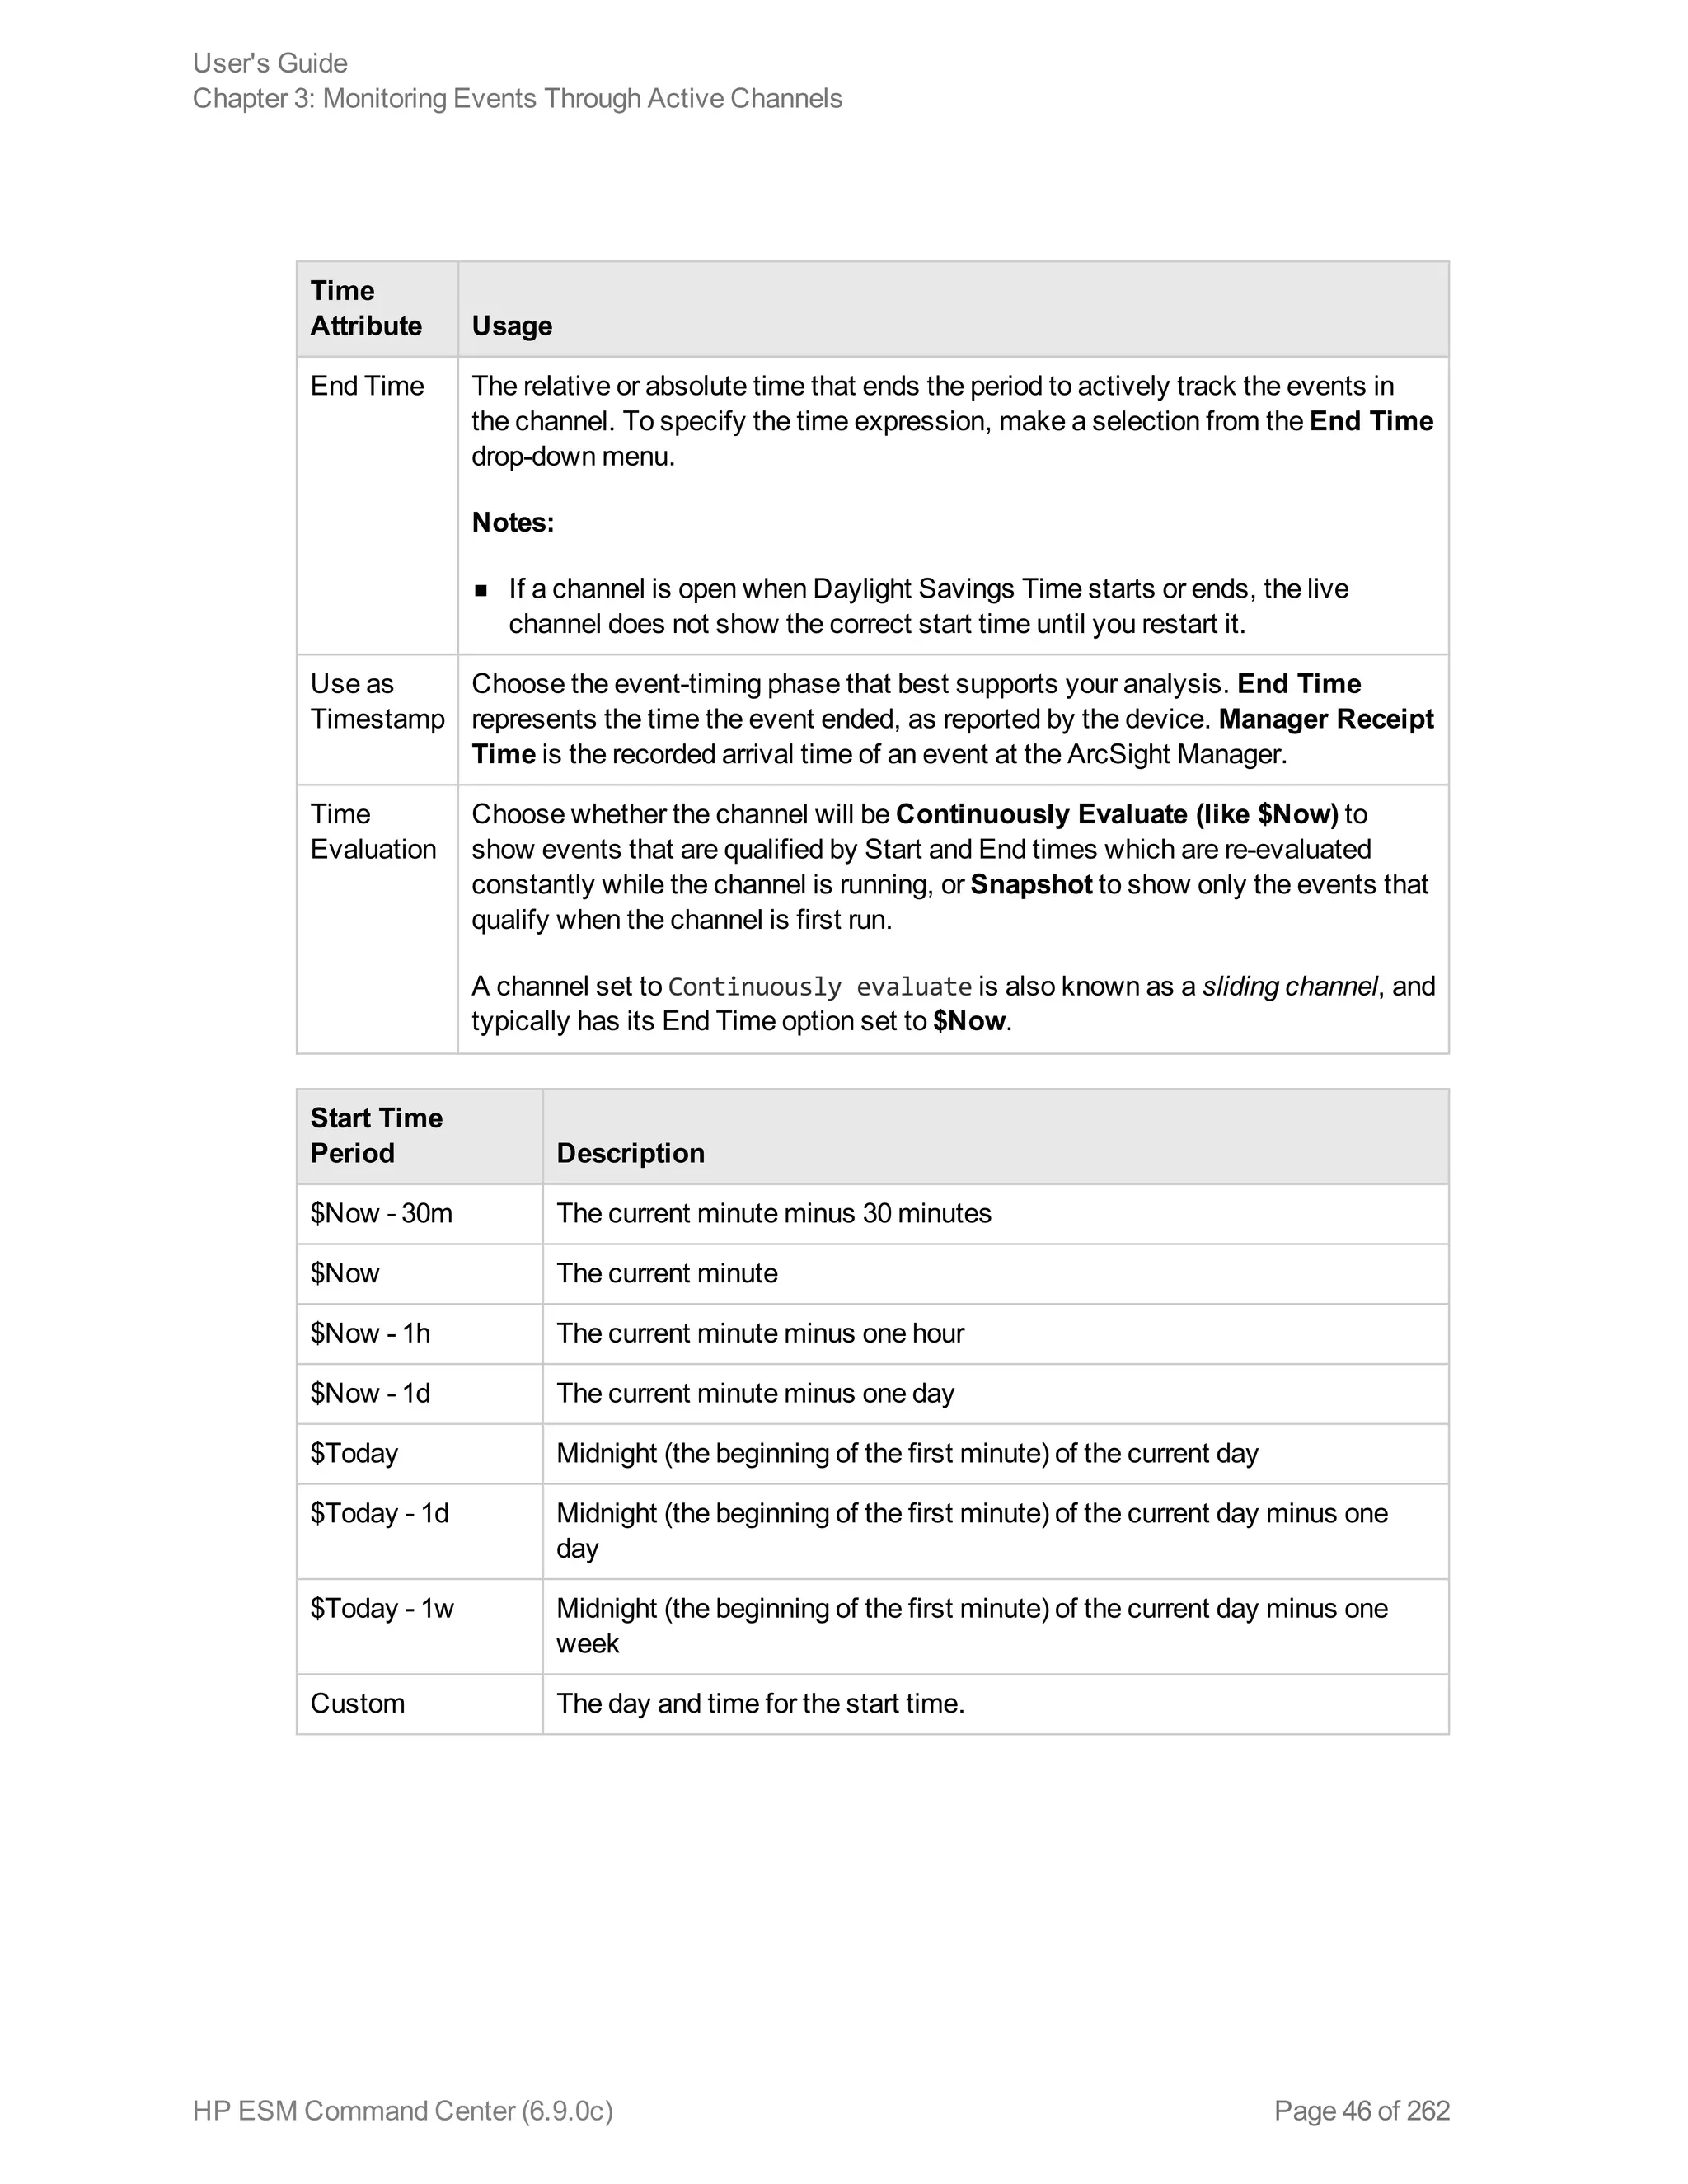
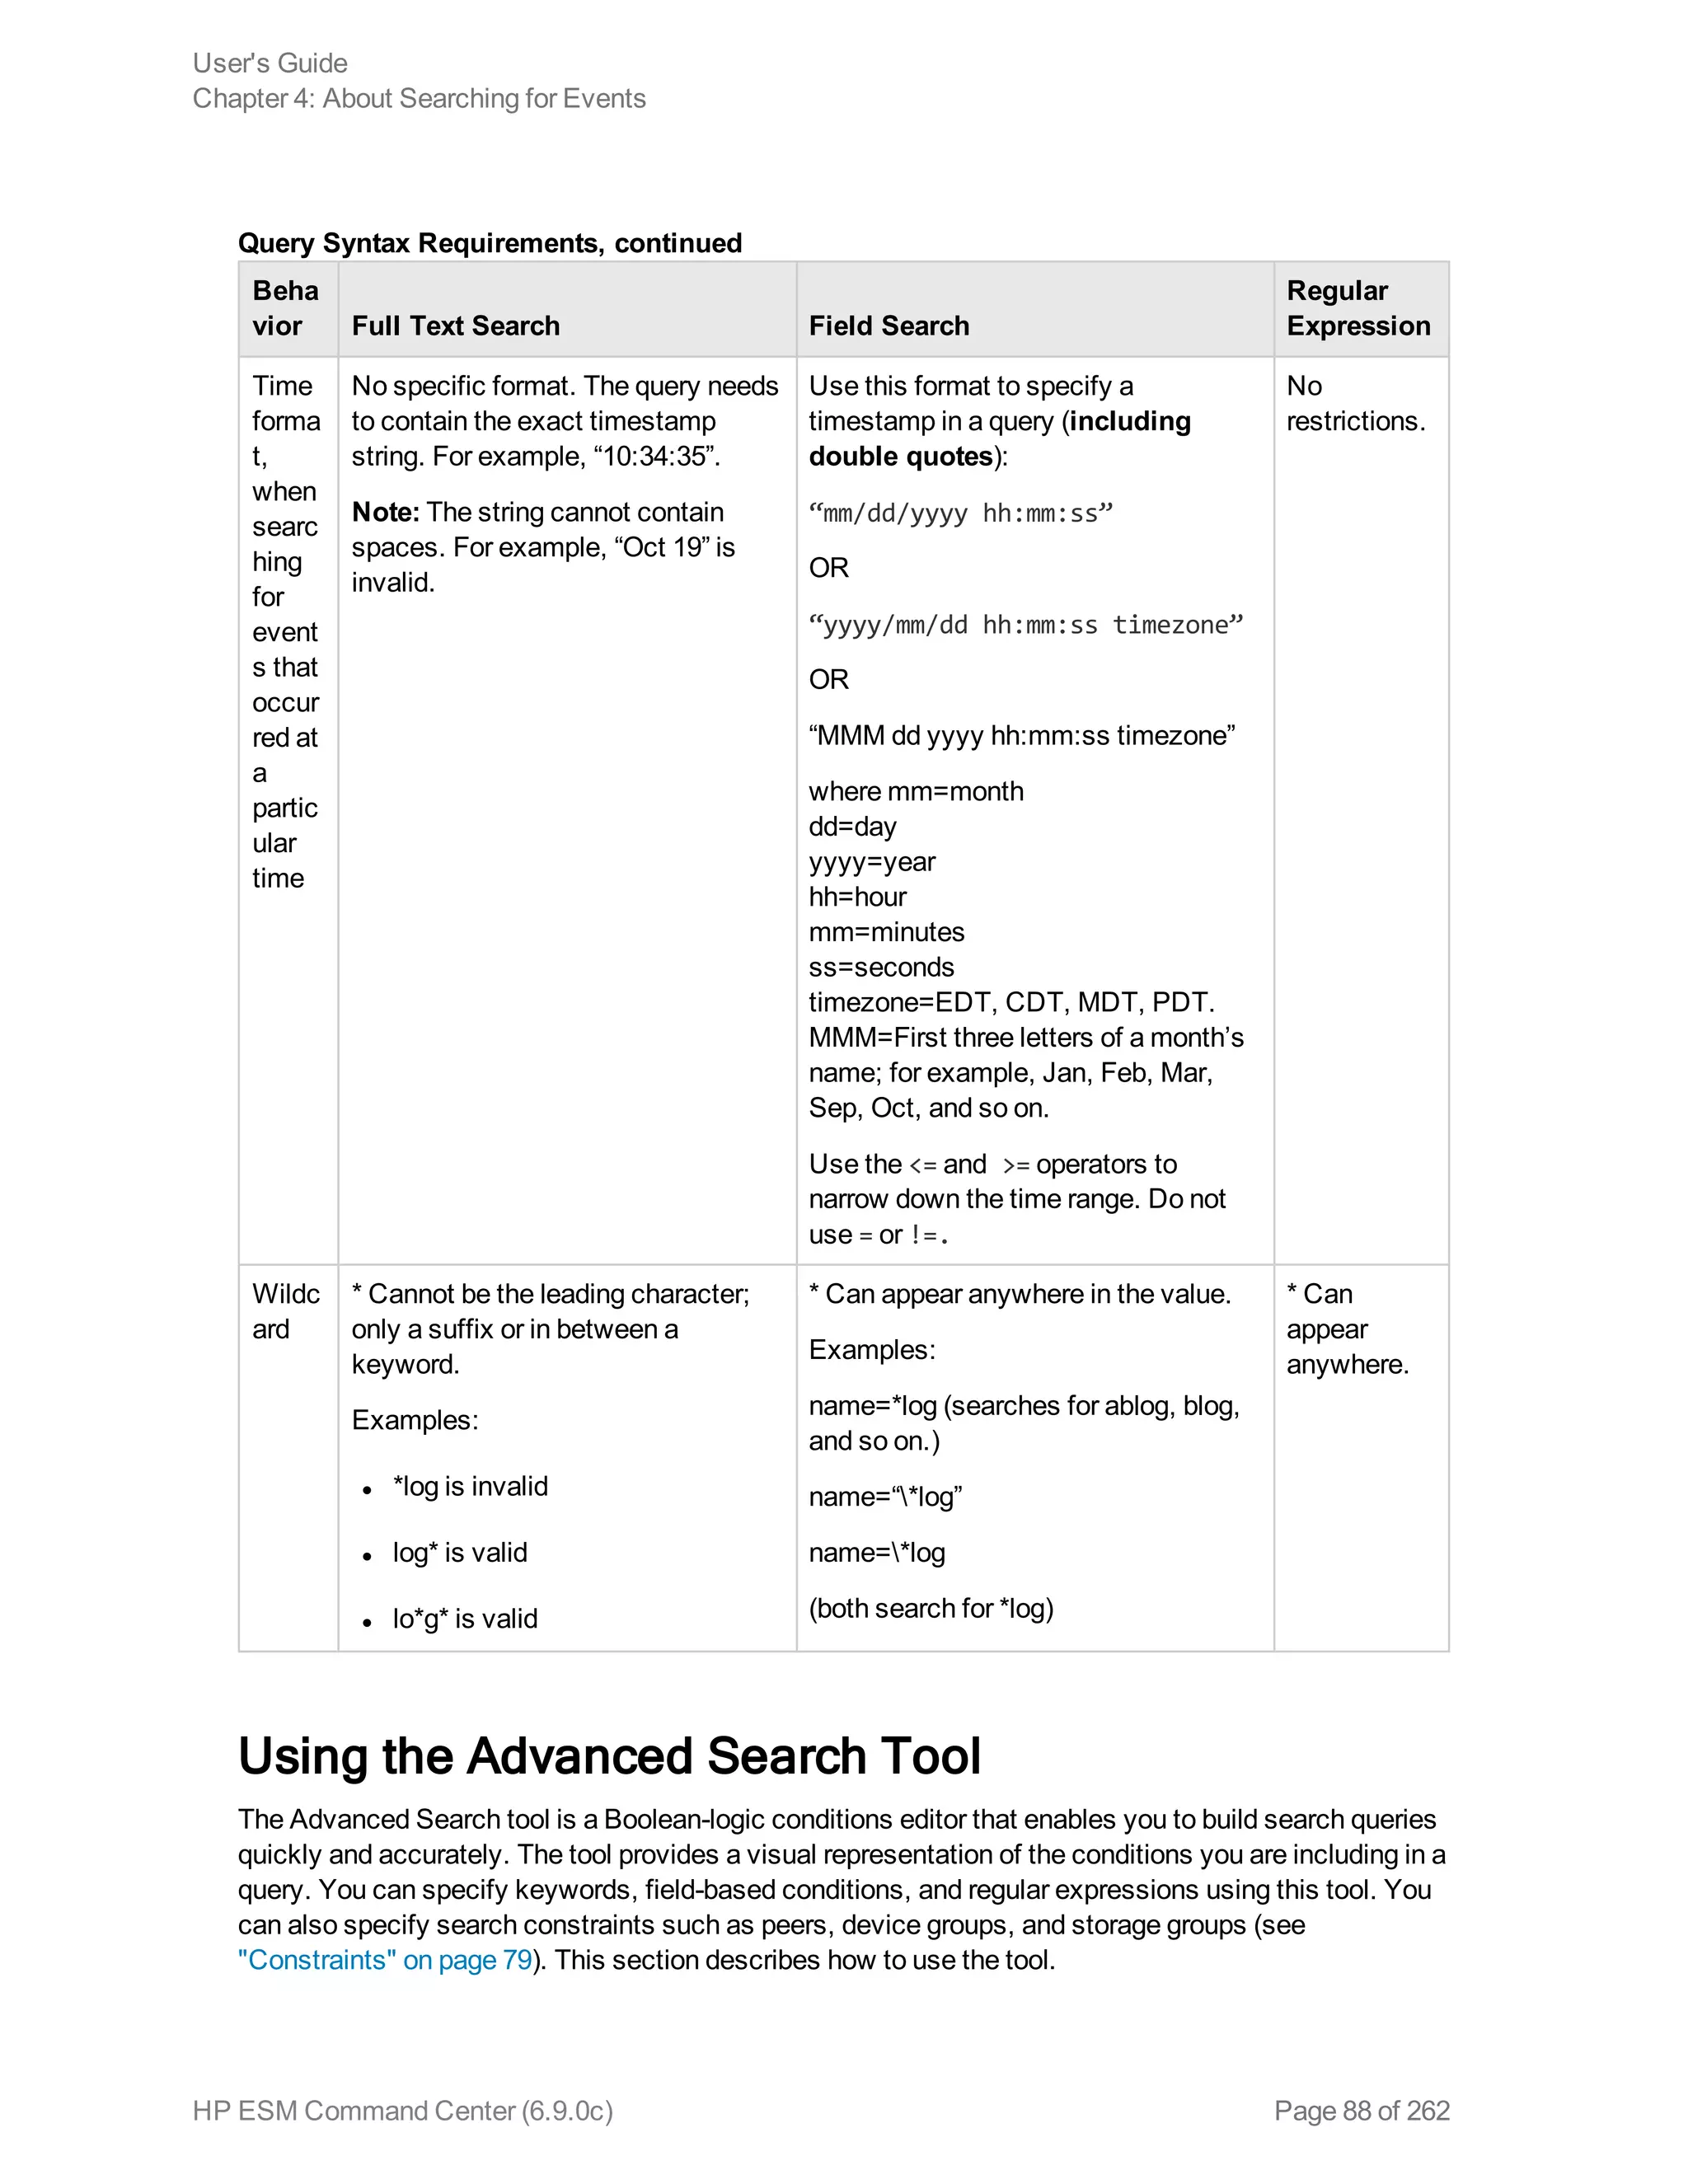
![Time Range
The endTime timestamp indicates when the event occurred. A search query uses this time to search
for matching events.
A search operation requires you to specify the time range within which events would be searched. You
can select from many predefined time ranges or define a custom time range to suit your needs.
Predefined time range: When you select a predefined time range such as “Last 2 Hours” or “Today”,
the time range is relative to the current time. For example, if you select “Last 2 Hours” at 2:00:00 p.m.
on July 13th, events from 12:00:00 to 2:00:00 p.m. on July 13th will be searched. If you refresh your
search results at 5:00:00 p.m. on the same day, the time window is recalculated. Therefore, events that
match the specified criteria and occurred between 3:00:00 and 5:00:00 p.m. on July 13th are displayed.
Custom time range: You can specify a time range in a 24-hour format to suit your needs. For example,
a custom time range is:
Start: 8/13/2013 13:36:30
End: 8/13/2013 22:36:30
By default, the end time for a custom time range is the current time on your system and the start time is
two hours before the current time.
You can also use variables to specify custom time ranges. For example, a dynamic date range might
start at $Now - 2h (two hours ago) and end at $Now (the current time). The dynamic search is relative to
when the query is run. Scheduled search operations use this mechanism to search through newer
event data each time they are run.
The “Dynamic” field in the user interface enables you to specify the dynamic time, as shown in the
following figure:
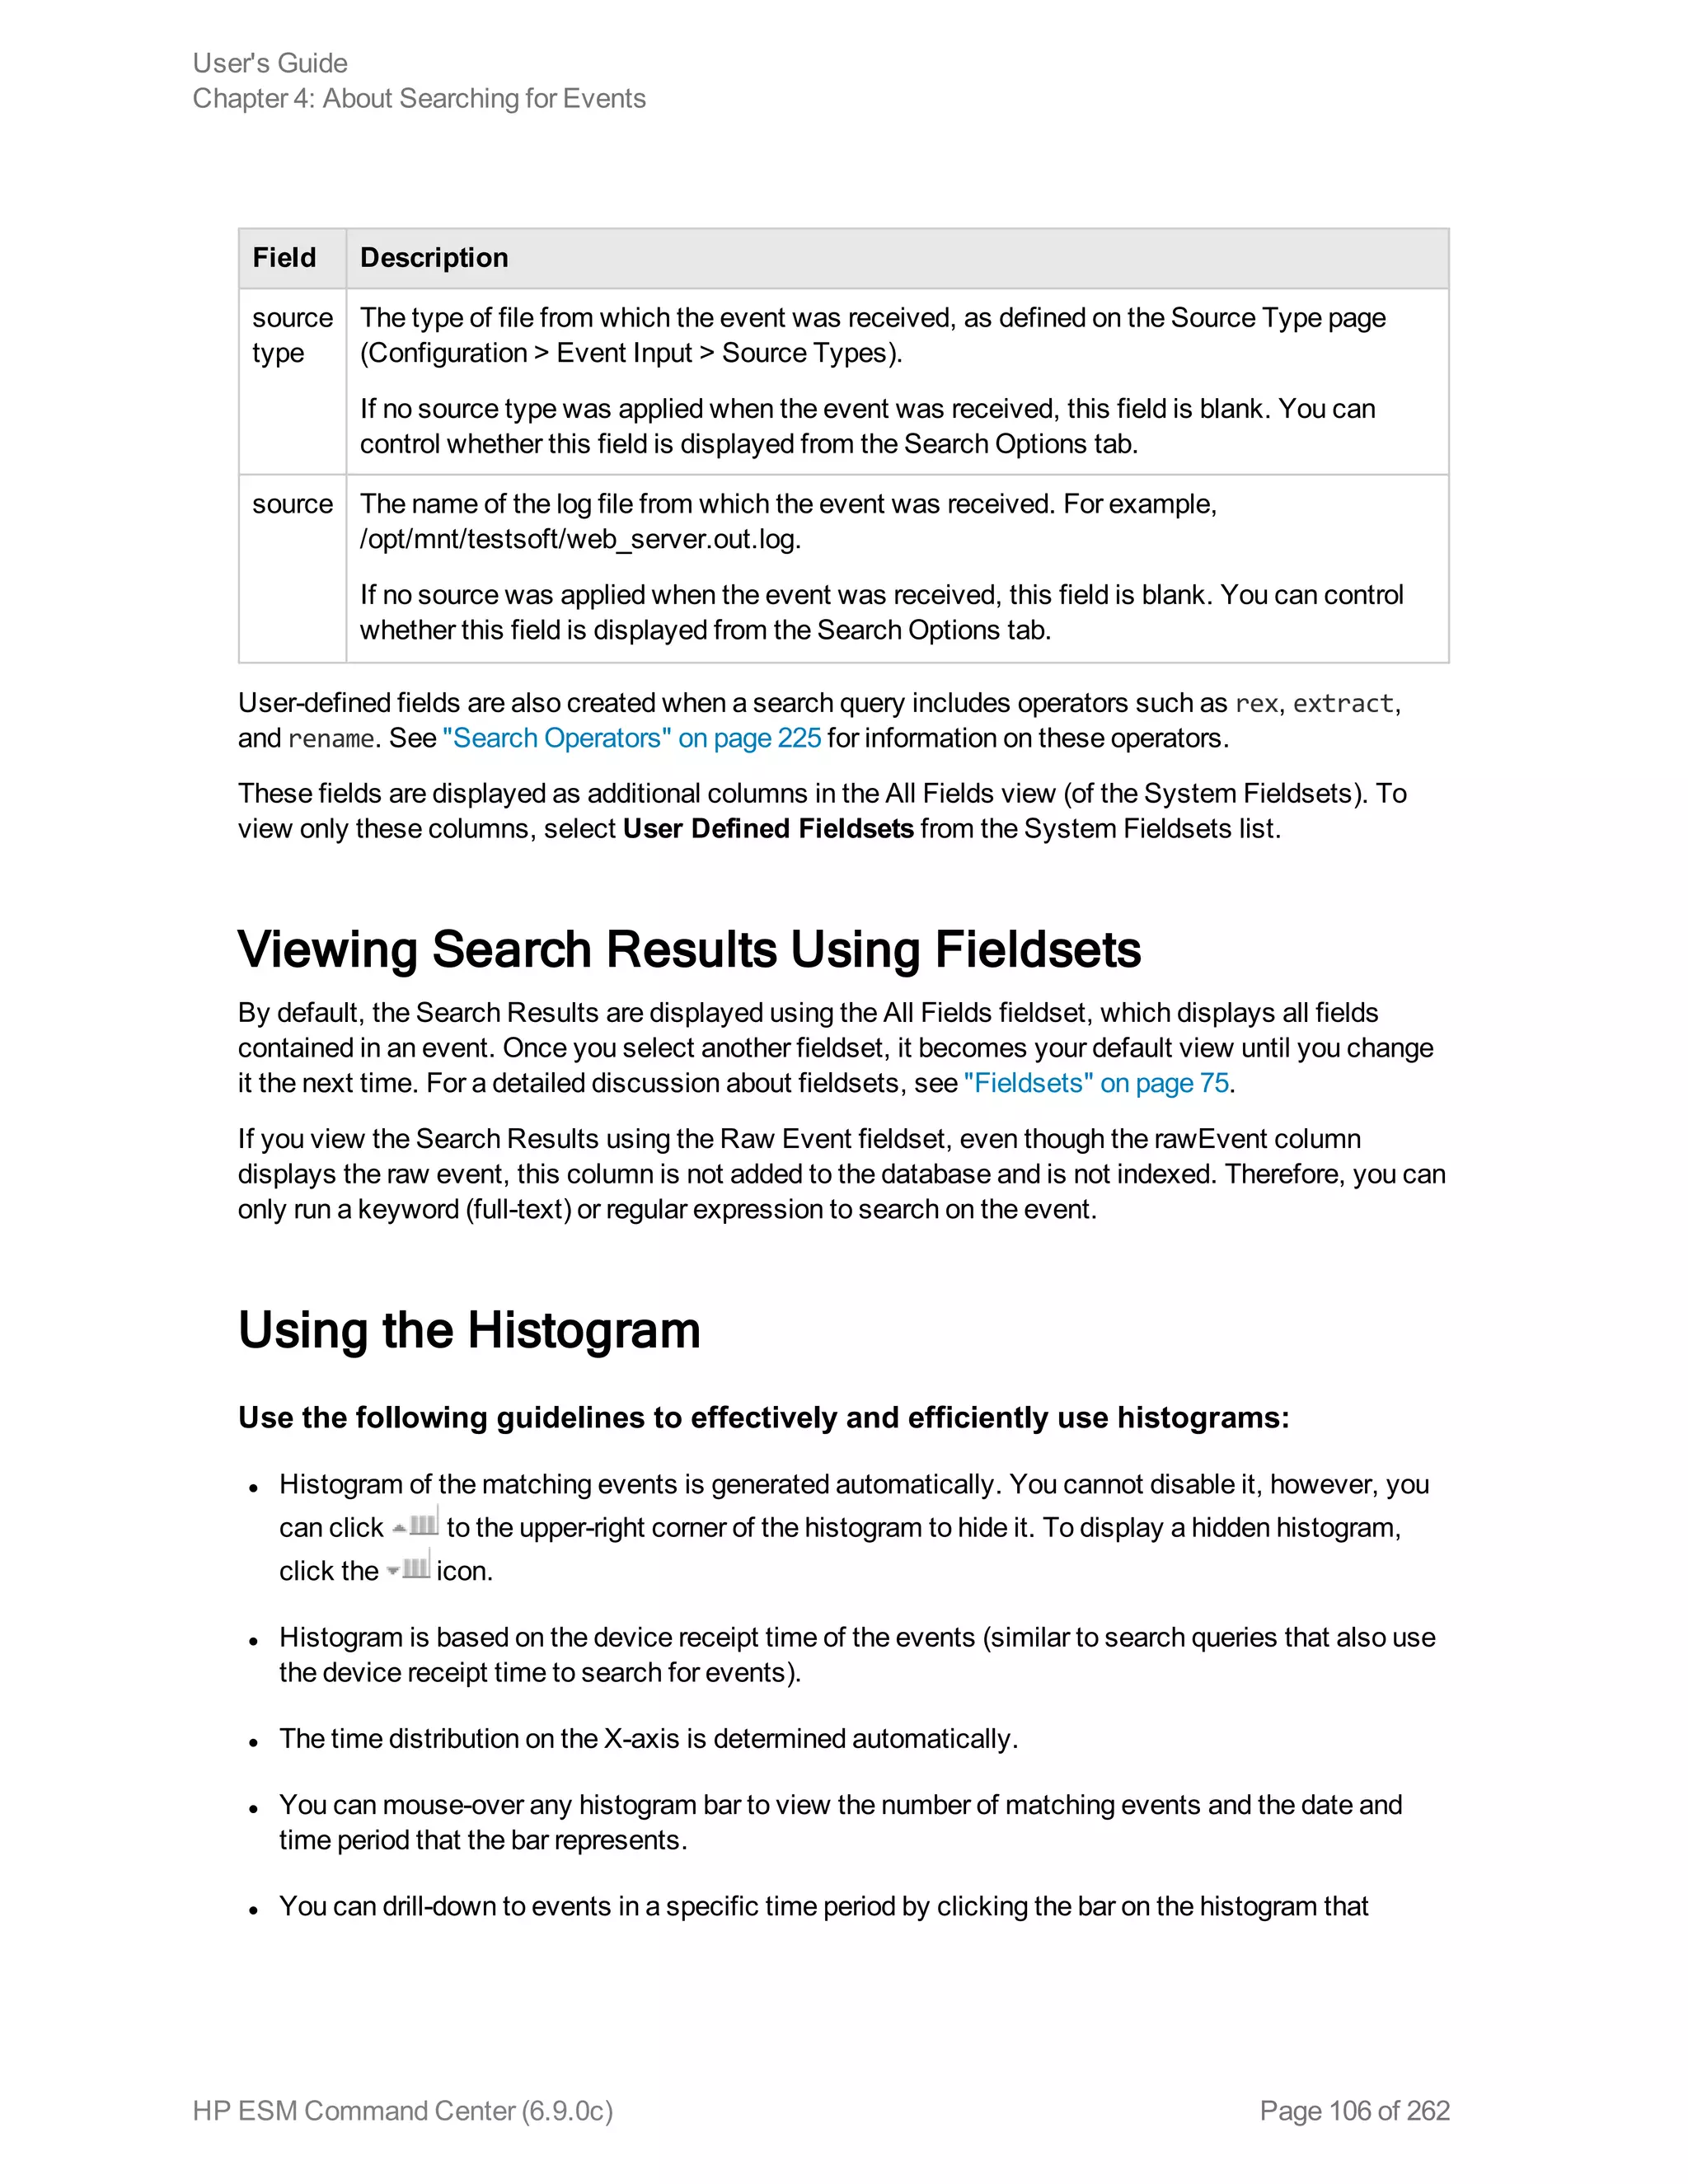
Following is a typical example of a dynamic search that limits results to the last two hours of activity:
Start: $Now - 2h
End: $Now
The syntax for dynamic search is:
<current_period> [ +/- <units>]
Where <current_period>, such as $Now, either stands alone or is followed by either a plus (‘+’) or
minus (‘-’) and a number of units, such as 2h for two hours. The <current_period> always starts with a
‘$’ and consists of a word, case-sensitive, with no spaces, as shown in the following table. The <units>
portion, if given, consists of an integer and a single, case-sensitive letter, as shown in Units table.
Note: Use the <= and >= operators to narrow down the time range. Do not use = or !=.
User's Guide
Chapter 4: About Searching for Events
HP ESM Command Center (6.9.0c) Page 74 of 262](https://image.slidesharecdn.com/esmcommandcenterguide6-170530061619/75/ESM_CommandCenterGuide_6-9-0-pdf-74-2048.jpg)
![Constraints
Using constraints in a query can speed up a search operation as they limit the scope of data that needs
to be searched. Constraints enable you to limit a query to events from one or more of the following:
l Stored in particular storage groups
l Stored on specific peers
For example, you might want to search for events in the SG1 and SG2 storage groups on the local
system only.
For information about storage groups and peers, see "Storage" on page 179 and "Peers" on page 216.
Follow these guidelines when specifying constraints:
l Use the following operators to specify constraints in a search query expression:
Metadata Identifier Example
_storageGroup _storageGroup IN [“Internal Event Storage Group”, “SG1”]
_peerLogger _peerLogger IN [“192.0.2.10”, “192.0.2.11”]
l If a query includes the Boolean operator OR and metadata identifiers, the expression to be
evaluated with OR must be enclosed in parentheses, as shown in this example:
(success OR fail) _storageGroup IN [“Default Storage Group”]
If the expression to be evaluated with OR is not enclosed in parentheses, an error message is
displayed on the user interface screen.
l When specifying multiple groups in a constraint, ensure that the group names are enclosed in
square brackets; for example, _storageGroup IN [“SGA”, “SGB”].
User's Guide
Chapter 4: About Searching for Events
HP ESM Command Center (6.9.0c) Page 79 of 262](https://image.slidesharecdn.com/esmcommandcenterguide6-170530061619/75/ESM_CommandCenterGuide_6-9-0-pdf-79-2048.jpg)
![l You can apply constraints to a search query by:
n Typing the constraint in the Search text box.
Once you type “_s” (for storage group) or “_p” (for peer) in the Search text box, Search Helper
automatically provides a drop-down list of relevant terms and operators from which you can select.
Caution: If a search query contains constraints and a regular expression, make sure that the
constraints are specified before the regular expression. For example, _peerLogger IN
[“192.0.2.10”] name contains abc | REGEX=“:d31”
n Selecting Storage Groups or peers from the Advanced Search tool. (To access the Advanced
Search tool, click Advanced Search beneath the text box where you type the query.) For more
information about the Advanced Search, see "Using the Advanced Search Tool" on page 88.
n Syntax Reference for Query Expressions
To create valid and accurate query expressions, follow these requirements.
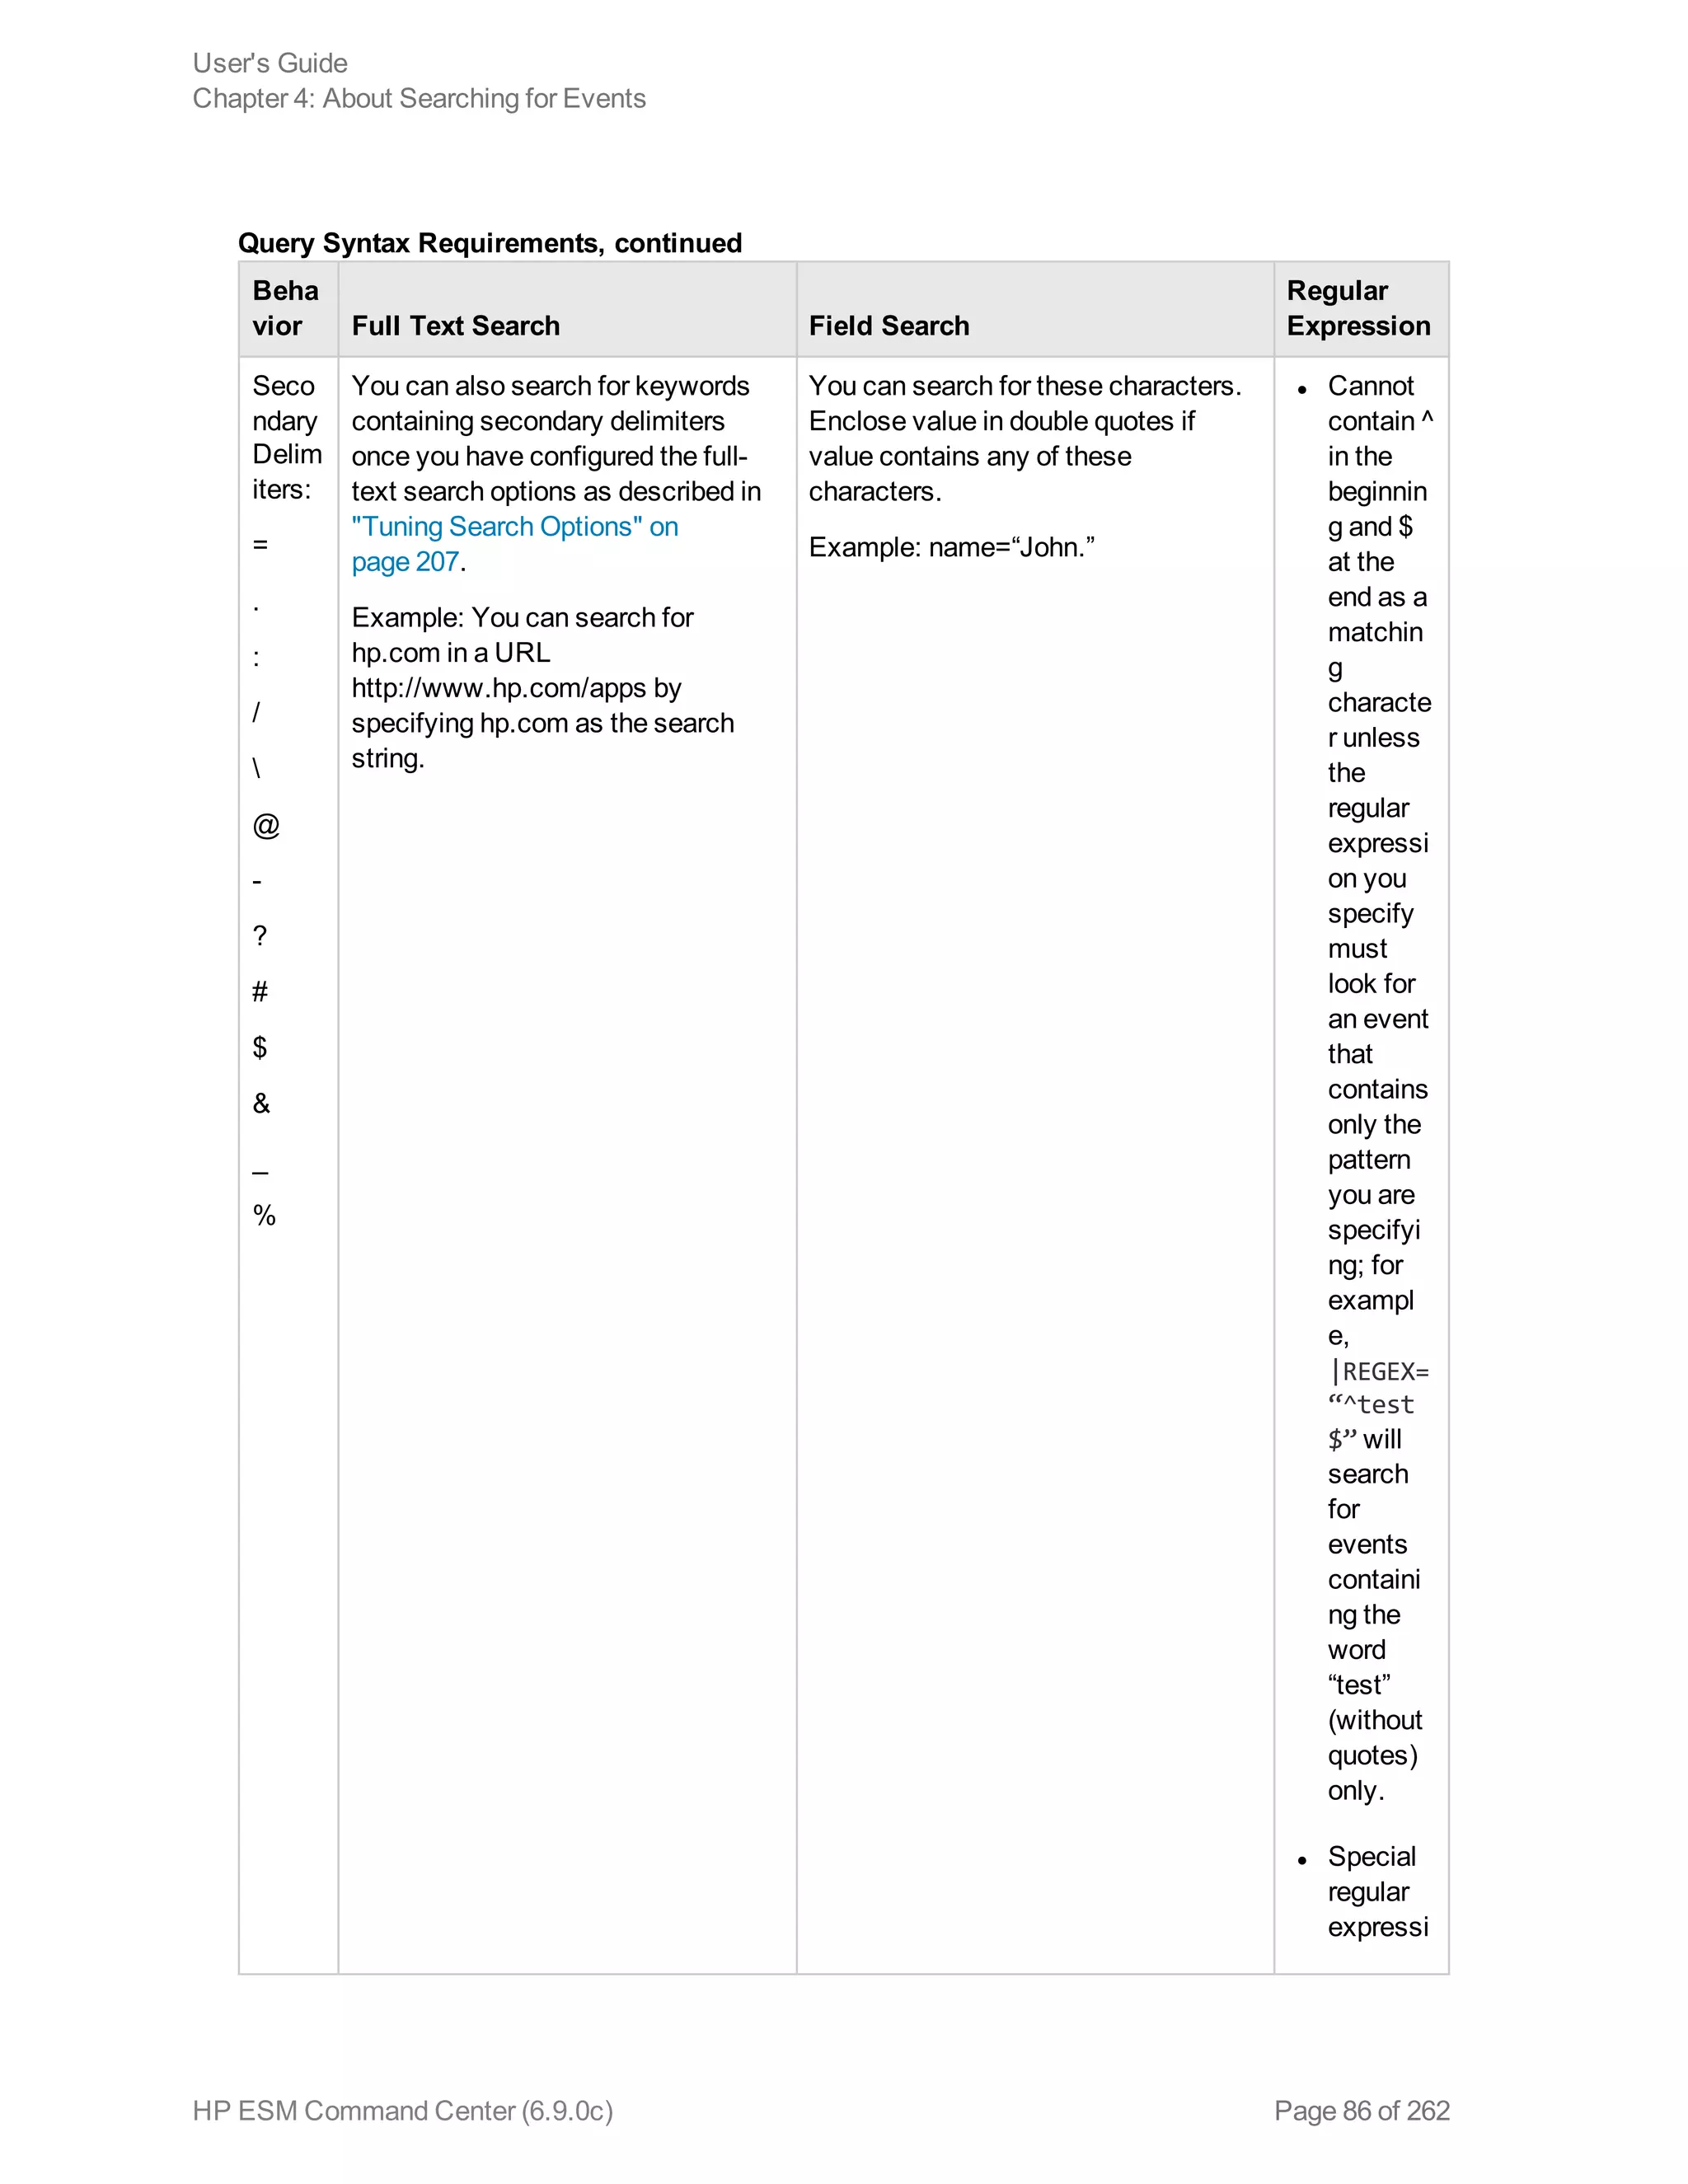
Beha
vior Full Text Search Field Search
Regular
Expression
Case
sensit
ivity
Insensitive
(Cannot be changed.)
Sensitive
(Can be changed using Tuning
options. See "Tuning Search Options"
on page 207.)
Insensitive
(Can be
changed
using
Tuning
options.
See
"Search
Operators"
on
page 225.)
Query Syntax Requirements
User's Guide
Chapter 4: About Searching for Events
HP ESM Command Center (6.9.0c) Page 80 of 262](https://image.slidesharecdn.com/esmcommandcenterguide6-170530061619/75/ESM_CommandCenterGuide_6-9-0-pdf-80-2048.jpg)
![Beha
vior Full Text Search Field Search
Regular
Expression
Opera
tors
Upper-, lower-, or mixed case
Boolean operators—AND, OR,
NOT. If an operator is not specified,
AND is used.
To search for literal operator AND,
OR, NOT, in an event, enclose them
in double quotes.
Example: “AND”, “or”, “Not”
Note: If a query includes the
Boolean operator OR and the
metadata identifiers (_storageGroup
and _peerLogger), the expression to
be evaluated with OR must be
enclosed in parentheses, as shown
in this example:
(success OR fail) _
storageGroup IN [“Default
Storage Group”]
Use any operator listed in the "Field-
based Search" on page 69 section.
l Unless a value is enclosed
between double quotes, a space
between values is interpreted as
an AND. For example,
name=John Doe is interpreted as
John AND Doe.
l If an operator is not specified
between multiple field
expressions, AND is used.
l To search for literal operator,
enclose the operator in double
quotes. Examples:
message STARTSWITH=“NOT”
message=“LOGIN DID NOT
SUCCEED”
l If a query includes the Boolean
operator OR and the metadata
identifiers (_storageGroup and _
peerLogger), the expression to be
evaluated with OR must be
enclosed in parentheses, as
shown in this example:
(success OR fail) _
storageGroup IN [“Default
Storage Group”]
| and the
operators
described in
"Search
Operators"
on
page 225.
Use this
operator to
AND
multiple
regular
expressions
in one query
expression.
Query Syntax Requirements, continued
User's Guide
Chapter 4: About Searching for Events
HP ESM Command Center (6.9.0c) Page 83 of 262](https://image.slidesharecdn.com/esmcommandcenterguide6-170530061619/75/ESM_CommandCenterGuide_6-9-0-pdf-83-2048.jpg)
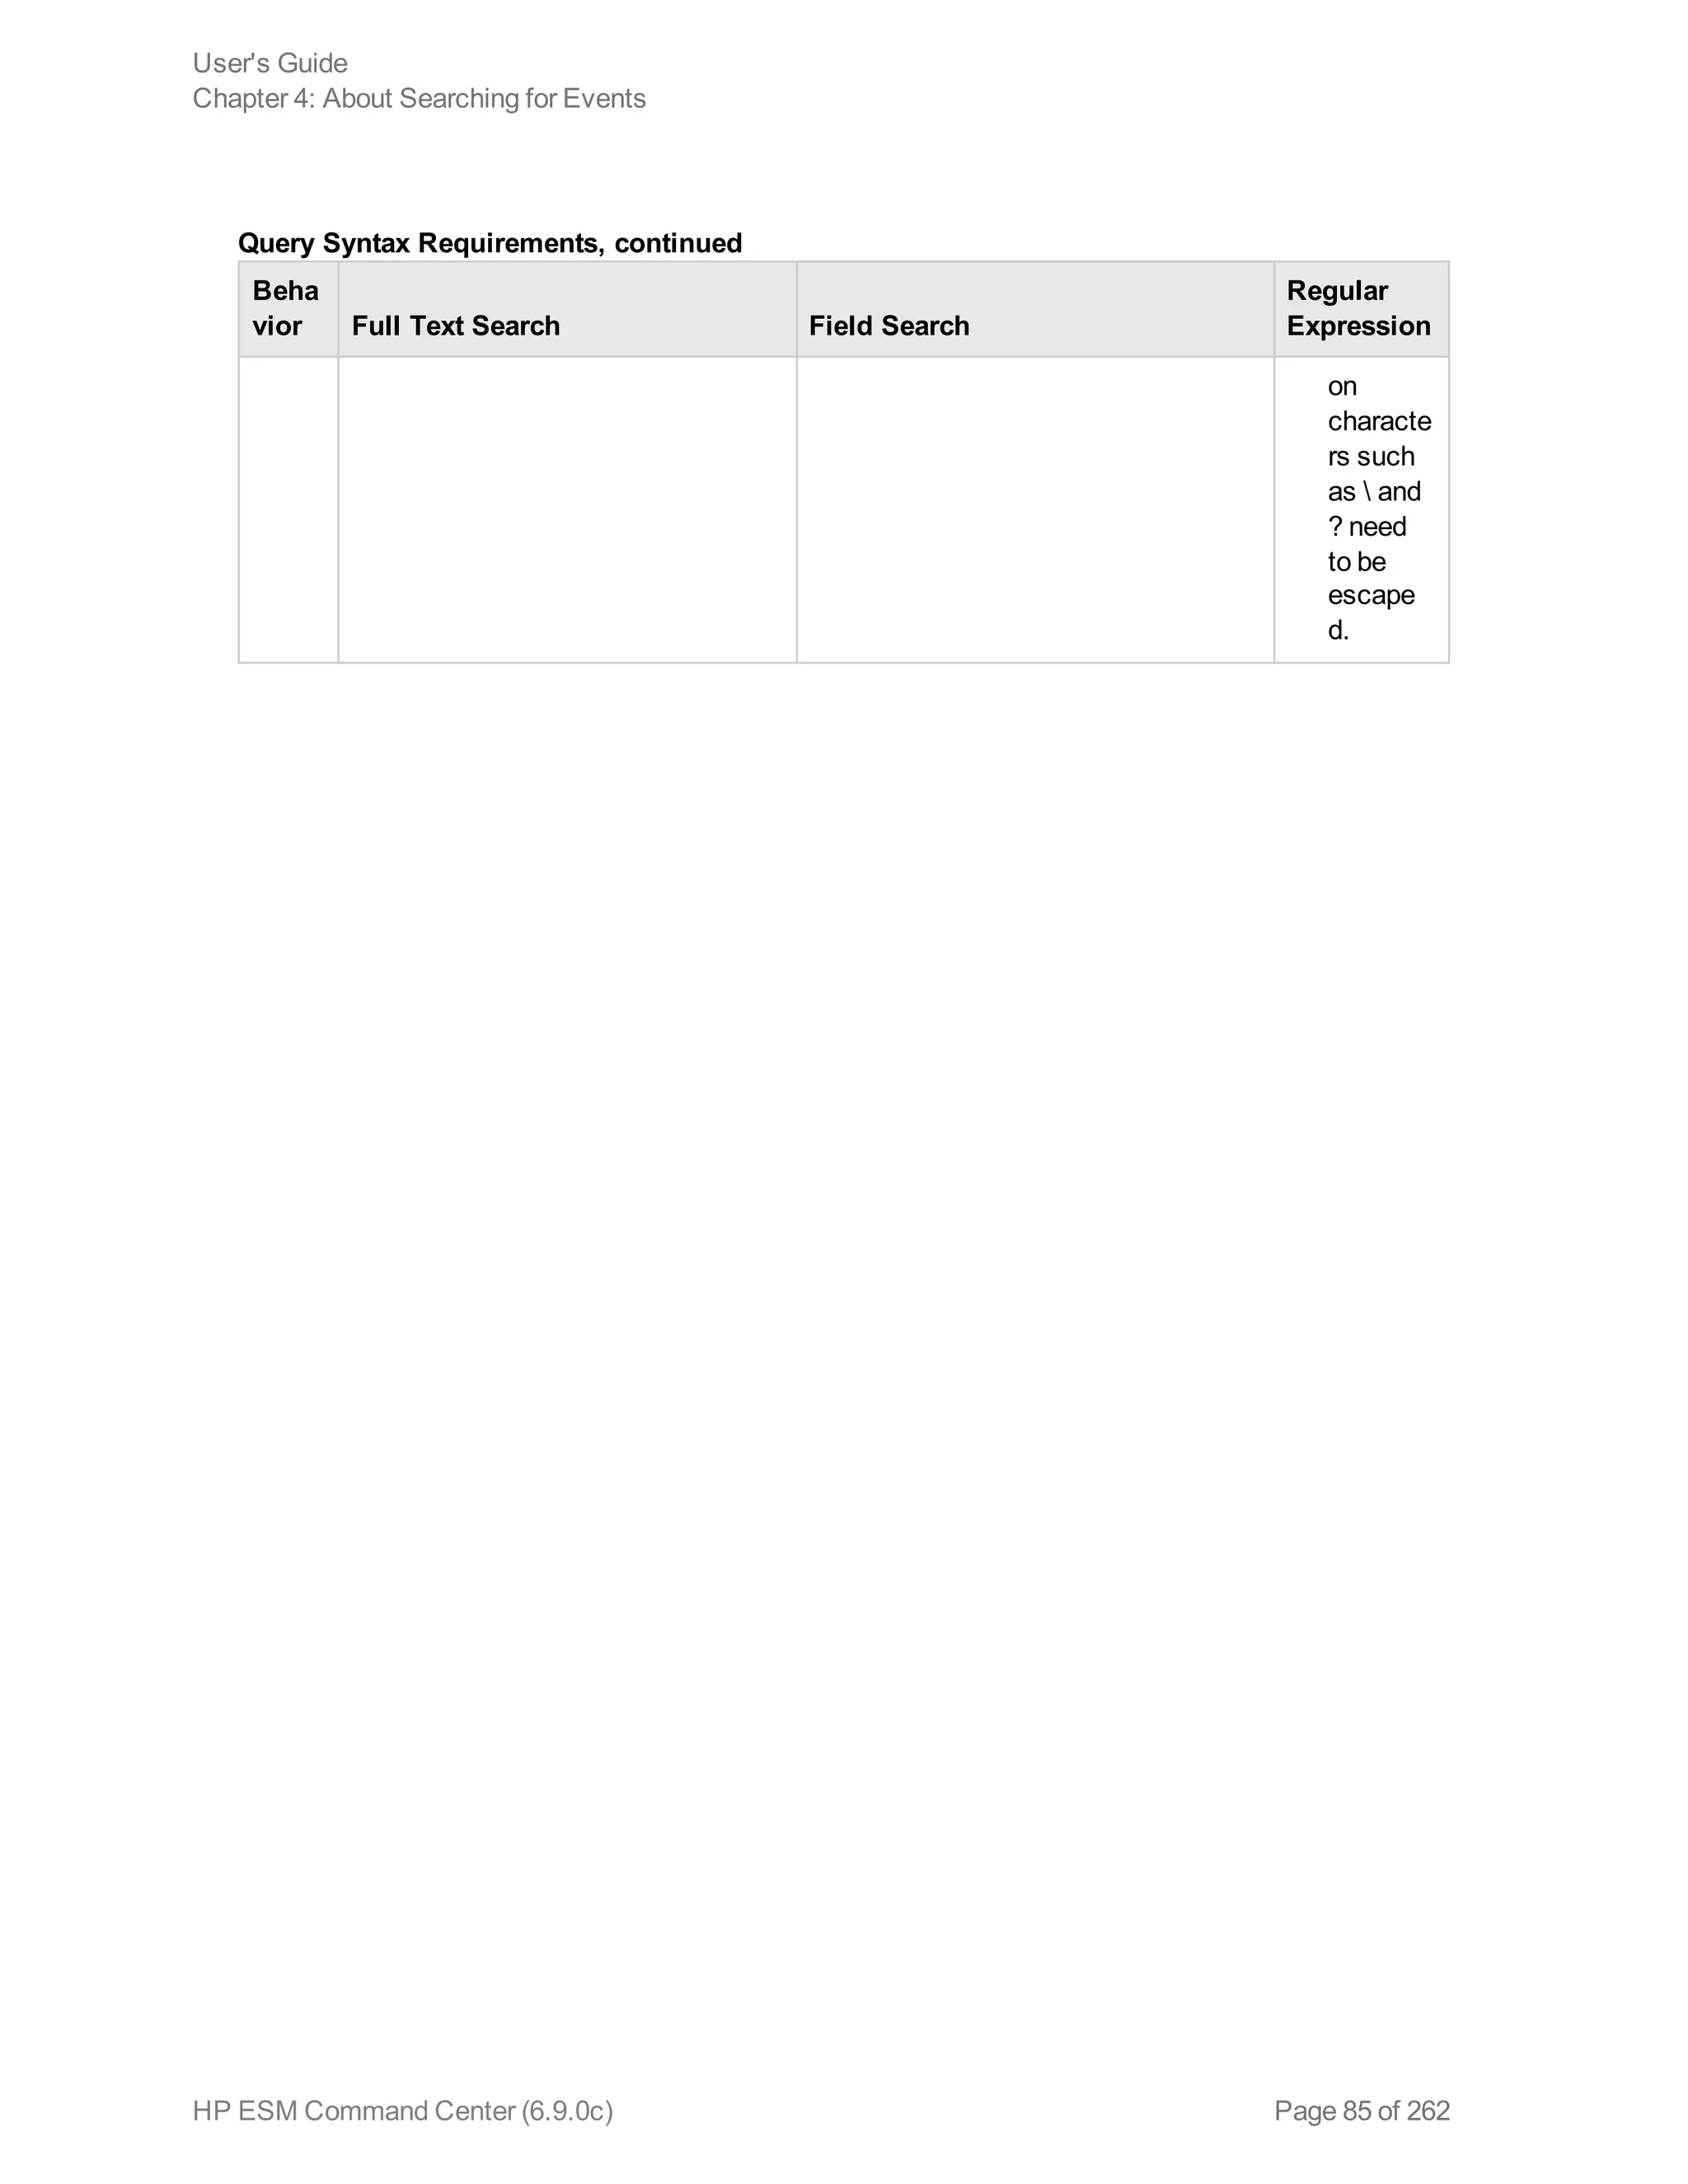
![Beha
vior Full Text Search Field Search
Regular
Expression
Prima
ry
Delim
iters:
Spac
e
,
;
(
)
[
]
}
“
|
*
>
<
!
You can search for keywords
containing primary delimiters by
enclosing the keywords in double
quotes.
Example:
“John Doe”
“Name=John Doe”
“www.hp.com”
You can search for these characters.
Enclose value in double quotes if
value contains any of these
characters.
Example: name=“John*”
l Cannot
contain ^
in the
beginnin
g and $
at the
end as a
matchin
g
characte
r unless
the
regular
expressi
on you
specify
must
look for
an event
that
contains
only the
pattern
you are
specifyi
ng; for
exampl
e,
|REGEX=
“^test
$” will
search
for
events
containi
ng the
word
“test”
(without
quotes)
only.
l Special
regular
expressi
Query Syntax Requirements, continued
User's Guide
Chapter 4: About Searching for Events
HP ESM Command Center (6.9.0c) Page 84 of 262](https://image.slidesharecdn.com/esmcommandcenterguide6-170530061619/75/ESM_CommandCenterGuide_6-9-0-pdf-84-2048.jpg)
![Beha
vior Full Text Search Field Search
Regular
Expression
on
characte
rs such
as and
? need
to be
escape
d.
Synta
x
keyword1 boolean_operator
keyword2 boolean_operator
keyword3...
field_name operator field_value
(For instructions on how to view the
fields, see "Viewing the Default Fields
" on page 213. section.)
(List of operators in the "Field-based
Search" on page 69 section.)
|REGEX=
“<REGEX1>”
| REGEX=“
<REGEX2>”
|..
Tab
Newli
ne
{
“
*
Cannot search for these
characters.
Examples:
“John{Doe” is invalid
No restrictions.
Enclose special character in double
quotes. Escape the wildcard
character and double quotes.
Example:
name=“John* “Doe” (matches John*
“Doe)
No
restrictions.
Special
regular
expression
characters
such as (,),
[,], {,}, ", |,
and * need
to be
escaped.
Query Syntax Requirements, continued
User's Guide
Chapter 4: About Searching for Events
HP ESM Command Center (6.9.0c) Page 87 of 262](https://image.slidesharecdn.com/esmcommandcenterguide6-170530061619/75/ESM_CommandCenterGuide_6-9-0-pdf-87-2048.jpg)
![example, _storageGroup IN [“SGA”, “SGB”].
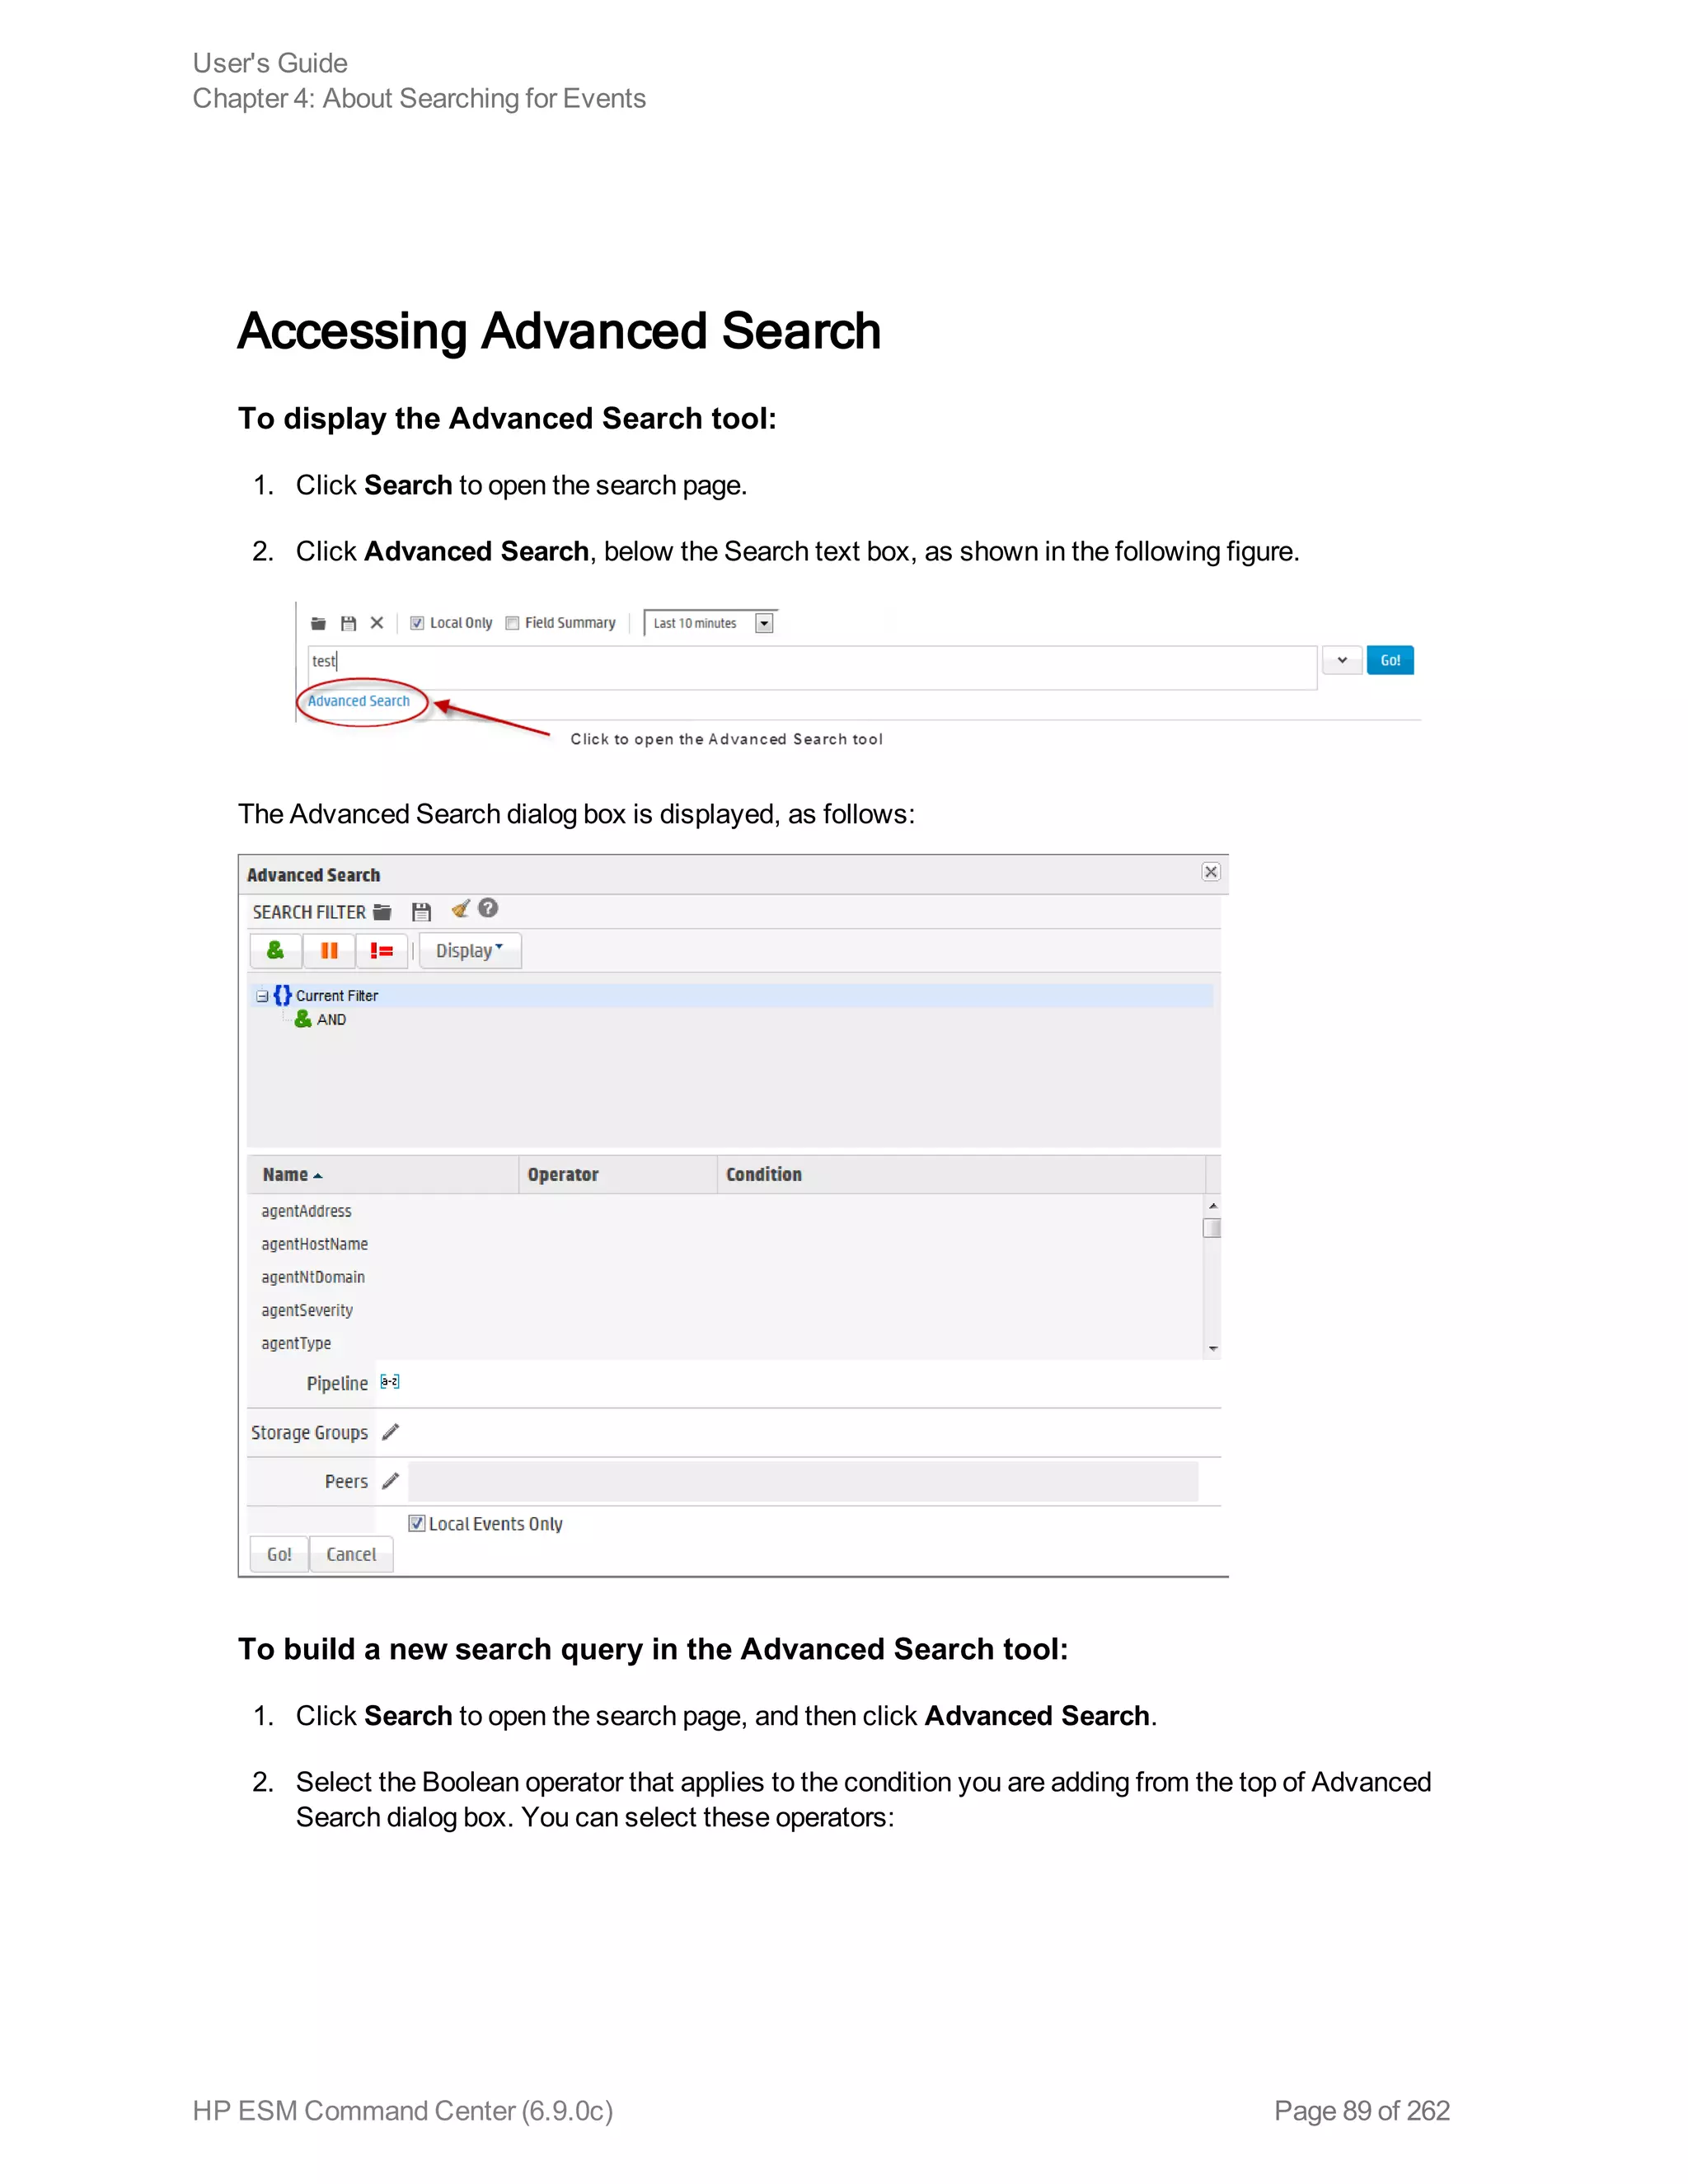
o Click Advanced Search. (See "Using the Advanced Search Tool" on page 88 for more
information.) Use this option to specify storage groups and peers to which the search should
be limited.
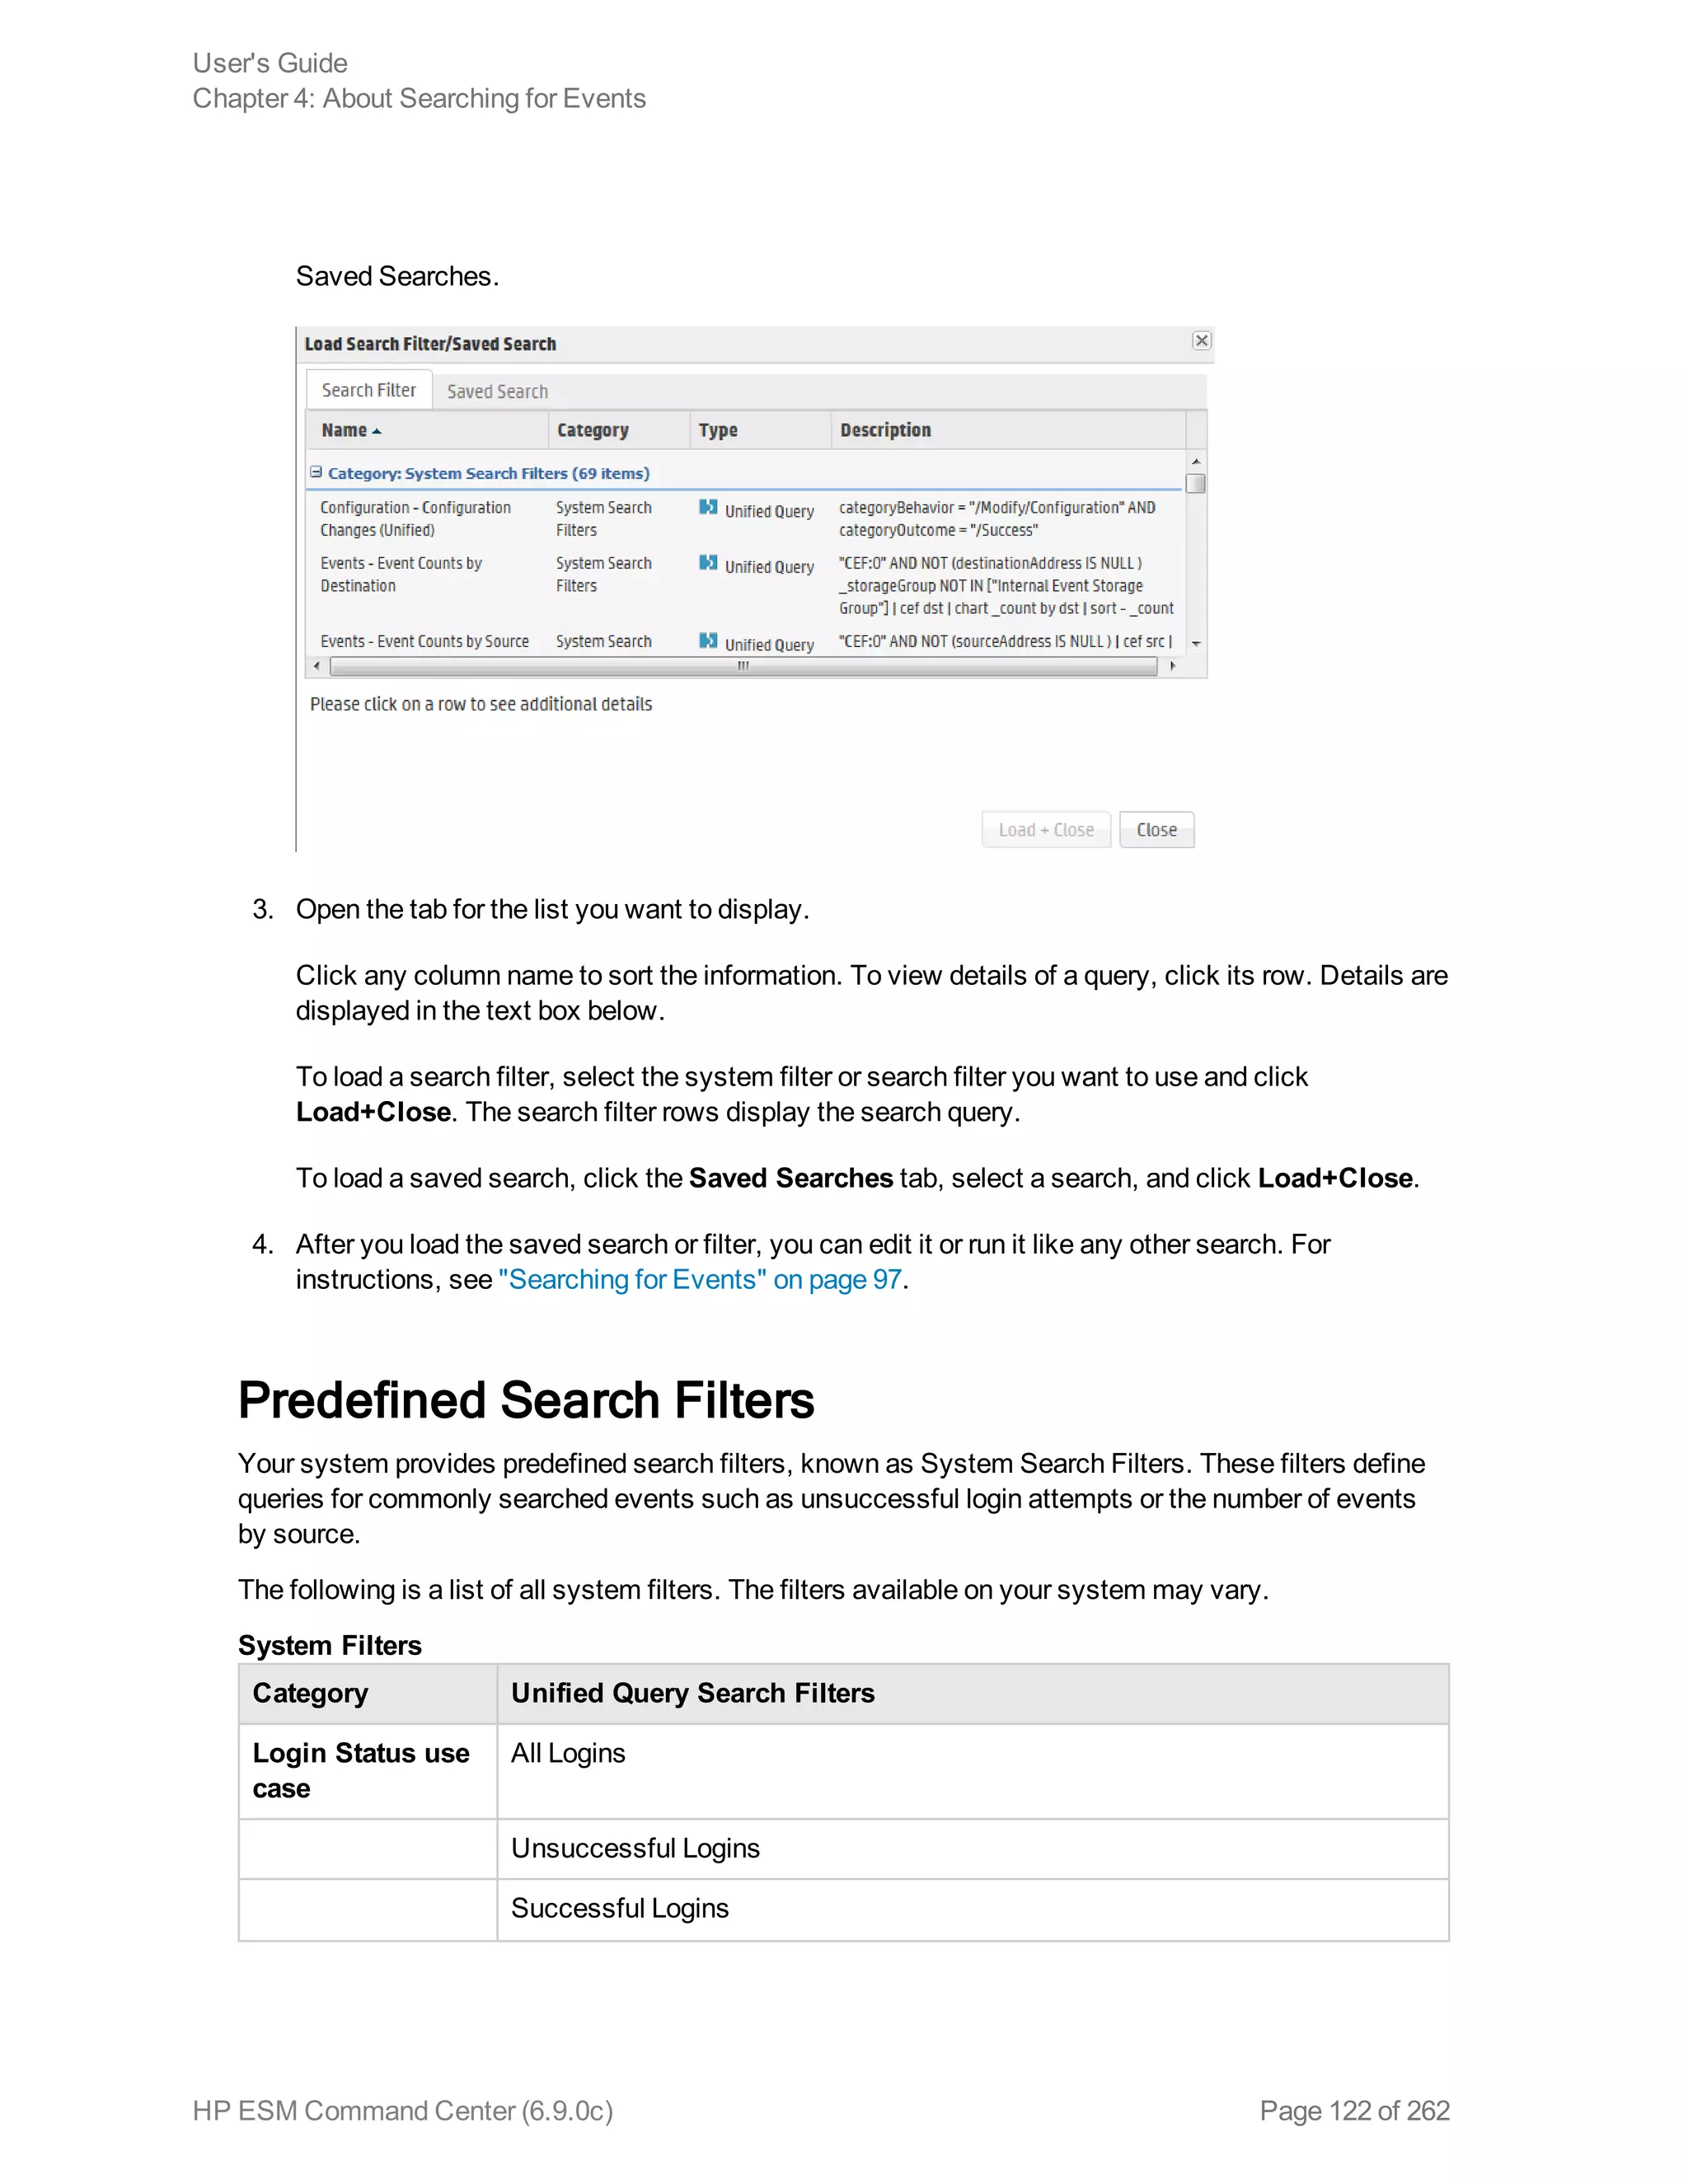
d. Click the icon to load a search filter or a saved search. Select the search filter or the saved
search from the displayed list and click Load+Close.
For more information, see "Saved Queries (Search Filters and Saved Searches)" on page 118
and "Predefined Search Filters" on page 122.
4. Click Go!
The search results are displayed in the bottom section of same screen in which you ran the
search. For more information about how search results are displayed and the various controls
available, see "Understanding the Search Results Display" on page 103.
5. You can save the search as a search filter or saved search. Click the icon to do so. For more
information, see "Saved Queries (Search Filters and Saved Searches)" on page 118.
Granting Access to Search Operations and Event
Filters
To perform local searches, a user must belong to a Logger Search Group with the “Search for events”
user right set to Yes.
To perform searches on peers and view the search results, a user needs to belong to these user groups
with the listed permissions:
l Logger Search Group with “Search for events on remote peers” user right set (checked).
l Logger Rights Group with the “View registered peers” user rights set (checked).
Access to the search feature is granted at the user group level. In addition to the search operation
permission, a user needs permissions to event filters to enable access to the appropriate events. By
default, Administrative users have access to all events, but other users might not have access to any
events.
To grant access to search events:
1. In the ArcSight Console, select a system filter or create a filter to provide access to the
appropriate events. For more information, refer to the Filtering Events section of the ArcSight
Console Guide.
User's Guide
Chapter 4: About Searching for Events
HP ESM Command Center (6.9.0c) Page 99 of 262](https://image.slidesharecdn.com/esmcommandcenterguide6-170530061619/75/ESM_CommandCenterGuide_6-9-0-pdf-99-2048.jpg)

![Exist in Logger 5.3 SP1 and Later" on the next page.
l When searching version 5.3 SP1 (or earlier) peer Loggers, you can search all Logger 5.3 SP1 fields.
For a list of those fields, refer to the documentation that came with your Logger, or to the
Configuration (or Configuration > Settings) > Search > Default Fields tab in your Logger.
When searching ESM 6.5c (and later) peers, you can search all ESM fields. For a list of those
fields, refer to the Administration > Search > Default Fields tab in ArcSight Command Center.
l Storage groups on peers must have identical names.
l Only storage groups with identical names are searched. If a peer does not have identical storage
group names, the search operation skips searching for events for those groups on those peers.
l If a peer becomes unavailable during a search operation, one of the following errors might be
displayed:
[Logger IP address] Error: Get Query Statistics
[Logger IP address] Error: Remote exception (does not authorize the request.
Please check if remote has relationship with your logger)
[Local Logger] Remote exception (Peer[IP address] is not available at this time)
These error messages can occur when the peer cannot be reached. Once the peer is reachable, run the
search again. The error messages might still display for a search in progress, even after the relationship
is restored. You can ignore the messages if they do not recur when you run a new distributed search.
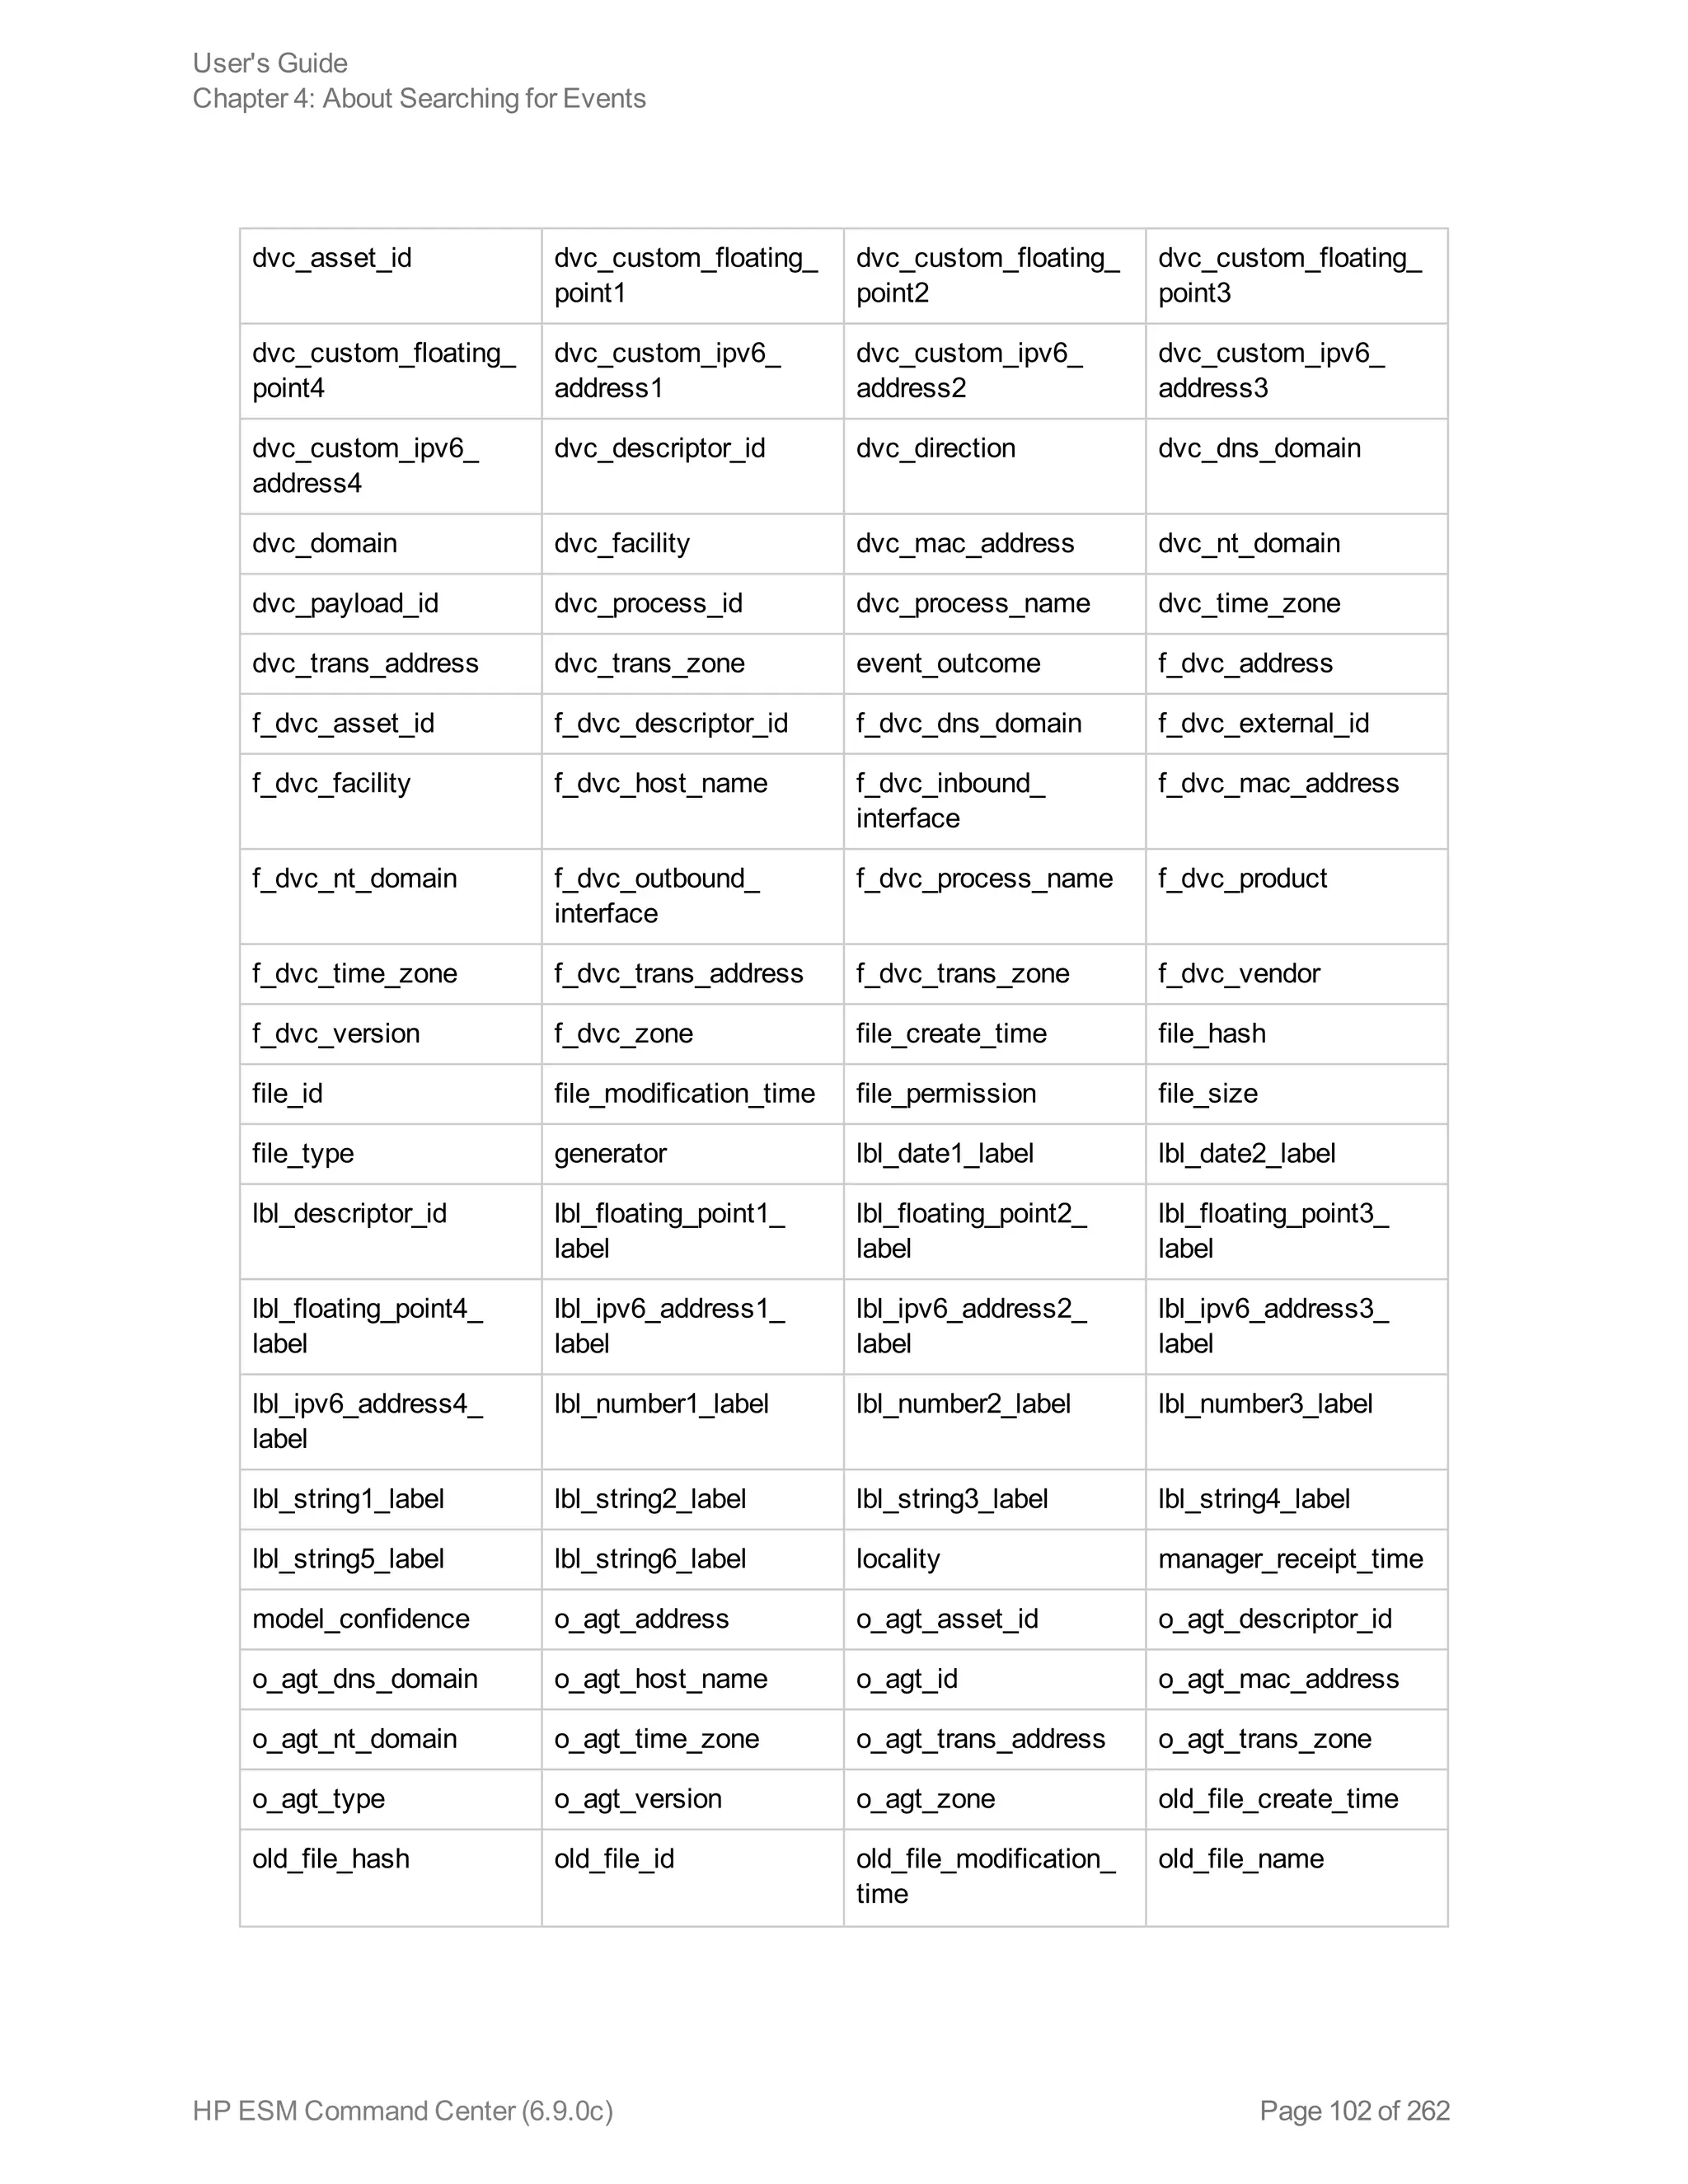
Fields That Do Not Exist in Logger 5.3 SP1 and Later
The fields in the following table appear in the list of Default Fields provided in Command Center under
Administration > Search > Default Fields, but they do not exist in Logger 5.3 SP1 and later.
Therefore, they are not supported when searching Logger 5.3 SP1 (and later) peers.
agt_asset_id agt_descriptor_id agt_dns_domain agt_id
agt_mac_address agt_receipt_time agt_time_zone agt_trans_address
agt_trans_zone agt_version asset_criticality base_event_ids
cat_custom_format_
field
cat_descriptor_id cat_device_type cat_tuple_description
cef_others correlated_event_id crypto_signature customer
dest_asset_id dest_geo_country_
code
dest_geo_id dest_geo_latitude
dest_geo_location_info dest_geo_longitude dest_geo_postal_code dest_geo_region_code
dest_process_id dest_trans_port dest_trans_zone domain
User's Guide
Chapter 4: About Searching for Events
HP ESM Command Center (6.9.0c) Page 101 of 262](https://image.slidesharecdn.com/esmcommandcenterguide6-170530061619/75/ESM_CommandCenterGuide_6-9-0-pdf-101-2048.jpg)

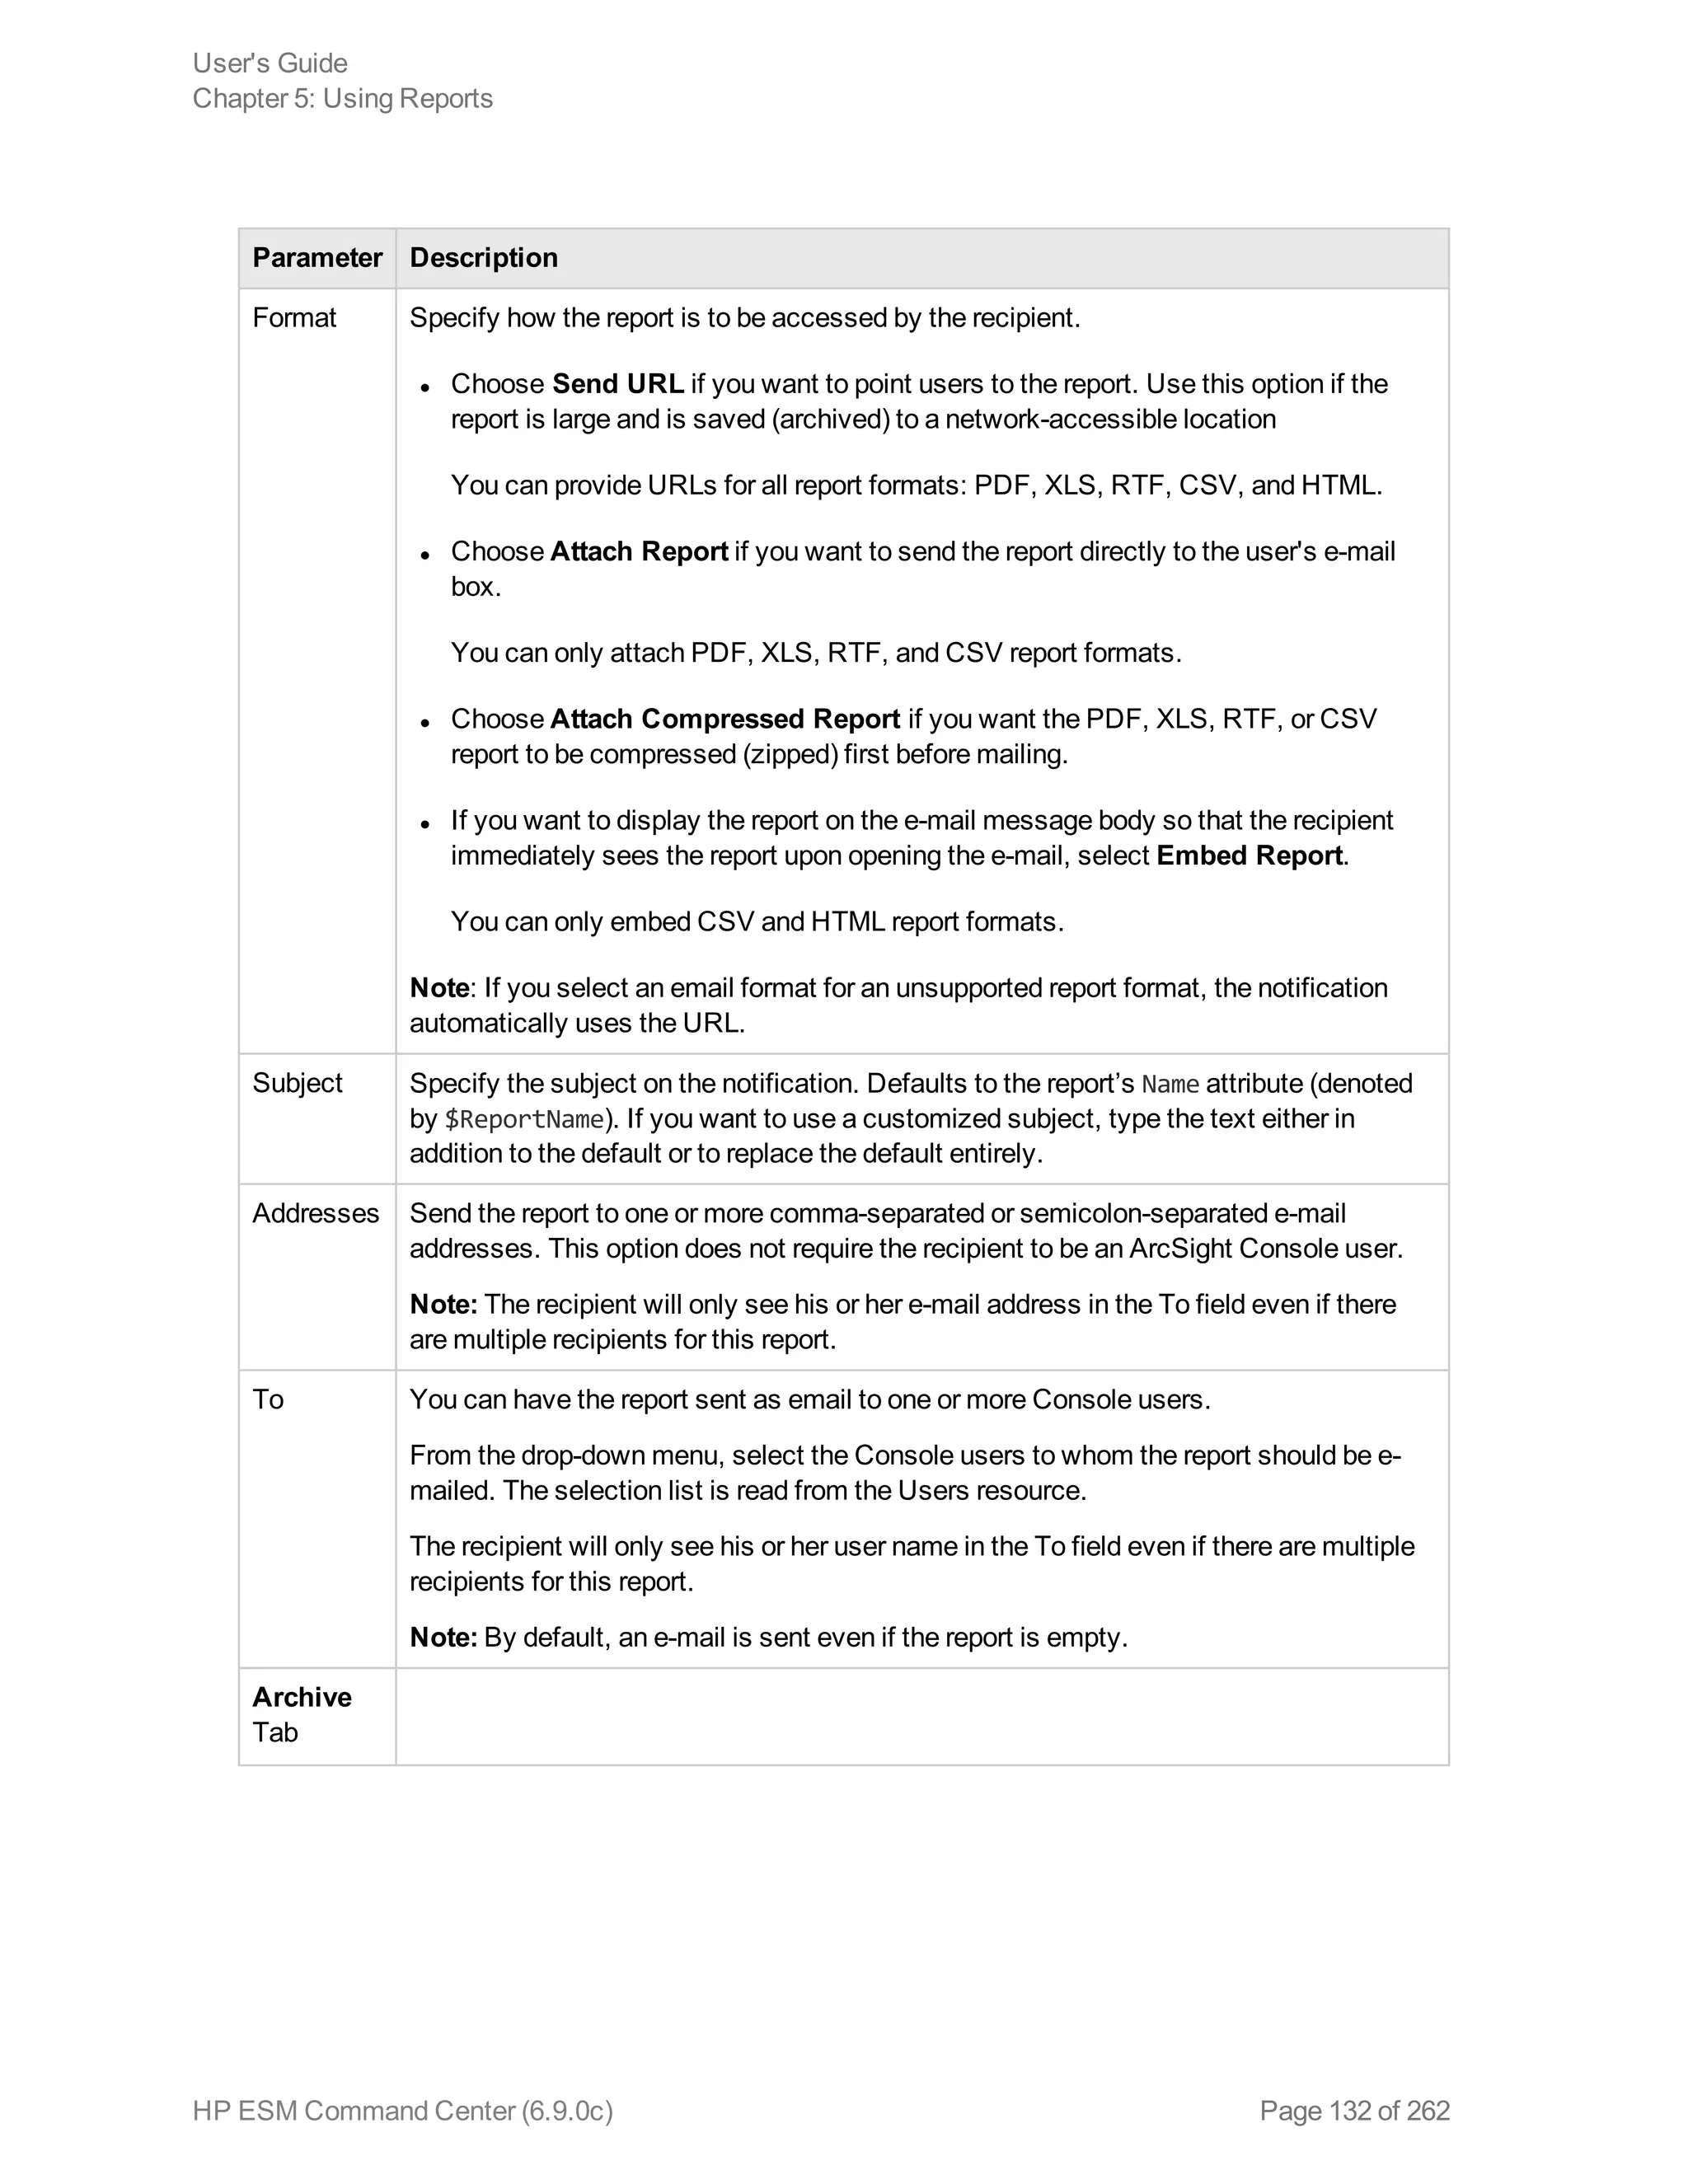
![Chapter 5: Using Reports
The ArcSight ESM Command Center interface enables you to view the hierarchy of reports created in
the ArcSight Console, run them, and view the results.
To create a report to appear on this page, refer to the chapter “Building Reports,” in the ArcSight
Console User’s Guide. The reports available to you are organized in the tree in the left panel. Click the
group folders in the tree to open or close them. Click a folder to see a list of its reports in the right-hand
pane.
Running and Viewing Reports 130
Report Parameters 131
Archived Reports 134
Running and Viewing Reports
The reports that are available were created in the ArcSight Console. Refer to the ArcSight Console
User’s Guide for information on creating and managing reports.
To run and view a report:
1. Click Reports in the top menu bar.
2. Navigate to a report folder in the resource tree at the left.
3. Click a report folder to show a list of that folder’s reports in the right pane.
4. Select a report and click Run to run it with the default parameters and display the results.
For focused reports ( ), you can also click the report name to run it.
For regular reports ( ) you can click the report name to change the output parameters before you
run it. The report parameters dialog is described in "Report Parameters" on the next page.
If you have run reports recently you can select one from Reports > Recents.
Note: In ESM Command Center, if you have a report that is currently in the process of
generating and you select and run another report, it cancels the first report.
If you run a report that takes more than approximately 30 minutes to execute, ACC may
display a Manager Unresponsive error. The report continues to run on the server. You can
view the finished report in the Archives > Archives tab > reports tree > [user]'s Archive
HP ESM Command Center (6.9.0c) Page 130 of 262](https://image.slidesharecdn.com/esmcommandcenterguide6-170530061619/75/ESM_CommandCenterGuide_6-9-0-pdf-130-2048.jpg)
![Reports folder > Temporary Reports folder (the [user] string is the currently logged in
Username).
Report Parameters
For regular reports ( ) you can change the output parameters by double-clicking the report name. It
brings up a dialog that enables you to change selected parameters before running it.
Parameter Description
Basic Tab
Start Time To set a start time that overrides the one set in the query, specify a start time here.
For example, if you want all the report elements to report on events for the past 2 hours,
you can create a start-time parameter of $Now-2h, which sets both table and chart start
times to $Now-2h.
This setting is saved locally as part of the report definition, not as part of the original
query upon which the report is based.
End Time To set an end time that overrides the one set in the query, specify an end time here.
This setting is saved locally as part of the report definition, not as part of the original
query or trend upon which the report is based.
Other
options
The other options that might appear vary according to the report, for example you might
see License Type for licensing reports, or Row Limit, Filter By, or other options with
choices appropriate to the report.
Run as
User
Run the report as a particular user. From the drop-down menu, select the user name by
which you would like to run the report.
For example, this option would allow an administrator for an Managed Security Service
Provider (MSSP) to run report for a customer. The administrator would need write
permissions to the user.
Email Tab
User's Guide
Chapter 5: Using Reports
HP ESM Command Center (6.9.0c) Page 131 of 262](https://image.slidesharecdn.com/esmcommandcenterguide6-170530061619/75/ESM_CommandCenterGuide_6-9-0-pdf-131-2048.jpg)


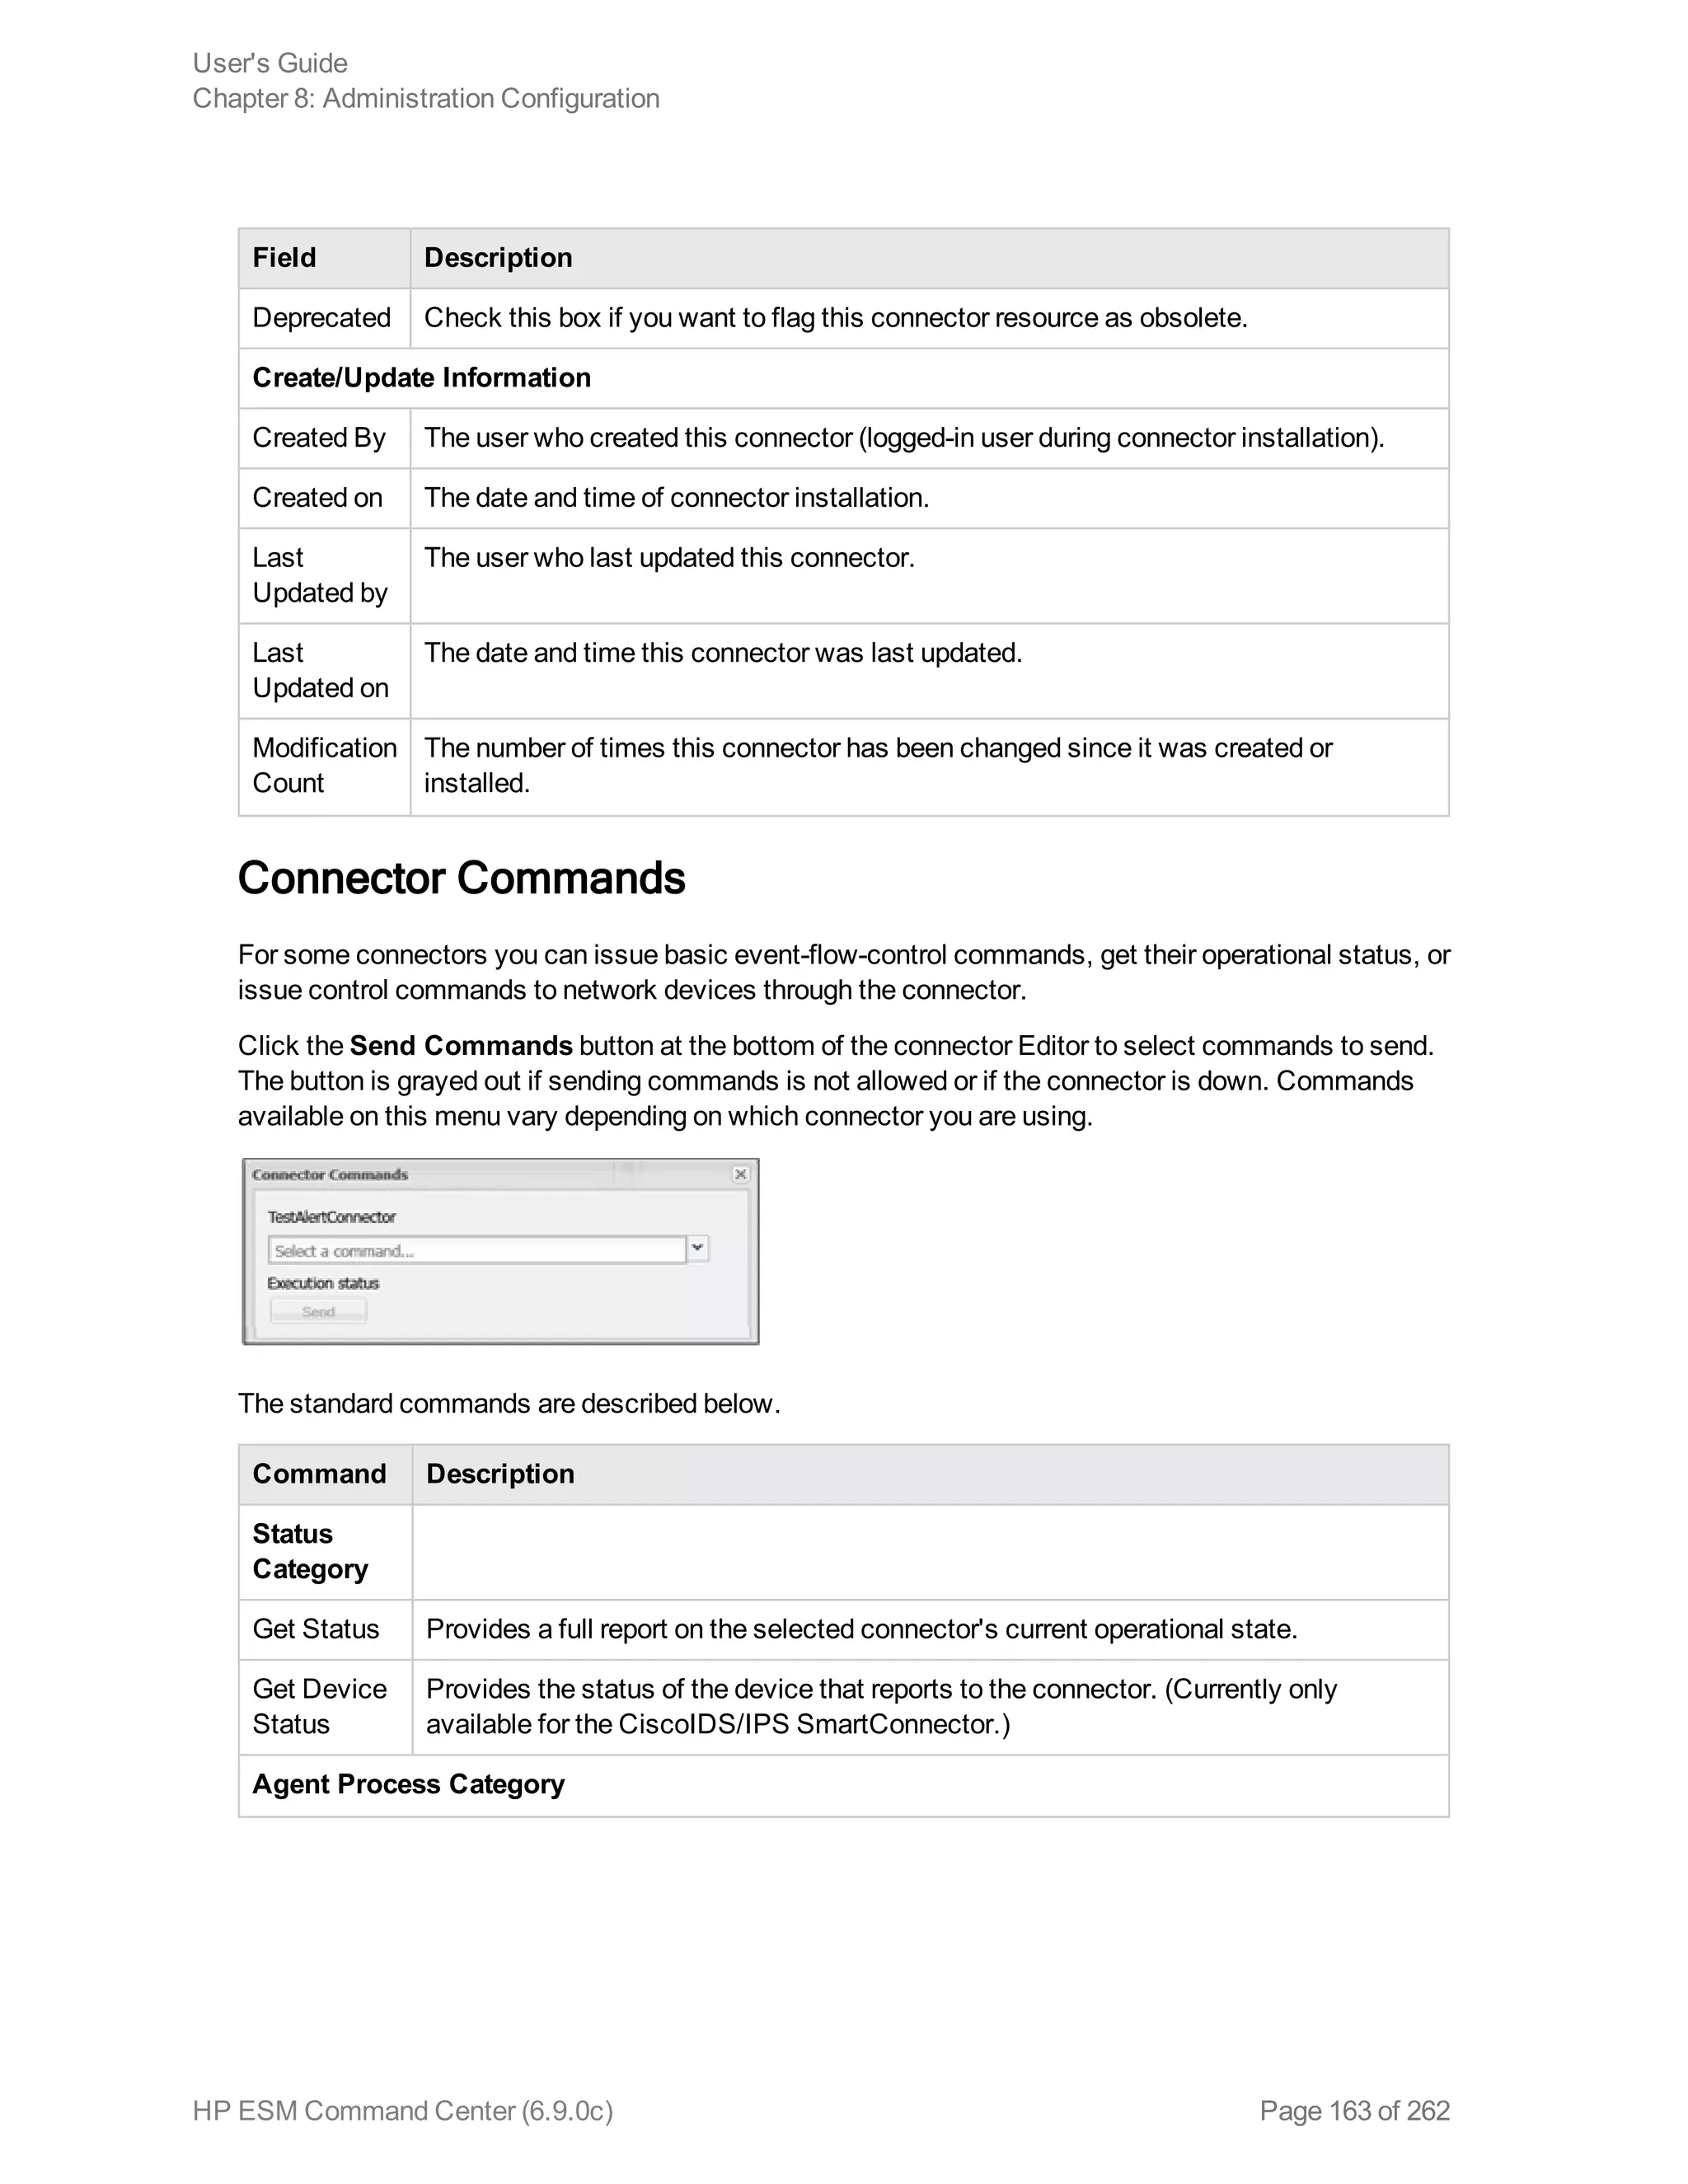
![Command Description
Mapping Category
Get Additional
Data Names
Returns a list of data names seen for each device vendor/product combination
since the connector started. For example:
Additional Data Names Seen:
Generic (no vendor/product):
test1 [3 times]
test11
test13 [2 times]
Vendor/product [vend/prod]:
test1
test10 [6 times]
By default, the command limits the list to show only the most recent 100 device
vendor/product combinations and the most recent 100 names for each.
Tip: You can change this limit by editing the connector property
agent.additionaldata.mapper.track.max.names in the file $ARCSIGHT_
HOME/ArcSightSmartAgents/current/user/agent/agent.properties on the
machine where the connector is installed. However, in most cases we recommend
keeping the defaults. If you do change a property setting such as this, restart the
connector.
If a data name is not a string, its data type is displayed in the list. If the connector
saw an additional data name more than once, the command output indicates the
number of times the name was seen.
Map Additional
Data Name...
Brings up a dialog where you can map an additional data name for the selected
connector.
For a generic mapping, you can leave the Device vendor and Device product
fields blank. For a specific mapping, fill in these fields with the appropriate vendor
and product names.
Typically, the Additional data name is one of the names shown in the Get
Additional Data Names output (but can be another name not on that list).
The ArcSight field must be a valid ArcSight event field.
Click OK to create the mapping.
Here is an example of the command output for a successful generic mapping:
Successfully mapped additional data name [test11] to event field
[message] for vendor/product []
User's Guide
Chapter 8: Administration Configuration
HP ESM Command Center (6.9.0c) Page 167 of 262](https://image.slidesharecdn.com/esmcommandcenterguide6-170530061619/75/ESM_CommandCenterGuide_6-9-0-pdf-167-2048.jpg)
![Command Description
A successful device vendor/product-specific mapping returns output similar to this:
Successfully mapped additional data name [test10] to event field
[message] for vendor/product [vend/prod]
If the additional data name has not been seen, the name is still mapped, but with a
warning like this:
Successfully mapped additional data name [foo] to event field
[deviceCustomString1] for vendor/product [vend/prod] (note that
additional data name [foo] has not been seen for vendor/product
[vend/prod])
If the ArcSight field is not valid, the error returned is similar to this:
Failed to map additional data name [bar] to event field [messages]
for vendor/product [vend/prod] (event field [messages] is unknown)
Unmap
Additional Data
Name...
Brings up a dialog where you can unmap an additional data name for the selected
connector.
To remove a generic mapping, you can leave the Device vendor and Device
product fields blank. To remove a specific mapping, fill in these fields with the
appropriate vendor and product names. The additional data name should be one
that was previously mapped for the specified device vendor and product
combination.
Click OK to un-map the data name.
Here is an example of the command output for a successful generic unmapping:
Successfully unmapped additional data name [test11] for
vendor/product []
A successful device vendor/product-specific unmapping returns output similar to
this:
Successfully unmapped additional data name [foo] for vendor/product
[vend/prod]
If the specified additional data name was not previously mapped, the output looks
like this:
Failed to unmap additional data name [foo] for vendor/product
[vend/prod] (not previously mapped)
User's Guide
Chapter 8: Administration Configuration
HP ESM Command Center (6.9.0c) Page 168 of 262](https://image.slidesharecdn.com/esmcommandcenterguide6-170530061619/75/ESM_CommandCenterGuide_6-9-0-pdf-168-2048.jpg)


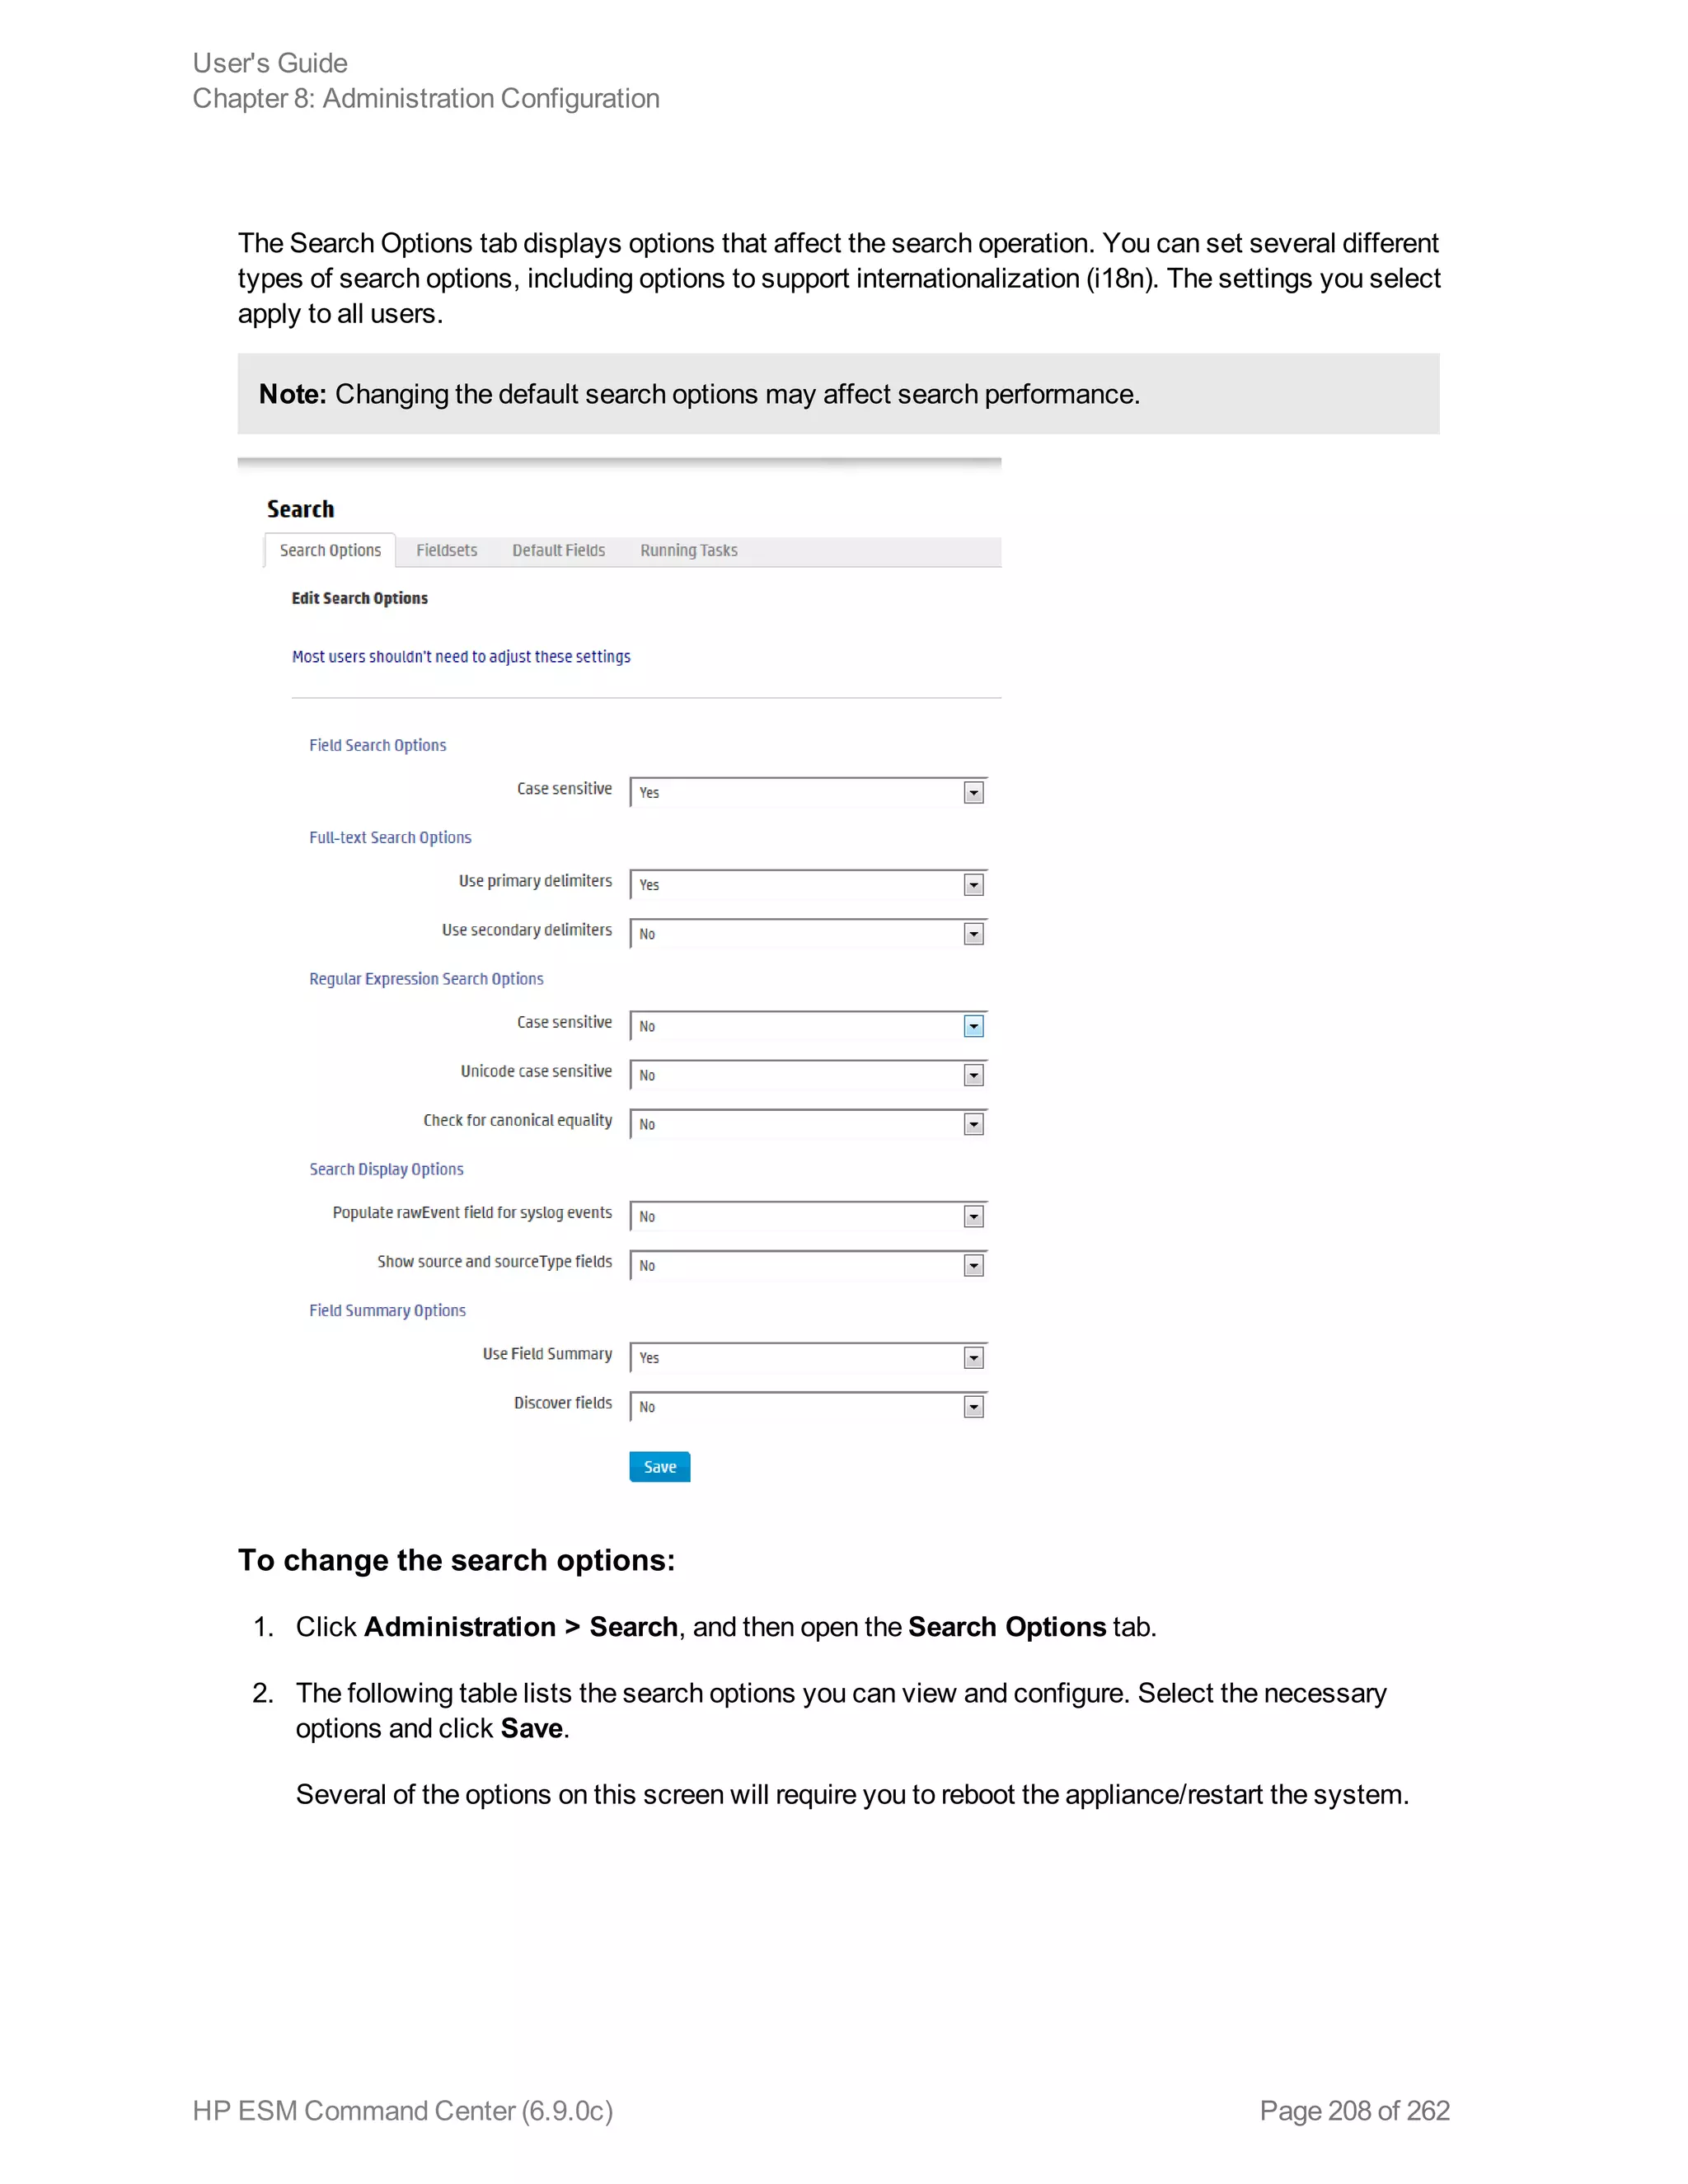
![Option Description
Field Search Option
Case
sensitive
Default: Yes
Controls whether to differentiate between upper- and lower-case characters
during a search. When this option is set to No, searching for "login" will find
"login," "Login," and "LOGIN".
You must reboot the Logger appliance/restart software Logger the system for
this change to take effect.
Notes:
n Case-sensitive search only applies to the local system. Peers will continue
to use case-insensitive search.
n Full-text search (keyword search) is case insensitive. You cannot change
its case sensitivity.
n Set this option to Yes to increase local query performance.
Full-text Search Options
Use primary
delimiters
Default: Yes
Controls whether primary delimiters are applied to an event when tokenizing it
for indexing. For information about Indexing, see "Indexing" on page 129.
A primary delimiter tokenizes an event for indexing. For example, an event
"john doe the first" is tokenized into "john" "doe" "the" "first" using the “space”
primary delimiter.
Users can search for keywords containing primary delimiters by enclosing the
keywords in double quotes.
Supported primary delimiters: space, tab, newline, comma, semi-colon, (, ), [, ],
{, }, “, |, *, >, <, !
User's Guide
Chapter 8: Administration Configuration
HP ESM Command Center (6.9.0c) Page 209 of 262](https://image.slidesharecdn.com/esmcommandcenterguide6-170530061619/75/ESM_CommandCenterGuide_6-9-0-pdf-209-2048.jpg)

![Note: If you run a peer search on Loggers, one of which is running v5.1 or earlier (in which CEF
was not deprecated), the query that does not contain CEF defined fields will run without any issues
in the circumstance when the query is initiated on a Logger running v5.2; however, if the query is
initiated on a v5.1 Logger, it will fail.
Extracts values for specified fields from matching CEF events. If an event is non-CEF, the field value
is set to NULL.
Usage:
...| cef <field1> <field2> <field3> ...
Notes:
If multiple fields are specified, separate each field name with a white space or a comma.
To identify the name of a CEF field, use the Search Builder tool (click Advanced Search under the
Search text box), which lists the names of all fields alphabetically.
The extracted fields are displayed as additional columns in the All Fields view (of the System
FieldSets). To view only the extracted columns, select User Defined Fieldsets from the System
Fieldsets list.
Example 1:
...| cef categorySignificance agentType
Example 2:
...| cef deviceEventCategory name
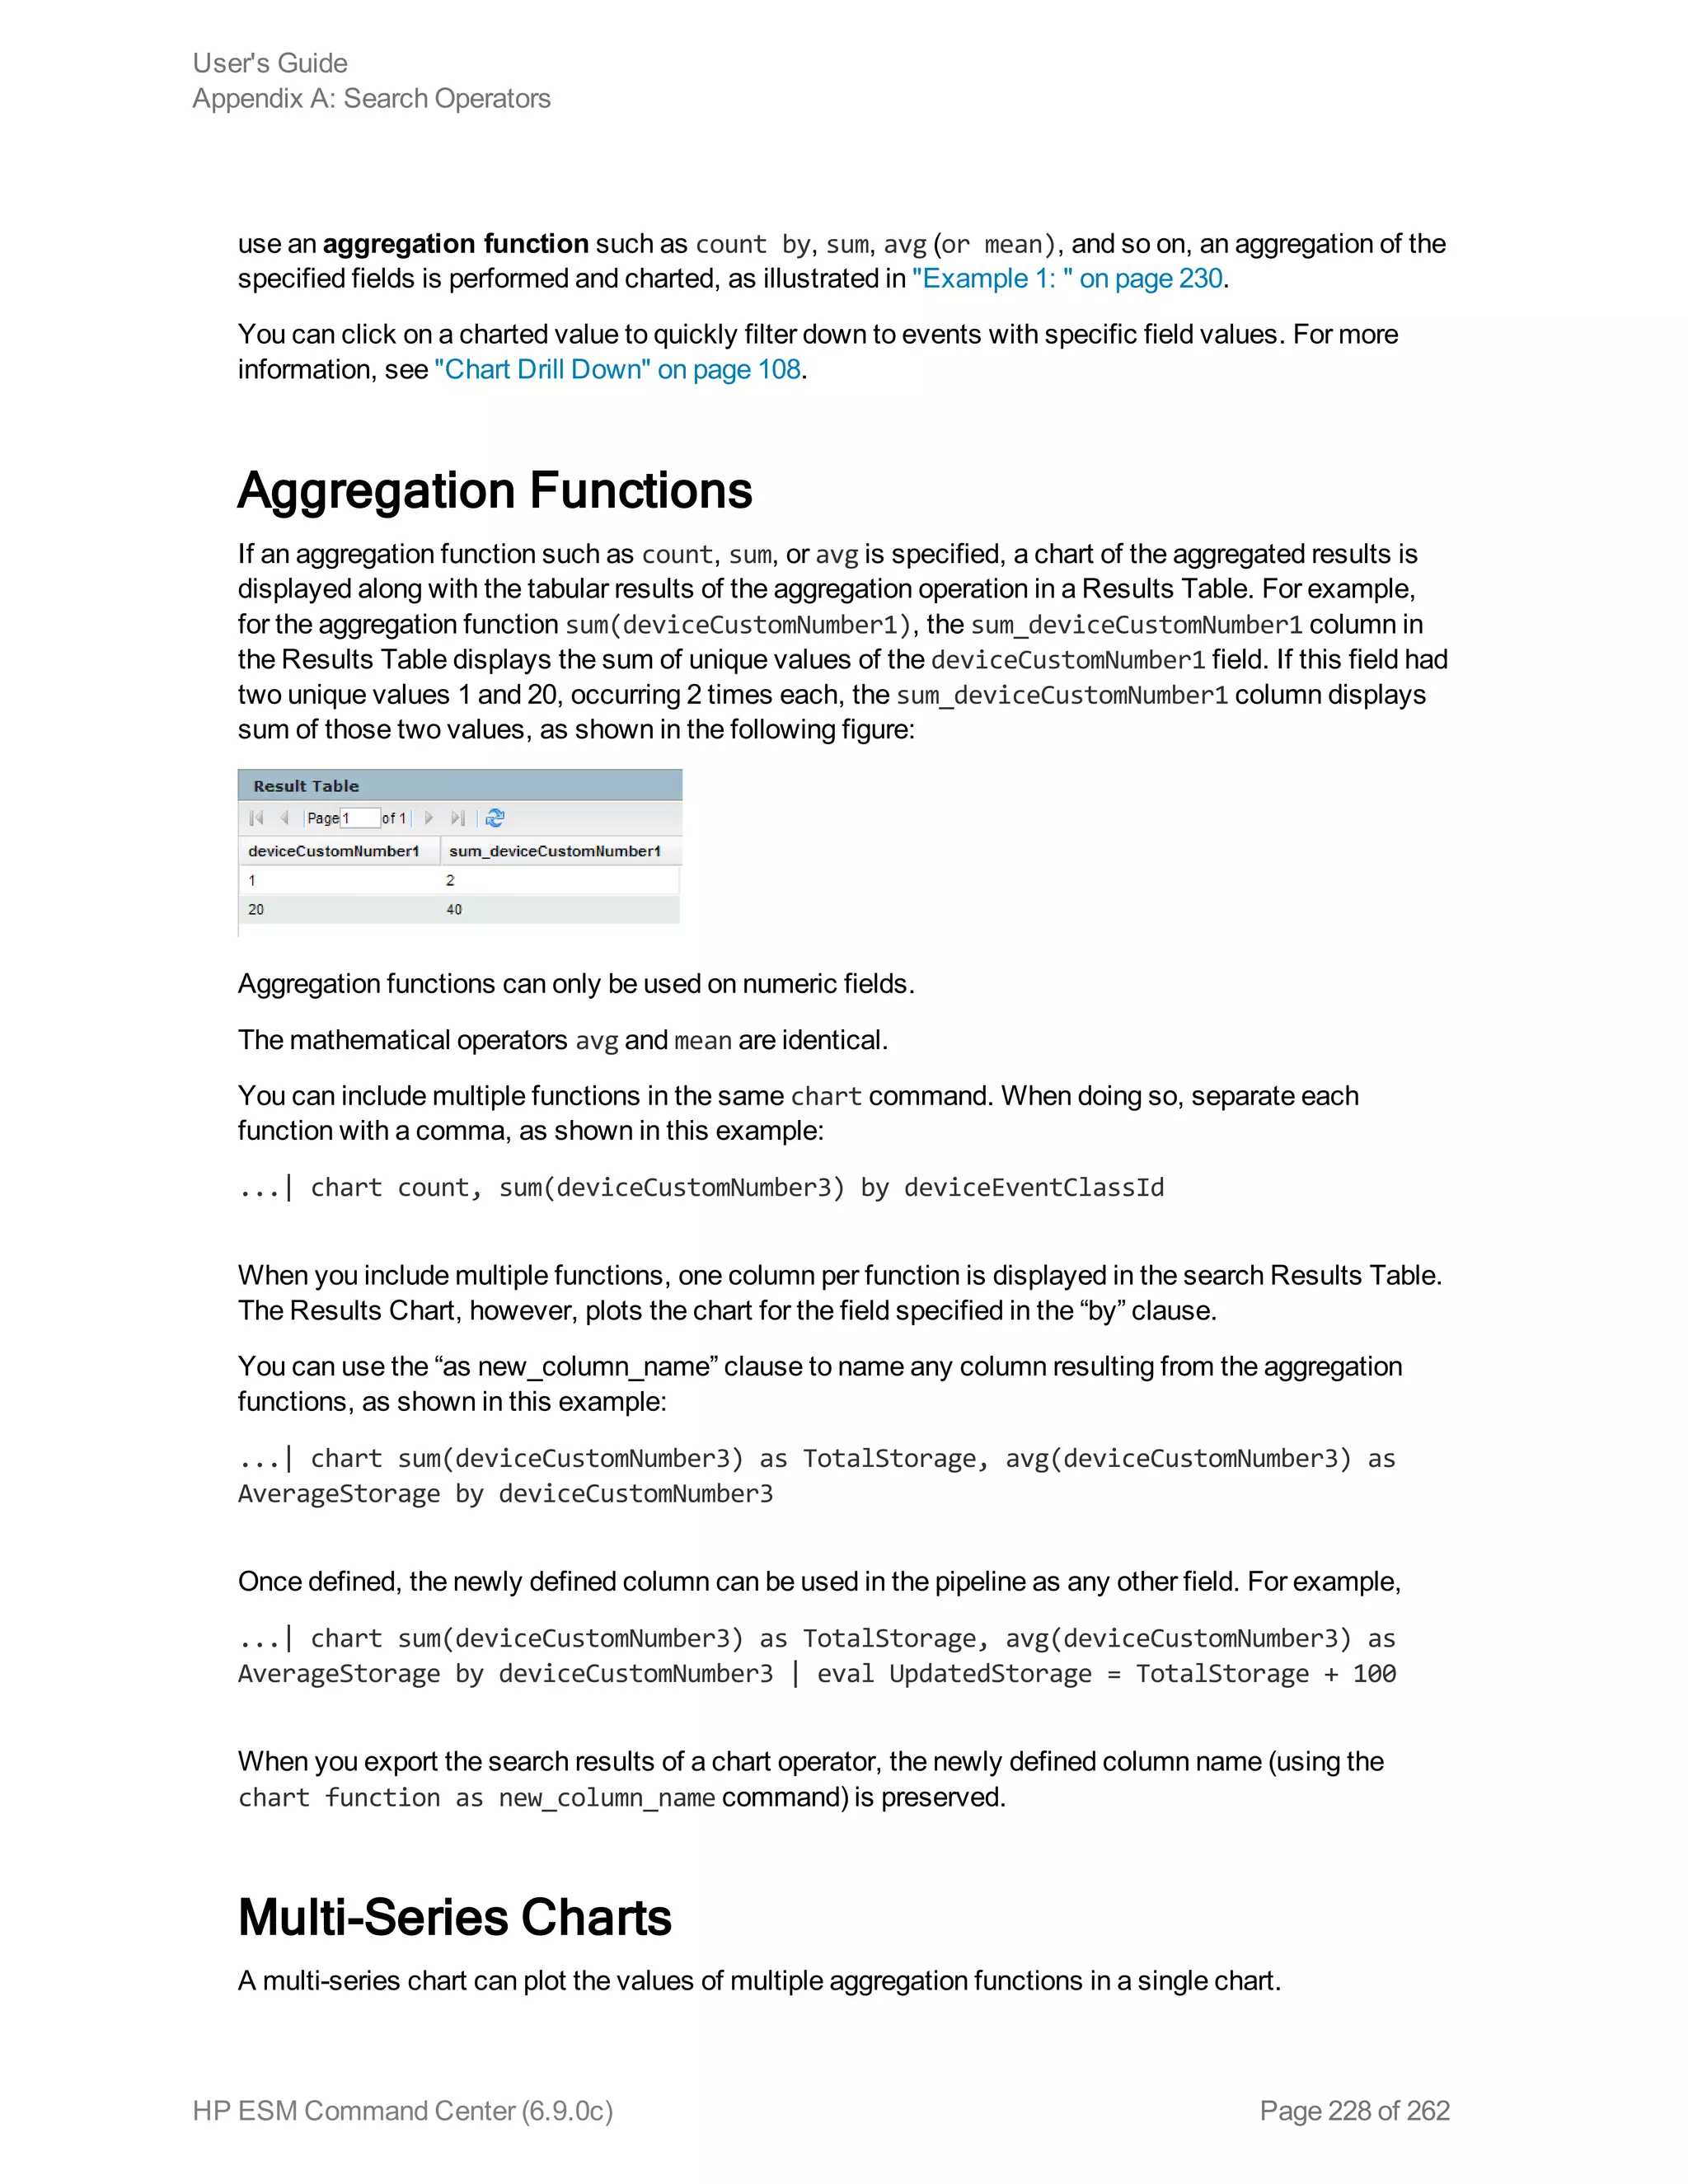
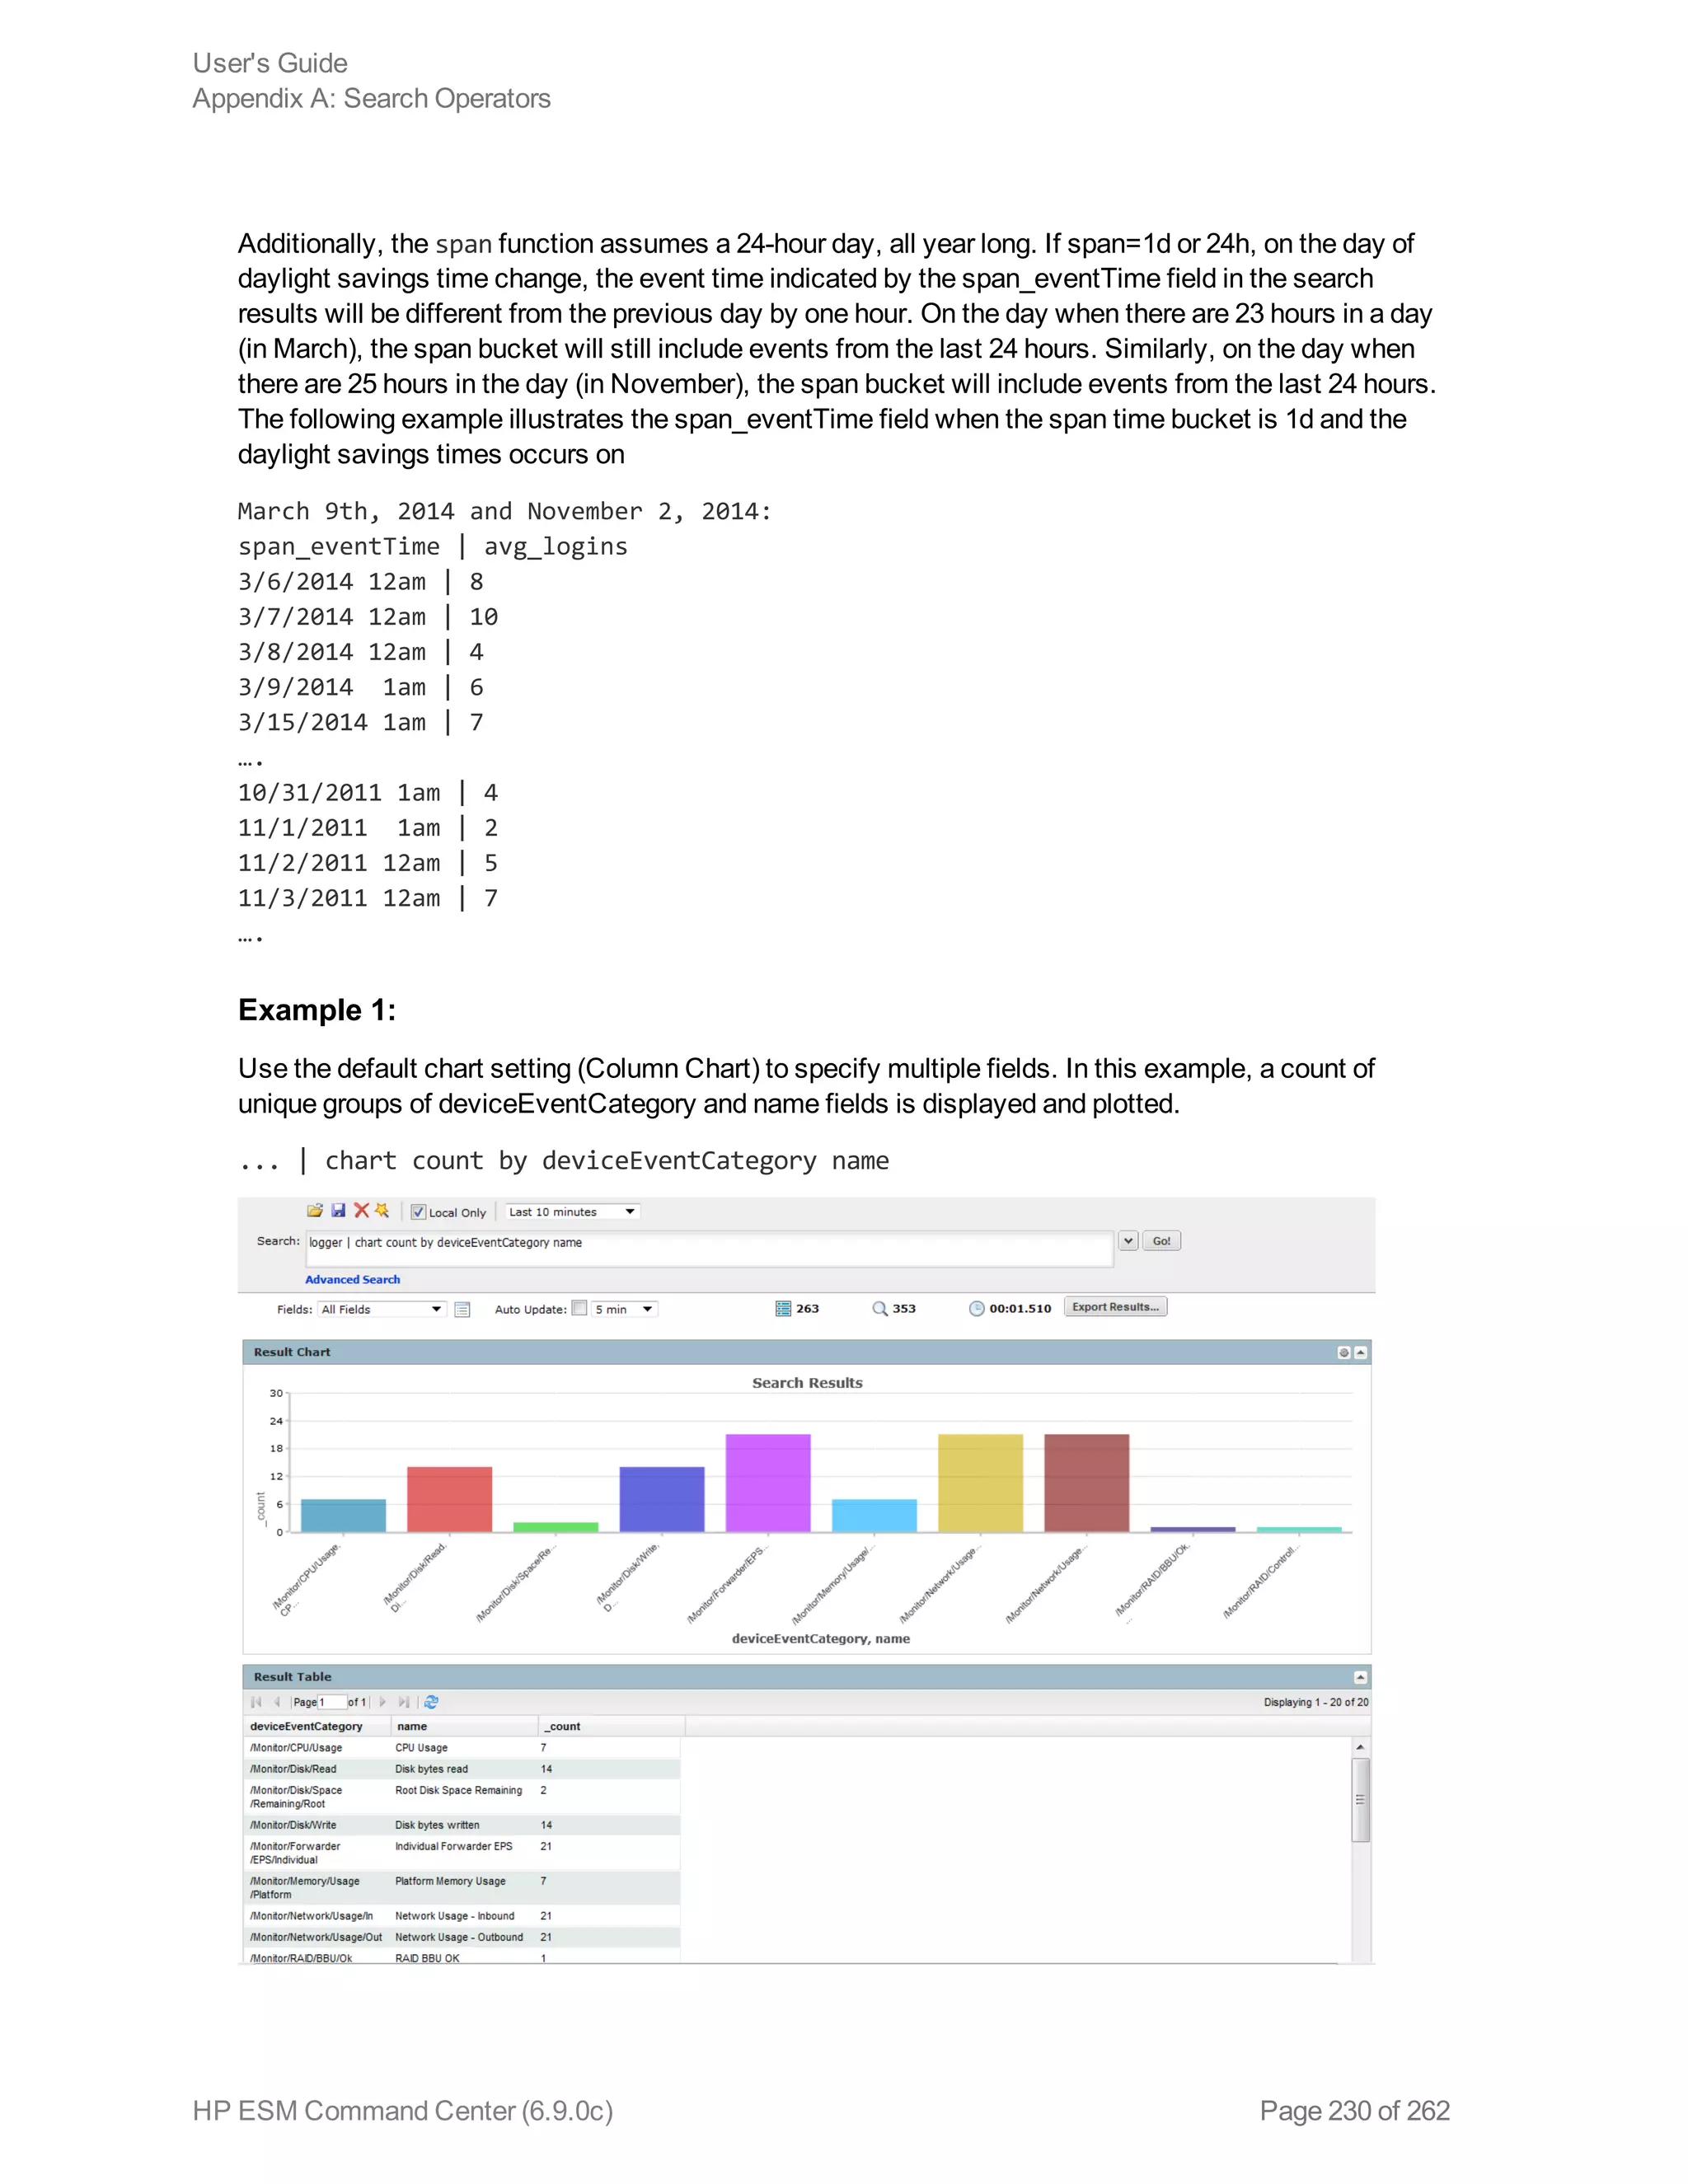
chart
Displays search results in a chart form of the specified fields.
Usage:
...| chart <field>
...| chart count by <field1> <field2> <field3> ...
[span [<time_field>]=<time_bucket>]
...| chart {{sum | avg | min | max | stdev} (<field>)}+ by <field1>, <field2>,
<field3> ...[span [<time_field>]= <time_bucket>]
...| chart {<function> (<field>)} as <new_column_name> by <field>
[span [<time_field>]=<time_bucket>]
User's Guide
Appendix A: Search Operators
HP ESM Command Center (6.9.0c) Page 226 of 262](https://image.slidesharecdn.com/esmcommandcenterguide6-170530061619/75/ESM_CommandCenterGuide_6-9-0-pdf-226-2048.jpg)
![where
<field>, <field1>, <field2> are the names of the field that you want to chart. The fields can be
either event fields available in the ESM Command Center schema or a user-defined fields created
using the rex or eval operator prior in the query.
Note: The specified fields must contain numeric values. If a field you specify is of the wrong data
type, you will receive an error message like the following: "The search cannot be run, there is an
error in your query: Invalid field type for field [field name].”
<time> is the bucket size for grouping events. Use d for day, h for hour, m for minute, s for seconds.
For example, 2h, 5d, 1m. (See Notes for details.)
<function> is one of these: count, sum, avg (or mean), min, max, stdev
<new_column_name> is the name you want to assign to the column in which the function’s results are
displayed. For example, Total.
Deprecated Usage:
The following deprecated usage contains “_count”. The recommended usage, as shown above, is
“count”.
...| chart _count by <field1> <field2> <field3> ...
Notes:
By default, a column chart is displayed. Other chart types you can select from: bar chart, line chart, pie
chart, area chart, stacked column, or stacked bar.
To change the chart settings (including its type), click to the upper right corner of the Result Chart
frame of the screen. You can change these settings:
- Title: Enter a meaningful title for the chart.
- Type: Column, Bar, Pie, Area, Line, Stacked column, Stacked Bar. The last two types create stacked
charts in which multiple values are plotted in a stack form. These charts are an alternate way of
representing multi-series charts, which are described below.
- Display Limit: Number of unique values to plot. Default: 10
If the configured Display Limit is less than the number of unique values for a query, the top values equal
to the specified Display Limit are plotted. That is, if the Display Limit is 5 and 7 unique values are found,
the top 5 values will be plotted.
All chart commands except “count by” accept only one field in the input. The specified field must
contain numeric values.
If multiple fields are specified, separate the field names with a white space or a comma.
The chart <field> command does not aggregate field values. It simply lists and charts each
occurrence of the values of the specified field. For example, chart sourcePort. However, when you
User's Guide
Appendix A: Search Operators
HP ESM Command Center (6.9.0c) Page 227 of 262](https://image.slidesharecdn.com/esmcommandcenterguide6-170530061619/75/ESM_CommandCenterGuide_6-9-0-pdf-227-2048.jpg)
![dedup
Removes duplicate events from search results. That is, events that contain the same value in the
specified field. The first matching event is kept, and the subsequent events with the same value in the
specified field are removed.
Usage:
... | dedup [N] <field1>,<field2>, ... [keepevents=(true|false)] [keepempty=
(true|false)]
N is an optional number that specifies the number of duplicate events to keep. For example, “dedup 5
deviceEventClassId” will keep the first five events containing the same deviceEventClassId values for
each deviceEventClassId, and remove the events that match after the first five have been kept.
Default: 1.
field1, field2 is a field or a comma-separated field list whose values are compared to determine
duplicate events. If a field list is specified, the values of the unique sets of all those fields are used to
remove events. For example, if name and deviceCustomNumber1 are specified, and two events
contain “Network Usage - Outbound” and “2347896”, only the first event is kept in the search results.
keepevents specifies whether to set the fields specified in the field list to NULL or not. When this
option is set to True, the values are set to NULL and events are not removed from search results.
However, when this option is set to False, duplicate events are removed from the search results.
Default: False.
User's Guide
Appendix A: Search Operators
HP ESM Command Center (6.9.0c) Page 232 of 262](https://image.slidesharecdn.com/esmcommandcenterguide6-170530061619/75/ESM_CommandCenterGuide_6-9-0-pdf-232-2048.jpg)
![Example 1:
If the Category Behavior is “Communicate”, then assign the value “communicate” to a new field “cat”;
otherwise, assign the value “notCommunicate” to it.
_storageGroup IN [“Default Storage Group”] | cef categoryBehavior | eval cat=if
(categoryBehavior== “/Communicate”, “communicate”, “notCommunicate”)
Example 2:
Append the word, “END”, at the end of extracted event name. For example, if event name is “ESM
Command Center Internal Event”, after the eval operation it is “ESM Command Center Internal
EventEND” and is assigned to a new field, “fullname”.
logger | cef msg name | eval fullname=name + “END”
Example 3:
Add 100 to the value of bytesIn and assign it to a new field, “Plus”. Then, sort the values assigned to
“Plus” in ascending order.
_storageGroup IN [“Default Storage Group”] | cef bytesIn bytesOut name | eval
Plus=bytesIn +100 | sort Plus
extract
Extracts key value pairs from raw events.
Usage:
...| extract [pairdelim=“<delimiters>”] [kvdelim=“<delimiters>”] [maxchars=<n>]
fields=“key1,key2,key3...”
pairdelim is a delimiter (or a list of delimiters) that separates one key-value pair from another key-
value pair in an event. By default, semi colon, pipe, and comma (; | ,) are used.
kvdelim is a delimiter (or a list of delimiters) that separates a key from its value. By default, “=".
maxchars is the maximum number of characters in an event that would be scanned for extracting key
value pairs. By default, 10240.
fields is a key (or a list of comma-separated keys) whose values you want to display in the search
results. For example, if you want to display the Name Age, and Location values from this event:
Name:Jane | Age:30 | Location:LA
Then, extract the “Name”, “Age”, and “Location” keys and list them in the fields list.
User's Guide
Appendix A: Search Operators
HP ESM Command Center (6.9.0c) Page 234 of 262](https://image.slidesharecdn.com/esmcommandcenterguide6-170530061619/75/ESM_CommandCenterGuide_6-9-0-pdf-234-2048.jpg)
![Understanding how the operator works:
The key represents a field in the raw event and its value consists of the characters that appear after the
key until the next key in the event. The following raw event is used to illustrate the concept:
[Thu Jul 30 01:20:06 2009] [error] [client 69.63.180.245] PHP Warning: memcache_
pconnect() [<a href='function.memcache-pconnect'>function.memcache-pconnect</a>]:
Can't connect to 10.4.31.4:11211
To extract the URL from the above event, you can define these key-pair delimiters, which separate the
key-value pairs in the event:
Greater than sign (“>”)
Square bracket (“[“)
And, define this key delimiter, which separates the key from its value:
Equal to sign (“=")
Thus, the following command will extract the URL
... | extract pairdelim= “>[” kvdelim= “=" fields=“<a href”
The key value pairs in the event will be: [<a href='function.memcache-pconnect'>
The key in the event will be: <a href
The extracted URL will be: 'function.memcache-pconnect'
Notes:
This operator only works on raw events. That is, you cannot extract key value pairs from structured
data in CEF events or from fields defined by the rex operator. For raw CEF events, you can use the
CEF name as the fieldname.
You can specify the pairdelim and kvdelim delimiters in the extract operator command to extract
keys and their values. However, if you want to determine the key names that these delimiters will
generate, use the keys operator as described in "keys" on page 237. The keys operator can only be
used to determine keys; you cannot pipe those keys in the extract operator. That is, ...| keys |
extract fields=field1 is incorrect.
The keys specified in the fields list can be used further in the pipeline operations. For example, ...|
extract pairdelim= “|” kvdelim= “:” fields= “count” | top count
If none of the specified pairdelim characters exist in an event, the event is not parsed into key value
pairs. The whole event is skipped. Similarly, if the specified kvdelim does not exist, values are not
separated from the keys.
To specify double quotes (“) as the delimiter, enter it within the pair of double quotes with backslash()
as the escape character. For example, “=”|”. Similarly, use two backslashes to treat a backslash
character literally. For example, “”.
User's Guide
Appendix A: Search Operators
HP ESM Command Center (6.9.0c) Page 235 of 262](https://image.slidesharecdn.com/esmcommandcenterguide6-170530061619/75/ESM_CommandCenterGuide_6-9-0-pdf-235-2048.jpg)
![Example:
... | extract pairdelim= “|” kvdelim= “:” fields= “Name,Age,Location”
Extracts values from events in this format:
Name:Jane | Age:30 | Location:LA
fields
Includes or excludes specified fields from search results.
Usage:
... | fields ([(+ | -)] <field>)+
+ includes only the specified field or fields in the search results. This is the default.
- excludes only the specified field or fields from the search results.
Notes:
Typically, the <field> list contains event fields available in the ESM Command Center schema or user-
defined fields created using the rex operator prior in the query, as shown in the examples below.
However, fields might also be defined by other operators such as the eval operator.
The + and - can be used in the same expression when multiple fields are specified. For example, | fields
+ name - agentType
A complete field name must be specified for this operator; wildcard characters in a field name are not
supported.
When this operator is included in a query, select User Defined Fieldsets from the System Fieldsets
list to view the search results.
Example 1:
... | fields - agentType + categorySignificance
Example 2:
... | fields - name
head
Displays the first <N> lines of the search results.
User's Guide
Appendix A: Search Operators
HP ESM Command Center (6.9.0c) Page 236 of 262](https://image.slidesharecdn.com/esmcommandcenterguide6-170530061619/75/ESM_CommandCenterGuide_6-9-0-pdf-236-2048.jpg)
![Usage:
... | head [<N>]
<N> is the number of lines to display. Default: 10, if <N> is not specified.
Notes:
When this operator is included in a query, the search results are not previewable. That is, the query
must finish running before search results are displayed.
Example:
... | head
keys
Identifies keys in raw events based on the specified delimiters.
Usage:
... | keys [pairdelim= “<delimiters>”] [kvdelim= “<delimiters>”] [limit=<n>]
pairdelim is a delimiter (or a list of delimiters) that separates one key-value pair from another key-
value pair in an event. By default, semi colon, pipe, and comma (; | ,) are used.
kvdelim is a delimiter (or a list of delimiters) that separates a key from its value. By default, “=”.
limit is the maximum number of key value pairs to find. There is no default or maximum number for
this parameter.
Notes:
When searching across peers using the keys operator, the number of events returned when a search is
initiated on a Logger 5.3 SP1 (or earlier version) may not be the same as when the search is initiated on
Logger 6.0 or ArcSight Manager 6.5c (or later versions). This happens because of the updated schema.
Logger 6.0 and ESM 6.5c use the End Time for searches; Logger 5.3 SP1 and earlier used the Receipt
Time.
This operator only works on raw events. That is, you cannot identify key value pairs from CEF events
or fields defined by the rex operator.
Although this operator is not required to determine keys, it is recommended that you use it to first
determine the keys whose values you want to obtain using the extract operator. This operator returns
aggregated results. Therefore, the search results list the keys found in the matching events and their
counts.
User's Guide
Appendix A: Search Operators
HP ESM Command Center (6.9.0c) Page 237 of 262](https://image.slidesharecdn.com/esmcommandcenterguide6-170530061619/75/ESM_CommandCenterGuide_6-9-0-pdf-237-2048.jpg)
![The resulting field of a rename operation is case sensitive. When using such a field in a search
operation, make sure that you the same case that was used to define the field.
When you export the search results of a search query that contains the rename expression, the
resulting file contains the renamed fields.
Example 1:
...| rename src_ip as IPAddress
Example 2:
...| rename src_ip as “Source IP Address”
replace
Replaces the specified string in the specified fields with the specified new string.
Usage:
<orig_str> with <new_str> [in <field_list>]
<orig_str> is the original string you want to replace. (See Notes for more details.)
<new_str> is the new string you want to replace with. (See Notes for more details.)
<field_list> is the optional, however highly recommended. See Notes for details.
Notes:
Even though the field list is optional for this command, HP strongly recommends that you specify the
fields on which the replace operator should act in this command.
If you skip the field list, the replace operator acts on the fields that have been either explicitly defined
using the cef, rex, and eval operators preceding the replace command, or any fields that were used
in other operator commands that preceded the replace operator command. For example, the replace
command acts on deviceEventCategory in all of the following cases and replaces all instances of
“EPS” with “Events”:
...| replace *EPS* with *Events* in deviceEventCategory
...| cef deviceEventCategory | replace *EPS* with *Events*
...| top deviceEventCategory | replace *EPS* with *Events*
An additional column of the same name is added to the search results for each field in which string is
replaced. The column with the original value continues to be displayed in the search results in addition
to the column with replaced values. For example, if you replace “err” with “Error” in the “message”
column, an additional “message” column is added to the search results that contains the modified
value.
User's Guide
Appendix A: Search Operators
HP ESM Command Center (6.9.0c) Page 241 of 262](https://image.slidesharecdn.com/esmcommandcenterguide6-170530061619/75/ESM_CommandCenterGuide_6-9-0-pdf-241-2048.jpg)
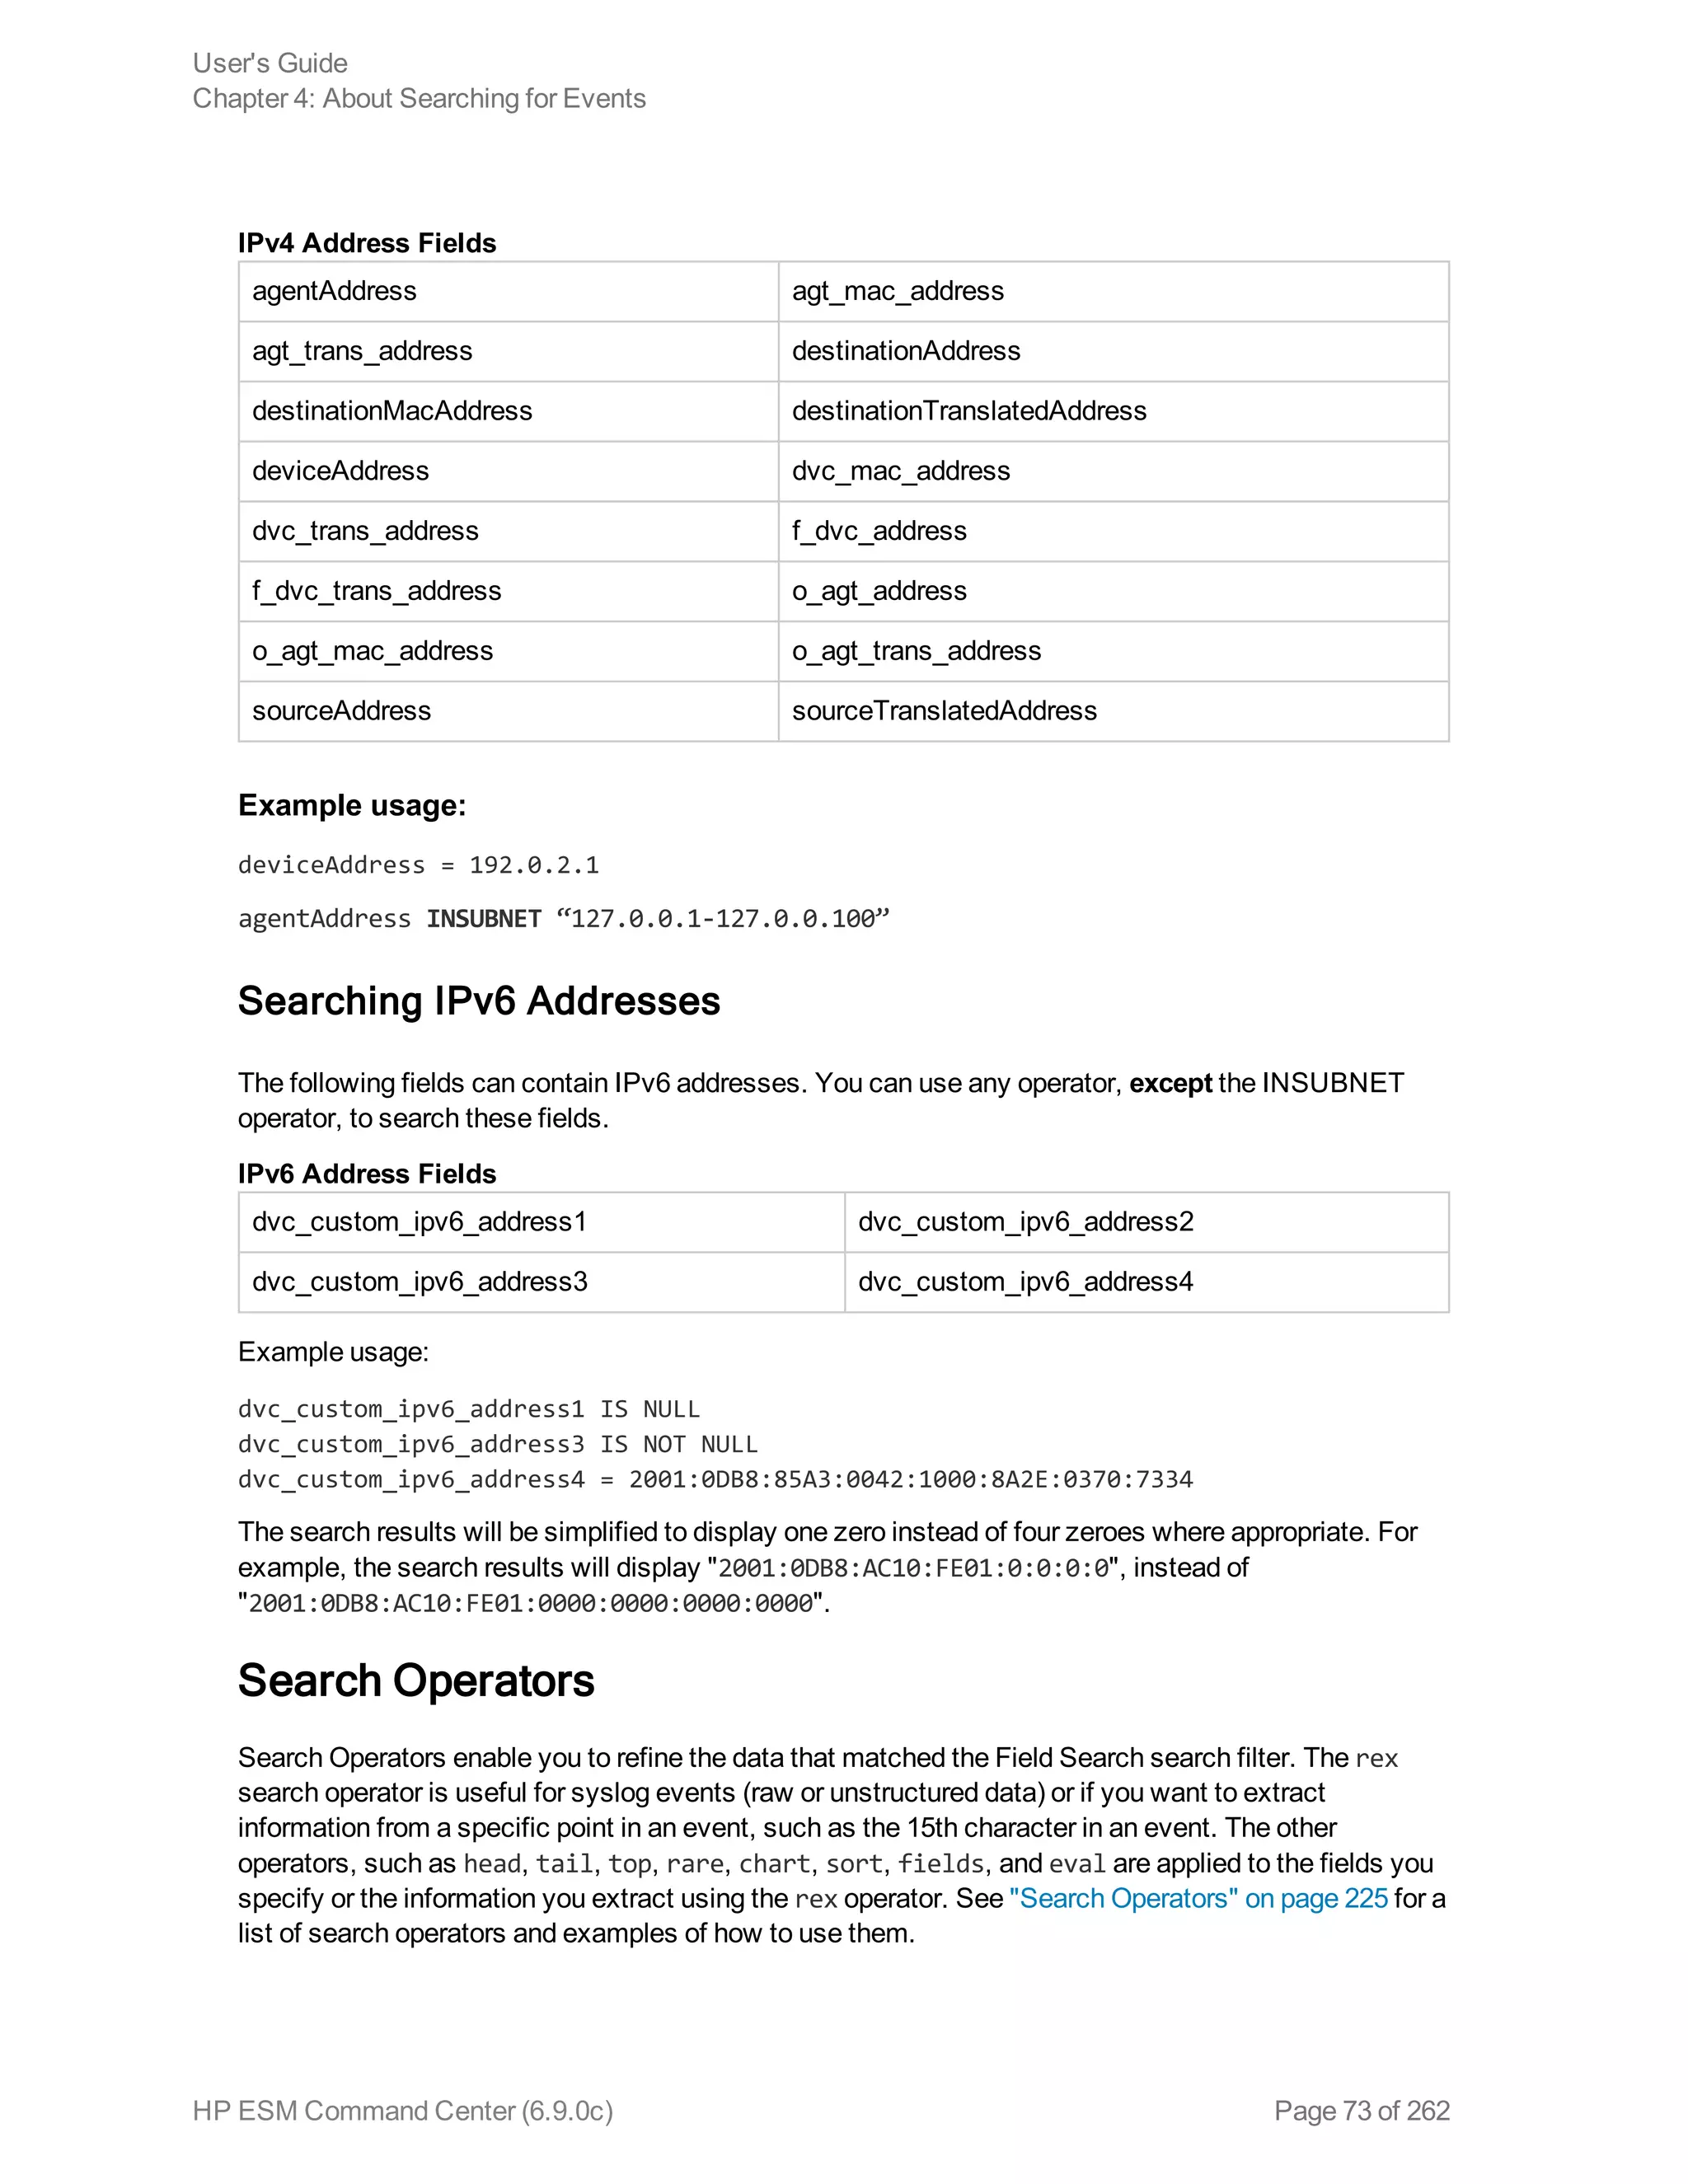
![or a raw event message.
Usage:
... | rex <regular_expression containing a field name>
OR
... | rex field = <field> mode=sed “s/<string to be substituted>/<substitution
value>”
Understanding how extraction works:
When the value is extracted based on a regular expression, the extracted value is assigned to a field
name, which is specified as part of the regular expression. The syntax for defining the field name is
?<fieldname>, where fieldname is a string of alphanumeric characters. Using an underscore (“_”) is
not recommended.
We use the following event to illustrate the power of rex.
[Thu Jul 30 01:20:06 2009] [error] [client 69.63.180.245] PHP Warning: Can't connect to
10.4.31.4:11211
If you want to extract any IP address from the above event and assign it to a field called “IP_Address”,
you can simply specify the following rex expression:
| rex “(?<IPAddress>d{1,3}.d{1,3}.d{1,3}.d{1,3})”
However, if you wanted to extract the IP address after the word “client” from the following event and
assign it to a field called “SourceIP”, you will need to specify a start and end point for IP address
extraction so that the second IP address in the event is not captured. The starting point in this event
can be “[client” and the end point can be “]”. Thus, the rex expression will be:
| rex “[client (?<SourceIP>[^]]*)”
In this rex expression ?<SourceIP> is the field name defined to capture IP address and “client ”
specifies the text or point in the event AFTER which data will be extracted. The [^]]* expression will
match every character that is not a closing right bracket, therefore, for our example event, the
expression will match until the end of the first IP address and not the second IP address that appears
after the word “to”.
Understanding how substitution works:
When the rex operator is used in sed mode, you can substitute the values of extracted fields with the
values you specify. For example, if you are generating a report of events that contain credit card
numbers, you might want to substitute the credit card numbers to obfuscate the real numbers.
The substitution only occurs in the search results. The actual event is not changed.
User's Guide
Appendix A: Search Operators
HP ESM Command Center (6.9.0c) Page 243 of 262](https://image.slidesharecdn.com/esmcommandcenterguide6-170530061619/75/ESM_CommandCenterGuide_6-9-0-pdf-243-2048.jpg)
![In the following example, the credit card numbers in the CCN field are substituted with “xxxx”, thus
obfuscating sensitive data:
| rex field=CCN mode=sed “s/*/XXXX/g”
The “/g” at the end of the command indicates a global replace, that is, all occurrences of the specified
pattern will be replaced in all matching events. If “/g” is omitted, only the first occurrence of the
specified pattern in each event is replaced.
Multiple substitutions can be performed in a single command, as shown in the following example. In
this example, the word “Authentication” is substituted with “xxxx” globally (for all matching events), the
first byte of the agent address that start with “192” is substituted with “xxxx” and an IP address that
starts with “10” is substituted with “xxxx”.
| rex field=msg mode=sed “s/Authentication/xxxx/g” | rex field=agentAddress
mode=sed “s/192/xxxx/g” | rex field=dst mode=sed “s/10.*/xxxx/g”
Notes:
A detailed tutorial on the rex operator is available at "Using the Rex Operator" on page 250.
The extracted values are displayed as additional columns in the All Fields view (of the System
FieldSets). To view only the extracted columns, select User Defined Fieldsets from the System
Fieldsets list. In the above example, an additional column with heading “SourceIP” is added to the All
Fields view; IP address values extracted from events are listed in this column.
If you want to use other search operators such as fields, sort, chart, and so on to refine your search
results, you must first use this operator to extract those fields.
Example 1:
The following example extracts name and social security number from an event that contains data in
name:John ssn:123-45-6789 format and assigns them to Name and SSN fields:
... | rex “name: (?<Name>.*) ssn: (?<SSN>.*)”
Example 2:
The following example extracts URLs from events and displays the top 10 of the extracted URLs:
... | rex “http://(?<URL>[^ ]*)” | top URL
Example 3:
The following example substitutes the last four digits of social security numbers extracted in the first
event with XXXX:
... | rex field=SSN mode=sed “s/-d{4}/-XXXX/g”
User's Guide
Appendix A: Search Operators
HP ESM Command Center (6.9.0c) Page 244 of 262](https://image.slidesharecdn.com/esmcommandcenterguide6-170530061619/75/ESM_CommandCenterGuide_6-9-0-pdf-244-2048.jpg)
![sort
Sorts search results as specified by the sort criteria.
Usage:
... | sort [<N>] ((+ | -) field)+
+ Sort the results by specified fields in ascending order. This is the default.
- Sort the results by specified fields in descending order.
<N> Keep the top N results, where N can be a number between 1 and 10,000. Default: 10,000.
Notes:
Typically, the <field> list contains event fields available in the ESM Command Center schema or user-
defined fields created using the rex operator prior in the query, as shown in the examples below.
However, fields might also be defined by other operators such as the eval operator.
Sorting is based on the data type of the specified field.
When multiple fields are specified for a sort operation, the first field is used to sort the data. If there are
multiple same values after the first sort, the second field is used to sort within the same values,
followed by third field, and so on. For example, in the example below, first the matching events are
sorted by “cat” (device event category). If multiple events have the same “cat”, those events are further
sorted by “eventId”.
When multiple fields are specified, you can specify a different sort order for each field. For example, |
sort + deviceEventCategory - eventId.
If multiple fields are specified, separate the field names with a white space or a comma.
Sorting is case-sensitive. Therefore, “Error:105” will precede “error:105” in the sorted list (when sorted
in ascending order).
When a sort operator is included in a query, only the top 10,000 matches are displayed. This is a known
limitation and will be addressed in a future ESM Command Center release.
When this operator is included in a query, the search results are not previewable. That is, the query
must finish running before search results are displayed.
Example:
... | sort deviceEventCategory eventId
tail
Displays the last <N> lines of the search results.
User's Guide
Appendix A: Search Operators
HP ESM Command Center (6.9.0c) Page 245 of 262](https://image.slidesharecdn.com/esmcommandcenterguide6-170530061619/75/ESM_CommandCenterGuide_6-9-0-pdf-245-2048.jpg)
![Usage:
...| tail [<N>]
<N> is the number of lines to display. Default: 10, if <N> is not specified.
Notes:
When this operator is included in a query, the search results are not previewable. That is, the query
must finish running before search results are displayed.
Example:
... | tail 5
top
Lists the search results in a tabular form of the most common values for the specified field. That is, the
values are listed from the highest count value to the lowest.
Usage:
...| top [<n>] <field1> <field2> <field3> ...
<n> limits the matches to the top n values for the specified fields. Default: 10, if <N> is not specified.
Notes:
The fields can be either event fields available in the ESM Command Center schema or user-defined
fields created using the rex or eval operators prior in the query. If multiple fields are specified, separate
the field names with a white space or a comma.
When multiple fields are specified, the count of unique sets of all those fields is listed from the highest
to lowest count.
A chart of the search results is automatically generated when this operator is included in a query. You
can click on a charted value to quickly filter down to events with specific field values. For more
information, see "Chart Drill Down" on page 108.
To limit the matches to the top n values for the specified fields, specify a value for n. For example,
...| top 5 deviceEventCategory
Example 1:
... | top deviceEventCategory
User's Guide
Appendix A: Search Operators
HP ESM Command Center (6.9.0c) Page 246 of 262](https://image.slidesharecdn.com/esmcommandcenterguide6-170530061619/75/ESM_CommandCenterGuide_6-9-0-pdf-246-2048.jpg)
![Example 2:
... | top 5 categories
transaction
Groups events that have the same values in the specified fields.
Usage:
... | transaction <field1> <field2>... [maxevents=<number>] [maxspan=<number>
[s|m|h|d]] [maxpause=<number>[s|m|h|d]] [startswith=<reg_exp>] [endswith=<reg_exp>]
field1, field2 is a field or a comma-separated field list whose values are compared to determine
events to group. If a field list is specified, the values of the unique sets of all those fields are used to
determine events to group. For example, if host and portNum are specified, and two events contain
“hostA” and “8080”, the events are grouped in a transaction.
maxevents specifies the maximum number of events that can be part of a single transaction. For
example, if you specify 5, after 5 matching events have been found, additional events are not included
in the transaction. Default: 1000
maxspan specifies the limit on the duration of the transaction. That is, the difference in time between the
first event and all other events in a transaction will never be more than the specified maxspan limit. For
example, if you specify maxspan=30s, the event time of all events within the transaction will be at
most 30 seconds more than the event time of the first event in the transaction. Default: Unlimited
maxpause specifies the length of time by which consecutive events in a transaction can be apart. That
is, this option ensures that events in a single transaction are never more than the maxpause value from
the previous event in the transaction. Default: Unlimited
startswith specifies a regular expression that is used to recognize the beginning of a transaction. For
example, if a transaction operator includes startswith= “user [L|l]ogin”, all events are scanned for this
regular expression. When an event matches the regular expression, a transaction is created, and
subsequent events with matching fields are added to the transaction.
Note: The regular expression is applied to the raw event, not to a field in an event.
endswith specifies a regular expression that is used to recognize the end of an existing transaction.
That is, an existing transaction is completed when an event matches the specified “endswith” regular
expression. For example, if a transaction operator includes endswith= “[L|l]ogout”, any event being
added to a transaction is checked, and if the regular expression matches the event, the transaction is
completed.
Note: The regular expression is applied to the raw event, not to a field in an event.
User's Guide
Appendix A: Search Operators
HP ESM Command Center (6.9.0c) Page 247 of 262](https://image.slidesharecdn.com/esmcommandcenterguide6-170530061619/75/ESM_CommandCenterGuide_6-9-0-pdf-247-2048.jpg)
![... | transaction sessionID sourceAddress maxspan=1h startswith= “user [L|l]ogin”
where
Displays events that match the criteria specified in the “where” expression.
Usage:
...| where <expression>
<expression> can be any valid field-based query expression, as described in "Field-based Search" on
page 69.
Notes:
<expression> can only be a valid field-based query expression. Arithmetic expressions or functions
are not supported.
Example 1:
... | where eventId is NULL
Example 2:
... | where eventId=10006093313 OR deviceVersion CONTAINS “5.3.1.0.0”
Example 3:
... | where eventId >=10005985569 OR categories= “/Agent/Started”
User's Guide
Appendix A: Search Operators
HP ESM Command Center (6.9.0c) Page 249 of 262](https://image.slidesharecdn.com/esmcommandcenterguide6-170530061619/75/ESM_CommandCenterGuide_6-9-0-pdf-249-2048.jpg)
![Appendix B: Using the Rex Operator
The rex operator is a powerful operator that enables you to extract information that matches a specified
regular expression and assigns it to a field, whose field name you specify. You can also specify an
optional start point and an end point in the rex expression between which the information matching the
regular expression is searched.
This appendix describes the rex search operator in detail. It includes information on the following
topics.
Syntax of the rex Operator 250
Sample rex Expressions 252
When a rex expression is included in a search query, it must be preceded by a basic search query that
finds events from which the rex expression will extract information. For example:
failed | rex “(?<srcip>[^ ]d{1,3}.d{1,3}.d{1,3}.d{1,3})”
Syntax of the rex Operator
| rex “text1(?<field1>text2regex)”
text1 — The text or point in the event AFTER which information extraction begins. The default is the
beginning of the event.
text2 — The text or point in the event at which information extraction ends.
field1 — The name of the field to which the extracted information is assigned.
regex — The pattern (regular expression) used for matching information to be extracted between text1
and text2.
Note: If you are an experienced regular expression user, see the Note in the next section for a
quick understanding of how rex enables you to capture named input and reference it for further
processing.
Understanding the rex Operator Syntax
Extract all information AFTER text1 and until text2 that matches the specified regex (regular
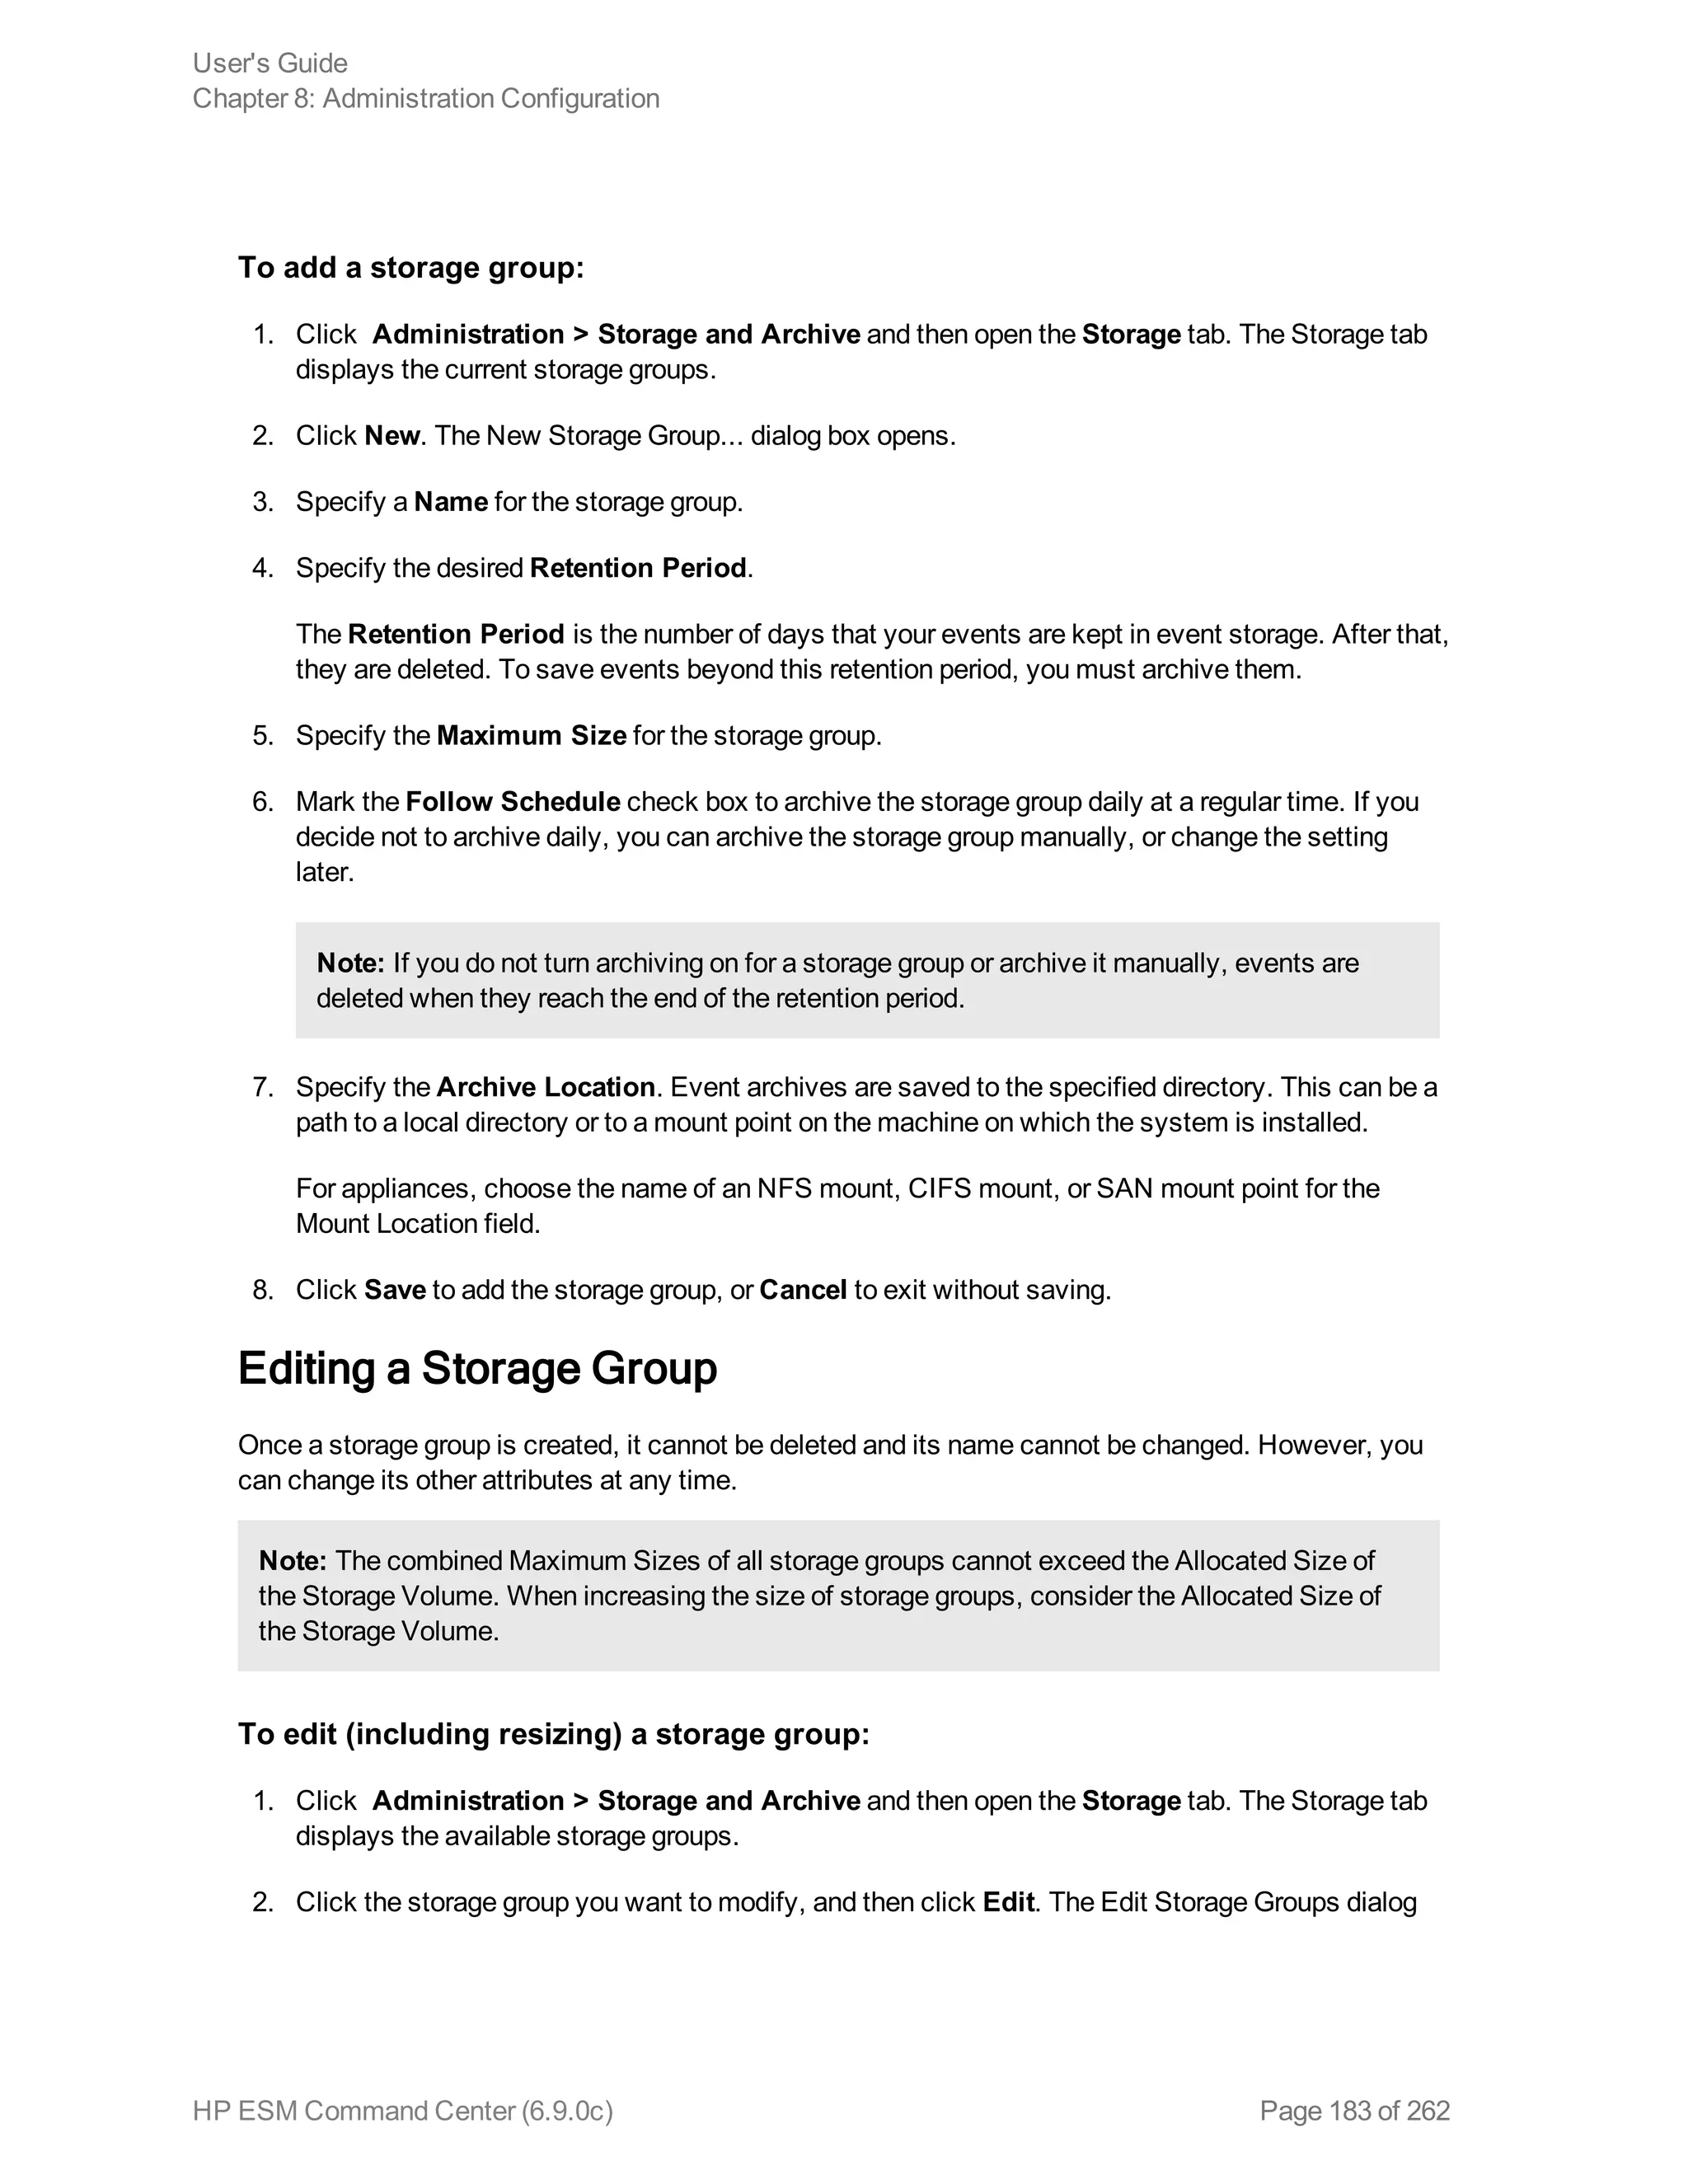
expression) and assign TO field1.
l text1 and [text2] can be any points in an event — start and end of an event, specific string in an
event (even if the string is in the middle of a word in the event), a specific number of characters from
the start or end of an event, or a pattern.
HP ESM Command Center (6.9.0c) Page 250 of 262](https://image.slidesharecdn.com/esmcommandcenterguide6-170530061619/75/ESM_CommandCenterGuide_6-9-0-pdf-250-2048.jpg)
![l To specify the next space in the event as text2, enter [^ ].
This is interpreted as “not space.” Therefore, entering a “not” results in the capture to stop at the
point where the specified character, in this case, a space, is found in the event.
l To specify [text2] to be the end of the line, enter [^$].
This is interpreted as “not end of line.” Therefore, when an end-of-line in an event is encountered, the
capture will stop at that point. The [^$] usage only captures one character if it is not an end-of-line
character. However, by specifying [^$]* in a rex expression, the usage captures all characters until
end-of-line.
You can also specify .* to capture all characters in an event instead of [^$]. Examples in this
document, however, use [^$].
l Any extra spaces within the double quotes of the rex expression are treated literally.
l The characters that need to be escaped for rex expressions are the same as the ones for regular
expressions. Refer to a regular expressions document of your choice to obtain a complete list of
such characters.
l Information captured by a rex expression can be used for further processing in a subsequent rex
expression as illustrated in the following example in which an IP address is captured by the first rex
expression and the network ID (assuming the first three bytes of the IP address represent it) to
which the IP address belongs is extracted from the captured IP address:
logger | rex “(?<srcip>[^ ]d{1,3}.d{1,3}.d{1,3}.d{1,3})” | rex
field=srcip “(?<netid>d{1,3}.d{1,3}.d{1,3})”
Note: If you are an experienced regular expression user, you can interpret the rex expression
syntax as follows:
rex “(?<field1>regex)”
where the entire expression in the parentheses specifies a named capture. That is, the
captured group is assigned a name, which can be referenced later for further processing. For
example, in the following expression “srcip” is the name assigned to the capture.
failed | rex “(?<srcip>[^ ]d{1,3}.d{1,3}.d{1,3}.d{1,3})”
Once named, use “srcip” for further processing as follows:
failed | rex “(?<srcip>[^ ]d{1,3}.d{1,3}.d{1,3}.d{1,3})” | top srcip
Creating a rex Expression Manually
Start with a simple search that finds the events that contains the information in which you are
interested. Once the events are displayed, identify a common starting point in those events that
User's Guide
Appendix B: Using the Rex Operator
HP ESM Command Center (6.9.0c) Page 251 of 262](https://image.slidesharecdn.com/esmcommandcenterguide6-170530061619/75/ESM_CommandCenterGuide_6-9-0-pdf-251-2048.jpg)
![precedes the information.
For example, you are interested in extracting the client IP address, which always appears after the
word “[client” in the following event.
[Thu Jul 30 01:20:06 2009] [error] [client 69.63.180.245] PHP Warning: memcache_
pconnect() [<a href='function.memcache-pconnect'>function.memcache-pconnect</a>]:
Can't connect to 10.4.31.4:11211
Therefore, “[client” is the starting point. A good end point is the “]” after the last byte of the client IP
address. Now, we need to define the regular expression that will extract the IP address. Because in
this example, only the client IP address appears after the word “client”, we use “*” as the regular
expression, which means “extract everything”. (We could be more specific and use d{1,3}.d{1,3}
.d{1,3}.d{1,3} for the IP address.) We assign the extracted IP address to a field name
“clientIP”. We are almost ready to create a rex expression, except that we need to escape the “[” and “]”
characters in the expression. The escape character to use is “”.
Now, we are ready to create the rex expression to extract the IP address that appears after the word
“client” in the event shown above.
| rex “[client(?<clientip>[^]]*)”
Sample rex Expressions
This section contains several sample examples for extracting different types of information from an
event. The specificity of the information extracted increases with each example. Use these examples
as a starting point for creating rex expressions to suit your needs.
This event is used as an example to illustrate the information the following rex expressions will extract:
l Capture matching events from the left of the pipeline and assign them to the field, message. The
entire event is assigned to the “message” field.
| rex “(?<message>[^$]*)”
This expression extracts the entire event (as shown above), starting at the word “CEF:0”.
l Specifying the starting point as number of characters from the start of an event instead of a specific
character or word
| rex “[a-zA-Z0-9:.s]{16}(?<message>[^$]*)”
This expression starts extracting after 16 consecutive occurrences of the characters specified for
text1 — alphanumeric characters, colons, periods, or spaces. Although the first 16 characters of the
first event are “CEF:0|ArcSight|L”, the extraction does not begin at “ogger|5.3.0...” because the
pipeline character is not part of the characters we are matching, but this character is part of the
User's Guide
Appendix B: Using the Rex Operator
HP ESM Command Center (6.9.0c) Page 252 of 262](https://image.slidesharecdn.com/esmcommandcenterguide6-170530061619/75/ESM_CommandCenterGuide_6-9-0-pdf-252-2048.jpg)
![beginning of the event. Therefore, the first 16 consecutive occurrences are “Logger Internal “. As a
result, information starting at the word “Event”, is extracted from our example event.
l Extract a specified number of characters instead of specifying an end point such as the next space
or the end of the line
| rex “[a-zA-Z0-9:.s]{16}(?<message>[^$]{5})”
This expression only extracts the word “Event”. (See the previous sample rex expression for a
detailed explanation of the reason extraction begins at the word “Event”.)
l Extract everything after “CEF:0|” into a field, message. Then, pipe events for which the message
field is not null through another rex expression to extract the IP address contained in the matching
events and assign the IP addresses to another field, msgip. Only display events where msgip is not
null.
| rex “CEF:0|(?<message>[^$]*)” | where message is not null | rex “dvc=
(?<msgip>[^ ]d{1,3}.d{1,3}.d{1,3}.d{1,3})” | where msgip is not null
Note: The “: and =” characters do not need to be escaped; however, “|” must be escaped. The
characters that need to be escaped for rex expressions are the same as the ones for regular
expressions. Refer to a regular expressions document of your choice to obtain a complete list
of such characters.
This expression extracts the device IP address from the event.
The following rex examples use this event for illustration:
l Extract the first two IP addresses from an event and assign them to two different fields, IP1 and
IP2.
| rex “(?<IP1>[^$]d{1,3}.d{1,3}.d{1,3}.d{1,3})” | rex “d{1,3}.d{1,3}
.d{1,3}.d{1,3}(?<IP2>[^$]d{1,3}.d{1,3}.d{1,3}.d{1,3})”
This expression extracts the first and second IP addresses in the above event.
Because the two IP addresses are right after one another in this event, you can also specify the
extraction of the two IP addresses in a single rex expression as follows:
| rex “(?<IP1>[^$]d{1,3}.d{1,3}.d{1,3}.d{1,3})(?<IP2>[^$]d{1,3}.d{1,3}
.d{1,3}.d{1,3})”
Note: Do not specify a space in the above expression.
l Building on the previous example, add a new field called Ignore. Assign the value “Y” to this field if
User's Guide
Appendix B: Using the Rex Operator
HP ESM Command Center (6.9.0c) Page 253 of 262](https://image.slidesharecdn.com/esmcommandcenterguide6-170530061619/75/ESM_CommandCenterGuide_6-9-0-pdf-253-2048.jpg)
![the two IP addresses extracted in the previous example are the same and assign the value “N” if the
two IP addresses are different. Then, list the top IP1 and IP2 combinations for events for which
Ignore field is “N”.
| rex (?<IP1>[^$]d{1,3}.d{1,3}.d{1,3}.d{1,3})” | rex “d{1,3}.d{1,3}
.d{1,3}.d{1,3}(?<IP2>[^$]d{1,3}.d{1,3}.d{1,3}.d{1,3})” | eval
Ignore=if(IP1==IP2,“Y”,“N”) | where Ignore=“N” | top IP1 IP2
Note: The eval command uses double == to equate the two fields.
l Information captured by a rex expression can be used for further processing in a subsequent rex
expression as illustrated in the following example. The first IP address is captured by the first rex
expression and the network ID (assuming the first three bytes of the IP address represent it) to
which the IP address belongs is extracted from the captured IP address:
logger | rex “(?<srcip>[^ ]d{1,3}.d{1,3}.d{1,3}.d{1,3})” | rex field=srcip “(?<netid>d{1,3}.d{1,3}
.d{1,3})
The following rex example uses this event for illustration:
l Extract all URLs from events and generate a chart of the URL counts, excluding blank URLs
| rex “http://(?<customURL>[^ ]*)” | where customURL is not null | chart count
by customURL | sort - customURL
Note: Consider the following:
n The events contain the URL string in “http://” format.
n Meta character / needs to be enclosed in squarebrackets [] to be treated literally.
The following rex example uses this event for illustration:
l Extract the first word after the word “user” (one space after the word) or “user=”. The word “user” is
case-insensitive in this case and must be preceded by a space character. That is, words such as
“ruser” and “suser” should not be matched.
| rex “s[u|U][s|S][e|E][r|R][s|=](?<CustomUser>[^ ]*)”
User's Guide
Appendix B: Using the Rex Operator
HP ESM Command Center (6.9.0c) Page 254 of 262](https://image.slidesharecdn.com/esmcommandcenterguide6-170530061619/75/ESM_CommandCenterGuide_6-9-0-pdf-254-2048.jpg)