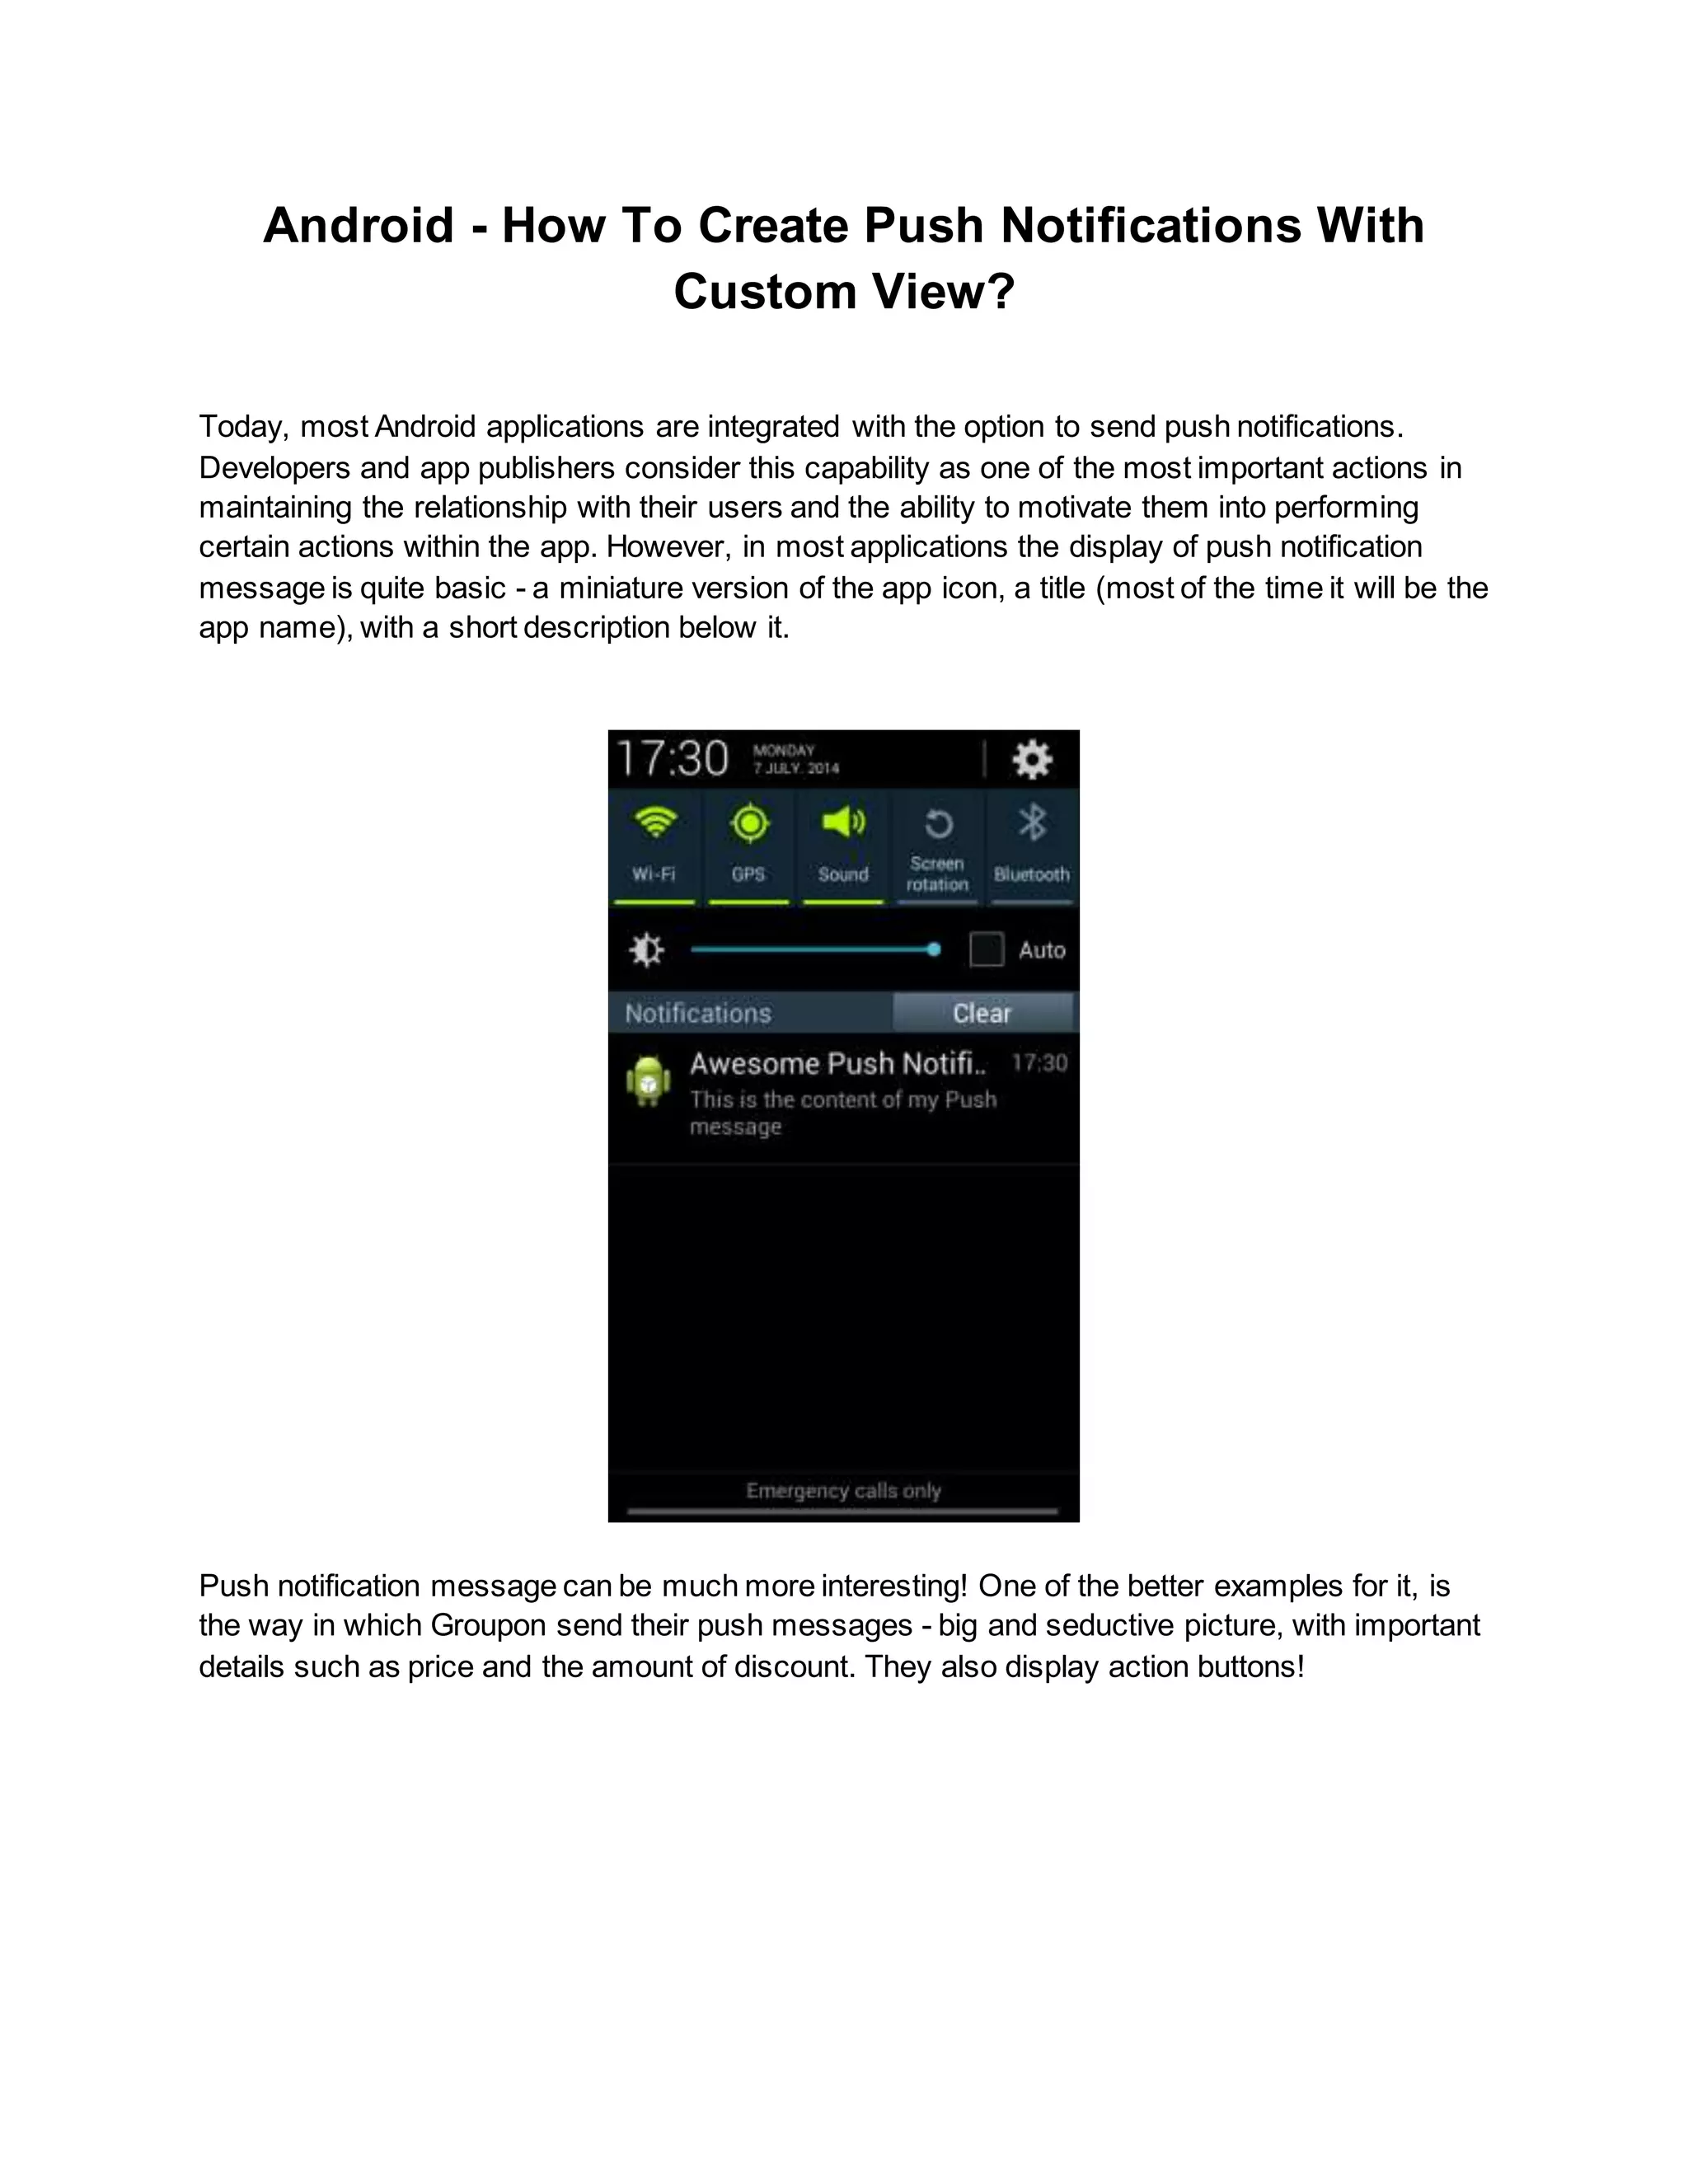
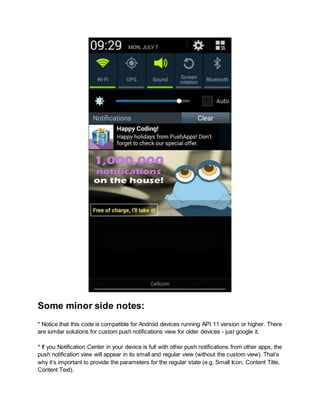
Android - How To Create Push Notifications With 
Custom View? 
Today, most Android applications are integrated with the option to send push notifications. 
Developers and app publishers consider this capability as one of the most important actions in 
maintaining the relationship with their users and the ability to motivate them into performing 
certain actions within the app. However, in most applications the display of push notification 
message is quite basic - a miniature version of the app icon, a title (most of the time it will be the 
app name), with a short description below it. 
Push notification message can be much more interesting! One of the better examples for it, is 
the way in which Groupon send their push messages - big and seductive picture, with important 
details such as price and the amount of discount. They also display action buttons!
In this tutorial we will learn how to create a rich push notification message. 
Integrating Push Notifications in your app 
If your app doesn’t yet support in basic push notification, please refer to PushApps short tutorial: 
https://wiki.pushapps.mobi/display/PUSHAPPS/Android+Getting+Started 
This tutorial assumes you have completed the basic push notifications integration, and you are 
able to receive notifications to your device. We will take you step by step from this phase and 
show you how to code and design the notification. 
Push Notification received event 
After you register the device to PushApps with your private keys, we would like to “take control” 
over the push notification received event. We would like to perform certain actions and display 
our custom view. With PushApps it’s easy: 
1. In you Application class (if you don’t have one, please create it) register to PushApps with 
your Google API Project Number and PushApps Token.
@Override 
public void onCreate() { 
super.onCreate(); 
// first we initialize the push manager, you can also initialize the 
// PushManager in your main activity. 
PushManager.init(getBaseContext(), GOOGLE_API_PROJECT_NUMBER, 
PUSHAPPS_APP_TOKEN); 
PushManager.getInstance(getApplicationContext()) 
.setShouldStartIntentAsNewTask(false); 
// these methods are both optional and used for the notification 
// customization 
PushManager.getInstance(getApplicationContext()).setShouldStackNotifications(true); 
} 
2. We want PushApps to notify us when a new push notification received to the device. For that, 
we need to implement the PushAppsMessageInterface. 
@Override 
public void onCreate() { 
super.onCreate(); 
// first we initialize the push manager, you can also initi alize the 
// PushManager in your main activity. 
PushManager.init(getBaseContext(), GOOGLE_API_PROJECT_NUMBER, PUSHAPPS_APP_TOKEN); 
PushManager.getInstance(getApplicationContext()).setShouldStartIntentAsNewTask(false); 
// these methods are both optional and used for the notification 
// customization 
PushManager.getInstance(getApplicationContext()).setShouldStackNotifications( true); 
// register for message events 
PushManager.getInstance(getApplicationContext()).registerForMessagesEvents( 
new PushAppsMessageInterface() { 
// This method will get called every time the device will receive a push message 
@Override 
public void onMessage(Context ctx, Intent intent) {
Log.d(“PushAppsDemo”, “We got a message!”); 
} 
} 
Creating the custom view 
The first step in building your own unique View, is writing the XML. There is nothing new in this 
section - exactly as we build a new view for an Activity or a Fragment, same is here. Like all 
other XMLs, this one will also should be placed inside the res / layout directory. In this tutorial, 
we’re creating a similar view as the one as Groupon. However, you can create any view you 
want, while the only limit is the view height - remember that this is not a full-screen view (but 
only shown in the Notification Center). 
1. Creating the XML: 
<?xml version="1.0" encoding="utf-8"?> 
<LinearLayout xmlns:android="http://schemas.android.com/apk/res/android" 
android:layout_width="fill_parent" 
android:layout_height="250dp" 
android:orientation="vertical" 
android:background="@android:color/black"> 
<RelativeLayout 
android:id="@+id/notification_upper_layout" 
android:layout_width="wrap_content" 
android:layout_height="wrap_content"> 
<ImageView 
android:id="@+id/notification_icon" 
android:layout_width="wrap_content" 
android:layout_height="wrap_content" 
android:src="@drawable/small_pic"/> 
<TextView 
android:id="@+id/notification_title" 
android:layout_width="wrap_content" 
android:layout_height="wrap_content"
android:text="PushApps Custom Notification" 
android:textColor="@android:color/white" 
android:textStyle="bold" 
android:textSize="16dp" 
android:layout_marginLeft="8dp" 
android:layout_toRightOf="@id/notification_icon"/> 
<TextView 
android:id="@+id/notification_subtitle" 
android:layout_width="wrap_content" 
android:layout_height="wrap_content" 
android:text="Happy Holidays from PushApps! This is a special gift!" 
android:textColor="@android:color/white" 
android:textSize="14dp" 
android:layout_marginLeft="8dp" 
android:layout_toRightOf="@id/notification_icon" 
android:layout_below="@id/notification_title"/> 
</RelativeLayout> 
<RelativeLayout 
android:id="@+id/notification_main_layout" 
android:layout_width="fill_parent" 
android:layout_height="fill_parent"> 
<ImageView 
android:id="@+id/notification_main_image_view" 
android:layout_width="fill_parent" 
android:layout_height="wrap_content" 
/> 
<RelativeLayout 
android:id="@+id/notification_bottom_layout" 
android:layout_width="fill_parent" 
android:layout_height="40dp" 
android:layout_alignParentBottom="true" 
android:layout_centerHorizontal="true" 
android:background="@android:color/black" 
android:alpha="0.2"> 
</RelativeLayout> 
<TextView
android:id="@+id/notification_colored_text" 
android:layout_width="wrap_content" 
android:layout_height="wrap_content" 
android:textColor="#F4F420" 
android:textSize="14dp" 
android:layout_alignParentBottom="true" 
android:padding="6dp" 
android:layout_marginLeft="5dp" 
android:background="@drawable/button_border" 
android:textStyle="bold"/> 
</RelativeLayout> 
</LinearLayout> 
2. We would like to link our new XML with our code, and of course update the view values (such 
as text and image) with those we received in the push notification JSON: 
// register for message events 
PushManager.getInstance(getApplicationContext()).registerForMessagesEvents(new 
PushAppsMessageInterface() { 
// This method will get called every time the device will receive a push message 
@Override 
public void onMessage(Context ctx, Intent intent) { 
// Get the title string from the push notification message 
String titleTxt = intent.getStringExtra(PushManager.NOTIFICATION_TITLE_KEY); 
// Get the message string from the push notification message 
String subTitleTxt = intent.getStringExtra(PushManager.NOTIFICATION_MESSAGE_KEY); 
String extraData = intent.getStringExtra("info"); // Your Custom JSON key 
String actionButton = "Click Me!"; // Some default string 
String imageUrl = ""; 
try { 
JSONObject jsonObject = new JSONObject(extraData); 
// Extract the text for our action button, from the custom JSON 
actionButton = jsonObject.getString("button_text"); 
imageUrl = jsonObject.getString("picture_url");
} catch (JSONException e) {} 
// The intent to start, when the user clicks the notification 
Intent resultIntent = new Intent(getApplicationContext(), MainActivity.class); 
TaskStackBuilder stackBuilder = TaskStackBuilder.create(getApplicationContext()); 
stackBuilder.addParentStack(MainActivity.class); 
stackBuilder.addNextIntent(resultIntent); 
PendingIntent resultPendingIntent = stackBuilder.getPendingIntent( 
0, PendingIntent.FLAG_UPDATE_CURRENT); 
// The custom view 
RemoteViews expandedView = new RemoteViews( 
getApplicationContext().getPackageName(),R.layout.custom_notification); 
expandedView.setTextViewText(R.id.notification_title, titleTxt); 
expandedView.setTextViewText(R.id.notification_subtitle, subTitleTxt); 
expandedView.setTextViewText(R.id.notification_colored_text, actionButton); 
expandedView.setImageViewBitmap( 
R.id.notification_main_image_view, drawableFromUrl(imageUrl)); 
// Building the notification that will show up in the notification center 
Notification notification = new NotificationCompat.Builder( 
getApplicationContext()) 
.setSmallIcon(R.drawable.small_pic) 
.setSound(Settings.System.DEFAULT_NOTIFICATION_URI) 
.setDefaults(Notification.DEFAULT_VIBRATE) 
.setAutoCancel(true) 
.setContentIntent(resultPendingIntent) 
.setContentTitle(titleTxt) 
.setContentText(subTitleTxt) 
.build(); 
notification.bigContentView = expandedView; 
NotificationManager mNotificationManager = (NotificationManager) 
getSystemService(Context.NOTIFICATION_SERVICE); 
mNotificationManager.notify(1, notification); 
} 
});
Sending a Push Notification from the PushApps 
Admin Console 
Sending a push notification from the PushApps Admin Console is very simple. You can learn a 
lot about it from our WIKI - http://wiki.pushapps.mobi/display/PUSHAPPS/Admin+Console. 
Please notice that the parameters keys that you provide in the Admin Console should match 
those in your Android code. 
Finally!
Some minor side notes: 
* Notice that this code is compatible for Android devices running API 11 version or higher. There 
are similar solutions for custom push notifications view for older devices - just google it. 
* If you Notification Center in your device is full with other push notifications from other apps, the 
push notification view will appear in its small and regular view (without the custom view). That’s 
why it’s important to provide the parameters for the regular state (e.g. Small Icon, Content Title, 
Content Text).
Checkout the entire source code from here. 
Happy Coding!

How to create android push notifications with custom view

  • 1.
    Android - HowTo Create Push Notifications With Custom View? Today, most Android applications are integrated with the option to send push notifications. Developers and app publishers consider this capability as one of the most important actions in maintaining the relationship with their users and the ability to motivate them into performing certain actions within the app. However, in most applications the display of push notification message is quite basic - a miniature version of the app icon, a title (most of the time it will be the app name), with a short description below it. Push notification message can be much more interesting! One of the better examples for it, is the way in which Groupon send their push messages - big and seductive picture, with important details such as price and the amount of discount. They also display action buttons!
  • 2.
    In this tutorialwe will learn how to create a rich push notification message. Integrating Push Notifications in your app If your app doesn’t yet support in basic push notification, please refer to PushApps short tutorial: https://wiki.pushapps.mobi/display/PUSHAPPS/Android+Getting+Started This tutorial assumes you have completed the basic push notifications integration, and you are able to receive notifications to your device. We will take you step by step from this phase and show you how to code and design the notification. Push Notification received event After you register the device to PushApps with your private keys, we would like to “take control” over the push notification received event. We would like to perform certain actions and display our custom view. With PushApps it’s easy: 1. In you Application class (if you don’t have one, please create it) register to PushApps with your Google API Project Number and PushApps Token.
  • 3.
    @Override public voidonCreate() { super.onCreate(); // first we initialize the push manager, you can also initialize the // PushManager in your main activity. PushManager.init(getBaseContext(), GOOGLE_API_PROJECT_NUMBER, PUSHAPPS_APP_TOKEN); PushManager.getInstance(getApplicationContext()) .setShouldStartIntentAsNewTask(false); // these methods are both optional and used for the notification // customization PushManager.getInstance(getApplicationContext()).setShouldStackNotifications(true); } 2. We want PushApps to notify us when a new push notification received to the device. For that, we need to implement the PushAppsMessageInterface. @Override public void onCreate() { super.onCreate(); // first we initialize the push manager, you can also initi alize the // PushManager in your main activity. PushManager.init(getBaseContext(), GOOGLE_API_PROJECT_NUMBER, PUSHAPPS_APP_TOKEN); PushManager.getInstance(getApplicationContext()).setShouldStartIntentAsNewTask(false); // these methods are both optional and used for the notification // customization PushManager.getInstance(getApplicationContext()).setShouldStackNotifications( true); // register for message events PushManager.getInstance(getApplicationContext()).registerForMessagesEvents( new PushAppsMessageInterface() { // This method will get called every time the device will receive a push message @Override public void onMessage(Context ctx, Intent intent) {
  • 4.
    Log.d(“PushAppsDemo”, “We gota message!”); } } Creating the custom view The first step in building your own unique View, is writing the XML. There is nothing new in this section - exactly as we build a new view for an Activity or a Fragment, same is here. Like all other XMLs, this one will also should be placed inside the res / layout directory. In this tutorial, we’re creating a similar view as the one as Groupon. However, you can create any view you want, while the only limit is the view height - remember that this is not a full-screen view (but only shown in the Notification Center). 1. Creating the XML: <?xml version="1.0" encoding="utf-8"?> <LinearLayout xmlns:android="http://schemas.android.com/apk/res/android" android:layout_width="fill_parent" android:layout_height="250dp" android:orientation="vertical" android:background="@android:color/black"> <RelativeLayout android:id="@+id/notification_upper_layout" android:layout_width="wrap_content" android:layout_height="wrap_content"> <ImageView android:id="@+id/notification_icon" android:layout_width="wrap_content" android:layout_height="wrap_content" android:src="@drawable/small_pic"/> <TextView android:id="@+id/notification_title" android:layout_width="wrap_content" android:layout_height="wrap_content"
  • 5.
    android:text="PushApps Custom Notification" android:textColor="@android:color/white" android:textStyle="bold" android:textSize="16dp" android:layout_marginLeft="8dp" android:layout_toRightOf="@id/notification_icon"/> <TextView android:id="@+id/notification_subtitle" android:layout_width="wrap_content" android:layout_height="wrap_content" android:text="Happy Holidays from PushApps! This is a special gift!" android:textColor="@android:color/white" android:textSize="14dp" android:layout_marginLeft="8dp" android:layout_toRightOf="@id/notification_icon" android:layout_below="@id/notification_title"/> </RelativeLayout> <RelativeLayout android:id="@+id/notification_main_layout" android:layout_width="fill_parent" android:layout_height="fill_parent"> <ImageView android:id="@+id/notification_main_image_view" android:layout_width="fill_parent" android:layout_height="wrap_content" /> <RelativeLayout android:id="@+id/notification_bottom_layout" android:layout_width="fill_parent" android:layout_height="40dp" android:layout_alignParentBottom="true" android:layout_centerHorizontal="true" android:background="@android:color/black" android:alpha="0.2"> </RelativeLayout> <TextView
  • 6.
    android:id="@+id/notification_colored_text" android:layout_width="wrap_content" android:layout_height="wrap_content" android:textColor="#F4F420" android:textSize="14dp" android:layout_alignParentBottom="true" android:padding="6dp" android:layout_marginLeft="5dp" android:background="@drawable/button_border" android:textStyle="bold"/> </RelativeLayout> </LinearLayout> 2. We would like to link our new XML with our code, and of course update the view values (such as text and image) with those we received in the push notification JSON: // register for message events PushManager.getInstance(getApplicationContext()).registerForMessagesEvents(new PushAppsMessageInterface() { // This method will get called every time the device will receive a push message @Override public void onMessage(Context ctx, Intent intent) { // Get the title string from the push notification message String titleTxt = intent.getStringExtra(PushManager.NOTIFICATION_TITLE_KEY); // Get the message string from the push notification message String subTitleTxt = intent.getStringExtra(PushManager.NOTIFICATION_MESSAGE_KEY); String extraData = intent.getStringExtra("info"); // Your Custom JSON key String actionButton = "Click Me!"; // Some default string String imageUrl = ""; try { JSONObject jsonObject = new JSONObject(extraData); // Extract the text for our action button, from the custom JSON actionButton = jsonObject.getString("button_text"); imageUrl = jsonObject.getString("picture_url");
  • 7.
    } catch (JSONExceptione) {} // The intent to start, when the user clicks the notification Intent resultIntent = new Intent(getApplicationContext(), MainActivity.class); TaskStackBuilder stackBuilder = TaskStackBuilder.create(getApplicationContext()); stackBuilder.addParentStack(MainActivity.class); stackBuilder.addNextIntent(resultIntent); PendingIntent resultPendingIntent = stackBuilder.getPendingIntent( 0, PendingIntent.FLAG_UPDATE_CURRENT); // The custom view RemoteViews expandedView = new RemoteViews( getApplicationContext().getPackageName(),R.layout.custom_notification); expandedView.setTextViewText(R.id.notification_title, titleTxt); expandedView.setTextViewText(R.id.notification_subtitle, subTitleTxt); expandedView.setTextViewText(R.id.notification_colored_text, actionButton); expandedView.setImageViewBitmap( R.id.notification_main_image_view, drawableFromUrl(imageUrl)); // Building the notification that will show up in the notification center Notification notification = new NotificationCompat.Builder( getApplicationContext()) .setSmallIcon(R.drawable.small_pic) .setSound(Settings.System.DEFAULT_NOTIFICATION_URI) .setDefaults(Notification.DEFAULT_VIBRATE) .setAutoCancel(true) .setContentIntent(resultPendingIntent) .setContentTitle(titleTxt) .setContentText(subTitleTxt) .build(); notification.bigContentView = expandedView; NotificationManager mNotificationManager = (NotificationManager) getSystemService(Context.NOTIFICATION_SERVICE); mNotificationManager.notify(1, notification); } });
  • 8.
    Sending a PushNotification from the PushApps Admin Console Sending a push notification from the PushApps Admin Console is very simple. You can learn a lot about it from our WIKI - http://wiki.pushapps.mobi/display/PUSHAPPS/Admin+Console. Please notice that the parameters keys that you provide in the Admin Console should match those in your Android code. Finally!
  • 9.
    Some minor sidenotes: * Notice that this code is compatible for Android devices running API 11 version or higher. There are similar solutions for custom push notifications view for older devices - just google it. * If you Notification Center in your device is full with other push notifications from other apps, the push notification view will appear in its small and regular view (without the custom view). That’s why it’s important to provide the parameters for the regular state (e.g. Small Icon, Content Title, Content Text).
  • 10.
    Checkout the entiresource code from here. Happy Coding!