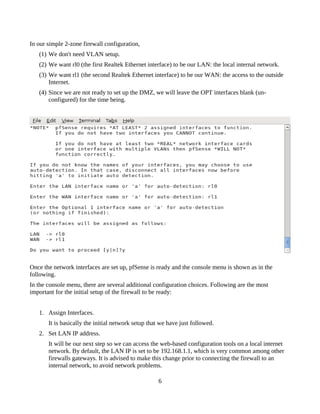
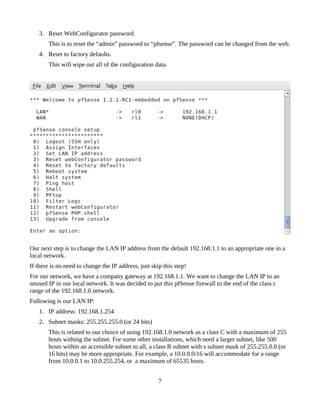
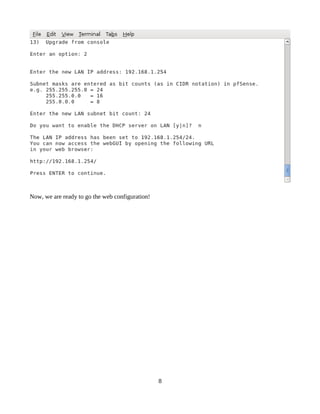
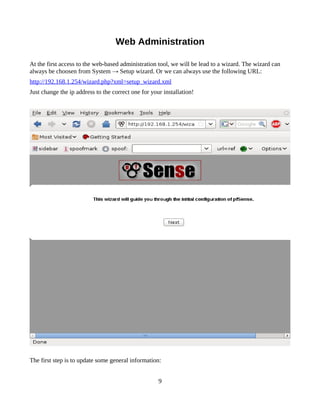
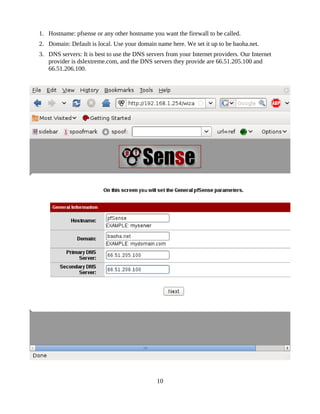
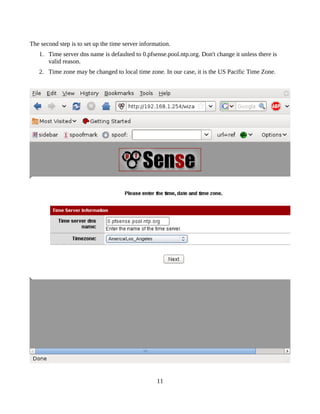
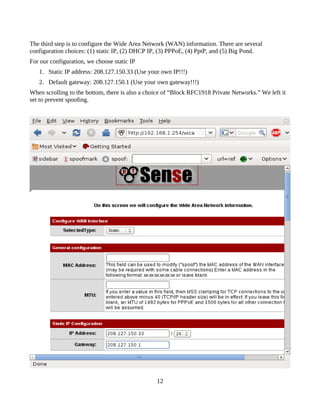
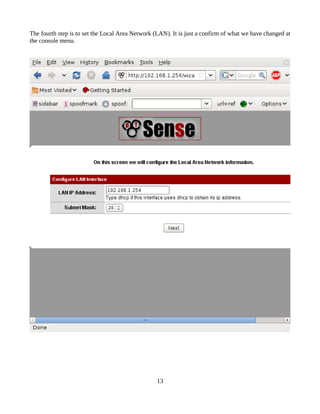
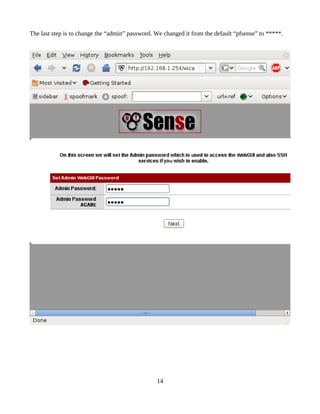
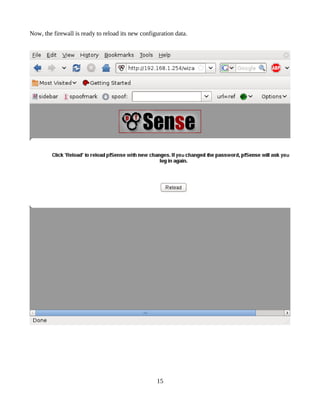
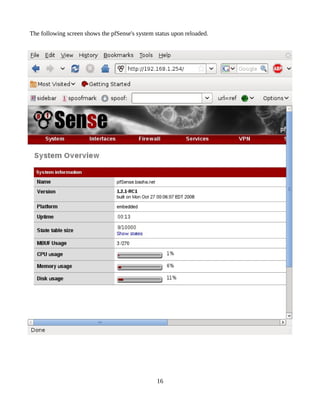
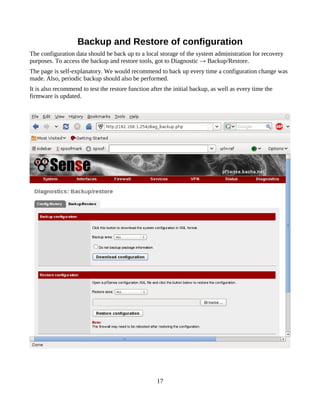
This study guide is intended to provide those pursuing the CCNA certification with a framework of what concepts need to be studied. This is not a comprehensive document containing all the secrets of the CCNA, nor is it a “braindump” of questions and answers.
I sincerely hope that this document provides some assistance and clarity in your studies.
IBM Easy Connect mode:
● Enables flexible integration of IBM® PureSystems™ with existing Cisco, Juniper and other vendor networks
● Features workload-optimized connectivity that is secure, dynamic and easy to manage
● Delivers simple connectivity across the core network and advanced switching at the network edge
● Provides economical alternative to pass-through and port-aggregation devices with fast transparent mode and virtualization-aware hybrid mode
Learn about IBM Flex System Fabric EN4093 and EN4093R 10Gb Scalable Switches. The IBM Flex System Fabric EN4093 and EN4093R 10Gb Scalable Switches provide unmatched scalability and performance, while also delivering innovations to help address a number of networking concerns today and providing capabilities that will help you prepare for the future. These switches are capable of supporting up to sixty-four 10 Gb Ethernet connections while offering Layer 2/3 switching, in addition to OpenFlow and easy connect modes. For more information on Pure Systems, visit http://ibm.co/18vDnp6.
Visit http://bit.ly/KWh5Dx to 'Follow' the official Twitter handle of IBM India Smarter Computing.
Presentation from 2008. Compares Lighttpd .vs Apache for static content. Discovery session for scaling http://www.imagesocket.com during it's peak popularity.
This is really old and /outdated/ at this point.
Model Attribute Check Company Auto PropertyCeline George
In Odoo, the multi-company feature allows you to manage multiple companies within a single Odoo database instance. Each company can have its own configurations while still sharing common resources such as products, customers, and suppliers.
Operation “Blue Star” is the only event in the history of Independent India where the state went into war with its own people. Even after about 40 years it is not clear if it was culmination of states anger over people of the region, a political game of power or start of dictatorial chapter in the democratic setup.
The people of Punjab felt alienated from main stream due to denial of their just demands during a long democratic struggle since independence. As it happen all over the word, it led to militant struggle with great loss of lives of military, police and civilian personnel. Killing of Indira Gandhi and massacre of innocent Sikhs in Delhi and other India cities was also associated with this movement.
How to Make a Field invisible in Odoo 17Celine George
It is possible to hide or invisible some fields in odoo. Commonly using “invisible” attribute in the field definition to invisible the fields. This slide will show how to make a field invisible in odoo 17.
2024.06.01 Introducing a competency framework for languag learning materials ...Sandy Millin
http://sandymillin.wordpress.com/iateflwebinar2024
Published classroom materials form the basis of syllabuses, drive teacher professional development, and have a potentially huge influence on learners, teachers and education systems. All teachers also create their own materials, whether a few sentences on a blackboard, a highly-structured fully-realised online course, or anything in between. Despite this, the knowledge and skills needed to create effective language learning materials are rarely part of teacher training, and are mostly learnt by trial and error.
Knowledge and skills frameworks, generally called competency frameworks, for ELT teachers, trainers and managers have existed for a few years now. However, until I created one for my MA dissertation, there wasn’t one drawing together what we need to know and do to be able to effectively produce language learning materials.
This webinar will introduce you to my framework, highlighting the key competencies I identified from my research. It will also show how anybody involved in language teaching (any language, not just English!), teacher training, managing schools or developing language learning materials can benefit from using the framework.
Instructions for Submissions thorugh G- Classroom.pptxJheel Barad
This presentation provides a briefing on how to upload submissions and documents in Google Classroom. It was prepared as part of an orientation for new Sainik School in-service teacher trainees. As a training officer, my goal is to ensure that you are comfortable and proficient with this essential tool for managing assignments and fostering student engagement.
The French Revolution, which began in 1789, was a period of radical social and political upheaval in France. It marked the decline of absolute monarchies, the rise of secular and democratic republics, and the eventual rise of Napoleon Bonaparte. This revolutionary period is crucial in understanding the transition from feudalism to modernity in Europe.
For more information, visit-www.vavaclasses.com
Embracing GenAI - A Strategic ImperativePeter Windle
Artificial Intelligence (AI) technologies such as Generative AI, Image Generators and Large Language Models have had a dramatic impact on teaching, learning and assessment over the past 18 months. The most immediate threat AI posed was to Academic Integrity with Higher Education Institutes (HEIs) focusing their efforts on combating the use of GenAI in assessment. Guidelines were developed for staff and students, policies put in place too. Innovative educators have forged paths in the use of Generative AI for teaching, learning and assessments leading to pockets of transformation springing up across HEIs, often with little or no top-down guidance, support or direction.
This Gasta posits a strategic approach to integrating AI into HEIs to prepare staff, students and the curriculum for an evolving world and workplace. We will highlight the advantages of working with these technologies beyond the realm of teaching, learning and assessment by considering prompt engineering skills, industry impact, curriculum changes, and the need for staff upskilling. In contrast, not engaging strategically with Generative AI poses risks, including falling behind peers, missed opportunities and failing to ensure our graduates remain employable. The rapid evolution of AI technologies necessitates a proactive and strategic approach if we are to remain relevant.
Palestine last event orientationfvgnh .pptxRaedMohamed3
An EFL lesson about the current events in Palestine. It is intended to be for intermediate students who wish to increase their listening skills through a short lesson in power point.
The Roman Empire A Historical Colossus.pdfkaushalkr1407
The Roman Empire, a vast and enduring power, stands as one of history's most remarkable civilizations, leaving an indelible imprint on the world. It emerged from the Roman Republic, transitioning into an imperial powerhouse under the leadership of Augustus Caesar in 27 BCE. This transformation marked the beginning of an era defined by unprecedented territorial expansion, architectural marvels, and profound cultural influence.
The empire's roots lie in the city of Rome, founded, according to legend, by Romulus in 753 BCE. Over centuries, Rome evolved from a small settlement to a formidable republic, characterized by a complex political system with elected officials and checks on power. However, internal strife, class conflicts, and military ambitions paved the way for the end of the Republic. Julius Caesar’s dictatorship and subsequent assassination in 44 BCE created a power vacuum, leading to a civil war. Octavian, later Augustus, emerged victorious, heralding the Roman Empire’s birth.
Under Augustus, the empire experienced the Pax Romana, a 200-year period of relative peace and stability. Augustus reformed the military, established efficient administrative systems, and initiated grand construction projects. The empire's borders expanded, encompassing territories from Britain to Egypt and from Spain to the Euphrates. Roman legions, renowned for their discipline and engineering prowess, secured and maintained these vast territories, building roads, fortifications, and cities that facilitated control and integration.
The Roman Empire’s society was hierarchical, with a rigid class system. At the top were the patricians, wealthy elites who held significant political power. Below them were the plebeians, free citizens with limited political influence, and the vast numbers of slaves who formed the backbone of the economy. The family unit was central, governed by the paterfamilias, the male head who held absolute authority.
Culturally, the Romans were eclectic, absorbing and adapting elements from the civilizations they encountered, particularly the Greeks. Roman art, literature, and philosophy reflected this synthesis, creating a rich cultural tapestry. Latin, the Roman language, became the lingua franca of the Western world, influencing numerous modern languages.
Roman architecture and engineering achievements were monumental. They perfected the arch, vault, and dome, constructing enduring structures like the Colosseum, Pantheon, and aqueducts. These engineering marvels not only showcased Roman ingenuity but also served practical purposes, from public entertainment to water supply.
Introduction to AI for Nonprofits with Tapp NetworkTechSoup
Dive into the world of AI! Experts Jon Hill and Tareq Monaur will guide you through AI's role in enhancing nonprofit websites and basic marketing strategies, making it easy to understand and apply.
2. Introduction
PfSense is a complete, embedded firewall software package that provides all the important features of
commercial firewall boxes (including ease of use) at a fraction of the price (free software). It is based
on FreeBSD. The software is available at the URL, http://www.pfsense.com/.
Hacom implements pfSense on our hardware to take advantages of their features, as well as , to provide
complete packaged supports for commercial customers: small, medium and enterprises, who desire a
one-stop shop.
Documentation
Since pfSense is similar to M0n0wall, the documentation of the M0n0wall systems can be perused at
the following URL,
• The M0n0 Users Manual (http://m0n0.ch/wall/docbook/)
• M0n0wall Quick Start Guide (http://m0n0.ch/wall/quickstart/)
• pfSense FAQ (http://faq.pfsense.com/)
• pfSense tutorial (http://www.pfsense.com/index.php?id=36)
Hacom's pfSense
Hacom offers three groups of commercially packaged pfSense systems with choices of support
services: Phoenix , Mercury and Mars . The following comparison table can be used to select
appropriate equipments depending on a network environment.
Performance* Phoenix Mercury Mars
Suggested Users 5-25 10-50 10-250
Throughput 90Mbps 200Mbps 400Mbps
Concurrent Connections 80,000 200,000 200,000-400,000
3DES IPSec Throughput 8-10Mbps 20Mbps 25-40Mbps
AES IPSec Throughput 10-40Mbps 80Mbps 40-60Mbps
• Performance depends on network environment and configuration of the firewall.
2
3. Hardware
Phoenix Mercury Mars
Specification
Systemboard ES466B CV700A CV700A CV763A CI852A
333Mhz AMD 500Mhz 1Ghz 1.6Ghz
CPU 1Ghz VIA C7
Geode GX VIA C7 Celeron-M Celeron-M
Memory 256MB 512MB 512MB 1GB
Storage 1 GB CF (Compact Flash) or 1GB DOM (Disk-On-Module)**
3x10M/10 4x10M/10
Ethernet 3x10M/100M 4x10M/100M/1G
0M/1G 0M/1G
** Disk-on-Module is more durable than compact flash due to its built-in wear leveling function.
This quick-start guide is also applicable to other Hacom's pfSense pre-loaded systems.
Requirements to Access to pfSense's Console.
You will need a keyboard and a monitor to access the console of Hacom's pfSense. Serial console is
available on certain models.
Input/Output Phoenix Mercury Mars
Systemboard ES466B CV700A CV700A CV763A CI852A
Monitor VGA
Keyboard USB USB or PS/2
Optional
(Required
Serial Optional
hardware
Console (Required a serial-console enabled BIOS update)
modification
at factory!)
3
4. Setup and Configuration
The simplest pfSense configuration is a 2-zone firewall: WAN and LAN. WAN is the Internet, the
outside world. LAN is the local internal network protected by the firewall. Following is a diagram of
the 2-zone pfSense firewall.
When the system is booted up, a Grub screen is shown. There is a five (5) seconds delay for user to
access Grub directly.
4
5. At the first boot up, pfSense was not configured. User will see a setup screen asking for network
interface configuration.
PfSense requires that at least two (2) network interfaces are available to set up a firewall. Hacom
systems typically have at least three (3) network interfaces.
Depending on the systems, they are typically based on the Realtek chipset and will be detected by
pfSense as:
rl0: first Realtek 10M/100M Ethernet adapter
rl1: second Realtek 10M/100M Ethernet adapter
rl2: third Realtek 10M/100M Ethernet adapter
For the Intel Gigabit Ethernet systems, pfSense will detect the following network interfaces, instead:
em0: first Intel Gigabit 10M/100M/1G Ethernet adapter
em1: second Intel Gigabit 10M/100M/1G Ethernet adapter
em2: third Intel Gigabit 10M/100M/1G Ethernet adapter
In some of our systems, an Atheros-based wireless network interface will also be detected as:
ath0: first 802.11/b/g Wifi network interface
5
6. In our simple 2-zone firewall configuration,
(1) We don't need VLAN setup.
(2) We want rl0 (the first Realtek Ethernet interface) to be our LAN: the local internal network.
(3) We want rl1 (the second Realtek Ethernet interface) to be our WAN: the access to the outside
Internet.
(4) Since we are not ready to set up the DMZ, we will leave the OPT interfaces blank (un-
configured) for the time being.
Once the network interfaces are set up, pfSense is ready and the console menu is shown as in the
following.
In the console menu, there are several additional configuration choices. Following are the most
important for the initial setup of the firewall to be ready:
1. Assign Interfaces.
It is basically the initial network setup that we have just followed.
2. Set LAN IP address.
It will be our next step so we can access the web-based configuration tools on a local internet
network. By default, the LAN IP is set to be 192.168.1.1, which is very common among other
firewalls gateways. It is advised to make this change prior to connecting the firewall to an
internal network, to avoid network problems.
6
7. 3. Reset WebConfigurator password.
This is to reset the “admin” password to “pfsense”. The password can be changed from the web.
4. Reset to factory defaults.
This will wipe out all of the configuration data.
Our next step is to change the LAN IP address from the default 192.168.1.1 to an appropriate one in a
local network.
If there is no need to change the IP address, just skip this step!
For our network, we have a company gateway at 192.168.1.1. We want to change the LAN IP to an
unused IP in our local network. It was decided to put this pfSense firewall to the end of the class c
range of the 192.168.1.0 network.
Following is our LAN IP:
1. IP address: 192.168.1.254
2. Subnet masks: 255.255.255.0 (or 24 bits)
This is related to our choice of using 192.168.1.0 network as a class C with a maximum of 255
hosts withing the subnet. For some other installations, which need a larger subnet, like 500
hosts within an accessible subnet to all, a class B subnet with s subnet mask of 255.255.0.0 (or
16 bits) may be more appropriate. For example, a 10.0.0.0/16 will accommodate for a range
from 10.0.0.1 to 10.0.255.254, or a maximum of 65535 hosts.
7
8. Now, we are ready to go the web configuration!
8
9. Web Administration
At the first access to the web-based administration tool, we will be lead to a wizard. The wizard can
always be choosen from System → Setup wizard. Or we can always use the following URL:
http://192.168.1.254/wizard.php?xml=setup_wizard.xml
Just change the ip address to the correct one for your installation!
The first step is to update some general information:
9
10. 1. Hostname: pfsense or any other hostname you want the firewall to be called.
2. Domain: Default is local. Use your domain name here. We set it up to be baoha.net.
3. DNS servers: It is best to use the DNS servers from your Internet providers. Our Internet
provider is dslextreme.com, and the DNS servers they provide are 66.51.205.100 and
66.51.206.100.
10
11. The second step is to set up the time server information.
1. Time server dns name is defaulted to 0.pfsense.pool.ntp.org. Don't change it unless there is
valid reason.
2. Time zone may be changed to local time zone. In our case, it is the US Pacific Time Zone.
11
12. The third step is to configure the Wide Area Network (WAN) information. There are several
configuration choices: (1) static IP, (2) DHCP IP, (3) PPPoE, (4) PptP, and (5) Big Pond.
For our configuration, we choose static IP
1. Static IP address: 208.127.150.33 (Use your own IP!!!)
2. Default gateway: 208.127.150.1 (Use your own gateway!!!)
When scrolling to the bottom, there is also a choice of “Block RFC1918 Private Networks.” We left it
set to prevent spoofing.
12
13. The fourth step is to set the Local Area Network (LAN). It is just a confirm of what we have changed at
the console menu.
13
14. The last step is to change the “admin” password. We changed it from the default “pfsense” to *****.
14
17. Backup and Restore of configuration
The configuration data should be back up to a local storage of the system administration for recovery
purposes. To access the backup and restore tools, got to Diagnostic → Backup/Restore.
The page is self-explanatory. We would recommend to back up every time a configuration change was
made. Also, periodic backup should also be performed.
It is also recommend to test the restore function after the initial backup, as well as every time the
firmware is updated.
17
18. Firmware Update
There are several ways to update the firmware.
1. For Hacom systems prior to pfSense version 1.2.1, it is recommended
a. to back up the configuration
b. to flash the new firmware
c. to restore the configuration.
2. Starting from version 1.2.1, firmware can be updated reliably on-line.
Important notes: Hacom pfSense systems are based on the full firmware, including headless systems.
● When updating the firmware, use the full-update version.
● The compact flash (CF) based systems require the platform information to be changed from
“embedded” to “pfSense” before the updating process. It should be changed back to
“embedded” after the update. The CF-based system can be used as “pfSense” platform if the
mount command shows the following:
...
pfSense:~# mount
/dev/ad2s4a on / (ufs, local, noatime)
devfs on /dev (devfs, local)
/dev/md0 on /var/run (ufs, local)
/dev/ad2s4d on /cf (ufs, local, noatime)
devfs on /var/dhcpd/dev (devfs, local)
pfSense:~#
...
The “noatime” option on the root / and /cf allows the CF to last several years under normal use.
It is recommended to use industrial-grade CF or Disk-on-Module (DOM) with their built-in
static wear leveling function.
● The DOM based platforms are “pfSense” and ready to use just like a solid state drive.
18
19. Following is the procedure to update the firmware.
First, the platform is changed to “pfSense”. This step can be skipped for DOM-based systems or
systems which are already “pfSense”.
The following procedure is done as a shell using the console. It can also be performed using the web-
based administration: go to Diagnostic → Command.
19
20. The second step is to enable the Firmware upload. Go to System → Firmware.
20
21. The third step is to upload the firmware.
1. The new firmware should have been downloaded into a local storage.
2. Browse to the local folder to upload the new firmware.
3. If asked about the kernel, select the Uniprocessor or Multiprocessor kernel, as appropriate. Do
not select embedded kernel since that will disable the display, keyboard and mouse.
4. Click on upgrade firmware and wait.
21
22. If the firmware is uploaded successful, it will take a while for the updating process. It takes more than
10 minutes for an OpenBrick-E cv700a3r50 to complete the firmware update.
22
24. Maximum Firewall States
It is recommended to change the maximum firewall state from the default 10,000 to at least 100,000 for
systems with 256MB RAM memory, or 200,000 for systems with more than 512MB RAM, or 400,000
for systems with more than 1GB RAM. Each state uses about 1k of RAM memory.
Sometimes, the maximum number of firewall states is also referred as maximum number of concurrent
connections.
Go to System → Advanced, and scroll all the way to the bottom to see the option.
24