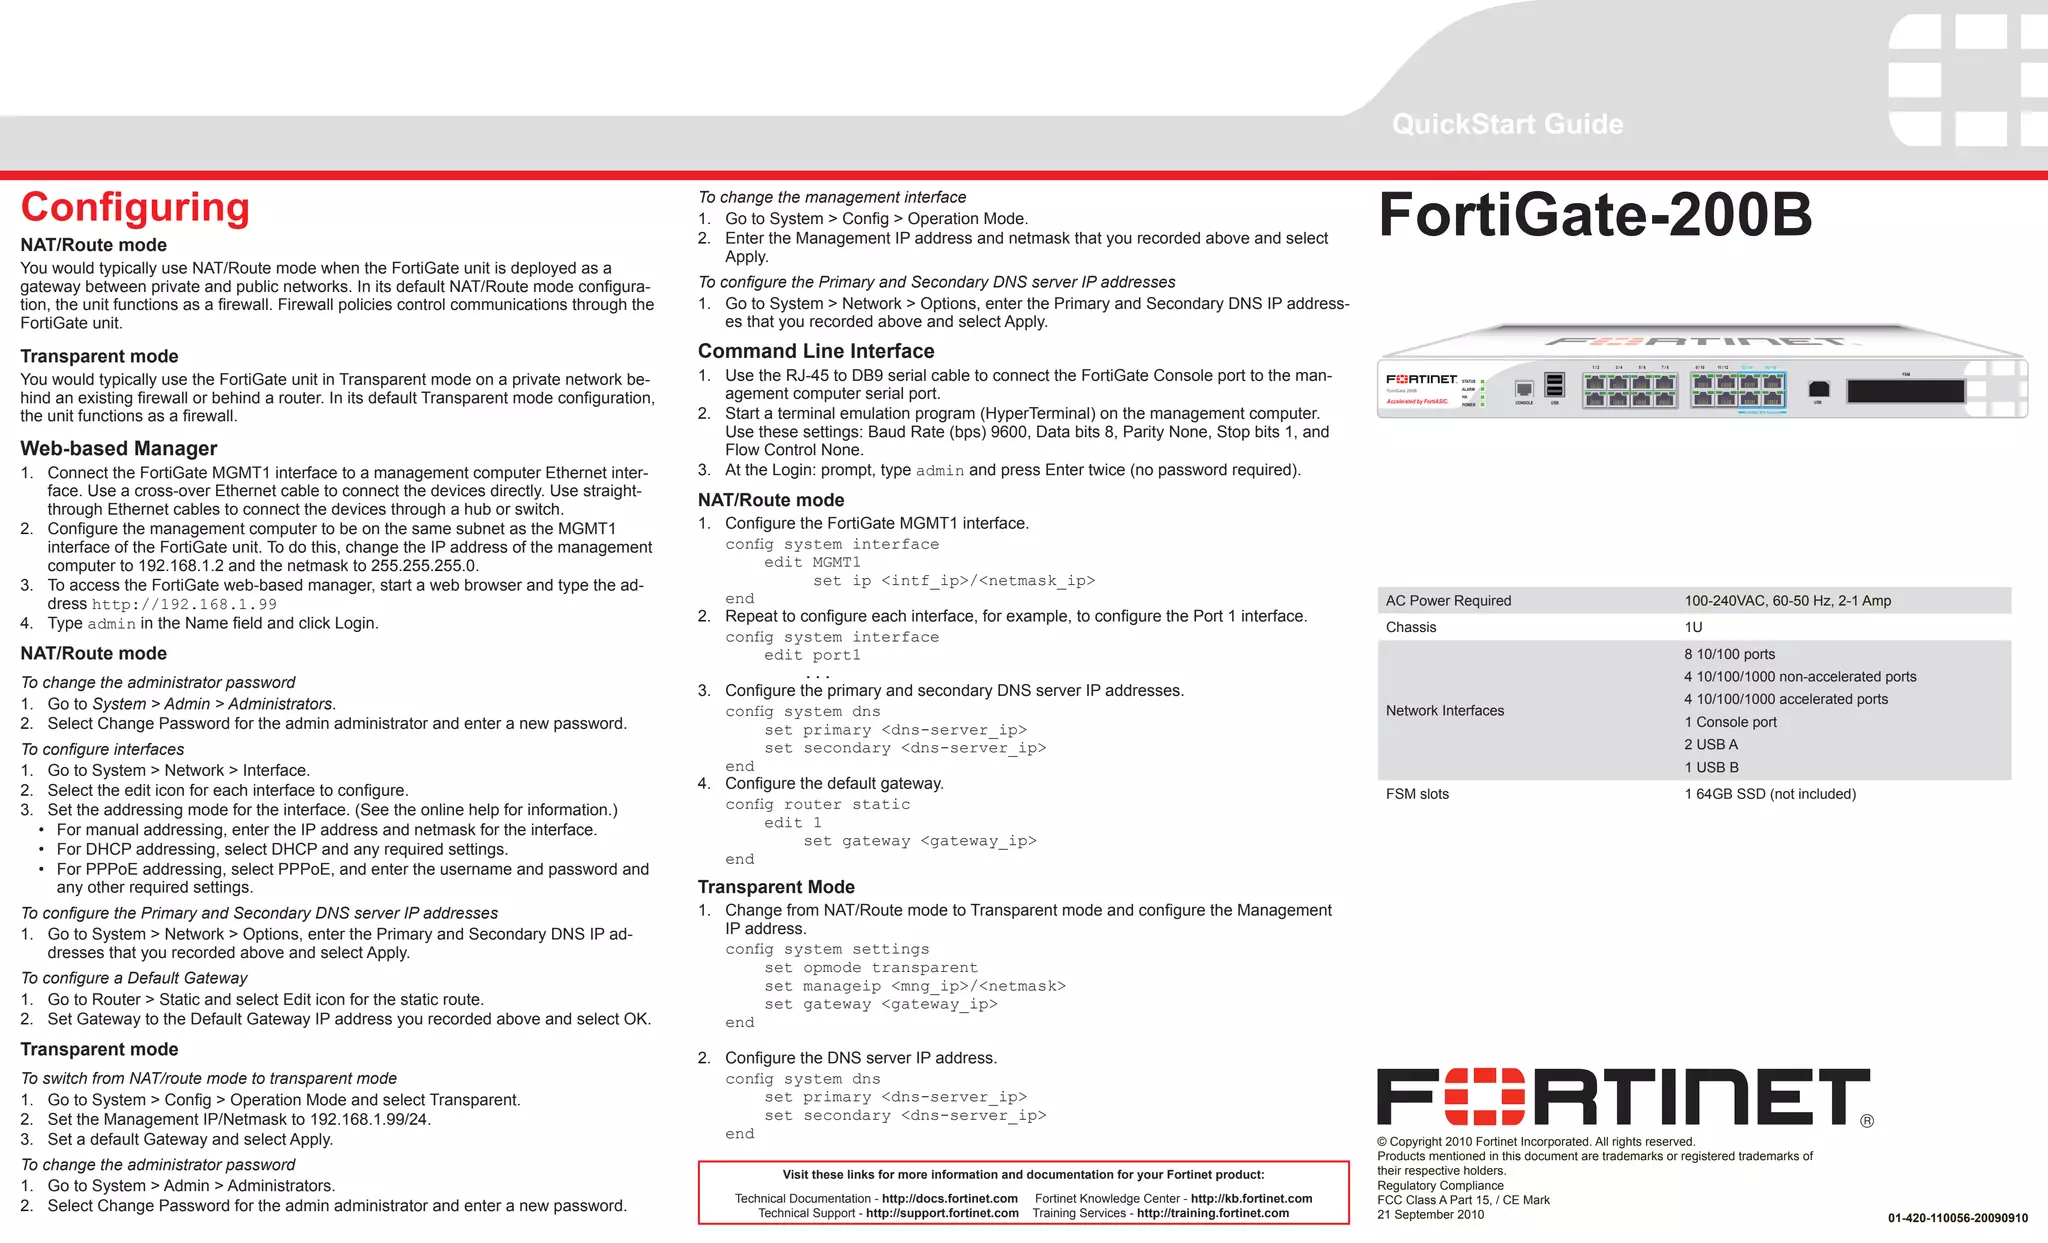
SlideShare a Scribd company logo
QuickStart Guide


Configuring                                                                                                                                                                                                    FortiGate-200B
                                                                                               To change the management interface
                                                                                               1.	 Go to System > Config > Operation Mode.
NAT/Route mode                                                                                 2.	 Enter the Management IP address and netmask that you recorded above and select
                                                                                                   Apply.
You would typically use NAT/Route mode when the FortiGate unit is deployed as a
gateway between private and public networks. In its default NAT/Route mode configura-          To configure the Primary and Secondary DNS server IP addresses
tion, the unit functions as a firewall. Firewall policies control communications through the   1.	 Go to System > Network > Options, enter the Primary and Secondary DNS IP address-
FortiGate unit.                                                                                    es that you recorded above and select Apply.

Transparent mode                                                                               Command Line Interface
                                                                                                                                                                                                                                                          1/2   3/4   5/6   7/8    9 / 10   11 / 12   13 / 14      15 / 16


You would typically use the FortiGate unit in Transparent mode on a private network be-        1.	 Use the RJ-45 to DB9 serial cable to connect the FortiGate Console port to the man-                                           STATUS
                                                                                                                                                                                                                                                                                                                                       FSM


                                                                                                   agement computer serial port.
                                                                                                                                                                                                                                 ALARM

hind an existing firewall or behind a router. In its default Transparent mode configuration,
                                                                                                                                                                                                                FortiGate 200B
                                                                                                                                                                                                                                 HA
                                                                                                                                                                                                                                          CONSOLE   USB                                                                        USB
                                                                                                                                                                                                                                 POWER


the unit functions as a firewall.                                                              2.	 Start a terminal emulation program (HyperTerminal) on the management computer.                                                                                                                      FortiASIC NP2 Powered


                                                                                                   Use these settings: Baud Rate (bps) 9600, Data bits 8, Parity None, Stop bits 1, and
Web-based Manager                                                                                  Flow Control None.
1.	 Connect the FortiGate MGMT1 interface to a management computer Ethernet inter-             3.	 At the Login: prompt, type admin and press Enter twice (no password required).
    face. Use a cross-over Ethernet cable to connect the devices directly. Use straight-
    through Ethernet cables to connect the devices through a hub or switch.
                                                                                               NAT/Route mode
2.	 Configure the management computer to be on the same subnet as the MGMT1                    1.	 Configure the FortiGate MGMT1 interface.
    interface of the FortiGate unit. To do this, change the IP address of the management           config system interface
    computer to 192.168.1.2 and the netmask to 255.255.255.0.                                           edit MGMT1
3.	 To access the FortiGate web-based manager, start a web browser and type the ad-                            set ip <intf_ip>/<netmask_ip>
    dress http://192.168.1.99                                                                      end                                                                                                          AC Power Required                                                 100-240VAC, 60-50 Hz, 2-1 Amp
4.	 Type admin in the Name field and click Login.                                              2.	 Repeat to configure each interface, for example, to configure the Port 1 interface.
                                                                                                                                                                                                                Chassis                                                           1U
                                                                                                   config system interface
NAT/Route mode                                                                                          edit port1                                                                                                                                                                8 10/100 ports
                                                                                                              ...                                                                                                                                                                 4 10/100/1000 non-accelerated ports
To change the administrator password                                                           3.	 Configure the primary and secondary DNS server IP addresses.
1.	 Go to System > Admin > Administrators.                                                                                                                                                                                                                                        4 10/100/1000 accelerated ports
                                                                                                   config system dns                                                                                            Network Interfaces
2.	 Select Change Password for the admin administrator and enter a new password.                                                                                                                                                                                                  1 Console port
                                                                                                        set primary <dns-server_ip>
To configure interfaces                                                                                 set secondary <dns-server_ip>                                                                                                                                             2 USB A
1.	 Go to System > Network > Interface.                                                            end                                                                                                                                                                            1 USB B
2.	 Select the edit icon for each interface to configure.                                      4.	 Configure the default gateway.
                                                                                                                                                                                                                FSM slots                                                         1 64GB SSD (not included)
3.	 Set the addressing mode for the interface. (See the online help for information.)              config router static
   •	 For manual addressing, enter the IP address and netmask for the interface.                        edit 1
                                                                                                              set gateway <gateway_ip>
   •	 For DHCP addressing, select DHCP and any required settings.
                                                                                                   end
   •	 For PPPoE addressing, select PPPoE, and enter the username and password and
      any other required settings.                                                             Transparent Mode
To configure the Primary and Secondary DNS server IP addresses                                 1.	 Change from NAT/Route mode to Transparent mode and configure the Management
1.	 Go to System > Network > Options, enter the Primary and Secondary DNS IP ad-                   IP address.
    dresses that you recorded above and select Apply.                                              config system settings
                                                                                                        set opmode transparent
To configure a Default Gateway                                                                          set manageip <mng_ip>/<netmask>
1.	 Go to Router > Static and select Edit icon for the static route.                                    set gateway <gateway_ip>
2.	 Set Gateway to the Default Gateway IP address you recorded above and select OK.                end
Transparent mode                                                                               2.	 Configure the DNS server IP address.
To switch from NAT/route mode to transparent mode                                                  config system dns
1.	 Go to System > Config > Operation Mode and select Transparent.                                      set primary <dns-server_ip>
2.	 Set the Management IP/Netmask to 192.168.1.99/24.                                                   set secondary <dns-server_ip>
3.	 Set a default Gateway and select Apply.                                                        end                                                                                                         © Copyright 2010 Fortinet Incorporated. All rights reserved.
                                                                                                                                                                                                               Products mentioned in this document are trademarks or registered trademarks of
To change the administrator password                                                                                                                                                                           their respective holders.
                                                                                                            Visit these links for more information and documentation for your Fortinet product:
1.	 Go to System > Admin > Administrators.                                                                                                                                                                     Regulatory Compliance
                                                                                                    Technical Documentation - http://docs.fortinet.com    Fortinet Knowledge Center - http://kb.fortinet.com   FCC Class A Part 15, / CE Mark
2.	 Select Change Password for the admin administrator and enter a new password.                        Technical Support - http://support.fortinet.com   Training Services - http://training.fortinet.com     21 September 2010                                                                                                     01-420-110056-20090910
Package Contents                                                                                                                                                                                                                                                                                                        LED Description                                                                        Interface Description
                                                                                                                                                                                                                                                                                                                         LED                       State              Description                               Interface      Type     Speed           Protocol    Description
                                                                                                                                                                                                                 10/100/1000 accelerated
                                                        LEDs                                                                                               USB A                                                          ports
                                                                                                                                                                                                                                                                                                                                                   Green              The unit is on.                           Console        RJ-45                    Ethernet    Connection to the man-
                                                                                                                                                                                                                                                                                                                         Power                                                                                                                                      agement computer.
                                                                                                                                                                                    1/2     3/4   5/6   7/8       9 / 10   11 / 12   13 / 14      15 / 16
                                                                                                                                                                                                                                                                                    FSM
                                                                                                                                                                                                                                                                                                                                                   Off                The unit is off.                                                                              Provides access to the
                                                   STATUS


                                                                                                                                                                                                                                                                                                                                                   Green flashing     The unit is starting up.                                                                      command line interface
 FortiGate 200B                                    ALARM
                                                   HA


                                                                                                                                                                                                                                                                                                                         Status
                                                                                                                            CONSOLE                               USB                                                                                             USB
                                                   POWER


                                                                                                                                                                                                                                                                                                                                                                                                                                                                    (CLI).
                                                                                                                                                                                                                                      FortiASIC NP2 Powered


                                                                                                                                                                                                                                                                                                                                                   Green              The unit is running normally.
                                                                                                     Console                                                                                                                                                     USB B           FSM
                                                                                                      port                                                                            10/100 ports             10/100/1000
                                                                                                                                                                                                                                                              (currently not   module slot                                                         Green              The unit is being used in an HA           Ports 1 to 8   RJ-45    10/100 Base-    Ethernet    LAN ports configurable by
                                                                                                                                                                                                              non-accelerated                                                                                            HA                                                                                                             T                           a switch (by default).
                                                                                                                                                                                                                   ports                                         in use)                                                                                              cluster.
                               +12V @8.3A                                                                                                                                                                                                                                                                                                          Red                A critical error has occurred.            Ports 9 to     RJ-45    10/100/1000     Ethernet    Non-accelerated ports.
                                                                                                                                                                                                                                                                                                                                                                                                                12                      Base-T
                                                                                                                                                                                                                                                                                                                         Alarm                     Amber              A minor error has occurred.
                                                                                                                                                                                                                                                                                            AC LINE
                                                                                                                                                                                                                                                                                          100-240V AC
                                                                                                                                                                                                                                                                                          60-50Hz 2-1A
                   DC INPUT FOR REMOTE POWER
                   SUPPLY SPECIFIED IN MANUAL
                                                                                                                                                                                                                                                                                                                                                                                                                Ports 13       RJ-45    10/100/1000     Ethernet    ASIC accelerated ports.
                                                                                                                                                                                                                                                                                                           Power                                   Off                No errors detected.                       to 16                   Base-T
                      DC power connection                                                                                                                                                                                                                                                                  button
Ground                     (Optional)                                                                                                                                                                                                                                                               AC power
                                                                                                                                                                                                                                                                                                                                        Link/      Green              Port is online.                           USB            USB A                    USB         Optional connections for
                                                                                                                                                                                                                                                                                                    connection                          Activity   Flashing           Port is sending or receiving data.                                                            the USB key, modem, or
                                                                                                                                                                                                                                                                                                                         Ports 1
                                                                                                                                                                                                                                                                                                                         to 8           Speed      Off                Connected at 10 Mbps.                                                                         backup operation.
                                      QuickStart Guide
                                                                                                                                                                 FortiGate-30B
                                                                                                                                                                                                                                                                                                                                                   Amber              Connected at 100 Mbps.                    USB Man-       USB B                                For future use.
                                                                                                                                                                                                                                                                                                                                                                                                                agement
                                                                                                                                                                                                                                                                                                                                        Link/      Green              Port is online.
                                                                                 1/2   3/4   5/6   7/8   9 / 10   11 / 12   13 / 14      15 / 16
                                                                                                                                                           FSM
                                                        STATUS

                                      FortiGate 200B    ALARM
                                                        HA


                                                                                                                                                                                 REGISTER
                                                                 CONSOLE   USB                                                                       USB
                                                        POWER
                                                                                                                             FortiASIC NP2 Powered


                                                                                                                                                                                                                                                                                4 Rubber feet
                                                                                                                                                                                                                                                                                                                                                                                                                FSM            FSM                                  Fortinet Storage Module.
      Tools and Documenation


                                     Copyright 2009 Fortinet Incorporated. All rights reserved.
                                                                                                                                                                                                                                                                                                                                        Activity   Flashing           Port is sending or receiving data.
                                                                                                                                                                                                                                                                                                           Rack-Mount
                                                                                                                                                                                                                                                                                                                                                                                                                                                                    One SATA hard disk drive
                                     Trademarks

                                                                                                                                                                                                                           Straight-through    RJ-45 to
                                                                                                                                                                                                                            Ethernet cable DB-9 Serial Cable                                                Brackets
                                                                                                                                                                                                                                                                                                                         Ports 9 to
                                                                                                                                                                                                  AC Power Cable

                                                                                                                                                                                                                                                                               HDD Dummy Card                                           Speed      Green              Connected at 1000Mbps.                                                                        slot supports 2.5 inch solid
                                                                                                                                                                                                                                                                                                                         16
                                                                                                                                                                                                                                                                                                                                                   Amber              Connected at 100 Mbps.                                                                        state drives.

                                                                                                                                                                                                                                                                                                                                                   Off                Connected at 10 Mbps.


Factory Defaults                                                                                                                                                                                                                                                                                                        Connecting                                                                             Configuration Tools
                                                                                                                                                                                                                                                                                                                        Ensure the FortiGate unit is placed on a stable surface. Connect the following to      Web Config
 Administrator user name                                                                                                                                                                                            admin                                                                                               the FortiGate unit:
                                                                                                                                                                                                                                                                                                                                                                                                               Web Config is an easy to use management tool. Use it to configure the admin-
 Administrator password                                                                                                                                                                                             (none)                                                                                              •	    Connect the RJ-45 to DB-9 serial cable into the Console port on the unit.        istrator password, the interface and default gateway addresses, and the DNS
                                                                                                                                                                                                                                                                                                                              Insert the other end into the management computer.                               server addresses, add devices for log collection and configure reports.
 NAT/Route mode
                                                                                                                                                                                                                                                                                                                        •	    Insert the ethernet cable into a port. Insert the other end to the router con-   Requirements:
 Port 1                                                                                                                                                                                                             192.168.1.99                                                                                              nected to the Internet, or to the modem.                                         •	 An Ethernet connection between the Fortinet unit and management com-
 Port 9                                                                                                                                                                                                             192.168.100.99                                                                                      •	    Connect the AC power cable to the power supply on the back of the unit.             puter.
                                                                                                                                                                                                                                                                                                                                                                                                               •	 A web browser on the management computer.
To reset the FortiGate unit to the factory defaults, in the CLI type the command:                                                                                                                                                                                                                                       •	    Connect the power cord to a surge protected power bar or power supply.
	 execute factoryreset                                                                                                                                                                                                                                                                                                                                                                                         Command Line Interface (CLI)
                                                                                                                                                                                                                                                                                                                        FSM Modules                                                                            The CLI is a full-featured management tool. Use it to configure the administrator
                                                                                                                                                                                                                                                                                                                        Caution: When installing the FSM module, ensure that the FORTINET and/or               password, the interface addresses, the default gateway address, and the DNS
                                                                                                                                                                                                                                                                                                                        “THIS SIDE UP” labels are orientated upwards when inserting the module into            server addresses. To configure advanced settings, see the Tools and Documen-
                                                                                                                                                                                                                                                                                                                        the unit.                                                                              tation CD-ROM.
                                                                                                                                                                                                                                                                                                                        To insert the FSM module                                                               Requirements:
                                                                                                                                                                                                                                                                                                                                                                                                               •	 The RJ-45 to DB-9 serial connection between the Fortinet unit and the
                                                                                                                                                                                                                                                                                                                        1.	 Insert the module into the FSM slot on the unit with the Fortinet and/or “This
                                                                                                                                                                                                                                                                                                                            Side Up” labels facing upwards.                                                       management computer.
                                                                                                                                                                                                                                                                                                                        2.	 Close the latch.                                                                   •	 A terminal emulation application (HyperTerminal for Windows) on the man-
                                                                                                                                                                                                                                                                                                                                                                                                                  agement computer.

More Related Content

What's hot

test
testtest
test
sufwan
 
Intro to router_config
Intro to router_configIntro to router_config
Intro to router_config97148881557
 
Id. 01 router (computing)
Id. 01 router (computing)Id. 01 router (computing)
Id. 01 router (computing)
Rawa KirKuKi
 
Moveo Comfort Drive Technique
Moveo Comfort Drive TechniqueMoveo Comfort Drive Technique
Moveo Comfort Drive Technique
MarlonCastaneda
 
Configuracionde router camilaloaiza
Configuracionde router camilaloaizaConfiguracionde router camilaloaiza
Configuracionde router camilaloaiza
Once Redes
 
Command reference (nNEtetwork management)
Command reference (nNEtetwork management)Command reference (nNEtetwork management)
Command reference (nNEtetwork management)
prachandra
 
IBM Flex System Fabric EN4093 and EN4093R 10Gb Scalable Switches
IBM Flex System Fabric EN4093 and EN4093R 10Gb Scalable SwitchesIBM Flex System Fabric EN4093 and EN4093R 10Gb Scalable Switches
IBM Flex System Fabric EN4093 and EN4093R 10Gb Scalable Switches
IBM India Smarter Computing
 
Ccna day2
Ccna day2Ccna day2
Ccna day2
Vijay Kumar
 
Ccna 2
Ccna 2Ccna 2
Chapter 03 - Router Oper
Chapter 03 - Router OperChapter 03 - Router Oper
Chapter 03 - Router Operphanleson
 
Cisco IOS (internetworking operating system)
Cisco IOS (internetworking operating system)Cisco IOS (internetworking operating system)
Cisco IOS (internetworking operating system)
Netwax Lab
 
Midway motors 2011 Cadillac STS & DTS
Midway motors 2011 Cadillac STS & DTSMidway motors 2011 Cadillac STS & DTS
Midway motors 2011 Cadillac STS & DTS
choov
 
Network and services overview 20121202 clean
Network and services overview 20121202 cleanNetwork and services overview 20121202 clean
Network and services overview 20121202 clean
tlusby
 
IBM Flex System Fabric EN4093 10Gb Scalable Switch
IBM Flex System Fabric EN4093 10Gb Scalable SwitchIBM Flex System Fabric EN4093 10Gb Scalable Switch
IBM Flex System Fabric EN4093 10Gb Scalable Switch
IBM India Smarter Computing
 
Mitsubishi inverter freqrol-e700 series dienhathe.vn
Mitsubishi inverter freqrol-e700 series dienhathe.vnMitsubishi inverter freqrol-e700 series dienhathe.vn
Mitsubishi inverter freqrol-e700 series dienhathe.vn
Dien Ha The
 

What's hot (18)

test
testtest
test
 
Cisco how-to
Cisco how-toCisco how-to
Cisco how-to
 
Intro to router_config
Intro to router_configIntro to router_config
Intro to router_config
 
Id. 01 router (computing)
Id. 01 router (computing)Id. 01 router (computing)
Id. 01 router (computing)
 
Moveo Comfort Drive Technique
Moveo Comfort Drive TechniqueMoveo Comfort Drive Technique
Moveo Comfort Drive Technique
 
Configuracionde router camilaloaiza
Configuracionde router camilaloaizaConfiguracionde router camilaloaiza
Configuracionde router camilaloaiza
 
Command reference (nNEtetwork management)
Command reference (nNEtetwork management)Command reference (nNEtetwork management)
Command reference (nNEtetwork management)
 
IBM Flex System Fabric EN4093 and EN4093R 10Gb Scalable Switches
IBM Flex System Fabric EN4093 and EN4093R 10Gb Scalable SwitchesIBM Flex System Fabric EN4093 and EN4093R 10Gb Scalable Switches
IBM Flex System Fabric EN4093 and EN4093R 10Gb Scalable Switches
 
Ccna day2
Ccna day2Ccna day2
Ccna day2
 
Ccna day2
Ccna day2Ccna day2
Ccna day2
 
Ccna 2
Ccna 2Ccna 2
Ccna 2
 
Ccna day2
Ccna day2Ccna day2
Ccna day2
 
Chapter 03 - Router Oper
Chapter 03 - Router OperChapter 03 - Router Oper
Chapter 03 - Router Oper
 
Cisco IOS (internetworking operating system)
Cisco IOS (internetworking operating system)Cisco IOS (internetworking operating system)
Cisco IOS (internetworking operating system)
 
Midway motors 2011 Cadillac STS & DTS
Midway motors 2011 Cadillac STS & DTSMidway motors 2011 Cadillac STS & DTS
Midway motors 2011 Cadillac STS & DTS
 
Network and services overview 20121202 clean
Network and services overview 20121202 cleanNetwork and services overview 20121202 clean
Network and services overview 20121202 clean
 
IBM Flex System Fabric EN4093 10Gb Scalable Switch
IBM Flex System Fabric EN4093 10Gb Scalable SwitchIBM Flex System Fabric EN4093 10Gb Scalable Switch
IBM Flex System Fabric EN4093 10Gb Scalable Switch
 
Mitsubishi inverter freqrol-e700 series dienhathe.vn
Mitsubishi inverter freqrol-e700 series dienhathe.vnMitsubishi inverter freqrol-e700 series dienhathe.vn
Mitsubishi inverter freqrol-e700 series dienhathe.vn
 

Viewers also liked

FortiGate Firewall How-To: WEB Filtering
FortiGate Firewall How-To: WEB FilteringFortiGate Firewall How-To: WEB Filtering
FortiGate Firewall How-To: WEB Filtering
IPMAX s.r.l.
 
FortiGate-200B
FortiGate-200BFortiGate-200B
Juniper Networks SRX Branch Solutions
Juniper Networks SRX Branch SolutionsJuniper Networks SRX Branch Solutions
Juniper Networks SRX Branch Solutions
Altaware, Inc.
 
CW4Sの手引き - Juniper SRX GUI設定支援ツール
CW4Sの手引き - Juniper SRX GUI設定支援ツールCW4Sの手引き - Juniper SRX GUI設定支援ツール
CW4Sの手引き - Juniper SRX GUI設定支援ツール
Juniper Networks (日本)
 
Juniper
JuniperJuniper
Juniper
Kappa Data
 
Fortigate Hand Book
Fortigate Hand BookFortigate Hand Book
Fortigate Hand BookYusuf Usmani
 
vSRX on Your Laptop : PCで始めるvSRX ~JUNOSをさわってみよう!~
vSRX on Your Laptop : PCで始めるvSRX ~JUNOSをさわってみよう!~vSRX on Your Laptop : PCで始めるvSRX ~JUNOSをさわってみよう!~
vSRX on Your Laptop : PCで始めるvSRX ~JUNOSをさわってみよう!~
Juniper Networks (日本)
 
Juniper Srx quickstart-12.1r3
Juniper Srx quickstart-12.1r3Juniper Srx quickstart-12.1r3
Juniper Srx quickstart-12.1r3Mohamed Al-Natour
 
FortiGate 60C
FortiGate 60CFortiGate 60C
FortiGate 60C
dwaeyaert
 
Fortigate Training
Fortigate TrainingFortigate Training
Fortigate Training
NCS Computech Ltd.
 

Viewers also liked (10)

FortiGate Firewall How-To: WEB Filtering
FortiGate Firewall How-To: WEB FilteringFortiGate Firewall How-To: WEB Filtering
FortiGate Firewall How-To: WEB Filtering
 
FortiGate-200B
FortiGate-200BFortiGate-200B
FortiGate-200B
 
Juniper Networks SRX Branch Solutions
Juniper Networks SRX Branch SolutionsJuniper Networks SRX Branch Solutions
Juniper Networks SRX Branch Solutions
 
CW4Sの手引き - Juniper SRX GUI設定支援ツール
CW4Sの手引き - Juniper SRX GUI設定支援ツールCW4Sの手引き - Juniper SRX GUI設定支援ツール
CW4Sの手引き - Juniper SRX GUI設定支援ツール
 
Juniper
JuniperJuniper
Juniper
 
Fortigate Hand Book
Fortigate Hand BookFortigate Hand Book
Fortigate Hand Book
 
vSRX on Your Laptop : PCで始めるvSRX ~JUNOSをさわってみよう!~
vSRX on Your Laptop : PCで始めるvSRX ~JUNOSをさわってみよう!~vSRX on Your Laptop : PCで始めるvSRX ~JUNOSをさわってみよう!~
vSRX on Your Laptop : PCで始めるvSRX ~JUNOSをさわってみよう!~
 
Juniper Srx quickstart-12.1r3
Juniper Srx quickstart-12.1r3Juniper Srx quickstart-12.1r3
Juniper Srx quickstart-12.1r3
 
FortiGate 60C
FortiGate 60CFortiGate 60C
FortiGate 60C
 
Fortigate Training
Fortigate TrainingFortigate Training
Fortigate Training
 

Similar to Fortigate 200 b-quickstart

IP Ethernet
IP EthernetIP Ethernet
IP Ethernet
SILKAN
 
Hướng dẫn cài đặt switch planet layer 3
Hướng dẫn cài đặt switch planet layer 3Hướng dẫn cài đặt switch planet layer 3
Hướng dẫn cài đặt switch planet layer 3
3c telecom
 
CCNA complete.ppt
CCNA complete.pptCCNA complete.ppt
CCNA complete.ppt
atharkaleem2
 
MAHLE Data Recorder 2 (MDR2)
MAHLE Data Recorder 2 (MDR2)MAHLE Data Recorder 2 (MDR2)
MAHLE Data Recorder 2 (MDR2)
Brian Trimboli
 
PFSENSE Load Balance with Fail Over From Version Beta3
PFSENSE Load Balance with Fail Over From Version Beta3PFSENSE Load Balance with Fail Over From Version Beta3
PFSENSE Load Balance with Fail Over From Version Beta3
series09
 
Hacom%20pf sense%20quick start%20guide
Hacom%20pf sense%20quick start%20guideHacom%20pf sense%20quick start%20guide
Hacom%20pf sense%20quick start%20guide
HARRY CHAN PUTRA
 
Tp link extender setup
Tp link extender setupTp link extender setup
Wli Tx4 G54 Qsg V1.8 Web
Wli Tx4 G54 Qsg V1.8 WebWli Tx4 G54 Qsg V1.8 Web
Wli Tx4 G54 Qsg V1.8 Web925351jay1
 
Communication &amp; switching networks lab manual
Communication &amp; switching networks lab manualCommunication &amp; switching networks lab manual
Communication &amp; switching networks lab manual
MUSAAB HASAN
 
Lightspeed ii-manual-2012-jan
Lightspeed ii-manual-2012-janLightspeed ii-manual-2012-jan
Lightspeed ii-manual-2012-jan
Alan Spicer Marine Telecom
 
Forti gate 200b poe
Forti gate 200b poeForti gate 200b poe
Forti gate 200b poe
Huu Hieu
 
VLAN, Trunk and 802.1q Router Configuration Objectiv.docx
VLAN, Trunk and 802.1q Router Configuration   Objectiv.docxVLAN, Trunk and 802.1q Router Configuration   Objectiv.docx
VLAN, Trunk and 802.1q Router Configuration Objectiv.docx
dickonsondorris
 
EDS-10/40G Ethernat Delay Simulator
EDS-10/40G Ethernat Delay SimulatorEDS-10/40G Ethernat Delay Simulator
EDS-10/40G Ethernat Delay Simulator
East Coast Datacom, Inc.
 
CCNA Particular Book .pdf
CCNA Particular Book  .pdfCCNA Particular Book  .pdf
CCNA Particular Book .pdf
israchatta
 
Edge switch es-24_qsg
Edge switch es-24_qsgEdge switch es-24_qsg
Edge switch es-24_qsg
Rogelio Soto
 
Flyport wifi webserver configuration page
Flyport wifi webserver configuration pageFlyport wifi webserver configuration page
Flyport wifi webserver configuration page
Ionela
 
Outdoor 4G LTE CPE Installation Guide
Outdoor 4G LTE CPE Installation GuideOutdoor 4G LTE CPE Installation Guide
Outdoor 4G LTE CPE Installation Guide
Terence Yong
 

Similar to Fortigate 200 b-quickstart (20)

IP Ethernet
IP EthernetIP Ethernet
IP Ethernet
 
Hướng dẫn cài đặt switch planet layer 3
Hướng dẫn cài đặt switch planet layer 3Hướng dẫn cài đặt switch planet layer 3
Hướng dẫn cài đặt switch planet layer 3
 
CCNA complete.ppt
CCNA complete.pptCCNA complete.ppt
CCNA complete.ppt
 
MAHLE Data Recorder 2 (MDR2)
MAHLE Data Recorder 2 (MDR2)MAHLE Data Recorder 2 (MDR2)
MAHLE Data Recorder 2 (MDR2)
 
PFSENSE Load Balance with Fail Over From Version Beta3
PFSENSE Load Balance with Fail Over From Version Beta3PFSENSE Load Balance with Fail Over From Version Beta3
PFSENSE Load Balance with Fail Over From Version Beta3
 
Hacom%20pf sense%20quick start%20guide
Hacom%20pf sense%20quick start%20guideHacom%20pf sense%20quick start%20guide
Hacom%20pf sense%20quick start%20guide
 
Tp link extender setup
Tp link extender setupTp link extender setup
Tp link extender setup
 
Wli Tx4 G54 Qsg V1.8 Web
Wli Tx4 G54 Qsg V1.8 WebWli Tx4 G54 Qsg V1.8 Web
Wli Tx4 G54 Qsg V1.8 Web
 
Communication &amp; switching networks lab manual
Communication &amp; switching networks lab manualCommunication &amp; switching networks lab manual
Communication &amp; switching networks lab manual
 
User manual ramon
User manual  ramon User manual  ramon
User manual ramon
 
Lightspeed ii-manual-2012-jan
Lightspeed ii-manual-2012-janLightspeed ii-manual-2012-jan
Lightspeed ii-manual-2012-jan
 
Forti gate 200b poe
Forti gate 200b poeForti gate 200b poe
Forti gate 200b poe
 
VLAN, Trunk and 802.1q Router Configuration Objectiv.docx
VLAN, Trunk and 802.1q Router Configuration   Objectiv.docxVLAN, Trunk and 802.1q Router Configuration   Objectiv.docx
VLAN, Trunk and 802.1q Router Configuration Objectiv.docx
 
Air os qs
Air os qsAir os qs
Air os qs
 
EDS-10/40G Ethernat Delay Simulator
EDS-10/40G Ethernat Delay SimulatorEDS-10/40G Ethernat Delay Simulator
EDS-10/40G Ethernat Delay Simulator
 
CCNA Particular Book .pdf
CCNA Particular Book  .pdfCCNA Particular Book  .pdf
CCNA Particular Book .pdf
 
Edge switch es-24_qsg
Edge switch es-24_qsgEdge switch es-24_qsg
Edge switch es-24_qsg
 
Flyport wifi webserver configuration page
Flyport wifi webserver configuration pageFlyport wifi webserver configuration page
Flyport wifi webserver configuration page
 
Zxdsl 9210 guide
Zxdsl 9210 guideZxdsl 9210 guide
Zxdsl 9210 guide
 
Outdoor 4G LTE CPE Installation Guide
Outdoor 4G LTE CPE Installation GuideOutdoor 4G LTE CPE Installation Guide
Outdoor 4G LTE CPE Installation Guide
 

Fortigate 200 b-quickstart

  • 1. QuickStart Guide Configuring FortiGate-200B To change the management interface 1. Go to System > Config > Operation Mode. NAT/Route mode 2. Enter the Management IP address and netmask that you recorded above and select Apply. You would typically use NAT/Route mode when the FortiGate unit is deployed as a gateway between private and public networks. In its default NAT/Route mode configura- To configure the Primary and Secondary DNS server IP addresses tion, the unit functions as a firewall. Firewall policies control communications through the 1. Go to System > Network > Options, enter the Primary and Secondary DNS IP address- FortiGate unit. es that you recorded above and select Apply. Transparent mode Command Line Interface 1/2 3/4 5/6 7/8 9 / 10 11 / 12 13 / 14 15 / 16 You would typically use the FortiGate unit in Transparent mode on a private network be- 1. Use the RJ-45 to DB9 serial cable to connect the FortiGate Console port to the man- STATUS FSM agement computer serial port. ALARM hind an existing firewall or behind a router. In its default Transparent mode configuration, FortiGate 200B HA CONSOLE USB USB POWER the unit functions as a firewall. 2. Start a terminal emulation program (HyperTerminal) on the management computer. FortiASIC NP2 Powered Use these settings: Baud Rate (bps) 9600, Data bits 8, Parity None, Stop bits 1, and Web-based Manager Flow Control None. 1. Connect the FortiGate MGMT1 interface to a management computer Ethernet inter- 3. At the Login: prompt, type admin and press Enter twice (no password required). face. Use a cross-over Ethernet cable to connect the devices directly. Use straight- through Ethernet cables to connect the devices through a hub or switch. NAT/Route mode 2. Configure the management computer to be on the same subnet as the MGMT1 1. Configure the FortiGate MGMT1 interface. interface of the FortiGate unit. To do this, change the IP address of the management config system interface computer to 192.168.1.2 and the netmask to 255.255.255.0. edit MGMT1 3. To access the FortiGate web-based manager, start a web browser and type the ad- set ip <intf_ip>/<netmask_ip> dress http://192.168.1.99 end AC Power Required 100-240VAC, 60-50 Hz, 2-1 Amp 4. Type admin in the Name field and click Login. 2. Repeat to configure each interface, for example, to configure the Port 1 interface. Chassis 1U config system interface NAT/Route mode edit port1 8 10/100 ports ... 4 10/100/1000 non-accelerated ports To change the administrator password 3. Configure the primary and secondary DNS server IP addresses. 1. Go to System > Admin > Administrators. 4 10/100/1000 accelerated ports config system dns Network Interfaces 2. Select Change Password for the admin administrator and enter a new password. 1 Console port set primary <dns-server_ip> To configure interfaces set secondary <dns-server_ip> 2 USB A 1. Go to System > Network > Interface. end 1 USB B 2. Select the edit icon for each interface to configure. 4. Configure the default gateway. FSM slots 1 64GB SSD (not included) 3. Set the addressing mode for the interface. (See the online help for information.) config router static • For manual addressing, enter the IP address and netmask for the interface. edit 1 set gateway <gateway_ip> • For DHCP addressing, select DHCP and any required settings. end • For PPPoE addressing, select PPPoE, and enter the username and password and any other required settings. Transparent Mode To configure the Primary and Secondary DNS server IP addresses 1. Change from NAT/Route mode to Transparent mode and configure the Management 1. Go to System > Network > Options, enter the Primary and Secondary DNS IP ad- IP address. dresses that you recorded above and select Apply. config system settings set opmode transparent To configure a Default Gateway set manageip <mng_ip>/<netmask> 1. Go to Router > Static and select Edit icon for the static route. set gateway <gateway_ip> 2. Set Gateway to the Default Gateway IP address you recorded above and select OK. end Transparent mode 2. Configure the DNS server IP address. To switch from NAT/route mode to transparent mode config system dns 1. Go to System > Config > Operation Mode and select Transparent. set primary <dns-server_ip> 2. Set the Management IP/Netmask to 192.168.1.99/24. set secondary <dns-server_ip> 3. Set a default Gateway and select Apply. end © Copyright 2010 Fortinet Incorporated. All rights reserved. Products mentioned in this document are trademarks or registered trademarks of To change the administrator password their respective holders. Visit these links for more information and documentation for your Fortinet product: 1. Go to System > Admin > Administrators. Regulatory Compliance Technical Documentation - http://docs.fortinet.com Fortinet Knowledge Center - http://kb.fortinet.com FCC Class A Part 15, / CE Mark 2. Select Change Password for the admin administrator and enter a new password. Technical Support - http://support.fortinet.com Training Services - http://training.fortinet.com 21 September 2010 01-420-110056-20090910
  • 2. Package Contents LED Description Interface Description LED State Description Interface Type Speed Protocol Description 10/100/1000 accelerated LEDs USB A ports Green The unit is on. Console RJ-45 Ethernet Connection to the man- Power agement computer. 1/2 3/4 5/6 7/8 9 / 10 11 / 12 13 / 14 15 / 16 FSM Off The unit is off. Provides access to the STATUS Green flashing The unit is starting up. command line interface FortiGate 200B ALARM HA Status CONSOLE USB USB POWER (CLI). FortiASIC NP2 Powered Green The unit is running normally. Console USB B FSM port 10/100 ports 10/100/1000 (currently not module slot Green The unit is being used in an HA Ports 1 to 8 RJ-45 10/100 Base- Ethernet LAN ports configurable by non-accelerated HA T a switch (by default). ports in use) cluster. +12V @8.3A Red A critical error has occurred. Ports 9 to RJ-45 10/100/1000 Ethernet Non-accelerated ports. 12 Base-T Alarm Amber A minor error has occurred. AC LINE 100-240V AC 60-50Hz 2-1A DC INPUT FOR REMOTE POWER SUPPLY SPECIFIED IN MANUAL Ports 13 RJ-45 10/100/1000 Ethernet ASIC accelerated ports. Power Off No errors detected. to 16 Base-T DC power connection button Ground (Optional) AC power Link/ Green Port is online. USB USB A USB Optional connections for connection Activity Flashing Port is sending or receiving data. the USB key, modem, or Ports 1 to 8 Speed Off Connected at 10 Mbps. backup operation. QuickStart Guide FortiGate-30B Amber Connected at 100 Mbps. USB Man- USB B For future use. agement Link/ Green Port is online. 1/2 3/4 5/6 7/8 9 / 10 11 / 12 13 / 14 15 / 16 FSM STATUS FortiGate 200B ALARM HA REGISTER CONSOLE USB USB POWER FortiASIC NP2 Powered 4 Rubber feet FSM FSM Fortinet Storage Module. Tools and Documenation Copyright 2009 Fortinet Incorporated. All rights reserved. Activity Flashing Port is sending or receiving data. Rack-Mount One SATA hard disk drive Trademarks Straight-through RJ-45 to Ethernet cable DB-9 Serial Cable Brackets Ports 9 to AC Power Cable HDD Dummy Card Speed Green Connected at 1000Mbps. slot supports 2.5 inch solid 16 Amber Connected at 100 Mbps. state drives. Off Connected at 10 Mbps. Factory Defaults Connecting Configuration Tools Ensure the FortiGate unit is placed on a stable surface. Connect the following to Web Config Administrator user name admin the FortiGate unit: Web Config is an easy to use management tool. Use it to configure the admin- Administrator password (none) • Connect the RJ-45 to DB-9 serial cable into the Console port on the unit. istrator password, the interface and default gateway addresses, and the DNS Insert the other end into the management computer. server addresses, add devices for log collection and configure reports. NAT/Route mode • Insert the ethernet cable into a port. Insert the other end to the router con- Requirements: Port 1 192.168.1.99 nected to the Internet, or to the modem. • An Ethernet connection between the Fortinet unit and management com- Port 9 192.168.100.99 • Connect the AC power cable to the power supply on the back of the unit. puter. • A web browser on the management computer. To reset the FortiGate unit to the factory defaults, in the CLI type the command: • Connect the power cord to a surge protected power bar or power supply. execute factoryreset Command Line Interface (CLI) FSM Modules The CLI is a full-featured management tool. Use it to configure the administrator Caution: When installing the FSM module, ensure that the FORTINET and/or password, the interface addresses, the default gateway address, and the DNS “THIS SIDE UP” labels are orientated upwards when inserting the module into server addresses. To configure advanced settings, see the Tools and Documen- the unit. tation CD-ROM. To insert the FSM module Requirements: • The RJ-45 to DB-9 serial connection between the Fortinet unit and the 1. Insert the module into the FSM slot on the unit with the Fortinet and/or “This Side Up” labels facing upwards. management computer. 2. Close the latch. • A terminal emulation application (HyperTerminal for Windows) on the man- agement computer.