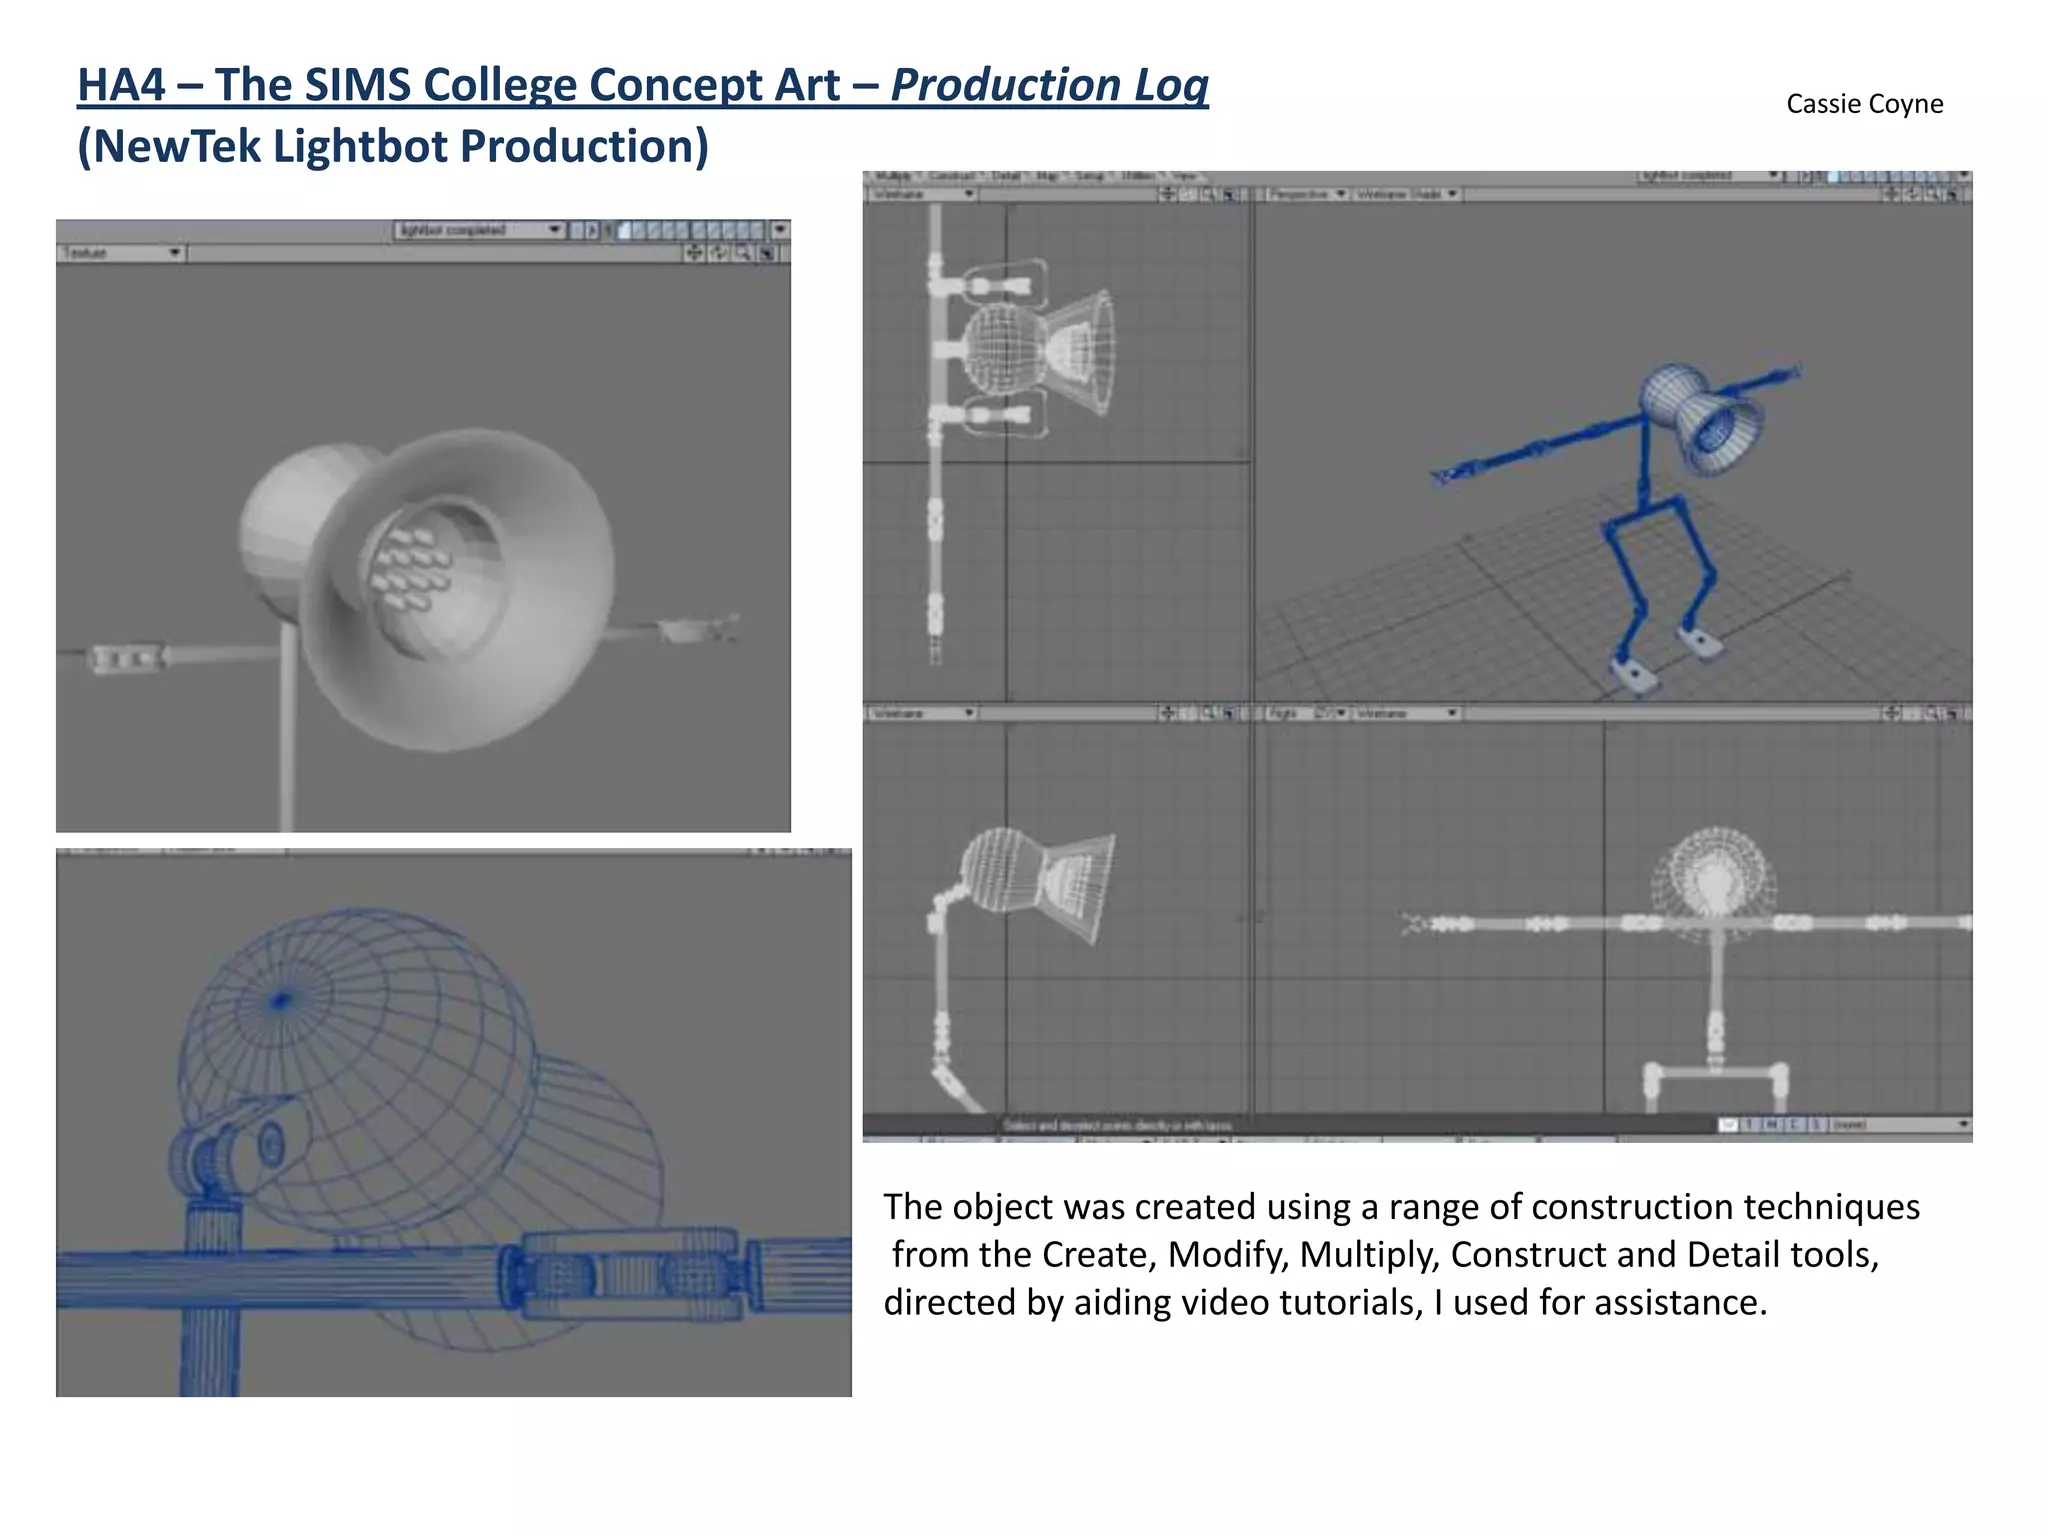
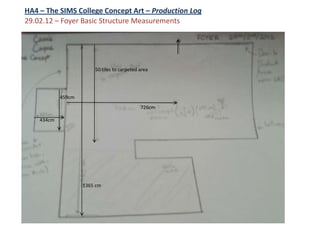
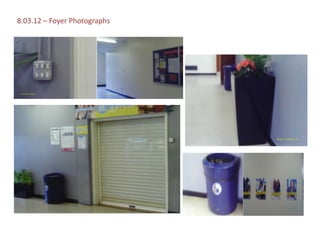
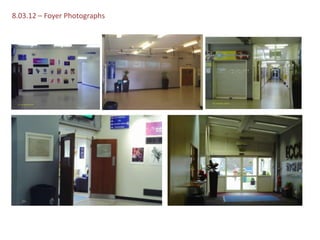
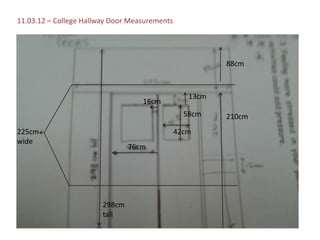
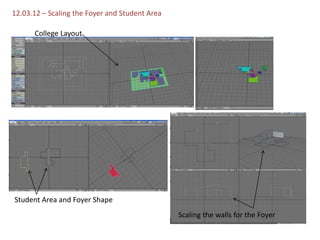
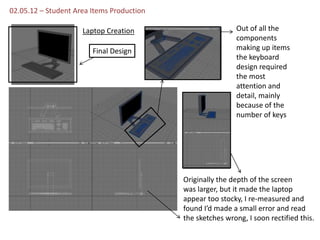
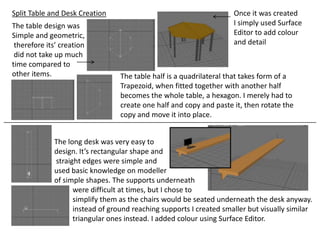
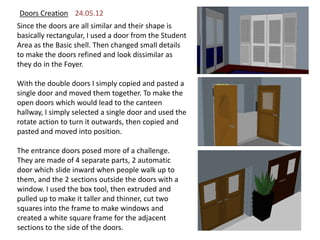
HA4 – The SIMS College Concept Art – Production Log                                       Cassie Coyne
(NewTek Lightbot Production)


                                    The object was created using a range of construction techniques
                                    from the Create, Modify, Multiply, Construct and Detail tools,
                                    directed by aiding video tutorials, I used for assistance.
HA4 – The SIMS College Concept Art – Production Log
29.02.12 – Foyer Basic Structure Measurements


                        50 tiles to carpeted area


            459cm
                                             726cm

    434cm


                    1365 cm
8.03.12 – Foyer Photographs
11.03.12 – College Hallway Door Measurements


                                                         88cm


                                                  13cm
                                   16cm
                                                 58cm    210cm
225cm                                          42cm
wide
                                76cm


                        298cm
                        tall
12.03.12 – Scaling the Foyer and Student Area

      College Layout


Student Area and Foyer Shape
                                                Scaling the walls for the Foyer
02.05.12 – Student Area Items Production

                     Laptop Creation                        Out of all the
                                                            components
                        Final Design                        making up items
                                                            the keyboard
                                                            design required
                                                            the most
                                                            attention and
                                                            detail, mainly
                                                            because of the
                                                            number of keys


                                           Originally the depth of the screen
                                           was larger, but it made the laptop
                                           appear too stocky, I re-measured and
                                           found I’d made a small error and read
                                           the sketches wrong, I soon rectified this.
Split Table and Desk Creation                                       Once it was created
The table design was                                                I simply used Surface
Simple and geometric,                                               Editor to add colour
 therefore its’ creation                                            and detail
 did not take up much
time compared to
other items.                     The table half is a quadrilateral that takes form of a
                                 Trapezoid, when fitted together with another half
                                 becomes the whole table, a hexagon. I merely had to
                                 create one half and copy and paste it, then rotate the
                                 copy and move it into place.


             The long desk was very easy to
             design. It’s rectangular shape and
             straight edges were simple and
             used basic knowledge on modeller
             of simple shapes. The supports underneath
                   were difficult at times, but I chose to
                   simplify them as the chairs would be seated underneath the desk anyway.
                   instead of ground reaching supports I created smaller but visually similar
                   triangular ones instead. I added colour using Surface Editor.
Tall Desk Chairs and Split Table Chairs Creation

                                                   The tall chairs posed a small challenge,
                                                   there were more bars for support and
                                                   the curved backing of the chair itself.
                                                   Initially the legs were shorter, I checked
                                                   all of my measurements but they were
                                                   correct. As they didn't reach close
                                                   enough to the underside of the desk, it
                                                   looked wrong.
                                                   In the end decided to increase the length.


                                                                 Once I had completed the
                                                                 tall chairs, I simply copied
                                                                 the backing, resized it and
                                                                 changed the colour for the
                                                                 small chairs. I created the
                                                                 legs using the box tool and
                                                                 weld, to fix the under bar
                                                                 and the legs together.
08.05.12

                                        Door Creation


 The door creation was simple. They are built from square, and rectangular
 shapes, the geometric structure is basic therefore the modelling knowledge
 required to complete them was small.

 I started by identifying the split sections which make up the door; the door
 frame, window, panels, handle and in one case the lock. Since all the doors were
 similar I only had to create one and copy and paste the basic shape, then change
 key features to match the style of the other doors.
Signs Creation                           Following the simplistic door designs, the signs
                                         were even easier to create.
                                         The basic shape is rectangular, I simple used
                                         the box tool to make that, then the extrude
                                         tool to give it depth. Once this was done I used
                                         the draw text tool, then resized it and
                                         positioned it, creating a thin border around it.

                                               The display case posed more of a
                                               challenge, taking into account the
                 Display Case Creation         frame, the transparent plastic case, the
                                               title frame and the posters inside it. During
                                               its’ creation, I decided not to go into
                                               intricate detail regarding the posters inside.
                                               Instead I used different matte colours to
                                               show the posters diversity.

                                               However the once the basic shell was
                                               created, it was a matter of surface editing.
                                               The glass case was originally solid, I edited
                                               it and changed the transparency to 80% to
                                               resemble the transparent plastic cover.
Heater Creation                                       Bin Creation


As with the other rectangular shaped
objects, the heating system was very
simple to create.                            The bin creation was a different
                                             experience to the other items. There
I simply used the box tool, then             are different shaped bins around the
extruded it to give depth, and drilled       college, and after failing to recreate the
the thin rectangular gaps into the           one perfectly I simplified it. I drew out
structure to make the grill. At first this   mapped points and joined them
was a issue, as I hadn’t quite grasped       together to create the shape. Then
understanding of this tool yet. With         drilled a holed through to make the gap
some practice I managed to complete          in the bin where the rubbish is placed.
it.
17.05.12 –Foyer Items Production


The basic Shell of the room


                                   The foyer was a small
                                   challenge, the roof is angled to
                                   a high point over the other
                                   walls and there is an inset
                                   door. I used the drill tool to cut
                                   the shape of the door into the
                                   wall and push it back. Then
                                   measured the height of the
                                   roof and pulled the point up to
                                   meet it.
Doors Creation 24.05.12
Since the doors are all similar and their shape is
basically rectangular, I used a door from the Student
Area as the Basic shell. Then changed small details
to make the doors refined and look dissimilar as
they do in the Foyer.

With the double doors I simply copied and pasted a
single door and moved them together. To make the
open doors which would lead to the canteen
hallway, I simply selected a single door and used the
rotate action to turn it outwards, then copied and
pasted and moved into position.

The entrance doors posed more of a challenge.
They are made of 4 separate parts, 2 automatic
door which slide inward when people walk up to
them, and the 2 sections outside the doors with a
window. I used the box tool, then extruded and
pulled up to make it taller and thinner, cut two
squares into the frame to make windows and
created a white square frame for the adjacent
sections to the side of the doors.
Plants Creation

The plants were difficult to create taking into account
the diverse shapes of the leaves, the mounds of dirt
they were planed in and the vases all this was inside.

However once the bulk of the item was made, it was
simply a matter of creating it section by section. First
I created the vases, using the box tool, the extrude
and bevel tool. I selected the points and pulled them
in to an edge near the rim. For the dirt I used the box
tool to create a square and coloured in red/brown.
With the leaves I took a different approach, I used the
points tool to draw the basic outline of the leaves and
bevelled and extruded out, then pulled the point in
so the edges would be thin.

For the smaller potted plants I simply used the
stretch tool to make the large plant smaller and wider
and then copied and pasted them and moved them
into their positions.
Posters and Display Cases

The posters were simple to create. I used
the box tool to create a flat square shape
and gave them different colours to show
the diversity between them. I would have
gone into more detail with some text, but
taking time into account it wasn’t a priority.

The display case was easier because I had
already made 2 different kinds for the
Student Area. I copied and pasted one over
to the Foyer and resized it, then changed
the colours and extruded the frame out
more, made the glass cover thicker and
added a seal in the middle.

I didn’t place any posters inside because
the glass was obviously there.
Shutters, Mats and Office Window
The shutters were not complex but took time to
complete. First I created the frame on the top
where the shutter rolls down from. Then I made
a rectangular shape and slightly extruded it to
make on sliver of the shutter. I copied and
pasted that to make another and changed the
colour slightly darker on one of them to show
the diversity more. Then I pasted more of them
and placed them in order going down until there
were enough to reach the floor. I drilled a
square shaped hole into the wall where the shop
was and fitted the shutter inside it.

The mats are simply rectangular flat shapes with
different colours.

For the office window I created the wooden
frame and shelf extruding from under it. Then
drilled a hole into the wall behind it, and
inserted a piece transparent square for the glass.
I made a small book for the shelf to give it some
detail and add to the realistic quality.
Eccles Sixth Form Mirror Sign

The mirror sign posed to much of a challenge for the
amount of time left. Instead I found a create text
button, then typed in Eccles to create the top line of
text, and so on. Once the text was up I clicked the
Foyer room as a background layer and re sized the text
to fit into position. Once that was complete, I
highlighted all the text and extruded it outward to give
it depth like the actual mirror has.

Once it was structurally correct and resembled the
mirror in form, I moved onto the details. It looked to
plain and flat for a mirror. I changed this by going to
the surface editor and changing the reflection to
90%, then changed the colour from white to a dark
grey to give it a realistic quality, so it would reflect
items in the room.
Refrigerators and Counter Top Creation
                               The refrigerators were similar to shelves, I used
                               the box tool to create the square shape, then
                               extruded it out giving it depth so the shelves
                               could be put in. The used the drill tool in
                               construct and cut a square shape into both sides
                               of it. I deleted the first side and left the back. I
                               pulled the bottom up to form the first shelf and
                               used the box tool to make the next. Once the
                               main shelves were complete, I cut a second
                               smaller hole to the right side of the other
                               one, and placed two smaller shelves in there.
                               Once the shelves were complete, I created
                               numerous different items for the stock produce
                               and used different colours and changed the
                               shapes slightly to show their diversity.

                               The counter was an extruded box with a thin
                               slab for the top. I copied a food item over and
                               placed it on top with the cash till for more
                               realism.

Ha4 sims concept_productionlog

  • 1.
    HA4 – TheSIMS College Concept Art – Production Log Cassie Coyne (NewTek Lightbot Production) The object was created using a range of construction techniques from the Create, Modify, Multiply, Construct and Detail tools, directed by aiding video tutorials, I used for assistance.
  • 2.
    HA4 – TheSIMS College Concept Art – Production Log 29.02.12 – Foyer Basic Structure Measurements 50 tiles to carpeted area 459cm 726cm 434cm 1365 cm
  • 3.
    8.03.12 – FoyerPhotographs
  • 4.
    8.03.12 – FoyerPhotographs
  • 5.
    11.03.12 – CollegeHallway Door Measurements 88cm 13cm 16cm 58cm 210cm 225cm 42cm wide 76cm 298cm tall
  • 6.
    12.03.12 – Scalingthe Foyer and Student Area College Layout Student Area and Foyer Shape Scaling the walls for the Foyer
  • 7.
    02.05.12 – StudentArea Items Production Laptop Creation Out of all the components Final Design making up items the keyboard design required the most attention and detail, mainly because of the number of keys Originally the depth of the screen was larger, but it made the laptop appear too stocky, I re-measured and found I’d made a small error and read the sketches wrong, I soon rectified this.
  • 8.
    Split Table andDesk Creation Once it was created The table design was I simply used Surface Simple and geometric, Editor to add colour therefore its’ creation and detail did not take up much time compared to other items. The table half is a quadrilateral that takes form of a Trapezoid, when fitted together with another half becomes the whole table, a hexagon. I merely had to create one half and copy and paste it, then rotate the copy and move it into place. The long desk was very easy to design. It’s rectangular shape and straight edges were simple and used basic knowledge on modeller of simple shapes. The supports underneath were difficult at times, but I chose to simplify them as the chairs would be seated underneath the desk anyway. instead of ground reaching supports I created smaller but visually similar triangular ones instead. I added colour using Surface Editor.
  • 9.
    Tall Desk Chairsand Split Table Chairs Creation The tall chairs posed a small challenge, there were more bars for support and the curved backing of the chair itself. Initially the legs were shorter, I checked all of my measurements but they were correct. As they didn't reach close enough to the underside of the desk, it looked wrong. In the end decided to increase the length. Once I had completed the tall chairs, I simply copied the backing, resized it and changed the colour for the small chairs. I created the legs using the box tool and weld, to fix the under bar and the legs together.
  • 10.
    08.05.12 Door Creation The door creation was simple. They are built from square, and rectangular shapes, the geometric structure is basic therefore the modelling knowledge required to complete them was small. I started by identifying the split sections which make up the door; the door frame, window, panels, handle and in one case the lock. Since all the doors were similar I only had to create one and copy and paste the basic shape, then change key features to match the style of the other doors.
  • 11.
    Signs Creation Following the simplistic door designs, the signs were even easier to create. The basic shape is rectangular, I simple used the box tool to make that, then the extrude tool to give it depth. Once this was done I used the draw text tool, then resized it and positioned it, creating a thin border around it. The display case posed more of a challenge, taking into account the Display Case Creation frame, the transparent plastic case, the title frame and the posters inside it. During its’ creation, I decided not to go into intricate detail regarding the posters inside. Instead I used different matte colours to show the posters diversity. However the once the basic shell was created, it was a matter of surface editing. The glass case was originally solid, I edited it and changed the transparency to 80% to resemble the transparent plastic cover.
  • 12.
    Heater Creation Bin Creation As with the other rectangular shaped objects, the heating system was very simple to create. The bin creation was a different experience to the other items. There I simply used the box tool, then are different shaped bins around the extruded it to give depth, and drilled college, and after failing to recreate the the thin rectangular gaps into the one perfectly I simplified it. I drew out structure to make the grill. At first this mapped points and joined them was a issue, as I hadn’t quite grasped together to create the shape. Then understanding of this tool yet. With drilled a holed through to make the gap some practice I managed to complete in the bin where the rubbish is placed. it.
  • 13.
    17.05.12 –Foyer ItemsProduction The basic Shell of the room The foyer was a small challenge, the roof is angled to a high point over the other walls and there is an inset door. I used the drill tool to cut the shape of the door into the wall and push it back. Then measured the height of the roof and pulled the point up to meet it.
  • 14.
    Doors Creation 24.05.12 Sincethe doors are all similar and their shape is basically rectangular, I used a door from the Student Area as the Basic shell. Then changed small details to make the doors refined and look dissimilar as they do in the Foyer. With the double doors I simply copied and pasted a single door and moved them together. To make the open doors which would lead to the canteen hallway, I simply selected a single door and used the rotate action to turn it outwards, then copied and pasted and moved into position. The entrance doors posed more of a challenge. They are made of 4 separate parts, 2 automatic door which slide inward when people walk up to them, and the 2 sections outside the doors with a window. I used the box tool, then extruded and pulled up to make it taller and thinner, cut two squares into the frame to make windows and created a white square frame for the adjacent sections to the side of the doors.
  • 15.
    Plants Creation The plantswere difficult to create taking into account the diverse shapes of the leaves, the mounds of dirt they were planed in and the vases all this was inside. However once the bulk of the item was made, it was simply a matter of creating it section by section. First I created the vases, using the box tool, the extrude and bevel tool. I selected the points and pulled them in to an edge near the rim. For the dirt I used the box tool to create a square and coloured in red/brown. With the leaves I took a different approach, I used the points tool to draw the basic outline of the leaves and bevelled and extruded out, then pulled the point in so the edges would be thin. For the smaller potted plants I simply used the stretch tool to make the large plant smaller and wider and then copied and pasted them and moved them into their positions.
  • 16.
    Posters and DisplayCases The posters were simple to create. I used the box tool to create a flat square shape and gave them different colours to show the diversity between them. I would have gone into more detail with some text, but taking time into account it wasn’t a priority. The display case was easier because I had already made 2 different kinds for the Student Area. I copied and pasted one over to the Foyer and resized it, then changed the colours and extruded the frame out more, made the glass cover thicker and added a seal in the middle. I didn’t place any posters inside because the glass was obviously there.
  • 17.
    Shutters, Mats andOffice Window The shutters were not complex but took time to complete. First I created the frame on the top where the shutter rolls down from. Then I made a rectangular shape and slightly extruded it to make on sliver of the shutter. I copied and pasted that to make another and changed the colour slightly darker on one of them to show the diversity more. Then I pasted more of them and placed them in order going down until there were enough to reach the floor. I drilled a square shaped hole into the wall where the shop was and fitted the shutter inside it. The mats are simply rectangular flat shapes with different colours. For the office window I created the wooden frame and shelf extruding from under it. Then drilled a hole into the wall behind it, and inserted a piece transparent square for the glass. I made a small book for the shelf to give it some detail and add to the realistic quality.
  • 18.
    Eccles Sixth FormMirror Sign The mirror sign posed to much of a challenge for the amount of time left. Instead I found a create text button, then typed in Eccles to create the top line of text, and so on. Once the text was up I clicked the Foyer room as a background layer and re sized the text to fit into position. Once that was complete, I highlighted all the text and extruded it outward to give it depth like the actual mirror has. Once it was structurally correct and resembled the mirror in form, I moved onto the details. It looked to plain and flat for a mirror. I changed this by going to the surface editor and changing the reflection to 90%, then changed the colour from white to a dark grey to give it a realistic quality, so it would reflect items in the room.
  • 19.
    Refrigerators and CounterTop Creation The refrigerators were similar to shelves, I used the box tool to create the square shape, then extruded it out giving it depth so the shelves could be put in. The used the drill tool in construct and cut a square shape into both sides of it. I deleted the first side and left the back. I pulled the bottom up to form the first shelf and used the box tool to make the next. Once the main shelves were complete, I cut a second smaller hole to the right side of the other one, and placed two smaller shelves in there. Once the shelves were complete, I created numerous different items for the stock produce and used different colours and changed the shapes slightly to show their diversity. The counter was an extruded box with a thin slab for the top. I copied a food item over and placed it on top with the cash till for more realism.