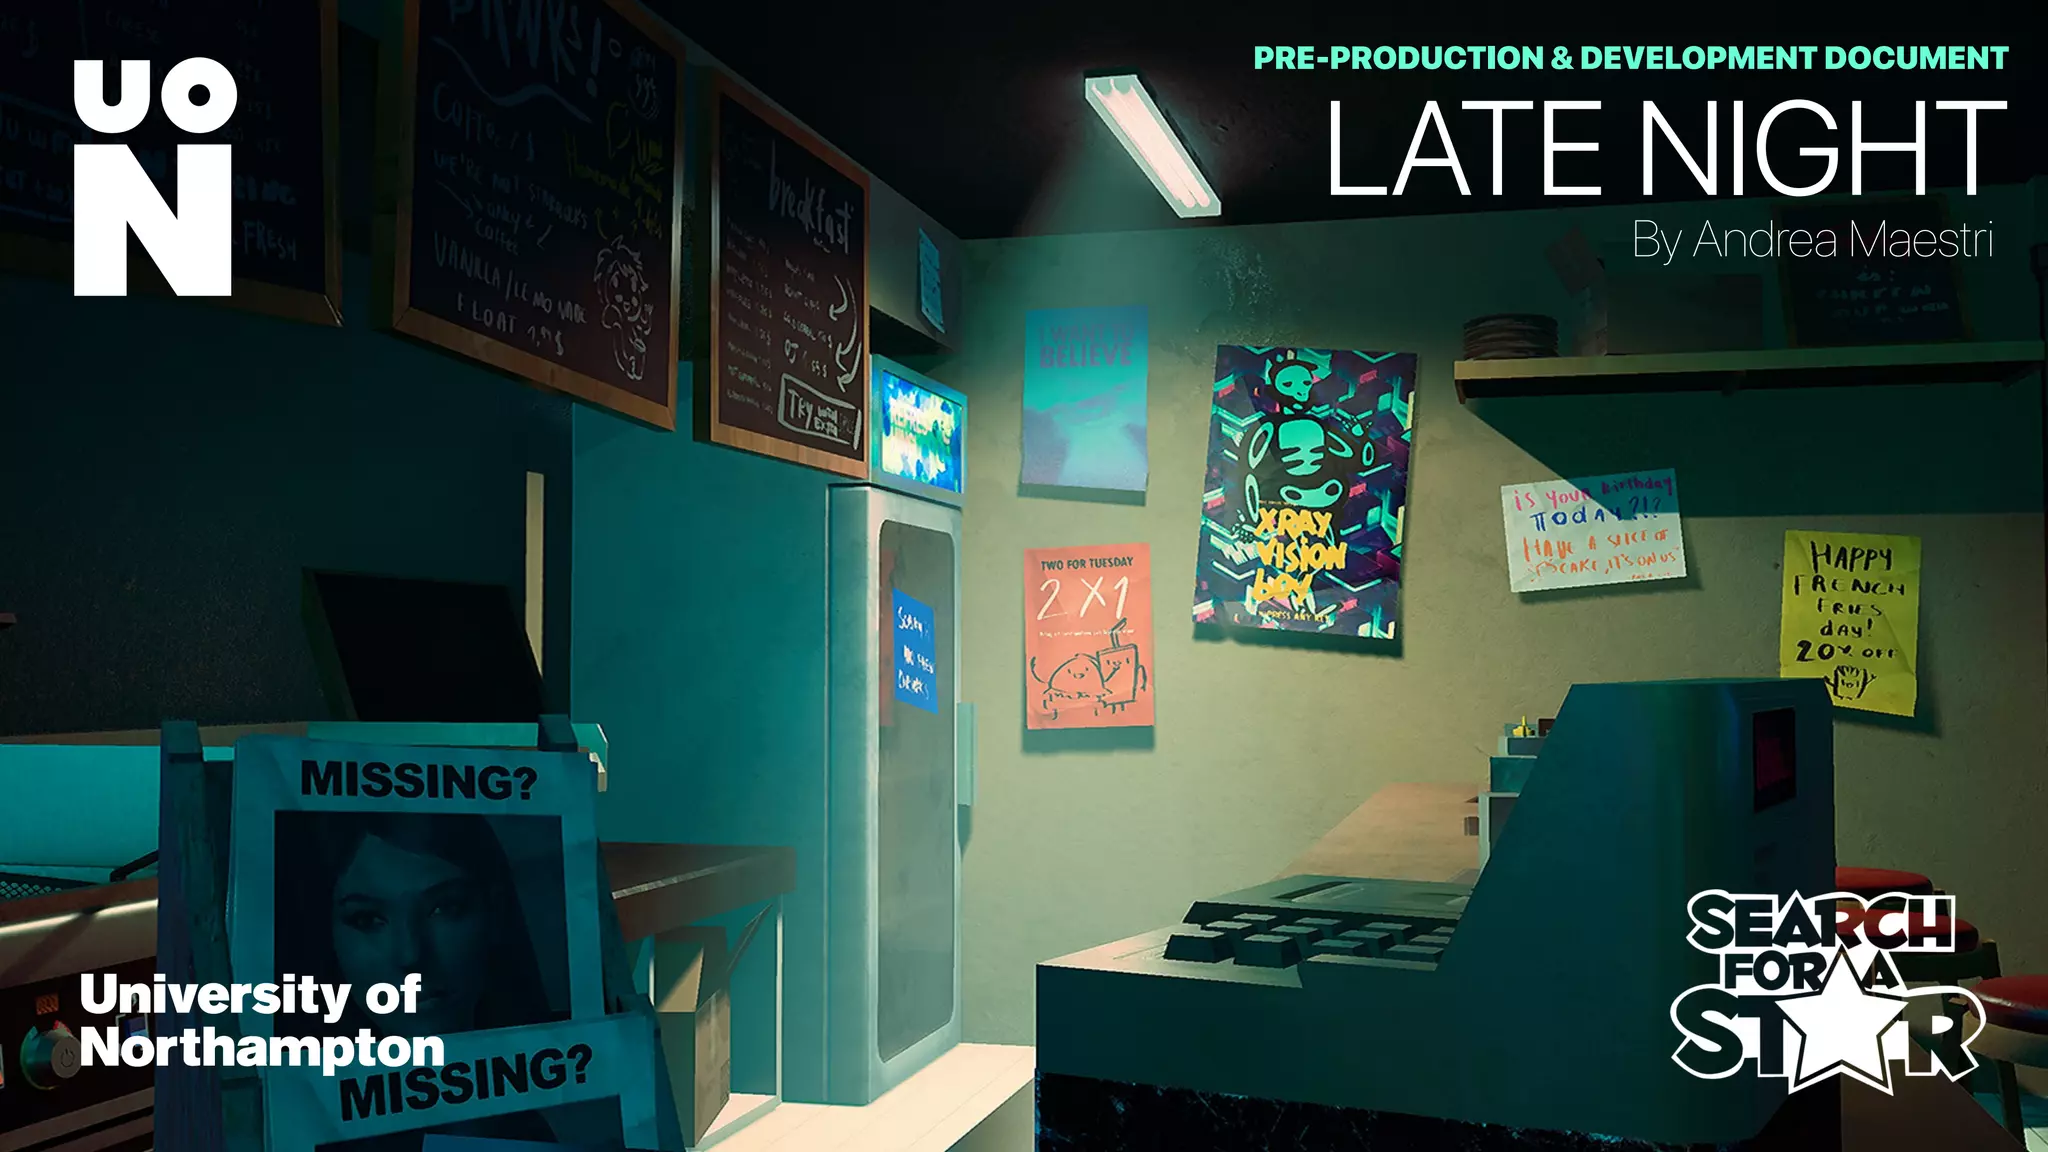
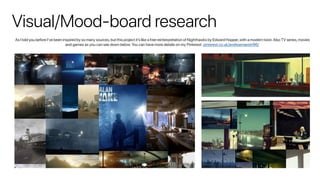
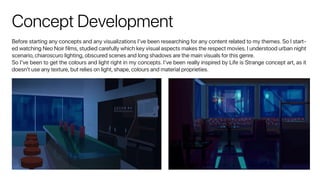
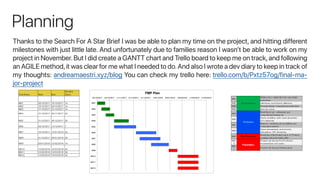
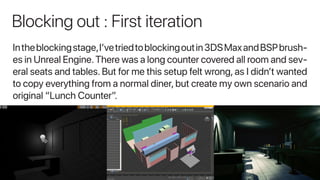
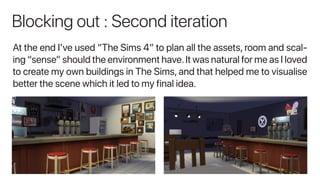
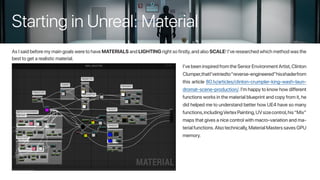
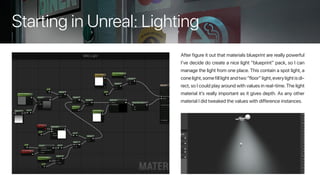
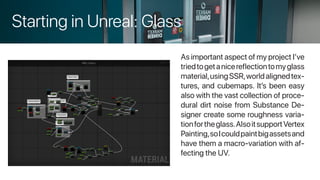
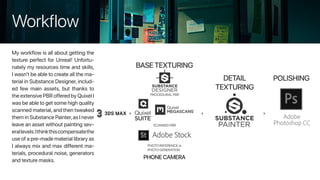
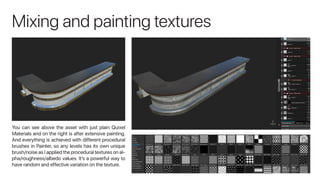
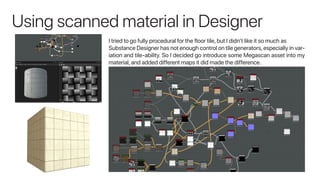
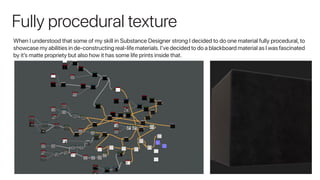
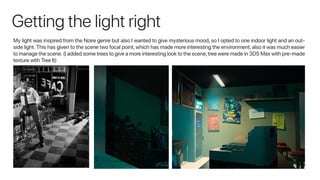
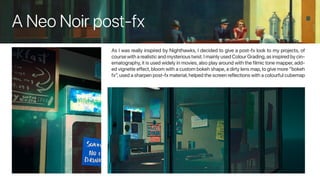
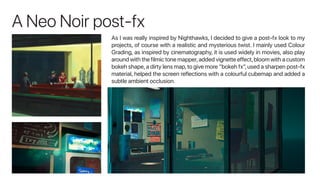
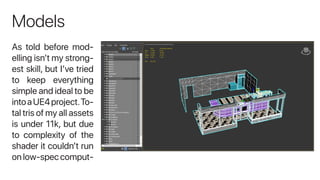
LATE NIGHTBy Andrea Maestri
PRE-PRODUCTION & DEVELOPMENT DOCUMENT
Introduction
When I created this project I was looking for an idea that can challenges and outstands the many portfolio
out there, but also showcasing my expertise skills in Game Environment Art. I didn’t wanted to compare
myself to other student,but be inspired by the many professional in the Gaming Industry and current/past
arts: filmography and pop-culture. As this entry is part of my Final Major Project, I wanted to gather as
many inspiration as possible because the entire project last one academic year. I’ve decided to go with a
revisited Neo Noir theme as I was fascinated by many TV series and games, but give them a Teen Drama/
Mystery twist. Also I’ve been focused to apply all the informations and feedbacks from professionals, es-
pecially from Stage 1,last year Rising Stars and Art Communities.This project has been work of months of
researching,tutorials and continuous personal development,as I wanted to achieve a professional portfo-
lio piece for my final year.As project for my portfolio I wanted to have no constraints in styles so I opted for
a realistic environment, but in a cinematic and accustomed way. And thanks to my tutors and my positive
attitude I can now you present my Search For A Star 2018 entry.
Visual/Mood-board research
As I told you before I’ve been inspired by so many sources,but this project it’s like a free reinterpretation of Nighthawks by Edward Hopper,with a modern twist.Also TV series,movies
and games as you can see down below. You can have more details on my Pinterest: pinterest.co.uk/andreamaestri96/
Concept Development
Before starting any concepts and any visualizations I’ve been researching for any content related to my themes. So I start-
ed watching Neo Noir films, studied carefully which key visual aspects makes the respect movies. I understood urban night
scenario, chiaroscuro lighting, obscured scenes and long shadows are the main visuals for this genre.
So I’ve been to get the colours and light right in my concepts. I’ve been really inspired by Life is Strange concept art, as it
doesn’t use any texture, but relies on light, shape, colours and material proprieties.
Planning
Thanks to the Search For A Star Brief I was be able to plan my time on the project, and hitting different
milestones with just little late. And unfortunately due to families reason I wasn’t be able to work on my
project in November.But I did create a GANTT chart and Trello board to keep me on track,and following
an AGILE method,it was clear for me what I needed to do.And also I wrote a dev diary to keep in track of
my thoughts: andreamaestri.xyz/blog You can check my trello here: trello.com/b/Pxtz57og/final-ma-
jor-project
Skill Risk Assessment
Before staring the project I’ve questioned myself what goals I should achieve based on my skill, and which abilities should I
practice more and others that need training. I’ve noted down all my constructive feedbacks and listed my strongest skills:
•	Art Direction
•	Presentation
•	Materials & Texturing
•	Lighting
So I’ve focused to improve even more those skills and try reduce the time spent on other activities,but without neglect them.
Areas that I need to improve are:
•	High-poly Modelling
•	Baking
So I’ve almost skipped these activities in this time of the project but I want to improve myself before graduation.
Getting references
I did a huge online resource online, I figure it out that I wanted to create a “Lunch Counter” en.wikipedia.org/wiki/Lunch_
counter which is a small diner. Unfortunately in UK are rarely available this types of diners, but luckily I found some online
references:
•	Cheyenne Diner in New York, there’s a Flickr album about this diner
flickr.com/photos/8095451@N08/sets/72157604354225329/
•	Various images on Trello trello.com/c/vCMmvSy8/5-fmp-ideas
•	Life Is Strange, the diner environment, it was really inspiring for me, and the mood is what exactly I wanted
Sense of Scale
IwantedtogetthesenseofscalerightsoI’vebeenresearchingreferenceaboutprops
size, but unfortunately there were not enough informations, so I’ve been looking for
an Interior Design Reference book
Where there’s a lot of infos about object size and specification that are adaptable to
my project. Also I placed a dummy of 1.80 cm (average human male size) in Unreal
and it really helped me to plan the size of my assets.
Blocking out : First iteration
Intheblockingstage,I’vetriedtoblockingoutin3DSMaxandBSPbrush-
es in Unreal Engine.There was a long counter covered all room and sev-
eral seats and tables. But for me this setup felt wrong, as I didn’t wanted
to copy everything from a normal diner, but create my own scenario and
original “Lunch Counter”.
Blocking out : Second iteration
At the end I’ve used “The Sims 4” to plan all the assets, room and scal-
ing “sense” should the environment have.It was natural for me as I loved
to create my own buildings in The Sims, and that helped me to visualise
better the scene which it led to my final idea.
Starting in Unreal: Material
As I said before my main goals were to have MATERIALS and LIGHTING right so firstly,and also SCALE! I’ve researched which method was the
best to get a realistic material.
I’ve been inspired from the Senior Environment Artist,Clinton
Clumper,thatI’vetriedto“reverse-engineered”hisshaderfrom
this article 80.lv/articles/clinton-crumpler-king-wash-laun-
dromat-scene-production/.I’m happy to know how different
functions works in the material blueprint and copy from it,he
did helped me to understand better how UE4 have so many
functions,includingVertexPainting,UVsizecontrol,his“Mix”
maps that gives a nice control with macro-variation and ma-
terial functions.Also technically,Material Masters saves GPU
memory.
Starting in Unreal: Lighting
After figure it out that materials blueprint are really powerful
I’ve decide do create a nice light “blueprint” pack, so I can
manage the light from one place. This contain a spot light, a
conelight,somefilllightandtwo“floor”light,everylightisdi-
rect,so I could play around with values in real-time.The light
material it’s really important as it gives depth. As any other
material I did tweaked the values with difference instances.
Starting in Unreal: Glass
As important aspect of my project I’ve
triedtogetanicereflectiontomyglass
material,usingSSR,worldalignedtex-
tures, and cubemaps. It’s been easy
also with the vast collection of proce-
dural dirt noise from Substance De-
signer create some roughness varia-
tionfortheglass.AlsoitsupportVertex
Painting,soIcouldpaintbigassetsand
have them a macro-variation with af-
fecting the UV.
Workflow
My workflow is all about getting the
texture perfect for Unreal! Unfortu-
nately my resources time and skills,
I wasn’t be able to create all the ma-
terial in Substance Designer, includ-
ed few main assets, but thanks to
the extensive PBR offered by Quixel I
was be able to get some high quality
scanned material, and then tweaked
them in Substance Painter,as I never
leave an asset without painting sev-
erallevels.Ithinkthiscompensatethe
use of a pre-made material library as
I always mix and max different ma-
terials, procedural noise, generators
and texture masks.
Mixing and painting textures
You can see above the asset with just plain Quixel
Materials and on the right is after extensive painting.
And everything is achieved with different procedural
brushes in Painter, so any levels has its own unique
brush/noise as I applied the procedural textures on al-
pha/roughness/albedo values. It’s a powerful way to
have random and effective variation on the texture.
Using scanned material in Designer
I tried to go fully procedural for the floor tile, but I didn’t like it so much as
Substance Designer has not enough control on tile generators,especially in var-
iation and tile-ability. So I decided go introduce some Megascan asset into my
material, and added different maps it did made the difference.
Fully procedural texture
When I understood that some of my skill in Substance Designer strong I decided to do one material fully procedural, to
showcase my abilities in de-constructing real-life materials.I’ve decided to do a blackboard material as I was fascinated
by it’s matte propriety but also how it has some life prints inside that.
Getting the light right
My light was inspired from the Noire genre but also I wanted to give mysterious mood, so I opted to one indoor light and an out-
side light. This has given to the scene two focal point, which has made more interesting the environment, also it was much easier
to manage the scene.(I added some trees to give a more interesting look to the scene,tree were made in 3DS Max with pre-made
texture with Tree It)
A Neo Noir post-fx
As I was really inspired by Nighthawks, I decided to give a post-fx look to my projects, of
course with a realistic and mysterious twist.I mainly used Colour Grading,as inspired by cin-
ematography,it is used widely in movies,also play around with the filmic tone mapper,add-
ed vignette effect, bloom with a custom bokeh shape, a dirty lens map, to give more “bokeh
fx”,used a sharpen post-fx material,helped the screen reflections with a colourful cubemap
A Neo Noir post-fx
As I was really inspired by Nighthawks, I decided to give a post-fx look to my
projects, of course with a realistic and mysterious twist. I mainly used Colour
Grading, as inspired by cinematography, it is used widely in movies, also play
around with the filmic tone mapper,added vignette effect,bloom with a custom
bokeh shape,a dirty lens map,to give more “bokeh fx”,used a sharpen post-fx
material, helped the screen reflections with a colourful cubemap and added a
subtle ambient occlusion.
Models
As told before mod-
elling isn’t my strong-
est skill, but I’ve tried
to keep everything
simple and ideal to be
intoaUE4project.To-
tal tris of my all assets
is under 11k, but due
to complexity of the
shader it couldn’t run
on low-spec comput-

Late night Development Document

  • 1.
    LATE NIGHTBy AndreaMaestri PRE-PRODUCTION & DEVELOPMENT DOCUMENT
  • 2.
    Introduction When I createdthis project I was looking for an idea that can challenges and outstands the many portfolio out there, but also showcasing my expertise skills in Game Environment Art. I didn’t wanted to compare myself to other student,but be inspired by the many professional in the Gaming Industry and current/past arts: filmography and pop-culture. As this entry is part of my Final Major Project, I wanted to gather as many inspiration as possible because the entire project last one academic year. I’ve decided to go with a revisited Neo Noir theme as I was fascinated by many TV series and games, but give them a Teen Drama/ Mystery twist. Also I’ve been focused to apply all the informations and feedbacks from professionals, es- pecially from Stage 1,last year Rising Stars and Art Communities.This project has been work of months of researching,tutorials and continuous personal development,as I wanted to achieve a professional portfo- lio piece for my final year.As project for my portfolio I wanted to have no constraints in styles so I opted for a realistic environment, but in a cinematic and accustomed way. And thanks to my tutors and my positive attitude I can now you present my Search For A Star 2018 entry.
  • 3.
    Visual/Mood-board research As Itold you before I’ve been inspired by so many sources,but this project it’s like a free reinterpretation of Nighthawks by Edward Hopper,with a modern twist.Also TV series,movies and games as you can see down below. You can have more details on my Pinterest: pinterest.co.uk/andreamaestri96/
  • 4.
    Concept Development Before startingany concepts and any visualizations I’ve been researching for any content related to my themes. So I start- ed watching Neo Noir films, studied carefully which key visual aspects makes the respect movies. I understood urban night scenario, chiaroscuro lighting, obscured scenes and long shadows are the main visuals for this genre. So I’ve been to get the colours and light right in my concepts. I’ve been really inspired by Life is Strange concept art, as it doesn’t use any texture, but relies on light, shape, colours and material proprieties.
  • 5.
    Planning Thanks to theSearch For A Star Brief I was be able to plan my time on the project, and hitting different milestones with just little late. And unfortunately due to families reason I wasn’t be able to work on my project in November.But I did create a GANTT chart and Trello board to keep me on track,and following an AGILE method,it was clear for me what I needed to do.And also I wrote a dev diary to keep in track of my thoughts: andreamaestri.xyz/blog You can check my trello here: trello.com/b/Pxtz57og/final-ma- jor-project
  • 6.
    Skill Risk Assessment Beforestaring the project I’ve questioned myself what goals I should achieve based on my skill, and which abilities should I practice more and others that need training. I’ve noted down all my constructive feedbacks and listed my strongest skills: • Art Direction • Presentation • Materials & Texturing • Lighting So I’ve focused to improve even more those skills and try reduce the time spent on other activities,but without neglect them. Areas that I need to improve are: • High-poly Modelling • Baking So I’ve almost skipped these activities in this time of the project but I want to improve myself before graduation.
  • 7.
    Getting references I dida huge online resource online, I figure it out that I wanted to create a “Lunch Counter” en.wikipedia.org/wiki/Lunch_ counter which is a small diner. Unfortunately in UK are rarely available this types of diners, but luckily I found some online references: • Cheyenne Diner in New York, there’s a Flickr album about this diner flickr.com/photos/8095451@N08/sets/72157604354225329/ • Various images on Trello trello.com/c/vCMmvSy8/5-fmp-ideas • Life Is Strange, the diner environment, it was really inspiring for me, and the mood is what exactly I wanted
  • 8.
    Sense of Scale IwantedtogetthesenseofscalerightsoI’vebeenresearchingreferenceaboutprops size,but unfortunately there were not enough informations, so I’ve been looking for an Interior Design Reference book Where there’s a lot of infos about object size and specification that are adaptable to my project. Also I placed a dummy of 1.80 cm (average human male size) in Unreal and it really helped me to plan the size of my assets.
  • 9.
    Blocking out :First iteration Intheblockingstage,I’vetriedtoblockingoutin3DSMaxandBSPbrush- es in Unreal Engine.There was a long counter covered all room and sev- eral seats and tables. But for me this setup felt wrong, as I didn’t wanted to copy everything from a normal diner, but create my own scenario and original “Lunch Counter”.
  • 10.
    Blocking out :Second iteration At the end I’ve used “The Sims 4” to plan all the assets, room and scal- ing “sense” should the environment have.It was natural for me as I loved to create my own buildings in The Sims, and that helped me to visualise better the scene which it led to my final idea.
  • 11.
    Starting in Unreal:Material As I said before my main goals were to have MATERIALS and LIGHTING right so firstly,and also SCALE! I’ve researched which method was the best to get a realistic material. I’ve been inspired from the Senior Environment Artist,Clinton Clumper,thatI’vetriedto“reverse-engineered”hisshaderfrom this article 80.lv/articles/clinton-crumpler-king-wash-laun- dromat-scene-production/.I’m happy to know how different functions works in the material blueprint and copy from it,he did helped me to understand better how UE4 have so many functions,includingVertexPainting,UVsizecontrol,his“Mix” maps that gives a nice control with macro-variation and ma- terial functions.Also technically,Material Masters saves GPU memory.
  • 12.
    Starting in Unreal:Lighting After figure it out that materials blueprint are really powerful I’ve decide do create a nice light “blueprint” pack, so I can manage the light from one place. This contain a spot light, a conelight,somefilllightandtwo“floor”light,everylightisdi- rect,so I could play around with values in real-time.The light material it’s really important as it gives depth. As any other material I did tweaked the values with difference instances.
  • 13.
    Starting in Unreal:Glass As important aspect of my project I’ve triedtogetanicereflectiontomyglass material,usingSSR,worldalignedtex- tures, and cubemaps. It’s been easy also with the vast collection of proce- dural dirt noise from Substance De- signer create some roughness varia- tionfortheglass.AlsoitsupportVertex Painting,soIcouldpaintbigassetsand have them a macro-variation with af- fecting the UV.
  • 14.
    Workflow My workflow isall about getting the texture perfect for Unreal! Unfortu- nately my resources time and skills, I wasn’t be able to create all the ma- terial in Substance Designer, includ- ed few main assets, but thanks to the extensive PBR offered by Quixel I was be able to get some high quality scanned material, and then tweaked them in Substance Painter,as I never leave an asset without painting sev- erallevels.Ithinkthiscompensatethe use of a pre-made material library as I always mix and max different ma- terials, procedural noise, generators and texture masks.
  • 15.
    Mixing and paintingtextures You can see above the asset with just plain Quixel Materials and on the right is after extensive painting. And everything is achieved with different procedural brushes in Painter, so any levels has its own unique brush/noise as I applied the procedural textures on al- pha/roughness/albedo values. It’s a powerful way to have random and effective variation on the texture.
  • 16.
    Using scanned materialin Designer I tried to go fully procedural for the floor tile, but I didn’t like it so much as Substance Designer has not enough control on tile generators,especially in var- iation and tile-ability. So I decided go introduce some Megascan asset into my material, and added different maps it did made the difference.
  • 17.
    Fully procedural texture WhenI understood that some of my skill in Substance Designer strong I decided to do one material fully procedural, to showcase my abilities in de-constructing real-life materials.I’ve decided to do a blackboard material as I was fascinated by it’s matte propriety but also how it has some life prints inside that.
  • 18.
    Getting the lightright My light was inspired from the Noire genre but also I wanted to give mysterious mood, so I opted to one indoor light and an out- side light. This has given to the scene two focal point, which has made more interesting the environment, also it was much easier to manage the scene.(I added some trees to give a more interesting look to the scene,tree were made in 3DS Max with pre-made texture with Tree It)
  • 19.
    A Neo Noirpost-fx As I was really inspired by Nighthawks, I decided to give a post-fx look to my projects, of course with a realistic and mysterious twist.I mainly used Colour Grading,as inspired by cin- ematography,it is used widely in movies,also play around with the filmic tone mapper,add- ed vignette effect, bloom with a custom bokeh shape, a dirty lens map, to give more “bokeh fx”,used a sharpen post-fx material,helped the screen reflections with a colourful cubemap
  • 20.
    A Neo Noirpost-fx As I was really inspired by Nighthawks, I decided to give a post-fx look to my projects, of course with a realistic and mysterious twist. I mainly used Colour Grading, as inspired by cinematography, it is used widely in movies, also play around with the filmic tone mapper,added vignette effect,bloom with a custom bokeh shape,a dirty lens map,to give more “bokeh fx”,used a sharpen post-fx material, helped the screen reflections with a colourful cubemap and added a subtle ambient occlusion.
  • 21.
    Models As told beforemod- elling isn’t my strong- est skill, but I’ve tried to keep everything simple and ideal to be intoaUE4project.To- tal tris of my all assets is under 11k, but due to complexity of the shader it couldn’t run on low-spec comput-