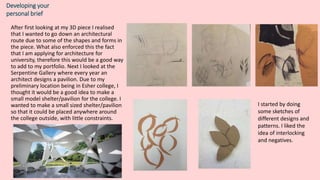
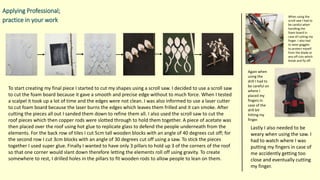
SlideShare a Scribd company logo
Zakriya Chughtai
Place in Question assignment 2015
Location studies
After first receiving what location I was
given, we where made to examine the
location through looking at different
aspects and drawing the location from
all angles to try and capture the bigger
picture. Then due to my location being
boring in my opinion, I tried to focus in
on major parts like the lamp post, trees
and bushes. To try and show the
overhanging space, I drew quick linear
drawing to show the gloomy
atmosphere.
The materials which were used are ink,
charcoal, coffee and pastel. The ink was
used to produce sharp details however
the charcoal and graphite were used to
give softer tones. When drawing with
graphite, the texture reminded me of
being twisted, wiry and tube-like. What I
enjoyed working with the most was the
ink because of the deep black and the
intricate marks it can create.
Location studies
SketchUp and Movie
Looking at the area, I decided to pick out key features of it and tried to recreate them in Google SketchUp. The first aspect I decided to
recreate was the lamp post. I used the measurements of the base; which I took and some estimations for the rest. What I like is the curvature
mixed with a linear approach. Next I moved onto the trees, where I drew the outline then started to lift and twist the shape multiple times, to
represent the forms in the trees. To produce a more realistic representation of the bushes I input them from the 3D warehouse. Next I gave
each aspect colour and shadow to make the atmosphere more realistic. To develop these designs I used them to influence my 3D model of my
given location.
Making and
developmental work -
(Large drawing, 3D, print)
For the larger drawings I
incorporated mainly every aspect I
sketched. The materials used were
charcoal, ink, graphite, acrylic and
textured papers. I wouldn’t change
a lot as I am happy the way it
turned out. If I were to change
anything it would be to take away
from some of the literal aspects of
artwork. This is the reason why I
want it showing upside down, so
some parts are more questionable.
What I think went well is how the
artwork is split into 3 sections and
how the overlapping parts bring
them altogether.
For the next artwork I used the
same materials and subjects. I
enjoyed using the ink, so I wanted
to include more of that in this
artwork. The use of colour defines
more parts which was done by
using orange, green, blue and
brown. The scale of the lamp post
and natural aspects adds to the
contrast between man-made and
nature.
When first thinking
of designs and ideas
for my 3D model I
was inspired by the
shapes and forms in
my Google SketchUp.
I took inspiration from the linear aspects and developed
them into the design for my model. The materials used
in the model are wood, copper rods and electric wire.
The inspiration for the use of electric wire came from
the sculptor Judit Rita Judit Rita Raboczky.
To create my dry point prints first
looked at the work of Lesser Ury. His
work inspired me to scratch into the
plastic sheet in a similar way he does. I
did this using a compass and traced the
image of leaves from my primary
drawings. When printing the paper had
to be damp and I used scrim to apply
and tissue paper to block out ink. I was
pleased in how they turned out, due to
them capturing a large range of tones
from black to white. The blocked out
negatives eventually helped develop
the ideas for my final 3D model.
Using historical and contemporary research
Judit Rita Raboczky helped me decide on how to
portray the tree in my 3D sculpture. Firstly looking
at my drawings I thought they were very twisted
which made me thick whether I could use electric
wire as material. Looking at Raboczky’s artwork
she influenced the way I would use the wire. What
I learnt from her was to use a frame underneath
then intertwine the wire to create the wanted
aesthetics.
Lesser Ury influenced my prints. I wanted to use a
similar style of how he scratched into the surface
for his own print. He did this with a lot of short and
sketchy marks which also created a lot of soft mid
tones. What I leant when doing my print was that I
had to be careful on placement of the ink and how
much I had to use. I also realised that what made
his prints appealing were the range of tones from
light to dark.
Toyo Ito’s pavilion in the serpentine gallery highly
influenced my final piece due to segmented
design. This made me want to use a similar style of
design. What I learnt was that Ito based the entire
design from the geometrics of a cube. This made
me wonder whether if I could do the same,
however base my pavilion from the forms of
leaves.
Developing your
personal brief
After first looking at my 3D piece I realised
that I wanted to go down an architectural
route due to some of the shapes and forms in
the piece. What also enforced this the fact
that I am applying for architecture for
university, therefore this would be a good way
to add to my portfolio. Next I looked at the
Serpentine Gallery where every year an
architect designs a pavilion. Due to my
preliminary location being in Esher college, I
thought it would be a good idea to make a
small model shelter/pavilion for the college. I
wanted to make a small sized shelter/pavilion
so that it could be placed anywhere around
the college outside, with little constraints.
I started by doing
some sketches of
different designs and
patterns. I liked the
idea of interlocking
and negatives.
Developing your
personal brief
I started by taking inspiration from the negatives and arc shapes in my print by producing a simple overlapping leaf pattern. This helped me visualise a floor
design which I was thinking of. Next, to develop this I wanted the roof design to have a correlation to the floor. Which is why I used acetate to trace out
negatives within the shapes of the leaves. Following this, I picked up on the floor design again, by creating a recurring leaf design, by using a compass. I did
this to neaten up my preliminary thoughts and so it could be used for the use of a tile. I liked how the leaves gradually becomes negatives as you move
down, due to the arcs. To enforce this I thought it would be a good idea to have the two back rows of leaf tiling to be risen to how the change and impose
the overlapping theme of the tiles. Finally picking up the roof design again, I also wanted to neaten it up by making it geometric and linear to contrast with
the curves in the floor. This would overall show the contrast between man-made and natural. In-between the panels in the roof, I wanted to place a glass
panel over for protection from the elements.
Then to help visualise my final piece I cut out the tile pieces
which would be used, and tried to replicate how the back tiles
could be risen. I first tried slotting them within each other, and
gluing it with hot glue. This didn’t work and looked very messy.
The next idea I had was to individually cut blocks of wood at an
angle to hold the tiles up individually. This led to me to think of
holding the roof up with the same blocks of wood.
Applying Professional;
practice in your work
To start creating my final piece I started to cut my shapes using a scroll saw. I decided to use a scroll saw
to cut the foam board because it gave a smooth and precise edge without to much force. When I tested
a scalpel it took up a lot of time and the edges were not clean. I was also informed to use a laser cutter
to cut foam board because the laser burns the edges which leaves them frilled and it can smoke. After
cutting the pieces all out I sanded them down to refine them all. I also used the scroll saw to cut the
roof pieces which then copper rods were slotted through to hold them together. A piece of acetate was
then placed over the roof using hot glue to replicate glass to defend the people underneath from the
elements. For the back row of tiles I cut 5cm tall wooden blocks with an angle of 40 degrees cut off; for
the second row I cut 3cm blocks with an angle of 30 degrees cut off using a saw. To stick the pieces
together I used super glue. Finally I wanted to have only 3 pillars to hold up 3 of the corners of the roof
so that one corner would slant down therefore letting the elements roll off using gravity. To create
somewhere to rest, I drilled holes in the pillars to fit wooden rods to allow people to lean on them.
When using the
scroll saw I had to
be careful when
handling the
foam board in
case of cutting my
finger. I also had
to wear goggles
to protect myself
from the blade or
any off cuts which
break and fly off.
Again when
using the
drill I had to
be careful on
where I
placed my
fingers in
case of the
drill bit
hitting my
finger.
Lastly I also needed to be
weary when using the saw. I
had to watch where I was
putting my fingers in case of
me accidently getting too
close and eventually cutting
my finger.
Pictures of final piece
Evaluation of the project
I spent quite a lot of time on the project, during lesson and almost everyday after school, trying to come up with ideas and
topping up analysis and annotation. To try and come up with new ideas I tried to look at as many artists and designers as
possible to gain inspiration for my own work. Stages which were more difficult than others were definitely being decisive on
my final piece and in what direction I should take it in. This for me was the hardest part due to it taking up a lot of thought.
What I most enjoyed was surveying the area and getting stuck by creating 3D models. Not a lot of things went wrong in my
opinion, however when creating the model for the final piece, I was at first going to use balsa wood but it kept breaking
when being drilled into. Therefore I had to change the type of wood I were to use to a thicker and firmer wood. I also feel
that overall my final piece and preliminary drawings turned out well. The drawing helped to force me in the right direction
whilst also creating a solid base to start from. The final piece also eventually turned out aesthetically how I wanted it to, and
it looks like it could serve the purpose of a shelter/pavilion well in reality.
I researched into a range of artists and artworks for this project however the main influences were, Judit Rita Raboczky,
Lesser Ury, Toyo Ito, Eduardo Chillida and Will Alsop. Raboczky helped develop my first 3 model of my location, Lesser Ury
influenced my prints, Toyo Ito helped progress my ideas for my final 3D model, Chillida inspired aspects of my prints and final
Alsop helped with the design process for my final piece. The primary and secondary drawing which were taken had a large
influence on the direction I took for this project. This was mainly done through my first hand drawings of the bushes and
leaves which were the made the subject of my prints. The prints then helped develop forms and shapes which would in the
long term help decide on what I would base my final piece on, which was the forms of the leaves. The main sources to find
artists and artworks of inspiration was the internet and books.
There was lots of development which took place before coming up with my final outcome. A large part of my development
was doing dry point prints. To better the prints I could have created a larger range and taken more time when applying ink
and producing the print to create a better look and more prints which could have led to more ideas. When creating the 3D
model of my location I knew what I wanted to do due to my planning and drawings. This made it easier to make. Although as
previously discussed the main influence on this project were the primary drawings and dry point prints.

More Related Content

What's hot

Essay Final
Essay FinalEssay Final
Essay Final
jisunfoo
 
Laura process journal memphis
Laura process journal memphisLaura process journal memphis
Laura process journal memphisRob
 
April 2015 assignment 1
April 2015 assignment 1April 2015 assignment 1
April 2015 assignment 1
Li Sze
 
Development pro forma
Development pro formaDevelopment pro forma
Development pro formaAmy Addison
 
English 1
English 1English 1
The Place in Question Summary
The Place in Question SummaryThe Place in Question Summary
The Place in Question Summary
alicekell1
 
Equivalents project summary template
Equivalents project summary templateEquivalents project summary template
Equivalents project summary template
jeffohsoj
 
Art reflection – cloud
Art reflection – cloudArt reflection – cloud
Art reflection – cloud
phychedelicmasquerade
 
2015 2 adx presentation summary place in question
2015 2 adx presentation summary place in question2015 2 adx presentation summary place in question
2015 2 adx presentation summary place in question
momokopowis
 
Equivalents project summary Powerpoint
Equivalents project summary PowerpointEquivalents project summary Powerpoint
Equivalents project summary Powerpoint
Isobel2559
 
English essay
English essayEnglish essay
English essay
jygwen
 
Mudbox tiger bust
Mudbox tiger bustMudbox tiger bust
Mudbox tiger bust
techymarines
 

What's hot (18)

Essay Final
Essay FinalEssay Final
Essay Final
 
HA3 - Production Log
HA3 - Production LogHA3 - Production Log
HA3 - Production Log
 
My Portfolio
My PortfolioMy Portfolio
My Portfolio
 
Laura process journal memphis
Laura process journal memphisLaura process journal memphis
Laura process journal memphis
 
Development
DevelopmentDevelopment
Development
 
April 2015 assignment 1
April 2015 assignment 1April 2015 assignment 1
April 2015 assignment 1
 
Development pro forma
Development pro formaDevelopment pro forma
Development pro forma
 
English 17
English 17English 17
English 17
 
English 1
English 1English 1
English 1
 
Drawing 2 pdf 2
Drawing 2 pdf 2Drawing 2 pdf 2
Drawing 2 pdf 2
 
The Place in Question Summary
The Place in Question SummaryThe Place in Question Summary
The Place in Question Summary
 
Equivalents project summary template
Equivalents project summary templateEquivalents project summary template
Equivalents project summary template
 
Art reflection – cloud
Art reflection – cloudArt reflection – cloud
Art reflection – cloud
 
2015 2 adx presentation summary place in question
2015 2 adx presentation summary place in question2015 2 adx presentation summary place in question
2015 2 adx presentation summary place in question
 
Process Journal
Process JournalProcess Journal
Process Journal
 
Equivalents project summary Powerpoint
Equivalents project summary PowerpointEquivalents project summary Powerpoint
Equivalents project summary Powerpoint
 
English essay
English essayEnglish essay
English essay
 
Mudbox tiger bust
Mudbox tiger bustMudbox tiger bust
Mudbox tiger bust
 

Viewers also liked

Brosura certificate in coaching skills
Brosura certificate in coaching skillsBrosura certificate in coaching skills
Brosura certificate in coaching skills
Jelena Pavlovic
 
Aplicación de web 2.0
Aplicación de web 2.0Aplicación de web 2.0
Aplicación de web 2.0Joseph Herrera
 
Attributes in VHDL
Attributes in VHDLAttributes in VHDL
Attributes in VHDL
Saurav Agrawal
 
Fumigation techniques for pest control
Fumigation techniques for pest controlFumigation techniques for pest control
Fumigation techniques for pest control
Jayantyadav94
 
Fumigation Presentation
Fumigation PresentationFumigation Presentation
Fumigation PresentationAman Ujala
 
Lss module 3 chpt 11 human reproduction
Lss module 3 chpt 11 human reproductionLss module 3 chpt 11 human reproduction
Lss module 3 chpt 11 human reproduction
Betsy Eng
 
Marco Teórico
Marco TeóricoMarco Teórico
Marco Teórico
Juan Lobato Valdespino
 
Fumigation
FumigationFumigation
Fumigation
Paul singh
 

Viewers also liked (10)

Brosura certificate in coaching skills
Brosura certificate in coaching skillsBrosura certificate in coaching skills
Brosura certificate in coaching skills
 
Edition 3
Edition 3Edition 3
Edition 3
 
Anshul 2015
Anshul 2015Anshul 2015
Anshul 2015
 
Aplicación de web 2.0
Aplicación de web 2.0Aplicación de web 2.0
Aplicación de web 2.0
 
Attributes in VHDL
Attributes in VHDLAttributes in VHDL
Attributes in VHDL
 
Fumigation techniques for pest control
Fumigation techniques for pest controlFumigation techniques for pest control
Fumigation techniques for pest control
 
Fumigation Presentation
Fumigation PresentationFumigation Presentation
Fumigation Presentation
 
Lss module 3 chpt 11 human reproduction
Lss module 3 chpt 11 human reproductionLss module 3 chpt 11 human reproduction
Lss module 3 chpt 11 human reproduction
 
Marco Teórico
Marco TeóricoMarco Teórico
Marco Teórico
 
Fumigation
FumigationFumigation
Fumigation
 

Similar to Place In Question

Summary Presentation: Place in Question
Summary Presentation: Place in QuestionSummary Presentation: Place in Question
Summary Presentation: Place in Question
lydia3136
 
Digital graphics evaluation pro forma
Digital graphics evaluation pro formaDigital graphics evaluation pro forma
Digital graphics evaluation pro forma
Joe Hill
 
Process journal
Process journalProcess journal
Process journalXavier Tan
 
Digital graphics evaluation
Digital graphics evaluationDigital graphics evaluation
Digital graphics evaluation
charles-stick
 
6. production reflection (interactive)
6. production reflection (interactive)6. production reflection (interactive)
6. production reflection (interactive)
ThomasBond14
 
Final reflective task
Final reflective taskFinal reflective task
Final reflective task
Declan Brophy
 
Final reflective task
Final reflective taskFinal reflective task
Final reflective task
Declan Brophy
 
Digital graphics evaluation pro forma
Digital graphics evaluation pro formaDigital graphics evaluation pro forma
Digital graphics evaluation pro forma
twilliams1992
 
Production Experiments
Production ExperimentsProduction Experiments
Production Experiments
Hannah Palfreeman
 
ENGLISH PROCESS ESSAY(PROJECT 1)
ENGLISH PROCESS ESSAY(PROJECT 1)ENGLISH PROCESS ESSAY(PROJECT 1)
ENGLISH PROCESS ESSAY(PROJECT 1)
Rosabella Zuntivai Mobijohn
 
Construction
ConstructionConstruction
Construction
salaffina
 
Video Game Project - 6. production reflection
Video Game Project - 6. production reflectionVideo Game Project - 6. production reflection
Video Game Project - 6. production reflection
Tigs0102
 
Nature/Man made project summary
Nature/Man made project summaryNature/Man made project summary
Nature/Man made project summary
patrycjakacprzak
 
Packaging evidence 1
Packaging evidence 1Packaging evidence 1
Packaging evidence 1hannahmedia
 
Digital graphics evaluation pro forma
Digital graphics evaluation pro formaDigital graphics evaluation pro forma
Digital graphics evaluation pro forma
thenamesbarnett
 
Construction
ConstructionConstruction
Construction
salaffina
 
Equivalents project summary
Equivalents project summary Equivalents project summary
Equivalents project summary
jeffohsoj
 
Digital graphics evaluation pro forma 3
Digital graphics evaluation pro forma 3Digital graphics evaluation pro forma 3
Digital graphics evaluation pro forma 3
Amelia101
 
Equivalents - Project Summary
Equivalents - Project SummaryEquivalents - Project Summary
Equivalents - Project Summary
Lucian Stuart-Davidson
 

Similar to Place In Question (20)

Summary Presentation: Place in Question
Summary Presentation: Place in QuestionSummary Presentation: Place in Question
Summary Presentation: Place in Question
 
Digital graphics evaluation pro forma
Digital graphics evaluation pro formaDigital graphics evaluation pro forma
Digital graphics evaluation pro forma
 
Process journal
Process journalProcess journal
Process journal
 
Digital graphics evaluation
Digital graphics evaluationDigital graphics evaluation
Digital graphics evaluation
 
6. production reflection (interactive)
6. production reflection (interactive)6. production reflection (interactive)
6. production reflection (interactive)
 
Final reflective task
Final reflective taskFinal reflective task
Final reflective task
 
Final reflective task
Final reflective taskFinal reflective task
Final reflective task
 
Digital graphics evaluation pro forma
Digital graphics evaluation pro formaDigital graphics evaluation pro forma
Digital graphics evaluation pro forma
 
Production Experiments
Production ExperimentsProduction Experiments
Production Experiments
 
Graphic Design
Graphic DesignGraphic Design
Graphic Design
 
ENGLISH PROCESS ESSAY(PROJECT 1)
ENGLISH PROCESS ESSAY(PROJECT 1)ENGLISH PROCESS ESSAY(PROJECT 1)
ENGLISH PROCESS ESSAY(PROJECT 1)
 
Construction
ConstructionConstruction
Construction
 
Video Game Project - 6. production reflection
Video Game Project - 6. production reflectionVideo Game Project - 6. production reflection
Video Game Project - 6. production reflection
 
Nature/Man made project summary
Nature/Man made project summaryNature/Man made project summary
Nature/Man made project summary
 
Packaging evidence 1
Packaging evidence 1Packaging evidence 1
Packaging evidence 1
 
Digital graphics evaluation pro forma
Digital graphics evaluation pro formaDigital graphics evaluation pro forma
Digital graphics evaluation pro forma
 
Construction
ConstructionConstruction
Construction
 
Equivalents project summary
Equivalents project summary Equivalents project summary
Equivalents project summary
 
Digital graphics evaluation pro forma 3
Digital graphics evaluation pro forma 3Digital graphics evaluation pro forma 3
Digital graphics evaluation pro forma 3
 
Equivalents - Project Summary
Equivalents - Project SummaryEquivalents - Project Summary
Equivalents - Project Summary
 

Recently uploaded

20 slides of research movie and artists .pdf
20 slides of research movie and artists .pdf20 slides of research movie and artists .pdf
20 slides of research movie and artists .pdf
ameli25062005
 
Transforming Brand Perception and Boosting Profitability
Transforming Brand Perception and Boosting ProfitabilityTransforming Brand Perception and Boosting Profitability
Transforming Brand Perception and Boosting Profitability
aaryangarg12
 
Can AI do good? at 'offtheCanvas' India HCI prelude
Can AI do good? at 'offtheCanvas' India HCI preludeCan AI do good? at 'offtheCanvas' India HCI prelude
Can AI do good? at 'offtheCanvas' India HCI prelude
Alan Dix
 
一比一原版(UNUK毕业证书)诺丁汉大学毕业证如何办理
一比一原版(UNUK毕业证书)诺丁汉大学毕业证如何办理一比一原版(UNUK毕业证书)诺丁汉大学毕业证如何办理
一比一原版(UNUK毕业证书)诺丁汉大学毕业证如何办理
7sd8fier
 
Коричневый и Кремовый Деликатный Органический Копирайтер Фрилансер Марке...
Коричневый и Кремовый Деликатный Органический Копирайтер Фрилансер Марке...Коричневый и Кремовый Деликатный Органический Копирайтер Фрилансер Марке...
Коричневый и Кремовый Деликатный Органический Копирайтер Фрилансер Марке...
ameli25062005
 
Mohannad Abdullah portfolio _ V2 _22-24
Mohannad Abdullah  portfolio _ V2 _22-24Mohannad Abdullah  portfolio _ V2 _22-24
Mohannad Abdullah portfolio _ V2 _22-24
M. A. Architect
 
一比一原版(UW毕业证)西雅图华盛顿大学毕业证如何办理
一比一原版(UW毕业证)西雅图华盛顿大学毕业证如何办理一比一原版(UW毕业证)西雅图华盛顿大学毕业证如何办理
一比一原版(UW毕业证)西雅图华盛顿大学毕业证如何办理
kecekev
 
一比一原版(Glasgow毕业证书)格拉斯哥大学毕业证成绩单如何办理
一比一原版(Glasgow毕业证书)格拉斯哥大学毕业证成绩单如何办理一比一原版(Glasgow毕业证书)格拉斯哥大学毕业证成绩单如何办理
一比一原版(Glasgow毕业证书)格拉斯哥大学毕业证成绩单如何办理
n0tivyq
 
Portfolio.pdf
Portfolio.pdfPortfolio.pdf
Portfolio.pdf
garcese
 
一比一原版(LSE毕业证书)伦敦政治经济学院毕业证成绩单如何办理
一比一原版(LSE毕业证书)伦敦政治经济学院毕业证成绩单如何办理一比一原版(LSE毕业证书)伦敦政治经济学院毕业证成绩单如何办理
一比一原版(LSE毕业证书)伦敦政治经济学院毕业证成绩单如何办理
jyz59f4j
 
SECURING BUILDING PERMIT CITY OF CALOOCAN.pdf
SECURING BUILDING PERMIT CITY OF CALOOCAN.pdfSECURING BUILDING PERMIT CITY OF CALOOCAN.pdf
SECURING BUILDING PERMIT CITY OF CALOOCAN.pdf
eloprejohn333
 
一比一原版(MMU毕业证书)曼彻斯特城市大学毕业证成绩单如何办理
一比一原版(MMU毕业证书)曼彻斯特城市大学毕业证成绩单如何办理一比一原版(MMU毕业证书)曼彻斯特城市大学毕业证成绩单如何办理
一比一原版(MMU毕业证书)曼彻斯特城市大学毕业证成绩单如何办理
7sd8fier
 
Storytelling For The Web: Integrate Storytelling in your Design Process
Storytelling For The Web: Integrate Storytelling in your Design ProcessStorytelling For The Web: Integrate Storytelling in your Design Process
Storytelling For The Web: Integrate Storytelling in your Design Process
Chiara Aliotta
 
Book Formatting: Quality Control Checks for Designers
Book Formatting: Quality Control Checks for DesignersBook Formatting: Quality Control Checks for Designers
Book Formatting: Quality Control Checks for Designers
Confidence Ago
 
UNIT IV-VISUAL STYLE AND MOBILE INTERFACES.pptx
UNIT IV-VISUAL STYLE AND MOBILE INTERFACES.pptxUNIT IV-VISUAL STYLE AND MOBILE INTERFACES.pptx
UNIT IV-VISUAL STYLE AND MOBILE INTERFACES.pptx
GOWSIKRAJA PALANISAMY
 
Game Concept Presentation for Ukrainian Mythology Based Game With Designs
Game Concept Presentation for Ukrainian Mythology Based Game With DesignsGame Concept Presentation for Ukrainian Mythology Based Game With Designs
Game Concept Presentation for Ukrainian Mythology Based Game With Designs
184804
 
一比一原版(CITY毕业证书)谢菲尔德哈勒姆大学毕业证如何办理
一比一原版(CITY毕业证书)谢菲尔德哈勒姆大学毕业证如何办理一比一原版(CITY毕业证书)谢菲尔德哈勒姆大学毕业证如何办理
一比一原版(CITY毕业证书)谢菲尔德哈勒姆大学毕业证如何办理
9a93xvy
 
Top Israeli Products and Brands - Plan it israel.pdf
Top Israeli Products and Brands - Plan it israel.pdfTop Israeli Products and Brands - Plan it israel.pdf
Top Israeli Products and Brands - Plan it israel.pdf
PlanitIsrael
 
原版定做(penn毕业证书)美国宾夕法尼亚大学毕业证文凭学历证书原版一模一样
原版定做(penn毕业证书)美国宾夕法尼亚大学毕业证文凭学历证书原版一模一样原版定做(penn毕业证书)美国宾夕法尼亚大学毕业证文凭学历证书原版一模一样
原版定做(penn毕业证书)美国宾夕法尼亚大学毕业证文凭学历证书原版一模一样
gpffo76j
 
White wonder, Work developed by Eva Tschopp
White wonder, Work developed by Eva TschoppWhite wonder, Work developed by Eva Tschopp
White wonder, Work developed by Eva Tschopp
Mansi Shah
 

Recently uploaded (20)

20 slides of research movie and artists .pdf
20 slides of research movie and artists .pdf20 slides of research movie and artists .pdf
20 slides of research movie and artists .pdf
 
Transforming Brand Perception and Boosting Profitability
Transforming Brand Perception and Boosting ProfitabilityTransforming Brand Perception and Boosting Profitability
Transforming Brand Perception and Boosting Profitability
 
Can AI do good? at 'offtheCanvas' India HCI prelude
Can AI do good? at 'offtheCanvas' India HCI preludeCan AI do good? at 'offtheCanvas' India HCI prelude
Can AI do good? at 'offtheCanvas' India HCI prelude
 
一比一原版(UNUK毕业证书)诺丁汉大学毕业证如何办理
一比一原版(UNUK毕业证书)诺丁汉大学毕业证如何办理一比一原版(UNUK毕业证书)诺丁汉大学毕业证如何办理
一比一原版(UNUK毕业证书)诺丁汉大学毕业证如何办理
 
Коричневый и Кремовый Деликатный Органический Копирайтер Фрилансер Марке...
Коричневый и Кремовый Деликатный Органический Копирайтер Фрилансер Марке...Коричневый и Кремовый Деликатный Органический Копирайтер Фрилансер Марке...
Коричневый и Кремовый Деликатный Органический Копирайтер Фрилансер Марке...
 
Mohannad Abdullah portfolio _ V2 _22-24
Mohannad Abdullah  portfolio _ V2 _22-24Mohannad Abdullah  portfolio _ V2 _22-24
Mohannad Abdullah portfolio _ V2 _22-24
 
一比一原版(UW毕业证)西雅图华盛顿大学毕业证如何办理
一比一原版(UW毕业证)西雅图华盛顿大学毕业证如何办理一比一原版(UW毕业证)西雅图华盛顿大学毕业证如何办理
一比一原版(UW毕业证)西雅图华盛顿大学毕业证如何办理
 
一比一原版(Glasgow毕业证书)格拉斯哥大学毕业证成绩单如何办理
一比一原版(Glasgow毕业证书)格拉斯哥大学毕业证成绩单如何办理一比一原版(Glasgow毕业证书)格拉斯哥大学毕业证成绩单如何办理
一比一原版(Glasgow毕业证书)格拉斯哥大学毕业证成绩单如何办理
 
Portfolio.pdf
Portfolio.pdfPortfolio.pdf
Portfolio.pdf
 
一比一原版(LSE毕业证书)伦敦政治经济学院毕业证成绩单如何办理
一比一原版(LSE毕业证书)伦敦政治经济学院毕业证成绩单如何办理一比一原版(LSE毕业证书)伦敦政治经济学院毕业证成绩单如何办理
一比一原版(LSE毕业证书)伦敦政治经济学院毕业证成绩单如何办理
 
SECURING BUILDING PERMIT CITY OF CALOOCAN.pdf
SECURING BUILDING PERMIT CITY OF CALOOCAN.pdfSECURING BUILDING PERMIT CITY OF CALOOCAN.pdf
SECURING BUILDING PERMIT CITY OF CALOOCAN.pdf
 
一比一原版(MMU毕业证书)曼彻斯特城市大学毕业证成绩单如何办理
一比一原版(MMU毕业证书)曼彻斯特城市大学毕业证成绩单如何办理一比一原版(MMU毕业证书)曼彻斯特城市大学毕业证成绩单如何办理
一比一原版(MMU毕业证书)曼彻斯特城市大学毕业证成绩单如何办理
 
Storytelling For The Web: Integrate Storytelling in your Design Process
Storytelling For The Web: Integrate Storytelling in your Design ProcessStorytelling For The Web: Integrate Storytelling in your Design Process
Storytelling For The Web: Integrate Storytelling in your Design Process
 
Book Formatting: Quality Control Checks for Designers
Book Formatting: Quality Control Checks for DesignersBook Formatting: Quality Control Checks for Designers
Book Formatting: Quality Control Checks for Designers
 
UNIT IV-VISUAL STYLE AND MOBILE INTERFACES.pptx
UNIT IV-VISUAL STYLE AND MOBILE INTERFACES.pptxUNIT IV-VISUAL STYLE AND MOBILE INTERFACES.pptx
UNIT IV-VISUAL STYLE AND MOBILE INTERFACES.pptx
 
Game Concept Presentation for Ukrainian Mythology Based Game With Designs
Game Concept Presentation for Ukrainian Mythology Based Game With DesignsGame Concept Presentation for Ukrainian Mythology Based Game With Designs
Game Concept Presentation for Ukrainian Mythology Based Game With Designs
 
一比一原版(CITY毕业证书)谢菲尔德哈勒姆大学毕业证如何办理
一比一原版(CITY毕业证书)谢菲尔德哈勒姆大学毕业证如何办理一比一原版(CITY毕业证书)谢菲尔德哈勒姆大学毕业证如何办理
一比一原版(CITY毕业证书)谢菲尔德哈勒姆大学毕业证如何办理
 
Top Israeli Products and Brands - Plan it israel.pdf
Top Israeli Products and Brands - Plan it israel.pdfTop Israeli Products and Brands - Plan it israel.pdf
Top Israeli Products and Brands - Plan it israel.pdf
 
原版定做(penn毕业证书)美国宾夕法尼亚大学毕业证文凭学历证书原版一模一样
原版定做(penn毕业证书)美国宾夕法尼亚大学毕业证文凭学历证书原版一模一样原版定做(penn毕业证书)美国宾夕法尼亚大学毕业证文凭学历证书原版一模一样
原版定做(penn毕业证书)美国宾夕法尼亚大学毕业证文凭学历证书原版一模一样
 
White wonder, Work developed by Eva Tschopp
White wonder, Work developed by Eva TschoppWhite wonder, Work developed by Eva Tschopp
White wonder, Work developed by Eva Tschopp
 

Place In Question

  • 1. Zakriya Chughtai Place in Question assignment 2015
  • 2. Location studies After first receiving what location I was given, we where made to examine the location through looking at different aspects and drawing the location from all angles to try and capture the bigger picture. Then due to my location being boring in my opinion, I tried to focus in on major parts like the lamp post, trees and bushes. To try and show the overhanging space, I drew quick linear drawing to show the gloomy atmosphere. The materials which were used are ink, charcoal, coffee and pastel. The ink was used to produce sharp details however the charcoal and graphite were used to give softer tones. When drawing with graphite, the texture reminded me of being twisted, wiry and tube-like. What I enjoyed working with the most was the ink because of the deep black and the intricate marks it can create.
  • 3. Location studies SketchUp and Movie Looking at the area, I decided to pick out key features of it and tried to recreate them in Google SketchUp. The first aspect I decided to recreate was the lamp post. I used the measurements of the base; which I took and some estimations for the rest. What I like is the curvature mixed with a linear approach. Next I moved onto the trees, where I drew the outline then started to lift and twist the shape multiple times, to represent the forms in the trees. To produce a more realistic representation of the bushes I input them from the 3D warehouse. Next I gave each aspect colour and shadow to make the atmosphere more realistic. To develop these designs I used them to influence my 3D model of my given location.
  • 4. Making and developmental work - (Large drawing, 3D, print) For the larger drawings I incorporated mainly every aspect I sketched. The materials used were charcoal, ink, graphite, acrylic and textured papers. I wouldn’t change a lot as I am happy the way it turned out. If I were to change anything it would be to take away from some of the literal aspects of artwork. This is the reason why I want it showing upside down, so some parts are more questionable. What I think went well is how the artwork is split into 3 sections and how the overlapping parts bring them altogether. For the next artwork I used the same materials and subjects. I enjoyed using the ink, so I wanted to include more of that in this artwork. The use of colour defines more parts which was done by using orange, green, blue and brown. The scale of the lamp post and natural aspects adds to the contrast between man-made and nature. When first thinking of designs and ideas for my 3D model I was inspired by the shapes and forms in my Google SketchUp. I took inspiration from the linear aspects and developed them into the design for my model. The materials used in the model are wood, copper rods and electric wire. The inspiration for the use of electric wire came from the sculptor Judit Rita Judit Rita Raboczky. To create my dry point prints first looked at the work of Lesser Ury. His work inspired me to scratch into the plastic sheet in a similar way he does. I did this using a compass and traced the image of leaves from my primary drawings. When printing the paper had to be damp and I used scrim to apply and tissue paper to block out ink. I was pleased in how they turned out, due to them capturing a large range of tones from black to white. The blocked out negatives eventually helped develop the ideas for my final 3D model.
  • 5. Using historical and contemporary research Judit Rita Raboczky helped me decide on how to portray the tree in my 3D sculpture. Firstly looking at my drawings I thought they were very twisted which made me thick whether I could use electric wire as material. Looking at Raboczky’s artwork she influenced the way I would use the wire. What I learnt from her was to use a frame underneath then intertwine the wire to create the wanted aesthetics. Lesser Ury influenced my prints. I wanted to use a similar style of how he scratched into the surface for his own print. He did this with a lot of short and sketchy marks which also created a lot of soft mid tones. What I leant when doing my print was that I had to be careful on placement of the ink and how much I had to use. I also realised that what made his prints appealing were the range of tones from light to dark. Toyo Ito’s pavilion in the serpentine gallery highly influenced my final piece due to segmented design. This made me want to use a similar style of design. What I learnt was that Ito based the entire design from the geometrics of a cube. This made me wonder whether if I could do the same, however base my pavilion from the forms of leaves.
  • 6. Developing your personal brief After first looking at my 3D piece I realised that I wanted to go down an architectural route due to some of the shapes and forms in the piece. What also enforced this the fact that I am applying for architecture for university, therefore this would be a good way to add to my portfolio. Next I looked at the Serpentine Gallery where every year an architect designs a pavilion. Due to my preliminary location being in Esher college, I thought it would be a good idea to make a small model shelter/pavilion for the college. I wanted to make a small sized shelter/pavilion so that it could be placed anywhere around the college outside, with little constraints. I started by doing some sketches of different designs and patterns. I liked the idea of interlocking and negatives.
  • 7. Developing your personal brief I started by taking inspiration from the negatives and arc shapes in my print by producing a simple overlapping leaf pattern. This helped me visualise a floor design which I was thinking of. Next, to develop this I wanted the roof design to have a correlation to the floor. Which is why I used acetate to trace out negatives within the shapes of the leaves. Following this, I picked up on the floor design again, by creating a recurring leaf design, by using a compass. I did this to neaten up my preliminary thoughts and so it could be used for the use of a tile. I liked how the leaves gradually becomes negatives as you move down, due to the arcs. To enforce this I thought it would be a good idea to have the two back rows of leaf tiling to be risen to how the change and impose the overlapping theme of the tiles. Finally picking up the roof design again, I also wanted to neaten it up by making it geometric and linear to contrast with the curves in the floor. This would overall show the contrast between man-made and natural. In-between the panels in the roof, I wanted to place a glass panel over for protection from the elements. Then to help visualise my final piece I cut out the tile pieces which would be used, and tried to replicate how the back tiles could be risen. I first tried slotting them within each other, and gluing it with hot glue. This didn’t work and looked very messy. The next idea I had was to individually cut blocks of wood at an angle to hold the tiles up individually. This led to me to think of holding the roof up with the same blocks of wood.
  • 8. Applying Professional; practice in your work To start creating my final piece I started to cut my shapes using a scroll saw. I decided to use a scroll saw to cut the foam board because it gave a smooth and precise edge without to much force. When I tested a scalpel it took up a lot of time and the edges were not clean. I was also informed to use a laser cutter to cut foam board because the laser burns the edges which leaves them frilled and it can smoke. After cutting the pieces all out I sanded them down to refine them all. I also used the scroll saw to cut the roof pieces which then copper rods were slotted through to hold them together. A piece of acetate was then placed over the roof using hot glue to replicate glass to defend the people underneath from the elements. For the back row of tiles I cut 5cm tall wooden blocks with an angle of 40 degrees cut off; for the second row I cut 3cm blocks with an angle of 30 degrees cut off using a saw. To stick the pieces together I used super glue. Finally I wanted to have only 3 pillars to hold up 3 of the corners of the roof so that one corner would slant down therefore letting the elements roll off using gravity. To create somewhere to rest, I drilled holes in the pillars to fit wooden rods to allow people to lean on them. When using the scroll saw I had to be careful when handling the foam board in case of cutting my finger. I also had to wear goggles to protect myself from the blade or any off cuts which break and fly off. Again when using the drill I had to be careful on where I placed my fingers in case of the drill bit hitting my finger. Lastly I also needed to be weary when using the saw. I had to watch where I was putting my fingers in case of me accidently getting too close and eventually cutting my finger.
  • 10. Evaluation of the project I spent quite a lot of time on the project, during lesson and almost everyday after school, trying to come up with ideas and topping up analysis and annotation. To try and come up with new ideas I tried to look at as many artists and designers as possible to gain inspiration for my own work. Stages which were more difficult than others were definitely being decisive on my final piece and in what direction I should take it in. This for me was the hardest part due to it taking up a lot of thought. What I most enjoyed was surveying the area and getting stuck by creating 3D models. Not a lot of things went wrong in my opinion, however when creating the model for the final piece, I was at first going to use balsa wood but it kept breaking when being drilled into. Therefore I had to change the type of wood I were to use to a thicker and firmer wood. I also feel that overall my final piece and preliminary drawings turned out well. The drawing helped to force me in the right direction whilst also creating a solid base to start from. The final piece also eventually turned out aesthetically how I wanted it to, and it looks like it could serve the purpose of a shelter/pavilion well in reality. I researched into a range of artists and artworks for this project however the main influences were, Judit Rita Raboczky, Lesser Ury, Toyo Ito, Eduardo Chillida and Will Alsop. Raboczky helped develop my first 3 model of my location, Lesser Ury influenced my prints, Toyo Ito helped progress my ideas for my final 3D model, Chillida inspired aspects of my prints and final Alsop helped with the design process for my final piece. The primary and secondary drawing which were taken had a large influence on the direction I took for this project. This was mainly done through my first hand drawings of the bushes and leaves which were the made the subject of my prints. The prints then helped develop forms and shapes which would in the long term help decide on what I would base my final piece on, which was the forms of the leaves. The main sources to find artists and artworks of inspiration was the internet and books. There was lots of development which took place before coming up with my final outcome. A large part of my development was doing dry point prints. To better the prints I could have created a larger range and taken more time when applying ink and producing the print to create a better look and more prints which could have led to more ideas. When creating the 3D model of my location I knew what I wanted to do due to my planning and drawings. This made it easier to make. Although as previously discussed the main influence on this project were the primary drawings and dry point prints.