SlideShare a Scribd company logo
GSTR1 > Creation of Outward Supplies Return
How can I create and add details for the outward supplies in the GSTR1?
To create and add details for the outward supplies in the GSTR1, perform the following steps:
1. Access the www.gst.gov.in URL. The GST Home page is displayed.
2. Login to the GST Portal with valid credentials i.e. your userid and password
3. Click the Services > Returns > Returns Dashboard command.
4. The File Returns page is displayed. Select the Financial Year & Return Filing Period (Month) for which you want to file the return from the drop-down list.
5. Click the SEARCH button.
6. The File Returns page is displayed. This page displays the due date of filing the returns, which the taxpayer is required to file using separate tiles.
In the GSTR1 tile, click the PREPARE ONLINE button if you want to prepare the return by making entries on the GST Portal.
Note:
• The due date for filing GSTR1 is 10th of every month.
• You can click the PREPARE OFFLINE button to upload the JSON ( Java Script Object Notation) file containing invoice details and other GSTR 1 details in the GSTN
specified format prepared through the GSTN provided offline tools or any other software.
7. The GSTR-1 – Details of outward supplies of goods or services page is displayed. In first month, Turnover of ‘Aggregate Turnover - April to June, 2017’ will be
there for Taxpayer to fill along with ‘Aggregate Turnover in the preceding financial year’ and then click on the SAVE button. This field is mandatory. You can proceed to
furnish other details only after furnishing this information.
From the next month, ‘Aggregate Turnover in the preceding financial year’ will be auto-populated based on previous tax period return
There will be no. of tiles representing Tables to enter relevant details. Click on the tile names to know and enter related details:
GSTR1 – Invoice Details
• 4A, 4B, 4C, 6B, 6C - B2B Invoices: To add an invoice for taxable outwards supplies to a registered person, perform the following steps
• 5A, 5B - B2C (Large) Invoices: To add an invoice for taxable outwards supplies to a consumer, where place of supply is other than the State where supplier is
located (Inter-state supplies) and invoice value is more than Rs. 2.5 lakh
• 9B - Credit / Debit Notes (Registered): To add details of credit or debit notes issued to the registered recipients
• 9B - Credit / Debit Notes (UnRegistered): To add details of credit , debit notes or refund voucher issued to the unregistered recipients
• 6A - Exports Invoices: To add an invoice for supplies exported
GSTR1 – Other Details
• 7- B2C Others: To add consolidated details of taxable outwards supplies to a customer where invoice value is less than Rs. 2.5 lakh and all intra state supplies to
unregistered customers
• 8A, 8B, 8C, 8D - Nil Rated Supplies: Nil Rated Supplies: To add consolidated details of nil rated, exempted and Non-GST Outward supplies
• 11A(1), 11A(2) - Tax Liability (Advances Received): Tax Liability (Advances Received): To add details of transactions attracting tax liability arising on account of
Time of Supply (like receipt of advances)
• 11B(1), 11B(2) - Adjustment of Advances: To add the advance amount received in earlier tax period and adjusted against the supplies being shown in this tax period
• 12 - HSN / SAC summary of outward supplies:To furnish the summarized details of all outward supplies HSN and rate wise along with quantitative details.
• 13 - Documents Issued:To add the details of documents issued during the tax period
4A, 4B, 4C, 6B, 6C - B2B Invoices:
To add an invoice for taxable outwards supplies to a registered person, perform the following steps:
1. Click the 4A, 4B, 4C, 6B, 6C - B2B Invoices tile to enter the invoice details for B2B transactions (goods/ services sold to a registered taxpayer).
2. The B2B Invoices – Receiver-Wise-Summary page is displayed. Click the ADD INVOICE button to add a new invoice for any receiver.
3. The B2B – Add Invoice page is displayed. In the Receiver GSTIN/UIN field, enter the GSTIN or UIN of the receiver.
4. Select the checkbox for Deemed Exports or SEZ Supplies with payment or SEZ supplies without payment as applicable.
5. In the Invoice No., Invoice Date and Total Invoice Value fields, enter the Invoice number, date of the invoice and value of the total invoice.
Note:
• The GSTIN should be registered on the date of invoice
• Once the GSTIN of the receiver is entered, Receiver Name, POS and Supply Type fields are auto-populated based on the GSTIN of the receiver.
• The auto-populated POS is editable. Depending on selected POS, the supply type gets auto-populated.
• The screen will expand downwards and more fields will appear to enter line item details of the invoice.
• In case of UN Bodies, Embassies, Government Offices or Other Notified persons, you need to provide Unique Identification Number (UIN) of the receiver.
• An invoice number should be alphanumeric with allowable special characters and unique for a given Financial Year (FY).
• Invoice date cannot be a future date or a date prior to the date of registering with GST.
6. If the supply is made through an e-commerce company, select the checkbox for Supplies through E-Commerce and in the GSTIN of the e-commerce operator
field, enter the GSTIN of the e-commerce company.
Note: Fill this field only when the supply is made through an e-commerce company.
7. Select the Supply attract Reverse Charge checkbox, in case supply made to the taxpayer is covered under the reverse charge mechanism.
In case of Intra-State transaction:
In case the POS (place of supply) of the goods/ services is the same state as that of the supplier, the transaction is an Intra-State transaction.
Notice, fields for Central Tax and State/UT Tax will appear.
a) In the Taxable Value field against the rates, enter the taxable value of the goods or services.
b) In the Cess field, enter the cess amount.
Note: The Amount of Tax fields are auto-populated based on the values entered in Taxable Value fields respectively. However, the taxpayer can edit the tax amount.
In case of Inter-State transaction:
In case the Place of Supply (POS) is different from the state of the supplier transaction becomes an Inter-State transaction.
Notice, fields for Integrated Tax will appear.
a) In the Taxable Value field against the rates, enter the taxable value of the goods or services.
b) In the Cess field, enter the cess amount.
Note: The Amount of Tax fields are auto-populated based on the values entered in Taxable Value fields respectively. However, the taxpayer can edit the tax amount.
The CESS field is not auto populated and has to be entered by the taxpayer
8. Click the SAVE button to save the invoice details.
9. You will be directed to the previous page and a message is displayed that Request accepted successfully.
Note: The status of the added invoice is Processed.
Here, you can also edit/delete the added invoices (under Actions).
Note: B2B invoices uploaded in GSTR1 as a supplier will reflect in the B2B Invoices of the receiver in GSTR-2A/GSTR 2 in near real time. However, no action can be
taken by receiver unless the Supplier files GSTR 1.
Uploaded by Taxpayer: The "Uploaded by Taxpayer" tab shows all the invoices that you have uploaded for a given tax period.
Uploaded by Receiver: The "Uploaded by Receiver" tab displays the invoices that you missed from your GSTR-1, but were uploaded by the Receiver Taxpayer for
taking appropriate actions.
Modified by Receiver: If the receiver Taxpayer has modified any invoice that you uploaded in your GSTR-1, it will show-up under the "Modified by Receiver" tab for
taking appropriate actions.
Rejected by Receiver: The "Rejected by Receiver" tab displays invoices from your GSTR-1 that were rejected by the receiver Taxpayer for taking appropriate actions.
10. Click the BACK button to go back to the Invoices - Receiver-Wise-Summary page.
11. Here, you can view receiver wise summary of invoices. A tax payer can add invoice of the particular receiver by clicking on the particular reciever and then clicking
on the add invoice button at the bottom of the page. Click the BACK button to go back to the GSTR-1 page.
You will be directed to the GSTR-1 landing page and the B2B Invoices tile in GSTR1 will reflect the number of invoices added along with Total Invoice value, Total
taxable value and total tax liability.
5A, 5B - B2C (Large) Invoices:
To add an invoice for taxable outwards supplies to a consumer, where place of supply is other than the State where supplier is located (Inter-state supplies) and invoice
value is more than Rs. 2.5 lakh, perform the following steps:
1. Click the 5A, 5B - B2C (Large) Invoices tile to enter the invoice details for inter-state taxable outward supplies made to a consumer of value greater than 2.5 lacs.
2. The B2C (Large) Invoices – Summary page is displayed. Click the ADD INVOICE button to add a new invoice.
3. The B2C (Large) Invoices – Details page is displayed. In the POS field, select the place of supply (state code) where the supplies were delivered.
4. In the Invoice No. field, enter the Invoice number issued to the consumer of that POS.
Note: An invoice number should be alphanumeric with allowable special characters and unique for a given Financial Year (FY).
5. In the Invoice Date field, enter the date on which the invoice was generated.
6. In the Total Invoice Value field, enter the total amount for which the goods or services are supplied.
7. If the supply is made through an e-commerce company, select the checkbox for Supplies through E-Commerce and in the GSTIN of the e-commerce operator
field, enter the GSTIN of the e-commerce company.
Note: Fill this field only when the supply is made through an e-commerce company.
8. In the Taxable Value field against the rates, enter the taxable value of the goods or services.
9. In the Cess field, enter the cess amount.
Note: The Amount of Tax fields are auto-populated based on the values entered in Taxable Value fields respectively. However, the taxpayer can edit the tax amount.
The CESS field is not auto populated and has to be entered by the taxpayer.
10. Click the SAVE button to save the invoice details.
11. You will be directed to the previous page and a message is displayed that Request accepted successfully.
Note: The status of the added invoice is processed.
Here, you can also edit/delete the added invoices (under Actions).
12. Click the BACK button to go back to the GSTR-1 page.
You will be directed to the GSTR-1 landing page and the B2C (large) Invoices tile in GSTR1 will reflect the number of invoices added along with Total tax liability.
9B - Credit / Debit Notes (Registered):
To add details of credit or debit notes for the registered user, perform the following steps:
1. Click the 9B - Credit / Debit Notes (Registered)/refund voucher tile to enter the details of credit or debit notes issued to the registered recipients or details of
refund voucher against advance received.
2. The Credit/Debit Notes (Registered)- Summary page is displayed. Click the ADD DETAILS button to add credit or debit note details.
3. The Credit / Debit Notes (Registered) – Add Note page is displayed. In the Receiver GSTIN/UIN field, enter the GSTIN of the receiver (registered taxpayer) to
whom supply is made.
Note: The Receiver Name field is auto-populated, when the user enters the GSTIN of the Receiver.
4. In the Debit/Credit Note No. field, enter the debit or credit note number or refund voucher number
Note: A Debit or Credit Note number should be unique for a given Financial Year (FY).
5. In the Debit/Credit Note Date field, enter the date on which the debit or credit Note was issued.
Note: The date should be before the end date of the tax period. Debit / credit note date cannot be earlier than original invoice date.
6. In the Original Invoice Number field, enter the invoice number of the earlier filed invoice (original invoice) on which the Debit or Credit Note is being issued or the
number of advance receipt against which the refund voucher is issued.
7. In the Original Invoice Date field, enter the original invoice date.
8. From the Note Type drop-down list, select whether the details added are for a Debit or Credit Note or refund voucher
9. In the Note Value field, enter the value of the note or refund voucher.
10. From the Supply Type drop-down list, select whether the note or voucher is added for an invoice of Inter-state or Intra-state transaction.
11. From the Reason for Issuing Note drop-down list, select the reason on account of which the debit or credit note is issued.
In case of Intra-State transaction:
In case the POS (place of supply) of the goods/ services is the same state as that of the supplier, the transaction is an Intra-State transaction.
Notice, fields for Central Tax and State/UT Tax appear.
a) In the Taxable Value field against the rates, enter the taxable value of the goods or services.
b) In the Cess field, enter the cess amount.
Note: The Amount of Tax fields are auto-populated based on the values entered in Taxable Value fields respectively. However, the taxpayer can edit the tax amount.
The CESS field is not auto populated and has to be entered by the taxpayer.
In case of Inter-State transaction:
In case Place of Supply (POS) is different from the state of the supplier, transaction becomes an Inter-State transaction.
Notice, fields for Integrated Tax appear.
a) a) In the Taxable Value field against the rates, enter the taxable value of the goods or services.
b) In the Cess field, enter the cess amount.
Note: The Amount of Tax fields are auto-populated based on the values entered in Taxable Value fields respectively. However, the taxpayer can edit the tax amount.
The CESS field is not auto populated and has to be entered by the taxpayer.
12 Click the SAVE button to save the details.
13. You will be directed to the previous page and a message is displayed that Request accepted successfully.
Note: The status of the added invoice is Processed.
Here, you can also edit/delete the added invoices (under Actions).
Uploaded by Taxpayer: The "Uploaded by Taxpayer" tab shows all the debit/credit note/refund vouchers that you have uploaded for a given tax period.
Uploaded by Receiver: The "Uploaded by Receiver" tab displays the debit/credit note/refund vouchers that you missed from your GSTR-1, but were detected and
uploaded by the Receiver Taxpayer for taking action.
Modified by Receiver: If the receiver Taxpayer has modified any debit/credit note/refund vouchers that you uploaded in your GSTR-1, it will show-up under the
"Modified by Receiver" tab for taking action.
Rejected by Receiver: The "Rejected by Receiver" tab displays debit/credit note/refund vouchers from your GSTR-1 that were rejected by the receiver Taxpayer.
14. Click the BACK button.
15. You will be directed to the GSTR-1 landing page and the 9B- Credit/ Debit Notes (Registered) tile in GSTR1 will reflect the number of credit/debit notes/refund
vouchers added.
9B - Credit / Debit Notes (UnRegistered):
To add details of credit or debit notes or refund vouchers issued to unregistered persons, perform the following steps:
1. Click the 9B - Credit / Debit Notes (Unregistered) tile to enter the details of credit or debit notes issued to the unregistered recipients.
2. The Credit/Debit Notes (Unregistered) - Summary page is displayed. Click the ADD DETAILS button to add credit or debit note or refund voucher details.
3. The Credit / Debit Notes (Unregistered) – Add Note page is displayed. From the Type drop-down list, select the appropriate choice like B2CL, export without
payment etc.
4. In the Debit/Credit Note No. field, enter the debit or credit note number.
Note: A Debit or Credit Note number should be unique for a given Financial Year (FY).
5. In the Debit/Credit Note Date field, enter the date on which the debit or credit Note was issued.
Note: The date should be before the end date of the tax period. Debit / credit note date cannot be earlier than original invoice date.
6. In the Original Invoice Number field, enter the invoice number of the earlier filed invoice (original invoice) on which the Debit or Credit Note is being issued.
7. In the Original Invoice Date field, enter the original invoice date.
8. From the Note Type drop-down list, select whether the details are added for a Debit or Credit Note or refund voucher.
9. In the Note Value field, enter the value of the note or refund voucher
10. From the Reason for Issuing Note drop-down list, select the reason on account of which the debit or credit note is issued.
In case the POS (place of supply) of the goods/ services is the same state as that of the supplier, the transaction is an Intra-State transaction.
Notice, fields for Central Tax and State/UT Tax appear.
a) In the Taxable Value field against the rates, enter the taxable value of the goods or services.
b) In the Cess field, enter the cess amount.
Note: The Amount of Tax fields are auto-populated based on the values entered in Taxable Value fields respectively. However, the taxpayer can edit the tax amount.
The CESS field is not auto populated and purely user input.
In case of Inter-State transaction:
In case the POS(place of supply) is in a different state as that of the supplier, transaction becomes an Inter-State transaction.
Notice, fields for Integrated Tax appear.
a) In the Taxable Value field against the rates, enter the taxable value of the goods or services.
b) In the Cess field, enter the cess amount.
Note: The Amount of Tax fields are auto-populated based on the values entered in Taxable Value fields respectively. However, the taxpayer can edit the tax amount.
The CESS field is not auto populated and has to be entered.
11. Click the SAVE button to save the details.
12. Click the BACK button to go back to the GSTR-1 page.
13. You will be directed to the GSTR-1 landing page and the 9B- Credit/ Debit Notes (Unregistered) tile in GSTR1 will reflect the number of credit/debit notes/ refund
vouchers added.
6A - Exports Invoices:
To add an invoice for supplies exported, perform the following steps:
1. Click the 6A- Export Invoices tile to enter the invoice details for supplies exported.
2. The Exports – Invoices Summary page is displayed. Click the ADD INVOICE to add a new invoice.
3. The Exports – Add Details page is displayed. In the Invoice No. field, enter the Invoice number issued against exports sales.
4. In the Invoice Date field, enter the date on which the invoice was generated.
5. In the Port Code field, enter the port code.
6. In the Shipping Bill No. / Bill of Export No. field, enter the unique number of the shipping bill with location code generated while shipping.
7. In the Shipping Bill Date/ Bill of Export Date field, enter the date on which the shipping bill was issued.
8. In the Total Invoice Value field, enter the total amount of all the goods or services supplied.
9. From the GST Payment drop-down list, select whether the GST is paid against the invoice or not.
10. In the Taxable Value field against the rates, enter the taxable value of the goods or services.
Note: The Amount of Tax fields are auto-populated based on the values entered in Taxable Value fields respectively. However, the taxpayer can edit the tax amount.
11. Click the SAVE button to save the details.
12. You will be directed to the previous page and a message is displayed that Request accepted successfully.
Note: The status of the added invoice is Processed.
Here, you can also edit/delete the added invoices (under Actions).
13. Click the BACK button.
14. You will be directed to the GSTR-1 landing page and the Export Invoices tile in GSTR1 will reflect the number of such invoices added along with Total tax liability.
7- B2C Others:
To add details of taxable outwards supplies to a customer where invoice value is less than Rs. 2.5 lakh and intra-state supplies to customers, perform the following
steps:
1. Click the B2C (Others) tile to enter the details for B2C transactions.
2. The B2C (Others) Details – Summary page is displayed. Select E-commerce tab to add a line item for a transaction through E-commerce or else select Other than
E-commerce tab in case transaction is through non E-commerce.
3. Click the ADD DETAILS button to add the line item details.
4. In the POS field, select the Place of Supply (State Code) where the supplies were delivered. Based on the state selected in POS, Supply Type field is auto-
populated.
5. In the Taxable Value field, enter the collated amount of all the unique goods or services supplied.
6. In the Rate field, enter the applicable Rate.
7. In the GSTIN of the e-commerce operator field, enter the GSTIN of the e-commerce operator.
Note: This field will appear when you select the E-commerce tab.
In case of Intra-State transaction:
Notice, fields for Central Tax, State/UT Tax & CESS will appear in the screen.
Note: The Central Tax, State/UT Tax fields are auto-populated based on the value entered in Rate field. However, these can be edited. The CESS field is not auto
populated and has to be entered by the taxpayer.
In case of Inter-State transaction:
Notice, fields for Integrated Tax & CESS will appear in the screen.
Note: The Integrated Tax field is auto-populated based on the value entered in Rate field. However, these can be edited. The CESS field is not auto populated and has
to be entered.
8. Click the SAVE button to save the details added.
9. Click the BACK button to go back to the GSTR-1 page.
You will be directed to the GSTR-1 landing page and the B2C (Others) tile in GSTR1 will reflect the number of invoices added.
8A, 8B, 8C, 8D - Nil Rated Supplies:
To add an invoice for Nil Rated Supplies, Exempted and Non-GST Outward supplies, perform the following steps:
1. Click the Nil Rated Supplies tile to enter the details for Nil rated supplies.
2. The Nil Rated Supplies page is displayed with section for Click the EDIT button at the bottom of the page to enable the fields displayed on the
page.
3. Enter the data in Nil Rated Supplies, Exempted (Other than Nil rated/non-GST supply), and Non-GST Supplies Amount fields for the following
categories of transactions:
a. Inter-state supplies to registered person
b. Inter-state supplies to unregistered person
c. Intra-state supplies to registered person
d. Intra-state supplies to unregistered person
4. Click the SAVE button to save the details.
A success message is displayed on the top of the page.
5. Click the BACK button to go back to the GSTR-1 page.
You will be directed to the GSTR-1 landing page and the Nil Rated Supplies tile in GSTR1 will reflect the updated invoice value.
11A(1), 11A(2) - Tax Liability (Advances Received):
To add details of Tax Liability (Advances Received) arising on account of Time of Supply without issuance of Invoice in the same period, perform the following steps:
1. Click the Tax Liability (Advance Received) tiles to enter the tax liability details
2. The Tax Liability (Advance Payment) – Summary page is displayed. Click the ADD DETAILS button to add the advance tax receipt and related liability details.
3. In the POS field, select the State code of the place of supply applicable for the advances received. .
Note: Based on the state code selected, Supply Type column would be auto-populated as Inter-state or Intra-state.
In case of Intra-State transaction:
Notice, fields for Central Tax, State/UT Tax & CESS will appear in the screen.
a) In the Gross Advance Received field, enter the amount paid by the receiver to the supplier for the goods/service provided by the supplier without issuing of
any invoice for the goods/services against the applicable Rate (%).
b) In the Central Tax, State/UT Tax field, system will auto-populate the Central Tax and State/UT Tax amount. The same will be editable.
c) In the CESS field, enter the CESS amount
In case of Inter-State transaction:
Notice, fields for Integrated Tax & CESS will appear in the screen.
a) In the Gross Advance Received field, enter the amount paid by the receiver to the supplier for the goods/service provided by the supplier without issuing of
any invoice for the goods/services against the applicable Rate (%).
b) In the Integrated Tax field, system will auto-populate the Integrated Tax amount. This will be an editable field. .
c) In the CESS field, enter the CESS amount.
7. Click the SAVE button.
8. The line item details are added in a tabular format. Notice the line item details. In case, the details are incorrect, you can edit or delete the line item by using the Edit
and Delete icons that appear under the Actions column.
9. Click the BACK button to go back to the GSTR-1 page.
You will be directed to the GSTR-1 landing page and the Tax Liability (AdvanceRecieved) tile in GSTR1 will reflect the updated total value and no. of entries
11B(1), 11B(2) - Adjustment of Advances
To fill details of Adjustment of Advances on invoices issued in the current period, perform the following steps.
1. Click the 11B(1), 11B(2)- Adjustment of Advances tile to enter the details of tax already paid on invoices issued in the current period.
2. The Tax already paid on invoices issued in the current period – Summary page is displayed. Click the ADD DETAILS button to add details for invoices issued in
the current period on which tax has already been paid.
3. The Tax already paid on invoices issued in the current period - Add Details page is displayed.
In case of Inter-State transaction:
Notice, fields for Integrated Tax & CESS will appear in the screen.
a) In the Gross Advance adjusted field, enter the amount paid by the receiver to the supplier for the goods/services against the applicable Rate (%)
b) In the Integrated Tax field, system will auto-populate the Integrated Tax amount. This will be an editable field. .
c) In the CESS field, enter the CESS amount.
In case of Intra-State transaction:
Notice, fields for Central Tax, State/UT Tax & CESS will appear in the screen.
a) In the Gross Advance adjusted field, enter the amount paid by the receiver to the supplier for the goods/services against the applicable Rate (%)
b) In the Integrated Tax field, system will auto-populate the Integrated Tax amount. This will be an editable field. .
c) In the CESS field, enter the CESS amount.
4. Click the SAVE button to save the details.
5. You can also Edit/Delete the added invoices (under Actions tab).
6. Click the BACK button to go back to the GSTR-1 page.
You will be directed to the GSTR-1 landing page and the Adjustment of Advances tile in GSTR1 will reflect the number of Line Items added.
12 - HSN / SAC summary of outward supplies:
To furnish the HSN-wise summary of outward supplies and rate wise along with quantitative details, perform the following steps -
Note: This field is applicable only if Annual turnover is more than 1.5 cr.
1. Click the HSN-wise summary of outward supplies tile to furnish the summarized details of all outward supplies HSN-wise along with quantitative details.
2. The HSN-wise summary of outward supplies– Summary page is displayed. Click the ADD DETAILS button to add details for invoices issued in the current period
on which tax has already been paid.
3. The HSN summary of outward supplies – Add/Edit Details page is displayed.
4. In the HSN field, enter the applicable provision of reporting HSN code of the outward supplied.
5. In the Description field, enter the description. (Either HSN or Description should be mandatorily entered)
6. In the UQC field, select UQC.
7. In the Total Quantity field, enter the quantity.
8. In the Total Value field, enter the Total Value of the outward supply.
9. In the Total Taxable Value field, enter the Total Taxable Value of the outward supply.
In case of Intra-State transaction:
Notice, fields for Central Tax, State/ UT Tax & CESS will appear in the screen.
In the Central TAX, State Tax and CESS Rate field, enter the Central TAX, State Tax and CESS Rate.
In case of Inter-State transaction:
Notice, fields for Integrated Tax & CESS will appear in the screen.
In the Integrated Tax and CESS Rate field, enter the Integrated Tax and CESS rate.
10. Click the ADD button.
11. You will be directed to Added/Edited Line Items to be saved page and a message is displayed that Request accepted successfully.
12. Click the BACK button to go back to the GSTR-1 page.
You will be directed to the GSTR-1 landing page and the HSN summary of outward supplies tile in GSTR1 will be updated.
13 - Documents Issued:
To Upload the details of Documents issued perform the following steps.
1. Click the Documents Issued tile to add the details for document issued during the current tax period.
2. To update the document for Invoices for outward supply, Click on Add Document:
3. Add the details:
Similarly the documents for below categories can be added:
Invoices for inward supply from unregistered person
Revised Invoice
Debit Note
Credit Note
Receipt voucher
Payment Voucher
Refund voucher
Delivery Challan for job work
Delivery Challan for supply on approval
Delivery Challan in case of liquid gas
Delivery Challan in cases other than by way of supply (excluding at S no. 9 to 11)
4. Click On SAVE at the end of the page:
5. Click the BACK button to go back to the GSTR-1 page.
You will be directed to the GSTR-1 landing page and the Documents Issued summary of outward supplies tile in GSTR1 will be updated
Goods and services tax

More Related Content

What's hot

Gstr 3 b
Gstr 3 bGstr 3 b
Gstr 3 b
geeta kumari
 
GST returns - law and procedure. By DK Bholusaria
GST returns - law and procedure. By DK BholusariaGST returns - law and procedure. By DK Bholusaria
GST returns - law and procedure. By DK Bholusaria
DK Bholusaria
 
FORM GSTR-1 PPT
FORM GSTR-1 PPTFORM GSTR-1 PPT
FORM GSTR-1 PPT
Hina juyal
 
Master guide on gst annual return and audit
Master guide on gst annual return and auditMaster guide on gst annual return and audit
Master guide on gst annual return and audit
PSPCL
 
GST ITC provisions in brief
GST ITC provisions in brief GST ITC provisions in brief
GST ITC provisions in brief
DK Bholusaria
 
GST Return Overview by CA Shital Thadeshwar
GST  Return Overview  by CA Shital ThadeshwarGST  Return Overview  by CA Shital Thadeshwar
GST Return Overview by CA Shital Thadeshwar
Shital Thadeshwar
 
GSTR 3 Return Format
GSTR 3 Return FormatGSTR 3 Return Format
GSTR 3 Return Format
ProfitBooks Solutions Pvt Ltd
 
GST RETURN FILING
GST RETURN FILING GST RETURN FILING
GST RETURN FILING
Manjunath Raibagi
 
Understanding gst returns
Understanding gst returnsUnderstanding gst returns
Understanding gst returns
Dheeraj Mundra
 
Returns fillings Process under GST
Returns fillings Process under GSTReturns fillings Process under GST
Returns fillings Process under GST
Dnyanesh Patade
 
Overview of filing return under GST
Overview of filing return under GSTOverview of filing return under GST
Overview of filing return under GST
Team Asija
 
Cleartax GST Offline Guide
Cleartax GST Offline GuideCleartax GST Offline Guide
Cleartax GST Offline Guide
MASOOM SEKHAR SAHOO
 
GSTR-2 Return Format
GSTR-2 Return FormatGSTR-2 Return Format
GSTR-2 Return Format
ProfitBooks Solutions Pvt Ltd
 
HSN Summary and B2C (others) Summary for GSTR 1 - ClearTax
HSN Summary and B2C (others) Summary for GSTR 1 - ClearTaxHSN Summary and B2C (others) Summary for GSTR 1 - ClearTax
HSN Summary and B2C (others) Summary for GSTR 1 - ClearTax
MASOOM SEKHAR SAHOO
 
GSTR 3B Return Filing Process
GSTR 3B Return Filing ProcessGSTR 3B Return Filing Process
GSTR 3B Return Filing Process
ProfitBooks Solutions Pvt Ltd
 
FORM GSTR 2 PPT
FORM GSTR 2 PPT FORM GSTR 2 PPT
FORM GSTR 2 PPT
Hina juyal
 
Invoicing under GST
Invoicing under GSTInvoicing under GST
Invoicing under GST
gst-trichy
 
GST Accounts & Records
GST Accounts & RecordsGST Accounts & Records
GST Accounts & Records
prakashnath
 
Practical aspects of GST Transition
Practical aspects of GST TransitionPractical aspects of GST Transition
Practical aspects of GST Transition
DK Bholusaria
 
New format of Gst returns from 1st April 2019
New format of Gst returns from 1st April 2019 New format of Gst returns from 1st April 2019
New format of Gst returns from 1st April 2019
SakshiJain476
 

What's hot (20)

Gstr 3 b
Gstr 3 bGstr 3 b
Gstr 3 b
 
GST returns - law and procedure. By DK Bholusaria
GST returns - law and procedure. By DK BholusariaGST returns - law and procedure. By DK Bholusaria
GST returns - law and procedure. By DK Bholusaria
 
FORM GSTR-1 PPT
FORM GSTR-1 PPTFORM GSTR-1 PPT
FORM GSTR-1 PPT
 
Master guide on gst annual return and audit
Master guide on gst annual return and auditMaster guide on gst annual return and audit
Master guide on gst annual return and audit
 
GST ITC provisions in brief
GST ITC provisions in brief GST ITC provisions in brief
GST ITC provisions in brief
 
GST Return Overview by CA Shital Thadeshwar
GST  Return Overview  by CA Shital ThadeshwarGST  Return Overview  by CA Shital Thadeshwar
GST Return Overview by CA Shital Thadeshwar
 
GSTR 3 Return Format
GSTR 3 Return FormatGSTR 3 Return Format
GSTR 3 Return Format
 
GST RETURN FILING
GST RETURN FILING GST RETURN FILING
GST RETURN FILING
 
Understanding gst returns
Understanding gst returnsUnderstanding gst returns
Understanding gst returns
 
Returns fillings Process under GST
Returns fillings Process under GSTReturns fillings Process under GST
Returns fillings Process under GST
 
Overview of filing return under GST
Overview of filing return under GSTOverview of filing return under GST
Overview of filing return under GST
 
Cleartax GST Offline Guide
Cleartax GST Offline GuideCleartax GST Offline Guide
Cleartax GST Offline Guide
 
GSTR-2 Return Format
GSTR-2 Return FormatGSTR-2 Return Format
GSTR-2 Return Format
 
HSN Summary and B2C (others) Summary for GSTR 1 - ClearTax
HSN Summary and B2C (others) Summary for GSTR 1 - ClearTaxHSN Summary and B2C (others) Summary for GSTR 1 - ClearTax
HSN Summary and B2C (others) Summary for GSTR 1 - ClearTax
 
GSTR 3B Return Filing Process
GSTR 3B Return Filing ProcessGSTR 3B Return Filing Process
GSTR 3B Return Filing Process
 
FORM GSTR 2 PPT
FORM GSTR 2 PPT FORM GSTR 2 PPT
FORM GSTR 2 PPT
 
Invoicing under GST
Invoicing under GSTInvoicing under GST
Invoicing under GST
 
GST Accounts & Records
GST Accounts & RecordsGST Accounts & Records
GST Accounts & Records
 
Practical aspects of GST Transition
Practical aspects of GST TransitionPractical aspects of GST Transition
Practical aspects of GST Transition
 
New format of Gst returns from 1st April 2019
New format of Gst returns from 1st April 2019 New format of Gst returns from 1st April 2019
New format of Gst returns from 1st April 2019
 

Similar to Goods and services tax

2709172005 user manual combined
2709172005 user manual   combined2709172005 user manual   combined
2709172005 user manual combined
Karunesh Srivastava
 
Gstr 1 return filing format simplified
Gstr 1 return filing format simplifiedGstr 1 return filing format simplified
Gstr 1 return filing format simplified
Prachi Desai
 
Sample Oracle Payable User Manual
Sample Oracle Payable User ManualSample Oracle Payable User Manual
Sample Oracle Payable User ManualSuvrendu Bose
 
Registration & ITC
Registration & ITCRegistration & ITC
Registration & ITC
premarhea
 
mayuri GST CIA 3.pptx
mayuri GST CIA 3.pptxmayuri GST CIA 3.pptx
mayuri GST CIA 3.pptx
Mayuri Bhole
 
Payment lifecycle - Paytm Mall Shop
Payment lifecycle - Paytm Mall ShopPayment lifecycle - Paytm Mall Shop
Payment lifecycle - Paytm Mall Shop
Paytm
 
GST Return Filing.pdf
GST Return Filing.pdfGST Return Filing.pdf
GST Return Filing.pdf
LegalMinions
 
Alert 22
Alert 22Alert 22
Alert 22
Akash Gupta
 
mayuri GST CIA 3.pptx
mayuri GST CIA 3.pptxmayuri GST CIA 3.pptx
mayuri GST CIA 3.pptx
Mayuri Bhole
 
Gstr 9
Gstr 9Gstr 9
payment lifecycle
payment lifecyclepayment lifecycle
payment lifecycle
paytmslides2
 
Payment lifecycle - Paytm Mall Shop
Payment lifecycle - Paytm Mall ShopPayment lifecycle - Paytm Mall Shop
Payment lifecycle - Paytm Mall Shop
Paytm
 
GST Guide Cable Industry
GST Guide Cable IndustryGST Guide Cable Industry
GST Guide Cable Industry
Prateek Kumar Khemka
 
E tutorial -
E tutorial - E tutorial -
E tutorial -
PSPCL
 
TDS_RRSK_Feb23.pptx
TDS_RRSK_Feb23.pptxTDS_RRSK_Feb23.pptx
TDS_RRSK_Feb23.pptx
juvvaharish
 
Payment lifecycle of Paytm Mall Shop
Payment lifecycle of Paytm Mall ShopPayment lifecycle of Paytm Mall Shop
Payment lifecycle of Paytm Mall Shop
Paytm
 
Gst understanding
Gst understandingGst understanding
Gst understanding
CA Harshil Goyal
 
Vat
VatVat
Vat
BandS
 
Final return on_gst
Final return on_gstFinal return on_gst
Final return on_gst
aman sharma
 
Gst gstr-123 forms
Gst gstr-123 formsGst gstr-123 forms
Gst gstr-123 forms
SANJAY SONAWANE
 

Similar to Goods and services tax (20)

2709172005 user manual combined
2709172005 user manual   combined2709172005 user manual   combined
2709172005 user manual combined
 
Gstr 1 return filing format simplified
Gstr 1 return filing format simplifiedGstr 1 return filing format simplified
Gstr 1 return filing format simplified
 
Sample Oracle Payable User Manual
Sample Oracle Payable User ManualSample Oracle Payable User Manual
Sample Oracle Payable User Manual
 
Registration & ITC
Registration & ITCRegistration & ITC
Registration & ITC
 
mayuri GST CIA 3.pptx
mayuri GST CIA 3.pptxmayuri GST CIA 3.pptx
mayuri GST CIA 3.pptx
 
Payment lifecycle - Paytm Mall Shop
Payment lifecycle - Paytm Mall ShopPayment lifecycle - Paytm Mall Shop
Payment lifecycle - Paytm Mall Shop
 
GST Return Filing.pdf
GST Return Filing.pdfGST Return Filing.pdf
GST Return Filing.pdf
 
Alert 22
Alert 22Alert 22
Alert 22
 
mayuri GST CIA 3.pptx
mayuri GST CIA 3.pptxmayuri GST CIA 3.pptx
mayuri GST CIA 3.pptx
 
Gstr 9
Gstr 9Gstr 9
Gstr 9
 
payment lifecycle
payment lifecyclepayment lifecycle
payment lifecycle
 
Payment lifecycle - Paytm Mall Shop
Payment lifecycle - Paytm Mall ShopPayment lifecycle - Paytm Mall Shop
Payment lifecycle - Paytm Mall Shop
 
GST Guide Cable Industry
GST Guide Cable IndustryGST Guide Cable Industry
GST Guide Cable Industry
 
E tutorial -
E tutorial - E tutorial -
E tutorial -
 
TDS_RRSK_Feb23.pptx
TDS_RRSK_Feb23.pptxTDS_RRSK_Feb23.pptx
TDS_RRSK_Feb23.pptx
 
Payment lifecycle of Paytm Mall Shop
Payment lifecycle of Paytm Mall ShopPayment lifecycle of Paytm Mall Shop
Payment lifecycle of Paytm Mall Shop
 
Gst understanding
Gst understandingGst understanding
Gst understanding
 
Vat
VatVat
Vat
 
Final return on_gst
Final return on_gstFinal return on_gst
Final return on_gst
 
Gst gstr-123 forms
Gst gstr-123 formsGst gstr-123 forms
Gst gstr-123 forms
 

More from PSPCL

CHANGES IN ITR FORMS AY 2018-19
CHANGES IN ITR FORMS AY 2018-19CHANGES IN ITR FORMS AY 2018-19
CHANGES IN ITR FORMS AY 2018-19
PSPCL
 
Benami property transaction act
Benami property transaction actBenami property transaction act
Benami property transaction act
PSPCL
 
3b
3b3b
3b
PSPCL
 
GOODS AND SERVICES TAX – AN OVERVIEW
GOODS AND SERVICES TAX – AN OVERVIEWGOODS AND SERVICES TAX – AN OVERVIEW
GOODS AND SERVICES TAX – AN OVERVIEW
PSPCL
 
1 news0107042017
1 news01070420171 news0107042017
1 news0107042017
PSPCL
 
Presentation gst-bill-2017
Presentation gst-bill-2017Presentation gst-bill-2017
Presentation gst-bill-2017
PSPCL
 
Cbec gst-migration-help
Cbec gst-migration-helpCbec gst-migration-help
Cbec gst-migration-help
PSPCL
 
incentive for digital payment
incentive for digital paymentincentive for digital payment
incentive for digital payment
PSPCL
 
Gst impact study-icai
Gst impact study-icaiGst impact study-icai
Gst impact study-icai
PSPCL
 
Presentation on igst model
Presentation on igst modelPresentation on igst model
Presentation on igst model
PSPCL
 
Tds rate
Tds rateTds rate
Tds rate
PSPCL
 
Power sector reforms
Power sector reformsPower sector reforms
Power sector reforms
PSPCL
 
19 09 15_form26_a (1)
19 09 15_form26_a (1)19 09 15_form26_a (1)
19 09 15_form26_a (1)
PSPCL
 
02 09 15_tax_audit_clausewise
02 09 15_tax_audit_clausewise02 09 15_tax_audit_clausewise
02 09 15_tax_audit_clausewise
PSPCL
 
Black money
Black money Black money
Black money
PSPCL
 
05 08 15_ecommerce
05 08 15_ecommerce05 08 15_ecommerce
05 08 15_ecommerce
PSPCL
 
Practical tips on survey
Practical tips on survey  Practical tips on survey
Practical tips on survey
PSPCL
 
Eso ps companies-act_2013
Eso ps companies-act_2013Eso ps companies-act_2013
Eso ps companies-act_2013PSPCL
 
Sumit grover
Sumit groverSumit grover
Sumit groverPSPCL
 
Sec 56 others ources
Sec 56 others ources Sec 56 others ources
Sec 56 others ources PSPCL
 

More from PSPCL (20)

CHANGES IN ITR FORMS AY 2018-19
CHANGES IN ITR FORMS AY 2018-19CHANGES IN ITR FORMS AY 2018-19
CHANGES IN ITR FORMS AY 2018-19
 
Benami property transaction act
Benami property transaction actBenami property transaction act
Benami property transaction act
 
3b
3b3b
3b
 
GOODS AND SERVICES TAX – AN OVERVIEW
GOODS AND SERVICES TAX – AN OVERVIEWGOODS AND SERVICES TAX – AN OVERVIEW
GOODS AND SERVICES TAX – AN OVERVIEW
 
1 news0107042017
1 news01070420171 news0107042017
1 news0107042017
 
Presentation gst-bill-2017
Presentation gst-bill-2017Presentation gst-bill-2017
Presentation gst-bill-2017
 
Cbec gst-migration-help
Cbec gst-migration-helpCbec gst-migration-help
Cbec gst-migration-help
 
incentive for digital payment
incentive for digital paymentincentive for digital payment
incentive for digital payment
 
Gst impact study-icai
Gst impact study-icaiGst impact study-icai
Gst impact study-icai
 
Presentation on igst model
Presentation on igst modelPresentation on igst model
Presentation on igst model
 
Tds rate
Tds rateTds rate
Tds rate
 
Power sector reforms
Power sector reformsPower sector reforms
Power sector reforms
 
19 09 15_form26_a (1)
19 09 15_form26_a (1)19 09 15_form26_a (1)
19 09 15_form26_a (1)
 
02 09 15_tax_audit_clausewise
02 09 15_tax_audit_clausewise02 09 15_tax_audit_clausewise
02 09 15_tax_audit_clausewise
 
Black money
Black money Black money
Black money
 
05 08 15_ecommerce
05 08 15_ecommerce05 08 15_ecommerce
05 08 15_ecommerce
 
Practical tips on survey
Practical tips on survey  Practical tips on survey
Practical tips on survey
 
Eso ps companies-act_2013
Eso ps companies-act_2013Eso ps companies-act_2013
Eso ps companies-act_2013
 
Sumit grover
Sumit groverSumit grover
Sumit grover
 
Sec 56 others ources
Sec 56 others ources Sec 56 others ources
Sec 56 others ources
 

Recently uploaded

Putting the SPARK into Virtual Training.pptx
Putting the SPARK into Virtual Training.pptxPutting the SPARK into Virtual Training.pptx
Putting the SPARK into Virtual Training.pptx
Cynthia Clay
 
Exploring Patterns of Connection with Social Dreaming
Exploring Patterns of Connection with Social DreamingExploring Patterns of Connection with Social Dreaming
Exploring Patterns of Connection with Social Dreaming
Nicola Wreford-Howard
 
Filing Your Delaware Franchise Tax A Detailed Guide
Filing Your Delaware Franchise Tax A Detailed GuideFiling Your Delaware Franchise Tax A Detailed Guide
Filing Your Delaware Franchise Tax A Detailed Guide
YourLegal Accounting
 
Search Disrupted Google’s Leaked Documents Rock the SEO World.pdf
Search Disrupted Google’s Leaked Documents Rock the SEO World.pdfSearch Disrupted Google’s Leaked Documents Rock the SEO World.pdf
Search Disrupted Google’s Leaked Documents Rock the SEO World.pdf
Arihant Webtech Pvt. Ltd
 
Role of Remote Sensing and Monitoring in Mining
Role of Remote Sensing and Monitoring in MiningRole of Remote Sensing and Monitoring in Mining
Role of Remote Sensing and Monitoring in Mining
Naaraayani Minerals Pvt.Ltd
 
BeMetals Presentation_May_22_2024 .pdf
BeMetals Presentation_May_22_2024   .pdfBeMetals Presentation_May_22_2024   .pdf
BeMetals Presentation_May_22_2024 .pdf
DerekIwanaka1
 
一比一原版加拿大渥太华大学毕业证(uottawa毕业证书)如何办理
一比一原版加拿大渥太华大学毕业证(uottawa毕业证书)如何办理一比一原版加拿大渥太华大学毕业证(uottawa毕业证书)如何办理
一比一原版加拿大渥太华大学毕业证(uottawa毕业证书)如何办理
taqyed
 
3.0 Project 2_ Developing My Brand Identity Kit.pptx
3.0 Project 2_ Developing My Brand Identity Kit.pptx3.0 Project 2_ Developing My Brand Identity Kit.pptx
3.0 Project 2_ Developing My Brand Identity Kit.pptx
tanyjahb
 
falcon-invoice-discounting-a-premier-platform-for-investors-in-india
falcon-invoice-discounting-a-premier-platform-for-investors-in-indiafalcon-invoice-discounting-a-premier-platform-for-investors-in-india
falcon-invoice-discounting-a-premier-platform-for-investors-in-india
Falcon Invoice Discounting
 
Enterprise Excellence is Inclusive Excellence.pdf
Enterprise Excellence is Inclusive Excellence.pdfEnterprise Excellence is Inclusive Excellence.pdf
Enterprise Excellence is Inclusive Excellence.pdf
KaiNexus
 
The-McKinsey-7S-Framework. strategic management
The-McKinsey-7S-Framework. strategic managementThe-McKinsey-7S-Framework. strategic management
The-McKinsey-7S-Framework. strategic management
Bojamma2
 
5 Things You Need To Know Before Hiring a Videographer
5 Things You Need To Know Before Hiring a Videographer5 Things You Need To Know Before Hiring a Videographer
5 Things You Need To Know Before Hiring a Videographer
ofm712785
 
Taurus Zodiac Sign_ Personality Traits and Sign Dates.pptx
Taurus Zodiac Sign_ Personality Traits and Sign Dates.pptxTaurus Zodiac Sign_ Personality Traits and Sign Dates.pptx
Taurus Zodiac Sign_ Personality Traits and Sign Dates.pptx
my Pandit
 
Cree_Rey_BrandIdentityKit.PDF_PersonalBd
Cree_Rey_BrandIdentityKit.PDF_PersonalBdCree_Rey_BrandIdentityKit.PDF_PersonalBd
Cree_Rey_BrandIdentityKit.PDF_PersonalBd
creerey
 
Lookback Analysis
Lookback AnalysisLookback Analysis
Lookback Analysis
Safe PaaS
 
Pitch Deck Teardown: RAW Dating App's $3M Angel deck
Pitch Deck Teardown: RAW Dating App's $3M Angel deckPitch Deck Teardown: RAW Dating App's $3M Angel deck
Pitch Deck Teardown: RAW Dating App's $3M Angel deck
HajeJanKamps
 
chapter 10 - excise tax of transfer and business taxation
chapter 10 - excise tax of transfer and business taxationchapter 10 - excise tax of transfer and business taxation
chapter 10 - excise tax of transfer and business taxation
AUDIJEAngelo
 
Skye Residences | Extended Stay Residences Near Toronto Airport
Skye Residences | Extended Stay Residences Near Toronto AirportSkye Residences | Extended Stay Residences Near Toronto Airport
Skye Residences | Extended Stay Residences Near Toronto Airport
marketingjdass
 
Introduction to Amazon company 111111111111
Introduction to Amazon company 111111111111Introduction to Amazon company 111111111111
Introduction to Amazon company 111111111111
zoyaansari11365
 
Memorandum Of Association Constitution of Company.ppt
Memorandum Of Association Constitution of Company.pptMemorandum Of Association Constitution of Company.ppt
Memorandum Of Association Constitution of Company.ppt
seri bangash
 

Recently uploaded (20)

Putting the SPARK into Virtual Training.pptx
Putting the SPARK into Virtual Training.pptxPutting the SPARK into Virtual Training.pptx
Putting the SPARK into Virtual Training.pptx
 
Exploring Patterns of Connection with Social Dreaming
Exploring Patterns of Connection with Social DreamingExploring Patterns of Connection with Social Dreaming
Exploring Patterns of Connection with Social Dreaming
 
Filing Your Delaware Franchise Tax A Detailed Guide
Filing Your Delaware Franchise Tax A Detailed GuideFiling Your Delaware Franchise Tax A Detailed Guide
Filing Your Delaware Franchise Tax A Detailed Guide
 
Search Disrupted Google’s Leaked Documents Rock the SEO World.pdf
Search Disrupted Google’s Leaked Documents Rock the SEO World.pdfSearch Disrupted Google’s Leaked Documents Rock the SEO World.pdf
Search Disrupted Google’s Leaked Documents Rock the SEO World.pdf
 
Role of Remote Sensing and Monitoring in Mining
Role of Remote Sensing and Monitoring in MiningRole of Remote Sensing and Monitoring in Mining
Role of Remote Sensing and Monitoring in Mining
 
BeMetals Presentation_May_22_2024 .pdf
BeMetals Presentation_May_22_2024   .pdfBeMetals Presentation_May_22_2024   .pdf
BeMetals Presentation_May_22_2024 .pdf
 
一比一原版加拿大渥太华大学毕业证(uottawa毕业证书)如何办理
一比一原版加拿大渥太华大学毕业证(uottawa毕业证书)如何办理一比一原版加拿大渥太华大学毕业证(uottawa毕业证书)如何办理
一比一原版加拿大渥太华大学毕业证(uottawa毕业证书)如何办理
 
3.0 Project 2_ Developing My Brand Identity Kit.pptx
3.0 Project 2_ Developing My Brand Identity Kit.pptx3.0 Project 2_ Developing My Brand Identity Kit.pptx
3.0 Project 2_ Developing My Brand Identity Kit.pptx
 
falcon-invoice-discounting-a-premier-platform-for-investors-in-india
falcon-invoice-discounting-a-premier-platform-for-investors-in-indiafalcon-invoice-discounting-a-premier-platform-for-investors-in-india
falcon-invoice-discounting-a-premier-platform-for-investors-in-india
 
Enterprise Excellence is Inclusive Excellence.pdf
Enterprise Excellence is Inclusive Excellence.pdfEnterprise Excellence is Inclusive Excellence.pdf
Enterprise Excellence is Inclusive Excellence.pdf
 
The-McKinsey-7S-Framework. strategic management
The-McKinsey-7S-Framework. strategic managementThe-McKinsey-7S-Framework. strategic management
The-McKinsey-7S-Framework. strategic management
 
5 Things You Need To Know Before Hiring a Videographer
5 Things You Need To Know Before Hiring a Videographer5 Things You Need To Know Before Hiring a Videographer
5 Things You Need To Know Before Hiring a Videographer
 
Taurus Zodiac Sign_ Personality Traits and Sign Dates.pptx
Taurus Zodiac Sign_ Personality Traits and Sign Dates.pptxTaurus Zodiac Sign_ Personality Traits and Sign Dates.pptx
Taurus Zodiac Sign_ Personality Traits and Sign Dates.pptx
 
Cree_Rey_BrandIdentityKit.PDF_PersonalBd
Cree_Rey_BrandIdentityKit.PDF_PersonalBdCree_Rey_BrandIdentityKit.PDF_PersonalBd
Cree_Rey_BrandIdentityKit.PDF_PersonalBd
 
Lookback Analysis
Lookback AnalysisLookback Analysis
Lookback Analysis
 
Pitch Deck Teardown: RAW Dating App's $3M Angel deck
Pitch Deck Teardown: RAW Dating App's $3M Angel deckPitch Deck Teardown: RAW Dating App's $3M Angel deck
Pitch Deck Teardown: RAW Dating App's $3M Angel deck
 
chapter 10 - excise tax of transfer and business taxation
chapter 10 - excise tax of transfer and business taxationchapter 10 - excise tax of transfer and business taxation
chapter 10 - excise tax of transfer and business taxation
 
Skye Residences | Extended Stay Residences Near Toronto Airport
Skye Residences | Extended Stay Residences Near Toronto AirportSkye Residences | Extended Stay Residences Near Toronto Airport
Skye Residences | Extended Stay Residences Near Toronto Airport
 
Introduction to Amazon company 111111111111
Introduction to Amazon company 111111111111Introduction to Amazon company 111111111111
Introduction to Amazon company 111111111111
 
Memorandum Of Association Constitution of Company.ppt
Memorandum Of Association Constitution of Company.pptMemorandum Of Association Constitution of Company.ppt
Memorandum Of Association Constitution of Company.ppt
 

Goods and services tax

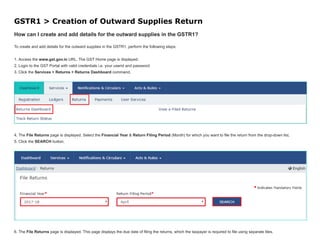
  • 1. GSTR1 > Creation of Outward Supplies Return How can I create and add details for the outward supplies in the GSTR1? To create and add details for the outward supplies in the GSTR1, perform the following steps: 1. Access the www.gst.gov.in URL. The GST Home page is displayed. 2. Login to the GST Portal with valid credentials i.e. your userid and password 3. Click the Services > Returns > Returns Dashboard command. 4. The File Returns page is displayed. Select the Financial Year & Return Filing Period (Month) for which you want to file the return from the drop-down list. 5. Click the SEARCH button. 6. The File Returns page is displayed. This page displays the due date of filing the returns, which the taxpayer is required to file using separate tiles.
  • 2. In the GSTR1 tile, click the PREPARE ONLINE button if you want to prepare the return by making entries on the GST Portal. Note: • The due date for filing GSTR1 is 10th of every month. • You can click the PREPARE OFFLINE button to upload the JSON ( Java Script Object Notation) file containing invoice details and other GSTR 1 details in the GSTN specified format prepared through the GSTN provided offline tools or any other software. 7. The GSTR-1 – Details of outward supplies of goods or services page is displayed. In first month, Turnover of ‘Aggregate Turnover - April to June, 2017’ will be there for Taxpayer to fill along with ‘Aggregate Turnover in the preceding financial year’ and then click on the SAVE button. This field is mandatory. You can proceed to furnish other details only after furnishing this information. From the next month, ‘Aggregate Turnover in the preceding financial year’ will be auto-populated based on previous tax period return
  • 3. There will be no. of tiles representing Tables to enter relevant details. Click on the tile names to know and enter related details: GSTR1 – Invoice Details • 4A, 4B, 4C, 6B, 6C - B2B Invoices: To add an invoice for taxable outwards supplies to a registered person, perform the following steps • 5A, 5B - B2C (Large) Invoices: To add an invoice for taxable outwards supplies to a consumer, where place of supply is other than the State where supplier is located (Inter-state supplies) and invoice value is more than Rs. 2.5 lakh • 9B - Credit / Debit Notes (Registered): To add details of credit or debit notes issued to the registered recipients • 9B - Credit / Debit Notes (UnRegistered): To add details of credit , debit notes or refund voucher issued to the unregistered recipients • 6A - Exports Invoices: To add an invoice for supplies exported GSTR1 – Other Details • 7- B2C Others: To add consolidated details of taxable outwards supplies to a customer where invoice value is less than Rs. 2.5 lakh and all intra state supplies to unregistered customers • 8A, 8B, 8C, 8D - Nil Rated Supplies: Nil Rated Supplies: To add consolidated details of nil rated, exempted and Non-GST Outward supplies • 11A(1), 11A(2) - Tax Liability (Advances Received): Tax Liability (Advances Received): To add details of transactions attracting tax liability arising on account of Time of Supply (like receipt of advances) • 11B(1), 11B(2) - Adjustment of Advances: To add the advance amount received in earlier tax period and adjusted against the supplies being shown in this tax period • 12 - HSN / SAC summary of outward supplies:To furnish the summarized details of all outward supplies HSN and rate wise along with quantitative details. • 13 - Documents Issued:To add the details of documents issued during the tax period 4A, 4B, 4C, 6B, 6C - B2B Invoices:
  • 4. To add an invoice for taxable outwards supplies to a registered person, perform the following steps: 1. Click the 4A, 4B, 4C, 6B, 6C - B2B Invoices tile to enter the invoice details for B2B transactions (goods/ services sold to a registered taxpayer). 2. The B2B Invoices – Receiver-Wise-Summary page is displayed. Click the ADD INVOICE button to add a new invoice for any receiver. 3. The B2B – Add Invoice page is displayed. In the Receiver GSTIN/UIN field, enter the GSTIN or UIN of the receiver. 4. Select the checkbox for Deemed Exports or SEZ Supplies with payment or SEZ supplies without payment as applicable. 5. In the Invoice No., Invoice Date and Total Invoice Value fields, enter the Invoice number, date of the invoice and value of the total invoice. Note: • The GSTIN should be registered on the date of invoice
  • 5. • Once the GSTIN of the receiver is entered, Receiver Name, POS and Supply Type fields are auto-populated based on the GSTIN of the receiver. • The auto-populated POS is editable. Depending on selected POS, the supply type gets auto-populated. • The screen will expand downwards and more fields will appear to enter line item details of the invoice. • In case of UN Bodies, Embassies, Government Offices or Other Notified persons, you need to provide Unique Identification Number (UIN) of the receiver. • An invoice number should be alphanumeric with allowable special characters and unique for a given Financial Year (FY). • Invoice date cannot be a future date or a date prior to the date of registering with GST. 6. If the supply is made through an e-commerce company, select the checkbox for Supplies through E-Commerce and in the GSTIN of the e-commerce operator field, enter the GSTIN of the e-commerce company. Note: Fill this field only when the supply is made through an e-commerce company. 7. Select the Supply attract Reverse Charge checkbox, in case supply made to the taxpayer is covered under the reverse charge mechanism. In case of Intra-State transaction: In case the POS (place of supply) of the goods/ services is the same state as that of the supplier, the transaction is an Intra-State transaction. Notice, fields for Central Tax and State/UT Tax will appear. a) In the Taxable Value field against the rates, enter the taxable value of the goods or services. b) In the Cess field, enter the cess amount. Note: The Amount of Tax fields are auto-populated based on the values entered in Taxable Value fields respectively. However, the taxpayer can edit the tax amount. In case of Inter-State transaction: In case the Place of Supply (POS) is different from the state of the supplier transaction becomes an Inter-State transaction. Notice, fields for Integrated Tax will appear. a) In the Taxable Value field against the rates, enter the taxable value of the goods or services. b) In the Cess field, enter the cess amount. Note: The Amount of Tax fields are auto-populated based on the values entered in Taxable Value fields respectively. However, the taxpayer can edit the tax amount. The CESS field is not auto populated and has to be entered by the taxpayer 8. Click the SAVE button to save the invoice details.
  • 6.
  • 7. 9. You will be directed to the previous page and a message is displayed that Request accepted successfully. Note: The status of the added invoice is Processed. Here, you can also edit/delete the added invoices (under Actions). Note: B2B invoices uploaded in GSTR1 as a supplier will reflect in the B2B Invoices of the receiver in GSTR-2A/GSTR 2 in near real time. However, no action can be taken by receiver unless the Supplier files GSTR 1. Uploaded by Taxpayer: The "Uploaded by Taxpayer" tab shows all the invoices that you have uploaded for a given tax period. Uploaded by Receiver: The "Uploaded by Receiver" tab displays the invoices that you missed from your GSTR-1, but were uploaded by the Receiver Taxpayer for taking appropriate actions. Modified by Receiver: If the receiver Taxpayer has modified any invoice that you uploaded in your GSTR-1, it will show-up under the "Modified by Receiver" tab for taking appropriate actions. Rejected by Receiver: The "Rejected by Receiver" tab displays invoices from your GSTR-1 that were rejected by the receiver Taxpayer for taking appropriate actions. 10. Click the BACK button to go back to the Invoices - Receiver-Wise-Summary page.
  • 8. 11. Here, you can view receiver wise summary of invoices. A tax payer can add invoice of the particular receiver by clicking on the particular reciever and then clicking on the add invoice button at the bottom of the page. Click the BACK button to go back to the GSTR-1 page.
  • 9. You will be directed to the GSTR-1 landing page and the B2B Invoices tile in GSTR1 will reflect the number of invoices added along with Total Invoice value, Total taxable value and total tax liability. 5A, 5B - B2C (Large) Invoices: To add an invoice for taxable outwards supplies to a consumer, where place of supply is other than the State where supplier is located (Inter-state supplies) and invoice value is more than Rs. 2.5 lakh, perform the following steps: 1. Click the 5A, 5B - B2C (Large) Invoices tile to enter the invoice details for inter-state taxable outward supplies made to a consumer of value greater than 2.5 lacs.
  • 10. 2. The B2C (Large) Invoices – Summary page is displayed. Click the ADD INVOICE button to add a new invoice. 3. The B2C (Large) Invoices – Details page is displayed. In the POS field, select the place of supply (state code) where the supplies were delivered. 4. In the Invoice No. field, enter the Invoice number issued to the consumer of that POS. Note: An invoice number should be alphanumeric with allowable special characters and unique for a given Financial Year (FY). 5. In the Invoice Date field, enter the date on which the invoice was generated. 6. In the Total Invoice Value field, enter the total amount for which the goods or services are supplied. 7. If the supply is made through an e-commerce company, select the checkbox for Supplies through E-Commerce and in the GSTIN of the e-commerce operator field, enter the GSTIN of the e-commerce company.
  • 11. Note: Fill this field only when the supply is made through an e-commerce company. 8. In the Taxable Value field against the rates, enter the taxable value of the goods or services. 9. In the Cess field, enter the cess amount. Note: The Amount of Tax fields are auto-populated based on the values entered in Taxable Value fields respectively. However, the taxpayer can edit the tax amount. The CESS field is not auto populated and has to be entered by the taxpayer. 10. Click the SAVE button to save the invoice details.
  • 12. 11. You will be directed to the previous page and a message is displayed that Request accepted successfully. Note: The status of the added invoice is processed. Here, you can also edit/delete the added invoices (under Actions). 12. Click the BACK button to go back to the GSTR-1 page.
  • 13. You will be directed to the GSTR-1 landing page and the B2C (large) Invoices tile in GSTR1 will reflect the number of invoices added along with Total tax liability. 9B - Credit / Debit Notes (Registered): To add details of credit or debit notes for the registered user, perform the following steps: 1. Click the 9B - Credit / Debit Notes (Registered)/refund voucher tile to enter the details of credit or debit notes issued to the registered recipients or details of refund voucher against advance received.
  • 14. 2. The Credit/Debit Notes (Registered)- Summary page is displayed. Click the ADD DETAILS button to add credit or debit note details. 3. The Credit / Debit Notes (Registered) – Add Note page is displayed. In the Receiver GSTIN/UIN field, enter the GSTIN of the receiver (registered taxpayer) to whom supply is made. Note: The Receiver Name field is auto-populated, when the user enters the GSTIN of the Receiver. 4. In the Debit/Credit Note No. field, enter the debit or credit note number or refund voucher number Note: A Debit or Credit Note number should be unique for a given Financial Year (FY). 5. In the Debit/Credit Note Date field, enter the date on which the debit or credit Note was issued. Note: The date should be before the end date of the tax period. Debit / credit note date cannot be earlier than original invoice date. 6. In the Original Invoice Number field, enter the invoice number of the earlier filed invoice (original invoice) on which the Debit or Credit Note is being issued or the number of advance receipt against which the refund voucher is issued. 7. In the Original Invoice Date field, enter the original invoice date. 8. From the Note Type drop-down list, select whether the details added are for a Debit or Credit Note or refund voucher 9. In the Note Value field, enter the value of the note or refund voucher. 10. From the Supply Type drop-down list, select whether the note or voucher is added for an invoice of Inter-state or Intra-state transaction. 11. From the Reason for Issuing Note drop-down list, select the reason on account of which the debit or credit note is issued. In case of Intra-State transaction: In case the POS (place of supply) of the goods/ services is the same state as that of the supplier, the transaction is an Intra-State transaction. Notice, fields for Central Tax and State/UT Tax appear. a) In the Taxable Value field against the rates, enter the taxable value of the goods or services.
  • 15. b) In the Cess field, enter the cess amount. Note: The Amount of Tax fields are auto-populated based on the values entered in Taxable Value fields respectively. However, the taxpayer can edit the tax amount. The CESS field is not auto populated and has to be entered by the taxpayer. In case of Inter-State transaction: In case Place of Supply (POS) is different from the state of the supplier, transaction becomes an Inter-State transaction. Notice, fields for Integrated Tax appear. a) a) In the Taxable Value field against the rates, enter the taxable value of the goods or services. b) In the Cess field, enter the cess amount. Note: The Amount of Tax fields are auto-populated based on the values entered in Taxable Value fields respectively. However, the taxpayer can edit the tax amount. The CESS field is not auto populated and has to be entered by the taxpayer. 12 Click the SAVE button to save the details.
  • 16. 13. You will be directed to the previous page and a message is displayed that Request accepted successfully. Note: The status of the added invoice is Processed. Here, you can also edit/delete the added invoices (under Actions). Uploaded by Taxpayer: The "Uploaded by Taxpayer" tab shows all the debit/credit note/refund vouchers that you have uploaded for a given tax period. Uploaded by Receiver: The "Uploaded by Receiver" tab displays the debit/credit note/refund vouchers that you missed from your GSTR-1, but were detected and uploaded by the Receiver Taxpayer for taking action. Modified by Receiver: If the receiver Taxpayer has modified any debit/credit note/refund vouchers that you uploaded in your GSTR-1, it will show-up under the "Modified by Receiver" tab for taking action. Rejected by Receiver: The "Rejected by Receiver" tab displays debit/credit note/refund vouchers from your GSTR-1 that were rejected by the receiver Taxpayer. 14. Click the BACK button.
  • 17. 15. You will be directed to the GSTR-1 landing page and the 9B- Credit/ Debit Notes (Registered) tile in GSTR1 will reflect the number of credit/debit notes/refund vouchers added.
  • 18. 9B - Credit / Debit Notes (UnRegistered): To add details of credit or debit notes or refund vouchers issued to unregistered persons, perform the following steps: 1. Click the 9B - Credit / Debit Notes (Unregistered) tile to enter the details of credit or debit notes issued to the unregistered recipients. 2. The Credit/Debit Notes (Unregistered) - Summary page is displayed. Click the ADD DETAILS button to add credit or debit note or refund voucher details.
  • 19. 3. The Credit / Debit Notes (Unregistered) – Add Note page is displayed. From the Type drop-down list, select the appropriate choice like B2CL, export without payment etc. 4. In the Debit/Credit Note No. field, enter the debit or credit note number. Note: A Debit or Credit Note number should be unique for a given Financial Year (FY). 5. In the Debit/Credit Note Date field, enter the date on which the debit or credit Note was issued. Note: The date should be before the end date of the tax period. Debit / credit note date cannot be earlier than original invoice date. 6. In the Original Invoice Number field, enter the invoice number of the earlier filed invoice (original invoice) on which the Debit or Credit Note is being issued. 7. In the Original Invoice Date field, enter the original invoice date. 8. From the Note Type drop-down list, select whether the details are added for a Debit or Credit Note or refund voucher. 9. In the Note Value field, enter the value of the note or refund voucher 10. From the Reason for Issuing Note drop-down list, select the reason on account of which the debit or credit note is issued. In case the POS (place of supply) of the goods/ services is the same state as that of the supplier, the transaction is an Intra-State transaction. Notice, fields for Central Tax and State/UT Tax appear. a) In the Taxable Value field against the rates, enter the taxable value of the goods or services. b) In the Cess field, enter the cess amount. Note: The Amount of Tax fields are auto-populated based on the values entered in Taxable Value fields respectively. However, the taxpayer can edit the tax amount. The CESS field is not auto populated and purely user input.
  • 20. In case of Inter-State transaction: In case the POS(place of supply) is in a different state as that of the supplier, transaction becomes an Inter-State transaction. Notice, fields for Integrated Tax appear. a) In the Taxable Value field against the rates, enter the taxable value of the goods or services. b) In the Cess field, enter the cess amount. Note: The Amount of Tax fields are auto-populated based on the values entered in Taxable Value fields respectively. However, the taxpayer can edit the tax amount. The CESS field is not auto populated and has to be entered. 11. Click the SAVE button to save the details.
  • 21. 12. Click the BACK button to go back to the GSTR-1 page. 13. You will be directed to the GSTR-1 landing page and the 9B- Credit/ Debit Notes (Unregistered) tile in GSTR1 will reflect the number of credit/debit notes/ refund vouchers added. 6A - Exports Invoices: To add an invoice for supplies exported, perform the following steps: 1. Click the 6A- Export Invoices tile to enter the invoice details for supplies exported.
  • 22. 2. The Exports – Invoices Summary page is displayed. Click the ADD INVOICE to add a new invoice. 3. The Exports – Add Details page is displayed. In the Invoice No. field, enter the Invoice number issued against exports sales. 4. In the Invoice Date field, enter the date on which the invoice was generated. 5. In the Port Code field, enter the port code. 6. In the Shipping Bill No. / Bill of Export No. field, enter the unique number of the shipping bill with location code generated while shipping. 7. In the Shipping Bill Date/ Bill of Export Date field, enter the date on which the shipping bill was issued. 8. In the Total Invoice Value field, enter the total amount of all the goods or services supplied.
  • 23. 9. From the GST Payment drop-down list, select whether the GST is paid against the invoice or not. 10. In the Taxable Value field against the rates, enter the taxable value of the goods or services. Note: The Amount of Tax fields are auto-populated based on the values entered in Taxable Value fields respectively. However, the taxpayer can edit the tax amount. 11. Click the SAVE button to save the details.
  • 24. 12. You will be directed to the previous page and a message is displayed that Request accepted successfully. Note: The status of the added invoice is Processed. Here, you can also edit/delete the added invoices (under Actions). 13. Click the BACK button.
  • 25. 14. You will be directed to the GSTR-1 landing page and the Export Invoices tile in GSTR1 will reflect the number of such invoices added along with Total tax liability. 7- B2C Others: To add details of taxable outwards supplies to a customer where invoice value is less than Rs. 2.5 lakh and intra-state supplies to customers, perform the following steps: 1. Click the B2C (Others) tile to enter the details for B2C transactions.
  • 26. 2. The B2C (Others) Details – Summary page is displayed. Select E-commerce tab to add a line item for a transaction through E-commerce or else select Other than E-commerce tab in case transaction is through non E-commerce.
  • 27. 3. Click the ADD DETAILS button to add the line item details. 4. In the POS field, select the Place of Supply (State Code) where the supplies were delivered. Based on the state selected in POS, Supply Type field is auto- populated. 5. In the Taxable Value field, enter the collated amount of all the unique goods or services supplied. 6. In the Rate field, enter the applicable Rate. 7. In the GSTIN of the e-commerce operator field, enter the GSTIN of the e-commerce operator. Note: This field will appear when you select the E-commerce tab.
  • 28. In case of Intra-State transaction: Notice, fields for Central Tax, State/UT Tax & CESS will appear in the screen. Note: The Central Tax, State/UT Tax fields are auto-populated based on the value entered in Rate field. However, these can be edited. The CESS field is not auto populated and has to be entered by the taxpayer.
  • 29. In case of Inter-State transaction: Notice, fields for Integrated Tax & CESS will appear in the screen. Note: The Integrated Tax field is auto-populated based on the value entered in Rate field. However, these can be edited. The CESS field is not auto populated and has to be entered.
  • 30. 8. Click the SAVE button to save the details added.
  • 31. 9. Click the BACK button to go back to the GSTR-1 page.
  • 32. You will be directed to the GSTR-1 landing page and the B2C (Others) tile in GSTR1 will reflect the number of invoices added.
  • 33. 8A, 8B, 8C, 8D - Nil Rated Supplies: To add an invoice for Nil Rated Supplies, Exempted and Non-GST Outward supplies, perform the following steps: 1. Click the Nil Rated Supplies tile to enter the details for Nil rated supplies.
  • 34. 2. The Nil Rated Supplies page is displayed with section for Click the EDIT button at the bottom of the page to enable the fields displayed on the page.
  • 35. 3. Enter the data in Nil Rated Supplies, Exempted (Other than Nil rated/non-GST supply), and Non-GST Supplies Amount fields for the following categories of transactions: a. Inter-state supplies to registered person b. Inter-state supplies to unregistered person c. Intra-state supplies to registered person d. Intra-state supplies to unregistered person
  • 36. 4. Click the SAVE button to save the details. A success message is displayed on the top of the page.
  • 37. 5. Click the BACK button to go back to the GSTR-1 page. You will be directed to the GSTR-1 landing page and the Nil Rated Supplies tile in GSTR1 will reflect the updated invoice value.
  • 38. You will be directed to the GSTR-1 landing page and the Nil Rated Supplies tile in GSTR1 will reflect the updated invoice value.
  • 39. 11A(1), 11A(2) - Tax Liability (Advances Received): To add details of Tax Liability (Advances Received) arising on account of Time of Supply without issuance of Invoice in the same period, perform the following steps: 1. Click the Tax Liability (Advance Received) tiles to enter the tax liability details
  • 40. 2. The Tax Liability (Advance Payment) – Summary page is displayed. Click the ADD DETAILS button to add the advance tax receipt and related liability details.
  • 41. 3. In the POS field, select the State code of the place of supply applicable for the advances received. . Note: Based on the state code selected, Supply Type column would be auto-populated as Inter-state or Intra-state. In case of Intra-State transaction: Notice, fields for Central Tax, State/UT Tax & CESS will appear in the screen. a) In the Gross Advance Received field, enter the amount paid by the receiver to the supplier for the goods/service provided by the supplier without issuing of any invoice for the goods/services against the applicable Rate (%). b) In the Central Tax, State/UT Tax field, system will auto-populate the Central Tax and State/UT Tax amount. The same will be editable. c) In the CESS field, enter the CESS amount
  • 42. In case of Inter-State transaction: Notice, fields for Integrated Tax & CESS will appear in the screen. a) In the Gross Advance Received field, enter the amount paid by the receiver to the supplier for the goods/service provided by the supplier without issuing of any invoice for the goods/services against the applicable Rate (%). b) In the Integrated Tax field, system will auto-populate the Integrated Tax amount. This will be an editable field. .
  • 43. c) In the CESS field, enter the CESS amount. 7. Click the SAVE button.
  • 44. 8. The line item details are added in a tabular format. Notice the line item details. In case, the details are incorrect, you can edit or delete the line item by using the Edit and Delete icons that appear under the Actions column.
  • 45. 9. Click the BACK button to go back to the GSTR-1 page. You will be directed to the GSTR-1 landing page and the Tax Liability (AdvanceRecieved) tile in GSTR1 will reflect the updated total value and no. of entries
  • 46. 11B(1), 11B(2) - Adjustment of Advances To fill details of Adjustment of Advances on invoices issued in the current period, perform the following steps. 1. Click the 11B(1), 11B(2)- Adjustment of Advances tile to enter the details of tax already paid on invoices issued in the current period.
  • 47. 2. The Tax already paid on invoices issued in the current period – Summary page is displayed. Click the ADD DETAILS button to add details for invoices issued in the current period on which tax has already been paid. 3. The Tax already paid on invoices issued in the current period - Add Details page is displayed.
  • 48. In case of Inter-State transaction: Notice, fields for Integrated Tax & CESS will appear in the screen. a) In the Gross Advance adjusted field, enter the amount paid by the receiver to the supplier for the goods/services against the applicable Rate (%) b) In the Integrated Tax field, system will auto-populate the Integrated Tax amount. This will be an editable field. .
  • 49. c) In the CESS field, enter the CESS amount. In case of Intra-State transaction: Notice, fields for Central Tax, State/UT Tax & CESS will appear in the screen.
  • 50. a) In the Gross Advance adjusted field, enter the amount paid by the receiver to the supplier for the goods/services against the applicable Rate (%) b) In the Integrated Tax field, system will auto-populate the Integrated Tax amount. This will be an editable field. . c) In the CESS field, enter the CESS amount. 4. Click the SAVE button to save the details.
  • 51.
  • 52. 5. You can also Edit/Delete the added invoices (under Actions tab). 6. Click the BACK button to go back to the GSTR-1 page.
  • 53. You will be directed to the GSTR-1 landing page and the Adjustment of Advances tile in GSTR1 will reflect the number of Line Items added.
  • 54. 12 - HSN / SAC summary of outward supplies: To furnish the HSN-wise summary of outward supplies and rate wise along with quantitative details, perform the following steps - Note: This field is applicable only if Annual turnover is more than 1.5 cr. 1. Click the HSN-wise summary of outward supplies tile to furnish the summarized details of all outward supplies HSN-wise along with quantitative details.
  • 55. 2. The HSN-wise summary of outward supplies– Summary page is displayed. Click the ADD DETAILS button to add details for invoices issued in the current period on which tax has already been paid.
  • 56. 3. The HSN summary of outward supplies – Add/Edit Details page is displayed. 4. In the HSN field, enter the applicable provision of reporting HSN code of the outward supplied. 5. In the Description field, enter the description. (Either HSN or Description should be mandatorily entered) 6. In the UQC field, select UQC. 7. In the Total Quantity field, enter the quantity. 8. In the Total Value field, enter the Total Value of the outward supply.
  • 57. 9. In the Total Taxable Value field, enter the Total Taxable Value of the outward supply. In case of Intra-State transaction: Notice, fields for Central Tax, State/ UT Tax & CESS will appear in the screen. In the Central TAX, State Tax and CESS Rate field, enter the Central TAX, State Tax and CESS Rate.
  • 58. In case of Inter-State transaction: Notice, fields for Integrated Tax & CESS will appear in the screen. In the Integrated Tax and CESS Rate field, enter the Integrated Tax and CESS rate.
  • 59. 10. Click the ADD button.
  • 60. 11. You will be directed to Added/Edited Line Items to be saved page and a message is displayed that Request accepted successfully.
  • 61. 12. Click the BACK button to go back to the GSTR-1 page.
  • 62. You will be directed to the GSTR-1 landing page and the HSN summary of outward supplies tile in GSTR1 will be updated.
  • 63. 13 - Documents Issued: To Upload the details of Documents issued perform the following steps. 1. Click the Documents Issued tile to add the details for document issued during the current tax period.
  • 64. 2. To update the document for Invoices for outward supply, Click on Add Document:
  • 65. 3. Add the details:
  • 66. Similarly the documents for below categories can be added: Invoices for inward supply from unregistered person
  • 70. Delivery Challan for job work Delivery Challan for supply on approval
  • 71. Delivery Challan in case of liquid gas Delivery Challan in cases other than by way of supply (excluding at S no. 9 to 11) 4. Click On SAVE at the end of the page:
  • 72. 5. Click the BACK button to go back to the GSTR-1 page.
  • 73. You will be directed to the GSTR-1 landing page and the Documents Issued summary of outward supplies tile in GSTR1 will be updated