MCT Brattberg Multi Cable Transit system provides a tested and certified seal that protects human lives and equipment against hazards and harsh environments. MCT Brattberg cable transits and pipe penetration seals are installed in walls and floors to maintain fire and water integrity.
The MCT Brattberg cable transit system is based on a simple idea consisting of two components - a frame and packing blocks. The cable duct or pipe seal is achieved when the packing blocks are pressed together around cables and pipes in a frame.
The heart of the MCT Brattberg cable transit system is "Lycron" rubber material from which the insert blocks are made. It is extremely resistant to fire and pressure changes, the cable transits also withstand smoke, extreme temperature changes, vibration, damaging insects, chemicals and ageing.
MCT Brattberg - SR Cable Transit & Pipe Seals
SR Gland is designed to seal cables and pipes between 4-100 mm diameter and can be supplied cut to allow pre-terminated cable/pipe to be installed. SR Glands are supplied with a centre core providing a seal prior to cable installation. SR cable and pipe seals will provide an effective barrier against fire, water, dust, vermin. When cable is inserted into the SR gland simply tighten the compression bolts equally until the cable/pipe is secure.
MCT Brattberg cable and pipe transits are designed and manufactured to provide maximum benefits.
Cable Transit System Concept
* The cable transit system contains frames, blocks, and insulation collars.
* Long-term reliability of all components.
* Cable and pipe transit system quick to install.
* Design and features of each type of component make them easy to install.
* Product costs are reduced as no special tools are required to install transits.
* Packing guides indicate location of insert blocks and cables within frames.
* Transit design planning software is available for engineers/designers.
Cable Transit Frames:
* Transit frames suit ship bulkheads and decks.
* Each corner is multiple-welded to satisfy the destruction test.
* Robotic welding is used to maintain consistent high-quality welds.
* Tight dimensional tolerances maintain functionality of insert blocks.
* The inner surfaces are smooth and free from residual weld spatter.
This free wire tutorial is by Judy Larson. It was published originally on www.beadinggem.com. Check out the site for more free tutorials, featured designers, inspirations and so much more.
This tutorial was written by Judy Larson who donated the original piece to help a small boy battling cancer. If you download this tutorial, please consider donating to help Knox. It it is after the time frame for this cause., please donate something ( jewelry design, time, money) in aid of others in need of help. Some suggestions include helping children's hospitals, supporting cancer research.
For other Judy Larson tutorials, please see www.beadinggem.com
This is a design tutorial by Judy Larson which first appeared on The Beading Gem's Journal - www.beadinggem.com. Check out the site for free tutorials, featured designers, inspirations and so much more.
Rustic Romance Heart Pendant Wire Jewelry TutorialHouseofGems.com
This whimsical heart shaped pendant is made with two gauges of wire, and a single pink quartz bead. You only need basic wire wrapping skills to complete this lovely project! Kasia used antiqued copper wire to give the swirly necklace a rustic look.
This is an original and free beaded snowflake necklace tutorial by Zsuzsanna Szilagyi. Check out her Etsy store : biZSUterie https://tidd.ly/3gZZL5e
Also check out www.beadinggem.com for all kinds of tutorials, tips and tricks and inspirations!
This is an original and free beaded snowflake necklace tutorial by Zsuzsanna Szilagyi. Check out her Etsy store : biZSUterie https://tidd.ly/3gZZL5e
Also check out www.beadinggem.com for all kinds of tutorials, tips and tricks and inspirations!
This is an original and free beaded snowflake necklace tutorial by Zsuzsanna Szilagyi. Check out her Etsy store : biZSUterie https://tidd.ly/3gZZL5e
Also check out www.beadinggem.com for all kinds of tutorials, tips and tricks and inspirations!
This is a design tutorial by Judy Larson which first appeared on The Beading Gem's Journal - www.beadinggem.com. Check out the site for free tutorials, featured designers, inspirations and so much more.
Honest Reviews of Tim Han LMA Course Program.pptxtimhan337
Personal development courses are widely available today, with each one promising life-changing outcomes. Tim Han’s Life Mastery Achievers (LMA) Course has drawn a lot of interest. In addition to offering my frank assessment of Success Insider’s LMA Course, this piece examines the course’s effects via a variety of Tim Han LMA course reviews and Success Insider comments.
Francesca Gottschalk - How can education support child empowerment.pptxEduSkills OECD
Francesca Gottschalk from the OECD’s Centre for Educational Research and Innovation presents at the Ask an Expert Webinar: How can education support child empowerment?
A Strategic Approach: GenAI in EducationPeter Windle
Artificial Intelligence (AI) technologies such as Generative AI, Image Generators and Large Language Models have had a dramatic impact on teaching, learning and assessment over the past 18 months. The most immediate threat AI posed was to Academic Integrity with Higher Education Institutes (HEIs) focusing their efforts on combating the use of GenAI in assessment. Guidelines were developed for staff and students, policies put in place too. Innovative educators have forged paths in the use of Generative AI for teaching, learning and assessments leading to pockets of transformation springing up across HEIs, often with little or no top-down guidance, support or direction.
This Gasta posits a strategic approach to integrating AI into HEIs to prepare staff, students and the curriculum for an evolving world and workplace. We will highlight the advantages of working with these technologies beyond the realm of teaching, learning and assessment by considering prompt engineering skills, industry impact, curriculum changes, and the need for staff upskilling. In contrast, not engaging strategically with Generative AI poses risks, including falling behind peers, missed opportunities and failing to ensure our graduates remain employable. The rapid evolution of AI technologies necessitates a proactive and strategic approach if we are to remain relevant.
Instructions for Submissions thorugh G- Classroom.pptxJheel Barad
This presentation provides a briefing on how to upload submissions and documents in Google Classroom. It was prepared as part of an orientation for new Sainik School in-service teacher trainees. As a training officer, my goal is to ensure that you are comfortable and proficient with this essential tool for managing assignments and fostering student engagement.
The Roman Empire A Historical Colossus.pdfkaushalkr1407
The Roman Empire, a vast and enduring power, stands as one of history's most remarkable civilizations, leaving an indelible imprint on the world. It emerged from the Roman Republic, transitioning into an imperial powerhouse under the leadership of Augustus Caesar in 27 BCE. This transformation marked the beginning of an era defined by unprecedented territorial expansion, architectural marvels, and profound cultural influence.
The empire's roots lie in the city of Rome, founded, according to legend, by Romulus in 753 BCE. Over centuries, Rome evolved from a small settlement to a formidable republic, characterized by a complex political system with elected officials and checks on power. However, internal strife, class conflicts, and military ambitions paved the way for the end of the Republic. Julius Caesar’s dictatorship and subsequent assassination in 44 BCE created a power vacuum, leading to a civil war. Octavian, later Augustus, emerged victorious, heralding the Roman Empire’s birth.
Under Augustus, the empire experienced the Pax Romana, a 200-year period of relative peace and stability. Augustus reformed the military, established efficient administrative systems, and initiated grand construction projects. The empire's borders expanded, encompassing territories from Britain to Egypt and from Spain to the Euphrates. Roman legions, renowned for their discipline and engineering prowess, secured and maintained these vast territories, building roads, fortifications, and cities that facilitated control and integration.
The Roman Empire’s society was hierarchical, with a rigid class system. At the top were the patricians, wealthy elites who held significant political power. Below them were the plebeians, free citizens with limited political influence, and the vast numbers of slaves who formed the backbone of the economy. The family unit was central, governed by the paterfamilias, the male head who held absolute authority.
Culturally, the Romans were eclectic, absorbing and adapting elements from the civilizations they encountered, particularly the Greeks. Roman art, literature, and philosophy reflected this synthesis, creating a rich cultural tapestry. Latin, the Roman language, became the lingua franca of the Western world, influencing numerous modern languages.
Roman architecture and engineering achievements were monumental. They perfected the arch, vault, and dome, constructing enduring structures like the Colosseum, Pantheon, and aqueducts. These engineering marvels not only showcased Roman ingenuity but also served practical purposes, from public entertainment to water supply.
Biological screening of herbal drugs: Introduction and Need for
Phyto-Pharmacological Screening, New Strategies for evaluating
Natural Products, In vitro evaluation techniques for Antioxidants, Antimicrobial and Anticancer drugs. In vivo evaluation techniques
for Anti-inflammatory, Antiulcer, Anticancer, Wound healing, Antidiabetic, Hepatoprotective, Cardio protective, Diuretics and
Antifertility, Toxicity studies as per OECD guidelines
Operation “Blue Star” is the only event in the history of Independent India where the state went into war with its own people. Even after about 40 years it is not clear if it was culmination of states anger over people of the region, a political game of power or start of dictatorial chapter in the democratic setup.
The people of Punjab felt alienated from main stream due to denial of their just demands during a long democratic struggle since independence. As it happen all over the word, it led to militant struggle with great loss of lives of military, police and civilian personnel. Killing of Indira Gandhi and massacre of innocent Sikhs in Delhi and other India cities was also associated with this movement.
Welcome to TechSoup New Member Orientation and Q&A (May 2024).pdfTechSoup
In this webinar you will learn how your organization can access TechSoup's wide variety of product discount and donation programs. From hardware to software, we'll give you a tour of the tools available to help your nonprofit with productivity, collaboration, financial management, donor tracking, security, and more.
Synthetic Fiber Construction in lab .pptxPavel ( NSTU)
Synthetic fiber production is a fascinating and complex field that blends chemistry, engineering, and environmental science. By understanding these aspects, students can gain a comprehensive view of synthetic fiber production, its impact on society and the environment, and the potential for future innovations. Synthetic fibers play a crucial role in modern society, impacting various aspects of daily life, industry, and the environment. ynthetic fibers are integral to modern life, offering a range of benefits from cost-effectiveness and versatility to innovative applications and performance characteristics. While they pose environmental challenges, ongoing research and development aim to create more sustainable and eco-friendly alternatives. Understanding the importance of synthetic fibers helps in appreciating their role in the economy, industry, and daily life, while also emphasizing the need for sustainable practices and innovation.
2024.06.01 Introducing a competency framework for languag learning materials ...Sandy Millin
http://sandymillin.wordpress.com/iateflwebinar2024
Published classroom materials form the basis of syllabuses, drive teacher professional development, and have a potentially huge influence on learners, teachers and education systems. All teachers also create their own materials, whether a few sentences on a blackboard, a highly-structured fully-realised online course, or anything in between. Despite this, the knowledge and skills needed to create effective language learning materials are rarely part of teacher training, and are mostly learnt by trial and error.
Knowledge and skills frameworks, generally called competency frameworks, for ELT teachers, trainers and managers have existed for a few years now. However, until I created one for my MA dissertation, there wasn’t one drawing together what we need to know and do to be able to effectively produce language learning materials.
This webinar will introduce you to my framework, highlighting the key competencies I identified from my research. It will also show how anybody involved in language teaching (any language, not just English!), teacher training, managing schools or developing language learning materials can benefit from using the framework.
Glass Pebble Cabochon Wire Wrapped Pendant Tutorial
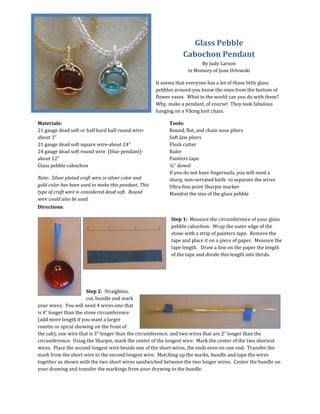
1. Glass Pebble Cabochon Pendant By Judy Larson in Memory of June Orlowski
It seems that everyone has a lot of those little glass pebbles around-you know the ones from the bottom of flower vases. What in the world can you do with them? Why, make a pendant, of course! They look fabulous hanging on a Viking knit chain.
Materials: 21 gauge dead soft or half hard half round wire- about 3” 21 gauge dead soft square wire-about 24” 24 gauge dead soft round wire (blue pendant)- about 12” Glass pebble cabochon
Note: Silver plated craft wire in silver color and gold color has been used to make this pendant. This type of craft wire is considered dead soft. Round wire could also be used.
Tools: Round, flat, and chain nose pliers Soft Jaw pliers Flush cutter Ruler Painters tape ¼” dowel If you do not have fingernails, you will need a sharp, non-serrated knife to separate the wires Ultra fine point Sharpie marker Mandrel the size of the glass pebble
Directions:
Step 1: Measure the circumference of your glass pebble cabochon: Wrap the outer edge of the stone with a strip of painters tape. Remove the tape and place it on a piece of paper. Measure the tape length. Draw a line on the paper the length of the tape and divide this length into thirds.
Step 2: Straighten, cut, bundle and mark your wires: You will need 4 wires-one that is 4” longer than the stone circumference (add more length if you want a larger rosette or spiral showing on the front of the cab); one wire that is 3” longer than the circumference; and two wires that are 2” longer than the circumference. Using the Sharpie, mark the center of the longest wire. Mark the center of the two shortest wires. Place the second longest wire beside one of the short wires, the ends even on one end. Transfer the mark from the short wire to the second longest wire. Matching up the marks, bundle and tape the wires together as shown with the two short wires sandwiched between the two longer wires. Center the bundle on your drawing and transfer the markings from your drawing to the bundle.
2. Step 3: Using your half round wire, make three wraps to show on the two center marked lines. Place the bundle next to your drawing and check to make sure that the wraps are lined up with the marks. The wraps in the photo are NOT lined up with the lines. Close is not good enough-they need to be as exact as possible. Use your fingernail, NOT a tool, to move the wraps if you need to. If you do not have fingernails, you can use the ¼” dowel. Once the wraps are where you want them, you can snug them down tighter with your flat nose pliers.
Step 4: You will be making a 90° bend AWAY from the wrong side of the bundle, TOWARD the outside or right side of the bundle. Place your flat nose pliers on the outer marked line so you can barely see the line. You could even cover the line just a hair. With your fingers, bend the bundle of wires 90° over the top of the pliers.
Step 5: The mandrel you use for bending your wire bundle does not have to be exactly the size of the glass pebble cabochon but it should be close. Center the mandrel between the wraps on the wrong side of the wire bundle and bend the bundle around the mandrel. When you pull the top bent wires close together around the cabochon, they should come close to meeting. This does not have to be perfect, just close.
Step 6: Remove the tape from the bundle ends. Take a close look at the wire bundle. The side that has the two long wires is the back and the side that has one long wire is the front. Use your flat nose pliers to flatten the bend in the front long wire.
3. Step 7: Put the cab into the bezel and pull the top wires together. Pull the front long wire around the top wires two times-two wraps will show on the back. It will look like there are three on the front, even though you only wrapped twice. Cut the wire off on the front side of the bundle. The glass pebble cabochon can be taken out of the bezel after the first full wrap.
Step 8: Put the glass pebble cabochon back in the bezel. At this point, it may seem that it does not fit. You will find that the top back of the cab does not set flush with the bezel wires-that is OK. Use your fingernail to start to pull up the inner bottom wire between the two wraps. You can finish by using the ¼” dowel to push the wire up as shown. Do the same thing to the front side of the cabochon. The glass pebble cabochon is not secured permanently in the bezel at this point so you may need to hold it in place with painters tape for the next few steps.
Step 9: Fan the top wires out slightly: The two long wires go toward the back, one set of two center wires goes to the right side and the other set of two center wires goes to the left side. There is one short wire left in the center front.
4. Step 10: Cut the two sets of side wires to slightly more than 1/8” long. Use your chain nose pliers to curl down the ends. Tuck the wire ends under the bottom of the wraps.
Step 11: At this point, the glass pebble cabochon will be sitting at an angle in the bezel and can not be pushed any further forward at the top. Use your fingernail and/or the ¼” dowel to push the back side wires over the protruding cab. Adjust them until they look even. Be careful not to pull too hard on these wires as they are your back two wires for the bail and they have not as yet been secured.
Step 12: Wrap the center front wire around the two bail wires: The center front wire needs to be wrapped in the OPPOSITE direction that you wrapped the first front wire in Step 7. Wrap two times, ending in the front. Cut off the excess wire and tighten the wire down.
5. Step 13: Finishing
Amber Colored Pendant
A: Twist the two bail wires together. Do not overtwist as you may break the off the bail.
B: At the base of the bail wire, make a slight bend toward the back of the pendant.
C: Using the ¼” dowel, bend the bail wire toward the front of the pendant.
D: Use your round nose pliers to make a small round curl in the end of the twisted wire. Switch to your soft jaw pliers so as to not scratch or mar the wire while finishing making a spiral. Adjust the spiral so it sits nicely on the front of the glass pebble cabochon. Note: If you want a larger spiral rosette on your next pendant, cut the longest wire ½” to 1” longer.
6. Green Colored Pendant
A: Cut 12” of 24 gauge round wire and wrap the two bail wires, making sure they do not twist while wrapping. Wrap until 7/8”-1” of bail wire is left showing. Start and end the wrap in the front of the pendant bail wires. Slightly fan out the two wires at the top. Using a soft jaw pliers so as to not scratch or mar the wire, spiral the bail wire ends toward the outside, as shown, until they meet the wire wrap on the bail wires.
B: Bend the bail wire assembly toward the front of the pendant in the same manner as B and C in the Amber Colored Pendant. Using your fingers, snug down the side bail spirals onto the glass pebble cabochon. The spirals will bend slightly toward the back.
Step 14: Make any adjustments needed to the bezel wires and the bail. Do not overthink this! The pendant probably looks fine and only you can see your mistakes.
Voila! You are done!