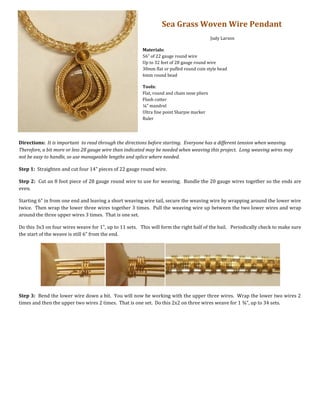
This free wire tutorial is by Judy Larson. It was published originally on www.beadinggem.com. Check out the site for more free tutorials, featured designers, inspirations and so much more.
Imaginative Spring Butterfly Pendant Tutorial HouseofGems.com
Spring is in the air and what better way to bring it in then with bright colors and butterflies. Using oxidized copper and colorful beads, Kasia from Kica Bijoux shows us how to create an enjoyable butterfly pendant.
This is a design tutorial by Judy Larson which first appeared on The Beading Gem's Journal - www.beadinggem.com. Check out the site for free tutorials, featured designers, inspirations and so much more.
This tutorial was written by Judy Larson who donated the original piece to help a small boy battling cancer. If you download this tutorial, please consider donating to help Knox. It it is after the time frame for this cause., please donate something ( jewelry design, time, money) in aid of others in need of help. Some suggestions include helping children's hospitals, supporting cancer research.
For other Judy Larson tutorials, please see www.beadinggem.com
This is a design tutorial by Judy Larson which first appeared on The Beading Gem's Journal - www.beadinggem.com. Check out the site for free tutorials, featured designers, inspirations and so much more.
The oxidized copper wire earrings seen in the photo look incredibly intricate and difficult to make. Luckily, Kasia from Kica Bijoux has given us an easy to follow tutorial that can be used by any level of expertise when it comes to handmade jewelry. All you need are some drop beads, ear wires, copper beads and your own choice of wire!
This is an original and free beaded snowflake necklace tutorial by Zsuzsanna Szilagyi. Check out her Etsy store : biZSUterie https://tidd.ly/3gZZL5e
Also check out www.beadinggem.com for all kinds of tutorials, tips and tricks and inspirations!
Learn how to make this lovely necklace with a few basic jewelry supplies, such as silver chain and crystal beads. It’s fun and easy, and totally ready for customization!
Inspired by the night sky, this romantic copper wire and blue agate ring is so simple to make. Learn this easy wire wrapping technique and you’ll have a shimmering collection of delicate gemstone rings in no time at all!
How to Make Glamorous Grape Earrings DIY Jewelry Making TutorialHouseofGems.com
Learn how to make your own beautiful glamorous grape earrings with this easy to follow step by step DIY. Take your jewelry making to the next level by learning how to make these beautiful earrings.
Rustic Romance Heart Pendant Wire Jewelry TutorialHouseofGems.com
This whimsical heart shaped pendant is made with two gauges of wire, and a single pink quartz bead. You only need basic wire wrapping skills to complete this lovely project! Kasia used antiqued copper wire to give the swirly necklace a rustic look.
2137ad - Characters that live in Merindol and are at the center of main storiesluforfor
Kurgan is a russian expatriate that is secretly in love with Sonia Contado. Henry is a british soldier that took refuge in Merindol Colony in 2137ad. He is the lover of Sonia Contado.
Explore the multifaceted world of Muntadher Saleh, an Iraqi polymath renowned for his expertise in visual art, writing, design, and pharmacy. This SlideShare delves into his innovative contributions across various disciplines, showcasing his unique ability to blend traditional themes with modern aesthetics. Learn about his impactful artworks, thought-provoking literary pieces, and his vision as a Neo-Pop artist dedicated to raising awareness about Iraq's cultural heritage. Discover why Muntadher Saleh is celebrated as "The Last Polymath" and how his multidisciplinary talents continue to inspire and influence.
2137ad Merindol Colony Interiors where refugee try to build a seemengly norm...luforfor
This are the interiors of the Merindol Colony in 2137ad after the Climate Change Collapse and the Apocalipse Wars. Merindol is a small Colony in the Italian Alps where there are around 4000 humans. The Colony values mainly around meritocracy and selection by effort.
Hadj Ounis's most notable work is his sculpture titled "Metamorphosis." This piece showcases Ounis's mastery of form and texture, as he seamlessly combines metal and wood to create a dynamic and visually striking composition. The juxtaposition of the two materials creates a sense of tension and harmony, inviting viewers to contemplate the relationship between nature and industry.
1. Sea Grass Woven Wire Pendant
Judy Larson
Materials:
56” of 22 gauge round wire
Up to 32 feet of 28 gauge round wire
30mm flat or puffed round coin style bead
6mm round bead
Tools:
Flat, round and chain nose pliers
Flush cutter
¼” mandrel
Ultra fine point Sharpie marker
Ruler
Directions: It is important to read through the directions before starting. Everyone has a different tension when weaving.
Therefore, a bit more or less 28 gauge wire than indicated may be needed when weaving this project. Long weaving wires may
not be easy to handle, so use manageable lengths and splice where needed.
Step 1: Straighten and cut four 14” pieces of 22 gauge round wire.
Step 2: Cut an 8 foot piece of 28 gauge round wire to use for weaving. Bundle the 20 gauge wires together so the ends are
even.
Starting 6” in from one end and leaving a short weaving wire tail, secure the weaving wire by wrapping around the lower wire
twice. Then wrap the lower three wires together 3 times. Pull the weaving wire up between the two lower wires and wrap
around the three upper wires 3 times. That is one set.
Do this 3x3 on four wires weave for 1”, up to 11 sets. This will form the right half of the bail. Periodically check to make sure
the start of the weave is still 6” from the end.
Step 3: Bend the lower wire down a bit. You will now be working with the upper three wires. Wrap the lower two wires 2
times and then the upper two wires 2 times. That is one set. Do this 2x2 on three wires weave for 1 ¾”, up to 34 sets.
2. Step 4: Slide the bead onto the wire you bent out of the way, pushing it up as close to the woven wires as you can get. Curve
the 2x2 woven section around the outer edge of the bead, matching the curve. Add more 2x2 weave, if needed.
Note: At some point you will need to add weaving wire. As you work through this project, cut manageable lengths of 28 gauge
wire to use. I like to work with 6 feet or more, but you may feel more comfortable with 3 or 4 feet of wire. Trim wire tails off when
you feel the weave is secure.
Step 5: Bend the lower two core wires around the wire coming out of the bottom of the bead. Press the bend down with a
pair of pliers.
Step 6: Bend the upper 3x3 woven section to the back over a ¼” mandrel and then a bit to the right. This keeps the wires out
of the way for the next weaving steps.
3. Step 7: Bend the wire coming out of the bottom of the bead to the left, over the 2x2 woven section core wires and in line with
the core wire coming out of the 2x2 weave. This will help secure the core wires bent over in Step 5.
Step 8: Make a loose clockwise curl with the core wire coming out of the 2x2 weave. Press the curl onto the bead and over the
end of the weave. Align the wire end to the outside of the other wire.
Step 9: Wrap the two wires together as close to the curl and the end of the 2x2 weave as possible. Then wrap the outer lower
wire three times. This completes one set. Do this 2x3 on two wires weave for 2”, up to 31 sets.
Step 10: Curve the 2x3 weave around the Step 8 wire curl and fit to the shape of the 2x2 woven section on the right of the
bead.
4. Step 11: Bend the wire tails behind the base of the “bail”. Press in place with pliers.
Step 12: Use a pliers to bend the bail core wires backwards and to the right a bit.
Step 13: Separate the 6 wires now on the upper right into two sets of 3. You will be working with the lower set of three.
Step 14: You may need to add a new 8 foot piece of wire here. Do the 2x2 weave (as in Step 3) for 1-7/8”, up to 36 sets.
5. Step 15: Shape the 2x2 woven section to fit the outer curve of the bead and the curve of the other woven sections on the right
side of the bead.
Step 16: Bend the outer core wire to the outside. Slide the other two core wire ends under the wire loop. Pull the wires to the
right behind the pendant. Press the bend down with pliers. Trim the wires off and press the ends in place. (The 2 right hand
photos are from the back.)
Step 17: You will now be working with the core wire you bent away from the 2x2 wrap in Step 16. Wrap this wire for 2-3/8”.
6. Step 18: Make a loose clockwise curl with the coiled wire, covering the joins of the lower weaves, but letting the first wire coil
still show. Make a gentle curve up the center of the bead with the coiled wire. Pull the wire tail to the right through the bail.
Step 19: Pull the remaining two lower wires to the left. Wrap the two wires together as close to the curl and the end of the
other weaves as possible. Then wrap the outer lower wire three times. This completes one set. Do this 2x3 weave for 2¼”, up
to 47 sets.
Step 20: You will now be working with the upper three wires coming out of the base of the bail. Do the 2x2 weave for 1-7/8”,
up to 36 sets.
7. Step 21: Curve the lower 2x3 woven wire section around the outer left edge of the bead.
Step 22: Slide the two core wire tails from left to right in front of the wire coming out of the bead. Pull the wires to the back.
Make sure that the weaving is tight to the wire coming out of the bead. Then pull the wires to the left. (In the photos,
everything is shown from the back.)
Step 23: Bend the upper 2x2 woven section over to the left of the bail (shown from the back).
Step 24: Pull the 2x2 woven section over a ¼” mandrel and down the front of the pendant.
8. Step 25: Shape the 2x2 woven section to fit the curve of the coiled wire down the center of the bead.
Step26: Slide the 2x2 weave core wires under the outer 2x3 woven section. Bend the two left core wires up and left. Loop the
right core wire around the 2x3 woven wire. Pull tightly and press into place.
Step 27: Make a loose clockwise curl with the wire. Pull it to the outside and next to the two wires bent up in Step 26. You
will now be working with these three wires.
9. Step 28: Add an 8 foot weave wire here. Do the 2x2 weave with the three wires for 1½”, up to 32 sets.
Step 29: You will now be working with the two wires to the left of the bail. Wrap the upper wire for 2”. Trim off excess wrap
wire.
Step 30: Pull the lower wire up over the bail. Slide the 6mm bead on the wire. Pull the wire down on the right of the bail, and
through the bail to the left. Pull tight. Wrap the wire one more time around the bail but not through the bead, unless the bead
has an extremely large hole. End on the front. Trim the wire tail and tuck the end under the bead.
10. Step 31: Use a pair of chain nose pliers to pinch the wires in just below the bead. Be careful to not press too hard or you could
shatter the bead.
Step 32: Pull the coil wrapped wire up over the bail and wrap around the base of the bead twice. Pull the core wire tail under
the bead and coil. Trim off and tuck into place.
Step 33: Curve the lower 2x2 weave section around the outer left edge of the bead. Slide the core wire ends through the bail
from left to right. Pull the core wire tails to the left (shown on the front and the back). Press the bend down with pliers. Pull
the core wires through the bail one more time. Press the bend into place. Trim the wire tails off so they are inside at the base
of the bail. Press into place.
Step 34: Make any necessary adjustments and you are done.