SlideShare a Scribd company logo
1
Someone Needs Your Help
Now that I am retired, I do not often travel the 40 miles to the
community where I taught for over 30 years. When I found a poster
here in my hometown last week about a fundraiser for the son of a
former student, I knew we would be attending the fundraiser.
However, I thought there had to be something more I could do, so
decided to make this necklace as an item for the fundraiser. As I was
planning it out, I realized that maybe people in the jewelry making
community might want to make something like this, so I
photographed each step, and then started writing. It is my hope that if
you download this tutorial, you will consider donating to Knox’s
family to help with his medical expenses.
If you want to donate on-line, you can “Help Knox Olafson Kick Cancer to the Curb!” by going to:
https://www.youcaring.com/christyolafson-804439
If you are downloading this tutorial after the timeframe to help Knox, someone, somewhere, always needs help.
Consider donating to St. Jude’s Children’s Hospital or cancer research.
Consider donating to local charities.
Or, volunteer your time and talents and make one of these necklaces for a worthy fundraiser in your community.
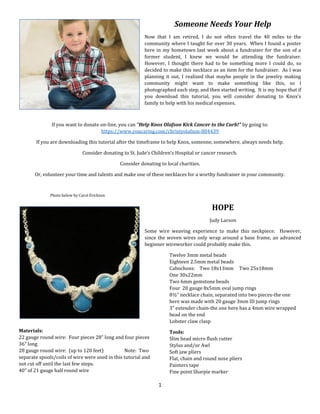
Photo below by Carol Erickson
HOPE
Judy Larson
Some wire weaving experience to make this neckpiece. However,
since the woven wires only wrap around a base frame, an advanced
beginner wireworker could probably make this.
Materials:
22 gauge round wire: Four pieces 28” long and four pieces
36” long
28 gauge round wire: (up to 120 feet) Note: Two
separate spools/coils of wire were used in this tutorial and
not cut off until the last few steps.
40” of 21 gauge half round wire
Twelve 3mm metal beads
Eighteen 2.5mm metal beads
Cabochons: Two 18x13mm Two 25x18mm
One 30x22mm
Two 6mm gemstone beads
Four 20 gauge 8x5mm oval jump rings
8½” necklace chain, separated into two pieces-the one
here was made with 20 gauge 3mm ID jump rings
3” extender chain-the one here has a 4mm wire wrapped
bead on the end
Lobster claw clasp
Tools:
Slim head micro flush cutter
Stylus and/or Awl
Soft jaw pliers
Flat, chain and round nose pliers
Painters tape
Fine point Sharpie marker
2
Wire Weaves Used (in bold print in the tutorial)
Leave a short tail when first starting a weave. Hold the tail between your fingers to anchor the
weaving wire as you begin to coil and/or weave. Wrap the weaving wire around one of the base
wires one or two times to anchor it before you start weaving.
Everyone has a different tension when wire wrapping. That is why most of the woven and coiled
sections in this tutorial are measured lengths instead of counted wraps or repetitions of wraps.
Coil: Make three or four wraps with 28 gauge weaving wire over the 22 gauge base wire, and then push the wires together. If
working from a spool or coil of wire, check it to make sure that the weaving wire is not kinked. Continue in this manner until
the desired length is reached.
3x3 on two wires: Wrap one base wire three times and then wrap the two base wires together three times. Push the wraps
together. Repeat this until the desired length is achieved.
2x2 on two wires: Wrap two base wires together two times and then wrap one base wire two times. Push the wraps
together. Repeat this until the desired length is achieved.
2x2 on three wires: Wrap the upper two base wires together two times, then wrap the lower two base wires together two
times. Push the wraps together. Repeat until the desired length is achieved.
’s or Mountains or Zig-Zag on four wires: Wrap the two lower base wires twice; wrap the two center base wires twice;
wrap the two upper base wires twice; wrap the two center base wires twice, wrap the two lower base wires twice. To repeat
the , start by wrapping the two center base wires. Push the wraps together after each set of two wraps. Repeat until the
desired length is achieved.
3
Securing Half Round Wire Wrapped Ends
21 gauge half round wire is very malleable. With all the handling of the cabochon framework during initial construction, these
wires could come loose. You can avoid that problem by pulling the half round wire ends between the separated base wires.
You then trim the half round wire off and tuck the end down into the “seam” between the two sets of separated wires.
The Layout
Lay your cabochons flat side down on a copy machine. Play
with the size, number and spacing until you have a few
layouts you like. Make a copy of each. Choose one and make
one or two copies of it. You may want to use the originals at
a later time for another fun project.
For the purposes of this tutorial, the design with five cabochons was chosen. Make design
choices, ideas, thoughts, where the cabochons are connected, etc. on the copy. You are not
committed your ideas, they are just guidelines for you. Design as you go within the
limitations of your wire lengths. Measure the total length of the piece to make sure that it is
not too large or small for your neck, how you want to wear it, or what you want to wear it
with. You can make adjustments accordingly. Make some decisions about where you want
to make the wraps to hold the framework wires together. On the design at the left, they are
marked with X’s but not easily seen.
Constructing the Necklace
The Cabochon Framework
Step 1: Straighten and cut four 36” pieces of 22 gauge round wire. Use painters tape to secure the wires together about 6”
either side of center, making sure the wires do not cross. Mark the center with the fine point Sharpie marker.
Step 2: Match the marked wire center with the center of the lower edge of the lower
30x22mm cabochon. Form the wire to match the curve of the cabochon photocopy. Check
the shape/fit on the gemstone cabochon to make sure it fits as well as possible.
Step 3: Bend the base wires out where shown on your original design. Flip the set of base
wires over, centering the marked wire center with the center of the lower edge of the
cabochon. Make adjustments in where and how much the wire will be bent out so that both
sides are as even as possible.
Step 4: Hint: This step may be a bit easier of you secure the center of the base wires together
with a bit of painters tape before you begin securing them together with the half round wire.
Secure the framework base wires together at the X’s you marked in your design. Using 21
gauge half round wire, make 4 wraps at each X. Flip the set of base wires over, matching the
center mark on the wire to the bottom center of the cabochon photocopy. Make
adjustments in where the finished wraps are located so that both sides are as even as
possible. Use the tips of a chain nose pliers to lightly tighten the wraps in place. They will probably move a bit during the
framework construction, so be aware that you will need to check placement before securing the cabochons in place.
4
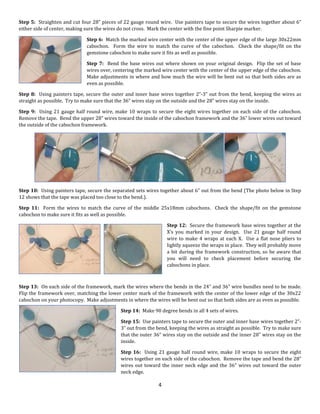
Step 5: Straighten and cut four 28” pieces of 22 gauge round wire. Use painters tape to secure the wires together about 6”
either side of center, making sure the wires do not cross. Mark the center with the fine point Sharpie marker.
Step 6: Match the marked wire center with the center of the upper edge of the large 30x22mm
cabochon. Form the wire to match the curve of the cabochon. Check the shape/fit on the
gemstone cabochon to make sure it fits as well as possible.
Step 7: Bend the base wires out where shown on your original design. Flip the set of base
wires over, centering the marked wire center with the center of the upper edge of the cabochon.
Make adjustments in where and how much the wire will be bent out so that both sides are as
even as possible.
Step 8: Using painters tape, secure the outer and inner base wires together 2”-3” out from the bend, keeping the wires as
straight as possible. Try to make sure that the 36” wires stay on the outside and the 28” wires stay on the inside.
Step 9: Using 21 gauge half round wire, make 10 wraps to secure the eight wires together on each side of the cabochon.
Remove the tape. Bend the upper 28” wires toward the inside of the cabochon framework and the 36” lower wires out toward
the outside of the cabochon framework.
Step 10: Using painters tape, secure the separated sets wires together about 6” out from the bend (The photo below in Step
12 shows that the tape was placed too close to the bend.).
Step 11: Form the wires to match the curve of the middle 25x18mm cabochons. Check the shape/fit on the gemstone
cabochon to make sure it fits as well as possible.
Step 12: Secure the framework base wires together at the
X’s you marked in your design. Use 21 gauge half round
wire to make 4 wraps at each X. Use a flat nose pliers to
lightly squeeze the wraps in place. They will probably move
a bit during the framework construction, so be aware that
you will need to check placement before securing the
cabochons in place.
Step 13: On each side of the framework, mark the wires where the bends in the 24” and 36” wire bundles need to be made.
Flip the framework over, matching the lower center mark of the framework with the center of the lower edge of the 30x22
cabochon on your photocopy. Make adjustments in where the wires will be bent out so that both sides are as even as possible.
Step 14: Make 90 degree bends in all 4 sets of wires.
Step 15: Use painters tape to secure the outer and inner base wires together 2”-
3” out from the bend, keeping the wires as straight as possible. Try to make sure
that the outer 36” wires stay on the outside and the inner 28” wires stay on the
inside.
Step 16: Using 21 gauge half round wire, make 10 wraps to secure the eight
wires together on each side of the cabochon. Remove the tape and bend the 28”
wires out toward the inner neck edge and the 36” wires out toward the outer
neck edge.
5
Step 17: Use painters tape to secure the separated sets wires together about 6” out from the bend.
Step 18: Form the wires to match the curve of the 18x13mm cabochons. Check the shape/fit on the gemstone cabochon to
make sure it fits as well as possible.
Step 19: Secure the framework wires together at the X’s you marked in your design. Use 21 gauge half round wire to make 3
wraps at each X. Use a flat nose pliers to lightly squeeze the wraps in place. They will probably move a bit during the
harness/base construction, so be aware that you will need to check placement before
securing the cabochons in place.
Step 20: On each side of the framework, mark the wires where the bends in the upper
and lower wire bundles need to be made. Flip the framework over, matching the
lower center mark of the framework with the center of the lower edge of the 30x22
cabochon on your photocopy. Make adjustments in where the wire will be bent out so
that both sides are as even as possible.
Step 21: Make 90 degree bends in all 4 sets of wires at those marks.
Step 22: Use painters tape to secure the 36” and 24” wires together 2”-3” out from
the bend, keeping the wires as straight as possible. Try to make sure that the 36”
wires stay on the outside and the 28” wires stay on the inside.
Step 23: Using 21 gauge half round wire, make 5 wraps to secure the eight wires
together on each side of the cabochon. Remove the tape and bend the 28” wires
toward the inner neck edge and the 36” wires out toward the outer neck edge.
Step 24: Adjust all the wire wraps inside each cabochon oval so they are mirror images of the ones on the opposite side of the
framework. Use the tips of a chain nose pliers to lightly tighten in place.
Step 24: Make bends in the wires in any manner you wish on the back side of the framework for the each of the cabochons to
sit on.
Step 25: Secure all the cabochons in place in the framework.
Step 26: Optional: Use the stylus or sharp awl to scratch your initials and date on the back of the large
central cabochon.
Hint: When ordering weaving wire, you may wish to order two 100 foot coils. That way, it will be easier to make mirror image
weaving wraps for each side of this neckpiece. You can work with a separate coil on each side and do each step at the same time.
It can be difficult to remember what you did or what changes you made to your design if you work a whole side of a design, and
then try to work on the other. Coming back a day or two later to repeat some steps as mirror images can be a challenge!
6
Weaving and Wrapping the Framework
Step 27: Cut two each of the following lengths of 28 gauge wire and set aside. If you are using two
separate coils of wire, you may wish to cut one of each length from each coil.
8” 30” 6 feet
Step 28: The whole unit will be easier to work with if you coil the base wires you are not using,
rather than leaving them long and hanging in the way (photo to the left).
From here through the end of the tutorial, most of the steps will have left and right side photos of the neckpiece as you would
view it while working on it, making it easier to make mirror image weavings as you progress through the construction process.
This should help if you are only using one coil of wire for the weaving or working in small increments of time.
For the first part of weaving and wrapping the framework of the neckpiece,
you will be working with the tails of the inner 28” base wires.
Step 29: Anchor the 28 gauge weaving
wire, leaving a 1” tail, on one of the two
center wires. Create five ’s on the four
wires, so the design faces the inner edge of
the framework. Trim off the beginning
wire tail. This wire end will be covered so
you do not need to worry if it is sharp.
Step 30: Use a soft jaw pliers to gently
twist the section just woven so it faces the
front of the framework.
Step 31: Separate the base wires. Slide a 6mm bead on the wire second from the
outside, keeping that wire straight.
Step 32: Construct about 5/16”, approximately 7 sets, of the 2x2 on two wires
weave. The wire that is wrapped by itself should be on the inside. Curve the
outer wire around the bead to meet the straight wire that the bead is on. Bend
the wire out along the straight wire. Curve the 2x2 on two wires section around
the bead to meet the wire that the bead is on. Add more 2x2 weaving if needed.
Bend the 2x2 on two wires base wire ends out along the straight wire that the
bead is on.
7
Step 33: Connect the four wires
above the bead with one . Pull
the outer wire to the outside of
the neckpiece framework.
Step 34: Construct 1½”-1¾”, approximately 32 sets, of the 2x2 on three wires weave on the three inner wires. You can add
more 2x2 on two wires later if needed.
Step 35: Bend the 2x2 on two wires section and the outer wire to the inside of the
neckpiece framework.
Step 36: Curve the 2x2 on two wires section and outer wire and bare wire
counterclockwise on the left and clockwise on the right, making a loop.
Step 37: Curve the 2x2 on two wires section around the bead and to the
outside of the neckpiece framework.
Step 38: Slightly uncurl the single wire. Use the reserved 30” piece of 28 gauge wire you set aside to wrap a 3” coil length on
the outer wire on both the left and right sides of the neckpiece framework. Tuck the
beginning wire tail into and under some of the previous weaving before you cut it off.
That way, the wire end will not scratch the skin of the wearer. Do not cut off the other
end of the 28 gauge wire yet. You may need it to add more length to the coiled section.
Step 39: Wrap the coiled wire into a loop again inside of the following the
curve of the 2x2 on three wires weave. Pull the coiled wire behind the 2x2
on three wires weave, under the bead and between the 2x2 on three wires
weave and the weave. Pull the coiled wire towards the outside of the
neckpiece framework.
8
Step 40: Above the bead, push the coiled wire end between the wire the bead is on and the inner 2x2 on two wires weave.
Pull the wire out the back. The coil should tightly rest against the outer side of the bead. Pull the wire toward the inside of the
neckpiece framework.
Step 41: Pull the coiled wire down around the inside of the
bead, then between the 2x2 on three wires weave and the
weave. Pull the wire tightly to the outside of the neckpiece
framework so that the coil rests tightly against the bead.
Step 42: Pull the coiled wire around the back of the
neckpiece framework and toward the center of the
framework. (Photos are of the back of the framework.)
Note: When the neckpiece is turned over, the front left side is
then on the right. ie: The photo to the left here is the right side
when seen from the front.
Step 43: Pull the 36” wire tails toward the upper inside
center of the neckpiece framework. Pull the coiled wire to
the front of the neckpiece framework.
9
Step 44: Curve the 2x2 on three wires weave around the outside of the
weave and behind the half round wire framework wrap section above the
cabochon. Straighten and pull the three wire tails toward the inside of the
neckpiece framework.
Step 45: Curve the coiled wire in the same manner, following the inner
curve of the 2x2 on three wires weave.
Step 46: Turn the neckpiece framework over. You
may need to add to the coil and/or the 2x2 on three
wires weave to make the ends even on the back of
the neckpiece framework.
Note: When the neckpiece is turned over, the front left
side is then on the right. ie: The photo to the left here
is the right side when seen from the front.
Step 47: Work from the back so when you wrap this section around to the front, the weave design will face out. Weave four
’s to secure all 4 base wires together.
10
Step 48: Wrap the ’s weave section around the front and then to the
back of the neckpiece framework.
Step 49: Straighten and pull the 24” wire tails toward the inside of the
neckpiece framework.
Step 50: The neckpiece does not need to be
embellished, so this step is optional. Slide a 2.5mm,
a 3mm and a 2.5mm bead on a reserved piece of 8”
wire. Secure them to the framework where shown,
just below the wire coil. Wrap the 28 gauge wire
ends around the framework once, hiding the wire
under the wraps. If some of the wire shows, do not
be too concerned. Then thread one wire tail
through the beads again (the bead hole edges are
sharp and can cut the wire over time). Wrap the 28
gauge wire around the framework again. Trim the
wire 28 gauge tails.
Step 51: Separate the upper wire on each side.
Working from the back so that the right side of the
weave will show on the front, make a 2”-2 ¼” length
of 2x2 on three wires weave on the lower three
wires. (Photos are from the front.)
Step 52: Wrap the 2x2 on three wires weave
around to and over the front of the cabochon. Curve
the weave down along the outer edge and then the
lower edge of the cabochon. Straighten and pull the
24” wire tails toward the inside of the neckpiece
framework.
11
Step 53: Pull the 2x2 on three wires weave to the back and
across the neckpiece framework.
Step 54: Using the 6 foot reserved 28 gauge wire, wrap a coil
along the entire length of the separated wire (from Step 51),
leaving about ¼” not wrapped at the end. Tuck the beginning wire
tail into and under some of the previous weaving before you cut it
off. That way, the wire end will not scratch the skin of the wearer.
Do not cut off the other end of the 28 gauge wire yet. You can trim
off the excess 28 gauge wire at the end.
Step 55: Pull the coil wrapped wire to the front and to the outside
of the neckpiece framework above and close to the 2x2 on three
wires weave section.
Pull the coiled wire down around the outside of the cabochon
framework,
Step 56: Wrap the 2x2 on three wires and the coiled wire
around the half round wire framework wrap section below the top
cabochon, ending by pulling both sections toward the center of the
neckpiece framework.
Step 57: Continue making enough 2x2 on three wires weaves
until that section can curve around the inside of the middle
cabochon and extend outward about ½”.
12
Step 58: Wrap the 2x2 on three wires weave around the half round wire
wrapped section of the framework below the middle cabochon, ending by
pulling bare wires of the 2x2 on three wires weave section toward the
outside of the neckpiece framework. Trim off the 28 gauge wrapping
wire.
Step 59: Wrap the coiled wire along the inside of the
2x2 on three wires weave on the middle cabochon.
Pull the coiled wire around the back and to the front,
following the 2x2 on three wires weave.
Step 60: Wrap the 22 gauge base wire
tails once fully around the framework,
ending on the back, pulling them tightly
against the neckpiece framework. Trim
off the excess base wire. Use a chain
nose pliers to pinch the ends onto the
neckpiece framework.
Step 61: Wrap the coiled wire around
framework between the 2x2 on three
wires wraps, ending on the back. Use a
stylus or a pick to push the wire end
under the wire weaving. Trim off the
excess wire. Use a chain nose pliers to
pinch the ends onto the neckpiece
framework. Hint: You may need to
remove some of the 28 gauge coil from
the base wire to make it easier to pull
under the wrapped sections.
13
For the second part of weaving and wrapping,
you will be working with the tails of the outer 36” wires to finish your neckpiece.
Step 62: Cut two each of the following lengths of 28 gauge wire and set aside. If you are using two separate coils of wire, you
may wish to cut one of each length from each coil. 14” 26” 5 feet 20”
Step 63: Straighten and separate the base wires.
You will be working with the lower two. Anchor the
28 gauge weaving wire on the upper wire, leaving a
1” tail. Create 2” of the 3x3 on two wires weave
on the lower two wires. Trim and tuck the
beginning wire tail into and under some of the
previous weaving before you cut it off. That way, the
wire end will not scratch the skin of the wearer. With
this weave, you can work from the front.
Step 64: Use the 14” piece of 28 gauge wire
you set aside to wrap this wire to make a 1”
coil length on the lower of the upper two
wires. Tuck the beginning wire tail into and
under some of the previous weaving before
you cut it off. That way, the wire end will not
scratch the skin of the wearer. Do not cut off
the other end of the 28 gauge wire yet. You
may need it to add more length to the coiled
section.
Step 65: Pull the 3x3 on two wires weave to the front and
across to the outside of the neckpiece framework, curving it
slightly downward.
Step 66: Pull the 3x3 on two wires
weave to the back. Bring the upper bare
wire and the coiled wire to the front,
following the upper edge of the 3x3 on
two wires weave.
14
Step 67: Bring the 3x3 on two wires weave to the front and
across just below the first 3x3 on two wires wrap, pulling it
to the outside of the neckpiece framework.
Step 68: Bring the 3x3 on two wires weave and the bare and
coiled wire around to the back, parallel to each other.
Straighten and pull them towards the center of the neckpiece
framework.
Step 69: Note: The weaving and coiling
should not extend beyond the framework more
than ¼”. Working from the back so the
design will face outward when wrapped to
the front, connect all four wires with
approximately 14 of the ’s weave.
Step 70: Pull the weave to the front. Curve the ’s weave
section around the inner edge of the upper cabochon,
creating an interesting “window” shape on the top inner
edge of the cabochon.
15
Step 71: Pull the weave around to the back and to the inside
of the neckpiece framework. Straighten the wires if needed.
Step 72: Turn the framework over. Working
from the back, pull the upper bare wire up
away from the lower three. Weave a 2”-2¼”
section of a 2x2 on three wires weave on
the lower three wires.
Step 73: Wrap a coil
on the upper wire for a
length of 2-3/8” using
the 26” piece of
reserved 28 gauge
wire. Tuck the
beginning wire tail into and under some of the previous weaving before
you cut it off. That way, the wire end will not scratch the skin of the wearer. Do not cut off the other end of the 28 gauge wire
yet. You may need it to add more length to the coiled section.
Step 74: Bring the 2x2 on three wires weave to the front
and curve it around the inner edge of the middle cabochon.
Step 75: Bring the coiled wire to the front, between the
weave and the 2x2 on three wires weave. Pull the coiled
wire tightly toward the back, but not across it. It will sink
between the two woven sections.
16
Step 76: Use a stylus or an awl to
create a small opening between the
upper cabochon and the wire
weaving.
Pull the coiled wire through that
opening, going from the center of the
neckpiece framework to the outside.
Step 77: Bring the coiled wire
around to the front and follow the
inside edge of the 2x2 on three
wires weave. Add more wraps to
the coil if needed to make the ends
of both sections even. Trim off the
28 gauge coil wire.
Step 78: Secure the upper two wires together by making two wraps, starting a weave. Make four ’s.
Step 79: Pull the weave around the back.
Straighten and pull the wires towards the
center. Separate the upper wire.
17
Step 80: Using the 6 foot reserved 28 gauge wire, wrap a coil
on the upper separated wire, leaving about ¼” not wrapped at
the end. Tuck the beginning wire tail into and under some of the
previous weaving before you cut it off.
Step 81: Pull the coiled wire around to the front.
Then slip the end, from outside to inside, under the
2x2 on three wires weave and the coil. Pull the
coiled wire tightly to hold everything firmly to the
framework.
Step 83: Pull the coiled wire across the back
towards the outside of the neckpiece framework.
Bend the coiled wire as shown just before curving it
up around the cabochon. It will be secured in place
later.
Step 84: Curve the coiled wire up around the outside of the 2x2
on three wires on the outside edge of the middle cabochon.
18
Step 85: Pull the coiled wire around to the back and towards the
outside of the neckpiece framework.
Step 86: Using a stylus or an awl, create a small opening between the
upper cabochon and the wire weaving.
Step 87: Pull the coiled wire through that opening, going from the
outside of the neckpiece framework to the inside.
This is what the back looks like.
Step 88: Bring the coiled wire up around the inner edge
of the upper cabochon, following the curve of the outer
edge of the weave. Use your fingertip to press the coil
into place.
Pull the coiled wire to the back and to the outside of the
neckpiece.
19
This is what the back looks like.
Step 89: Wrap the coiled wire around to the front and above the
coiled wire sitting next to the 2x2 on three wires weave.
Step 90: Pull the coiled wire around the back and to the front
again, Place it next to and above the upper coil.
Pull the coiled wire around to the back (not shown) and toward
the outside of the neckpiece.
Step 91: Using a stylus or an awl, create a small opening between
the woven wires.
Pull the coiled wire through that opening, going from the center
of the neckpiece framework to the outside.
Step 92 (below): Using a chain nose pliers, pull the coiled wire
tightly through the opening. Trim off the excess wire. Use a soft
jaw pliers to snug together the weaving you separated to get the
coiled wire through.
20
Step 93: Working from the back so the design will face
outward when wrapped to the front, construct a 1” length of
the 2x2 on three wires weave to start.
Step 94: Wrap the 2x2 on three wires section around to
the front.
Step 95: Wrap the 2x2 on three wires section around to
the back. Straighten and pull the wires outward.
This is what the lower section of the neckpiece now looks like from the front and back.
Step 96: Pull the outer wire on each side away from the other two.
Coil wrap the outer wire on each side with the reserved 20” pieces of
28 gauge wire, for approximately 2”. Tuck the beginning wire tail into
and under some of the previous weaving before you cut it off. That
way, the wire end will not scratch the skin of the wearer. Do not cut off
the other end of the 28 gauge wire yet. You may need it to add more
length to the coiled section.
21
Step 97: Working from the back so the right side will show when the
weaving is wrapped around the framework, make a 2½” length of 3x3 on
two wires. (The neckpiece with the finished weaving is shown from the
front.)
Step 98: Wrap the 3x3 on two wires weave section around to the front,
up toward the center of the neckpiece. The 3x3 on two wires weave
should nestle against the 2x2 on three wires section.
Step 99: Curve each of the 3x3 on two wires weave sections into a loop as
shown.
Step 101: Pull the 3x3 on two wires weave sections to the back.
Step 101: Press the loops against the weaves previously wrapped around
the neckpiece framework.
22
Step 102: Add enough 3x3 on two wires weave to measure 1-3/8” from top inner edge
of the neckpiece to the end of the weaving. End the weave by wrapping just one wire
three times.
Step 103: Wrap 3x3 on two wires weave section around the front,
coming from the bottom and pulling over the top, so that it nestles against
the previous 3x3 on two wires wrap with the loop.
Step 104: Wrap coiled wire around the front, between the 3x3 on two
wires and the 2x2 on three wires section, tucking it under the loop
created in Step 99. Pull the coiled wire down across the back.
Step 105: Bring the coiled wire back to the front, placing it between the two
inner 3x3 on two wires sections. Pull the coiled wire down across the back.
Step 106: Add enough weaving to the 3x3 on two wires or the coiled wire to make the ends of each even.
Step 107: Working from the back so the right side will show when the
weaving is wrapped around to the front of the framework, connect the three
wires on each side with a 1¾” length of 2x2 on three wires weave.
23
Step 108: Pull the 2x2 on three wires weave section around to the front of the cabochon. If needed, add more 2x2 on three
wires weave so that the weave is at least just over the top going to the back of the cabochon and both sides match in length.
Step 109: Trim ONE of the two 28 gauge wrap wires off, leaving a tail to tuck in. Secure that tail so it will not pop out and
scratch the skin.
Step 110: Separate all but the center two base wires. With the remaining 28gauge
wrapping wire, wrap the center two wires together for about 3/16”, no more than ¼”.
Step 111: Trim the center two wires to the length shown. Coil wrap the longer of the
two wires to within 1/8” of the end. Trim the 28 gauge wrap wire off. Use a chain nose
pliers to snug the cut end down onto the 22 gauge base wire.
Step 112: Use a chain nose pliers to make a small scroll in the shorter bare wire. Curve
the coiled wire around it, tucking the wire end under all the weaving. Press this section
down onto the cabochon.
Step 113: The remaining wires are
individually pulled tightly around to the
front between two sets of weaving. Use a
chain nose pliers to pull each wire
tighlty. This will make each wire
“dissapear” beneath all the weaving and
secure it from becoming loose.
24
Step 114: Trim each 22 gauge base wire end. Use a soft implement to press
each wire end under the weaves.
This is what your neckpiece now looks like. You can leave it as is, or add a bit of bead embellishment.
Where you stop with embellishment is up to you.
Embellishment
Step 115: For each side, cut two 5” pieces of 28 gauge wire. Slide a 2.5mm bead
on two wires. Center the bead. Pull the wires down on either side of the bead.
Step 116: Slide the four wires with the bead under
the weave on the lower side of the upper
cabochon. Pull the wires to the center of the
neckpiece, nestling the bead into the “V” created
where the weaving sections cross.
25
Step 117: Pull the four 28 gauge wires across
the front, between the weave and the coiled
wire.
Step 118: Pull the four 28 gauge wires tightly
between the weave and the coiled wire. They
should “disappear” beneath them.
Step 119: Pull the wires around the back,
following the weaving and pulling tightly to
make them “disappear” beneath the weaving.
Step 120: Bring the four 28 gauge wires around to the front and slip them under the wrapping covering the cabochon. Pull
tightly.
26
Step 121: After the wires have been
pulled tightly and you are sure they will
not pull out, use a micro flush cutter to
snip them off, trying to make sure that
the cut ends will be under the weaving.
A micro flush cutter has tiny little
narrow jaws making it easy to get into
those hard-to-reach spaces. Use a soft
implement to press each wire end under
and/or into the weaves.
Step 122: For each side, cut two 6” pieces of 28 gauge wire. Slide a 3mm bead on two wires. Center the bead. Pull the wires
down on either side of the bead.
Step 123: Slide the four wires with the bead
under the weave and coil on the lower part of the
middle cabochon. Pull the wires to the outside of
the neckpiece, nestling the bead into the “V”
created where the weaving sections cross.
Step 124: Pull the four 28 gauge wires across the
back, pulling tightly toward the center of the
neckpiece. Wrap around one more time, hiding the
wires.
Step 125: Bring the four 28 gauge wires around
to the front and slip them under the wire
wrapping sections covering the cabochon. Pull
tightly.
Step 126: After the wires have been pulled tightly
and you are sure they will not pull out, use a micro
flush cutter to snip them off, trying to make sure
that the cut ends will be under the weaving. Use a
soft implement to press each wire end under
and/or into the weaves.
27
Step 127: For each side, cut two 6” pieces of 28 gauge wire. Slide a 3mm bead on two wires. Center the bead. Pull the wires
down on either side of the bead.
Step 128: Slide the four wires with the
bead under the weave and coil on the
upper part of the middle cabochon.
Pull the wires to the outside of the
neckpiece, nestling the bead into the
“V” created where the weaving sections
cross.
Step 129: Pull the four 28 gauge wires
across the back, pulling tightly toward
the center of the neckpiece. Wrap
around one more time, hiding the
wires.
Step 130: Bring the four 28 gauge
wires around to the front and slip
them under the wrapping covering the
cabochon. Pull tightly.
Step 131: After the wires have been
pulled tightly and you are sure they
will not pull out, use a micro flush
cutter to snip them off, trying to make
sure that the cut ends will be under
the weaving. Use a soft implement to
press each wire end under the
weaves.
This is what your neckpiece now looks like. You can leave it as is, or add more bead embellishment.
28
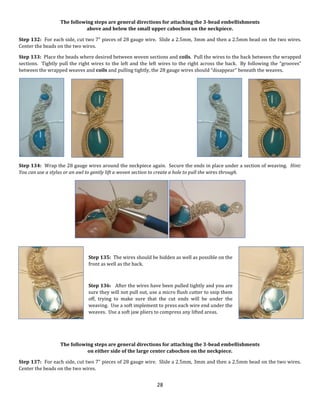
The following steps are general directions for attaching the 3-bead embellishments
above and below the small upper cabochon on the neckpiece.
Step 132: For each side, cut two 7” pieces of 28 gauge wire. Slide a 2.5mm, 3mm and then a 2.5mm bead on the two wires.
Center the beads on the two wires.
Step 133: Place the beads where desired between woven sections and coils. Pull the wires to the back between the wrapped
sections. Tightly pull the right wires to the left and the left wires to the right across the back. By following the “grooves”
between the wrapped weaves and coils and pulling tightly, the 28 gauge wires should “disappear” beneath the weaves.
Step 134: Wrap the 28 gauge wires around the neckpiece again. Secure the ends in place under a section of weaving. Hint:
You can use a stylus or an awl to gently lift a woven section to create a hole to pull the wires through.
Step 135: The wires should be hidden as well as possible on the
front as well as the back.
Step 136: After the wires have been pulled tightly and you are
sure they will not pull out, use a micro flush cutter to snip them
off, trying to make sure that the cut ends will be under the
weaving. Use a soft implement to press each wire end under the
weaves. Use a soft jaw pliers to compress any lifted areas.
The following steps are general directions for attaching the 3-bead embellishments
on either side of the large center cabochon on the neckpiece.
Step 137: For each side, cut two 7” pieces of 28 gauge wire. Slide a 2.5mm, 3mm and then a 2.5mm bead on the two wires.
Center the beads on the two wires.
29
Step 138: Place the beads on the wire just below
the woven loop, as shown. Pull the wires tightly to
the back in the “grooves” between wrapped sections.
Pull the wires across the back. By following the
“grooves” between the wrapped weaves and coils
and pulling tightly, the 28 gauge wires should
“disappear” beneath the weaves.
Step 139: Wrap one set of the 28 gauge wires around the neckpiece again. Secure the ends in place under a section of
weaving. Hint: You can use a stylus or an awl to gently lift a woven section to create a hole to pull the wires through.
Step 140: Wrap the other set of two wires around the unit so that you can secure the corner of the coiled wire indicated by
the arrow, below, to the base. Wrap the wires around the neckpiece again, pulling tightly.
Step 141: After the wires have been pulled tightly and you are sure they will not pull out, use a micro flush cutter to snip
them off, trying to make sure that the cut ends will be under the weaving. Use a soft implement to press each wire end under
the weaves. Use a soft jaw pliers to compress any lifted areas.
Step 142: The neckpiece may have become slightly twisted during construction. The cabocons may no longer be level. Press
the neckpiece against a flat surface. Make adjustments to the woven sections and coils so everything is how you want it.
The neckpiece now looks like this.
30
Shaping the Neckpiece to Fit the Neckline
Step 143: The finished neckpiece is a “V” shape. Gently curve it into a more
rounded open “C” shape. The neckpiece is still flat.
A neck mandrel makes shaping your flat neckpiece into a more three dimensional shape very easy. However, if you do not
have a neck mandrel, you will find the following two steps helpful.
Step 144: You will now give your neckpiece a little more
dimensionality. Your thigh, close to your knee, is a great
place to gently curve your neckpiece to make it lay neatly on
your neckline. Place one side of the neckpiece on your thigh,
close to your knee. Gently bend the neckpiece to give it a
slight three dimensional curve above the large center
cabochon.
Step 145: After shaping the neckpiece, make the sides more even by curving
it around a small bowl or large cup.
Finishing the Necklace
Step 146: Attach two 20 gauge 8x5mm oval jump rings to the upper
loop on either side of the neckpiece.
31
Step 147: Attach a 4¼” chain to the oval jump rings on either side of the neckpiece. This should make the necklace about 17”
long, just a bit larger than a choker length.
Hint: Create your own chain using 20 gauge 3.5mm ID jump rings in a 2x2 design, shown here.
Step 148: Attach a lobster claw clasp to the end of the chain on the right, as you would wear the necklace.
Step 149: Attach a 3” extender chain to the chain on the left, as you would wear the necklace, to make it adjustable for any
neck, or to wear it longer.
Step 150: Attach a wire wrapped 4mm bead to the end of the extender chain if you wish.
32
The photos of “HOPE” were taken by Carol Erickson

More Related Content

What's hot

Designer Wire Wrapped Clasp Hooks
Designer Wire Wrapped Clasp HooksDesigner Wire Wrapped Clasp Hooks
Designer Wire Wrapped Clasp Hooks
The Beading Gem's Journal
 
Wire Work Seahorse Pendant Tutorial
Wire Work Seahorse Pendant TutorialWire Work Seahorse Pendant Tutorial
Wire Work Seahorse Pendant Tutorial
The Beading Gem's Journal
 
Wire Wrapped Sweetheart Round Cabochon Pendant
Wire Wrapped Sweetheart Round Cabochon PendantWire Wrapped Sweetheart Round Cabochon Pendant
Wire Wrapped Sweetheart Round Cabochon Pendant
The Beading Gem's Journal
 
Mega Collection of Southwest Inspired Metal Work Jewelry Tutorials
Mega Collection of Southwest Inspired Metal Work Jewelry TutorialsMega Collection of Southwest Inspired Metal Work Jewelry Tutorials
Mega Collection of Southwest Inspired Metal Work Jewelry Tutorials
The Beading Gem's Journal
 
Leftover madness bead necklace
Leftover madness bead necklaceLeftover madness bead necklace
Leftover madness bead necklace
The Beading Gem's Journal
 
Arcadian Legends Pendant Woven Wire Tutorial
Arcadian Legends Pendant Woven Wire TutorialArcadian Legends Pendant Woven Wire Tutorial
Arcadian Legends Pendant Woven Wire Tutorial
HouseofGems.com
 
Gemstone Tassel Earrings tutorial
Gemstone Tassel Earrings tutorialGemstone Tassel Earrings tutorial
Gemstone Tassel Earrings tutorial
Amy Wilderson Cousin
 
Twisted Wire Wrapped Cross Pendant Tutorial
Twisted Wire Wrapped Cross Pendant TutorialTwisted Wire Wrapped Cross Pendant Tutorial
Twisted Wire Wrapped Cross Pendant Tutorial
The Beading Gem's Journal
 
Double Wrap Wire Bangle Bracelet Tutorial
Double Wrap Wire Bangle Bracelet TutorialDouble Wrap Wire Bangle Bracelet Tutorial
Double Wrap Wire Bangle Bracelet Tutorial
The Beading Gem's Journal
 
Sea Grass Woven Wire Pendant
Sea Grass Woven Wire PendantSea Grass Woven Wire Pendant
Sea Grass Woven Wire Pendant
The Beading Gem's Journal
 
Summer Fun Earrings Tutorial
Summer Fun Earrings TutorialSummer Fun Earrings Tutorial
Summer Fun Earrings Tutorial
The Beading Gem's Journal
 
Beaded Snowflake Necklace Tutorial
Beaded Snowflake Necklace Tutorial Beaded Snowflake Necklace Tutorial
Beaded Snowflake Necklace Tutorial
The Beading Gem's Journal
 
How to Wire Wrap a Multi Gemstone Necklace
How to Wire Wrap a Multi Gemstone NecklaceHow to Wire Wrap a Multi Gemstone Necklace
How to Wire Wrap a Multi Gemstone Necklace
The Beading Gem's Journal
 
Imaginative Spring Butterfly Pendant Tutorial
Imaginative Spring Butterfly Pendant Tutorial Imaginative Spring Butterfly Pendant Tutorial
Imaginative Spring Butterfly Pendant Tutorial
HouseofGems.com
 
Wire jewelry-free-ebook
Wire jewelry-free-ebookWire jewelry-free-ebook
Wire jewelry-free-ebook
LUISA BLANES
 
How to Make Pearl Snap FastenerJewelry
How to Make Pearl Snap FastenerJewelryHow to Make Pearl Snap FastenerJewelry
How to Make Pearl Snap FastenerJewelry
The Beading Gem's Journal
 
How to Make Wire Wrapped Ammonite Jewelry DIY Jewelry Making Tutorial
How to Make Wire Wrapped Ammonite Jewelry DIY Jewelry Making TutorialHow to Make Wire Wrapped Ammonite Jewelry DIY Jewelry Making Tutorial
How to Make Wire Wrapped Ammonite Jewelry DIY Jewelry Making Tutorial
HouseofGems.com
 
Gorgeous Spring Rain Earring Tutorial
Gorgeous Spring Rain Earring TutorialGorgeous Spring Rain Earring Tutorial
Gorgeous Spring Rain Earring Tutorial
HouseofGems.com
 
Clever Blossom Earrings with Gold and Black Glass Pearls
Clever Blossom Earrings with Gold and Black Glass PearlsClever Blossom Earrings with Gold and Black Glass Pearls
Clever Blossom Earrings with Gold and Black Glass Pearls
HouseofGems.com
 
Exquisite Copper Wire Earrings With Crystal Beads
Exquisite Copper Wire Earrings With Crystal BeadsExquisite Copper Wire Earrings With Crystal Beads
Exquisite Copper Wire Earrings With Crystal Beads
HouseofGems.com
 

What's hot (20)

Designer Wire Wrapped Clasp Hooks
Designer Wire Wrapped Clasp HooksDesigner Wire Wrapped Clasp Hooks
Designer Wire Wrapped Clasp Hooks
 
Wire Work Seahorse Pendant Tutorial
Wire Work Seahorse Pendant TutorialWire Work Seahorse Pendant Tutorial
Wire Work Seahorse Pendant Tutorial
 
Wire Wrapped Sweetheart Round Cabochon Pendant
Wire Wrapped Sweetheart Round Cabochon PendantWire Wrapped Sweetheart Round Cabochon Pendant
Wire Wrapped Sweetheart Round Cabochon Pendant
 
Mega Collection of Southwest Inspired Metal Work Jewelry Tutorials
Mega Collection of Southwest Inspired Metal Work Jewelry TutorialsMega Collection of Southwest Inspired Metal Work Jewelry Tutorials
Mega Collection of Southwest Inspired Metal Work Jewelry Tutorials
 
Leftover madness bead necklace
Leftover madness bead necklaceLeftover madness bead necklace
Leftover madness bead necklace
 
Arcadian Legends Pendant Woven Wire Tutorial
Arcadian Legends Pendant Woven Wire TutorialArcadian Legends Pendant Woven Wire Tutorial
Arcadian Legends Pendant Woven Wire Tutorial
 
Gemstone Tassel Earrings tutorial
Gemstone Tassel Earrings tutorialGemstone Tassel Earrings tutorial
Gemstone Tassel Earrings tutorial
 
Twisted Wire Wrapped Cross Pendant Tutorial
Twisted Wire Wrapped Cross Pendant TutorialTwisted Wire Wrapped Cross Pendant Tutorial
Twisted Wire Wrapped Cross Pendant Tutorial
 
Double Wrap Wire Bangle Bracelet Tutorial
Double Wrap Wire Bangle Bracelet TutorialDouble Wrap Wire Bangle Bracelet Tutorial
Double Wrap Wire Bangle Bracelet Tutorial
 
Sea Grass Woven Wire Pendant
Sea Grass Woven Wire PendantSea Grass Woven Wire Pendant
Sea Grass Woven Wire Pendant
 
Summer Fun Earrings Tutorial
Summer Fun Earrings TutorialSummer Fun Earrings Tutorial
Summer Fun Earrings Tutorial
 
Beaded Snowflake Necklace Tutorial
Beaded Snowflake Necklace Tutorial Beaded Snowflake Necklace Tutorial
Beaded Snowflake Necklace Tutorial
 
How to Wire Wrap a Multi Gemstone Necklace
How to Wire Wrap a Multi Gemstone NecklaceHow to Wire Wrap a Multi Gemstone Necklace
How to Wire Wrap a Multi Gemstone Necklace
 
Imaginative Spring Butterfly Pendant Tutorial
Imaginative Spring Butterfly Pendant Tutorial Imaginative Spring Butterfly Pendant Tutorial
Imaginative Spring Butterfly Pendant Tutorial
 
Wire jewelry-free-ebook
Wire jewelry-free-ebookWire jewelry-free-ebook
Wire jewelry-free-ebook
 
How to Make Pearl Snap FastenerJewelry
How to Make Pearl Snap FastenerJewelryHow to Make Pearl Snap FastenerJewelry
How to Make Pearl Snap FastenerJewelry
 
How to Make Wire Wrapped Ammonite Jewelry DIY Jewelry Making Tutorial
How to Make Wire Wrapped Ammonite Jewelry DIY Jewelry Making TutorialHow to Make Wire Wrapped Ammonite Jewelry DIY Jewelry Making Tutorial
How to Make Wire Wrapped Ammonite Jewelry DIY Jewelry Making Tutorial
 
Gorgeous Spring Rain Earring Tutorial
Gorgeous Spring Rain Earring TutorialGorgeous Spring Rain Earring Tutorial
Gorgeous Spring Rain Earring Tutorial
 
Clever Blossom Earrings with Gold and Black Glass Pearls
Clever Blossom Earrings with Gold and Black Glass PearlsClever Blossom Earrings with Gold and Black Glass Pearls
Clever Blossom Earrings with Gold and Black Glass Pearls
 
Exquisite Copper Wire Earrings With Crystal Beads
Exquisite Copper Wire Earrings With Crystal BeadsExquisite Copper Wire Earrings With Crystal Beads
Exquisite Copper Wire Earrings With Crystal Beads
 

Similar to Hope Wire Woven Necklace Tutorial

20 bracelet patterns macram bracelets friendship bracelets hemp bracelets and...
20 bracelet patterns macram bracelets friendship bracelets hemp bracelets and...20 bracelet patterns macram bracelets friendship bracelets hemp bracelets and...
20 bracelet patterns macram bracelets friendship bracelets hemp bracelets and...SNSPA, Bucharest
 
SIMPLE MACRAME KNOTTING TECHNIQUES.pptx
SIMPLE MACRAME KNOTTING TECHNIQUES.pptxSIMPLE MACRAME KNOTTING TECHNIQUES.pptx
SIMPLE MACRAME KNOTTING TECHNIQUES.pptx
Bernard Richardson
 
Rough Draft Lanyard Instructions
Rough Draft Lanyard InstructionsRough Draft Lanyard Instructions
Rough Draft Lanyard Instructions
Vickie Buenger
 
20 bracelet patterns macram bracelets friendship bracelets hemp bracelets and...
20 bracelet patterns macram bracelets friendship bracelets hemp bracelets and...20 bracelet patterns macram bracelets friendship bracelets hemp bracelets and...
20 bracelet patterns macram bracelets friendship bracelets hemp bracelets and...
SNSPA, Bucharest
 
Knitting_and_Crocheting.ppt
Knitting_and_Crocheting.pptKnitting_and_Crocheting.ppt
Knitting_and_Crocheting.ppt
MarkEdwardOlango
 
Rustic Romance Heart Pendant Wire Jewelry Tutorial
Rustic Romance Heart Pendant Wire Jewelry TutorialRustic Romance Heart Pendant Wire Jewelry Tutorial
Rustic Romance Heart Pendant Wire Jewelry Tutorial
HouseofGems.com
 
Quilted Chair Caddy
Quilted Chair CaddyQuilted Chair Caddy
Quilted Chair Caddy
mlwilburn
 
소형베틀도면
소형베틀도면소형베틀도면
소형베틀도면
Seongwon Kim
 
How to Make Vintage Copper Pendant DIY Jewelry Making Tutorial
How to Make Vintage Copper Pendant DIY Jewelry Making TutorialHow to Make Vintage Copper Pendant DIY Jewelry Making Tutorial
How to Make Vintage Copper Pendant DIY Jewelry Making Tutorial
HouseofGems.com
 
How make a laptop &/or cookbook stand
How make a laptop &/or cookbook standHow make a laptop &/or cookbook stand
How make a laptop &/or cookbook standkootoyoo
 
How to Make a Red Oval Round Necklace DIY Jewelry Making Tutorial
How to Make a Red Oval Round Necklace DIY Jewelry Making TutorialHow to Make a Red Oval Round Necklace DIY Jewelry Making Tutorial
How to Make a Red Oval Round Necklace DIY Jewelry Making Tutorial
HouseofGems.com
 
How to make_friendship_bracelets_1_[1]
How to make_friendship_bracelets_1_[1]How to make_friendship_bracelets_1_[1]
How to make_friendship_bracelets_1_[1]cubbypanda1234
 
How to make friendship bracelets
How to make friendship braceletsHow to make friendship bracelets
How to make friendship braceletscubbypanda1234
 
How to Make Glamorous Grape Earrings DIY Jewelry Making Tutorial
How to Make Glamorous Grape Earrings DIY Jewelry Making TutorialHow to Make Glamorous Grape Earrings DIY Jewelry Making Tutorial
How to Make Glamorous Grape Earrings DIY Jewelry Making Tutorial
HouseofGems.com
 
Erin's Dream Lanyards--Instructions
Erin's Dream Lanyards--InstructionsErin's Dream Lanyards--Instructions
Erin's Dream Lanyards--Instructions
Vickie Buenger
 
16 free crochet hat patterns scarves gloves
16 free crochet hat patterns scarves  gloves16 free crochet hat patterns scarves  gloves
16 free crochet hat patterns scarves glovesSNSPA, Bucharest
 

Similar to Hope Wire Woven Necklace Tutorial (19)

20 bracelet patterns macram bracelets friendship bracelets hemp bracelets and...
20 bracelet patterns macram bracelets friendship bracelets hemp bracelets and...20 bracelet patterns macram bracelets friendship bracelets hemp bracelets and...
20 bracelet patterns macram bracelets friendship bracelets hemp bracelets and...
 
Measuring device
Measuring deviceMeasuring device
Measuring device
 
SIMPLE MACRAME KNOTTING TECHNIQUES.pptx
SIMPLE MACRAME KNOTTING TECHNIQUES.pptxSIMPLE MACRAME KNOTTING TECHNIQUES.pptx
SIMPLE MACRAME KNOTTING TECHNIQUES.pptx
 
Rough Draft Lanyard Instructions
Rough Draft Lanyard InstructionsRough Draft Lanyard Instructions
Rough Draft Lanyard Instructions
 
20 bracelet patterns macram bracelets friendship bracelets hemp bracelets and...
20 bracelet patterns macram bracelets friendship bracelets hemp bracelets and...20 bracelet patterns macram bracelets friendship bracelets hemp bracelets and...
20 bracelet patterns macram bracelets friendship bracelets hemp bracelets and...
 
Knitting_and_Crocheting.ppt
Knitting_and_Crocheting.pptKnitting_and_Crocheting.ppt
Knitting_and_Crocheting.ppt
 
Rustic Romance Heart Pendant Wire Jewelry Tutorial
Rustic Romance Heart Pendant Wire Jewelry TutorialRustic Romance Heart Pendant Wire Jewelry Tutorial
Rustic Romance Heart Pendant Wire Jewelry Tutorial
 
Big bold briolettes
Big bold briolettesBig bold briolettes
Big bold briolettes
 
Quilted Chair Caddy
Quilted Chair CaddyQuilted Chair Caddy
Quilted Chair Caddy
 
소형베틀도면
소형베틀도면소형베틀도면
소형베틀도면
 
How to Make Vintage Copper Pendant DIY Jewelry Making Tutorial
How to Make Vintage Copper Pendant DIY Jewelry Making TutorialHow to Make Vintage Copper Pendant DIY Jewelry Making Tutorial
How to Make Vintage Copper Pendant DIY Jewelry Making Tutorial
 
How make a laptop &/or cookbook stand
How make a laptop &/or cookbook standHow make a laptop &/or cookbook stand
How make a laptop &/or cookbook stand
 
Art on0508
Art on0508Art on0508
Art on0508
 
How to Make a Red Oval Round Necklace DIY Jewelry Making Tutorial
How to Make a Red Oval Round Necklace DIY Jewelry Making TutorialHow to Make a Red Oval Round Necklace DIY Jewelry Making Tutorial
How to Make a Red Oval Round Necklace DIY Jewelry Making Tutorial
 
How to make_friendship_bracelets_1_[1]
How to make_friendship_bracelets_1_[1]How to make_friendship_bracelets_1_[1]
How to make_friendship_bracelets_1_[1]
 
How to make friendship bracelets
How to make friendship braceletsHow to make friendship bracelets
How to make friendship bracelets
 
How to Make Glamorous Grape Earrings DIY Jewelry Making Tutorial
How to Make Glamorous Grape Earrings DIY Jewelry Making TutorialHow to Make Glamorous Grape Earrings DIY Jewelry Making Tutorial
How to Make Glamorous Grape Earrings DIY Jewelry Making Tutorial
 
Erin's Dream Lanyards--Instructions
Erin's Dream Lanyards--InstructionsErin's Dream Lanyards--Instructions
Erin's Dream Lanyards--Instructions
 
16 free crochet hat patterns scarves gloves
16 free crochet hat patterns scarves  gloves16 free crochet hat patterns scarves  gloves
16 free crochet hat patterns scarves gloves
 

Recently uploaded

A Strategic Approach: GenAI in Education
A Strategic Approach: GenAI in EducationA Strategic Approach: GenAI in Education
A Strategic Approach: GenAI in Education
Peter Windle
 
Additional Benefits for Employee Website.pdf
Additional Benefits for Employee Website.pdfAdditional Benefits for Employee Website.pdf
Additional Benefits for Employee Website.pdf
joachimlavalley1
 
How libraries can support authors with open access requirements for UKRI fund...
How libraries can support authors with open access requirements for UKRI fund...How libraries can support authors with open access requirements for UKRI fund...
How libraries can support authors with open access requirements for UKRI fund...
Jisc
 
The French Revolution Class 9 Study Material pdf free download
The French Revolution Class 9 Study Material pdf free downloadThe French Revolution Class 9 Study Material pdf free download
The French Revolution Class 9 Study Material pdf free download
Vivekanand Anglo Vedic Academy
 
Chapter 3 - Islamic Banking Products and Services.pptx
Chapter 3 - Islamic Banking Products and Services.pptxChapter 3 - Islamic Banking Products and Services.pptx
Chapter 3 - Islamic Banking Products and Services.pptx
Mohd Adib Abd Muin, Senior Lecturer at Universiti Utara Malaysia
 
Mule 4.6 & Java 17 Upgrade | MuleSoft Mysore Meetup #46
Mule 4.6 & Java 17 Upgrade | MuleSoft Mysore Meetup #46Mule 4.6 & Java 17 Upgrade | MuleSoft Mysore Meetup #46
Mule 4.6 & Java 17 Upgrade | MuleSoft Mysore Meetup #46
MysoreMuleSoftMeetup
 
special B.ed 2nd year old paper_20240531.pdf
special B.ed 2nd year old paper_20240531.pdfspecial B.ed 2nd year old paper_20240531.pdf
special B.ed 2nd year old paper_20240531.pdf
Special education needs
 
Unit 8 - Information and Communication Technology (Paper I).pdf
Unit 8 - Information and Communication Technology (Paper I).pdfUnit 8 - Information and Communication Technology (Paper I).pdf
Unit 8 - Information and Communication Technology (Paper I).pdf
Thiyagu K
 
The Accursed House by Émile Gaboriau.pptx
The Accursed House by Émile Gaboriau.pptxThe Accursed House by Émile Gaboriau.pptx
The Accursed House by Émile Gaboriau.pptx
DhatriParmar
 
TESDA TM1 REVIEWER FOR NATIONAL ASSESSMENT WRITTEN AND ORAL QUESTIONS WITH A...
TESDA TM1 REVIEWER  FOR NATIONAL ASSESSMENT WRITTEN AND ORAL QUESTIONS WITH A...TESDA TM1 REVIEWER  FOR NATIONAL ASSESSMENT WRITTEN AND ORAL QUESTIONS WITH A...
TESDA TM1 REVIEWER FOR NATIONAL ASSESSMENT WRITTEN AND ORAL QUESTIONS WITH A...
EugeneSaldivar
 
The geography of Taylor Swift - some ideas
The geography of Taylor Swift - some ideasThe geography of Taylor Swift - some ideas
The geography of Taylor Swift - some ideas
GeoBlogs
 
Synthetic Fiber Construction in lab .pptx
Synthetic Fiber Construction in lab .pptxSynthetic Fiber Construction in lab .pptx
Synthetic Fiber Construction in lab .pptx
Pavel ( NSTU)
 
1.4 modern child centered education - mahatma gandhi-2.pptx
1.4 modern child centered education - mahatma gandhi-2.pptx1.4 modern child centered education - mahatma gandhi-2.pptx
1.4 modern child centered education - mahatma gandhi-2.pptx
JosvitaDsouza2
 
Introduction to AI for Nonprofits with Tapp Network
Introduction to AI for Nonprofits with Tapp NetworkIntroduction to AI for Nonprofits with Tapp Network
Introduction to AI for Nonprofits with Tapp Network
TechSoup
 
Sha'Carri Richardson Presentation 202345
Sha'Carri Richardson Presentation 202345Sha'Carri Richardson Presentation 202345
Sha'Carri Richardson Presentation 202345
beazzy04
 
Phrasal Verbs.XXXXXXXXXXXXXXXXXXXXXXXXXX
Phrasal Verbs.XXXXXXXXXXXXXXXXXXXXXXXXXXPhrasal Verbs.XXXXXXXXXXXXXXXXXXXXXXXXXX
Phrasal Verbs.XXXXXXXXXXXXXXXXXXXXXXXXXX
MIRIAMSALINAS13
 
Thesis Statement for students diagnonsed withADHD.ppt
Thesis Statement for students diagnonsed withADHD.pptThesis Statement for students diagnonsed withADHD.ppt
Thesis Statement for students diagnonsed withADHD.ppt
EverAndrsGuerraGuerr
 
CACJapan - GROUP Presentation 1- Wk 4.pdf
CACJapan - GROUP Presentation 1- Wk 4.pdfCACJapan - GROUP Presentation 1- Wk 4.pdf
CACJapan - GROUP Presentation 1- Wk 4.pdf
camakaiclarkmusic
 
Overview on Edible Vaccine: Pros & Cons with Mechanism
Overview on Edible Vaccine: Pros & Cons with MechanismOverview on Edible Vaccine: Pros & Cons with Mechanism
Overview on Edible Vaccine: Pros & Cons with Mechanism
DeeptiGupta154
 
Unit 2- Research Aptitude (UGC NET Paper I).pdf
Unit 2- Research Aptitude (UGC NET Paper I).pdfUnit 2- Research Aptitude (UGC NET Paper I).pdf
Unit 2- Research Aptitude (UGC NET Paper I).pdf
Thiyagu K
 

Recently uploaded (20)

A Strategic Approach: GenAI in Education
A Strategic Approach: GenAI in EducationA Strategic Approach: GenAI in Education
A Strategic Approach: GenAI in Education
 
Additional Benefits for Employee Website.pdf
Additional Benefits for Employee Website.pdfAdditional Benefits for Employee Website.pdf
Additional Benefits for Employee Website.pdf
 
How libraries can support authors with open access requirements for UKRI fund...
How libraries can support authors with open access requirements for UKRI fund...How libraries can support authors with open access requirements for UKRI fund...
How libraries can support authors with open access requirements for UKRI fund...
 
The French Revolution Class 9 Study Material pdf free download
The French Revolution Class 9 Study Material pdf free downloadThe French Revolution Class 9 Study Material pdf free download
The French Revolution Class 9 Study Material pdf free download
 
Chapter 3 - Islamic Banking Products and Services.pptx
Chapter 3 - Islamic Banking Products and Services.pptxChapter 3 - Islamic Banking Products and Services.pptx
Chapter 3 - Islamic Banking Products and Services.pptx
 
Mule 4.6 & Java 17 Upgrade | MuleSoft Mysore Meetup #46
Mule 4.6 & Java 17 Upgrade | MuleSoft Mysore Meetup #46Mule 4.6 & Java 17 Upgrade | MuleSoft Mysore Meetup #46
Mule 4.6 & Java 17 Upgrade | MuleSoft Mysore Meetup #46
 
special B.ed 2nd year old paper_20240531.pdf
special B.ed 2nd year old paper_20240531.pdfspecial B.ed 2nd year old paper_20240531.pdf
special B.ed 2nd year old paper_20240531.pdf
 
Unit 8 - Information and Communication Technology (Paper I).pdf
Unit 8 - Information and Communication Technology (Paper I).pdfUnit 8 - Information and Communication Technology (Paper I).pdf
Unit 8 - Information and Communication Technology (Paper I).pdf
 
The Accursed House by Émile Gaboriau.pptx
The Accursed House by Émile Gaboriau.pptxThe Accursed House by Émile Gaboriau.pptx
The Accursed House by Émile Gaboriau.pptx
 
TESDA TM1 REVIEWER FOR NATIONAL ASSESSMENT WRITTEN AND ORAL QUESTIONS WITH A...
TESDA TM1 REVIEWER  FOR NATIONAL ASSESSMENT WRITTEN AND ORAL QUESTIONS WITH A...TESDA TM1 REVIEWER  FOR NATIONAL ASSESSMENT WRITTEN AND ORAL QUESTIONS WITH A...
TESDA TM1 REVIEWER FOR NATIONAL ASSESSMENT WRITTEN AND ORAL QUESTIONS WITH A...
 
The geography of Taylor Swift - some ideas
The geography of Taylor Swift - some ideasThe geography of Taylor Swift - some ideas
The geography of Taylor Swift - some ideas
 
Synthetic Fiber Construction in lab .pptx
Synthetic Fiber Construction in lab .pptxSynthetic Fiber Construction in lab .pptx
Synthetic Fiber Construction in lab .pptx
 
1.4 modern child centered education - mahatma gandhi-2.pptx
1.4 modern child centered education - mahatma gandhi-2.pptx1.4 modern child centered education - mahatma gandhi-2.pptx
1.4 modern child centered education - mahatma gandhi-2.pptx
 
Introduction to AI for Nonprofits with Tapp Network
Introduction to AI for Nonprofits with Tapp NetworkIntroduction to AI for Nonprofits with Tapp Network
Introduction to AI for Nonprofits with Tapp Network
 
Sha'Carri Richardson Presentation 202345
Sha'Carri Richardson Presentation 202345Sha'Carri Richardson Presentation 202345
Sha'Carri Richardson Presentation 202345
 
Phrasal Verbs.XXXXXXXXXXXXXXXXXXXXXXXXXX
Phrasal Verbs.XXXXXXXXXXXXXXXXXXXXXXXXXXPhrasal Verbs.XXXXXXXXXXXXXXXXXXXXXXXXXX
Phrasal Verbs.XXXXXXXXXXXXXXXXXXXXXXXXXX
 
Thesis Statement for students diagnonsed withADHD.ppt
Thesis Statement for students diagnonsed withADHD.pptThesis Statement for students diagnonsed withADHD.ppt
Thesis Statement for students diagnonsed withADHD.ppt
 
CACJapan - GROUP Presentation 1- Wk 4.pdf
CACJapan - GROUP Presentation 1- Wk 4.pdfCACJapan - GROUP Presentation 1- Wk 4.pdf
CACJapan - GROUP Presentation 1- Wk 4.pdf
 
Overview on Edible Vaccine: Pros & Cons with Mechanism
Overview on Edible Vaccine: Pros & Cons with MechanismOverview on Edible Vaccine: Pros & Cons with Mechanism
Overview on Edible Vaccine: Pros & Cons with Mechanism
 
Unit 2- Research Aptitude (UGC NET Paper I).pdf
Unit 2- Research Aptitude (UGC NET Paper I).pdfUnit 2- Research Aptitude (UGC NET Paper I).pdf
Unit 2- Research Aptitude (UGC NET Paper I).pdf
 

Hope Wire Woven Necklace Tutorial

  • 1. 1 Someone Needs Your Help Now that I am retired, I do not often travel the 40 miles to the community where I taught for over 30 years. When I found a poster here in my hometown last week about a fundraiser for the son of a former student, I knew we would be attending the fundraiser. However, I thought there had to be something more I could do, so decided to make this necklace as an item for the fundraiser. As I was planning it out, I realized that maybe people in the jewelry making community might want to make something like this, so I photographed each step, and then started writing. It is my hope that if you download this tutorial, you will consider donating to Knox’s family to help with his medical expenses. If you want to donate on-line, you can “Help Knox Olafson Kick Cancer to the Curb!” by going to: https://www.youcaring.com/christyolafson-804439 If you are downloading this tutorial after the timeframe to help Knox, someone, somewhere, always needs help. Consider donating to St. Jude’s Children’s Hospital or cancer research. Consider donating to local charities. Or, volunteer your time and talents and make one of these necklaces for a worthy fundraiser in your community. Photo below by Carol Erickson HOPE Judy Larson Some wire weaving experience to make this neckpiece. However, since the woven wires only wrap around a base frame, an advanced beginner wireworker could probably make this. Materials: 22 gauge round wire: Four pieces 28” long and four pieces 36” long 28 gauge round wire: (up to 120 feet) Note: Two separate spools/coils of wire were used in this tutorial and not cut off until the last few steps. 40” of 21 gauge half round wire Twelve 3mm metal beads Eighteen 2.5mm metal beads Cabochons: Two 18x13mm Two 25x18mm One 30x22mm Two 6mm gemstone beads Four 20 gauge 8x5mm oval jump rings 8½” necklace chain, separated into two pieces-the one here was made with 20 gauge 3mm ID jump rings 3” extender chain-the one here has a 4mm wire wrapped bead on the end Lobster claw clasp Tools: Slim head micro flush cutter Stylus and/or Awl Soft jaw pliers Flat, chain and round nose pliers Painters tape Fine point Sharpie marker
  • 2. 2 Wire Weaves Used (in bold print in the tutorial) Leave a short tail when first starting a weave. Hold the tail between your fingers to anchor the weaving wire as you begin to coil and/or weave. Wrap the weaving wire around one of the base wires one or two times to anchor it before you start weaving. Everyone has a different tension when wire wrapping. That is why most of the woven and coiled sections in this tutorial are measured lengths instead of counted wraps or repetitions of wraps. Coil: Make three or four wraps with 28 gauge weaving wire over the 22 gauge base wire, and then push the wires together. If working from a spool or coil of wire, check it to make sure that the weaving wire is not kinked. Continue in this manner until the desired length is reached. 3x3 on two wires: Wrap one base wire three times and then wrap the two base wires together three times. Push the wraps together. Repeat this until the desired length is achieved. 2x2 on two wires: Wrap two base wires together two times and then wrap one base wire two times. Push the wraps together. Repeat this until the desired length is achieved. 2x2 on three wires: Wrap the upper two base wires together two times, then wrap the lower two base wires together two times. Push the wraps together. Repeat until the desired length is achieved. ’s or Mountains or Zig-Zag on four wires: Wrap the two lower base wires twice; wrap the two center base wires twice; wrap the two upper base wires twice; wrap the two center base wires twice, wrap the two lower base wires twice. To repeat the , start by wrapping the two center base wires. Push the wraps together after each set of two wraps. Repeat until the desired length is achieved.
  • 3. 3 Securing Half Round Wire Wrapped Ends 21 gauge half round wire is very malleable. With all the handling of the cabochon framework during initial construction, these wires could come loose. You can avoid that problem by pulling the half round wire ends between the separated base wires. You then trim the half round wire off and tuck the end down into the “seam” between the two sets of separated wires. The Layout Lay your cabochons flat side down on a copy machine. Play with the size, number and spacing until you have a few layouts you like. Make a copy of each. Choose one and make one or two copies of it. You may want to use the originals at a later time for another fun project. For the purposes of this tutorial, the design with five cabochons was chosen. Make design choices, ideas, thoughts, where the cabochons are connected, etc. on the copy. You are not committed your ideas, they are just guidelines for you. Design as you go within the limitations of your wire lengths. Measure the total length of the piece to make sure that it is not too large or small for your neck, how you want to wear it, or what you want to wear it with. You can make adjustments accordingly. Make some decisions about where you want to make the wraps to hold the framework wires together. On the design at the left, they are marked with X’s but not easily seen. Constructing the Necklace The Cabochon Framework Step 1: Straighten and cut four 36” pieces of 22 gauge round wire. Use painters tape to secure the wires together about 6” either side of center, making sure the wires do not cross. Mark the center with the fine point Sharpie marker. Step 2: Match the marked wire center with the center of the lower edge of the lower 30x22mm cabochon. Form the wire to match the curve of the cabochon photocopy. Check the shape/fit on the gemstone cabochon to make sure it fits as well as possible. Step 3: Bend the base wires out where shown on your original design. Flip the set of base wires over, centering the marked wire center with the center of the lower edge of the cabochon. Make adjustments in where and how much the wire will be bent out so that both sides are as even as possible. Step 4: Hint: This step may be a bit easier of you secure the center of the base wires together with a bit of painters tape before you begin securing them together with the half round wire. Secure the framework base wires together at the X’s you marked in your design. Using 21 gauge half round wire, make 4 wraps at each X. Flip the set of base wires over, matching the center mark on the wire to the bottom center of the cabochon photocopy. Make adjustments in where the finished wraps are located so that both sides are as even as possible. Use the tips of a chain nose pliers to lightly tighten the wraps in place. They will probably move a bit during the framework construction, so be aware that you will need to check placement before securing the cabochons in place.
  • 4. 4 Step 5: Straighten and cut four 28” pieces of 22 gauge round wire. Use painters tape to secure the wires together about 6” either side of center, making sure the wires do not cross. Mark the center with the fine point Sharpie marker. Step 6: Match the marked wire center with the center of the upper edge of the large 30x22mm cabochon. Form the wire to match the curve of the cabochon. Check the shape/fit on the gemstone cabochon to make sure it fits as well as possible. Step 7: Bend the base wires out where shown on your original design. Flip the set of base wires over, centering the marked wire center with the center of the upper edge of the cabochon. Make adjustments in where and how much the wire will be bent out so that both sides are as even as possible. Step 8: Using painters tape, secure the outer and inner base wires together 2”-3” out from the bend, keeping the wires as straight as possible. Try to make sure that the 36” wires stay on the outside and the 28” wires stay on the inside. Step 9: Using 21 gauge half round wire, make 10 wraps to secure the eight wires together on each side of the cabochon. Remove the tape. Bend the upper 28” wires toward the inside of the cabochon framework and the 36” lower wires out toward the outside of the cabochon framework. Step 10: Using painters tape, secure the separated sets wires together about 6” out from the bend (The photo below in Step 12 shows that the tape was placed too close to the bend.). Step 11: Form the wires to match the curve of the middle 25x18mm cabochons. Check the shape/fit on the gemstone cabochon to make sure it fits as well as possible. Step 12: Secure the framework base wires together at the X’s you marked in your design. Use 21 gauge half round wire to make 4 wraps at each X. Use a flat nose pliers to lightly squeeze the wraps in place. They will probably move a bit during the framework construction, so be aware that you will need to check placement before securing the cabochons in place. Step 13: On each side of the framework, mark the wires where the bends in the 24” and 36” wire bundles need to be made. Flip the framework over, matching the lower center mark of the framework with the center of the lower edge of the 30x22 cabochon on your photocopy. Make adjustments in where the wires will be bent out so that both sides are as even as possible. Step 14: Make 90 degree bends in all 4 sets of wires. Step 15: Use painters tape to secure the outer and inner base wires together 2”- 3” out from the bend, keeping the wires as straight as possible. Try to make sure that the outer 36” wires stay on the outside and the inner 28” wires stay on the inside. Step 16: Using 21 gauge half round wire, make 10 wraps to secure the eight wires together on each side of the cabochon. Remove the tape and bend the 28” wires out toward the inner neck edge and the 36” wires out toward the outer neck edge.
  • 5. 5 Step 17: Use painters tape to secure the separated sets wires together about 6” out from the bend. Step 18: Form the wires to match the curve of the 18x13mm cabochons. Check the shape/fit on the gemstone cabochon to make sure it fits as well as possible. Step 19: Secure the framework wires together at the X’s you marked in your design. Use 21 gauge half round wire to make 3 wraps at each X. Use a flat nose pliers to lightly squeeze the wraps in place. They will probably move a bit during the harness/base construction, so be aware that you will need to check placement before securing the cabochons in place. Step 20: On each side of the framework, mark the wires where the bends in the upper and lower wire bundles need to be made. Flip the framework over, matching the lower center mark of the framework with the center of the lower edge of the 30x22 cabochon on your photocopy. Make adjustments in where the wire will be bent out so that both sides are as even as possible. Step 21: Make 90 degree bends in all 4 sets of wires at those marks. Step 22: Use painters tape to secure the 36” and 24” wires together 2”-3” out from the bend, keeping the wires as straight as possible. Try to make sure that the 36” wires stay on the outside and the 28” wires stay on the inside. Step 23: Using 21 gauge half round wire, make 5 wraps to secure the eight wires together on each side of the cabochon. Remove the tape and bend the 28” wires toward the inner neck edge and the 36” wires out toward the outer neck edge. Step 24: Adjust all the wire wraps inside each cabochon oval so they are mirror images of the ones on the opposite side of the framework. Use the tips of a chain nose pliers to lightly tighten in place. Step 24: Make bends in the wires in any manner you wish on the back side of the framework for the each of the cabochons to sit on. Step 25: Secure all the cabochons in place in the framework. Step 26: Optional: Use the stylus or sharp awl to scratch your initials and date on the back of the large central cabochon. Hint: When ordering weaving wire, you may wish to order two 100 foot coils. That way, it will be easier to make mirror image weaving wraps for each side of this neckpiece. You can work with a separate coil on each side and do each step at the same time. It can be difficult to remember what you did or what changes you made to your design if you work a whole side of a design, and then try to work on the other. Coming back a day or two later to repeat some steps as mirror images can be a challenge!
  • 6. 6 Weaving and Wrapping the Framework Step 27: Cut two each of the following lengths of 28 gauge wire and set aside. If you are using two separate coils of wire, you may wish to cut one of each length from each coil. 8” 30” 6 feet Step 28: The whole unit will be easier to work with if you coil the base wires you are not using, rather than leaving them long and hanging in the way (photo to the left). From here through the end of the tutorial, most of the steps will have left and right side photos of the neckpiece as you would view it while working on it, making it easier to make mirror image weavings as you progress through the construction process. This should help if you are only using one coil of wire for the weaving or working in small increments of time. For the first part of weaving and wrapping the framework of the neckpiece, you will be working with the tails of the inner 28” base wires. Step 29: Anchor the 28 gauge weaving wire, leaving a 1” tail, on one of the two center wires. Create five ’s on the four wires, so the design faces the inner edge of the framework. Trim off the beginning wire tail. This wire end will be covered so you do not need to worry if it is sharp. Step 30: Use a soft jaw pliers to gently twist the section just woven so it faces the front of the framework. Step 31: Separate the base wires. Slide a 6mm bead on the wire second from the outside, keeping that wire straight. Step 32: Construct about 5/16”, approximately 7 sets, of the 2x2 on two wires weave. The wire that is wrapped by itself should be on the inside. Curve the outer wire around the bead to meet the straight wire that the bead is on. Bend the wire out along the straight wire. Curve the 2x2 on two wires section around the bead to meet the wire that the bead is on. Add more 2x2 weaving if needed. Bend the 2x2 on two wires base wire ends out along the straight wire that the bead is on.
  • 7. 7 Step 33: Connect the four wires above the bead with one . Pull the outer wire to the outside of the neckpiece framework. Step 34: Construct 1½”-1¾”, approximately 32 sets, of the 2x2 on three wires weave on the three inner wires. You can add more 2x2 on two wires later if needed. Step 35: Bend the 2x2 on two wires section and the outer wire to the inside of the neckpiece framework. Step 36: Curve the 2x2 on two wires section and outer wire and bare wire counterclockwise on the left and clockwise on the right, making a loop. Step 37: Curve the 2x2 on two wires section around the bead and to the outside of the neckpiece framework. Step 38: Slightly uncurl the single wire. Use the reserved 30” piece of 28 gauge wire you set aside to wrap a 3” coil length on the outer wire on both the left and right sides of the neckpiece framework. Tuck the beginning wire tail into and under some of the previous weaving before you cut it off. That way, the wire end will not scratch the skin of the wearer. Do not cut off the other end of the 28 gauge wire yet. You may need it to add more length to the coiled section. Step 39: Wrap the coiled wire into a loop again inside of the following the curve of the 2x2 on three wires weave. Pull the coiled wire behind the 2x2 on three wires weave, under the bead and between the 2x2 on three wires weave and the weave. Pull the coiled wire towards the outside of the neckpiece framework.
  • 8. 8 Step 40: Above the bead, push the coiled wire end between the wire the bead is on and the inner 2x2 on two wires weave. Pull the wire out the back. The coil should tightly rest against the outer side of the bead. Pull the wire toward the inside of the neckpiece framework. Step 41: Pull the coiled wire down around the inside of the bead, then between the 2x2 on three wires weave and the weave. Pull the wire tightly to the outside of the neckpiece framework so that the coil rests tightly against the bead. Step 42: Pull the coiled wire around the back of the neckpiece framework and toward the center of the framework. (Photos are of the back of the framework.) Note: When the neckpiece is turned over, the front left side is then on the right. ie: The photo to the left here is the right side when seen from the front. Step 43: Pull the 36” wire tails toward the upper inside center of the neckpiece framework. Pull the coiled wire to the front of the neckpiece framework.
  • 9. 9 Step 44: Curve the 2x2 on three wires weave around the outside of the weave and behind the half round wire framework wrap section above the cabochon. Straighten and pull the three wire tails toward the inside of the neckpiece framework. Step 45: Curve the coiled wire in the same manner, following the inner curve of the 2x2 on three wires weave. Step 46: Turn the neckpiece framework over. You may need to add to the coil and/or the 2x2 on three wires weave to make the ends even on the back of the neckpiece framework. Note: When the neckpiece is turned over, the front left side is then on the right. ie: The photo to the left here is the right side when seen from the front. Step 47: Work from the back so when you wrap this section around to the front, the weave design will face out. Weave four ’s to secure all 4 base wires together.
  • 10. 10 Step 48: Wrap the ’s weave section around the front and then to the back of the neckpiece framework. Step 49: Straighten and pull the 24” wire tails toward the inside of the neckpiece framework. Step 50: The neckpiece does not need to be embellished, so this step is optional. Slide a 2.5mm, a 3mm and a 2.5mm bead on a reserved piece of 8” wire. Secure them to the framework where shown, just below the wire coil. Wrap the 28 gauge wire ends around the framework once, hiding the wire under the wraps. If some of the wire shows, do not be too concerned. Then thread one wire tail through the beads again (the bead hole edges are sharp and can cut the wire over time). Wrap the 28 gauge wire around the framework again. Trim the wire 28 gauge tails. Step 51: Separate the upper wire on each side. Working from the back so that the right side of the weave will show on the front, make a 2”-2 ¼” length of 2x2 on three wires weave on the lower three wires. (Photos are from the front.) Step 52: Wrap the 2x2 on three wires weave around to and over the front of the cabochon. Curve the weave down along the outer edge and then the lower edge of the cabochon. Straighten and pull the 24” wire tails toward the inside of the neckpiece framework.
  • 11. 11 Step 53: Pull the 2x2 on three wires weave to the back and across the neckpiece framework. Step 54: Using the 6 foot reserved 28 gauge wire, wrap a coil along the entire length of the separated wire (from Step 51), leaving about ¼” not wrapped at the end. Tuck the beginning wire tail into and under some of the previous weaving before you cut it off. That way, the wire end will not scratch the skin of the wearer. Do not cut off the other end of the 28 gauge wire yet. You can trim off the excess 28 gauge wire at the end. Step 55: Pull the coil wrapped wire to the front and to the outside of the neckpiece framework above and close to the 2x2 on three wires weave section. Pull the coiled wire down around the outside of the cabochon framework, Step 56: Wrap the 2x2 on three wires and the coiled wire around the half round wire framework wrap section below the top cabochon, ending by pulling both sections toward the center of the neckpiece framework. Step 57: Continue making enough 2x2 on three wires weaves until that section can curve around the inside of the middle cabochon and extend outward about ½”.
  • 12. 12 Step 58: Wrap the 2x2 on three wires weave around the half round wire wrapped section of the framework below the middle cabochon, ending by pulling bare wires of the 2x2 on three wires weave section toward the outside of the neckpiece framework. Trim off the 28 gauge wrapping wire. Step 59: Wrap the coiled wire along the inside of the 2x2 on three wires weave on the middle cabochon. Pull the coiled wire around the back and to the front, following the 2x2 on three wires weave. Step 60: Wrap the 22 gauge base wire tails once fully around the framework, ending on the back, pulling them tightly against the neckpiece framework. Trim off the excess base wire. Use a chain nose pliers to pinch the ends onto the neckpiece framework. Step 61: Wrap the coiled wire around framework between the 2x2 on three wires wraps, ending on the back. Use a stylus or a pick to push the wire end under the wire weaving. Trim off the excess wire. Use a chain nose pliers to pinch the ends onto the neckpiece framework. Hint: You may need to remove some of the 28 gauge coil from the base wire to make it easier to pull under the wrapped sections.
  • 13. 13 For the second part of weaving and wrapping, you will be working with the tails of the outer 36” wires to finish your neckpiece. Step 62: Cut two each of the following lengths of 28 gauge wire and set aside. If you are using two separate coils of wire, you may wish to cut one of each length from each coil. 14” 26” 5 feet 20” Step 63: Straighten and separate the base wires. You will be working with the lower two. Anchor the 28 gauge weaving wire on the upper wire, leaving a 1” tail. Create 2” of the 3x3 on two wires weave on the lower two wires. Trim and tuck the beginning wire tail into and under some of the previous weaving before you cut it off. That way, the wire end will not scratch the skin of the wearer. With this weave, you can work from the front. Step 64: Use the 14” piece of 28 gauge wire you set aside to wrap this wire to make a 1” coil length on the lower of the upper two wires. Tuck the beginning wire tail into and under some of the previous weaving before you cut it off. That way, the wire end will not scratch the skin of the wearer. Do not cut off the other end of the 28 gauge wire yet. You may need it to add more length to the coiled section. Step 65: Pull the 3x3 on two wires weave to the front and across to the outside of the neckpiece framework, curving it slightly downward. Step 66: Pull the 3x3 on two wires weave to the back. Bring the upper bare wire and the coiled wire to the front, following the upper edge of the 3x3 on two wires weave.
  • 14. 14 Step 67: Bring the 3x3 on two wires weave to the front and across just below the first 3x3 on two wires wrap, pulling it to the outside of the neckpiece framework. Step 68: Bring the 3x3 on two wires weave and the bare and coiled wire around to the back, parallel to each other. Straighten and pull them towards the center of the neckpiece framework. Step 69: Note: The weaving and coiling should not extend beyond the framework more than ¼”. Working from the back so the design will face outward when wrapped to the front, connect all four wires with approximately 14 of the ’s weave. Step 70: Pull the weave to the front. Curve the ’s weave section around the inner edge of the upper cabochon, creating an interesting “window” shape on the top inner edge of the cabochon.
  • 15. 15 Step 71: Pull the weave around to the back and to the inside of the neckpiece framework. Straighten the wires if needed. Step 72: Turn the framework over. Working from the back, pull the upper bare wire up away from the lower three. Weave a 2”-2¼” section of a 2x2 on three wires weave on the lower three wires. Step 73: Wrap a coil on the upper wire for a length of 2-3/8” using the 26” piece of reserved 28 gauge wire. Tuck the beginning wire tail into and under some of the previous weaving before you cut it off. That way, the wire end will not scratch the skin of the wearer. Do not cut off the other end of the 28 gauge wire yet. You may need it to add more length to the coiled section. Step 74: Bring the 2x2 on three wires weave to the front and curve it around the inner edge of the middle cabochon. Step 75: Bring the coiled wire to the front, between the weave and the 2x2 on three wires weave. Pull the coiled wire tightly toward the back, but not across it. It will sink between the two woven sections.
  • 16. 16 Step 76: Use a stylus or an awl to create a small opening between the upper cabochon and the wire weaving. Pull the coiled wire through that opening, going from the center of the neckpiece framework to the outside. Step 77: Bring the coiled wire around to the front and follow the inside edge of the 2x2 on three wires weave. Add more wraps to the coil if needed to make the ends of both sections even. Trim off the 28 gauge coil wire. Step 78: Secure the upper two wires together by making two wraps, starting a weave. Make four ’s. Step 79: Pull the weave around the back. Straighten and pull the wires towards the center. Separate the upper wire.
  • 17. 17 Step 80: Using the 6 foot reserved 28 gauge wire, wrap a coil on the upper separated wire, leaving about ¼” not wrapped at the end. Tuck the beginning wire tail into and under some of the previous weaving before you cut it off. Step 81: Pull the coiled wire around to the front. Then slip the end, from outside to inside, under the 2x2 on three wires weave and the coil. Pull the coiled wire tightly to hold everything firmly to the framework. Step 83: Pull the coiled wire across the back towards the outside of the neckpiece framework. Bend the coiled wire as shown just before curving it up around the cabochon. It will be secured in place later. Step 84: Curve the coiled wire up around the outside of the 2x2 on three wires on the outside edge of the middle cabochon.
  • 18. 18 Step 85: Pull the coiled wire around to the back and towards the outside of the neckpiece framework. Step 86: Using a stylus or an awl, create a small opening between the upper cabochon and the wire weaving. Step 87: Pull the coiled wire through that opening, going from the outside of the neckpiece framework to the inside. This is what the back looks like. Step 88: Bring the coiled wire up around the inner edge of the upper cabochon, following the curve of the outer edge of the weave. Use your fingertip to press the coil into place. Pull the coiled wire to the back and to the outside of the neckpiece.
  • 19. 19 This is what the back looks like. Step 89: Wrap the coiled wire around to the front and above the coiled wire sitting next to the 2x2 on three wires weave. Step 90: Pull the coiled wire around the back and to the front again, Place it next to and above the upper coil. Pull the coiled wire around to the back (not shown) and toward the outside of the neckpiece. Step 91: Using a stylus or an awl, create a small opening between the woven wires. Pull the coiled wire through that opening, going from the center of the neckpiece framework to the outside. Step 92 (below): Using a chain nose pliers, pull the coiled wire tightly through the opening. Trim off the excess wire. Use a soft jaw pliers to snug together the weaving you separated to get the coiled wire through.
  • 20. 20 Step 93: Working from the back so the design will face outward when wrapped to the front, construct a 1” length of the 2x2 on three wires weave to start. Step 94: Wrap the 2x2 on three wires section around to the front. Step 95: Wrap the 2x2 on three wires section around to the back. Straighten and pull the wires outward. This is what the lower section of the neckpiece now looks like from the front and back. Step 96: Pull the outer wire on each side away from the other two. Coil wrap the outer wire on each side with the reserved 20” pieces of 28 gauge wire, for approximately 2”. Tuck the beginning wire tail into and under some of the previous weaving before you cut it off. That way, the wire end will not scratch the skin of the wearer. Do not cut off the other end of the 28 gauge wire yet. You may need it to add more length to the coiled section.
  • 21. 21 Step 97: Working from the back so the right side will show when the weaving is wrapped around the framework, make a 2½” length of 3x3 on two wires. (The neckpiece with the finished weaving is shown from the front.) Step 98: Wrap the 3x3 on two wires weave section around to the front, up toward the center of the neckpiece. The 3x3 on two wires weave should nestle against the 2x2 on three wires section. Step 99: Curve each of the 3x3 on two wires weave sections into a loop as shown. Step 101: Pull the 3x3 on two wires weave sections to the back. Step 101: Press the loops against the weaves previously wrapped around the neckpiece framework.
  • 22. 22 Step 102: Add enough 3x3 on two wires weave to measure 1-3/8” from top inner edge of the neckpiece to the end of the weaving. End the weave by wrapping just one wire three times. Step 103: Wrap 3x3 on two wires weave section around the front, coming from the bottom and pulling over the top, so that it nestles against the previous 3x3 on two wires wrap with the loop. Step 104: Wrap coiled wire around the front, between the 3x3 on two wires and the 2x2 on three wires section, tucking it under the loop created in Step 99. Pull the coiled wire down across the back. Step 105: Bring the coiled wire back to the front, placing it between the two inner 3x3 on two wires sections. Pull the coiled wire down across the back. Step 106: Add enough weaving to the 3x3 on two wires or the coiled wire to make the ends of each even. Step 107: Working from the back so the right side will show when the weaving is wrapped around to the front of the framework, connect the three wires on each side with a 1¾” length of 2x2 on three wires weave.
  • 23. 23 Step 108: Pull the 2x2 on three wires weave section around to the front of the cabochon. If needed, add more 2x2 on three wires weave so that the weave is at least just over the top going to the back of the cabochon and both sides match in length. Step 109: Trim ONE of the two 28 gauge wrap wires off, leaving a tail to tuck in. Secure that tail so it will not pop out and scratch the skin. Step 110: Separate all but the center two base wires. With the remaining 28gauge wrapping wire, wrap the center two wires together for about 3/16”, no more than ¼”. Step 111: Trim the center two wires to the length shown. Coil wrap the longer of the two wires to within 1/8” of the end. Trim the 28 gauge wrap wire off. Use a chain nose pliers to snug the cut end down onto the 22 gauge base wire. Step 112: Use a chain nose pliers to make a small scroll in the shorter bare wire. Curve the coiled wire around it, tucking the wire end under all the weaving. Press this section down onto the cabochon. Step 113: The remaining wires are individually pulled tightly around to the front between two sets of weaving. Use a chain nose pliers to pull each wire tighlty. This will make each wire “dissapear” beneath all the weaving and secure it from becoming loose.
  • 24. 24 Step 114: Trim each 22 gauge base wire end. Use a soft implement to press each wire end under the weaves. This is what your neckpiece now looks like. You can leave it as is, or add a bit of bead embellishment. Where you stop with embellishment is up to you. Embellishment Step 115: For each side, cut two 5” pieces of 28 gauge wire. Slide a 2.5mm bead on two wires. Center the bead. Pull the wires down on either side of the bead. Step 116: Slide the four wires with the bead under the weave on the lower side of the upper cabochon. Pull the wires to the center of the neckpiece, nestling the bead into the “V” created where the weaving sections cross.
  • 25. 25 Step 117: Pull the four 28 gauge wires across the front, between the weave and the coiled wire. Step 118: Pull the four 28 gauge wires tightly between the weave and the coiled wire. They should “disappear” beneath them. Step 119: Pull the wires around the back, following the weaving and pulling tightly to make them “disappear” beneath the weaving. Step 120: Bring the four 28 gauge wires around to the front and slip them under the wrapping covering the cabochon. Pull tightly.
  • 26. 26 Step 121: After the wires have been pulled tightly and you are sure they will not pull out, use a micro flush cutter to snip them off, trying to make sure that the cut ends will be under the weaving. A micro flush cutter has tiny little narrow jaws making it easy to get into those hard-to-reach spaces. Use a soft implement to press each wire end under and/or into the weaves. Step 122: For each side, cut two 6” pieces of 28 gauge wire. Slide a 3mm bead on two wires. Center the bead. Pull the wires down on either side of the bead. Step 123: Slide the four wires with the bead under the weave and coil on the lower part of the middle cabochon. Pull the wires to the outside of the neckpiece, nestling the bead into the “V” created where the weaving sections cross. Step 124: Pull the four 28 gauge wires across the back, pulling tightly toward the center of the neckpiece. Wrap around one more time, hiding the wires. Step 125: Bring the four 28 gauge wires around to the front and slip them under the wire wrapping sections covering the cabochon. Pull tightly. Step 126: After the wires have been pulled tightly and you are sure they will not pull out, use a micro flush cutter to snip them off, trying to make sure that the cut ends will be under the weaving. Use a soft implement to press each wire end under and/or into the weaves.
  • 27. 27 Step 127: For each side, cut two 6” pieces of 28 gauge wire. Slide a 3mm bead on two wires. Center the bead. Pull the wires down on either side of the bead. Step 128: Slide the four wires with the bead under the weave and coil on the upper part of the middle cabochon. Pull the wires to the outside of the neckpiece, nestling the bead into the “V” created where the weaving sections cross. Step 129: Pull the four 28 gauge wires across the back, pulling tightly toward the center of the neckpiece. Wrap around one more time, hiding the wires. Step 130: Bring the four 28 gauge wires around to the front and slip them under the wrapping covering the cabochon. Pull tightly. Step 131: After the wires have been pulled tightly and you are sure they will not pull out, use a micro flush cutter to snip them off, trying to make sure that the cut ends will be under the weaving. Use a soft implement to press each wire end under the weaves. This is what your neckpiece now looks like. You can leave it as is, or add more bead embellishment.
  • 28. 28 The following steps are general directions for attaching the 3-bead embellishments above and below the small upper cabochon on the neckpiece. Step 132: For each side, cut two 7” pieces of 28 gauge wire. Slide a 2.5mm, 3mm and then a 2.5mm bead on the two wires. Center the beads on the two wires. Step 133: Place the beads where desired between woven sections and coils. Pull the wires to the back between the wrapped sections. Tightly pull the right wires to the left and the left wires to the right across the back. By following the “grooves” between the wrapped weaves and coils and pulling tightly, the 28 gauge wires should “disappear” beneath the weaves. Step 134: Wrap the 28 gauge wires around the neckpiece again. Secure the ends in place under a section of weaving. Hint: You can use a stylus or an awl to gently lift a woven section to create a hole to pull the wires through. Step 135: The wires should be hidden as well as possible on the front as well as the back. Step 136: After the wires have been pulled tightly and you are sure they will not pull out, use a micro flush cutter to snip them off, trying to make sure that the cut ends will be under the weaving. Use a soft implement to press each wire end under the weaves. Use a soft jaw pliers to compress any lifted areas. The following steps are general directions for attaching the 3-bead embellishments on either side of the large center cabochon on the neckpiece. Step 137: For each side, cut two 7” pieces of 28 gauge wire. Slide a 2.5mm, 3mm and then a 2.5mm bead on the two wires. Center the beads on the two wires.
  • 29. 29 Step 138: Place the beads on the wire just below the woven loop, as shown. Pull the wires tightly to the back in the “grooves” between wrapped sections. Pull the wires across the back. By following the “grooves” between the wrapped weaves and coils and pulling tightly, the 28 gauge wires should “disappear” beneath the weaves. Step 139: Wrap one set of the 28 gauge wires around the neckpiece again. Secure the ends in place under a section of weaving. Hint: You can use a stylus or an awl to gently lift a woven section to create a hole to pull the wires through. Step 140: Wrap the other set of two wires around the unit so that you can secure the corner of the coiled wire indicated by the arrow, below, to the base. Wrap the wires around the neckpiece again, pulling tightly. Step 141: After the wires have been pulled tightly and you are sure they will not pull out, use a micro flush cutter to snip them off, trying to make sure that the cut ends will be under the weaving. Use a soft implement to press each wire end under the weaves. Use a soft jaw pliers to compress any lifted areas. Step 142: The neckpiece may have become slightly twisted during construction. The cabocons may no longer be level. Press the neckpiece against a flat surface. Make adjustments to the woven sections and coils so everything is how you want it. The neckpiece now looks like this.
  • 30. 30 Shaping the Neckpiece to Fit the Neckline Step 143: The finished neckpiece is a “V” shape. Gently curve it into a more rounded open “C” shape. The neckpiece is still flat. A neck mandrel makes shaping your flat neckpiece into a more three dimensional shape very easy. However, if you do not have a neck mandrel, you will find the following two steps helpful. Step 144: You will now give your neckpiece a little more dimensionality. Your thigh, close to your knee, is a great place to gently curve your neckpiece to make it lay neatly on your neckline. Place one side of the neckpiece on your thigh, close to your knee. Gently bend the neckpiece to give it a slight three dimensional curve above the large center cabochon. Step 145: After shaping the neckpiece, make the sides more even by curving it around a small bowl or large cup. Finishing the Necklace Step 146: Attach two 20 gauge 8x5mm oval jump rings to the upper loop on either side of the neckpiece.
  • 31. 31 Step 147: Attach a 4¼” chain to the oval jump rings on either side of the neckpiece. This should make the necklace about 17” long, just a bit larger than a choker length. Hint: Create your own chain using 20 gauge 3.5mm ID jump rings in a 2x2 design, shown here. Step 148: Attach a lobster claw clasp to the end of the chain on the right, as you would wear the necklace. Step 149: Attach a 3” extender chain to the chain on the left, as you would wear the necklace, to make it adjustable for any neck, or to wear it longer. Step 150: Attach a wire wrapped 4mm bead to the end of the extender chain if you wish.
  • 32. 32 The photos of “HOPE” were taken by Carol Erickson