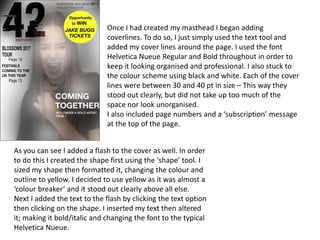
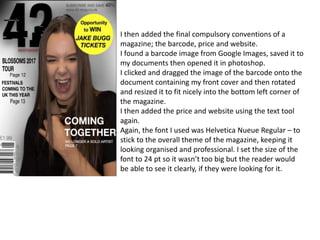
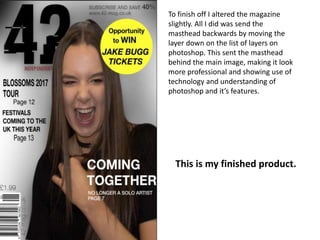
Construction
FRONT
COVER
The first thing that I did in the process of creating my
front cover was set a background.
I didn’t want a very bold background for my cover, so
I used the brush tool and grey/black to create more
of a shadow for my main image and cover lines,
rather than a solid color.
I selected the brush
tool from the menu on
the left side of the
screen. I set the brush
size to 2840 px – this
way the color did not
come out too solid and
more ‘blurred’, which is
the overall effect I
hoped for.
The next thing I did was decide on a suitable image for my front cover and I then used
the crop tool from the menu on photoshop to crop the image to fit the page. I ‘freely
cropped’ the image shown on the right by clicking and dragging the points outlining
the model for my image. Once I had cropped the image properly I pasted it onto my
cover and stretched the image to fit the page appropriately, leaving me with the image
shown on the left.
I then designed my masthead. After thorough research
into different magazine mastheads and trying out
different fonts I decided on a design that suited the
genre of my music magazine; Indie.
The name of my magazine is ‘42’ (Inspired by a popular
indie club in Manchester, 42nd Street Nightclub.) and the
selling line is simply ‘Independent’.
The font I used for my masthead is one called ‘HACKED’
which I downloaded and installed from a website called
‘dafont.com’.
I set the size of ‘42’ to 300pt so it was large and stood
out clearly. My selling line was set to 20pt in size, so it
was still clear and easy to read but still allowed the main
focus on the actual masthead.
I used contrasting colours; red and black. These are 2 of
the main colours from my overall colour scheme so it
suited very well.
Once I had created my masthead I began adding
coverlines. To do so, I just simply used the text tool and
added my cover lines around the page. I used the font
Helvetica Nueue Regular and Bold throughout in order to
keep it looking organised and professional. I also stuck to
the colour scheme using black and white. Each of the cover
lines were between 30 and 40 pt in size – This way they
stood out clearly, but did not take up too much of the
space nor look unorganised.
I also included page numbers and a ‘subscription’ message
at the top of the page.
As you can see I added a flash to the cover as well. In order
to do this I created the shape first using the ‘shape’ tool. I
sized my shape then formatted it, changing the colour and
outline to yellow. I decided to use yellow as it was almost a
‘colour breaker’ and it stood out clearly above all else.
Next I added the text to the flash by clicking the text option
then clicking on the shape. I inserted my text then altered
it; making it bold/italic and changing the font to the typical
Helvetica Nueue.
I then added the final compulsory conventions of a
magazine; the barcode, price and website.
I found a barcode image from Google Images, saved it to
my documents then opened it in photoshop.
I clicked and dragged the image of the barcode onto the
document containing my front cover and then rotated
and resized it to fit nicely into the bottom left corner of
the magazine.
I then added the price and website using the text tool
again.
Again, the font I used was Helvetica Nueue Regular – to
stick to the overall theme of the magazine, keeping it
looking organised and professional. I set the size of the
font to 24 pt so it wasn’t too big but the reader would
be able to see it clearly, if they were looking for it.
To finish off I altered the magazine
slightly. All I did was send the
masthead backwards by moving the
layer down on the list of layers on
photoshop. This sent the masthead
behind the main image, making it look
more professional and showing use of
technology and understanding of
photoshop and it’s features.
This is my finished product.

Front cover

  • 1.
  • 2.
    The first thingthat I did in the process of creating my front cover was set a background. I didn’t want a very bold background for my cover, so I used the brush tool and grey/black to create more of a shadow for my main image and cover lines, rather than a solid color. I selected the brush tool from the menu on the left side of the screen. I set the brush size to 2840 px – this way the color did not come out too solid and more ‘blurred’, which is the overall effect I hoped for.
  • 3.
    The next thingI did was decide on a suitable image for my front cover and I then used the crop tool from the menu on photoshop to crop the image to fit the page. I ‘freely cropped’ the image shown on the right by clicking and dragging the points outlining the model for my image. Once I had cropped the image properly I pasted it onto my cover and stretched the image to fit the page appropriately, leaving me with the image shown on the left.
  • 4.
    I then designedmy masthead. After thorough research into different magazine mastheads and trying out different fonts I decided on a design that suited the genre of my music magazine; Indie. The name of my magazine is ‘42’ (Inspired by a popular indie club in Manchester, 42nd Street Nightclub.) and the selling line is simply ‘Independent’. The font I used for my masthead is one called ‘HACKED’ which I downloaded and installed from a website called ‘dafont.com’. I set the size of ‘42’ to 300pt so it was large and stood out clearly. My selling line was set to 20pt in size, so it was still clear and easy to read but still allowed the main focus on the actual masthead. I used contrasting colours; red and black. These are 2 of the main colours from my overall colour scheme so it suited very well.
  • 5.
    Once I hadcreated my masthead I began adding coverlines. To do so, I just simply used the text tool and added my cover lines around the page. I used the font Helvetica Nueue Regular and Bold throughout in order to keep it looking organised and professional. I also stuck to the colour scheme using black and white. Each of the cover lines were between 30 and 40 pt in size – This way they stood out clearly, but did not take up too much of the space nor look unorganised. I also included page numbers and a ‘subscription’ message at the top of the page. As you can see I added a flash to the cover as well. In order to do this I created the shape first using the ‘shape’ tool. I sized my shape then formatted it, changing the colour and outline to yellow. I decided to use yellow as it was almost a ‘colour breaker’ and it stood out clearly above all else. Next I added the text to the flash by clicking the text option then clicking on the shape. I inserted my text then altered it; making it bold/italic and changing the font to the typical Helvetica Nueue.
  • 6.
    I then addedthe final compulsory conventions of a magazine; the barcode, price and website. I found a barcode image from Google Images, saved it to my documents then opened it in photoshop. I clicked and dragged the image of the barcode onto the document containing my front cover and then rotated and resized it to fit nicely into the bottom left corner of the magazine. I then added the price and website using the text tool again. Again, the font I used was Helvetica Nueue Regular – to stick to the overall theme of the magazine, keeping it looking organised and professional. I set the size of the font to 24 pt so it wasn’t too big but the reader would be able to see it clearly, if they were looking for it.
  • 7.
    To finish offI altered the magazine slightly. All I did was send the masthead backwards by moving the layer down on the list of layers on photoshop. This sent the masthead behind the main image, making it look more professional and showing use of technology and understanding of photoshop and it’s features. This is my finished product.