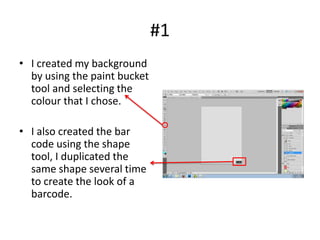
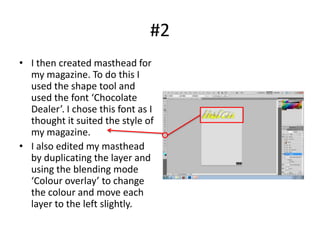
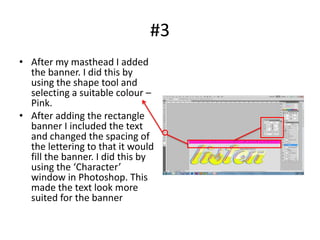
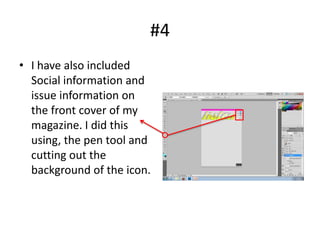
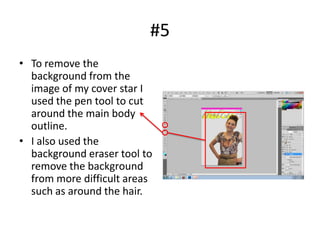
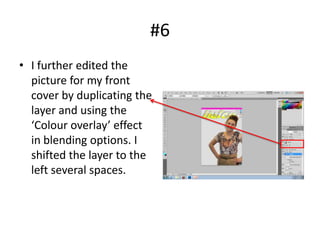
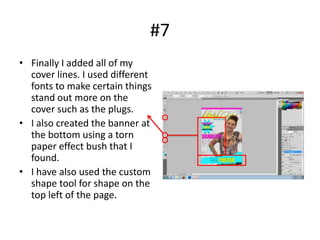
Photoshop – Front cover.
#1
• I created my background
  by using the paint bucket
  tool and selecting the
  colour that I chose.

• I also created the bar
  code using the shape
  tool, I duplicated the
  same shape several time
  to create the look of a
  barcode.
#2
• I then created masthead for
  my magazine. To do this I
  used the shape tool and
  used the font ‘Chocolate
  Dealer’. I chose this font as I
  thought it suited the style of
  my magazine.
• I also edited my masthead
  by duplicating the layer and
  using the blending mode
  ‘Colour overlay’ to change
  the colour and move each
  layer to the left slightly.
#3
• After my masthead I added
  the banner. I did this by
  using the shape tool and
  selecting a suitable colour –
  Pink.
• After adding the rectangle
  banner I included the text
  and changed the spacing of
  the lettering to that it would
  fill the banner. I did this by
  using the ‘Character’
  window in Photoshop. This
  made the text look more
  suited for the banner
#4
• I have also included
  Social information and
  issue information on
  the front cover of my
  magazine. I did this
  using, the pen tool and
  cutting out the
  background of the icon.
#5
• To remove the
  background from the
  image of my cover star I
  used the pen tool to cut
  around the main body
  outline.
• I also used the
  background eraser tool to
  remove the background
  from more difficult areas
  such as around the hair.
#6
• I further edited the
  picture for my front
  cover by duplicating the
  layer and using the
  ‘Colour overlay’ effect
  in blending options. I
  shifted the layer to the
  left several spaces.
#7
• Finally I added all of my
  cover lines. I used different
  fonts to make certain things
  stand out more on the
  cover such as the plugs.
• I also created the banner at
  the bottom using a torn
  paper effect bush that I
  found.
• I have also used the custom
  shape tool for shape on the
  top left of the page.

Photoshop - Front Cover

  • 1.
  • 2.
    #1 • I createdmy background by using the paint bucket tool and selecting the colour that I chose. • I also created the bar code using the shape tool, I duplicated the same shape several time to create the look of a barcode.
  • 3.
    #2 • I thencreated masthead for my magazine. To do this I used the shape tool and used the font ‘Chocolate Dealer’. I chose this font as I thought it suited the style of my magazine. • I also edited my masthead by duplicating the layer and using the blending mode ‘Colour overlay’ to change the colour and move each layer to the left slightly.
  • 4.
    #3 • After mymasthead I added the banner. I did this by using the shape tool and selecting a suitable colour – Pink. • After adding the rectangle banner I included the text and changed the spacing of the lettering to that it would fill the banner. I did this by using the ‘Character’ window in Photoshop. This made the text look more suited for the banner
  • 5.
    #4 • I havealso included Social information and issue information on the front cover of my magazine. I did this using, the pen tool and cutting out the background of the icon.
  • 6.
    #5 • To removethe background from the image of my cover star I used the pen tool to cut around the main body outline. • I also used the background eraser tool to remove the background from more difficult areas such as around the hair.
  • 7.
    #6 • I furtheredited the picture for my front cover by duplicating the layer and using the ‘Colour overlay’ effect in blending options. I shifted the layer to the left several spaces.
  • 8.
    #7 • Finally Iadded all of my cover lines. I used different fonts to make certain things stand out more on the cover such as the plugs. • I also created the banner at the bottom using a torn paper effect bush that I found. • I have also used the custom shape tool for shape on the top left of the page.