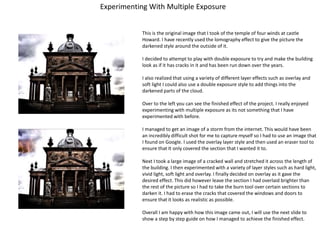
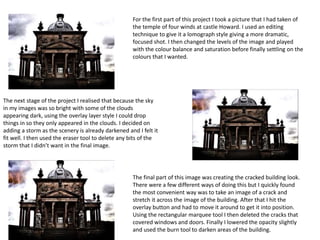
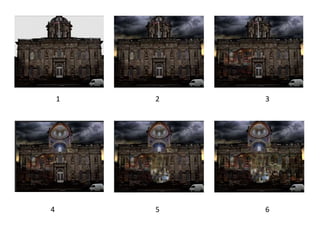
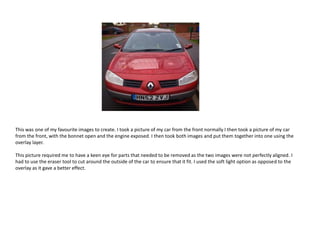
SlideShare a Scribd company logo
Experimenting With Multiple Exposure
This is the original image that I took of the temple of four winds at castle
Howard. I have recently used the lomography effect to give the picture the
darkened style around the outside of it.
I decided to attempt to play with double exposure to try and make the building
look as if it has cracks in it and has been run down over the years.
I also realized that using a variety of different layer effects such as overlay and
soft light I could also use a double exposure style to add things into the
darkened parts of the cloud.
Over to the left you can see the finished effect of the project. I really enjoyed
experimenting with multiple exposure as its not something that I have
experimented with before.
I managed to get an image of a storm from the internet. This would have been
an incredibly difficult shot for me to capture myself so I had to use an image that
I found on Google. I used the overlay layer style and then used an eraser tool to
ensure that It only covered the section that I wanted it to.
Next I took a large image of a cracked wall and stretched it across the length of
the building. I then experimented with a variety of layer styles such as hard light,
vivid light, soft light and overlay. I finally decided on overlay as it gave the
desired effect. This did however leave the section I had overlaid brighter than
the rest of the picture so I had to take the burn tool over certain sections to
darken it. I had to erase the cracks that covered the windows and doors to
ensure that it looks as realistic as possible.
Overall I am happy with how this image came out, I will use the next slide to
show a step by step guide on how I managed to achieve the finished effect.
For the first part of this project I took a picture that I had taken of
the temple of four winds at castle Howard. I used an editing
technique to give it a lomograph style giving a more dramatic,
focused shot. I then changed the levels of the image and played
with the colour balance and saturation before finally settling on the
colours that I wanted.

The next stage of the project I realised that because the sky
in my images was so bright with some of the clouds
appearing dark, using the overlay layer style I could drop
things in so they only appeared in the clouds. I decided on
adding a storm as the scenery is already darkened and I felt it
fit well. I then used the eraser tool to delete any bits of the
storm that I didn’t want in the final image.

The final part of this image was creating the cracked building look.
There were a few different ways of doing this but I quickly found
the most convenient way was to take an image of a crack and
stretch it across the image of the building. After that I hit the
overlay button and had to move it around to get it into position.
Using the rectangular marquee tool I then deleted the cracks that
covered windows and doors. Finally I lowered the opacity slightly
and used the burn tool to darken areas of the building.
This was another example of me using the same
method but on a different building. I had to use
more than one copy of the crack this time to
ensure realism shone through. I mostly
employed the same actions as before however
had to be much more careful with the eraser
tool to ensure it only hit certain sections of the
building, like the pillars and sections of the roof.
Improvements
My next image based around multiple exposures was this
image of the Minster in York. I took this image a while ago and
decided against using it for any previous work. However for this
style of work it seemed like a perfect thing to experiment with.
Many of the same techniques were used in this picture as were
used in my other multiple exposure shots however in these
ones they are a little more extreme.
This image has been overlaid with 4 images in total. Giving an
interesting amalgamation of colour and imagery which will
hopefully interest people who see it.
The theme of the project is discovery and before coming to
college I had never been in york, this is why I enjoyed going out
and photographing it so much. All of the overlaid images are of
things that were taken in york.
The large overlaid image in the centre is actually a little model
version of the city of york situated outside the minster, this was
one of the first photographs I ever took and I loved it and
decided to use it here, so it is essentially an image of the
minster in an image of the minster.

I also included the word discovery, purely because I managed to
include it in a bright colour, but through changing the opacity
have made it seem subtle and almost in some cases
unnoticeable.
Minster Multiple Exposure

The first step of this project was deciding what kind of images I wanted to use for the multiple exposure. I decided on keeping of a theme
of things that can be seen in York and set about looking for pictures. The first image on the left of the page is simply a picture of York
Minster that I took. This would be the platform for my editing. The next image shows the first image that I put in place. It was a picture
of a squirrel, which are common around certain areas of York. I took the image and used the soft light layer to transfer it onto the main
image. I then lowered the opacity slightly and put it on the bottom of the picture so that it almost blends in.
Next I added a picture of a sunset. It was at this point that I realised that there was a theme with the image, I have put the squirrel close
to the bottom as squirrels are usually on the ground and I had put the sun in the sky. Using the same methods as the previous image I
decided soft light and lower opacity and use the eraser tool to get rid of any unwanted excess of the image.
Finally I added the last image and the text. The final image was one of a model version of York that I took, it had an interesting depth of
field and was a nice blue/green colour. I put it onto the image and overlaid it and it gave a great result. The trees in the background of
the image tower up the sides of the minster whilst the colour combinations give the overall image an intriguing look. I added the text
discovery as that is the name of the project. I placed it above the layer of the sunset and overlaid the text layer, this let the colour from
the sunset layer shine through into the words giving a great colour for the text. I then lowered the opacity down to around 30% as I
wanted it to be there but I didn’t want it to be easily noticeable by someone.
This was another experiment with multiple exposure similar to my last couple. This one I decided to keep the cracks
from the first image that I used. The amount of cracks seemed a little over the top so I got rid of a lot of them and
just kept them around the door area to make it look more tidy. I Then took an image of some vines in a high
resolution and stretched them across the length of the building. It gave a great effect and I was pretty much happy
with the result.
Again as usual I neatened around the edges with the eraser tool and the marquee tools and removed the cracks that I
had left on the pillars. I tried experimenting by trying to make it seem like the vines were wrapping around the pillars
but it came out a pretty unsuccessful attempt so I settled for the outcome that I had.
Improvements
This image was the main idea that I had when I was given the task. I wanted to show the inside appearance of things without actually
going in them, kind of like an X-Ray effect. I quickly set about finding the best ways to do this and decided the kind of things that I
wanted to take images off to showcase this.
The first thing that I did was to take the image I took of Castle Howard. I then managed to acquire a variety of images of different rooms
that are in the building. It was then a case of deciding where to put each room, stretching or shrinking the images to the correct size and
ensuring that edges looked neat and that the rooms didn’t come out of the side of the building or anything like that. I managed to get
the three rooms for the ground floor but was struggling to decide what to do with the tower in the middle of it. I managed to get an
image of the tower from the inside, however it didn’t fit at all and was from the wrong angle. To rectify this I took the image and warped
it to fit the tower better and make it seem as if you were looking up the tower.
I also added the sky into this image. The original image that I took had a very bright sky with few clouds and since I used the lomography
editing technique it made all the darkness of the image stand out a little too much. I decided to use a stormy sky and play with the
colour levels and saturations to ensure that I got the best end result possible.

I like this image as it was a challenge to create and allowed me to show how creative I can be when given a task, this was the editing
style that I knew that I wanted to incorporate instantly as none of the other areas really seemed to interest me. After dabbling with the
others I settled on the multiple exposure effect, specifically to show what is inside of things without actually having to be inside of them.
1

4

2

3

5

6
This idea is based around the same thing as the last one, I took a variety of different images and layered them over the top of one image.
I wanted to take my idea of X Raying things but in a different way. I took a picture of my dog and decided that I wanted to try and
incorporate all of the things that dogs think about and dogs love.
I started off with a large open field. I put the image over the top of the dogs head and hid the layer. I then used the lasso tool to go
around the section of the head that I wanted, the next step was to unhide the layer of the field right click the image and select the
inverse, this allowed me to delete all of the excess of the image that wasn’t needed and shaping the image to fit onto the dogs head.
I then repeated the process of lasso cutting around other areas such as his ears, legs and nose and again put things in there that dogs
enjoy, such as, Tall grass fields, the sun and a little canal.
The execution of this idea Im actually quite proud of, I think it’s a unique idea that other projects havent really touched on. It took my
original idea and went outside of the box. Im happy with how the editing techniques went and don’t think there was much that I could
have done better. The image itself could have perhaps been a little better as the paw closest to the camera is out of focus but otherwise
im very happy with the image, before editing and after. I would have liked to experiment with this project in particular and maybe see
how far I could take it and what I could edit into the selected areas.
1

3

2

4
This was one of my favourite images to create. I took a picture of my car from the front normally I then took a picture of my car
from the front, with the bonnet open and the engine exposed. I then took both images and put them together into one using the
overlay layer.
This picture required me to have a keen eye for parts that needed to be removed as the two images were not perfectly aligned. I
had to use the eraser tool to cut around the outside of the car to ensure that it fit. I used the soft light option as opposed to the
overlay as it gave a better effect.

More Related Content

What's hot

Task 4 final images review work sheet landscape
Task 4 final images review work sheet landscapeTask 4 final images review work sheet landscape
Task 4 final images review work sheet landscape
AlexNesbit
 
Experiments evidence template2
Experiments evidence template2Experiments evidence template2
Experiments evidence template2Hannah Sewell
 
Task 2 completed!
Task 2 completed!Task 2 completed!
Task 2 completed!AlanSmith96
 
Experimenting with basic techniques
Experimenting with basic techniques Experimenting with basic techniques
Experimenting with basic techniques bekkiasquith
 
Evaluation- Photography
Evaluation- PhotographyEvaluation- Photography
Evaluation- Photography
joshh12
 
Fmp production reflection part 3
Fmp production reflection part 3Fmp production reflection part 3
Fmp production reflection part 3
sean cawood
 
Experiments evidence template task 2
Experiments evidence template task 2Experiments evidence template task 2
Experiments evidence template task 2hndoja
 
Task 6 evaluation
Task 6 evaluationTask 6 evaluation
Task 6 evaluation
Jonah Adshead
 
Experiments evidence template
Experiments evidence templateExperiments evidence template
Experiments evidence template
Callumknight
 
Final Major Project Evaluation
Final Major Project EvaluationFinal Major Project Evaluation
Final Major Project Evaluation
AlexNesbit
 
Experimental Photography Evaluations (with improvements)
Experimental Photography Evaluations (with improvements)Experimental Photography Evaluations (with improvements)
Experimental Photography Evaluations (with improvements)
cloestead
 
Experimental Photography Evaluations
Experimental Photography Evaluations Experimental Photography Evaluations
Experimental Photography Evaluations cloestead
 
Final Powerpoint Photography Certificate
Final Powerpoint Photography Certificate Final Powerpoint Photography Certificate
Final Powerpoint Photography Certificate
GiovanniZanolla1
 
Experiments evidence
Experiments evidenceExperiments evidence
Experiments evidencekatietorpey1
 
On Going Evaluations (unfinished)
On Going Evaluations (unfinished)On Going Evaluations (unfinished)
On Going Evaluations (unfinished)cloestead
 
57review
57review57review
57reviewsal1010
 
6. production reflection [comp]
6. production reflection [comp]6. production reflection [comp]
6. production reflection [comp]
Allison Hewitt
 

What's hot (19)

Task 4 final images review work sheet landscape
Task 4 final images review work sheet landscapeTask 4 final images review work sheet landscape
Task 4 final images review work sheet landscape
 
Experiments evidence template2
Experiments evidence template2Experiments evidence template2
Experiments evidence template2
 
Task 2 completed!
Task 2 completed!Task 2 completed!
Task 2 completed!
 
Experiments
ExperimentsExperiments
Experiments
 
Experimenting with basic techniques
Experimenting with basic techniques Experimenting with basic techniques
Experimenting with basic techniques
 
On going evaluations
On going evaluationsOn going evaluations
On going evaluations
 
Evaluation- Photography
Evaluation- PhotographyEvaluation- Photography
Evaluation- Photography
 
Fmp production reflection part 3
Fmp production reflection part 3Fmp production reflection part 3
Fmp production reflection part 3
 
Experiments evidence template task 2
Experiments evidence template task 2Experiments evidence template task 2
Experiments evidence template task 2
 
Task 6 evaluation
Task 6 evaluationTask 6 evaluation
Task 6 evaluation
 
Experiments evidence template
Experiments evidence templateExperiments evidence template
Experiments evidence template
 
Final Major Project Evaluation
Final Major Project EvaluationFinal Major Project Evaluation
Final Major Project Evaluation
 
Experimental Photography Evaluations (with improvements)
Experimental Photography Evaluations (with improvements)Experimental Photography Evaluations (with improvements)
Experimental Photography Evaluations (with improvements)
 
Experimental Photography Evaluations
Experimental Photography Evaluations Experimental Photography Evaluations
Experimental Photography Evaluations
 
Final Powerpoint Photography Certificate
Final Powerpoint Photography Certificate Final Powerpoint Photography Certificate
Final Powerpoint Photography Certificate
 
Experiments evidence
Experiments evidenceExperiments evidence
Experiments evidence
 
On Going Evaluations (unfinished)
On Going Evaluations (unfinished)On Going Evaluations (unfinished)
On Going Evaluations (unfinished)
 
57review
57review57review
57review
 
6. production reflection [comp]
6. production reflection [comp]6. production reflection [comp]
6. production reflection [comp]
 

Viewers also liked

T shirt%20 designs%20pro-forma(1)[1]
T shirt%20 designs%20pro-forma(1)[1]T shirt%20 designs%20pro-forma(1)[1]
T shirt%20 designs%20pro-forma(1)[1]Callumknight
 
Presentationfordave
PresentationfordavePresentationfordave
PresentationfordaveCallumknight
 
Evaluationhomeless
EvaluationhomelessEvaluationhomeless
EvaluationhomelessCallumknight
 
Tabloidcomparisons
TabloidcomparisonsTabloidcomparisons
TabloidcomparisonsCallumknight
 
Unit 57 photography evidence template
Unit 57 photography evidence templateUnit 57 photography evidence template
Unit 57 photography evidence template
Callumknight
 

Viewers also liked (14)

T shirt%20 designs%20pro-forma(1)[1]
T shirt%20 designs%20pro-forma(1)[1]T shirt%20 designs%20pro-forma(1)[1]
T shirt%20 designs%20pro-forma(1)[1]
 
Indesign
IndesignIndesign
Indesign
 
Presentationfordave
PresentationfordavePresentationfordave
Presentationfordave
 
Evaluationhomeless
EvaluationhomelessEvaluationhomeless
Evaluationhomeless
 
Photomoodboards
PhotomoodboardsPhotomoodboards
Photomoodboards
 
Finaldrafts
FinaldraftsFinaldrafts
Finaldrafts
 
Spread annotation
Spread annotationSpread annotation
Spread annotation
 
Irnbruboards
IrnbruboardsIrnbruboards
Irnbruboards
 
Tabloidcomparisons
TabloidcomparisonsTabloidcomparisons
Tabloidcomparisons
 
Typography
TypographyTypography
Typography
 
IrnBruIdeas
IrnBruIdeasIrnBruIdeas
IrnBruIdeas
 
Moodboards
MoodboardsMoodboards
Moodboards
 
Unit 57 photography evidence template
Unit 57 photography evidence templateUnit 57 photography evidence template
Unit 57 photography evidence template
 
Overallevaluation
OverallevaluationOverallevaluation
Overallevaluation
 

Similar to Experimental evaluation

Production Experiments
Production ExperimentsProduction Experiments
Production Experiments
ShaniceYates
 
production experiments updated
production experiments updated production experiments updated
production experiments updated
Abbey Glancy
 
Daily Logs fmp.docx
Daily Logs fmp.docxDaily Logs fmp.docx
Daily Logs fmp.docx
Lily809411
 
2.2 Production Experiments.pptx
2.2 Production Experiments.pptx2.2 Production Experiments.pptx
2.2 Production Experiments.pptx
MatthewEvans7662
 
2.2 Production Experiments.pptx
2.2 Production Experiments.pptx2.2 Production Experiments.pptx
2.2 Production Experiments.pptx
MatthewEvans7662
 
2.2 Production Experiments.pptx
2.2 Production Experiments.pptx2.2 Production Experiments.pptx
2.2 Production Experiments.pptx
alilyajaib
 
3. fmp production experiments
3. fmp production experiments3. fmp production experiments
3. fmp production experiments
NathanMead3
 
2.2 [pro forma] experimental photography planning
2.2 [pro forma] experimental photography planning 2.2 [pro forma] experimental photography planning
2.2 [pro forma] experimental photography planning
Jamie Mellors
 
4. production experiments(1)
4. production experiments(1)4. production experiments(1)
4. production experiments(1)
louis harman
 
Fmp2 production reflection
Fmp2 production reflectionFmp2 production reflection
Fmp2 production reflection
bronparsons
 
Ha2 production log_template_141014
Ha2 production log_template_141014Ha2 production log_template_141014
Ha2 production log_template_141014amybrockbank
 
Production reflection
Production reflectionProduction reflection
Production reflection
kallum-sykes
 
As component 2 py_62_sample 24
As component 2 py_62_sample 24As component 2 py_62_sample 24
As component 2 py_62_sample 24
Melanie Powell
 
Experiments evidence template
Experiments evidence templateExperiments evidence template
Experiments evidence templateChloeandRachel
 
2) productio experiments.pptx
2) productio experiments.pptx2) productio experiments.pptx
2) productio experiments.pptx
shelbyallerton
 
2) productio experiments.pptx
2) productio experiments.pptx2) productio experiments.pptx
2) productio experiments.pptx
shelbyallerton
 
Construction
ConstructionConstruction
Construction
salaffina
 

Similar to Experimental evaluation (20)

Graphic Design
Graphic DesignGraphic Design
Graphic Design
 
Production Experiments
Production ExperimentsProduction Experiments
Production Experiments
 
Evaluation
Evaluation Evaluation
Evaluation
 
Evaluation
Evaluation Evaluation
Evaluation
 
production experiments updated
production experiments updated production experiments updated
production experiments updated
 
Daily Logs fmp.docx
Daily Logs fmp.docxDaily Logs fmp.docx
Daily Logs fmp.docx
 
2.2 Production Experiments.pptx
2.2 Production Experiments.pptx2.2 Production Experiments.pptx
2.2 Production Experiments.pptx
 
2.2 Production Experiments.pptx
2.2 Production Experiments.pptx2.2 Production Experiments.pptx
2.2 Production Experiments.pptx
 
2.2 Production Experiments.pptx
2.2 Production Experiments.pptx2.2 Production Experiments.pptx
2.2 Production Experiments.pptx
 
3. fmp production experiments
3. fmp production experiments3. fmp production experiments
3. fmp production experiments
 
2.2 [pro forma] experimental photography planning
2.2 [pro forma] experimental photography planning 2.2 [pro forma] experimental photography planning
2.2 [pro forma] experimental photography planning
 
4. production experiments(1)
4. production experiments(1)4. production experiments(1)
4. production experiments(1)
 
Fmp2 production reflection
Fmp2 production reflectionFmp2 production reflection
Fmp2 production reflection
 
Ha2 production log_template_141014
Ha2 production log_template_141014Ha2 production log_template_141014
Ha2 production log_template_141014
 
Production reflection
Production reflectionProduction reflection
Production reflection
 
As component 2 py_62_sample 24
As component 2 py_62_sample 24As component 2 py_62_sample 24
As component 2 py_62_sample 24
 
Experiments evidence template
Experiments evidence templateExperiments evidence template
Experiments evidence template
 
2) productio experiments.pptx
2) productio experiments.pptx2) productio experiments.pptx
2) productio experiments.pptx
 
2) productio experiments.pptx
2) productio experiments.pptx2) productio experiments.pptx
2) productio experiments.pptx
 
Construction
ConstructionConstruction
Construction
 

More from Callumknight

Leafletsanalysis
LeafletsanalysisLeafletsanalysis
Leafletsanalysis
Callumknight
 
Planning form 2 finished
Planning form 2 finishedPlanning form 2 finished
Planning form 2 finishedCallumknight
 
Proposal formfinished
Proposal formfinishedProposal formfinished
Proposal formfinishedCallumknight
 
Planning form 1 finished
Planning form 1 finishedPlanning form 1 finished
Planning form 1 finishedCallumknight
 
Posters and banners
Posters and bannersPosters and banners
Posters and bannersCallumknight
 

More from Callumknight (17)

Evaluationfinal
EvaluationfinalEvaluationfinal
Evaluationfinal
 
Finalevaluation
FinalevaluationFinalevaluation
Finalevaluation
 
Photographystuff
PhotographystuffPhotographystuff
Photographystuff
 
Leafletsanalysis
LeafletsanalysisLeafletsanalysis
Leafletsanalysis
 
Planning form 2 finished
Planning form 2 finishedPlanning form 2 finished
Planning form 2 finished
 
Proposal formfinished
Proposal formfinishedProposal formfinished
Proposal formfinished
 
Planning form 1 finished
Planning form 1 finishedPlanning form 1 finished
Planning form 1 finished
 
Furthertechniques
FurthertechniquesFurthertechniques
Furthertechniques
 
Posters and banners
Posters and bannersPosters and banners
Posters and banners
 
Mcdonalds
McdonaldsMcdonalds
Mcdonalds
 
Swot
SwotSwot
Swot
 
Musicmagpie
MusicmagpieMusicmagpie
Musicmagpie
 
Flyball
FlyballFlyball
Flyball
 
Final irnbrucans
Final irnbrucansFinal irnbrucans
Final irnbrucans
 
Evaluations
EvaluationsEvaluations
Evaluations
 
Irn bruanalysis
Irn bruanalysisIrn bruanalysis
Irn bruanalysis
 
Allsashwork
AllsashworkAllsashwork
Allsashwork
 

Recently uploaded

Home assignment II on Spectroscopy 2024 Answers.pdf
Home assignment II on Spectroscopy 2024 Answers.pdfHome assignment II on Spectroscopy 2024 Answers.pdf
Home assignment II on Spectroscopy 2024 Answers.pdf
Tamralipta Mahavidyalaya
 
The basics of sentences session 5pptx.pptx
The basics of sentences session 5pptx.pptxThe basics of sentences session 5pptx.pptx
The basics of sentences session 5pptx.pptx
heathfieldcps1
 
BÀI TẬP BỔ TRỢ TIẾNG ANH GLOBAL SUCCESS LỚP 3 - CẢ NĂM (CÓ FILE NGHE VÀ ĐÁP Á...
BÀI TẬP BỔ TRỢ TIẾNG ANH GLOBAL SUCCESS LỚP 3 - CẢ NĂM (CÓ FILE NGHE VÀ ĐÁP Á...BÀI TẬP BỔ TRỢ TIẾNG ANH GLOBAL SUCCESS LỚP 3 - CẢ NĂM (CÓ FILE NGHE VÀ ĐÁP Á...
BÀI TẬP BỔ TRỢ TIẾNG ANH GLOBAL SUCCESS LỚP 3 - CẢ NĂM (CÓ FILE NGHE VÀ ĐÁP Á...
Nguyen Thanh Tu Collection
 
678020731-Sumas-y-Restas-Para-Colorear.pdf
678020731-Sumas-y-Restas-Para-Colorear.pdf678020731-Sumas-y-Restas-Para-Colorear.pdf
678020731-Sumas-y-Restas-Para-Colorear.pdf
CarlosHernanMontoyab2
 
Additional Benefits for Employee Website.pdf
Additional Benefits for Employee Website.pdfAdditional Benefits for Employee Website.pdf
Additional Benefits for Employee Website.pdf
joachimlavalley1
 
CLASS 11 CBSE B.St Project AIDS TO TRADE - INSURANCE
CLASS 11 CBSE B.St Project AIDS TO TRADE - INSURANCECLASS 11 CBSE B.St Project AIDS TO TRADE - INSURANCE
CLASS 11 CBSE B.St Project AIDS TO TRADE - INSURANCE
BhavyaRajput3
 
Adversarial Attention Modeling for Multi-dimensional Emotion Regression.pdf
Adversarial Attention Modeling for Multi-dimensional Emotion Regression.pdfAdversarial Attention Modeling for Multi-dimensional Emotion Regression.pdf
Adversarial Attention Modeling for Multi-dimensional Emotion Regression.pdf
Po-Chuan Chen
 
June 3, 2024 Anti-Semitism Letter Sent to MIT President Kornbluth and MIT Cor...
June 3, 2024 Anti-Semitism Letter Sent to MIT President Kornbluth and MIT Cor...June 3, 2024 Anti-Semitism Letter Sent to MIT President Kornbluth and MIT Cor...
June 3, 2024 Anti-Semitism Letter Sent to MIT President Kornbluth and MIT Cor...
Levi Shapiro
 
Language Across the Curriculm LAC B.Ed.
Language Across the  Curriculm LAC B.Ed.Language Across the  Curriculm LAC B.Ed.
Language Across the Curriculm LAC B.Ed.
Atul Kumar Singh
 
Supporting (UKRI) OA monographs at Salford.pptx
Supporting (UKRI) OA monographs at Salford.pptxSupporting (UKRI) OA monographs at Salford.pptx
Supporting (UKRI) OA monographs at Salford.pptx
Jisc
 
Unit 2- Research Aptitude (UGC NET Paper I).pdf
Unit 2- Research Aptitude (UGC NET Paper I).pdfUnit 2- Research Aptitude (UGC NET Paper I).pdf
Unit 2- Research Aptitude (UGC NET Paper I).pdf
Thiyagu K
 
special B.ed 2nd year old paper_20240531.pdf
special B.ed 2nd year old paper_20240531.pdfspecial B.ed 2nd year old paper_20240531.pdf
special B.ed 2nd year old paper_20240531.pdf
Special education needs
 
The Challenger.pdf DNHS Official Publication
The Challenger.pdf DNHS Official PublicationThe Challenger.pdf DNHS Official Publication
The Challenger.pdf DNHS Official Publication
Delapenabediema
 
A Strategic Approach: GenAI in Education
A Strategic Approach: GenAI in EducationA Strategic Approach: GenAI in Education
A Strategic Approach: GenAI in Education
Peter Windle
 
Welcome to TechSoup New Member Orientation and Q&A (May 2024).pdf
Welcome to TechSoup   New Member Orientation and Q&A (May 2024).pdfWelcome to TechSoup   New Member Orientation and Q&A (May 2024).pdf
Welcome to TechSoup New Member Orientation and Q&A (May 2024).pdf
TechSoup
 
Operation Blue Star - Saka Neela Tara
Operation Blue Star   -  Saka Neela TaraOperation Blue Star   -  Saka Neela Tara
Operation Blue Star - Saka Neela Tara
Balvir Singh
 
Model Attribute Check Company Auto Property
Model Attribute  Check Company Auto PropertyModel Attribute  Check Company Auto Property
Model Attribute Check Company Auto Property
Celine George
 
Introduction to AI for Nonprofits with Tapp Network
Introduction to AI for Nonprofits with Tapp NetworkIntroduction to AI for Nonprofits with Tapp Network
Introduction to AI for Nonprofits with Tapp Network
TechSoup
 
The approach at University of Liverpool.pptx
The approach at University of Liverpool.pptxThe approach at University of Liverpool.pptx
The approach at University of Liverpool.pptx
Jisc
 
TESDA TM1 REVIEWER FOR NATIONAL ASSESSMENT WRITTEN AND ORAL QUESTIONS WITH A...
TESDA TM1 REVIEWER  FOR NATIONAL ASSESSMENT WRITTEN AND ORAL QUESTIONS WITH A...TESDA TM1 REVIEWER  FOR NATIONAL ASSESSMENT WRITTEN AND ORAL QUESTIONS WITH A...
TESDA TM1 REVIEWER FOR NATIONAL ASSESSMENT WRITTEN AND ORAL QUESTIONS WITH A...
EugeneSaldivar
 

Recently uploaded (20)

Home assignment II on Spectroscopy 2024 Answers.pdf
Home assignment II on Spectroscopy 2024 Answers.pdfHome assignment II on Spectroscopy 2024 Answers.pdf
Home assignment II on Spectroscopy 2024 Answers.pdf
 
The basics of sentences session 5pptx.pptx
The basics of sentences session 5pptx.pptxThe basics of sentences session 5pptx.pptx
The basics of sentences session 5pptx.pptx
 
BÀI TẬP BỔ TRỢ TIẾNG ANH GLOBAL SUCCESS LỚP 3 - CẢ NĂM (CÓ FILE NGHE VÀ ĐÁP Á...
BÀI TẬP BỔ TRỢ TIẾNG ANH GLOBAL SUCCESS LỚP 3 - CẢ NĂM (CÓ FILE NGHE VÀ ĐÁP Á...BÀI TẬP BỔ TRỢ TIẾNG ANH GLOBAL SUCCESS LỚP 3 - CẢ NĂM (CÓ FILE NGHE VÀ ĐÁP Á...
BÀI TẬP BỔ TRỢ TIẾNG ANH GLOBAL SUCCESS LỚP 3 - CẢ NĂM (CÓ FILE NGHE VÀ ĐÁP Á...
 
678020731-Sumas-y-Restas-Para-Colorear.pdf
678020731-Sumas-y-Restas-Para-Colorear.pdf678020731-Sumas-y-Restas-Para-Colorear.pdf
678020731-Sumas-y-Restas-Para-Colorear.pdf
 
Additional Benefits for Employee Website.pdf
Additional Benefits for Employee Website.pdfAdditional Benefits for Employee Website.pdf
Additional Benefits for Employee Website.pdf
 
CLASS 11 CBSE B.St Project AIDS TO TRADE - INSURANCE
CLASS 11 CBSE B.St Project AIDS TO TRADE - INSURANCECLASS 11 CBSE B.St Project AIDS TO TRADE - INSURANCE
CLASS 11 CBSE B.St Project AIDS TO TRADE - INSURANCE
 
Adversarial Attention Modeling for Multi-dimensional Emotion Regression.pdf
Adversarial Attention Modeling for Multi-dimensional Emotion Regression.pdfAdversarial Attention Modeling for Multi-dimensional Emotion Regression.pdf
Adversarial Attention Modeling for Multi-dimensional Emotion Regression.pdf
 
June 3, 2024 Anti-Semitism Letter Sent to MIT President Kornbluth and MIT Cor...
June 3, 2024 Anti-Semitism Letter Sent to MIT President Kornbluth and MIT Cor...June 3, 2024 Anti-Semitism Letter Sent to MIT President Kornbluth and MIT Cor...
June 3, 2024 Anti-Semitism Letter Sent to MIT President Kornbluth and MIT Cor...
 
Language Across the Curriculm LAC B.Ed.
Language Across the  Curriculm LAC B.Ed.Language Across the  Curriculm LAC B.Ed.
Language Across the Curriculm LAC B.Ed.
 
Supporting (UKRI) OA monographs at Salford.pptx
Supporting (UKRI) OA monographs at Salford.pptxSupporting (UKRI) OA monographs at Salford.pptx
Supporting (UKRI) OA monographs at Salford.pptx
 
Unit 2- Research Aptitude (UGC NET Paper I).pdf
Unit 2- Research Aptitude (UGC NET Paper I).pdfUnit 2- Research Aptitude (UGC NET Paper I).pdf
Unit 2- Research Aptitude (UGC NET Paper I).pdf
 
special B.ed 2nd year old paper_20240531.pdf
special B.ed 2nd year old paper_20240531.pdfspecial B.ed 2nd year old paper_20240531.pdf
special B.ed 2nd year old paper_20240531.pdf
 
The Challenger.pdf DNHS Official Publication
The Challenger.pdf DNHS Official PublicationThe Challenger.pdf DNHS Official Publication
The Challenger.pdf DNHS Official Publication
 
A Strategic Approach: GenAI in Education
A Strategic Approach: GenAI in EducationA Strategic Approach: GenAI in Education
A Strategic Approach: GenAI in Education
 
Welcome to TechSoup New Member Orientation and Q&A (May 2024).pdf
Welcome to TechSoup   New Member Orientation and Q&A (May 2024).pdfWelcome to TechSoup   New Member Orientation and Q&A (May 2024).pdf
Welcome to TechSoup New Member Orientation and Q&A (May 2024).pdf
 
Operation Blue Star - Saka Neela Tara
Operation Blue Star   -  Saka Neela TaraOperation Blue Star   -  Saka Neela Tara
Operation Blue Star - Saka Neela Tara
 
Model Attribute Check Company Auto Property
Model Attribute  Check Company Auto PropertyModel Attribute  Check Company Auto Property
Model Attribute Check Company Auto Property
 
Introduction to AI for Nonprofits with Tapp Network
Introduction to AI for Nonprofits with Tapp NetworkIntroduction to AI for Nonprofits with Tapp Network
Introduction to AI for Nonprofits with Tapp Network
 
The approach at University of Liverpool.pptx
The approach at University of Liverpool.pptxThe approach at University of Liverpool.pptx
The approach at University of Liverpool.pptx
 
TESDA TM1 REVIEWER FOR NATIONAL ASSESSMENT WRITTEN AND ORAL QUESTIONS WITH A...
TESDA TM1 REVIEWER  FOR NATIONAL ASSESSMENT WRITTEN AND ORAL QUESTIONS WITH A...TESDA TM1 REVIEWER  FOR NATIONAL ASSESSMENT WRITTEN AND ORAL QUESTIONS WITH A...
TESDA TM1 REVIEWER FOR NATIONAL ASSESSMENT WRITTEN AND ORAL QUESTIONS WITH A...
 

Experimental evaluation

  • 1. Experimenting With Multiple Exposure This is the original image that I took of the temple of four winds at castle Howard. I have recently used the lomography effect to give the picture the darkened style around the outside of it. I decided to attempt to play with double exposure to try and make the building look as if it has cracks in it and has been run down over the years. I also realized that using a variety of different layer effects such as overlay and soft light I could also use a double exposure style to add things into the darkened parts of the cloud. Over to the left you can see the finished effect of the project. I really enjoyed experimenting with multiple exposure as its not something that I have experimented with before. I managed to get an image of a storm from the internet. This would have been an incredibly difficult shot for me to capture myself so I had to use an image that I found on Google. I used the overlay layer style and then used an eraser tool to ensure that It only covered the section that I wanted it to. Next I took a large image of a cracked wall and stretched it across the length of the building. I then experimented with a variety of layer styles such as hard light, vivid light, soft light and overlay. I finally decided on overlay as it gave the desired effect. This did however leave the section I had overlaid brighter than the rest of the picture so I had to take the burn tool over certain sections to darken it. I had to erase the cracks that covered the windows and doors to ensure that it looks as realistic as possible. Overall I am happy with how this image came out, I will use the next slide to show a step by step guide on how I managed to achieve the finished effect.
  • 2. For the first part of this project I took a picture that I had taken of the temple of four winds at castle Howard. I used an editing technique to give it a lomograph style giving a more dramatic, focused shot. I then changed the levels of the image and played with the colour balance and saturation before finally settling on the colours that I wanted. The next stage of the project I realised that because the sky in my images was so bright with some of the clouds appearing dark, using the overlay layer style I could drop things in so they only appeared in the clouds. I decided on adding a storm as the scenery is already darkened and I felt it fit well. I then used the eraser tool to delete any bits of the storm that I didn’t want in the final image. The final part of this image was creating the cracked building look. There were a few different ways of doing this but I quickly found the most convenient way was to take an image of a crack and stretch it across the image of the building. After that I hit the overlay button and had to move it around to get it into position. Using the rectangular marquee tool I then deleted the cracks that covered windows and doors. Finally I lowered the opacity slightly and used the burn tool to darken areas of the building.
  • 3. This was another example of me using the same method but on a different building. I had to use more than one copy of the crack this time to ensure realism shone through. I mostly employed the same actions as before however had to be much more careful with the eraser tool to ensure it only hit certain sections of the building, like the pillars and sections of the roof.
  • 5. My next image based around multiple exposures was this image of the Minster in York. I took this image a while ago and decided against using it for any previous work. However for this style of work it seemed like a perfect thing to experiment with. Many of the same techniques were used in this picture as were used in my other multiple exposure shots however in these ones they are a little more extreme. This image has been overlaid with 4 images in total. Giving an interesting amalgamation of colour and imagery which will hopefully interest people who see it. The theme of the project is discovery and before coming to college I had never been in york, this is why I enjoyed going out and photographing it so much. All of the overlaid images are of things that were taken in york. The large overlaid image in the centre is actually a little model version of the city of york situated outside the minster, this was one of the first photographs I ever took and I loved it and decided to use it here, so it is essentially an image of the minster in an image of the minster. I also included the word discovery, purely because I managed to include it in a bright colour, but through changing the opacity have made it seem subtle and almost in some cases unnoticeable.
  • 6. Minster Multiple Exposure The first step of this project was deciding what kind of images I wanted to use for the multiple exposure. I decided on keeping of a theme of things that can be seen in York and set about looking for pictures. The first image on the left of the page is simply a picture of York Minster that I took. This would be the platform for my editing. The next image shows the first image that I put in place. It was a picture of a squirrel, which are common around certain areas of York. I took the image and used the soft light layer to transfer it onto the main image. I then lowered the opacity slightly and put it on the bottom of the picture so that it almost blends in. Next I added a picture of a sunset. It was at this point that I realised that there was a theme with the image, I have put the squirrel close to the bottom as squirrels are usually on the ground and I had put the sun in the sky. Using the same methods as the previous image I decided soft light and lower opacity and use the eraser tool to get rid of any unwanted excess of the image. Finally I added the last image and the text. The final image was one of a model version of York that I took, it had an interesting depth of field and was a nice blue/green colour. I put it onto the image and overlaid it and it gave a great result. The trees in the background of the image tower up the sides of the minster whilst the colour combinations give the overall image an intriguing look. I added the text discovery as that is the name of the project. I placed it above the layer of the sunset and overlaid the text layer, this let the colour from the sunset layer shine through into the words giving a great colour for the text. I then lowered the opacity down to around 30% as I wanted it to be there but I didn’t want it to be easily noticeable by someone.
  • 7. This was another experiment with multiple exposure similar to my last couple. This one I decided to keep the cracks from the first image that I used. The amount of cracks seemed a little over the top so I got rid of a lot of them and just kept them around the door area to make it look more tidy. I Then took an image of some vines in a high resolution and stretched them across the length of the building. It gave a great effect and I was pretty much happy with the result. Again as usual I neatened around the edges with the eraser tool and the marquee tools and removed the cracks that I had left on the pillars. I tried experimenting by trying to make it seem like the vines were wrapping around the pillars but it came out a pretty unsuccessful attempt so I settled for the outcome that I had.
  • 9. This image was the main idea that I had when I was given the task. I wanted to show the inside appearance of things without actually going in them, kind of like an X-Ray effect. I quickly set about finding the best ways to do this and decided the kind of things that I wanted to take images off to showcase this. The first thing that I did was to take the image I took of Castle Howard. I then managed to acquire a variety of images of different rooms that are in the building. It was then a case of deciding where to put each room, stretching or shrinking the images to the correct size and ensuring that edges looked neat and that the rooms didn’t come out of the side of the building or anything like that. I managed to get the three rooms for the ground floor but was struggling to decide what to do with the tower in the middle of it. I managed to get an image of the tower from the inside, however it didn’t fit at all and was from the wrong angle. To rectify this I took the image and warped it to fit the tower better and make it seem as if you were looking up the tower. I also added the sky into this image. The original image that I took had a very bright sky with few clouds and since I used the lomography editing technique it made all the darkness of the image stand out a little too much. I decided to use a stormy sky and play with the colour levels and saturations to ensure that I got the best end result possible. I like this image as it was a challenge to create and allowed me to show how creative I can be when given a task, this was the editing style that I knew that I wanted to incorporate instantly as none of the other areas really seemed to interest me. After dabbling with the others I settled on the multiple exposure effect, specifically to show what is inside of things without actually having to be inside of them.
  • 11. This idea is based around the same thing as the last one, I took a variety of different images and layered them over the top of one image. I wanted to take my idea of X Raying things but in a different way. I took a picture of my dog and decided that I wanted to try and incorporate all of the things that dogs think about and dogs love. I started off with a large open field. I put the image over the top of the dogs head and hid the layer. I then used the lasso tool to go around the section of the head that I wanted, the next step was to unhide the layer of the field right click the image and select the inverse, this allowed me to delete all of the excess of the image that wasn’t needed and shaping the image to fit onto the dogs head. I then repeated the process of lasso cutting around other areas such as his ears, legs and nose and again put things in there that dogs enjoy, such as, Tall grass fields, the sun and a little canal. The execution of this idea Im actually quite proud of, I think it’s a unique idea that other projects havent really touched on. It took my original idea and went outside of the box. Im happy with how the editing techniques went and don’t think there was much that I could have done better. The image itself could have perhaps been a little better as the paw closest to the camera is out of focus but otherwise im very happy with the image, before editing and after. I would have liked to experiment with this project in particular and maybe see how far I could take it and what I could edit into the selected areas.
  • 13. This was one of my favourite images to create. I took a picture of my car from the front normally I then took a picture of my car from the front, with the bonnet open and the engine exposed. I then took both images and put them together into one using the overlay layer. This picture required me to have a keen eye for parts that needed to be removed as the two images were not perfectly aligned. I had to use the eraser tool to cut around the outside of the car to ensure that it fit. I used the soft light option as opposed to the overlay as it gave a better effect.