ERRORS
Mrs. Noor ul ain
Assistant Professor
Dept. Of Pharmaceutical Chemistry
Sri Adichunchanagiri College of Pharmacy.
Contents:
 Definition
 Introduction
 Classification
 Minimization of Errors
 Accuracy
 Precision
 Important Questions
ERRORS :
The difference between the experimental mean and a true value is termed as “Absolute
Error”. Absolute error may be positive or negative. Often a term Relative Error is used. The
relative error refers to the value found by dividing the absolute error by the true value.
Relative error= Measured mean value – True value
True value
The relative error is generally expressed as per cent by multiplying the relative error by 100.
 A measurement is quantitatively a property to be studied, selection of proper choice of
standard and comparison of the property of object with the standard.
 The three aspects of measurement are determination of units and dimensions,
determination of magnitude(numerical values), and knowing about the precision and
accuracy of the measurement being quantified.
 An analyst performing such measurements should obtain significant results with
significant reliability to whom the results are intended.
 An ERROR is the difference between the standard value and the experiment value.
TYPES OF ERRORS:
Errors of two types
1. Determinate/ Systemic Errors
2. Indeterminate Errors/ Random Errors
Determinate Errors:
These are the errors which can be avoided and whose magnitude is
determined. These are classified as
a. Operational and Personal Errors
b. Instrumental and reagent Errors
c. Method Errors
d. Additive and Proportional Errors
a. Personal and Operational Errors:
These are due to manual errors and do not depend on method or procedure. These errors
generally arise from the erratic personal judgement of the analyst. Personal errors vary
from person to person and these are minimized by experience and self care.
b. Instrumental and reagents Errors:
These errors arise from the imperfection of instruments. Ex: Use of unadjusted balance,
utilization of uncalibrated glassware, use of uncalibrated instruments, use of low grade
reagents leads to reagent errors. Electrical instruments are more cause to such errors
because of their fluctuations due to high voltage.
c. Method Errors:
These errors are due to incorrect sampling and incomplete reaction. These types of errors
are difficult to correct. Ex: In gravimetry: these errors occurs in different steps due to
insolubility of precipitates, co-precipitate, post-precipitate & decomposition.
d. Additive and Proportional Errors
Additive error does not depend on constituent present in the determination e.g. loss in
weight of Additive error does not depend on constituent present in the determination
e.g. loss in weight of
Proportional error depends on the amount of the constituent e.g. impurities in
standard compound.
Indeterminate Errors:
These are also called Random errors or accidental errors. These errors are attributed
to unknown cause and come across with every measurement and minimization of
such errors is not possible.
MINIMIZATION OF ERRORS:
The errors can be minimized by following methods:
1. Calibration of instrument and application of correction: Determine instrument
errors can be minimized by periodic calibration of instruments.
2. Analysing the Standard Sample: When a sample is analyzed, the results should be
compared with that of the standard sample that is analtzed from National Bureau
of sample (NBS).
3. Running a Blank Determination: The determination of a blank sample minimizes
the interferences of impurities.
4. Independent Analysis: Accuracy of determination can be established by carrying out
independent analysis.
Ex: Estimation of amount of HcL
5. In some case errors cannot be eliminated.
6. Apply a correction for that effect.
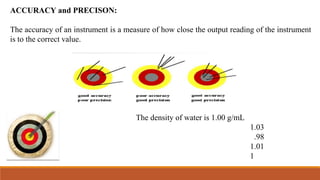
ACCURACY and PRECISON:
The accuracy of an instrument is a measure of how close the output reading of the instrument
is to the correct value.
The density of water is 1.00 g/mL
1.03
.98
1.01
1
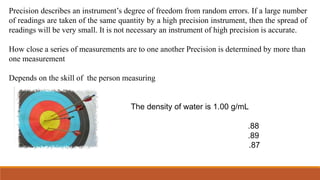
Precision describes an instrument’s degree of freedom from random errors. If a large number
of readings are taken of the same quantity by a high precision instrument, then the spread of
readings will be very small. It is not necessary an instrument of high precision is accurate.
How close a series of measurements are to one another Precision is determined by more than
one measurement
Depends on the skill of the person measuring
The density of water is 1.00 g/mL
.88
.89
.87
Significant Figures:
The significant figures of a given number are those significant or important digits, which
convey the meaning according to its accuracy. For example, 6.658 has four significant digits.
These substantial figures provide precision to the numbers. They are also termed as significant
digits.
Rules for Significant Figures
•All non-zero digits are significant. 198745 contains six significant digits.
•All zeros that occur between any two non zero digits are significant. For example, 108.0097
contains seven significant digits.
•All zeros that are on the right of a decimal point and also to the left of a non-zero digit is never
significant. For example, 0.00798 contained three significant digits.
•All zeros that are on the right of a decimal point are significant, only if, a non-zero digit does
not follow them. For example, 20.00 contains four significant digits.
•All the zeros that are on the right of the last non-zero digit, after the decimal point, are
significant. For example, 0.0079800 contains five significant digits.
•All the zeros that are on the right of the last non-zero digit are significant if they come from a
measurement. For example, 1090 m contains four significant digits.
IMPORTANT QUESTIONS:
1. Define and Classify Errors with an example.
2. Explain the Sources of Errors.
3. Methods to minimize the Errors.
4. Write a note on Accuracy and Precision.
5. Write a note on Significant Figure.

ERRORS

  • 1.
    ERRORS Mrs. Noor ulain Assistant Professor Dept. Of Pharmaceutical Chemistry Sri Adichunchanagiri College of Pharmacy.
  • 2.
    Contents:  Definition  Introduction Classification  Minimization of Errors  Accuracy  Precision  Important Questions
  • 3.
    ERRORS : The differencebetween the experimental mean and a true value is termed as “Absolute Error”. Absolute error may be positive or negative. Often a term Relative Error is used. The relative error refers to the value found by dividing the absolute error by the true value. Relative error= Measured mean value – True value True value The relative error is generally expressed as per cent by multiplying the relative error by 100.
  • 4.
     A measurementis quantitatively a property to be studied, selection of proper choice of standard and comparison of the property of object with the standard.  The three aspects of measurement are determination of units and dimensions, determination of magnitude(numerical values), and knowing about the precision and accuracy of the measurement being quantified.  An analyst performing such measurements should obtain significant results with significant reliability to whom the results are intended.  An ERROR is the difference between the standard value and the experiment value.
  • 5.
    TYPES OF ERRORS: Errorsof two types 1. Determinate/ Systemic Errors 2. Indeterminate Errors/ Random Errors Determinate Errors: These are the errors which can be avoided and whose magnitude is determined. These are classified as a. Operational and Personal Errors b. Instrumental and reagent Errors c. Method Errors d. Additive and Proportional Errors
  • 6.
    a. Personal andOperational Errors: These are due to manual errors and do not depend on method or procedure. These errors generally arise from the erratic personal judgement of the analyst. Personal errors vary from person to person and these are minimized by experience and self care. b. Instrumental and reagents Errors: These errors arise from the imperfection of instruments. Ex: Use of unadjusted balance, utilization of uncalibrated glassware, use of uncalibrated instruments, use of low grade reagents leads to reagent errors. Electrical instruments are more cause to such errors because of their fluctuations due to high voltage. c. Method Errors: These errors are due to incorrect sampling and incomplete reaction. These types of errors are difficult to correct. Ex: In gravimetry: these errors occurs in different steps due to insolubility of precipitates, co-precipitate, post-precipitate & decomposition.
  • 7.
    d. Additive andProportional Errors Additive error does not depend on constituent present in the determination e.g. loss in weight of Additive error does not depend on constituent present in the determination e.g. loss in weight of Proportional error depends on the amount of the constituent e.g. impurities in standard compound.
  • 8.
    Indeterminate Errors: These arealso called Random errors or accidental errors. These errors are attributed to unknown cause and come across with every measurement and minimization of such errors is not possible. MINIMIZATION OF ERRORS: The errors can be minimized by following methods: 1. Calibration of instrument and application of correction: Determine instrument errors can be minimized by periodic calibration of instruments. 2. Analysing the Standard Sample: When a sample is analyzed, the results should be compared with that of the standard sample that is analtzed from National Bureau of sample (NBS). 3. Running a Blank Determination: The determination of a blank sample minimizes the interferences of impurities.
  • 9.
    4. Independent Analysis:Accuracy of determination can be established by carrying out independent analysis. Ex: Estimation of amount of HcL 5. In some case errors cannot be eliminated. 6. Apply a correction for that effect.
  • 10.
    ACCURACY and PRECISON: Theaccuracy of an instrument is a measure of how close the output reading of the instrument is to the correct value. The density of water is 1.00 g/mL 1.03 .98 1.01 1
  • 11.
    Precision describes aninstrument’s degree of freedom from random errors. If a large number of readings are taken of the same quantity by a high precision instrument, then the spread of readings will be very small. It is not necessary an instrument of high precision is accurate. How close a series of measurements are to one another Precision is determined by more than one measurement Depends on the skill of the person measuring The density of water is 1.00 g/mL .88 .89 .87
  • 12.
    Significant Figures: The significantfigures of a given number are those significant or important digits, which convey the meaning according to its accuracy. For example, 6.658 has four significant digits. These substantial figures provide precision to the numbers. They are also termed as significant digits. Rules for Significant Figures •All non-zero digits are significant. 198745 contains six significant digits. •All zeros that occur between any two non zero digits are significant. For example, 108.0097 contains seven significant digits. •All zeros that are on the right of a decimal point and also to the left of a non-zero digit is never significant. For example, 0.00798 contained three significant digits.
  • 13.
    •All zeros thatare on the right of a decimal point are significant, only if, a non-zero digit does not follow them. For example, 20.00 contains four significant digits. •All the zeros that are on the right of the last non-zero digit, after the decimal point, are significant. For example, 0.0079800 contains five significant digits. •All the zeros that are on the right of the last non-zero digit are significant if they come from a measurement. For example, 1090 m contains four significant digits.
  • 14.
    IMPORTANT QUESTIONS: 1. Defineand Classify Errors with an example. 2. Explain the Sources of Errors. 3. Methods to minimize the Errors. 4. Write a note on Accuracy and Precision. 5. Write a note on Significant Figure.