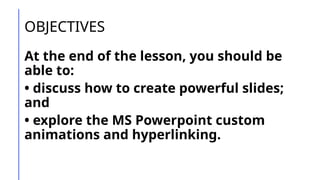
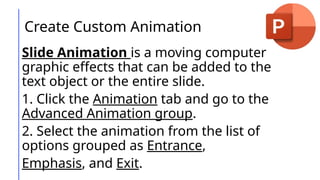
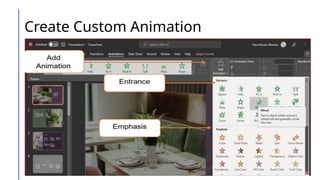
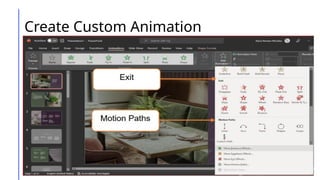
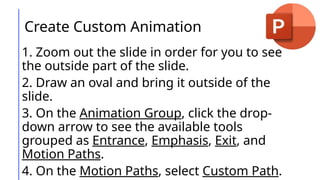
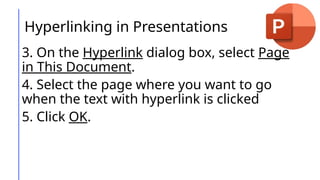
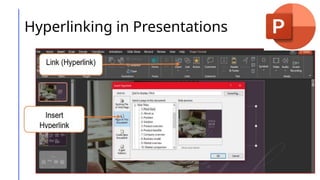
ADVANCED
PRESENTATION
SKILLS
LESSON 4:
EMPOWERMENT
TECHNOLOGIES
OBJECTIVES
At the end of the lesson, you should be
able to:
• discuss how to create powerful slides;
and
• explore the MS Powerpoint custom
animations and hyperlinking.
What is MS PowerPoint?
MS PowerPoint is a presentation graphics
program that allows you to create slide
shows. PowerPoint allows you to organize,
summarize and format your materials,
illustrate your presentation with images or
ClipArt, animation, graphics, and other
multimedia components.
What is MS PowerPoint?
The Power Point program was first
developed by Dennis Austin and Thomas
Rudkin of Forethought, Inc. It was called
then as the "Presenter" and was renamed
"Power Point". Forethought was
purchased by Microsoft Corporation in
1987 and has since continued to develop
and market the software until today.
Features of MS PowerPoint
•You can create a presentation using
PowerPoint. The presentation is made up a
series of slide. The slides that you create
using PowerPoint can also be presented as
overhead transparencies or 35mm slides.
•In addition to slides, you can print audience
handouts, outlines, and speaker's notes.
Features of MS PowerPoint
•You can format all the slides in a presentation
using the powerful slide master which will be
covered in the tutorial.
•You can keep your entire presentation in a
single file- all your slides, speaker's notes, and
audience handouts.
•You can import what you have created in other
Microsoft products, such as word and excel into
any of your slides.
Creating Effective Powerpoint Slides
Plan: Look at the Big Picture
a. Plan: Plan your talk first and then plan your
PowerPoint to accompany your argument and
evidence.
b. Audience: Who is in your audience and what
do they know about the material? What do you
want them to learn? Consider your overall
argument and evidence that you want to
present.
Creating Effective Powerpoint Slides
Plan: Look at the Big Picture
c. Purpose: Define the goals, topic and
appropriate depth and scope of information.
d. Presentation Length: Know the time available
for your presentation. Be realistic about how
much material you can cover as it is important
that you keep within your time limit. Follow the
general rule of thumb: You need about one slide
per minute.
Creating Slides
•The classic PowerPoint error is to write
sentences on a slide and read them.
Rather than treating your slides as a script
for your presentation, let the content on
your slides support your message.
Remember: LESS IS MORE.
Keep It Simple and Clear
a. Text
• Where possible, include a heading for each slide
• Use bulleted points and avoid long sentences (it
is often suggested that you include no more than
6 lines per slide or 6 words per line)
• Font size: 30 - 48 point for titles, 24 - 28 for text
• Avoid all capital letters
• Proofread carefully for spelling and grammar
Keep It Simple and Clear
b. Figures and Images
• Ensure images are clear and relevant
• Label all figures and tables
• Put units beside numbers on graphs and
charts
General Design Principles
• Embrace empty space
• Use vertical and horizontal guide markers
to consistently align elements
• Avoid too many colors, clutter, or fancy
visual effects
• Use high contrast to ensure visibility: e.g.,
Black text on white background or black on
light blue
General Design Principles
• Maintain consistency of the same elements on
a slide (colors, fonts, styles, placement etc.), as
well as, between slides in the slide deck
• Use animation sparingly, if at all. If you use
transitions, use the same kind each time
• Edit entire slide deck to ensure organization is
logical and design is consistent
Have a Back-Up Plan
Remember that PowerPoint may look
great, but technical failures do happen.
Mentally prepare for any eventuality. Make
sure to save the presentation several ways:
save on a USB stick and email it to yourself.
Print out the slides to have a paper version
in case of equipment failure and practice
giving your presentation without your
slides.
Create Custom Animation
Slide Animation is a moving computer
graphic effects that can be added to the
text object or the entire slide.
1. Click the Animation tab and go to the
Advanced Animation group.
2. Select the animation from the list of
options grouped as Entrance,
Emphasis, and Exit.
Create Custom Animation
1. Zoom out the slide in order for you to see
the outside part of the slide.
2. Draw an oval and bring it outside of the
slide.
3. On the Animation Group, click the drop-
down arrow to see the available tools
grouped as Entrance, Emphasis, Exit, and
Motion Paths.
4. On the Motion Paths, select Custom Path.
Create Custom Animation
5. Click from the object and draw a line of
path.
6. Double click the end of the line where
the shape will rest.
7. You can also select the preset motion
path such as Lines, Arcs, Turns, Shapes,
and Loops.
Create Custom Animation
Hyperlinking in Presentations
Hyperlink allows you to go to other slides
in the same or another presentation, in
web page, and even to email addresses.
1. Click the text where you want to create a
hyperlink.
2. Click the Insert tab, go to the Links
group and click the Hyperlink button.
Hyperlinking in Presentations
3. On the Hyperlink dialog box, select Page
in This Document.
4. Select the page where you want to go
when the text with hyperlink is clicked
5. Click OK.
Hyperlinking in Presentations
“Technology is just a tool. In terms
of getting the kids working
together and motivating them, the
teacher is the most important.”
– Bill Gates, Co-Founder of Microsoft

EMPTECH LESSONnnnnnnnnnnnnnnnnnnn 4.pptx

  • 1.
  • 2.
    OBJECTIVES At the endof the lesson, you should be able to: • discuss how to create powerful slides; and • explore the MS Powerpoint custom animations and hyperlinking.
  • 3.
    What is MSPowerPoint? MS PowerPoint is a presentation graphics program that allows you to create slide shows. PowerPoint allows you to organize, summarize and format your materials, illustrate your presentation with images or ClipArt, animation, graphics, and other multimedia components.
  • 4.
    What is MSPowerPoint? The Power Point program was first developed by Dennis Austin and Thomas Rudkin of Forethought, Inc. It was called then as the "Presenter" and was renamed "Power Point". Forethought was purchased by Microsoft Corporation in 1987 and has since continued to develop and market the software until today.
  • 5.
    Features of MSPowerPoint •You can create a presentation using PowerPoint. The presentation is made up a series of slide. The slides that you create using PowerPoint can also be presented as overhead transparencies or 35mm slides. •In addition to slides, you can print audience handouts, outlines, and speaker's notes.
  • 6.
    Features of MSPowerPoint •You can format all the slides in a presentation using the powerful slide master which will be covered in the tutorial. •You can keep your entire presentation in a single file- all your slides, speaker's notes, and audience handouts. •You can import what you have created in other Microsoft products, such as word and excel into any of your slides.
  • 7.
    Creating Effective PowerpointSlides Plan: Look at the Big Picture a. Plan: Plan your talk first and then plan your PowerPoint to accompany your argument and evidence. b. Audience: Who is in your audience and what do they know about the material? What do you want them to learn? Consider your overall argument and evidence that you want to present.
  • 8.
    Creating Effective PowerpointSlides Plan: Look at the Big Picture c. Purpose: Define the goals, topic and appropriate depth and scope of information. d. Presentation Length: Know the time available for your presentation. Be realistic about how much material you can cover as it is important that you keep within your time limit. Follow the general rule of thumb: You need about one slide per minute.
  • 9.
    Creating Slides •The classicPowerPoint error is to write sentences on a slide and read them. Rather than treating your slides as a script for your presentation, let the content on your slides support your message. Remember: LESS IS MORE.
  • 10.
    Keep It Simpleand Clear a. Text • Where possible, include a heading for each slide • Use bulleted points and avoid long sentences (it is often suggested that you include no more than 6 lines per slide or 6 words per line) • Font size: 30 - 48 point for titles, 24 - 28 for text • Avoid all capital letters • Proofread carefully for spelling and grammar
  • 11.
    Keep It Simpleand Clear b. Figures and Images • Ensure images are clear and relevant • Label all figures and tables • Put units beside numbers on graphs and charts
  • 12.
    General Design Principles •Embrace empty space • Use vertical and horizontal guide markers to consistently align elements • Avoid too many colors, clutter, or fancy visual effects • Use high contrast to ensure visibility: e.g., Black text on white background or black on light blue
  • 13.
    General Design Principles •Maintain consistency of the same elements on a slide (colors, fonts, styles, placement etc.), as well as, between slides in the slide deck • Use animation sparingly, if at all. If you use transitions, use the same kind each time • Edit entire slide deck to ensure organization is logical and design is consistent
  • 14.
    Have a Back-UpPlan Remember that PowerPoint may look great, but technical failures do happen. Mentally prepare for any eventuality. Make sure to save the presentation several ways: save on a USB stick and email it to yourself. Print out the slides to have a paper version in case of equipment failure and practice giving your presentation without your slides.
  • 15.
    Create Custom Animation SlideAnimation is a moving computer graphic effects that can be added to the text object or the entire slide. 1. Click the Animation tab and go to the Advanced Animation group. 2. Select the animation from the list of options grouped as Entrance, Emphasis, and Exit.
  • 16.
  • 17.
  • 18.
    Create Custom Animation 1.Zoom out the slide in order for you to see the outside part of the slide. 2. Draw an oval and bring it outside of the slide. 3. On the Animation Group, click the drop- down arrow to see the available tools grouped as Entrance, Emphasis, Exit, and Motion Paths. 4. On the Motion Paths, select Custom Path.
  • 19.
  • 20.
    Create Custom Animation 5.Click from the object and draw a line of path. 6. Double click the end of the line where the shape will rest. 7. You can also select the preset motion path such as Lines, Arcs, Turns, Shapes, and Loops.
  • 21.
  • 22.
    Hyperlinking in Presentations Hyperlinkallows you to go to other slides in the same or another presentation, in web page, and even to email addresses. 1. Click the text where you want to create a hyperlink. 2. Click the Insert tab, go to the Links group and click the Hyperlink button.
  • 23.
    Hyperlinking in Presentations 3.On the Hyperlink dialog box, select Page in This Document. 4. Select the page where you want to go when the text with hyperlink is clicked 5. Click OK.
  • 24.
  • 25.
    “Technology is justa tool. In terms of getting the kids working together and motivating them, the teacher is the most important.” – Bill Gates, Co-Founder of Microsoft