This document provides an overview of ELISA (enzyme-linked immunosorbent assay) technology and procedures. It describes the basic ELISA formats including indirect, blocking, and antigen-capture. It explains the steps involved in blocking ELISA and lists common components of ELISA kits. The document serves as a technical guide for laboratories to help maintain proficiency in ELISA techniques.
The document summarizes the enzyme-linked immunosorbent assay (ELISA) technique. It describes the basic process which involves coating a solid surface like a microwell plate with an antigen or antibody, adding an enzyme-linked antibody or antigen to detect binding, washing away unbound reagents, and measuring the enzyme activity using a chromogenic substrate which produces a detectable color change. It discusses different types of ELISA based on detection methods or the antigen-antibody binding procedure. It also lists materials commonly used and provides some advantages and limitations of the ELISA technique.
Enzyme-Linked ImmunoSorbent Assay, or ELISA, is a biochemical technique used mainly in immunology to detect the presence of an antibody or an antigen in a sample. The ELISA has been used as a diagnostic tool in medicine and plant pathology, as well as a quality control check in various industries. In simple terms, in ELISA an unknown amount of antigen is affixed to a surface, and then a specific antibody is washed over the surface so that it can bind the antigen. This antibody is linked to an enzyme, and in the final step a substance is added that the enzyme can convert to some detectable signal.
This document provides guidelines for performing enzyme-linked immunosorbent assays (ELISAs). It discusses ELISA components, equipment, techniques, timing, washing, reading plates, troubleshooting, and quality control. Regular maintenance and calibration of equipment is emphasized to obtain accurate and reproducible results. Following the procedures outlined in test package inserts and this technical guide helps ensure proper ELISA technique.
This document discusses methods for detecting Methicillin-Resistant Staphylococcus aureus (MRSA). MRSA is any strain of S. aureus that is resistant to beta-lactam antibiotics due to the mecA gene. Rapid detection of MRSA is important for optimal treatment and reducing costs. The document describes several screening methods, focusing on the oxacillin salt agar screening test which involves growing bacterial samples on agar containing oxacillin and 4% NaCl. Growth of more than one colony indicates oxacillin resistance and identifies the strain as MRSA.
This document provides an overview of the ELISA (Enzyme Linked Immuno Sorbent Assay) technique. It was developed in 1971 as a method to detect antigens or antibodies. The principle involves forming an antigen-antibody complex that is detected using an enzyme-conjugated secondary antibody. There are four main types of ELISA: direct, indirect, sandwich, and competitive. ELISA has various applications in diagnostics, food testing, and more due to its sensitivity, availability of equipment, and low cost of reagents.
The document provides an overview of enzyme-linked immunosorbent assay (ELISA) and how it is used as a diagnostic tool. It describes the basic immune response process, including how antigens are presented and recognized by B and T cells, leading to antibody production. It then explains the principles of ELISA, noting it detects antibodies or antigens based on antibody-antigen binding. The main types of ELISA - indirect, direct, sandwich and competitive - are defined. Applications like detecting disease infections and allergens are highlighted.
Enzyme-Linked Immunosorbent Assay (ELISA) , Types of Elisa , Presentation on ...Rajesh Singh
ELISA stands for enzyme-linked immunosorbent assay.
It is a common laboratory technique which is used to measure the concentration of an analyte (antigens) in solution.
Where Ag-Ab interaction is monitored by enzyme measurement.
It is similar in principle to Radio Immuno Assay (RIA) but It depends on an enzyme rather than a radioactive label.
ABSTRACT: The ELISA technique is a simple, sensitive, rapid, reliable, and versatile assay system for the quantitation of antigens and antibodies. Because of the extreme discriminating power of antibodies to recognize an almost infinite array of antigenic structures, the application of ELISA to analyte measurement is almost unlimited. ELISAs have been developed in many configurations depending on the particular application of the assay.
In solid-phase ELISA, one of the immunoreactants (antibody or antigen) is immobilized onto a solid support (microtiter plate) by adsorption, through non-covalent interactions. The immobilized antibody is then incubated with test solution containing the analyte of interest. Following a period of incubation and washing, the bound antigen is detected, by the addition of an enzyme-conjugated antibody that binds to the remaining antigenic sites on the antigen.
Although the technique is easy to perform and quite sensitive, there are certain problems to be solved before it becomes widely usable. In the present Memorandum the technical details are given and the advantages and shortcomings of the procedure are discussed. Present applications and future prospects are reviewed.
The document discusses the inducible clindamycin resistance test (D test) which is recommended to test for inducible resistance in staphylococci, streptococcus pneumoniae, and beta-hemolytic streptococci that are erythromycin resistant but clindamycin susceptible. The D test detects resistance by observing whether the zone of inhibition around a clindamycin disk is flattened near an erythromycin disk. A positive result indicates inducible resistance and that clindamycin treatment may fail in vivo due to selection of resistant mutants. The procedure and interpretation of the D test is described along with its limitations and clinical significance when evaluating clindamycin susceptibility.
The Epsilometer test, also known as the E-test, is a quantitative method for determining the minimum inhibitory concentration (MIC) of antibiotics against bacteria. It uses plastic strips containing a continuous gradient of an antibiotic immobilized on one side to establish an antibiotic gradient when placed on an agar plate inoculated with bacteria. Elliptical zones of inhibition form where the antibiotic has inhibited bacterial growth, and the MIC is read as the intersection of this zone with the scale on the other side of the strip. The E-test allows for simple and rapid MIC testing of bacteria against various antibiotics.
ELISA is a biochemical assay technique used in immunology to detect antibodies, antigens, or other substances. It works by immobilizing an antigen or antibody on a plate and detecting its presence with an enzyme-linked antibody or antigen. There are four common ELISA tests based on the binding structure between the antibody and antigen: direct ELISA, indirect ELISA, sandwich ELISA, and competition ELISA. ELISA provides a sensitive, specific, and quantitative method to detect antibodies or antigens in a sample.
1. ELISA (Enzyme-linked immunosorbent assay) is an immunoassay technique used to detect antibodies, proteins, peptides, and other molecules. It relies on an antigen-antibody reaction to detect the presence of a substance.
2. The document provides detailed information on the basic principles and steps of ELISA, including coating a plate with antibodies, adding samples and reagents, washing steps, and detecting reactions using enzymes and substrates.
3. Key aspects of performing ELISA are discussed such as sample treatment and storage, controlling humidity and air flow during incubations, and troubleshooting poor results. Direct, indirect, sandwich, and competitive ELISA techniques are also summarized.
The ELISA (enzyme-linked immunosorbent assay) is a popular biochemistry assay that uses antibodies and color change to identify a substance. It involves using an enzyme-linked antibody to detect antigen-antibody binding, where the enzyme converts a colorless substrate into a colored product. There are several types of ELISA including indirect, direct, sandwich, and competitive ELISA. ELISA has various applications such as screening blood donations, measuring hormone levels, and detecting infections and allergens.
Serological tests play an important role in the diagnosis of invasive fungal infections. Key serological tests discussed in the document include agglutination, immunodiffusion, complement fixation, enzyme-linked immunosorbent assay (ELISA), and lateral flow assays. ELISA tests have advantages like rapidity and are commonly used to detect fungal antigens or antibodies associated with diseases like cryptococcosis, aspergillosis, histoplasmosis, and candidiasis. The galactomannan ELISA assay detects a polysaccharide antigen released by Aspergillus and is useful for diagnosing invasive aspergillosis.
The document discusses antimicrobial susceptibility testing (AST), which determines the susceptibility of bacteria to different antimicrobial agents through in-vitro laboratory procedures. It outlines various guidelines and standardization procedures for AST, including standardized bacterial inoculum, growth medium, incubation conditions, and antimicrobial concentrations. Common AST methods include dilution methods like broth microdilution and agar dilution, which determine minimum inhibitory concentrations (MICs), and diffusion methods like disc diffusion testing, which provide qualitative susceptibility results.
This document describes various methods for detecting antigen-antibody reactions, including primary reactions like precipitation and agglutination that are visible to the naked eye, as well as secondary reactions that require labels like enzymes, radioisotopes, or fluorescent substances and can be seen using techniques like immunofluorescence (IF), enzyme-linked immunosorbent assay (ELISA), radioimmunoassay (RIA), Western blotting, and flow cytometry. It provides details on the principles, procedures, applications, and examples of each method.
ELISA (enzyme-linked immunosorbent assay) is a test that detects and measures antibodies in blood to determine if a person has antibodies related to certain infectious diseases. It works by using an enzyme to detect the binding of an antibody to its matching antigen. This produces a color change reaction that indicates whether the antibody is present. There are direct and indirect ELISA methods, with indirect using a secondary antibody to detect the primary antibody. ELISA can detect either antigens or antibodies and is used for medical diagnostics, food allergen detection, and other tests.
Measuring agglutination reactions can be used to quantify antibodies, identify antibody targets, and determine antibody specificity, with applications including ELISA, immunofluorescence, and blood typing tests.
ELISA, or enzyme-linked immunosorbent assay, is a quantitative immunological technique used to detect antibodies or antigens in a sample. It involves immobilizing an antigen or antibody on a plate and detecting it using an enzyme-linked antibody or antigen. The enzyme's activity is then measured using a chromogenic substrate, producing a detectable color change if the antigen-antibody complex is present. ELISA has applications in detecting hormones, proteins, infectious agents, drugs, and more due to its high sensitivity and specificity. It is a widely used, inexpensive, and easy to perform technique.
This document provides an overview of antigen-antibody interactions and their applications in infectious disease diagnosis. It discusses how immunochemical methods can detect microorganisms in patient specimens using antigens and antibodies. Various serological tests that utilize antigen-antibody reactions are described, including precipitation reactions, agglutination reactions, complement fixation tests, neutralization tests, and immunoassays. Specific techniques like immunodiffusion, immunoelectrophoresis, and slide and tube agglutination are also summarized. The document aims to explain the basic principles of antigen-antibody reactions and their uses in clinical diagnosis and epidemiology.
ELISA Vs ELISPOT - Principle, Procedure, Advantagesajithnandanam
The Enzyme Linked Immunospot (ELISPOT) technique was developed by Cecil Czerkinskdy in 1983. ELISPOT is used for the detection of secreted proteins, such as cytokines and growth factors. ELISPOT is primarily used in immunology research in the following areas:
This document discusses antifungal susceptibility testing. It provides background on the history of antifungal susceptibility testing and why it is needed. It describes different methods for testing including broth dilution and disk diffusion. It discusses various antifungal agents and their mechanisms of action. The document outlines the procedures for broth microdilution and macrodilution testing according to CLSI guidelines, including preparation of inoculum, drug solutions, reading results, and testing of filamentous fungi.
Content of this presentation is only for education purpose.
No conflict of interest.
Thanks to google.com it helps me for pictures & searching references.
The document provides a history of ELISA (Enzyme-Linked ImmunoSorbent Assay) and describes its components, procedures, types, applications and advantages. It discusses key events in immunology research from the 18th century leading to the development of ELISA in the 1970s. ELISA allows detection and quantification of antigens or antibodies in a simple, sensitive and cost-effective manner using enzyme-labeled antibodies or antigens.
ELISA (enzyme-linked immunosorbent assay) is a biochemical technique used to detect the presence of antibodies and antigens in a liquid sample. It relies on an enzyme-linked antibody or antigen to detect the target protein. There are different types of ELISA including direct, indirect, sandwich, and competitive. The ELISA process involves coating a plate with an antigen or antibody, adding a sample and enzyme-linked antibody, washing unbound material, and detecting the enzyme's product to quantify the target. ELISAs are widely used in medical testing, food safety, and disease detection.
This document describes the enzyme-linked immunosorbent assay (ELISA) technique. ELISA is used to detect antibodies or antigens in samples. It works by affixing an unknown amount of antigen to a surface, applying a specific antibody linked to an enzyme, and detecting the enzyme's activity through a color change. There are three main types of ELISA - direct, indirect, and sandwich - which differ in their use of primary and secondary antibodies. ELISA has advantages over other techniques like radioimmunoassay in not requiring radioactive materials and being highly sensitive and specific. It has a variety of applications like diagnosing infections and measuring protein levels.
The document discusses ELISA (enzyme-linked immunosorbent assay), a commonly used analytical technique for detecting antigens, antibodies, and proteins. It describes the basic principles of ELISA, including immobilizing an antigen and detecting it using an enzyme-linked antibody. There are four main types of ELISA discussed: direct ELISA, indirect ELISA, sandwich ELISA, and competitive ELISA. Sandwich ELISA is most common and involves capturing the antigen between two antibodies, followed by detection with enzyme-linked secondary antibodies.
Blog praxilabs com_2021_09_20_elisa_principleAyaFarid2
The Enzyme Linked Immunosorbent Assay (ELISA) is one of the most sensitive immunoassays available. The typical detection range for an ELISA is 0.1 to 1 fmole or 0.01 ng to 0.1 ng. It is a plate-based assay technique designed for detecting and quantifying peptides, proteins, antibodies, and hormones.
The document describes the ELISA (enzyme-linked immunosorbent assay) technique for detecting and quantifying proteins, antibodies, and hormones. In an ELISA, an antigen is immobilized to a plate and detected using an antibody linked to an enzyme. Detection involves incubating the plate with a substrate to produce a measurable product, allowing quantification of the antigen. There are different types of ELISA including direct, indirect, sandwich, and competitive formats that vary the immobilization and detection steps. Proper sample preparation and reagent dilution are important for accurate ELISA results.
The document provides an overview of enzyme-linked immunosorbent assay (ELISA), including its history, principles, requirements, types (direct, indirect, sandwich, competitive), applications (ELISPOT), equipment (washer, reader), and generations used for HIV detection. ELISA is a sensitive technique for detecting antigen-antibody interactions using an enzyme-substrate system for detection. It was developed in 1971 and involves multiple steps with different reagents to separate bound and unbound fractions.
The document provides an overview of ELISA (Enzyme-Linked Immunosorbent Assay), describing it as an antibody-based method used to quantitatively or qualitatively detect specific antigens or antibodies. It discusses different types of ELISA including indirect, sandwich, and ELISPOT. The basic principles of two-step and sandwich ELISA are described, involving binding of primary and secondary antibodies and use of an enzyme to produce a color change indicating the presence of an analyte. Considerations for whether ELISA is suitable for a given experiment are also outlined.
ELISA and its application in clinical researchesKcmscicmt
The document describes the enzyme-linked immunosorbent assay (ELISA), a commonly used laboratory technique for detecting and quantifying antigens and antibodies. It involves immobilizing an antigen or antibody to a plate and detecting it using an antibody or antigen linked to an enzyme. There are four basic ELISA formats - direct, indirect, sandwich, and competitive - that allow flexibility based on the antibodies and results required. The general ELISA procedure involves coating a plate with a capture antibody or antigen, adding the sample, washing unbound material, adding a detection antibody linked to an enzyme, washing again, and detecting the enzyme's activity using a substrate to produce a measurable signal correlated to analyte concentration.
This document provides an overview of enzyme-linked immunosorbent assay (ELISA), including its basic principles, types (sandwich, indirect, direct, competitive), applications (measuring hormones, detecting infections, allergens), and components (solid phase, adsorption, washing, antigen, antibody, enzyme conjugate, chromogen). ELISA is an important immunological method for detecting antigens and antibodies based on an enzyme-antibody or antigen-antibody reaction. It has advantages over radioimmunoassay such as higher sensitivity, safety, lower cost, and simpler instrumentation.
The document discusses ELISA (enzyme-linked immunosorbent assay), a biochemical technique used to detect antigens or antibodies. It describes the history and development of ELISA, which was developed in the 1970s as a safer alternative to radioimmunoassay by using enzyme labels instead of radioisotopes. The principle of ELISA involves fixing an antigen to a solid surface, then detecting it using an antibody linked to an enzyme. There are different types of ELISA based on whether it detects antigens or antibodies, including indirect, sandwich, and competitive ELISA.
The document describes the enzyme-linked immunosorbent assay (ELISA), including:
- ELISA is an immunological assay used to measure antibodies, antigens, proteins and glycoproteins in biological samples. It is commonly used for diagnosis of diseases like HIV and measurement of cytokines.
- ELISA assays are generally carried out in 96 well plates, allowing multiple samples to be measured at once. Each ELISA measures a specific antigen using capture and detection antibodies.
- There are different types of ELISA including sandwich ELISA, which is described as using two antibodies to detect antigens like cytokines between them in a multi-step process involving antibody coating, sample addition, detection antibody addition, and substrate conversion to a detectable signal. Determination of antigen
The document provides guidelines for performing ELISA (Enzyme-Linked Immunosorbent Assay), including:
1. ELISA is a popular immunological technique that uses antibodies and enzymes to detect antigens or antibodies. It is very sensitive and can be used both qualitatively and quantitatively.
2. The basic steps of ELISA involve coating a plate with an antigen, adding a primary antibody, adding a secondary antibody linked to an enzyme, adding a substrate that reacts with the enzyme to produce a colored product.
3. Factors that can cause troubleshooting issues include contamination, improper washing, expired reagents, incorrect procedures, temperature issues, poor pipetting technique, and more. Proper controls and validation
The document discusses enzyme-linked immunosorbent assay (ELISA), including its uses, variations, and applications. ELISA uses an enzyme-conjugated antibody that reacts with a substrate to generate a detectable color change. There are several types of ELISA including indirect, sandwich, and competitive ELISA that can be used either qualitatively or quantitatively to detect antigens or antibodies. ELISA has numerous medical and industrial applications such as detecting HIV, food allergens, drugs, and various pathogens.
Immunoassays are biochemical methods that use the specificity of antigen-antibody reactions to detect and quantify target molecules in biological samples. The document defines immunoassay and provides details on various types including enzyme immunoassays (ELISA, EMIT), radioimmunoassay (RIA), counting immunoassay (CIA), fluoroimmunoassay (FIA), and chemiluminescence immunoassay (CLIA). It describes the principles, components, procedures, and applications of each type of immunoassay for detecting molecules like antibodies, hormones, and proteins.
The ELISA (enzyme-linked immunosorbent assay) is a test that uses antibodies and color change to detect the presence of a substance like an antigen. There are four main types of ELISA - direct, indirect, sandwich, and competitive. The sandwich ELISA involves capturing the antigen between two antibodies, one coated on a surface and one linked to an enzyme. This amplified signal allows the ELISA to be a sensitive diagnostic tool for detecting substances related to diseases, food allergens, and other analytes.
The document discusses the topic of ELISA (Enzyme-Linked Immunosorbent Assay), including its principle, types, applications, advantages, and disadvantages. ELISA involves binding antibodies or antigens to a polystyrene plate and detecting antigen-antibody complexes using conjugated secondary antibodies and chromogenic substrates, which produce a colored reaction. There are four main types of ELISA: direct, indirect, sandwich, and competitive. ELISA has various applications in medicine, food testing, and more. It is a sensitive and specific technique with advantages like low cost and long shelf life, but also has some disadvantages.
ELISA is a widely used technique to detect antigens or antibodies. It works by using an enzyme-conjugated antibody that reacts with a chromogenic substrate to generate a colored product, allowing detection of antigen-antibody complexes. There are several variants of ELISA including indirect, sandwich, competitive, and ELISPOT assays that can be used qualitatively or quantitatively. ELISA has various applications such as detecting antibodies and allergens and is advantageous for being sensitive, having widely available equipment, and not using radiation.
ELISA (enzyme-linked immunosorbent assay) is a biochemical technique used to detect the presence of antibodies or antigens in a sample. It involves affixing an unknown antigen to a surface, applying a specific antibody linked to an enzyme, and adding a substrate that the enzyme converts to a detectable signal, most commonly a color change. ELISA has been used as a diagnostic tool in medicine, plant pathology, and the food industry for quality control.
Cosa hanno in comune un mattoncino Lego e la backdoor XZ?Speck&Tech
ABSTRACT: A prima vista, un mattoncino Lego e la backdoor XZ potrebbero avere in comune il fatto di essere entrambi blocchi di costruzione, o dipendenze di progetti creativi e software. La realtà è che un mattoncino Lego e il caso della backdoor XZ hanno molto di più di tutto ciò in comune.
Partecipate alla presentazione per immergervi in una storia di interoperabilità, standard e formati aperti, per poi discutere del ruolo importante che i contributori hanno in una comunità open source sostenibile.
BIO: Sostenitrice del software libero e dei formati standard e aperti. È stata un membro attivo dei progetti Fedora e openSUSE e ha co-fondato l'Associazione LibreItalia dove è stata coinvolta in diversi eventi, migrazioni e formazione relativi a LibreOffice. In precedenza ha lavorato a migrazioni e corsi di formazione su LibreOffice per diverse amministrazioni pubbliche e privati. Da gennaio 2020 lavora in SUSE come Software Release Engineer per Uyuni e SUSE Manager e quando non segue la sua passione per i computer e per Geeko coltiva la sua curiosità per l'astronomia (da cui deriva il suo nickname deneb_alpha).
How to Get CNIC Information System with Paksim Ga.pptxdanishmna97
Pakdata Cf is a groundbreaking system designed to streamline and facilitate access to CNIC information. This innovative platform leverages advanced technology to provide users with efficient and secure access to their CNIC details.
Infrastructure Challenges in Scaling RAG with Custom AI modelsZilliz
Building Retrieval-Augmented Generation (RAG) systems with open-source and custom AI models is a complex task. This talk explores the challenges in productionizing RAG systems, including retrieval performance, response synthesis, and evaluation. We’ll discuss how to leverage open-source models like text embeddings, language models, and custom fine-tuned models to enhance RAG performance. Additionally, we’ll cover how BentoML can help orchestrate and scale these AI components efficiently, ensuring seamless deployment and management of RAG systems in the cloud.
Goodbye Windows 11: Make Way for Nitrux Linux 3.5.0!SOFTTECHHUB
As the digital landscape continually evolves, operating systems play a critical role in shaping user experiences and productivity. The launch of Nitrux Linux 3.5.0 marks a significant milestone, offering a robust alternative to traditional systems such as Windows 11. This article delves into the essence of Nitrux Linux 3.5.0, exploring its unique features, advantages, and how it stands as a compelling choice for both casual users and tech enthusiasts.
For the full video of this presentation, please visit: https://www.edge-ai-vision.com/2024/06/building-and-scaling-ai-applications-with-the-nx-ai-manager-a-presentation-from-network-optix/
Robin van Emden, Senior Director of Data Science at Network Optix, presents the “Building and Scaling AI Applications with the Nx AI Manager,” tutorial at the May 2024 Embedded Vision Summit.
In this presentation, van Emden covers the basics of scaling edge AI solutions using the Nx tool kit. He emphasizes the process of developing AI models and deploying them globally. He also showcases the conversion of AI models and the creation of effective edge AI pipelines, with a focus on pre-processing, model conversion, selecting the appropriate inference engine for the target hardware and post-processing.
van Emden shows how Nx can simplify the developer’s life and facilitate a rapid transition from concept to production-ready applications.He provides valuable insights into developing scalable and efficient edge AI solutions, with a strong focus on practical implementation.
UiPath Test Automation using UiPath Test Suite series, part 5DianaGray10
Welcome to UiPath Test Automation using UiPath Test Suite series part 5. In this session, we will cover CI/CD with devops.
Topics covered:
CI/CD with in UiPath
End-to-end overview of CI/CD pipeline with Azure devops
Speaker:
Lyndsey Byblow, Test Suite Sales Engineer @ UiPath, Inc.
Driving Business Innovation: Latest Generative AI Advancements & Success StorySafe Software
Are you ready to revolutionize how you handle data? Join us for a webinar where we’ll bring you up to speed with the latest advancements in Generative AI technology and discover how leveraging FME with tools from giants like Google Gemini, Amazon, and Microsoft OpenAI can supercharge your workflow efficiency.
During the hour, we’ll take you through:
Guest Speaker Segment with Hannah Barrington: Dive into the world of dynamic real estate marketing with Hannah, the Marketing Manager at Workspace Group. Hear firsthand how their team generates engaging descriptions for thousands of office units by integrating diverse data sources—from PDF floorplans to web pages—using FME transformers, like OpenAIVisionConnector and AnthropicVisionConnector. This use case will show you how GenAI can streamline content creation for marketing across the board.
Ollama Use Case: Learn how Scenario Specialist Dmitri Bagh has utilized Ollama within FME to input data, create custom models, and enhance security protocols. This segment will include demos to illustrate the full capabilities of FME in AI-driven processes.
Custom AI Models: Discover how to leverage FME to build personalized AI models using your data. Whether it’s populating a model with local data for added security or integrating public AI tools, find out how FME facilitates a versatile and secure approach to AI.
We’ll wrap up with a live Q&A session where you can engage with our experts on your specific use cases, and learn more about optimizing your data workflows with AI.
This webinar is ideal for professionals seeking to harness the power of AI within their data management systems while ensuring high levels of customization and security. Whether you're a novice or an expert, gain actionable insights and strategies to elevate your data processes. Join us to see how FME and AI can revolutionize how you work with data!
Removing Uninteresting Bytes in Software FuzzingAftab Hussain
Imagine a world where software fuzzing, the process of mutating bytes in test seeds to uncover hidden and erroneous program behaviors, becomes faster and more effective. A lot depends on the initial seeds, which can significantly dictate the trajectory of a fuzzing campaign, particularly in terms of how long it takes to uncover interesting behaviour in your code. We introduce DIAR, a technique designed to speedup fuzzing campaigns by pinpointing and eliminating those uninteresting bytes in the seeds. Picture this: instead of wasting valuable resources on meaningless mutations in large, bloated seeds, DIAR removes the unnecessary bytes, streamlining the entire process.
In this work, we equipped AFL, a popular fuzzer, with DIAR and examined two critical Linux libraries -- Libxml's xmllint, a tool for parsing xml documents, and Binutil's readelf, an essential debugging and security analysis command-line tool used to display detailed information about ELF (Executable and Linkable Format). Our preliminary results show that AFL+DIAR does not only discover new paths more quickly but also achieves higher coverage overall. This work thus showcases how starting with lean and optimized seeds can lead to faster, more comprehensive fuzzing campaigns -- and DIAR helps you find such seeds.
- These are slides of the talk given at IEEE International Conference on Software Testing Verification and Validation Workshop, ICSTW 2022.
UiPath Test Automation using UiPath Test Suite series, part 6DianaGray10
Welcome to UiPath Test Automation using UiPath Test Suite series part 6. In this session, we will cover Test Automation with generative AI and Open AI.
UiPath Test Automation with generative AI and Open AI webinar offers an in-depth exploration of leveraging cutting-edge technologies for test automation within the UiPath platform. Attendees will delve into the integration of generative AI, a test automation solution, with Open AI advanced natural language processing capabilities.
Throughout the session, participants will discover how this synergy empowers testers to automate repetitive tasks, enhance testing accuracy, and expedite the software testing life cycle. Topics covered include the seamless integration process, practical use cases, and the benefits of harnessing AI-driven automation for UiPath testing initiatives. By attending this webinar, testers, and automation professionals can gain valuable insights into harnessing the power of AI to optimize their test automation workflows within the UiPath ecosystem, ultimately driving efficiency and quality in software development processes.
What will you get from this session?
1. Insights into integrating generative AI.
2. Understanding how this integration enhances test automation within the UiPath platform
3. Practical demonstrations
4. Exploration of real-world use cases illustrating the benefits of AI-driven test automation for UiPath
Topics covered:
What is generative AI
Test Automation with generative AI and Open AI.
UiPath integration with generative AI
Speaker:
Deepak Rai, Automation Practice Lead, Boundaryless Group and UiPath MVP
AI 101: An Introduction to the Basics and Impact of Artificial IntelligenceIndexBug
Imagine a world where machines not only perform tasks but also learn, adapt, and make decisions. This is the promise of Artificial Intelligence (AI), a technology that's not just enhancing our lives but revolutionizing entire industries.
In his public lecture, Christian Timmerer provides insights into the fascinating history of video streaming, starting from its humble beginnings before YouTube to the groundbreaking technologies that now dominate platforms like Netflix and ORF ON. Timmerer also presents provocative contributions of his own that have significantly influenced the industry. He concludes by looking at future challenges and invites the audience to join in a discussion.
Maruthi Prithivirajan, Head of ASEAN & IN Solution Architecture, Neo4j
Get an inside look at the latest Neo4j innovations that enable relationship-driven intelligence at scale. Learn more about the newest cloud integrations and product enhancements that make Neo4j an essential choice for developers building apps with interconnected data and generative AI.
Unlocking Productivity: Leveraging the Potential of Copilot in Microsoft 365, a presentation by Christoforos Vlachos, Senior Solutions Manager – Modern Workplace, Uni Systems
HCL Notes und Domino Lizenzkostenreduzierung in der Welt von DLAUpanagenda
Webinar Recording: https://www.panagenda.com/webinars/hcl-notes-und-domino-lizenzkostenreduzierung-in-der-welt-von-dlau/
DLAU und die Lizenzen nach dem CCB- und CCX-Modell sind für viele in der HCL-Community seit letztem Jahr ein heißes Thema. Als Notes- oder Domino-Kunde haben Sie vielleicht mit unerwartet hohen Benutzerzahlen und Lizenzgebühren zu kämpfen. Sie fragen sich vielleicht, wie diese neue Art der Lizenzierung funktioniert und welchen Nutzen sie Ihnen bringt. Vor allem wollen Sie sicherlich Ihr Budget einhalten und Kosten sparen, wo immer möglich. Das verstehen wir und wir möchten Ihnen dabei helfen!
Wir erklären Ihnen, wie Sie häufige Konfigurationsprobleme lösen können, die dazu führen können, dass mehr Benutzer gezählt werden als nötig, und wie Sie überflüssige oder ungenutzte Konten identifizieren und entfernen können, um Geld zu sparen. Es gibt auch einige Ansätze, die zu unnötigen Ausgaben führen können, z. B. wenn ein Personendokument anstelle eines Mail-Ins für geteilte Mailboxen verwendet wird. Wir zeigen Ihnen solche Fälle und deren Lösungen. Und natürlich erklären wir Ihnen das neue Lizenzmodell.
Nehmen Sie an diesem Webinar teil, bei dem HCL-Ambassador Marc Thomas und Gastredner Franz Walder Ihnen diese neue Welt näherbringen. Es vermittelt Ihnen die Tools und das Know-how, um den Überblick zu bewahren. Sie werden in der Lage sein, Ihre Kosten durch eine optimierte Domino-Konfiguration zu reduzieren und auch in Zukunft gering zu halten.
Diese Themen werden behandelt
- Reduzierung der Lizenzkosten durch Auffinden und Beheben von Fehlkonfigurationen und überflüssigen Konten
- Wie funktionieren CCB- und CCX-Lizenzen wirklich?
- Verstehen des DLAU-Tools und wie man es am besten nutzt
- Tipps für häufige Problembereiche, wie z. B. Team-Postfächer, Funktions-/Testbenutzer usw.
- Praxisbeispiele und Best Practices zum sofortigen Umsetzen
Observability Concepts EVERY Developer Should Know -- DeveloperWeek Europe.pdfPaige Cruz
Monitoring and observability aren’t traditionally found in software curriculums and many of us cobble this knowledge together from whatever vendor or ecosystem we were first introduced to and whatever is a part of your current company’s observability stack.
While the dev and ops silo continues to crumble….many organizations still relegate monitoring & observability as the purview of ops, infra and SRE teams. This is a mistake - achieving a highly observable system requires collaboration up and down the stack.
I, a former op, would like to extend an invitation to all application developers to join the observability party will share these foundational concepts to build on:
Communications Mining Series - Zero to Hero - Session 1DianaGray10
This session provides introduction to UiPath Communication Mining, importance and platform overview. You will acquire a good understand of the phases in Communication Mining as we go over the platform with you. Topics covered:
• Communication Mining Overview
• Why is it important?
• How can it help today’s business and the benefits
• Phases in Communication Mining
• Demo on Platform overview
• Q/A
In the rapidly evolving landscape of technologies, XML continues to play a vital role in structuring, storing, and transporting data across diverse systems. The recent advancements in artificial intelligence (AI) present new methodologies for enhancing XML development workflows, introducing efficiency, automation, and intelligent capabilities. This presentation will outline the scope and perspective of utilizing AI in XML development. The potential benefits and the possible pitfalls will be highlighted, providing a balanced view of the subject.
We will explore the capabilities of AI in understanding XML markup languages and autonomously creating structured XML content. Additionally, we will examine the capacity of AI to enrich plain text with appropriate XML markup. Practical examples and methodological guidelines will be provided to elucidate how AI can be effectively prompted to interpret and generate accurate XML markup.
Further emphasis will be placed on the role of AI in developing XSLT, or schemas such as XSD and Schematron. We will address the techniques and strategies adopted to create prompts for generating code, explaining code, or refactoring the code, and the results achieved.
The discussion will extend to how AI can be used to transform XML content. In particular, the focus will be on the use of AI XPath extension functions in XSLT, Schematron, Schematron Quick Fixes, or for XML content refactoring.
The presentation aims to deliver a comprehensive overview of AI usage in XML development, providing attendees with the necessary knowledge to make informed decisions. Whether you’re at the early stages of adopting AI or considering integrating it in advanced XML development, this presentation will cover all levels of expertise.
By highlighting the potential advantages and challenges of integrating AI with XML development tools and languages, the presentation seeks to inspire thoughtful conversation around the future of XML development. We’ll not only delve into the technical aspects of AI-powered XML development but also discuss practical implications and possible future directions.
2. ELISA TEchnIcAL GuIdE
Table of Contents
1 Introduction
2 ELISA Technology
3 ELISA Kits
5 ELISA Equipment
6 Equipment Maintenance and calibration
7 Reagent handling and Preparation
8 handling and Preparing Kit components
9 Quality control
10 Sample handling
12 Pipetting Methods
15 ELISA Plate Timing
16 ELISA Plate Washing
18 Reading Plates and data Management
19 ELISA Troubleshooting
Appendixes
23 A Gravimetric Pipette calibration Procedure
24 B Inventory control Tracking chart
25 C Laboratory Tracking chart
26 D Maintenance and calibration Schedule
27 E Quality control Quick check
b c
3. ELISA TEchnIcAL GuIdE
Introduction
IdEXX manufactures diagnostic test kits for the detection of diseases in
ruminants, horses, swine and poultry.
The enzyme-linked immunosorbent assay (ELISA) is one of the most sensitive
and reproducible technologies available. These assays are rapid, simple to
perform and easily automated. IdEXX introduced the first commercial poultry
ELISA for infectious bursal disease (IBd) in 1985 and the first commercial
livestock ELISA for Aujeszky’s disease/pseudorabies in 1986, enhancing the
way laboratories test production animals today.
As with any assay, the reproducibility and reliability of ELISAs are dependent
upon proper technique and attention to detail. This ELISA technical guide
will increase your awareness of ELISA techniques and help you maintain
proficiency with this methodology.
check your package insert for specific instructions for each assay you
perform. Periodically, improvements and revisions are made to kit and
package inserts. Therefore, it is important to review the protocol on a regular
basis. If you have questions concerning any of the following information, call
IdEXX Technical Services for assistance. Within the united States,
call 1-800-548-9997 or 1-800-943-3999. Outside of the united States, call
+1-207-556-4895 and select the Livestock and Poultry diagnostics Technical
Support option. Or visit our Web site at www.idexx.com/livestockandpoultry.
d 1
4. ELISA TEchnIcAL GuIdE
ELISA Technology
The ELISA is a rapid test used for detecting and quantifying antibodies or Blocking (Competitive) Format: In this format, the specific sample
antigens against viruses, bacteria and other materials. This method can be antibodies compete with, or block, the enzyme-labeled, specific antibody
ELISA formats provide the ability to:
used to detect many infectious agents affecting poultry and livestock. in the conjugate. The addition of an enzyme substrate-chromogen reagent
• Test a large number of samples at the same time causes color to develop. This color is inversely proportional to the amount of
In ELISA technology, the solid phase consists of a 96-well polystyrene plate,
• utomate the procedure using robotics or other
A bound sample antibody. The more antibodies present in the sample, the less
although other materials can be used. The function of the solid phase is to
types of automated equipment color development in the test wells (cAV Ab, cSFV Ab, etc.).
immobilize either antigens or antibodies in the sample, as they bind to the
• Computerize the calculation and reporting of results solid phase. After incubation, the plates are washed to remove any unbound
Antigen-Capture (Direct) Format: In the antigen-capture format, the antigen
material. conjugate is then added to the plate and allowed
in the sample is sandwiched between antibodies coated on the plate and an
to incubate.
enzyme-labeled conjugate. The antibody conjugate can be either monoclonal
The conjugate consists of either an antigen or antibody that has been labeled or polyclonal. The addition of an enzyme substrate-chromogen reagent
with an enzyme. depending upon the assay format, the immunologically causes color to develop. This color is directly proportional to the amount of the
reactive portion of the conjugate binds with either the solid phase or the target antigen present in the sample (cSFV Ag, ALV Ag, etc.).
sample. The enzyme portion of the conjugate enables detection. Steps in Blocking ELISA
The plates are washed again and an enzyme substrate (hydrogen peroxide Steps in Blocking ELISA
and a chromogen) is added and allowed to incubate. color develops in the
presence of bound enzyme and the optical density is read with an ELISA plate
reader.
ELISA Formats
ELISAs are divided into three main formats—indirect, blocking (competitive)
and antigen-capture (direct).
Indirect Format: In the indirect format, the sample antibody is sandwiched
between the antigen coated on the plate and an enzyme-labeled, anti-species
globulin conjugate. The addition of an enzyme substrate-chromogen reagent
causes color to develop. This color is directly proportional to the amount
of bound sample antibody. The more antibody present in the sample, the
stronger the color development in the test wells. This format is suitable for
determining total antibody level in samples (newcastle disease virus,
B. abortus, etc.).
ELISA Kits
Steps in an Indirect ELISA an Indirect ELISA
Steps in
An ELISA kit is a set of standardized reagents and microwell plates
manufactured for a specific test. IdEXX ELISA kits may contain some or
all of the following components: coated plates (solid and/or strip plates),
sample diluent, controls, wash concentrate, conjugate, substrate and stop
solution. The kits are manufactured in batches or lots. Each component
of each kit lot is optimized and manufactured to work as a unit. The kits
pass many quality-control tests conducted by IdEXX, numerous worldwide
reference laboratories, and/or the uSdA before they are approved and
released for sale.
NOTE: do not mix or use components from different kit lot numbers.
2 3
5. ELISA TEchnIcAL GuIdE
ELISA Kits continued ELISA Equipment
Coated Plates Equipment for ELISA testing is widely available. Readers, washers and
The 96-well plates are made of polystyrene and coated with either inactivated pipettes are available as manual or automated systems. Some of the factors
IDEXX kits are manufactured in batches or lots There is a large selection of equipment available.
antigen or antibody. This coating is the binding site for the antibodies or affecting equipment selection are the number and types of tests and samples,
according to strict quality standards. Each component When purchasing a plate reader, call IDEXX Technical
antigens in the sample. unbound antibodies or antigens in the sample are technical training of staff and financial considerations. Below is a brief outline
or reagent in a kit lot is optimized to work with the Services to make sure the xChek* software has the
washed away after incubation. of some equipment available for performing ELISA testing.
other reagents contained in the kit. This includes proper interface.
measurements of sensitivity, specificity and
Sample Diluent Pipettes
repeatability. Therefore, it is very important not to mix
reagents from different kit lots. Most assays require a specific dilution of the sample. Samples are added to • Single-channel, fixed-volume and adjustable-volume (1–20 µL,
the sample diluent and mixed prior to putting them onto the coated plates. 10–100 µL, 20–200 µL, etc.)
• Multichannel, 8- and 12-channels
Controls • Semi-automated dispensing units
The positive control is a solution that contains antibody or antigen. The • Fully automated systems that can process multiple plates
negative control is a solution without antibody or antigen. The controls help
to normalize or standardize each plate. controls are also used to validate the Multichannel pipette and single-channel pipette Dilutors
assay and to calculate sample results. In most kits, the controls are prediluted
• Single-channel
and ready to use. Be sure to follow the instructions in the package insert.
• Multichannel
Conjugate • Automated dispensing units
ELISA conjugates are enzyme-labeled antibodies or antigens that react
Washer Systems
specifically to plate-bound sample analytes. unbound conjugate is washed
away after incubation and before the addition of substrate. The optical density • Manual systems that wash one row or column at a time
of the colorimetric substrate is directly proportional to the quantity of bound • Semi-automated systems that handle one strip or plate at a time
enzyme present.
• Fully automated systems that can process multiple plates
All kit components have an expiration date.
Semi-automated wash system
Substrate
ELISA Plate Readers
For peroxidase conjugates, the substrate is a mixture of hydrogen peroxide
• Manual readers that read one row or well at a time
and a chromogen that reacts with the enzyme portion of the conjugate to
produce color. • Semi-automated readers that read one plate at a time
• Fully automated systems that can process multiple plates simultaneously
Wash Concentrate
The wash concentrate is a buffered solution containing detergent used Other
to wash away unbound materials from the plates. • humidity chamber (not required for all ELISA tests)
• Plate sealers for assays that have long incubation times
Stop Solution
(to avoid evaporation)
The stop solution stops the enzyme-substrate reaction and, thereby, Manual wash system
the color development.
Plate reader
4 5
6. ELISA TEchnIcAL GuIdE
Equipment Maintenance and Calibration Reagent Handling and Preparation
The maintenance and calibration of your laboratory equipment is extremely Receiving Kits
important in obtaining accurate and reproducible results. When you receive your ELISA kits, record the date on your Inventory control
Be sure to label your pipettes with the calibration date
and keep a log for the calibration and maintenance of The Maintenance and calibration Schedule (Appendix d) should be used Tracking chart (Appendix B) and on the kit boxes. Inspect them for damage
all your equipment. as a guideline. Adjust maintenance routines according to the amount of and store them at 2–7°c. When using kits from your inventory, use the first-in-
daily testing performed in your laboratory. Always refer to your equipment first-out (FIFO) method. In other words, use the kits that are the oldest (or will
manufacturer’s guide for their recommendations. expire) first. Individual kit components may have longer expiration dates than
the actual date on the outer kit box. however, you should go by the expiration
Calibration Protocols date on the outer label of the kit. If you do not use an entire kit, mark the date it
Equipment always needs to be in proper calibration. Equipment that is out of is opened and each time it is used thereafter. This way, you can keep track of
calibration can produce false or inaccurate results. Refer to the Maintenance how many times it moves or cycles from the refrigerator to room temperature.
and calibration Schedule (Appendix d) and your manufacturer’s instructions Keep the number of cycles to a minimum by batching (or accumulating)
for the proper calibration protocol and required frequency. samples into larger groups whenever possible.
Options for Calibrating Pipettes General Reagent Handling
• Perform the gravimetric method outlined in Appendix A. Be sure to check your package insert for guidelines on handling and preparing
reagents. Some test kits recommend that all reagents and plates be brought
• use a commercial automated calibration system like the PcS®‚ produced by
Label your kit with the date it was received. to room temperature (18–25°c) prior to use; others indicate that only specific
Artel. See Appendix A, Gravimetric Pipette calibration Procedure, for more
reagents be brought to room temperature. When you need to bring a kit to
information.
room temperature (18–25°c), take it out of the refrigerator and take the kit
• Send the pipette to the manufacturer; see your owner’s manual
components out of the kit box at least 2–3 hours before beginning the assay.
Pipette with calibration label for instructions. The contamination of reagents may compromise your
Measure all reagents using sterile or clean vessels. Be careful to measure only
• Send the pipette to a pipette calibration service. test results. Labeling your reagent reservoirs and using a
what is needed for the number of plates being run. This will help to maintain
separate one for each reagent will help minimize the risk.
Sending pipettes out for service is beneficial when repair or maintenance the integrity of the reagents. do not return reagents to the original stock
is necessary. however, this practice provides only a limited level of quality bottles. We strongly recommend using disposable pipettes and reservoirs
control, which can be increased with in-house calibration. when handling reagents to minimize the risk of contamination. however, if
Operator technique and laboratory environment are two critical variables you choose to reuse any disposable device, use a separate reservoir for
that determine how a pipette will perform when used on your bench top. A each reagent and be sure to label them. Also, wash and thoroughly rinse the
thorough quality-control program must include a quantitative account of these wells with deionized or distilled water after each use. change and discard the
effects. It is beneficial to have a method in place that allows you to perform disposable reservoirs as frequently as possible. never use the same reservoir
regular, routine performance verifications on your own pipettes. By doing so, for conjugate and substrate, even if it has been washed.
you will be able to track pipettes that are drifting out of tolerance. When this
Labeled reservoirs
happens, the failing pipette should be sent out for corrective maintenance or
repair by a qualified service before it compromises your laboratory data
and productivity.
6 7
7. ELISA TEchnIcAL GuIdE
Handling and Preparing Kit Components Quality Control
Plates In-House Controls
IBV Control Tracking September
Refer to the package insert for specific details on the Most assay plates are packaged individually with a desiccant. If a partial 0.4 We recommend using in-house assay controls to monitor your ELISA
Control/Values in Optical Density
0.35
kit you are using. plate is used, aspirate all the liquid from the used wells and cover them with techniques and kit performance over time.
0.3
Do not exchange components between kit lot numbers, sealing tape. Store unused portion of plates with several desiccants in a new 0.25
Because sera are generally received in small quantities, controls will need
even if kits are of similar type. Test results may be resealable bag. 0.2
0.15 to be made by pooling samples. collect negative and positive samples
severely and adversely affected. 0.1 separately. When sufficient quantities of each have been collected, pool similar
Sample Diluent and Wash Concentrate 0.05
0
samples together. Mix the pooled samples thoroughly. In small quantities,
Make sure the sample diluent and wash concentrate have come to room 1 0 5 7 9 11 13 15 17 19 21 20 25 27 29 perform the serial dilution of positive sera in negative serum. Assay each
Day
temperature (18–25°c) before use. These are usually the largest bottles in a dilution according to standard kit protocol (same sample dilution as described
Positive Control Negative Control
kit and require the most time to equilibrate. If the wash concentrate still shows in the kit package insert). Select the dilution that is most comparable to the
crystal formation after reaching room temperature, mix it by inverting it several Tracking chart for controls sample-to-positive (S/P) or sample-to-negative (S/n) values that you want to
times. monitor. Make large quantities of that dilution. Prefilter the prepared controls
using a 0.45-micron filter membrane; you may then choose to filter with a
Controls
0.20-micron filter membrane (optional). Put a small amount of the freshly made
Most kits are formulated with prediluted controls. however, some require that in-house control (volume enough for 1–2 tests) into airtight vials, label, date
you dilute them in the same manner as your sample. controls should be added and store frozen at -70°c if possible. Keep a record of this preparation in a
to the plate in the same method and at the same time as the samples. notebook for reference.
To use this control, thaw, mix and dilute it in the same manner as a routine
Conjugate
sample. Run it on every plate next to the kit controls. do not refreeze your in-
If the kit requires you to prepare a “working” conjugate solution, be sure to house control. You can store it for 3–5 days at 4°c.
follow the instructions closely. Prepare only what you immediately need, and
Record your results on the Laboratory Tracking chart (Appendix c) and graph
do not save leftover solution for future use. If conjugates are contaminated or
them. Any variations or trends should alert you to review your technique and
Seal, label and store partially used plates in a bag with desiccant. improperly stored, they may lose enzymatic activity or may have an apparent
quality-control measures.
increase in background. Most kits supply a ready-to-use conjugate.
Monitoring Temperature
Substrate
To help troubleshoot questionable results, record and ELISA tests are sensitive to temperature extremes. Try to maintain a laboratory
Our ELISA test kits include a ready-to-use substrate. The chemical activity
graph the laboratory temperature. temperature of 18–25°c. Avoid running assays under or near air vents as this
of the substrate will be compromised if it is exposed to light or comes into
may cause excessive cooling, heating and/or evaporation. Also, do not run
contact with metal. Protect this solution by storing it in a dark container until
assays in direct sunlight as this may cause excessive heat and evaporation.
ready for use.
cold bench tops may affect your assay and should be avoided by placing
Stop Solution several layers of paper towels or some other insulating material under the
assay plates during incubation.
Be sure to use the stop solution included in the kit. Follow any safety
precautions in the package insert. The stop solution should be at room Record and track the temperature during each assay. If your laboratory’s
temperature before use. If the stop solution shows crystal formation after temperature fluctuates from morning to afternoon, record this on your tracking
reaching room temperature, mix it by inverting several times. The stop chart. If you have conditions that are difficult to control, it is a good idea to
solution may crystalize at lower temperatures. Before use, make sure that it is use a temperature control chamber to incubate your plates. using ELISA plate
completely dissolved and appears clear. covers will help control evaporation and accidental spills.
Laboratory temperature tracking chart
Quality Control Check
use the Quality control Quick check (Appendix E) to troubleshoot
any problems.
8 9
8. ELISA TEchnIcAL GuIdE
Sample Handling Sample Handling continued
Meat juice sample Incoming Sample Quality Storing Samples
Take sample from the area indicated.
Sample quality can have a significant impact on final assay results. Most labs Avoid numerous freeze-thaw cycles, as this may Be sure samples are properly stored. In general, serum samples should be
have no choice regarding the quality of incoming samples. In many cases, the damage the antibodies or antigens in the sample. refrigerated at 2–7°c for no more than 3–5 days. If samples need to be stored
sample diluent formulation compensates for variations in sample quality. We recommend no more than 3–5 cycles. for a longer period, they should be removed from the clot and frozen to a
minimum of -20°c. Make sure all stored samples are properly labeled and
Gross fungal or bacterial contamination can have adverse effects on
sealed to prevent evaporation. Evidence of lyophilization (concentration of
the antibody or other protein components of a sample and may have an
the sample) can be seen as crystallization and is common in self-defrosting
undesirable effect on test results. If sample quality is highly questionable, Light hemolysis
freezers. This should be avoided because the integrity of the sample will most
obtaining a fresh sample is strongly advised, when possible.
likely be compromised.
Serum/Plasma Samples: Serum samples with trace hemolysis (light-red
color) and moderate lipemia (milky appearance) may have little or no effect on Using Frozen Samples
ELISA results. Avoid using samples that are heavily hemolyzed (dark-red color) Frozen samples can be thawed at room temperature or in a refrigerator. All
or grossly lipemic. check your package insert for information. When serum is thawed samples need to be thoroughly mixed prior to dilution to ensure that
on the clot, be careful not to aspirate any of the clotted material or blood cells. the proteins are dispersed throughout the sample. Mix by gentle vortexing
Blood sample
Take sample from the area indicated.
or inverting at least five times. Frothing or over-mixing of samples will cause
Meat Juice Samples: Meat juice samples should be as clean as possible. denaturation of serum proteins.
Remove debris and lipids from the sample when pipetting.
Milk Samples: Whole milk samples can be used after centrifugation for
Dark hemolysis
15 minutes at 2000 x g, or left overnight if refrigerated (2–8°c). The sample
intended for the assay should be drawn from below the cream layer.
Egg Yolk Samples: collect samples with a clean tuberculin syringe and mix
the diluted samples thoroughly by vortexing.
Other Sample Types: Refer to your package insert for sample handling,
preparation and storage of other sample types (e.g., albumin, cloacal swabs).
Milk sample
Take sample from the area indicated.
Unmixed thawed sample
Proteins settled on bottom of tube;
mix prior to taking sample
10 11
9. ELISA TEchnIcAL GuIdE
Pipetting Methods Pipetting Methods continued
Standard (Forward) Pipetting and Sample Preparation
Two pipetting methods used for ELISA are standard (forward) and reverse. not
all pipettes are capable of reverse pipetting. Refer to the instructions included 1. Put a new tip on a single-channel pipette and make sure that it is on tight.
Use standard (forward) pipetting for the preparation of
with your pipette for details. 2. Press the plunger to the first stop.
sample dilutions, and reverse pipetting for the addition
of diluted samples, controls and reagents. use standard (forward) pipetting for the preparation of sample dilutions, and 3. Some manufacturers recommend that you prewet the tip by aspirating and
reverse pipetting for the addition of diluted samples, controls and reagents. expelling an amount of the sample. check the instructions that came with
your pipette.
careful pipetting is crucial for accurate test results. Become familiar with the
pipette and both methods before running actual tests. Be sure to use the 4. draw the calibrated volume of sample into the tip and pause for one second
correct pipette and tip (volume capacity) for the volume being transferred. with the tip still in the sample. Be careful not to place the tip too deeply into
the sample.
Pipetting Technique 5. Touch the tip to the side of the sample container to remove any excess
1. draw the calibrated volume of sample into the tip. liquid on the outside of the tip.
2. Touch the side of the tube with the tip to remove the excess liquid. 6. dispense the sample into the measured diluent by depressing the plunger
past the first stop to the second stop. Be careful not to place the tip too
3. Ensure that you have the proper volume of sample in the tip.
deeply into the sample diluent.
When using a multichannel pipette, if the wells on your plate are empty,
For samples less than or equal to 10 µL: After dispensing the sample into
position the tips into the lower corner of each well, making contact with the
the diluent, rinse the pipette tip in the diluent by pushing the plunger down
plastic. If the wells on your plate contain liquid, position the tips above the
2–3 times before ejecting the tip.
liquid, making contact with the plastic.
7. Mix samples with a multichannel pipette prior to dispensing samples onto
the plate. You can do this by pushing the plunger down 3–6 times.
Pipetting a Sample 8. Eject the tip into a waste container.
Reverse Pipetting Using a Multichannel Pipette
1. Put new tips on the pipette. Make sure they are on tight and straight.
2. Press the plunger past the first stop and halfway to the second stop.
3. draw the liquid in a slow motion, being careful not to draw any air bubbles
into the tips. check for consistency of volume in the tips.
4. Touch the tips to the edge of the reagent reservoir to remove excess liquid
on the outside of the tips.
a. If the wells on your plate are empty, position the tips into the lower corner
Draw up the calibrated volume of The drop on the tip needs Touch the side of the tube with the Ensure that you have the proper of each well, making contact with the plastic.
sample into the tip. to be removed. tip to remove the excess liquid. volume of sample in the tip.
b. If the wells on your plate contain liquid, position the tips above the liquid,
making contact with the plastic.
Proper Pipetting 5. Slowly dispense the liquid into the wells by depressing the plunger to the
first stop. Be careful not to splash liquid out of the wells, and make sure
there are no drops left on the tips.
Proper position to dispense reagents into empty wells using
Bent tips; needs to be replaced 6. To repeat, hold the plunger at the first stop and continue with step 3.
a multichannel pipette; in the lower corner of each well
7. Eject the tips into a waste container.
NOTE: Reverse pipetting uses more reagent/volume (=“dead volume”).
Proper position to dispense reagents into wells containing
liquid using a multichannel pipette; above the liquid
12 13
10. ELISA TEchnIcAL GuIdE
Pipetting Methods continued ELISA Plate Timing
Automated Dilution Systems and Competitive Assays Adding Samples and Controls
Automated equipment uses more reagent/volume For those systems and assays using neat samples or lower dilution factors, To minimize incubation time between controls and Incubations for assay plates should be timed as precisely as possible. usually
than semiautomated. Check your manufacturer’s the sample can be put directly into the wells of the coated plates. samples, rack the controls with the samples and add the process of adding samples to the plate requires the most time. When
recommendations for purging and priming your system. them to your plate using a multichannel pipette. you dispense samples onto the plate, it is critical to keep the time difference
Follow the sequence below:
between the first and the last sample to a minimum.
1. Add the diluent to the plate.
use a multichannel pipette whenever possible to minimize the time interval
2. Add the sample into the diluent.
from the start of the plate to the end. If the time interval becomes too long or
3. Mix by tapping the plate or repeating pipetting. you are interrupted while adding samples to the plate, put a positive control
and/or your in-house control at the end of the plate and compare these results
with the controls at the beginning of the plate.
For tighter control over the time differentiation from when the controls and
samples are added, you can put your controls in a tube that is racked in
position with your samples. Then use a multichannel pipette and put the
controls onto the plate at the same time you are adding the samples.
Multiple Plate Runs
When timing multiple plates, it is important to keep track of the time interval
from the first plate to the last plate in the run. Keep your batch sizes small
enough so your processes do not overlap. You do not want to be washing a
plate (unless it is done by an automated washer) while another needs to have
conjugate added. If possible, use a timer for every plate.
Use several timers when incubating multiple plates.
14 15
11. ELISA TEchnIcAL GuIdE
ELISA Plate Washing ELISA Plate Washing continued
Automated or Semiautomated Systems Manual or Semi-Manual Systems
After tapping out plates, check paper towels for any In general, an automated or semiautomated wash system in proper working Work quickly so the time from washing the first well/row to the last is minimal.
evidence of color. This may indicate that the plates order will provide more consistent washing than manual methods. check that If the time is too long, the empty wells may dry out and the last wells will have
were not washed properly and there are reagents all the dispensing needles are dispensing with a smooth, steady stream and a longer incubation than the first wells.
remaining in or around the wells. that all aspiration ports aspirate uniformly. Washing by multichannel pipette or wash bottles should be avoided if at
Make sure your wash system is properly cleaned and maintained. Refer to the all possible as this gives insufficient washing that results in high and
Equipment Maintenance and calibration section in this guide (page 6) inconsistent background.
Microbial growth in wash system and your owner’s manual for proper maintenance. The plate-washing
tube; needs to be replaced
Make sure to aspirate all the liquid from the wells by placing the aspiration
technique should be consistent from plate to plate and from row to row within needles at the bottom and in the corners of the wells. do not scrape the
a plate. Avoid prolonged soak times unless specifically recommended in the
surface of the plate as this will remove the antigen/antibody bound to the
package insert. surface and cause inconsistent or inaccurate results. After aspiration, wells
Prepare the wash solution according to the package insert. use only the wash should not dry before the addition of the next reagent.
solution included with, or recommended for, your kit. After tapping out the plates, check the paper towels for any evidence of color.
Aspirate reagents from the plate before dispensing the wash solution. This may indicate that the plates were not washed properly and there are
reagents remaining in or around the wells.
Follow the specific recommendations in your package insert for the number
of washes to use at each step of an assay. Most assays require approximately Overflowing plate; this can contaminate other wells
300–350 µL per well per wash. Be careful to fill the wells above the level of the
reagents. do not allow wells to overflow. If this occurs, the test results may
be invalid.
do not allow the plate to dry between plate washings and prior to the addition
of reagents.
After the final aspiration, tap out any remaining liquid onto several layers of
paper towels.
When testing milk, albumin, whole blood or yolk samples, take extra care to
inspect the wells. Because of their protein or fat composition, these sample
types are sometimes more difficult to wash from the wells and may require the
maximum recommended number of wash cycles.
Proper position of manual washer needles for dispensing wash solution Proper position of manual washer needles for aspirating liquid
16 17
12. ELISA TEchnIcAL GuIdE
Reading Plates and Data Management ELISA Troubleshooting
This information is intended to help you troubleshoot your ELISA procedure.
If you need assistance, contact IdEXX Livestock and Poultry diagnostics
Reading Plates
Technical Services at 1-207-556-4895, option 2; or 1-800-548-9997, option 2.
The last step in an ELISA is to read and interpret the results. For most assays,
NOTE: The conditions described here may not pertain to every ELISA kit
the optical density (amount of color) of the solution on the plate is read with
because performance requirements vary for individual assays. Be sure to
a spectrophotometer, commonly known as a plate reader. There are many
check your package insert for specifications.
models and manufacturers of plate readers; refer to the manufacturer’s
instructions for details of operation.
The package insert specifies which wavelength is required for the assay. Most
assays specify the absorbance reading at 450 nm or 650 nm. Most assays are
optimized using a plate reader equipped with a 650-nm filter. Other filters can High Background or Excessive Color Development (High Optical Density [OD] Readings)
be used, but will result in lower optical density (Od) values. The use of 630-nm
or 620-nm filters will lower the Od values of both the controls and samples, Possible causes Recommended actions
but will do so equivalently across the entire plate. The use of these alternative
Poor-quality water was used to wash plates check the water quality. If it is questionable, try substituting an alternate water
filters will not affect the test results.
or to prepare wash solution. source, such as bottled distilled water, to wash plates or prepare the wash
Plates should be read as soon as possible following the addition of stop solution.
solution. Absorbance readings may drift if excessive time elapses between
stopping the reaction and reading the plates. Substrate solution has deteriorated. Make sure the substrate is colorless prior to addition to the plate.
There was insufficient washing or poor Try using the highest number of washes recommended for the assay. Make
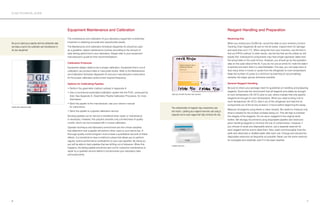
Data Management
washer performance. sure that at least 350 µL of wash solution is dispensed per well per wash.
IdEXX provides the xchek* software to assist you in the collection and Verify the performance of the washer system. have the system repaired if any
management of the data from your ELISA assays. The xchek software ports drip, dispense or aspirate poorly.
interfaces with most common plate readers to read the plate, send the optical
densities to the computer and calculate the results. An IdEXX Technical Washer system had microbial contamination. clean out microbial contamination by flushing the system with a dilute
Services Representative can assist you in learning more about solution of bleach (10% by volume) followed by a large amount of distilled or
this software. deionized water. Prime the system with the appropriate wash solution before
use. The tubing may need to be changed if the contamination is heavy.
Wash system contained an alternate wash Be sure each unique wash solution is properly labeled. Prime the system
formulation. thoroughly when switching between solutions.
Reader was malfunctioning or not blanked Verify the reader’s performance using a calibration plate and check the lamp
properly; this is a possible cause if the Od alignment. Verify the blanking procedure, if applicable, and reblank.
readings were high and the color was not dark.
Laboratory temperature was too high or too low. Maintain the room temperature within 18–25°c. Avoid running assays near
heat sources, in direct sunlight or under air vents.
Reagents were intermixed, contaminated or Ensure that the correct reagents were used, that working solutions were
prepared incorrectly. prepared correctly and that contamination has not occurred.
The xChek* software interfacing with the ELISA plate reader
18 19
13. ELISA TEchnIcAL GuIdE
ELISA Troubleshooting continued ELISA Troubleshooting continued
Insufficient Color Development (Low Optical Density [OD] Readings) Replicates Within a Plate Show Poor Reproducibility
Possible causes Recommended actions Possible causes Recommended actions
Laboratory temperature was too low. Maintain the room temperature within 18°–25°c. Avoid running assays under Excessive time was taken to add samples, Be sure to have all materials set up and ready to use quickly. use a
air conditioning vents or near cold windows. controls or reagents to the assay plate. multichannel pipette to add reagents to multiple wells simultaneously. Rack
controls with samples and dispense them onto the plate at the same time as
Wash solution was prepared incorrectly or the Be sure to use the wash solution recommended for the kit and that it is
the samples.
wrong wash solution was used. prepared correctly. Label each unique wash solution to avoid using the
wrong one. Multichannel pipette was not Verify pipette calibration and check that tips are on tight. Be sure all channels
functioning properly. of the pipette draw and dispense equal volumes.
Washer system had microbial contamination clean out microbial contamination by flushing the system with a dilute
or contained an alternate wash formulation. solution of bleach (10% by volume) followed by a large amount of distilled or There was inconsistent washing or washer Verify the performance of the washer system. have the system repaired if any
deionized water, then prime the system with the appropriate wash solution. system malfunctioning. ports drip or dispense/aspirate poorly.
Be sure each unique wash solution is properly labeled. Prime the system
thoroughly when switching between solutions. There was poor distribution If the sample was thawed or refrigerated, make sure it was mixed prior
of antibody in the sample. to dilution. diluted samples also need to be mixed prior to adding them
Too many wash cycles were used. Stay within the recommended range for the number of wash cycles. Try to use to the plate.
the lowest number of washes recommended for the assay.
Incubation periods were too short. Follow protocol for incubation times. Time each plate separately to ensure
accurate incubation periods.
Reagents and plates were too cold. Make sure plates and reagents are at room temperature by taking them out of No Color Development
the refrigerator, and the kit components out of the kit box, at least 2–3 hours
Possible causes Recommended actions
before starting the assay.
Reagents were used in the wrong order or an check the package insert for the assay protocol and repeat the assay.
Reagents were expired or intermixed from Verify the expiration dates and lot numbers on the reagents.
assay step was omitted.
a different lot number.
Samples were not added to diluent (indirect Verify that the samples were added to the diluent.
Wrong conjugate was used, conjugate was Be sure that the conjugate used is the one that came with the kit and all
format only).
prepared incorrectly or has deteriorated. conjugates are kit- and lot-specific. If preparation of a working conjugate is
needed, be sure that the concentrate and diluent are mixed in appropriate Wrong conjugate was used, conjugate was Be sure that the conjugate used is the one that came with the kit. All conjugates
volumes. do not prepare the working solution too far in advance, and do prepared incorrectly or has deteriorated. are kit- and lot-specific. If preparation of a working conjugate is needed, be
not save any unused portion for future use. If no conjugate preparation is sure that the concentrate and diluent are mixed in correct volumes. do not
necessary, be sure to pour out only the amount required for immediate use, prepare the working solution too far in advance and do not save any unused
and do not return any unused portion to the stock bottle. portion for future use. If no conjugate preparation is necessary, be sure to pour
out only the amount required for immediate use and do not return any unused
Assay plate read was at wrong wavelength, or Verify the correct wavelength for the assay and read the plate again. Verify
portion to the stock bottle.
reader was malfunctioning. reader calibration and lamp alignment.
Positive control was diluted (indirect format only). do not dilute controls unless specified in the package insert.
Excessive kit stress has occurred. check records to see how many times the kit has cycled from the refrigerator.
check to see if the kit was left out on a loading dock or other area for too long
or at extreme temperatures.
Assay plates were compromised or Be sure to refrigerate plates in sealed bags with a desiccant to maintain
previously used. stability. Prevent condensation from forming on plates by allowing them to
equilibrate to room temperature while in the packaging. If partial plates are
used, be sure to label used wells to prevent reuse; cover them with sealing
tape and use the remaining wells as soon as possible. do not store partially
used plates with other plates. Include a desiccant in the storage bag.
20 21