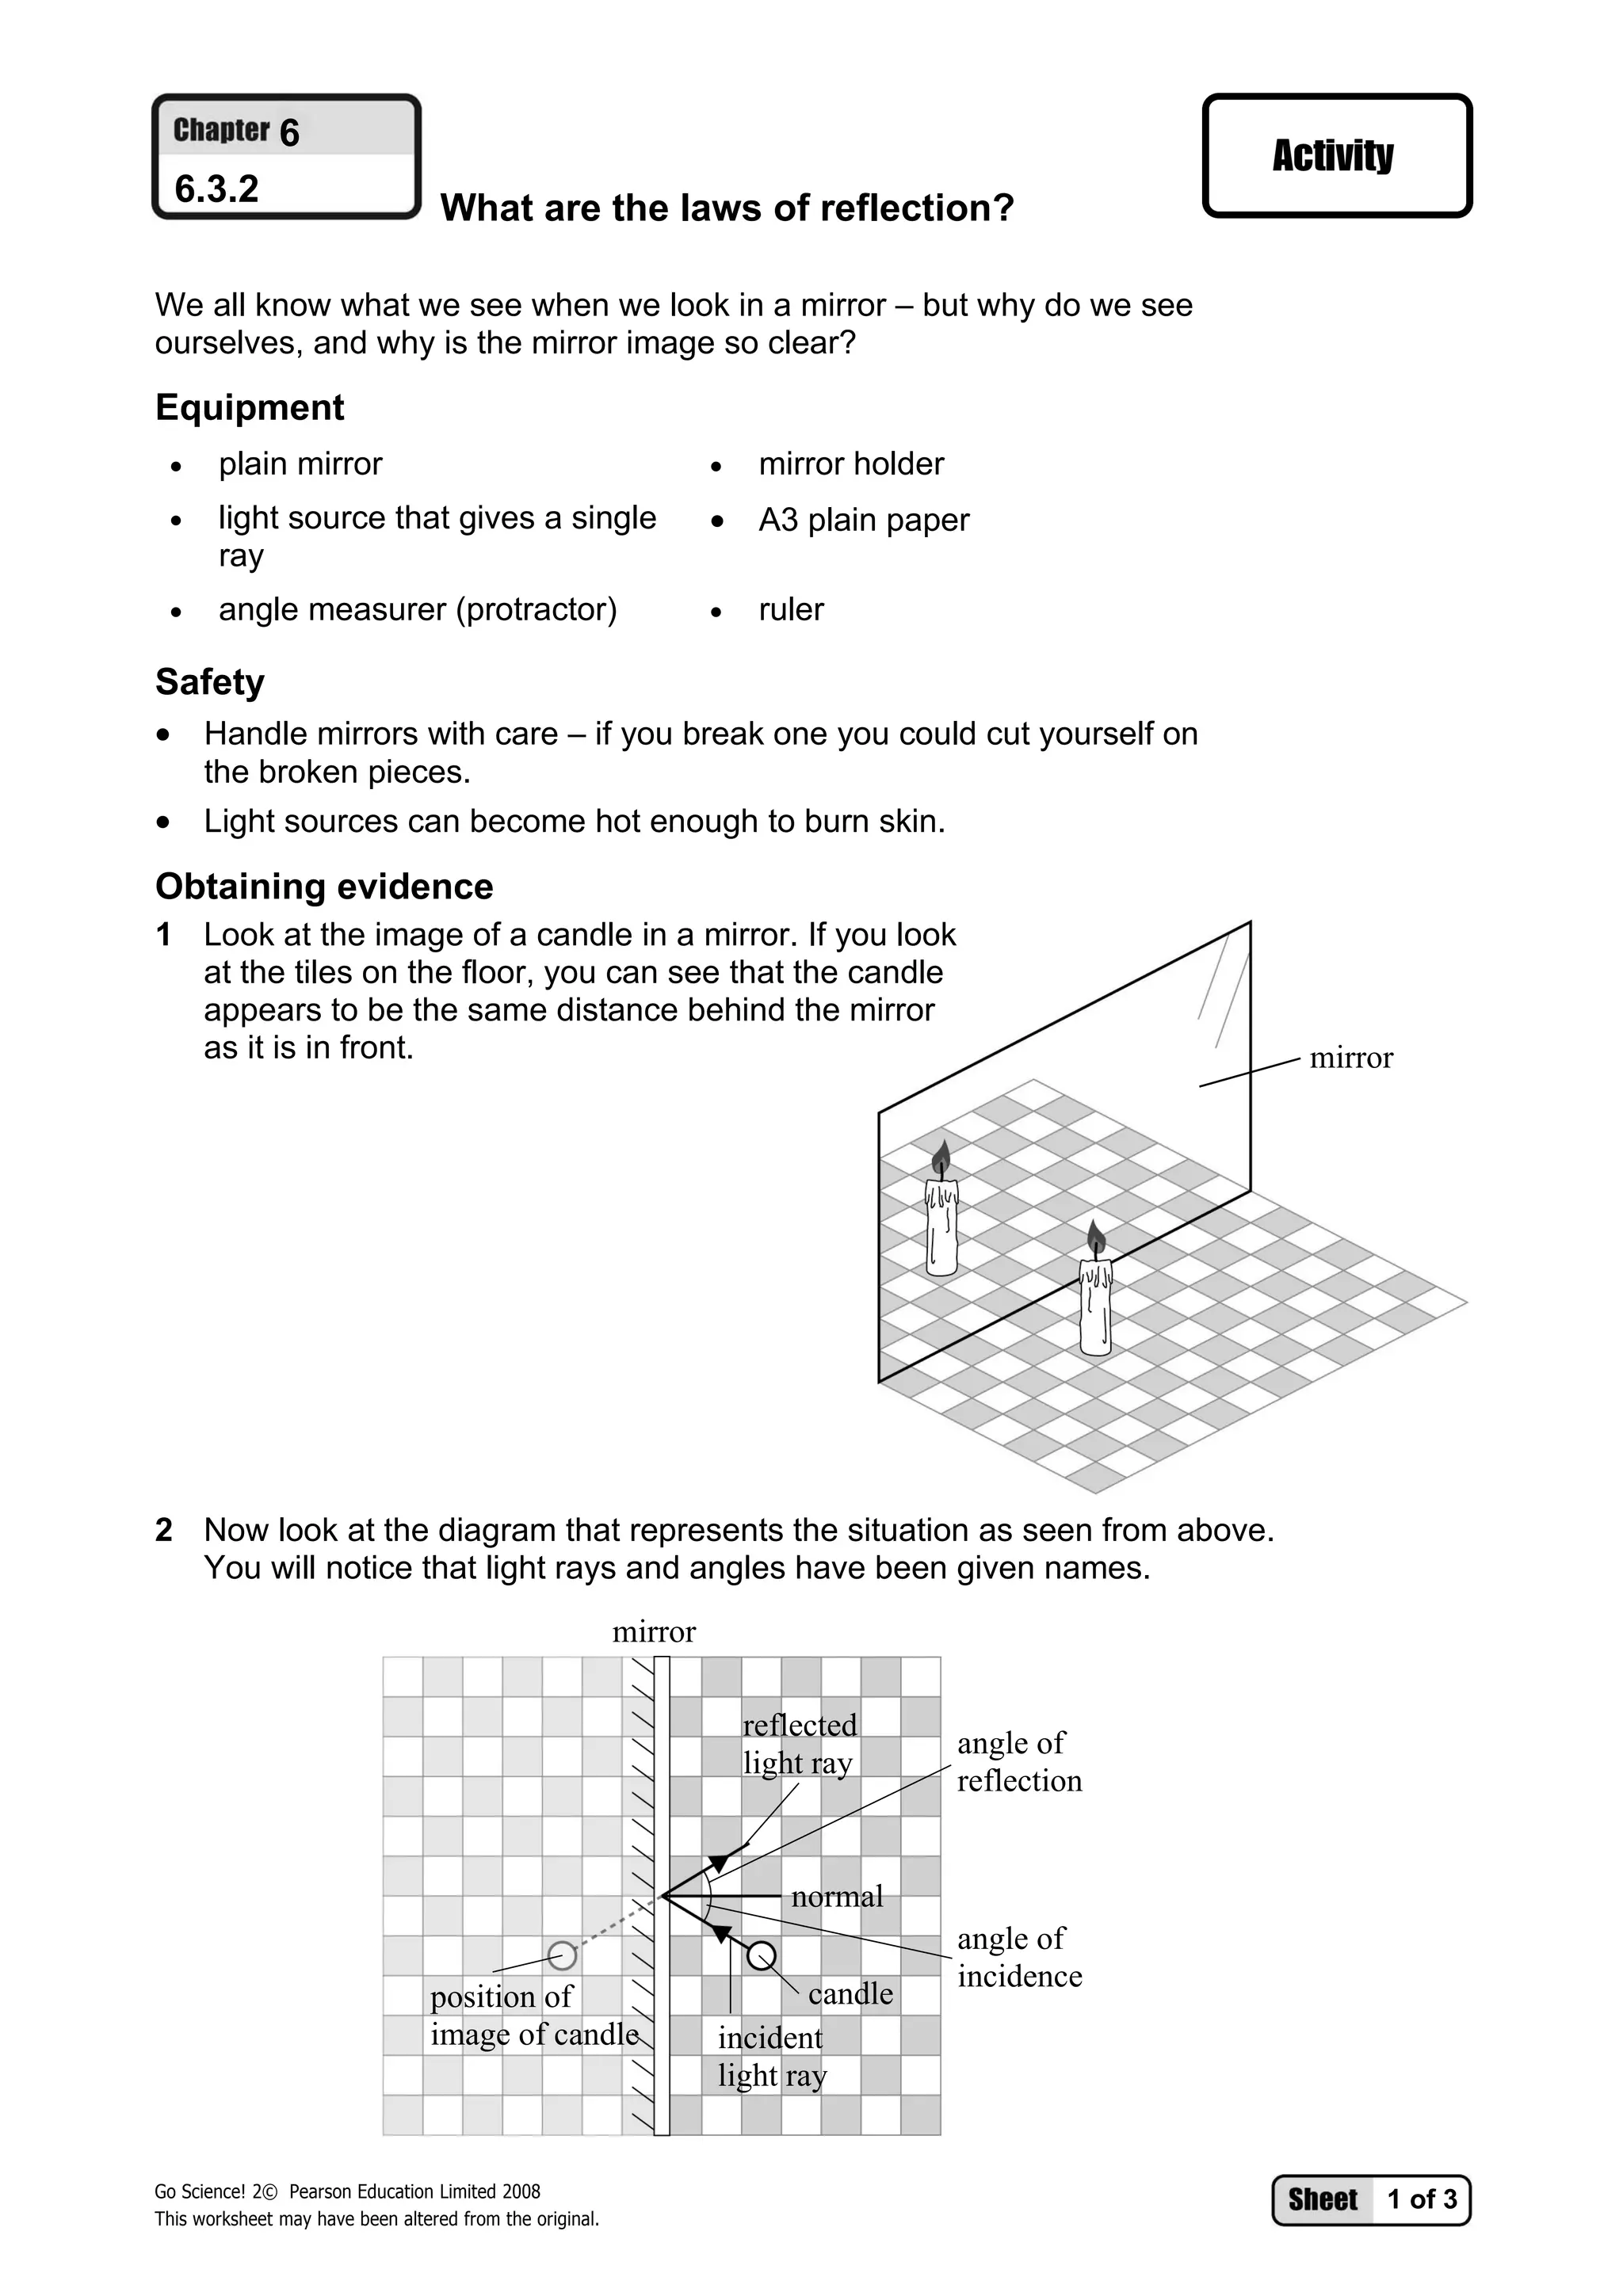
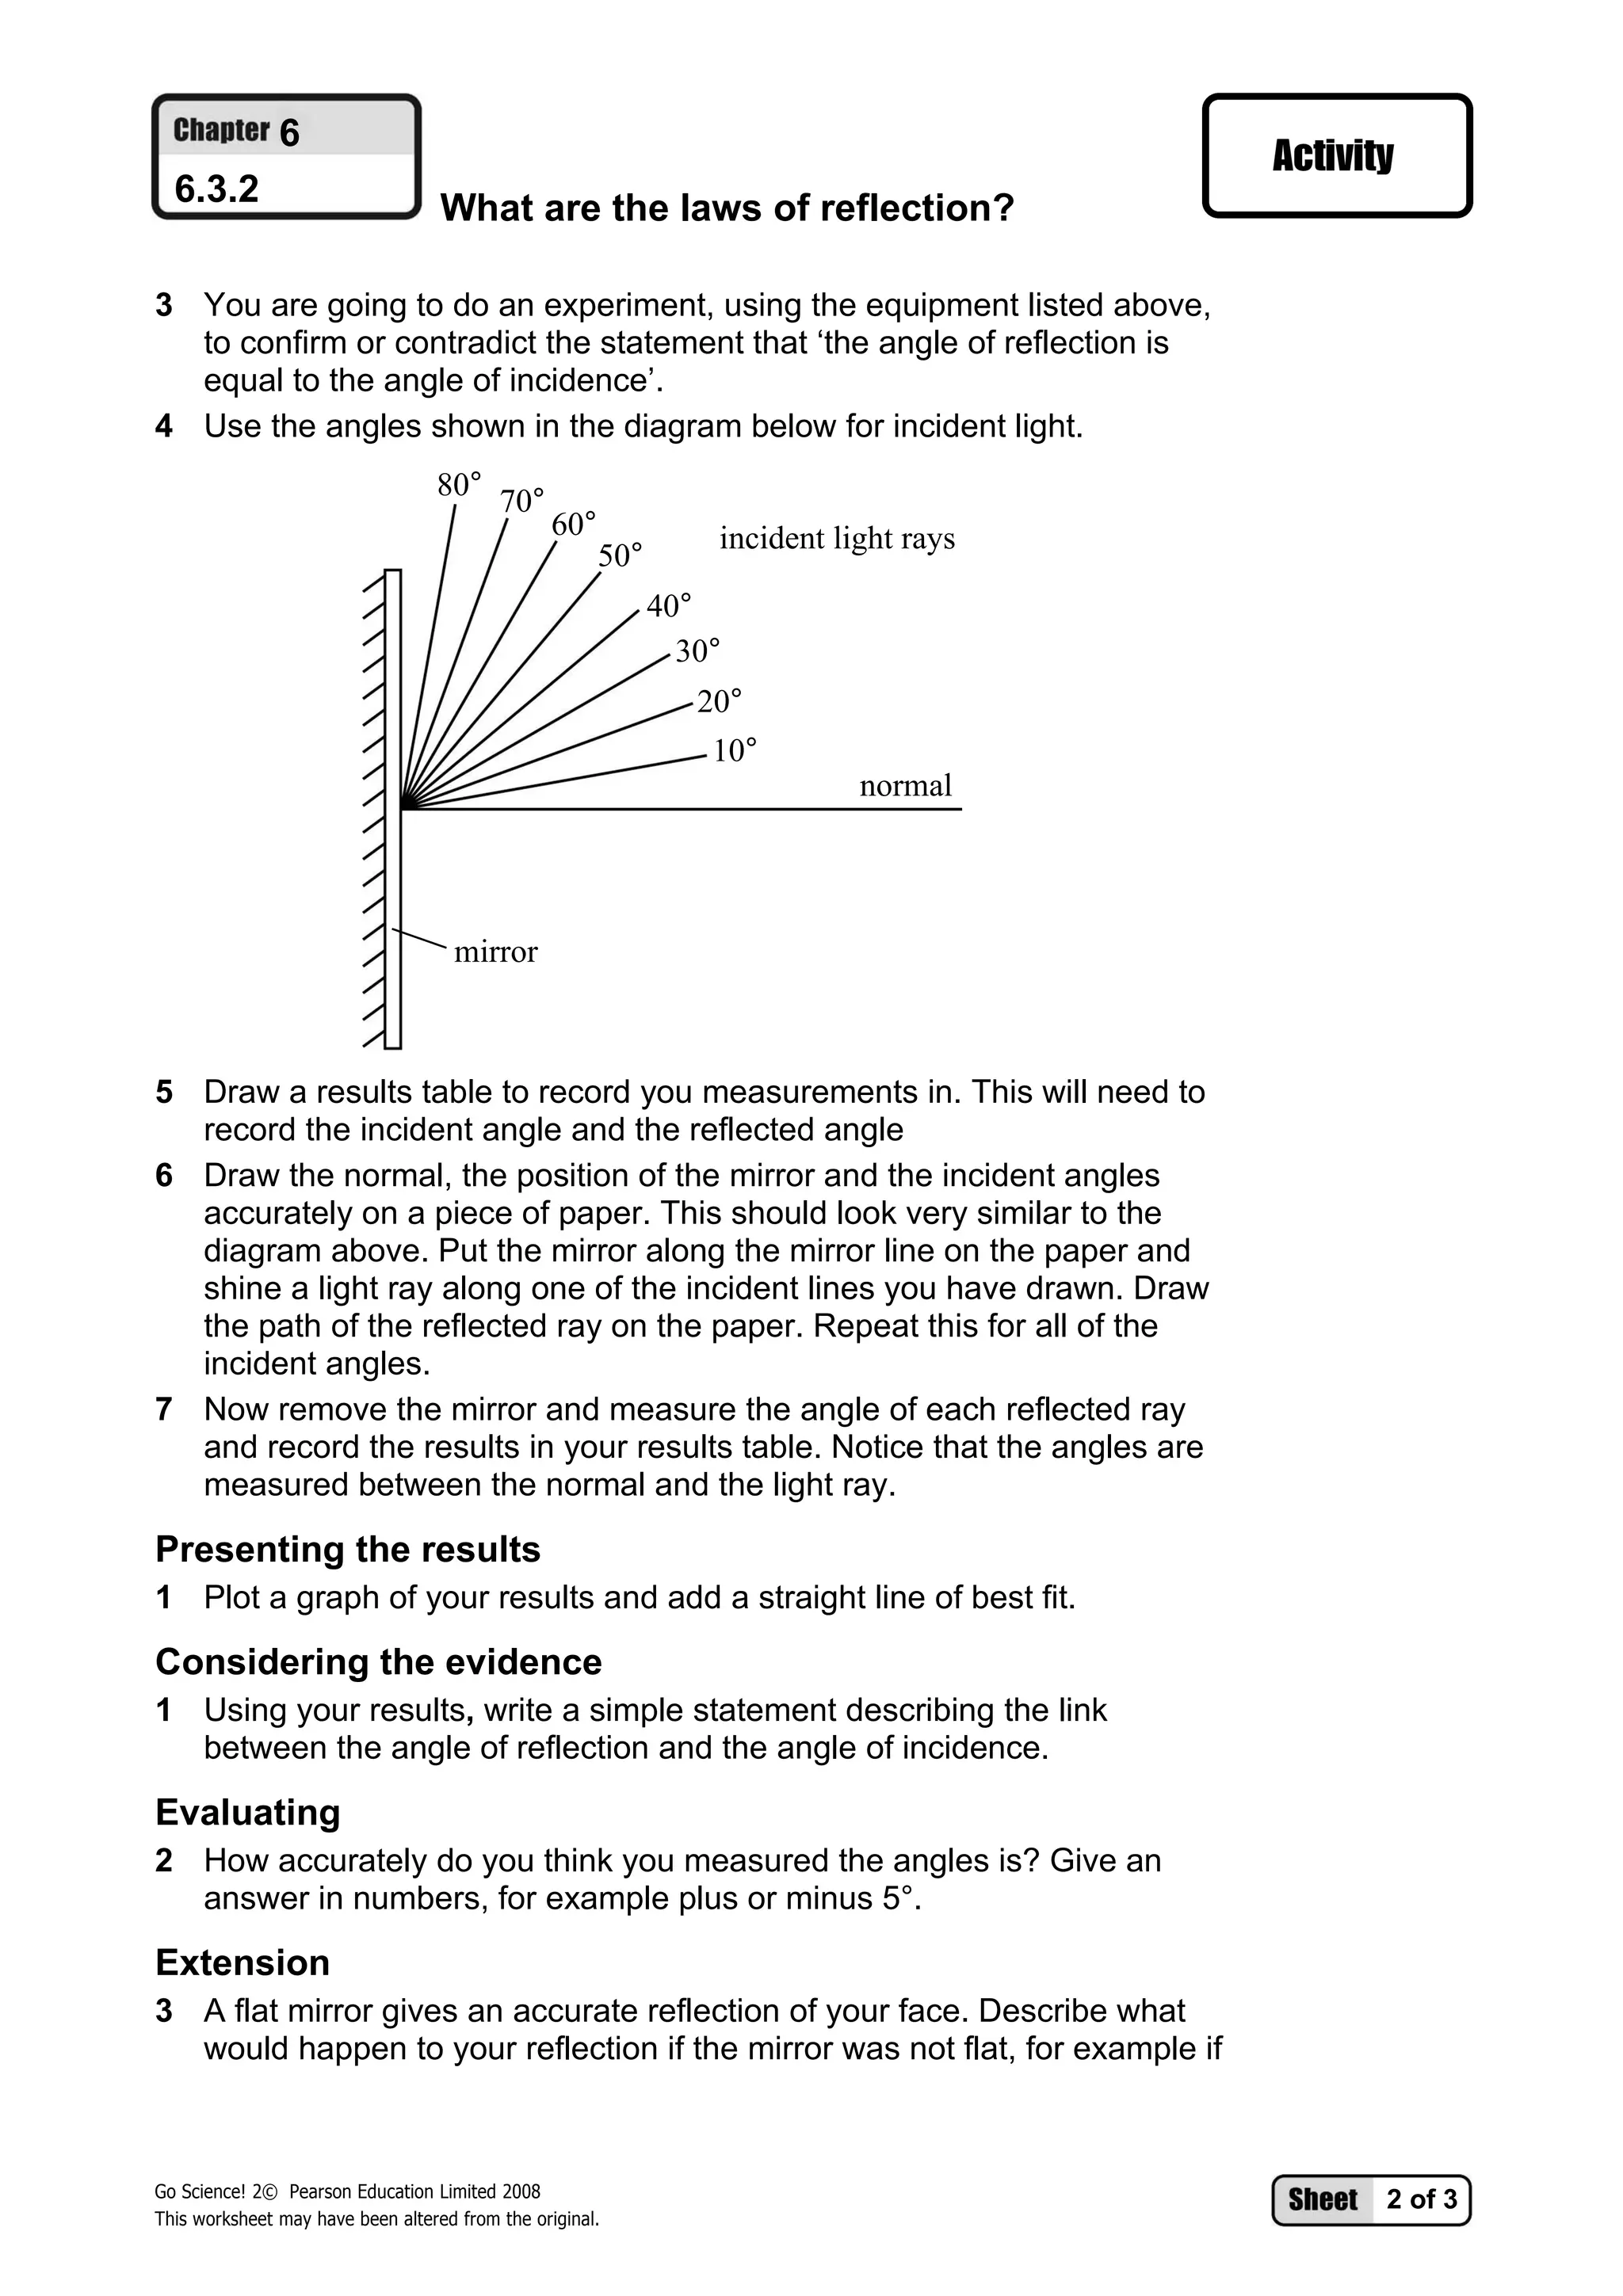
6
  6.3.2                            What are the laws of reflection?

We all know what we see when we look in a mirror – but why do we see
ourselves, and why is the mirror image so clear?

Equipment
 •     plain mirror                                                •    mirror holder
 •     light source that gives a single                            •    A3 plain paper
       ray
 •     angle measurer (protractor)                                 •    ruler

Safety
• Handle mirrors with care – if you break one you could cut yourself on
  the broken pieces.
• Light sources can become hot enough to burn skin.
Obtaining evidence
1 Look at the image of a candle in a mirror. If you look
  at the tiles on the floor, you can see that the candle
  appears to be the same distance behind the mirror
  as it is in front.                                                                                 mirror


2 Now look at the diagram that represents the situation as seen from above.
  You will notice that light rays and angles have been given names.
                                                          mirror

                                                                       reflected
                                                                                        angle of
                                                                       light ray
                                                                                        reflection


                                                                          normal
                                                                                        angle of
                                                                                        incidence
                                  position of                              candle
                                  image of candle                  incident
                                                                   light ray


Go Science! 2© Pearson Education Limited 2008
                                                                                                          1 of 3
This worksheet may have been altered from the original.
6
  6.3.2                            What are the laws of reflection?

3 You are going to do an experiment, using the equipment listed above,
  to confirm or contradict the statement that ‘the angle of reflection is
  equal to the angle of incidence’.
4 Use the angles shown in the diagram below for incident light.
                                  80° 70°
                                                 60°             incident light rays
                                                       50°
                                                             40°
                                                               30°
                                                                20°
                                                                 10°
                                                                            normal


                                    mirror


5 Draw a results table to record you measurements in. This will need to
  record the incident angle and the reflected angle
6 Draw the normal, the position of the mirror and the incident angles
  accurately on a piece of paper. This should look very similar to the
  diagram above. Put the mirror along the mirror line on the paper and
  shine a light ray along one of the incident lines you have drawn. Draw
  the path of the reflected ray on the paper. Repeat this for all of the
  incident angles.
7 Now remove the mirror and measure the angle of each reflected ray
  and record the results in your results table. Notice that the angles are
  measured between the normal and the light ray.

Presenting the results
1 Plot a graph of your results and add a straight line of best fit.

Considering the evidence
1 Using your results, write a simple statement describing the link
  between the angle of reflection and the angle of incidence.

Evaluating
2 How accurately do you think you measured the angles is? Give an
  answer in numbers, for example plus or minus 5°.

Extension
3 A flat mirror gives an accurate reflection of your face. Describe what
  would happen to your reflection if the mirror was not flat, for example if


Go Science! 2© Pearson Education Limited 2008
                                                                                       2 of 3
This worksheet may have been altered from the original.
6
  6.3.2                            What are the laws of reflection?

  you looked at your reflection in water with ripples on it. You might like
  to use sketches to help you.
4 Hold this piece of paper facing you. Notice the letter F (letter 1) below
  is the right way up and the right way round. Now turn the paper over so
  that the top edge of the paper is still at the top. Notice the reversed F
  (letter 2), seen through the paper from the other side, now looks the
  right way round. Turn the paper back towards you again. Now turn the
  paper round so that the top of the paper is at the bottom. Now notice
  the letter F (letter 3) that looks the right way round. Explain why the
  different reversed versions of the F look right in the mirror depending
  on what you did to the paper.
  1                   2


      3


Go Science! 2© Pearson Education Limited 2008
                                                                              3 of 3
This worksheet may have been altered from the original.

Document in windows internet explorer

  • 1.
    6 6.3.2 What are the laws of reflection? We all know what we see when we look in a mirror – but why do we see ourselves, and why is the mirror image so clear? Equipment • plain mirror • mirror holder • light source that gives a single • A3 plain paper ray • angle measurer (protractor) • ruler Safety • Handle mirrors with care – if you break one you could cut yourself on the broken pieces. • Light sources can become hot enough to burn skin. Obtaining evidence 1 Look at the image of a candle in a mirror. If you look at the tiles on the floor, you can see that the candle appears to be the same distance behind the mirror as it is in front. mirror 2 Now look at the diagram that represents the situation as seen from above. You will notice that light rays and angles have been given names. mirror reflected angle of light ray reflection normal angle of incidence position of candle image of candle incident light ray Go Science! 2© Pearson Education Limited 2008 1 of 3 This worksheet may have been altered from the original.
  • 2.
    6 6.3.2 What are the laws of reflection? 3 You are going to do an experiment, using the equipment listed above, to confirm or contradict the statement that ‘the angle of reflection is equal to the angle of incidence’. 4 Use the angles shown in the diagram below for incident light. 80° 70° 60° incident light rays 50° 40° 30° 20° 10° normal mirror 5 Draw a results table to record you measurements in. This will need to record the incident angle and the reflected angle 6 Draw the normal, the position of the mirror and the incident angles accurately on a piece of paper. This should look very similar to the diagram above. Put the mirror along the mirror line on the paper and shine a light ray along one of the incident lines you have drawn. Draw the path of the reflected ray on the paper. Repeat this for all of the incident angles. 7 Now remove the mirror and measure the angle of each reflected ray and record the results in your results table. Notice that the angles are measured between the normal and the light ray. Presenting the results 1 Plot a graph of your results and add a straight line of best fit. Considering the evidence 1 Using your results, write a simple statement describing the link between the angle of reflection and the angle of incidence. Evaluating 2 How accurately do you think you measured the angles is? Give an answer in numbers, for example plus or minus 5°. Extension 3 A flat mirror gives an accurate reflection of your face. Describe what would happen to your reflection if the mirror was not flat, for example if Go Science! 2© Pearson Education Limited 2008 2 of 3 This worksheet may have been altered from the original.
  • 3.
    6 6.3.2 What are the laws of reflection? you looked at your reflection in water with ripples on it. You might like to use sketches to help you. 4 Hold this piece of paper facing you. Notice the letter F (letter 1) below is the right way up and the right way round. Now turn the paper over so that the top edge of the paper is still at the top. Notice the reversed F (letter 2), seen through the paper from the other side, now looks the right way round. Turn the paper back towards you again. Now turn the paper round so that the top of the paper is at the bottom. Now notice the letter F (letter 3) that looks the right way round. Explain why the different reversed versions of the F look right in the mirror depending on what you did to the paper. 1 2 3 Go Science! 2© Pearson Education Limited 2008 3 of 3 This worksheet may have been altered from the original.