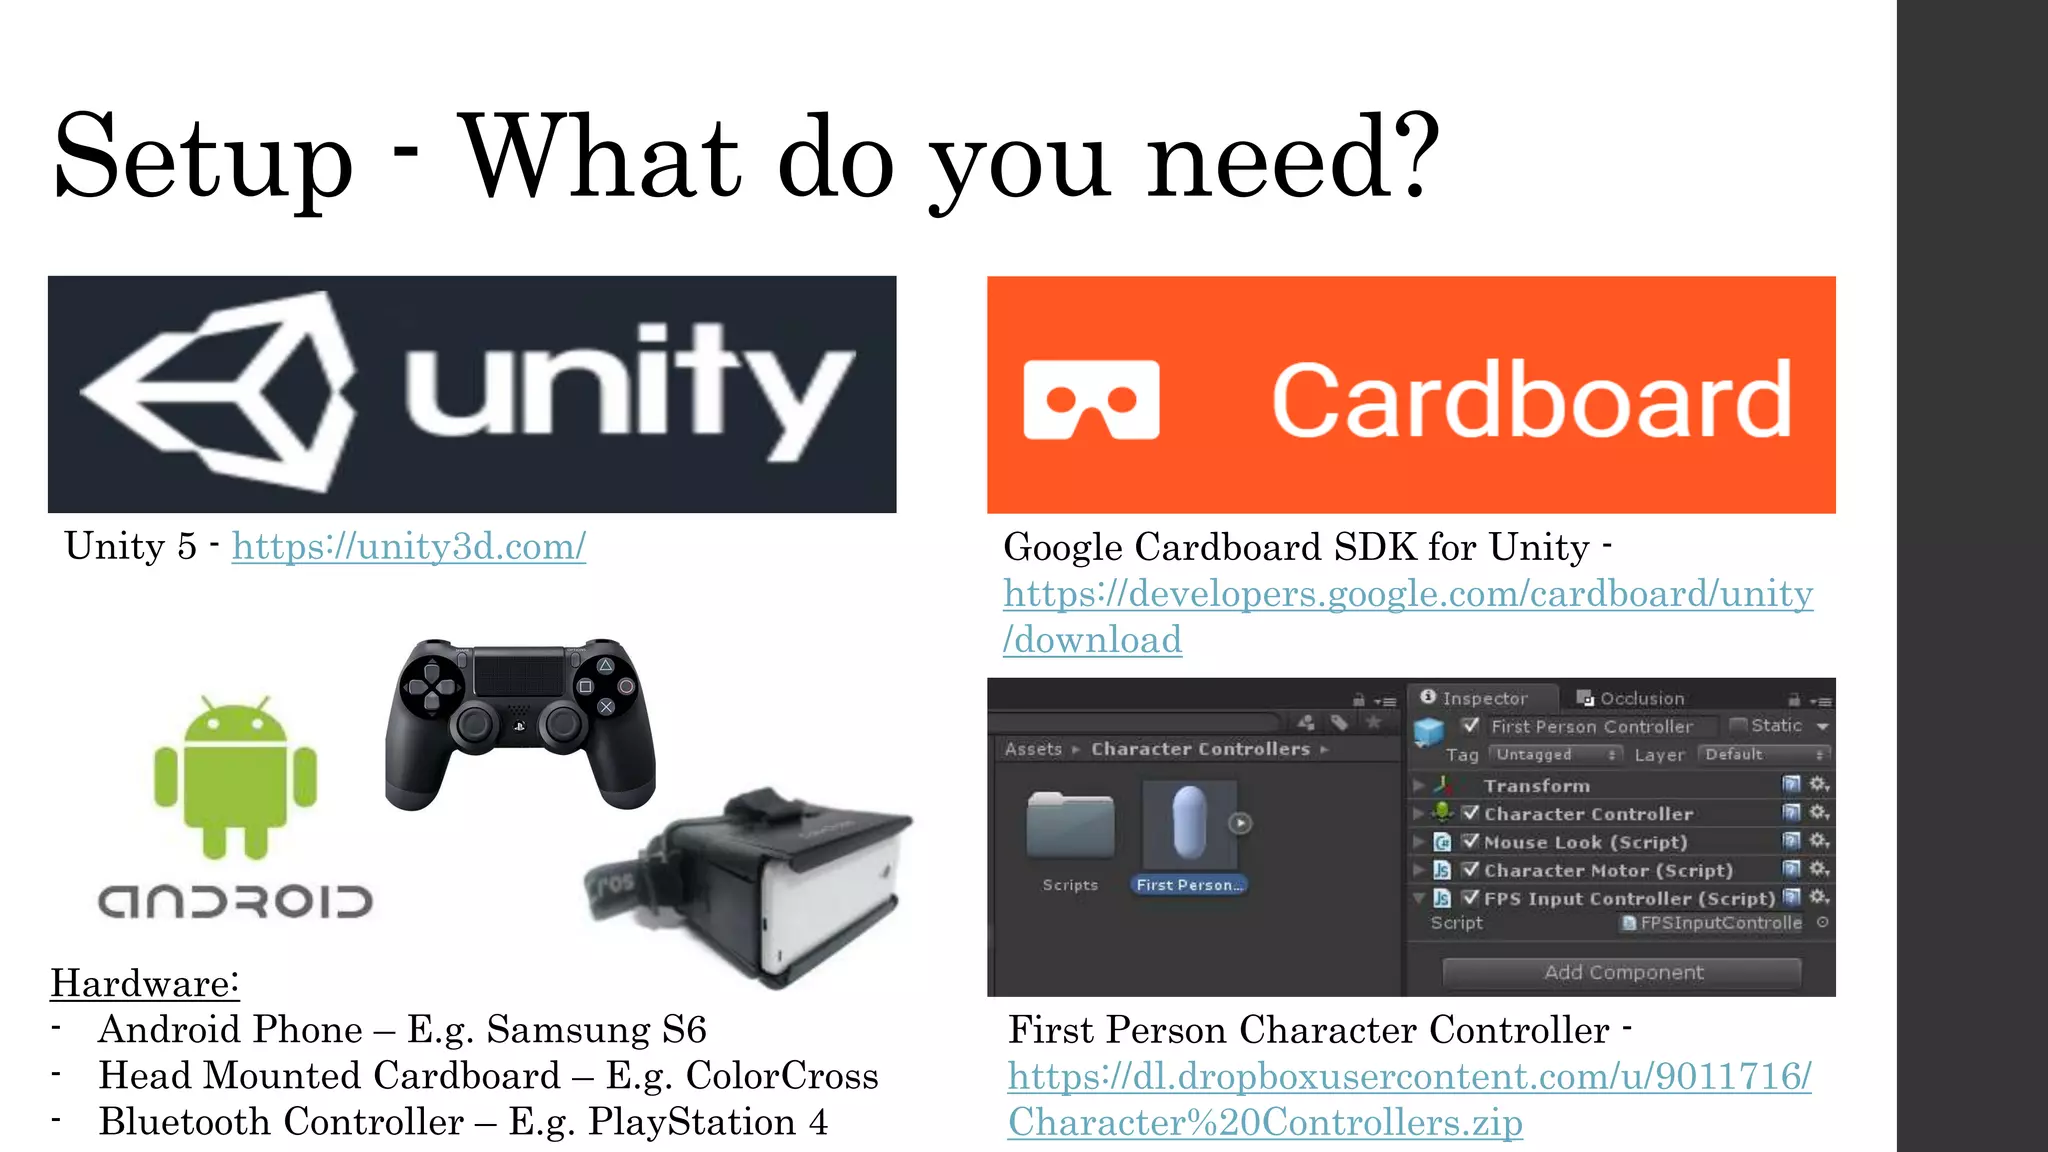
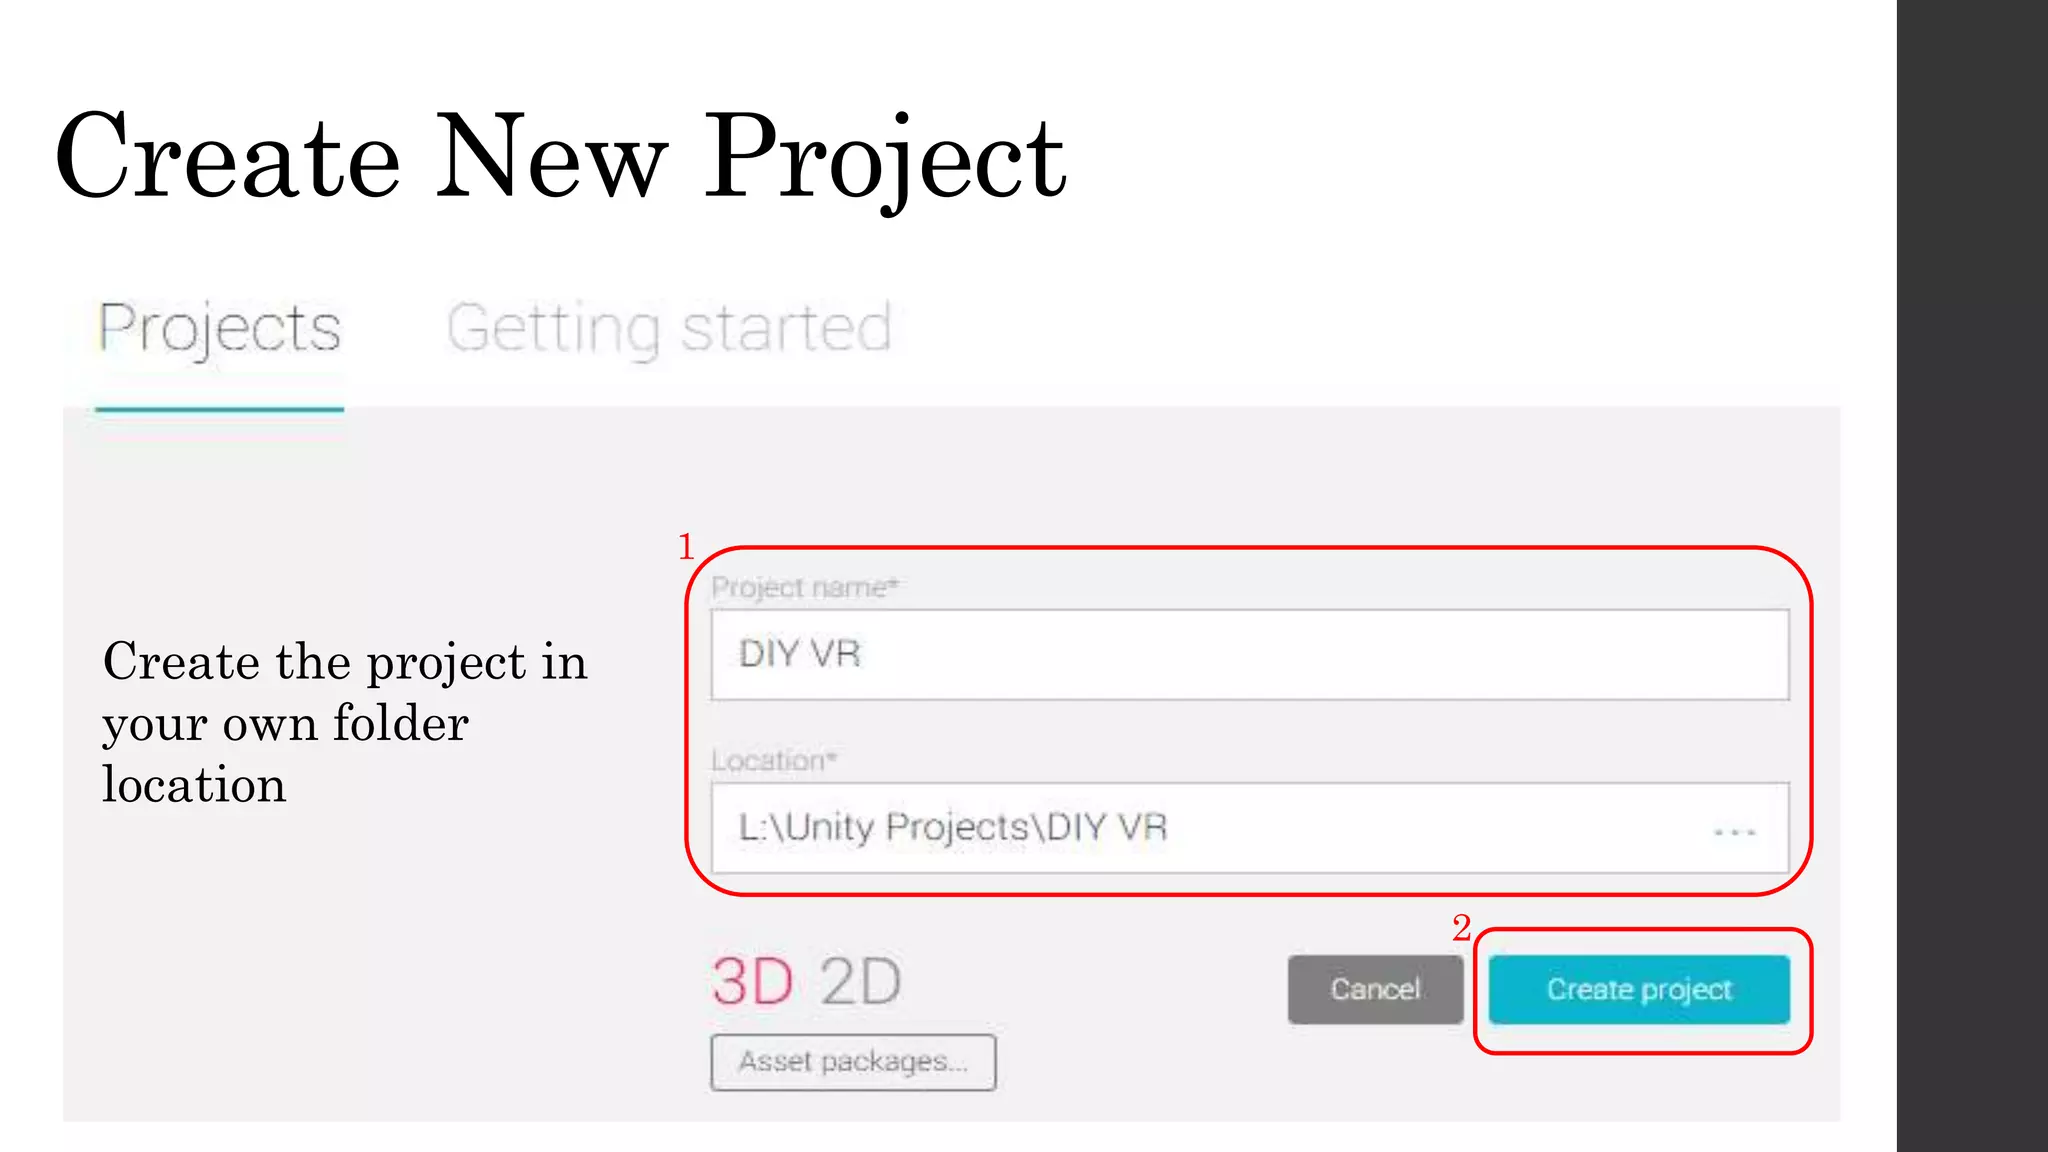
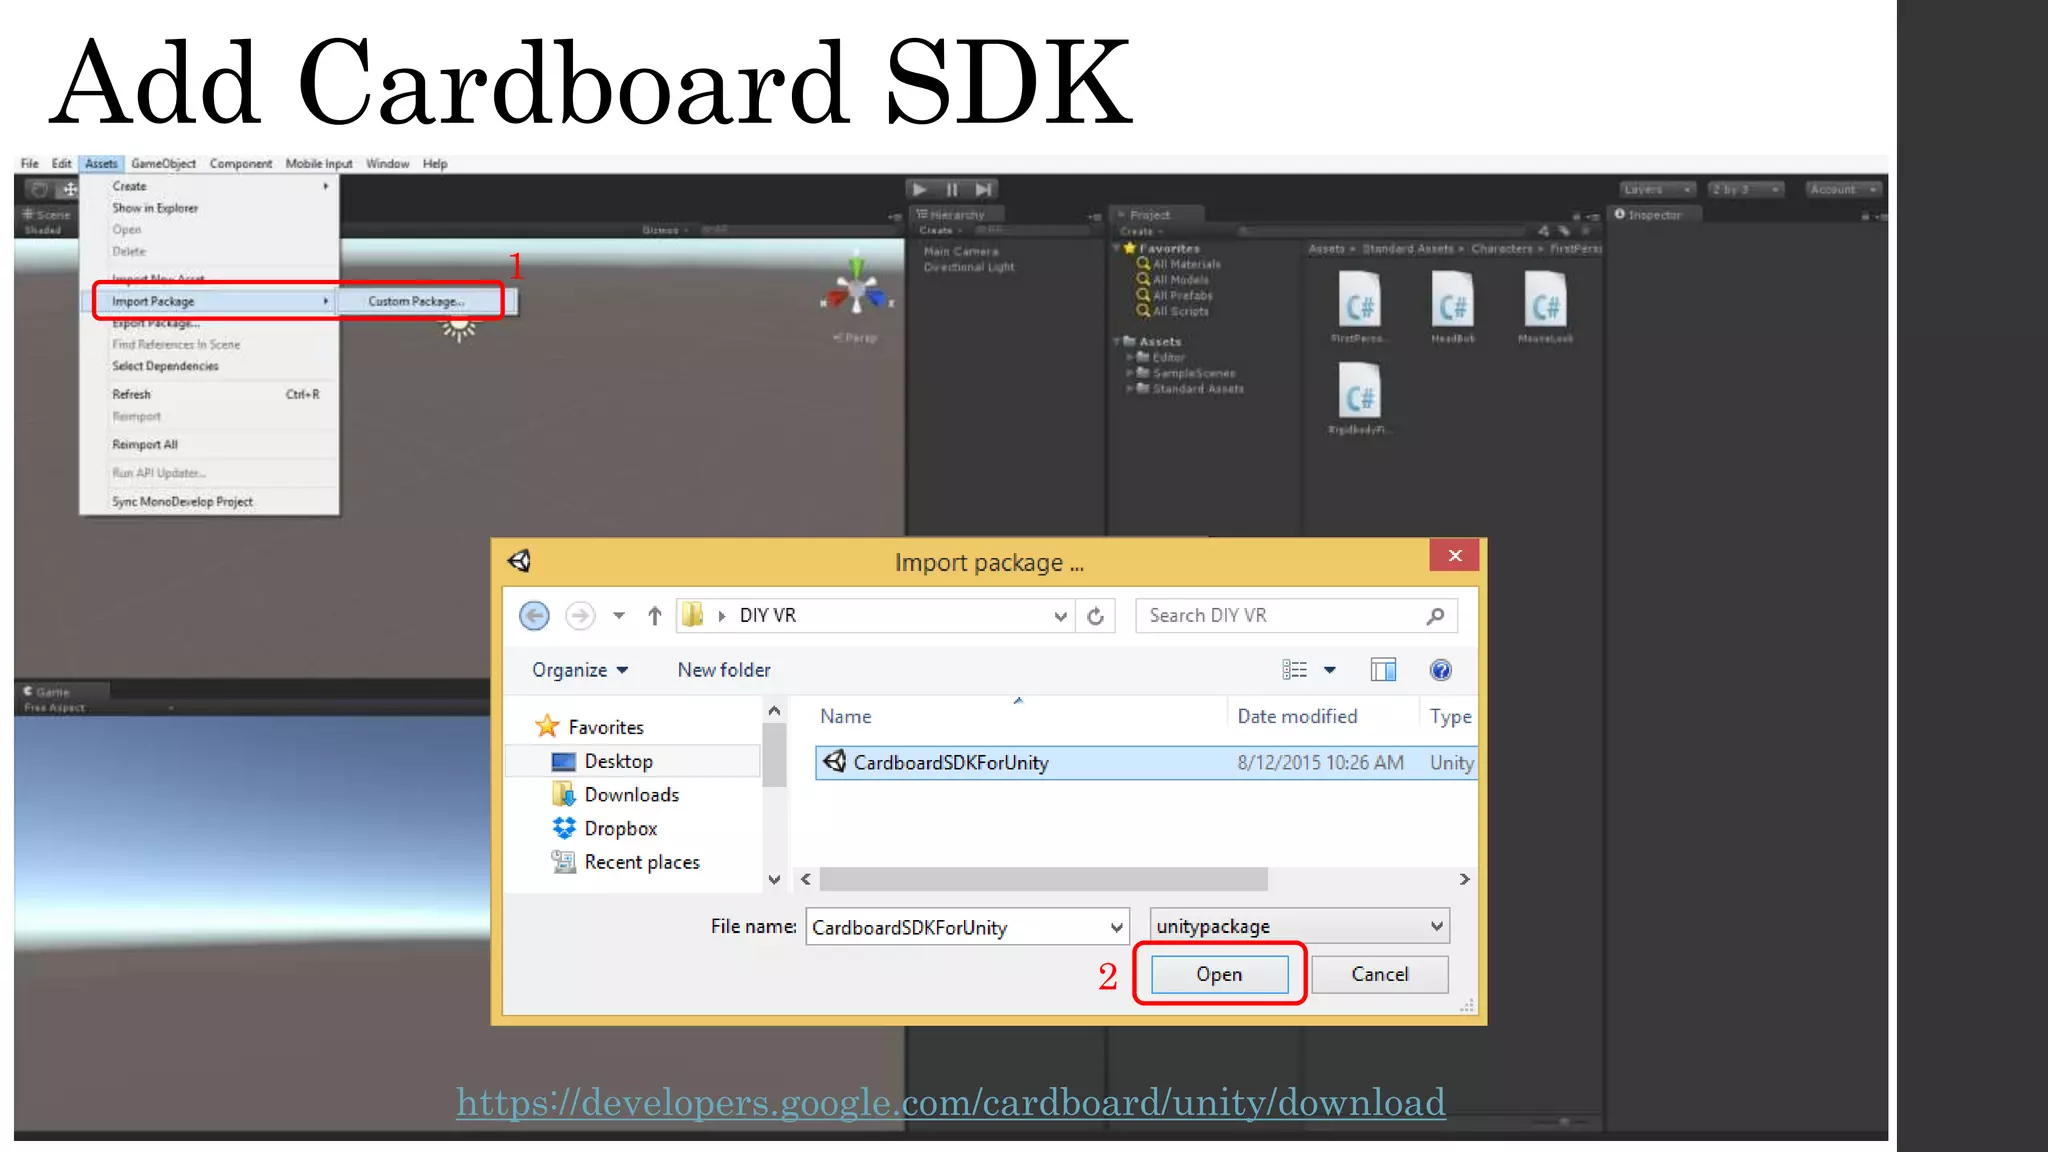
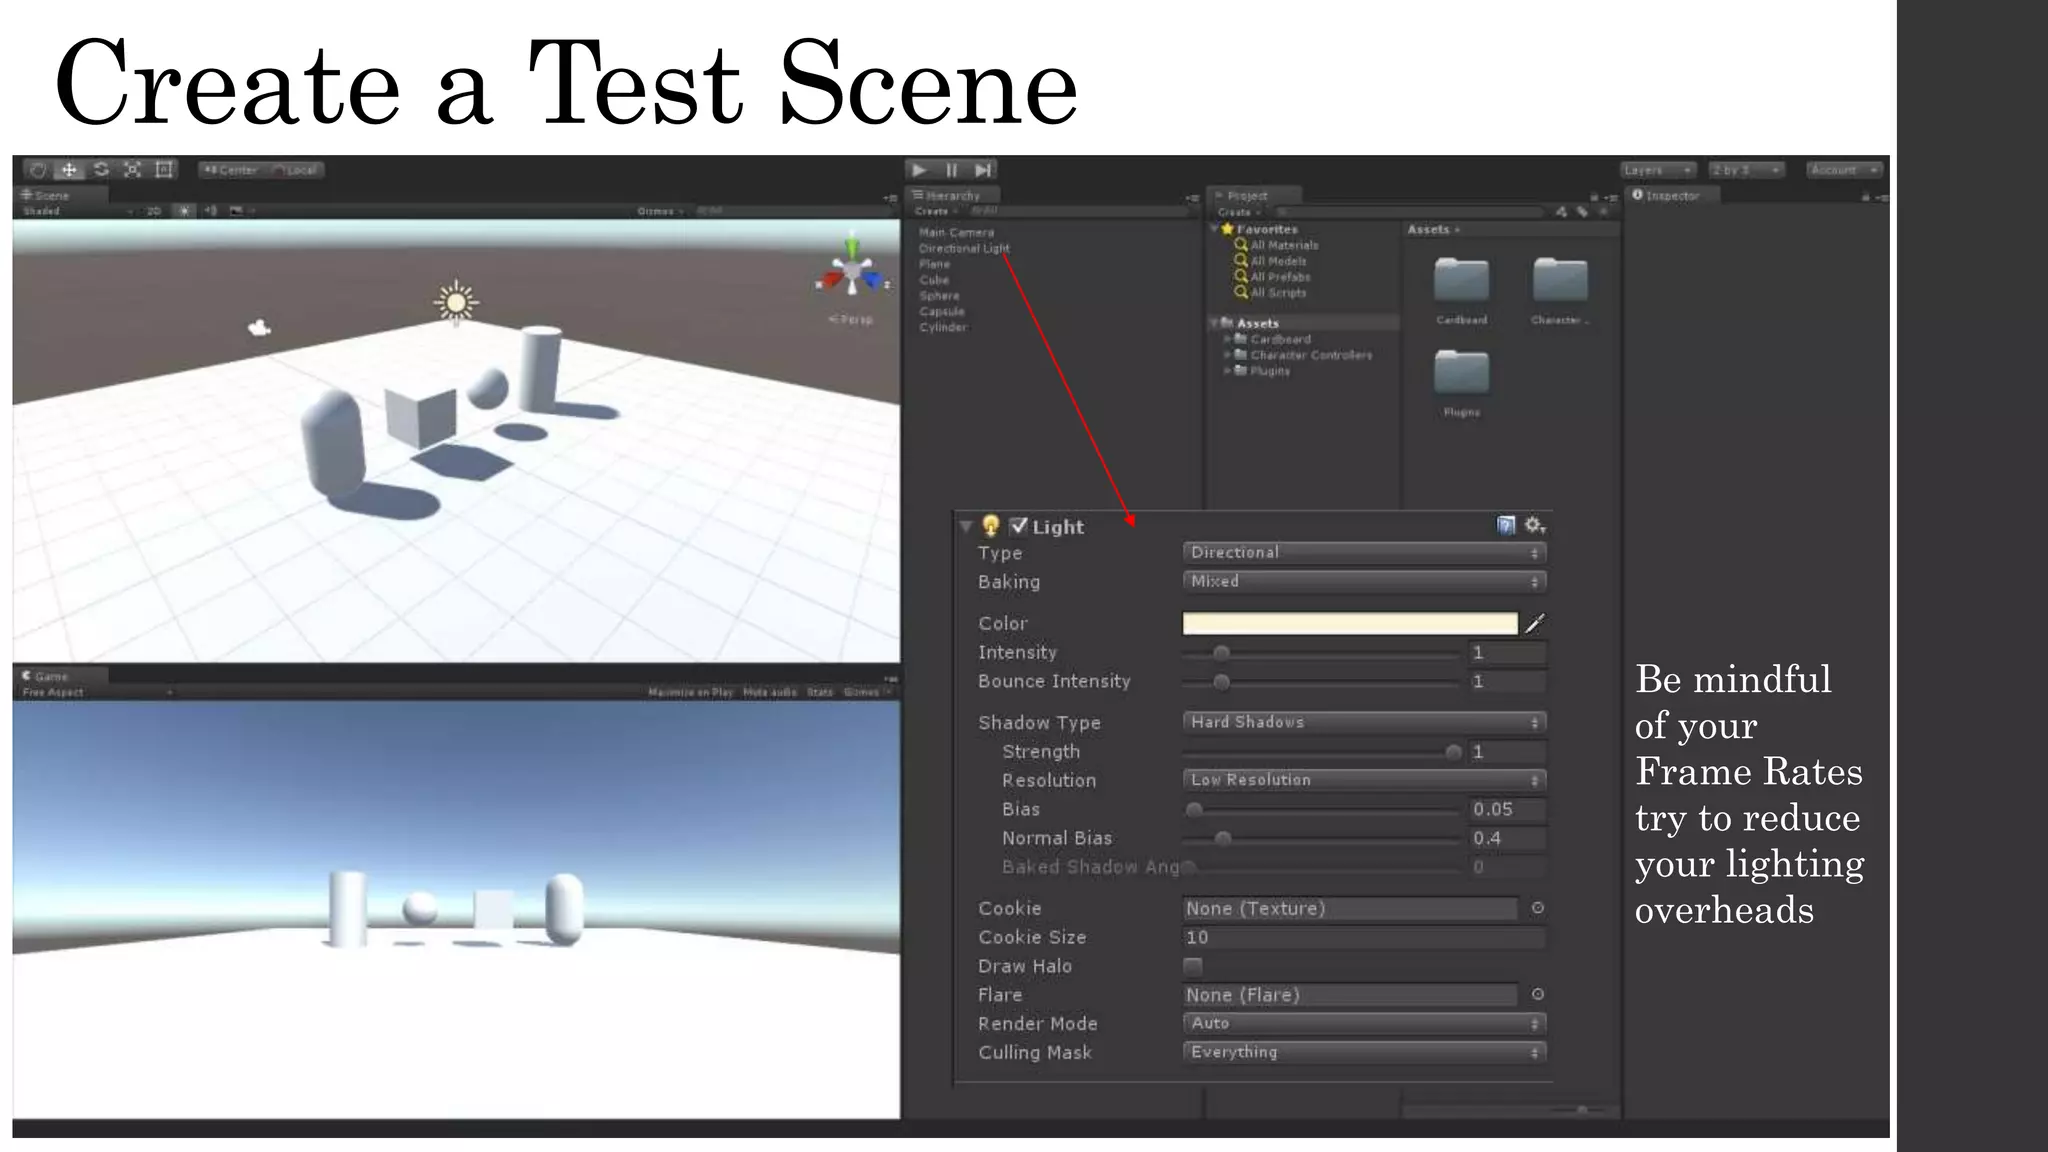
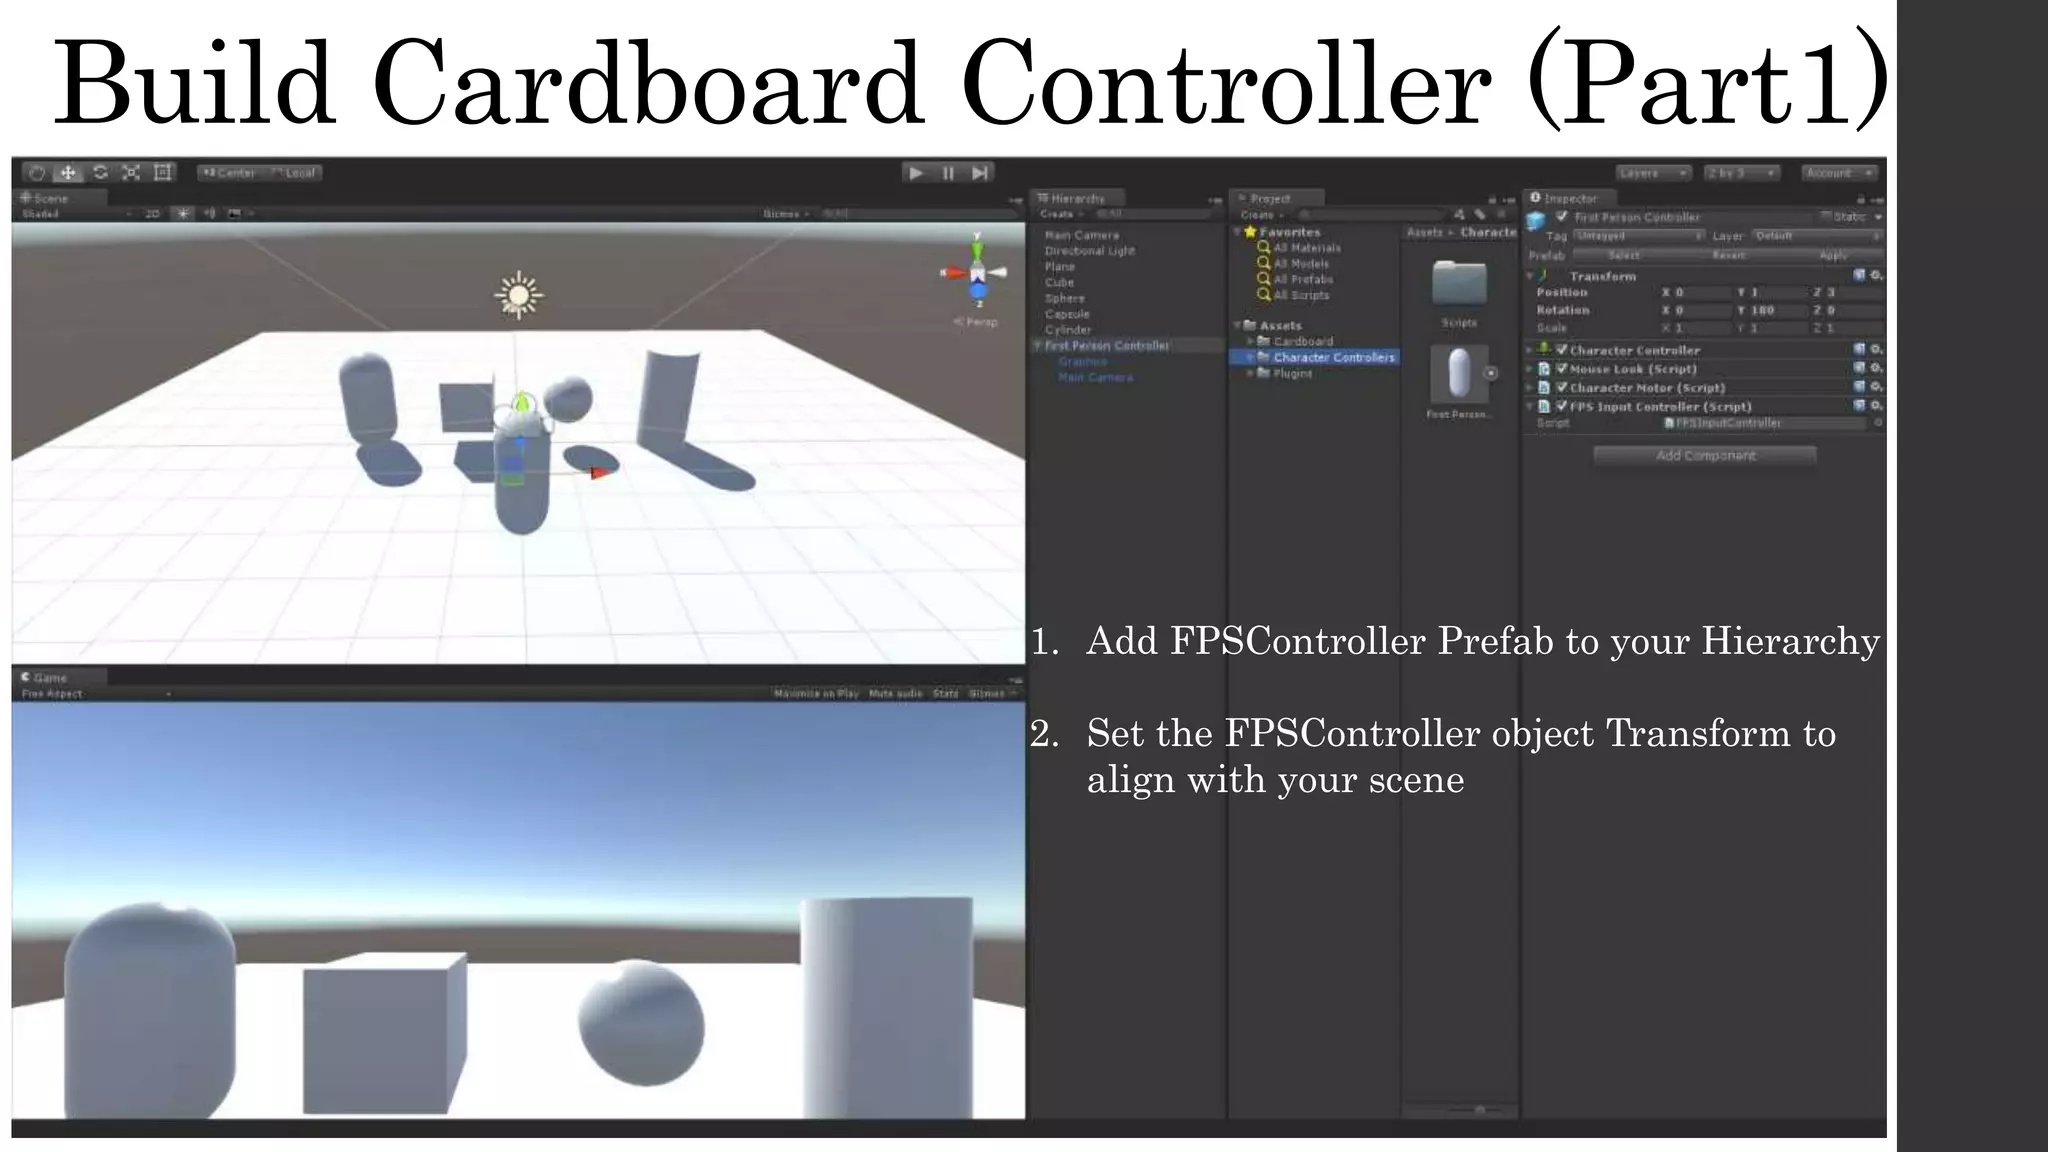
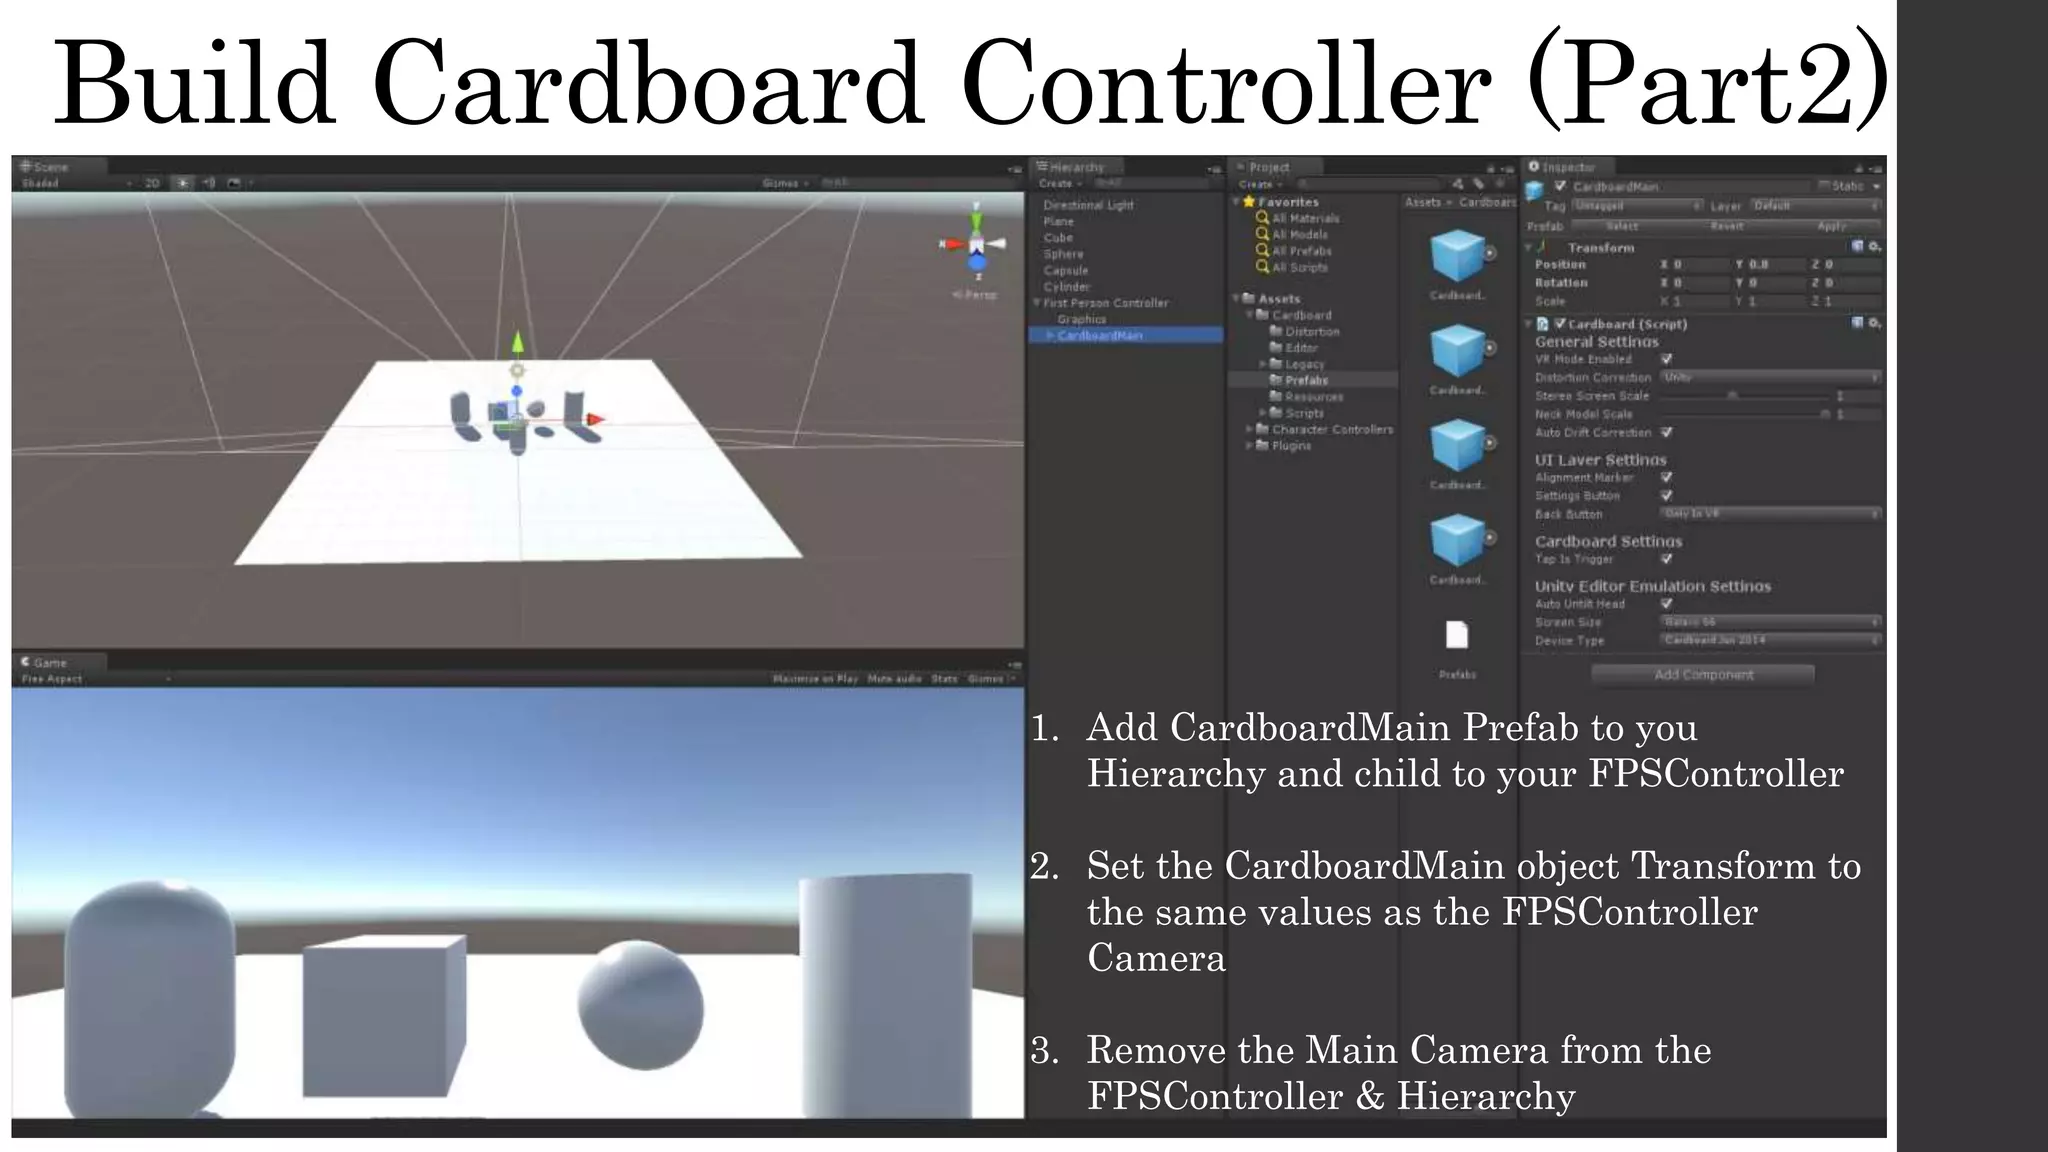
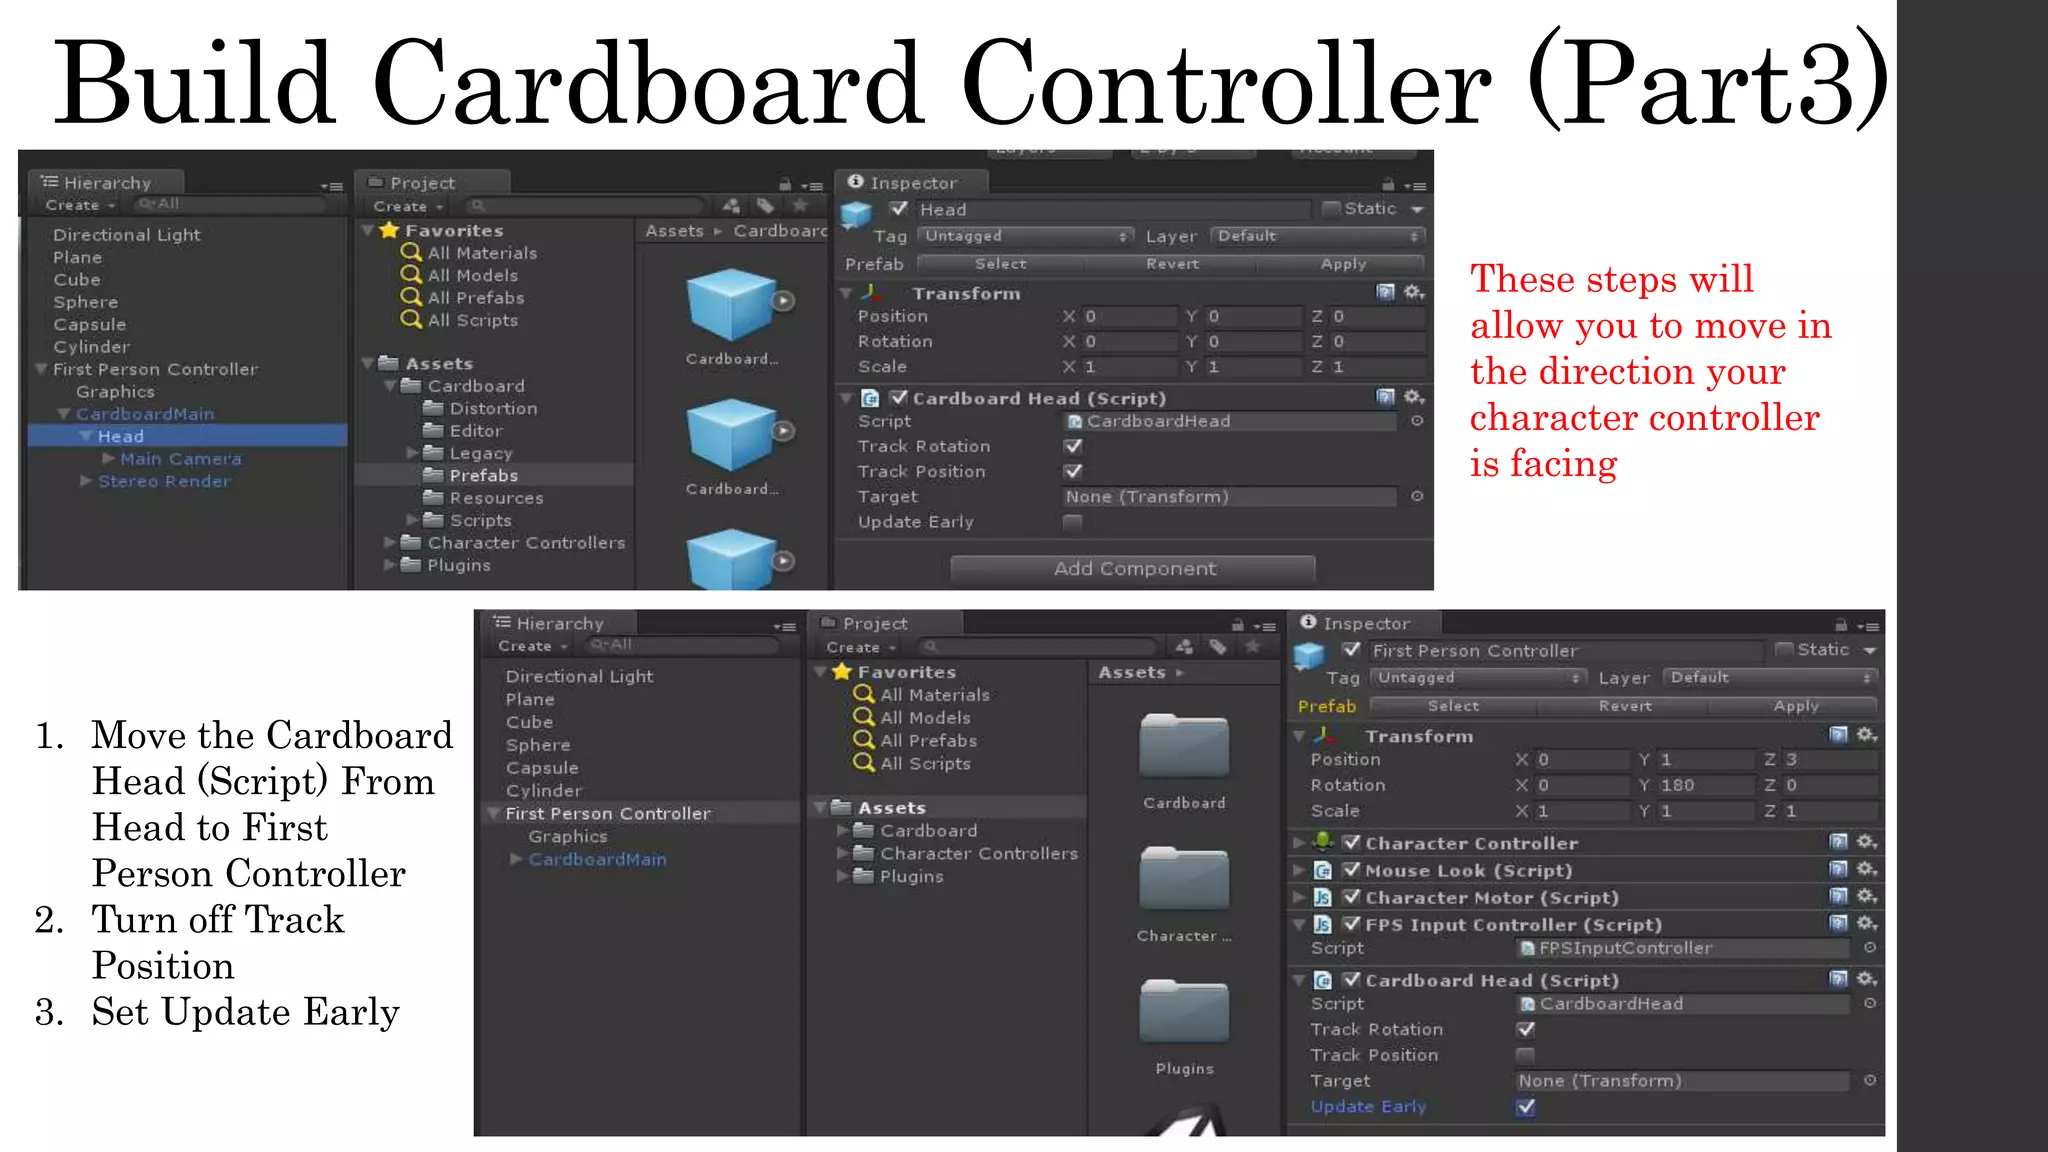
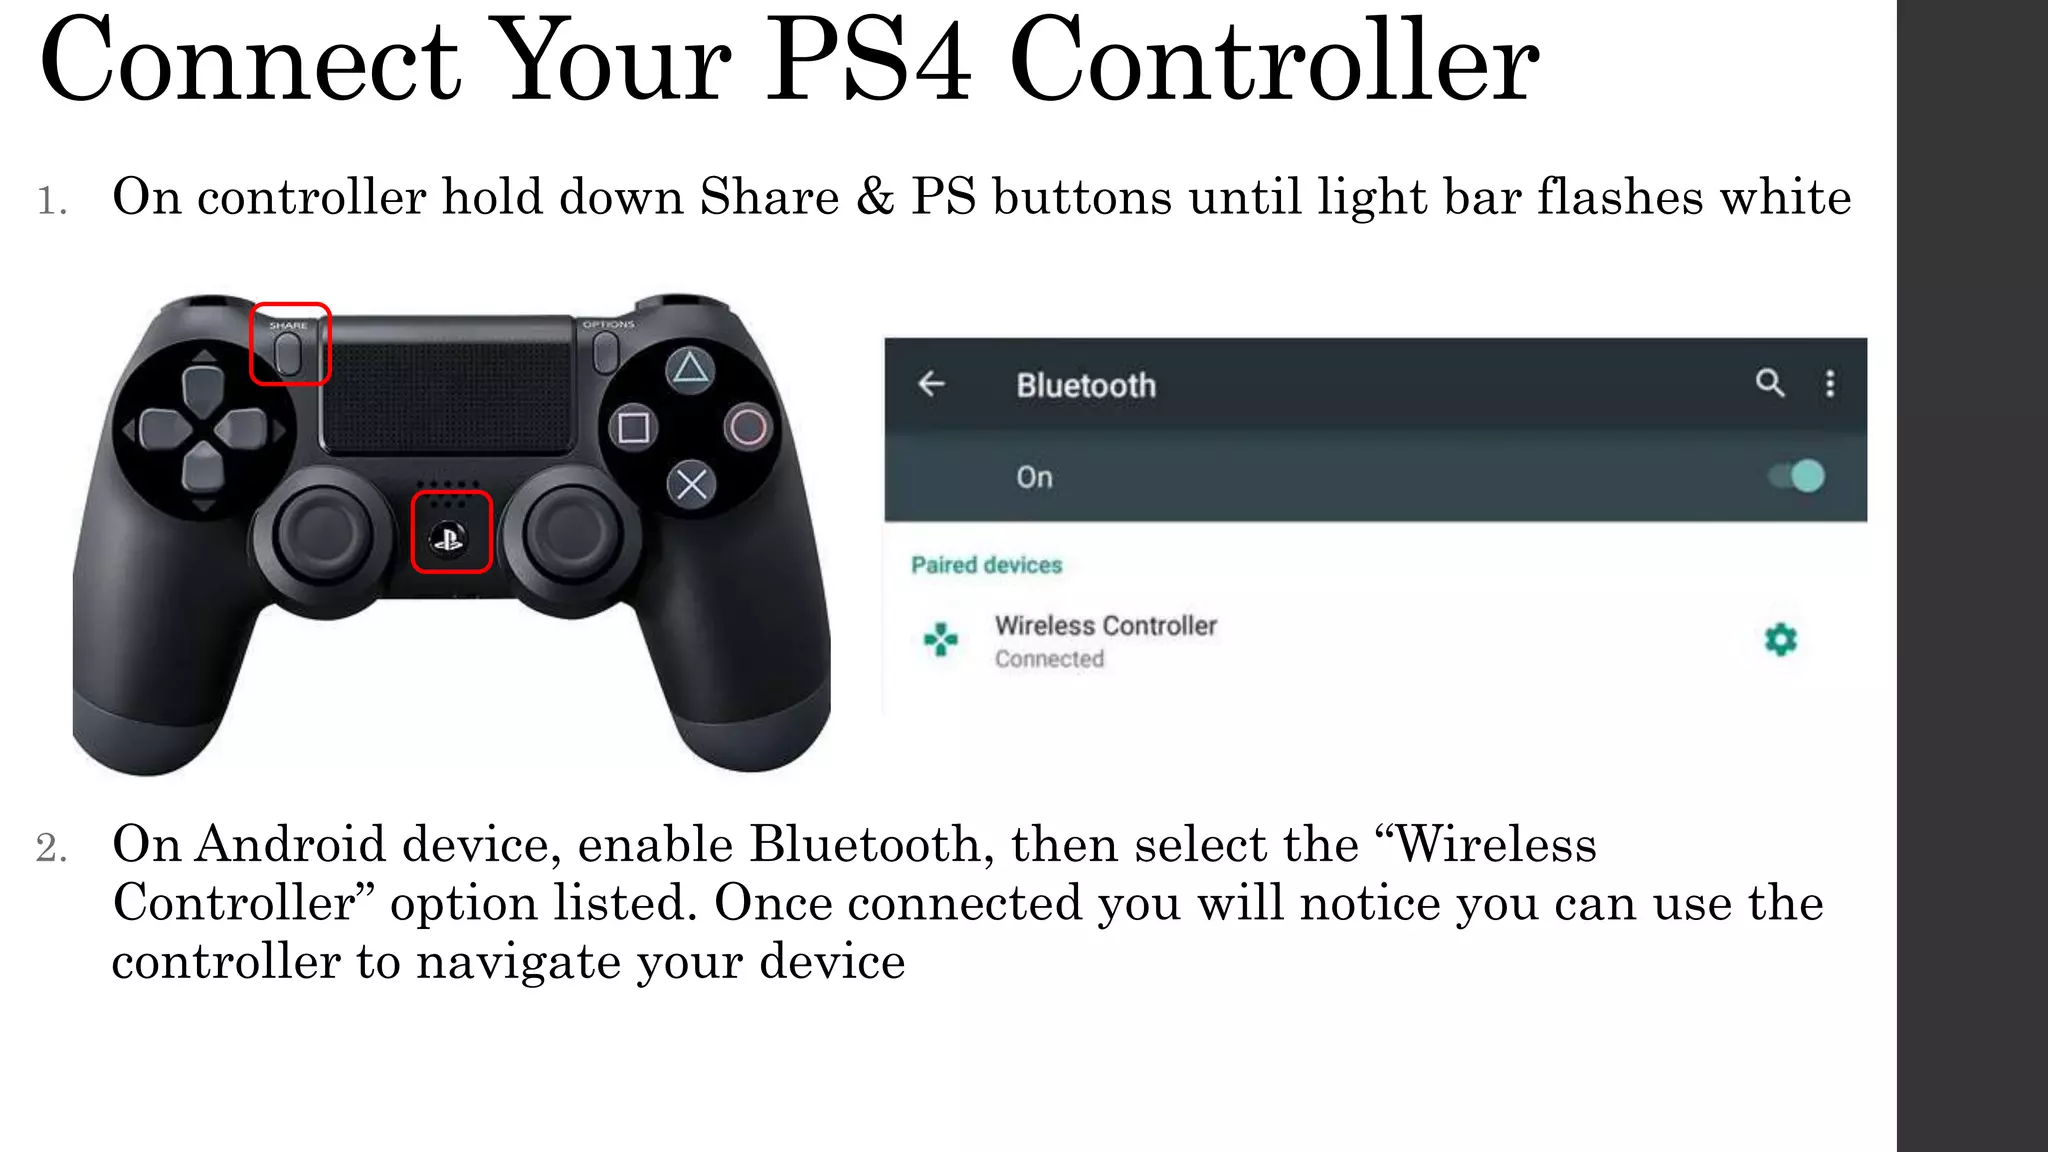
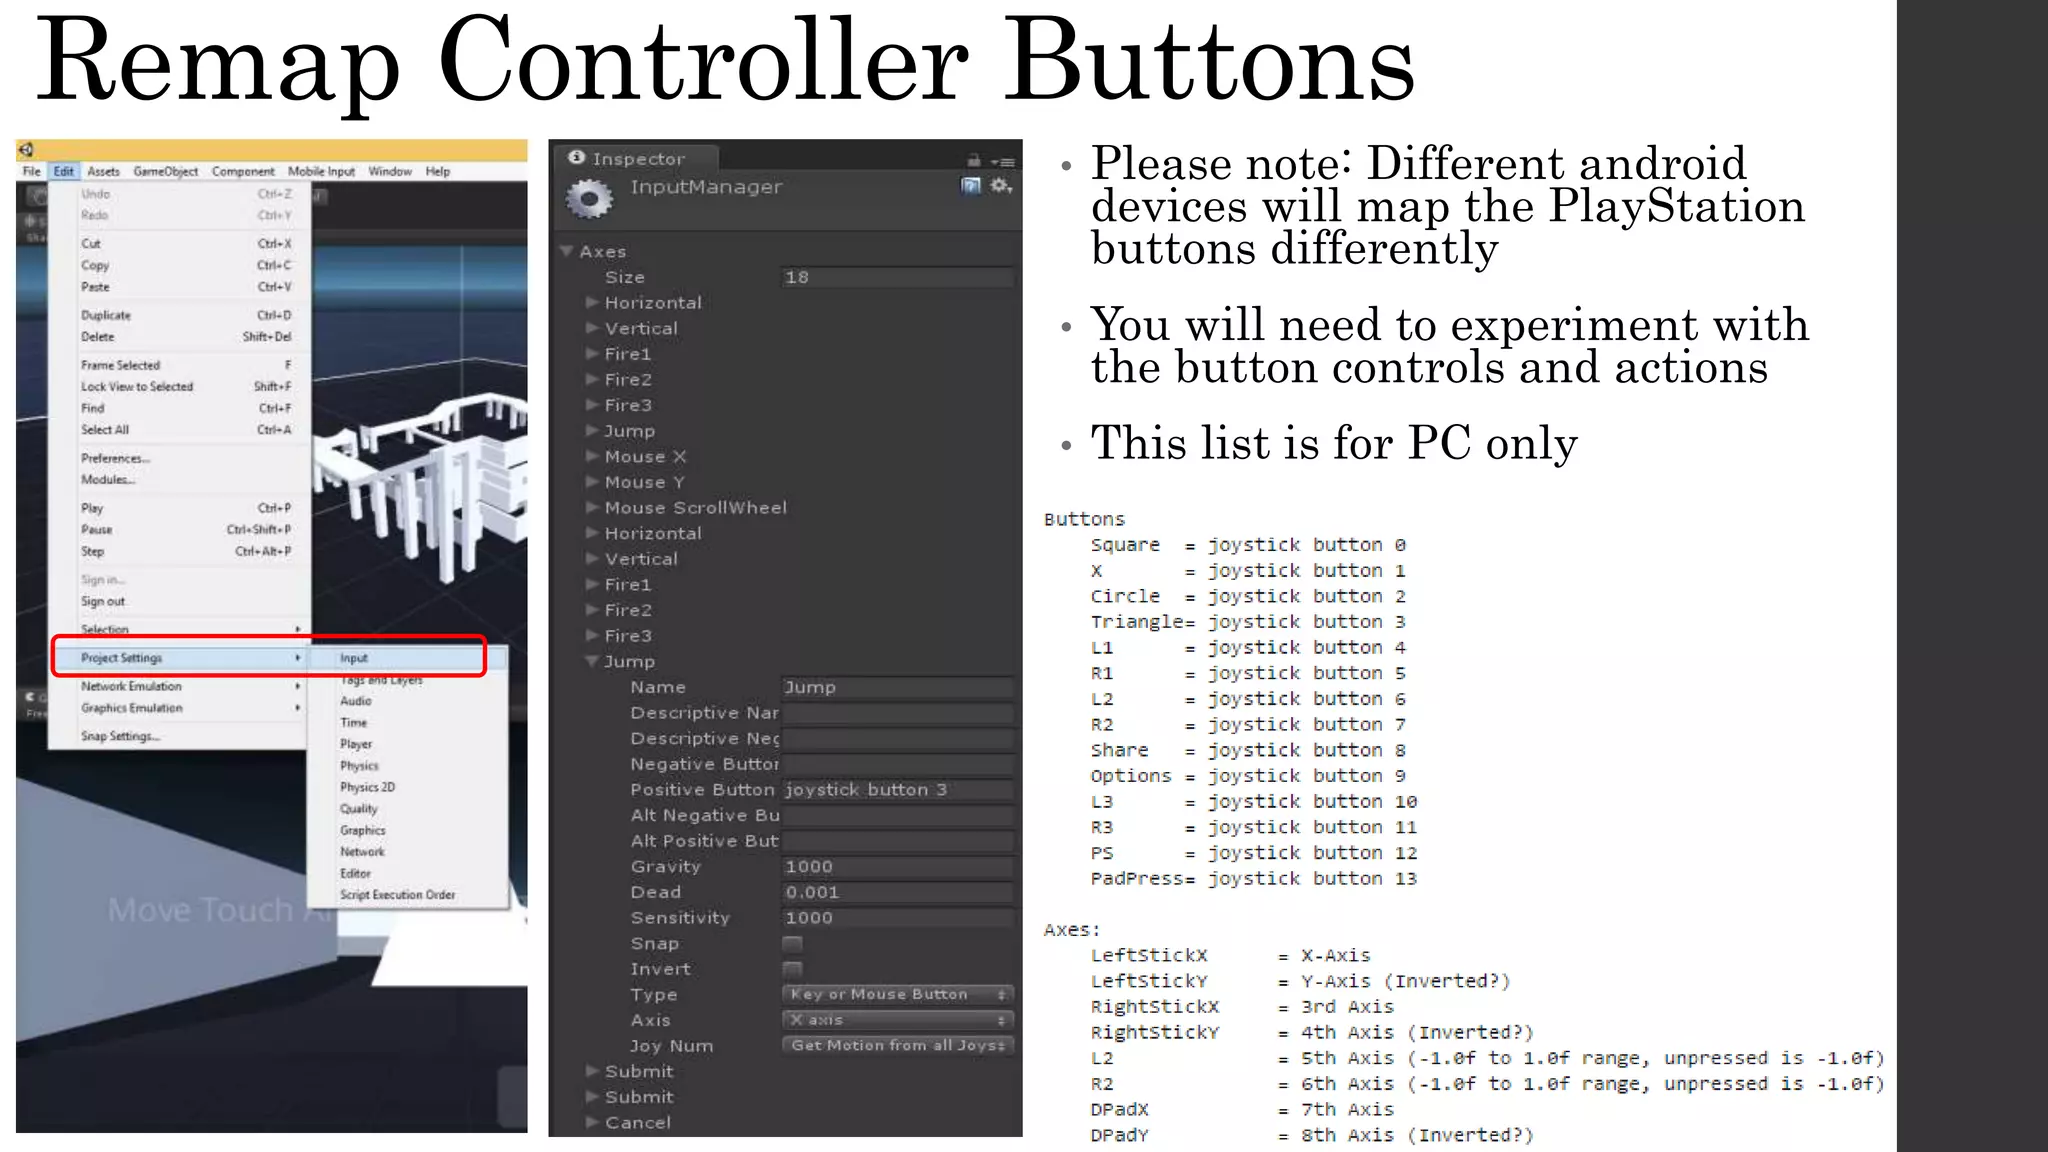
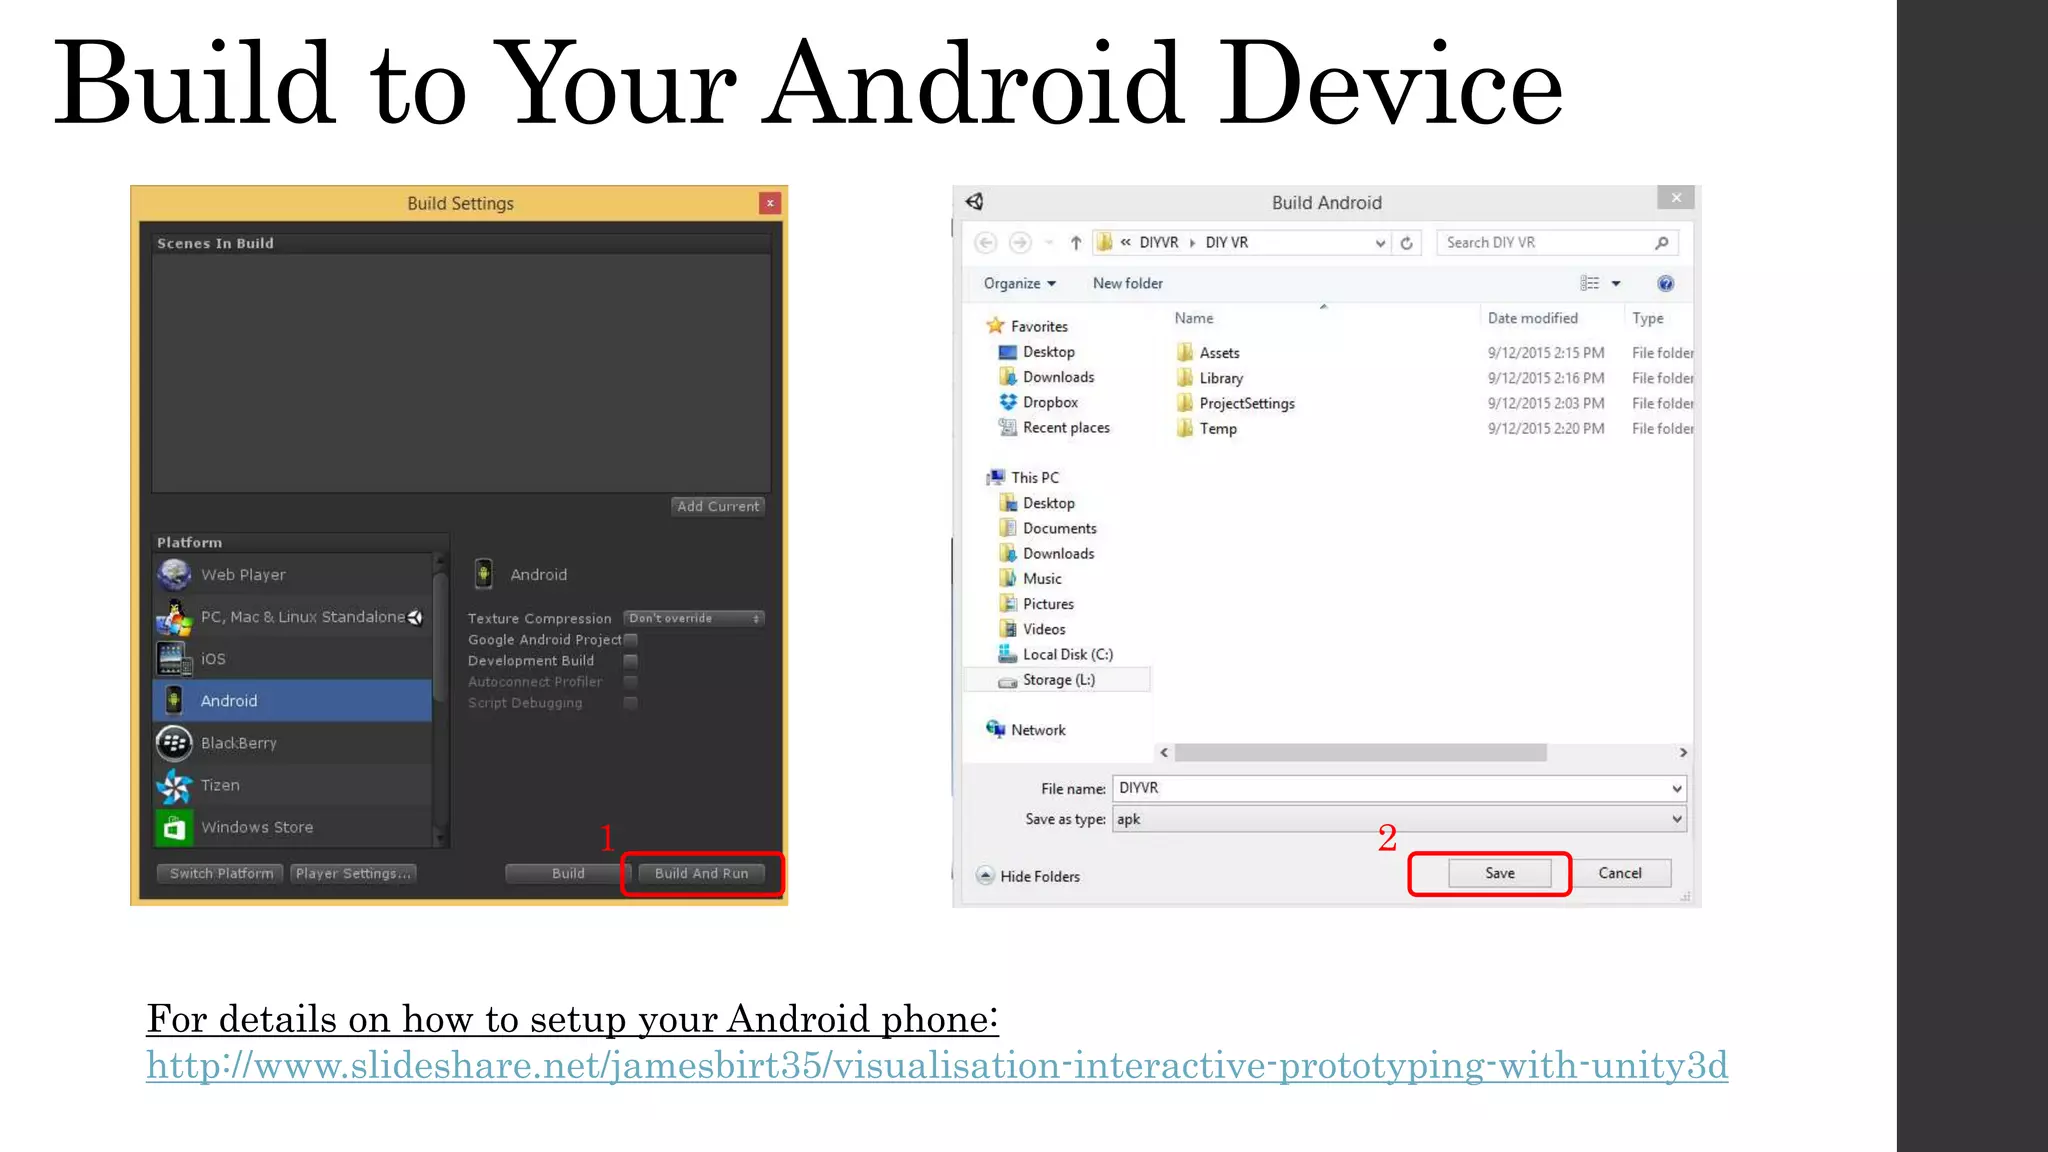
DIY Mobile VR
with Unity &
Cardboard SDK
Dr James Birt
Assistant Professor of Interactive Media
and Design (Games & Multimedia)
• BIT (Hons), PhD (Software Engineering &
Artificial Intelligence)
• 2014 Australian Office for Learning and
Teaching Citation for Outstanding Contribution
to Student Learning
• 15+ years industry & academic experience
• https://bond.edu.au/profile/dr-james-birt
Setup - What do you need?
Unity 5 - https://unity3d.com/ Google Cardboard SDK for Unity -
https://developers.google.com/cardboard/unity
/download
Hardware:
- Android Phone – E.g. Samsung S6
- Head Mounted Cardboard – E.g. ColorCross
- Bluetooth Controller – E.g. PlayStation 4
First Person Character Controller -
https://dl.dropboxusercontent.com/u/9011716/
Character%20Controllers.zip
Create New Project
Create the project in
your own folder
location
1
2
• Download First Person Character Controller from -
https://dl.dropboxusercontent.com/u/9011716/Character%20Controllers.zip
• Unzip the controller into your Assets Folder as shown
Add Character Controller
Add Cardboard SDK
1
2
https://developers.google.com/cardboard/unity/download
Create a Test Scene
Be mindful
of your
Frame Rates
try to reduce
your lighting
overheads
Build Cardboard Controller (Part1)
1. Add FPSController Prefab to your Hierarchy
2. Set the FPSController object Transform to
align with your scene
Build Cardboard Controller (Part2)
1. Add CardboardMain Prefab to you
Hierarchy and child to your FPSController
2. Set the CardboardMain object Transform to
the same values as the FPSController
Camera
3. Remove the Main Camera from the
FPSController & Hierarchy
Build Cardboard Controller (Part3)
1. Move the Cardboard
Head (Script) From
Head to First
Person Controller
2. Turn off Track
Position
3. Set Update Early
These steps will
allow you to move in
the direction your
character controller
is facing
Connect Your PS4 Controller
1. On controller hold down Share & PS buttons until light bar flashes white
2. On Android device, enable Bluetooth, then select the “Wireless
Controller” option listed. Once connected you will notice you can use the
controller to navigate your device
Set Build Settings for Android
1
2
3 4
5
Add your app
details settings I
have left as
default
Remap Controller Buttons
• Please note: Different android
devices will map the PlayStation
buttons differently
• You will need to experiment with
the button controls and actions
• This list is for PC only
Build to Your Android Device
1
For details on how to setup your Android phone:
http://www.slideshare.net/jamesbirt35/visualisation-interactive-prototyping-with-unity3d
2
Demo Scene
To make your lighting dynamic
try adding the following
JavaScript code to your
directional light & set your speed
variable e.g. 5

DIY Mobile VR with Unity 3d & Cardboard SDK

  • 1.
    DIY Mobile VR withUnity & Cardboard SDK
  • 2.
    Dr James Birt AssistantProfessor of Interactive Media and Design (Games & Multimedia) • BIT (Hons), PhD (Software Engineering & Artificial Intelligence) • 2014 Australian Office for Learning and Teaching Citation for Outstanding Contribution to Student Learning • 15+ years industry & academic experience • https://bond.edu.au/profile/dr-james-birt
  • 3.
    Setup - Whatdo you need? Unity 5 - https://unity3d.com/ Google Cardboard SDK for Unity - https://developers.google.com/cardboard/unity /download Hardware: - Android Phone – E.g. Samsung S6 - Head Mounted Cardboard – E.g. ColorCross - Bluetooth Controller – E.g. PlayStation 4 First Person Character Controller - https://dl.dropboxusercontent.com/u/9011716/ Character%20Controllers.zip
  • 4.
    Create New Project Createthe project in your own folder location 1 2
  • 5.
    • Download FirstPerson Character Controller from - https://dl.dropboxusercontent.com/u/9011716/Character%20Controllers.zip • Unzip the controller into your Assets Folder as shown Add Character Controller
  • 6.
  • 7.
    Create a TestScene Be mindful of your Frame Rates try to reduce your lighting overheads
  • 8.
    Build Cardboard Controller(Part1) 1. Add FPSController Prefab to your Hierarchy 2. Set the FPSController object Transform to align with your scene
  • 9.
    Build Cardboard Controller(Part2) 1. Add CardboardMain Prefab to you Hierarchy and child to your FPSController 2. Set the CardboardMain object Transform to the same values as the FPSController Camera 3. Remove the Main Camera from the FPSController & Hierarchy
  • 10.
    Build Cardboard Controller(Part3) 1. Move the Cardboard Head (Script) From Head to First Person Controller 2. Turn off Track Position 3. Set Update Early These steps will allow you to move in the direction your character controller is facing
  • 11.
    Connect Your PS4Controller 1. On controller hold down Share & PS buttons until light bar flashes white 2. On Android device, enable Bluetooth, then select the “Wireless Controller” option listed. Once connected you will notice you can use the controller to navigate your device
  • 12.
    Set Build Settingsfor Android 1 2 3 4 5 Add your app details settings I have left as default
  • 13.
    Remap Controller Buttons •Please note: Different android devices will map the PlayStation buttons differently • You will need to experiment with the button controls and actions • This list is for PC only
  • 14.
    Build to YourAndroid Device 1 For details on how to setup your Android phone: http://www.slideshare.net/jamesbirt35/visualisation-interactive-prototyping-with-unity3d 2
  • 15.
    Demo Scene To makeyour lighting dynamic try adding the following JavaScript code to your directional light & set your speed variable e.g. 5