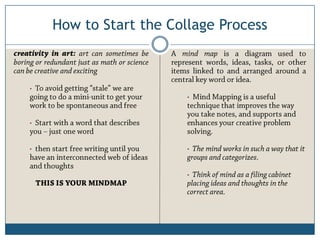
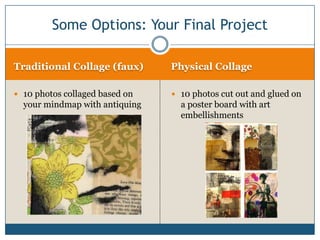
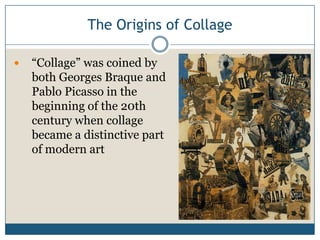
T E C H N I Q U E O F A N A R T P R O D U C T I O N ,
W H E R E T H E A R T W O R K I S M A D E F R O M A N
A S S E M B L A G E O F D I F F E R E N T F O R M S , T H U S
C R E A T I N G A N E W W H O L E
Collage
The Origins of Collage
 ―Collage‖ was coined by
both Georges Braque and
Pablo Picasso in the
beginning of the 20th
century when collage
became a distinctive part
of modern art
The Photomontage
 Collage made from
photographs, or parts of
photographs, is called
photomontage
 Photomontage is the
process (and result) of
making a composite
photograph by cutting
and joining a number of
other photographs
Digital Collage and eCollage
 Digital collage is the
technique of using computer
tools in collage creation to
encourage chance
associations of disparate
visual elements and the
subsequent transformation of
the visual results through the
use of electronic media. It is
commonly used in the
creation of digital art.
 The term "eCollage"
(electronic Collage) can be
used for a collage created by
using computer tools.
Dave McKean
 born 29 December 1963 in
Maidenhead, Berkshire
 he is an English illustrator,
photographer, comic book artist,
graphic designer, filmmaker and
musician.
 Utilizes his photography work to
create photo montages and collages
 Very illustrative and graphic quality to
his images
 Utilizes “aging-techniques” and
“antiquing” heavily in all his work
 Well known published illustrator and
movie maker (“Mirrormask”)
 His collage work is POST
PRODUCTION
Works by Dave McKean
Anne Geddes
 born 13 September 1956
 She is an Australian-born photographer,
clothing designer and businesswoman
who now lives and works in New
Zealand
 she has sold more than 18 million
books and 13 million calendars
 She chose babies as her subject
because of her love of them.
 She sets up her studio in advance—
props, lighting, cameras and
equipment[9]—so that all the baby
or babies have to do is sit. Many of
her props are custom made, such as
over-sized shoes and flowerpots
 Her work is PRE-PRODUCTION
collage (using props to create the
collage)
Works by Anne Geddes
How to Start the Collage Process
•
•
•
•
•
•
Examples of Mindmaps
Digital or eCollage Photomontage
 10 photos collaged based on
your mindmap
 10 photos blended as a motion
photo
Some Options: Your Final Project
Traditional Collage (faux) Physical Collage
 10 photos collaged based on
your mindmap with antiquing
 10 photos cut out and glued on
a poster board with art
embellishments
Some Options: Your Final Project
Your Final Project
 Your final project will consist of:
 10 photos based on your mindmap (this
should create a theme)
 These photos combined together in an
interesting and artistic way
 Your choices are:
 Digital collage
 Photomontage
 Traditional collage (faux)
 Physical collage
 RULES
 You must use only your images
 You must use only appropriate images
 You may use text and graphics that you
have created
 Your images must BLEND (they cannot
just be stacked together)
 You may use color, black and white or a
combination thereof
“Digital Imaging Practice 1”
1. Open two photos, preferably focusing on a single
subject matter
2. Turn both photos B&W using IMAGE  ADJUST 
GRAYSCALE or you can use the new CS3 tool:
IMAGE  ADJUST  Black & White
3. Choose the image that you want to be the
―background‖ and the image you want to be the
―merging-in‖ image
4. SELECT  SELECT ALL on the ―merging-in‖
image, then EDIT  COPY (SHORTCUTS: CTRL
A, CTRL C)
5. PASTE this image onto the ―background image‖ file
using CTRL V
6. RESIZE if needs be using EDIT  TRANSFORM 
SCALE
7. Click on the ERASER TOOL and then go to your
BRUSH SETTINGS and RESET YOUR BRUSHES
using this dialogue window
8. Choose a SOFT ROUND BRUSH
9. Change brush opacity to 50% and begin erasing the
excess parts of the ―merging-in‖ image (the parts you
do not want to see!)
10. Go over the areas several times until the two photos
start to ―merge‖  its okay if you get a ―halo‖ effect
11. ZOOM IN and clean up the edges with the eraser
12. When you are satisfied go to LAYER  FLATTEN
IMAGE
13. Use the BURN & DODGE TOOLS to get rid of
―haloes‖ and alter the image so that they use a similar
light source
14. Use the CROP tool to improve your composition
“Digital Imaging Practice 2”
1. Open two photos, preferably focusing on a single
subject matter
2. Turn both photos B&W using IMAGE  ADJUST 
GRAYSCALE or you can use the new CS3 tool:
IMAGE  ADJUST  Black & White
3. Choose the image that you want to be the
―background‖ and the image you want to be the
―merging-in‖ image
4. SELECT  SELECT ALL on the ―merging-in‖ image,
then EDIT  COPY (SHORTCUTS: CTRL A, CTRL C)
4. If you are more comfortable using the QUICK MASK
rather than the ERASER TOOL there is an alternate
method. Start from Step 3 Above.
5. Instead of SELECTING ALL, on the ―merging-in‖
image hit QUICK MASK and then paint out the area
of the photo you wish to copy (for the example to the
right I would paint out the elephant red)
6. Once done, exit QUICK MASK and everything BUT
your subject matter should be selected, go to SELECT
 INVERSE
7. Then EDIT  COPY and then go to your ―background
image‖
8. EDIT  PASTE (CTRL V)
9. Again, use the ERASER and BURN & TOOL to clean
up the image
“overlapping pictures”
1. Open an image in Photoshop
2. Open a second image in Photoshop
3. SELECT  SELECT ALL
4. EDIT  COPY
5. Close the second image
6. Go to the first image
7. EDIT  PASTE
8. Now both images should be in the same file, NOTE
that a new layer should have been created once you
pasted this image
9. You can now use the MOVE TOOL (black arrow) to
move the second LAYER – place the second image
where you would like
10. Pick the ERASER TOOL
11. At the top select the BRUSH from the menu above .
You will see a ―triangle in a circle‖ button – push this
button and a menu pull up. Select BASIC BRUSHES
and from this new menu , choose the 60 Drop
Shadow Brush.
12. Using this ERASER BRUSH you can erase the edges
of the photo. This will create a ―faded-look.‖
13. Make sure you are only hitting the edges. Line up the
eraser circle so that only half of it actually hits the
photograph.
14. Repeat these steps with a third photograph.
15. The examples to the right should help.

Collage

  • 1.
    T E CH N I Q U E O F A N A R T P R O D U C T I O N , W H E R E T H E A R T W O R K I S M A D E F R O M A N A S S E M B L A G E O F D I F F E R E N T F O R M S , T H U S C R E A T I N G A N E W W H O L E Collage
  • 2.
    The Origins ofCollage  ―Collage‖ was coined by both Georges Braque and Pablo Picasso in the beginning of the 20th century when collage became a distinctive part of modern art
  • 3.
    The Photomontage  Collagemade from photographs, or parts of photographs, is called photomontage  Photomontage is the process (and result) of making a composite photograph by cutting and joining a number of other photographs
  • 4.
    Digital Collage andeCollage  Digital collage is the technique of using computer tools in collage creation to encourage chance associations of disparate visual elements and the subsequent transformation of the visual results through the use of electronic media. It is commonly used in the creation of digital art.  The term "eCollage" (electronic Collage) can be used for a collage created by using computer tools.
  • 5.
    Dave McKean  born29 December 1963 in Maidenhead, Berkshire  he is an English illustrator, photographer, comic book artist, graphic designer, filmmaker and musician.  Utilizes his photography work to create photo montages and collages  Very illustrative and graphic quality to his images  Utilizes “aging-techniques” and “antiquing” heavily in all his work  Well known published illustrator and movie maker (“Mirrormask”)  His collage work is POST PRODUCTION
  • 6.
  • 7.
  • 8.
    Anne Geddes  born13 September 1956  She is an Australian-born photographer, clothing designer and businesswoman who now lives and works in New Zealand  she has sold more than 18 million books and 13 million calendars  She chose babies as her subject because of her love of them.  She sets up her studio in advance— props, lighting, cameras and equipment[9]—so that all the baby or babies have to do is sit. Many of her props are custom made, such as over-sized shoes and flowerpots  Her work is PRE-PRODUCTION collage (using props to create the collage)
  • 9.
  • 10.
  • 11.
    How to Startthe Collage Process • • • • • •
  • 12.
  • 13.
    Digital or eCollagePhotomontage  10 photos collaged based on your mindmap  10 photos blended as a motion photo Some Options: Your Final Project
  • 14.
    Traditional Collage (faux)Physical Collage  10 photos collaged based on your mindmap with antiquing  10 photos cut out and glued on a poster board with art embellishments Some Options: Your Final Project
  • 15.
    Your Final Project Your final project will consist of:  10 photos based on your mindmap (this should create a theme)  These photos combined together in an interesting and artistic way  Your choices are:  Digital collage  Photomontage  Traditional collage (faux)  Physical collage  RULES  You must use only your images  You must use only appropriate images  You may use text and graphics that you have created  Your images must BLEND (they cannot just be stacked together)  You may use color, black and white or a combination thereof
  • 16.
    “Digital Imaging Practice1” 1. Open two photos, preferably focusing on a single subject matter 2. Turn both photos B&W using IMAGE  ADJUST  GRAYSCALE or you can use the new CS3 tool: IMAGE  ADJUST  Black & White 3. Choose the image that you want to be the ―background‖ and the image you want to be the ―merging-in‖ image 4. SELECT  SELECT ALL on the ―merging-in‖ image, then EDIT  COPY (SHORTCUTS: CTRL A, CTRL C) 5. PASTE this image onto the ―background image‖ file using CTRL V 6. RESIZE if needs be using EDIT  TRANSFORM  SCALE 7. Click on the ERASER TOOL and then go to your BRUSH SETTINGS and RESET YOUR BRUSHES using this dialogue window 8. Choose a SOFT ROUND BRUSH 9. Change brush opacity to 50% and begin erasing the excess parts of the ―merging-in‖ image (the parts you do not want to see!) 10. Go over the areas several times until the two photos start to ―merge‖  its okay if you get a ―halo‖ effect 11. ZOOM IN and clean up the edges with the eraser 12. When you are satisfied go to LAYER  FLATTEN IMAGE 13. Use the BURN & DODGE TOOLS to get rid of ―haloes‖ and alter the image so that they use a similar light source 14. Use the CROP tool to improve your composition
  • 17.
    “Digital Imaging Practice2” 1. Open two photos, preferably focusing on a single subject matter 2. Turn both photos B&W using IMAGE  ADJUST  GRAYSCALE or you can use the new CS3 tool: IMAGE  ADJUST  Black & White 3. Choose the image that you want to be the ―background‖ and the image you want to be the ―merging-in‖ image 4. SELECT  SELECT ALL on the ―merging-in‖ image, then EDIT  COPY (SHORTCUTS: CTRL A, CTRL C) 4. If you are more comfortable using the QUICK MASK rather than the ERASER TOOL there is an alternate method. Start from Step 3 Above. 5. Instead of SELECTING ALL, on the ―merging-in‖ image hit QUICK MASK and then paint out the area of the photo you wish to copy (for the example to the right I would paint out the elephant red) 6. Once done, exit QUICK MASK and everything BUT your subject matter should be selected, go to SELECT  INVERSE 7. Then EDIT  COPY and then go to your ―background image‖ 8. EDIT  PASTE (CTRL V) 9. Again, use the ERASER and BURN & TOOL to clean up the image
  • 18.
    “overlapping pictures” 1. Openan image in Photoshop 2. Open a second image in Photoshop 3. SELECT  SELECT ALL 4. EDIT  COPY 5. Close the second image 6. Go to the first image 7. EDIT  PASTE 8. Now both images should be in the same file, NOTE that a new layer should have been created once you pasted this image 9. You can now use the MOVE TOOL (black arrow) to move the second LAYER – place the second image where you would like 10. Pick the ERASER TOOL 11. At the top select the BRUSH from the menu above . You will see a ―triangle in a circle‖ button – push this button and a menu pull up. Select BASIC BRUSHES and from this new menu , choose the 60 Drop Shadow Brush. 12. Using this ERASER BRUSH you can erase the edges of the photo. This will create a ―faded-look.‖ 13. Make sure you are only hitting the edges. Line up the eraser circle so that only half of it actually hits the photograph. 14. Repeat these steps with a third photograph. 15. The examples to the right should help.