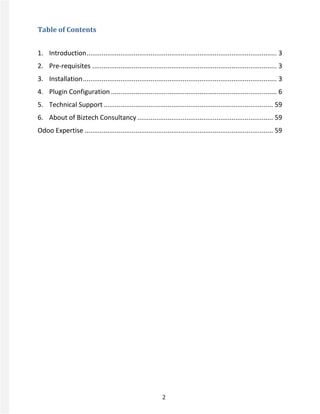
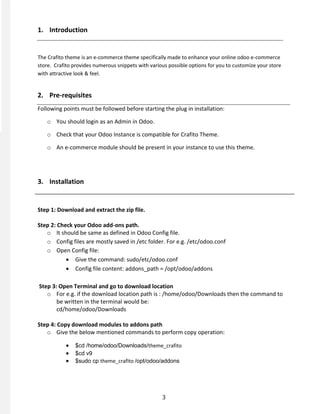
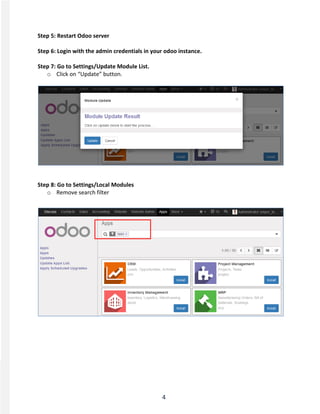
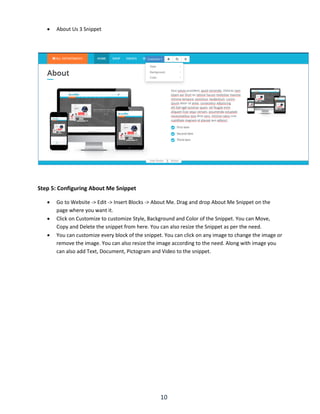
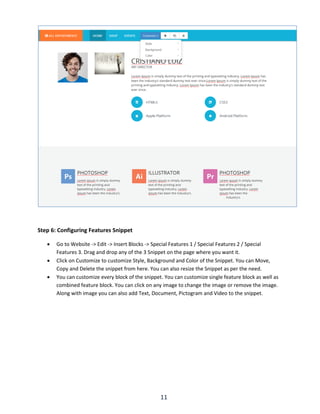
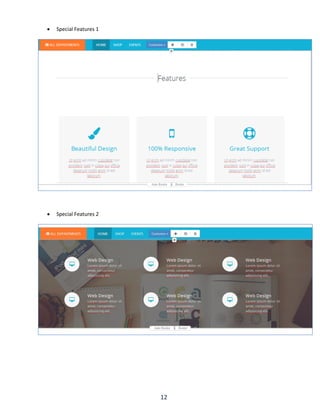
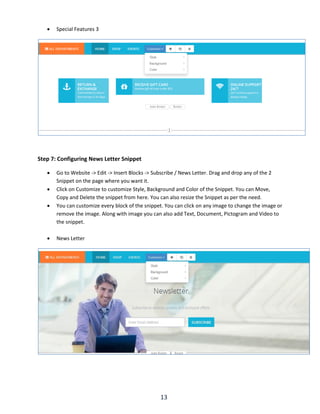
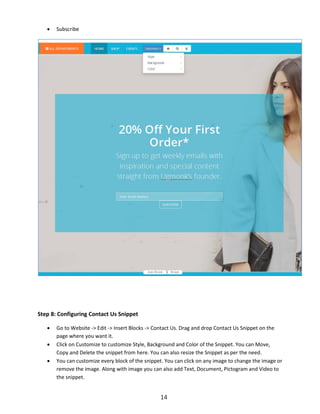
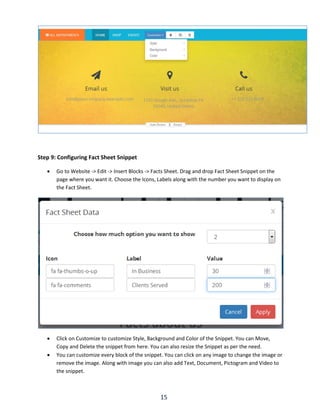
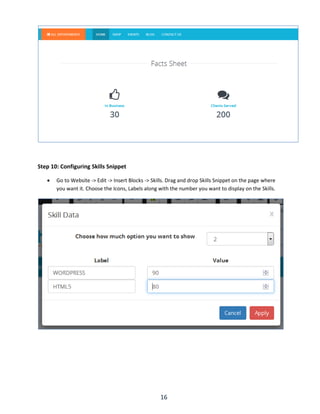
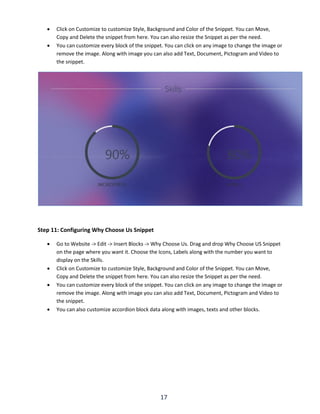
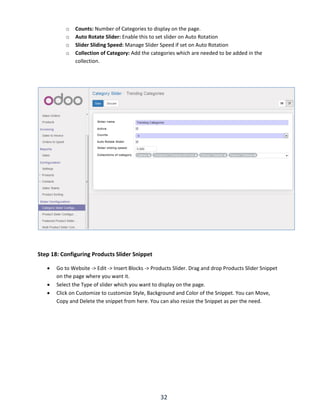
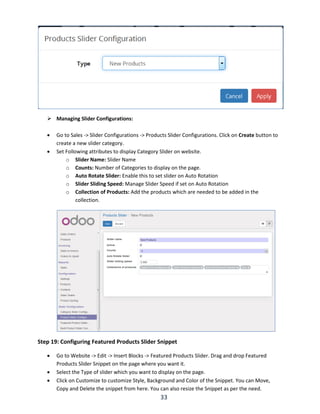
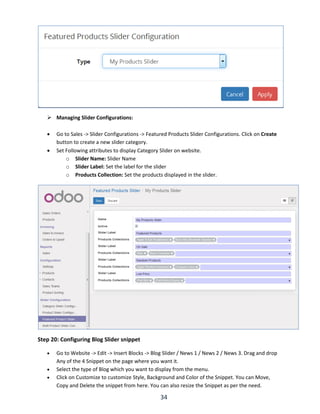
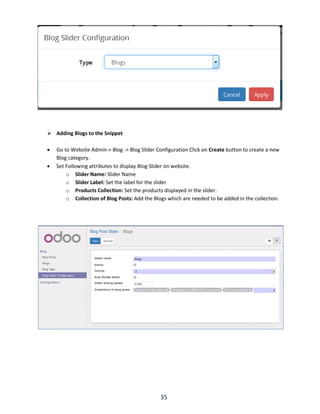
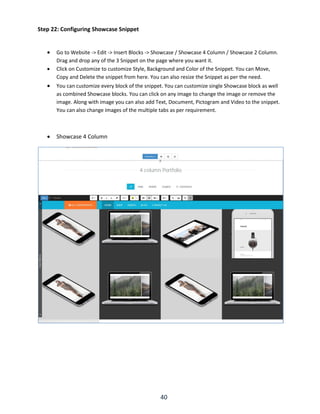
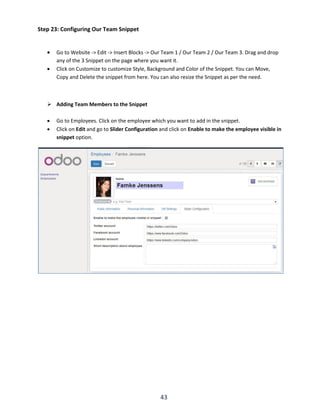
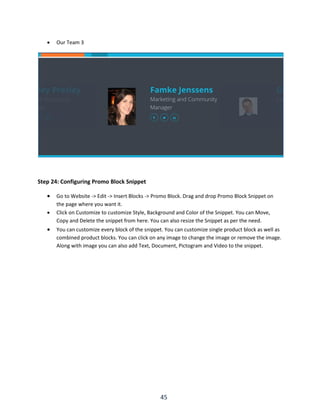
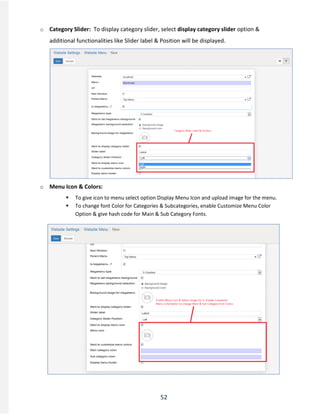
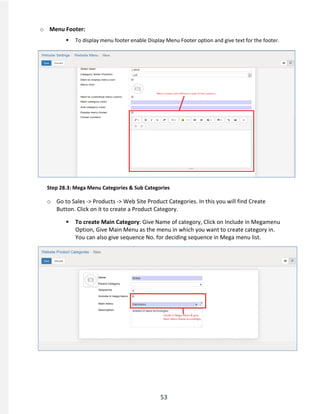
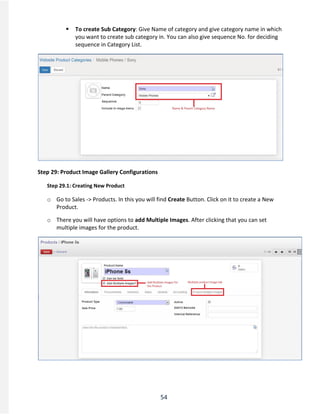
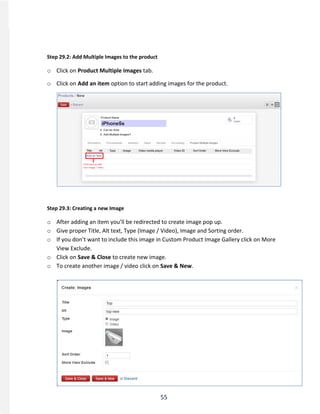
Crafito Odoo Theme is a responsive & highly customizable front-end multipurpose theme with an extensive set of custom snippets to manage every aspect of your website or store.
https://store.biztechconsultancy.com/odoo-crafito-theme.htm
Odoo Crafito Theme, Multipurpose Odoo Template For All IndustriesBiztech Store
Crafito is a powerful and responsive theme with plenty of customization option to suite all kinds of ecommerce stores. No matter which industry you operate in, if you are building an Odoo ecommerce store, then Crafito is what you need.
https://store.biztechconsultancy.com/odoo-crafito-theme.htm
Odoo MobiCraft: Responsive Mobile Ecommerce Store ThemeBiztech Store
MobiCraft is responsive & highly rich mobile online store Odoo theme. With this theme every factor of mobile ecommerce store is fully customizable.It is an HTML5 based Odoo Ecommerce theme developed with Bootstrap, for all size eCommerce businesses. MobiCraft is fully responsive and extensively flexible with optimized speed. Buy it now and get your ecommerce store on your fingertips on-the-move.
https://store.biztechconsultancy.com/odoo-mobicraft-theme.htm
Odoo Furnito Ecommerce Theme, Responsive OpenERP Furniture ThemeBiztech Store
Furnito is an HTML5 based Odoo Ecommerce theme built with Bootstrap, for furniture and home furnishing industry. Furnito is fully responsive and extensively optimized for speed. Buy Furnito now and get a fast and designer ecommerce store that highlights your products the best way possible!
View More: https://store.biztechconsultancy.com/odoo-furnito-theme.htm
User Manual For Kingfisher Fashion Odoo ThemeAppJetty
Kingfisher Fashion is HTML5 based theme for Odoo and built with bootstrap & designed for openerp fashion and apparel industry. Appjetty helps enterprises to extend Odoo with powerful and feature-rich plugins, extensions, themes and apps. Kingfisher Fahion is customizable, multipurpose and responsive theme for Odoo and it continues the legacy of the best selling Odoo ecommerce theme Kingfisher.
Odoo Kingfisher Pro Fashion Theme, Responsive eCommerce Fashion Store ThemeBiztech Store
Odoo Kingfisher Pro Fashion imparts great benefits in the form of stellar design. Get the store speed optimized with Less CSS. It is a professional responsive theme which helps enhance the look and feel of your fashion store.
https://store.biztechconsultancy.com/odoo-kingfisher-fashion-theme.htm
Magento is one of the most search engine friendly eCommerce systems available can be optimized to provide a solid foundation for an SEO strategy for your online store.
There’s no question that ranking higher than your competitors on Google is a must for any eCommerce website to succeed.
This guide will give you all the tips and tricks to get your Magento store in a position to outrank your rivals.
Whether you’re just getting started with a new website or improving an existing site, this guide to Magento SEO provides practical advice to ensure you get the most from your store.
From basic setup to advanced onsite SEO techniques, and ways to improve page load time, this guide aims to be the most comprehensive guide to Magento SEO available.
Orchid is leading Enterprise Software Solutions company in the U.A.E, with superior technological strengths. We have a track record of several successful software projects. Our proven and demonstrable track record empowers us to deliver value in each engagement. Our operational excellence ensures that each dollar that our clients spend, provide them an enhanced ROI.
Enterprise Resource Planning using Odoo/OpenERP in AfghanistanFarshid Ghyasi
Odoo is an open source comprehensive suite of business applications including Sales, CRM, Project management, Warehouse management, Accounting.
This presentation is about Odoo implementation in Afghanistan
Like us at: http://www.facebook.com/odoo.af
Website: http://www.netlinks.af
Brief introduction to Open ERP for international students of the International Bachelor in Information Management Programa. Deusto University is taking part in that program, besides of Tilburg University in Netherlands and Bentley University in Boston, MA, USA.
This is a simple power point for basic introduction of odoo. Very first facts and figures about the company and software plus the reasons odoo is a good ERP for SMB and even big enterprises.
Open Source web and cloud ERP / CRM with HTML5 UI by Vienna AdvantageVIENNA Advantage
Modern, Rich and Scalable Open Source ERP / CRM with HTML5 User Interface. Available as a web and cloud based ERP or as a standard on-premisses ERP Solution.
VIENNA Advantage ERP is a popular & sought-after brand across a variety of businesses, industry-verticals and customer segments world-wide.
It has risen within a short span of time and has close to 1000 immaculate product implementations, to emerge as a top contributor to the global ERP and CRM market.
With small enterprises to large corporations & government sectors as its customer base, VIENNA Advantage takes pride in offering comprehensive & leading-edge business solutions to augment your business furtherance.
Unite all parts of your business with an affordable enterprise software application aligned to strategic objectives and complex organizational structures. Operate a lean organization by harnessing the compelling business process automation and productivity features of VIENNA Advantage. Get a 360° view of your business and instant real-time business intelligence that drive crucial decisions. Move over time-consuming spreadsheets, create better business processes and spend lesser time in automating them. Pick from a wide range of functionalities and use it to suit any business. VIENNA Advantage integrates easily with third-party applications through web services. VIENNA Advantage on-premises or on-cloud are both affordable and scalable.
Based in Germany, with the development and support centers all over the globe, VIENNA Advantage has successfully established a strong partner network across the globe. Its partner eco-system assists customers with VIENNA Advantage localization and business-specific support, right at their door-steps. The partners are in turn, supported by an efficient remote support framework. VIENNA Advantage delivers its updates through VIENNA Market. The updates could be deployed on-demand and at the click of a button, eliminating the need for tedious and expensive migration efforts.
The technologies and people we are designing experiences for are constantly changing, in most cases they are changing at a rate that is difficult keep up with. When we think about how our teams are structured and the design processes we use in light of this challenge, a new design problem (or problem space) emerges, one that requires us to focus inward. How do we structure our teams and processes to be resilient? What would happen if we looked at our teams and design process as IA’s, Designers, Researchers? What strategies would we put in place to help them be successful? This talk will look at challenges we face leading, supporting, or simply being a part of design teams creating experiences for user groups with changing technological needs.
Crafito is HTML5 based theme for Odoo and built with bootstrap. Appjetty helps enterprises to extend Odoo with powerful and feature-rich plugins, extensions, themes and apps. Crafito is customizable, multipurpose and responsive theme for Odoo and it comes with a wide collection of custom snippets that gives control over any part of Odoo website.
Crafito Odoo theme is a responsive & highly customizable multipurpose ecommerce template with huge range of custom snippets to manage all aspect of odoo store & website.
To Know More About Theme: https://www.appjetty.com/odoo-crafito-theme.htm
Html5 Bootstrap Furniture Ecommerce Odoo Theme: User ManualAppJetty
Furnito is a HTML5 Bootstrap frontend Odoo ecommerce theme made specifically for the furniture and furnishing industry. Its a completely responsive theme that comes with a range of custom snippets. For more informatin visit: https://www.appjetty.com/odoo-furnito-theme.htm
Responsive Mobile Odoo Theme: Mobicraft User ManualAppJetty
Mobicraft is a best selling HTML5 Odoo ecommerce theme built with bootstrap and is completely responsive. Mobicraft is ideal for stores selling mobile or other gadgets and accessories. For more informatin visit: https://www.appjetty.com/odoo-mobicraft-theme.htm
Dnn developer slider module user manualDnn Developer
DnnDeveloper.in Slider is a new creative tool with amazing CSS animation effect to the Text, Button and small Image on the slide. Mobile friendly and compatible with major browsers, It's very user-friendly and manageable, it's really easy to use. It's EVS verified pro module.
“You can download this product from SlideTeam.net”
Presenting this set of slides with name - Kano Model Process. This is a four stage process.The stages in this process are Kano Model, Kano Framework, Product Development. https://bit.ly/3IJC7r7
Project Phases Showing Phase Content And Documents With Analysis And Design R...SlideTeam
Presenting this set of slides with name - Project Phases Showing Phase Content And Documents With Analysis And Design Report. This is a four stage process. The stages in this process are Project Phases, Project Steps, Project Methods. https://bit.ly/2U0bqK9
Presenting this set of slides with name - Software Project Development Process. This is a six stage process. The stages in this process are Business Development Methodologies, Product Development Process, Development Process. https://bit.ly/3kP9vBy
6 Step Client Onboarding Process With Launch ProjectSlideTeam
“You can download this product from SlideTeam.net”
Presenting this set of slides with name 6 Step Client Onboarding Process With Launch Project. This is a six process. The stages in this process are stages Client Onboarding, Business, Marketing. This is a completely editable PowerPoint presentation and is available for immediate download. Download now and impress your audience. https://bit.ly/3qKPvEH
"You can download this product from SlideTeam.net"
Provide a framework for efficient management of your organization with Project Action Tracker PowerPoint Images. Help set priorities in your workplace to make your team members work towards a common goal. Use this project status report examples PPT slide to keep your key stakeholders updated on the progress. Deliver key messages to the intended target audience with the help of this project status report PPT template. You can identify any risks that might prove to be a hindrance in your company’s growth. Convey communication and management strategy to update your project team, sponsors, or stakeholders. You can improve organizational support for your team with the help of a project status report PowerPoint presentation. Project overall status to keep your teammates updated. Easily provide a documented history of the project, which makes planning for your next project more manageable. Stay to the point and report what needs to be communicated with precision. Mention all the details about your project in the most simplified form. Create an efficient and impactful presentation in less time. https://bit.ly/3ueYChb
If you’re planning to turn your Magento 2 store into an app, check out these Best Mobile App Builder extensions. Using them, you can create mobile apps without any programming skills.
Language Translator Magento 2 ExtensionBiztech Store
Magento 2 Language Translator helps you translate product attributes, CMS pages along with CMS blocks, meta title & description, product reviews, tags and many more parts of store content. With Language translator, mass language translation of store content is possible as well. See More Details: https://store.biztechconsultancy.com/magento2-language-translator-extension.htm
Magento 2 Advance Shop By Brand Extension, Display Logo Slider on StoreBiztech Store
Shop by Brand Magento 2 Extension allows your store customers to shop products based on their brand preferences. As a store admin, it allows you to add the brand attribute to your products and show them in the frontend with all the brand details. Customers can also filter products by brand on category pages. To know more: https://store.biztechconsultancy.com/magento2-advance-shop-by-brand-extension.htm
Magento 2 Australia Post Shipping Extension, Parcel Shipping RateBiztech Store
Australia Post Shipping Extension for Magento 2 to add domestic and global parcel shipping rates in your online e-commerce store! Manage handling charges, signature on delivery, extra cover charges and many more things for product shipping.
To know more: https://store.biztechconsultancy.com/magento2-australia-post-extension.htm
FedEx Smart Shipping Magento Extension, FedEx Freight Service ModuleBiztech Store
Allow your customers to ship with FedEx Shipping method by integrating FedEx freight shipping service with your Magento store using this extension. FedEx smart shipping extension allows magento store admin to manage all aspects of FedEx freight shipping, get live shipping rate, provide multiple delivery options, etc. To Know More : https://store.biztechconsultancy.com/magento-fedex-smart-shipping.htm
SugarCRM Survey Rocket Plugin: User ManualBiztech Store
Get your customers’ surveys (feedback, reviews, comments, answers) combined with CRM data & know what makes your customers satisfied. Survey Rocket, a feature rich tool automates feedbacks and augments business relationships with your customers
https://store.biztechconsultancy.com/sugarcrm-survey-rocket.htm
Delivery Date Scheduler Magento Extension - User GuideBiztech Store
Magento Delivery Date Scheduler extension helps your customers decide the order's/product's delivery dates. This can improve the delivery processes and online orders can be placed on time at particular dates. https://store.biztechconsultancy.com/magento-delivery-date-scheduler.htm
Brush Your Ideas Magento Product Designer Extension - User GuideBiztech Store
Brush Your Ideas Magento extension aims at endowing your E-commerce store with an advanced designing tool. It allows your customers to pour their ideas and customize products of their choice. The products can be T-shirts, Mugs, Covers of Mobile and Laptop, Business card, Greeting Cards,Posters, upholstery and the list is endless! https://store.biztechconsultancy.com/brush-your-ideas-product-designer.htm
Tips to Improve your Buyers' InvolvementBiztech Store
Know your customers by understanding their preferences, requirements and desires by sending customer surveys.
https://store.biztechconsultancy.com/blog/tips-improve-buyers-involvement/
WordPress SugarCRM Customer Portal Pro PluginBiztech Store
We present WordPress SugarCRM Customer Portal Pro Plugin for SugarCRM users to help their WordPress customers access SugarCRM modules from WordPress dashboard.
Manage SugarCRM Instance On-the-move! A proficient mobile app works online and offline. It lets you have a dynamic functionality while accessing your customers’ data on mobile devices. You can select various types of modules and layouts from SugarCRM back end. Experience a smooth access on-the-go!
MageMob Cart Android & iPhone Application to Access Magento StoreBiztech Store
Biztech Store helps your customers access your magento store from their smartphones and place orders using our MageMob Cart mobile app, equipped with useful features.
SugarCRM Survey Rocket Plugin - User GuideBiztech Store
Intensify The Ways Of Improving Customer Satisfaction By Availing An Automated Customer Survey Plugin. Survey Rocket Plugin is one such tool that allows users to create multiple surveys with different email templates. Explore its striking features here.
https://store.biztechconsultancy.com/sugarcrm-survey-rocket.htm?utm_source=SurveyRocket&utm_medium=DM&utm_campaign=PremiumPlan
WordPress SugarCRM Customer Portal Pro PluginBiztech Store
It’s time to offer your WordPress customers the benefit of SugarCRM and WordPress integration by offering a dedicated SugarCRM Customer Portal that they can access from their WP interface. This is what your WordPress customers would be looking for. Better and automated systems making their business function smoother and faster.
SEO suite plugin allows you to set and manage dynamically meta information such as title, keywords, description for all products and categories pages of odoo store.
https://store.biztechconsultancy.com/odoo-seo-suite.htm
Customer order comment openerp plugin allow your customers to comment while placing an order on your online odoo website where you can know about their preferences.
https://store.biztechconsultancy.com/odoo-customer-order-comment.htm
Give your customers a quicker and filtered search results. Help them search product catalogue faster with relevant attributes! Help them get an improved shopping experience! Retain and acquire more customers!
http://bit.ly/1sNdWzi
StarTrack Shipping Extension - User GuideBiztech Store
StarTrack Shipping Extension is for Magento store in Australia where it display live shipping rates to customers for shipping services within Australia.
http://bit.ly/1HQp96b
Do you know what your customers think about your store? Now you can get your customers feedback through this extension and understand their taste and needs. This will also help you formulate a better marketing and business strategy for gaining better yields.
http://bit.ly/YDMe9j
The Art of the Pitch: WordPress Relationships and SalesLaura Byrne
Clients don’t know what they don’t know. What web solutions are right for them? How does WordPress come into the picture? How do you make sure you understand scope and timeline? What do you do if sometime changes?
All these questions and more will be explored as we talk about matching clients’ needs with what your agency offers without pulling teeth or pulling your hair out. Practical tips, and strategies for successful relationship building that leads to closing the deal.
Accelerate your Kubernetes clusters with Varnish CachingThijs Feryn
A presentation about the usage and availability of Varnish on Kubernetes. This talk explores the capabilities of Varnish caching and shows how to use the Varnish Helm chart to deploy it to Kubernetes.
This presentation was delivered at K8SUG Singapore. See https://feryn.eu/presentations/accelerate-your-kubernetes-clusters-with-varnish-caching-k8sug-singapore-28-2024 for more details.
Key Trends Shaping the Future of Infrastructure.pdfCheryl Hung
Keynote at DIGIT West Expo, Glasgow on 29 May 2024.
Cheryl Hung, ochery.com
Sr Director, Infrastructure Ecosystem, Arm.
The key trends across hardware, cloud and open-source; exploring how these areas are likely to mature and develop over the short and long-term, and then considering how organisations can position themselves to adapt and thrive.
Kubernetes & AI - Beauty and the Beast !?! @KCD Istanbul 2024Tobias Schneck
As AI technology is pushing into IT I was wondering myself, as an “infrastructure container kubernetes guy”, how get this fancy AI technology get managed from an infrastructure operational view? Is it possible to apply our lovely cloud native principals as well? What benefit’s both technologies could bring to each other?
Let me take this questions and provide you a short journey through existing deployment models and use cases for AI software. On practical examples, we discuss what cloud/on-premise strategy we may need for applying it to our own infrastructure to get it to work from an enterprise perspective. I want to give an overview about infrastructure requirements and technologies, what could be beneficial or limiting your AI use cases in an enterprise environment. An interactive Demo will give you some insides, what approaches I got already working for real.
DevOps and Testing slides at DASA ConnectKari Kakkonen
My and Rik Marselis slides at 30.5.2024 DASA Connect conference. We discuss about what is testing, then what is agile testing and finally what is Testing in DevOps. Finally we had lovely workshop with the participants trying to find out different ways to think about quality and testing in different parts of the DevOps infinity loop.
Essentials of Automations: Optimizing FME Workflows with ParametersSafe Software
Are you looking to streamline your workflows and boost your projects’ efficiency? Do you find yourself searching for ways to add flexibility and control over your FME workflows? If so, you’re in the right place.
Join us for an insightful dive into the world of FME parameters, a critical element in optimizing workflow efficiency. This webinar marks the beginning of our three-part “Essentials of Automation” series. This first webinar is designed to equip you with the knowledge and skills to utilize parameters effectively: enhancing the flexibility, maintainability, and user control of your FME projects.
Here’s what you’ll gain:
- Essentials of FME Parameters: Understand the pivotal role of parameters, including Reader/Writer, Transformer, User, and FME Flow categories. Discover how they are the key to unlocking automation and optimization within your workflows.
- Practical Applications in FME Form: Delve into key user parameter types including choice, connections, and file URLs. Allow users to control how a workflow runs, making your workflows more reusable. Learn to import values and deliver the best user experience for your workflows while enhancing accuracy.
- Optimization Strategies in FME Flow: Explore the creation and strategic deployment of parameters in FME Flow, including the use of deployment and geometry parameters, to maximize workflow efficiency.
- Pro Tips for Success: Gain insights on parameterizing connections and leveraging new features like Conditional Visibility for clarity and simplicity.
We’ll wrap up with a glimpse into future webinars, followed by a Q&A session to address your specific questions surrounding this topic.
Don’t miss this opportunity to elevate your FME expertise and drive your projects to new heights of efficiency.
Dev Dives: Train smarter, not harder – active learning and UiPath LLMs for do...UiPathCommunity
💥 Speed, accuracy, and scaling – discover the superpowers of GenAI in action with UiPath Document Understanding and Communications Mining™:
See how to accelerate model training and optimize model performance with active learning
Learn about the latest enhancements to out-of-the-box document processing – with little to no training required
Get an exclusive demo of the new family of UiPath LLMs – GenAI models specialized for processing different types of documents and messages
This is a hands-on session specifically designed for automation developers and AI enthusiasts seeking to enhance their knowledge in leveraging the latest intelligent document processing capabilities offered by UiPath.
Speakers:
👨🏫 Andras Palfi, Senior Product Manager, UiPath
👩🏫 Lenka Dulovicova, Product Program Manager, UiPath
LF Energy Webinar: Electrical Grid Modelling and Simulation Through PowSyBl -...DanBrown980551
Do you want to learn how to model and simulate an electrical network from scratch in under an hour?
Then welcome to this PowSyBl workshop, hosted by Rte, the French Transmission System Operator (TSO)!
During the webinar, you will discover the PowSyBl ecosystem as well as handle and study an electrical network through an interactive Python notebook.
PowSyBl is an open source project hosted by LF Energy, which offers a comprehensive set of features for electrical grid modelling and simulation. Among other advanced features, PowSyBl provides:
- A fully editable and extendable library for grid component modelling;
- Visualization tools to display your network;
- Grid simulation tools, such as power flows, security analyses (with or without remedial actions) and sensitivity analyses;
The framework is mostly written in Java, with a Python binding so that Python developers can access PowSyBl functionalities as well.
What you will learn during the webinar:
- For beginners: discover PowSyBl's functionalities through a quick general presentation and the notebook, without needing any expert coding skills;
- For advanced developers: master the skills to efficiently apply PowSyBl functionalities to your real-world scenarios.
Builder.ai Founder Sachin Dev Duggal's Strategic Approach to Create an Innova...Ramesh Iyer
In today's fast-changing business world, Companies that adapt and embrace new ideas often need help to keep up with the competition. However, fostering a culture of innovation takes much work. It takes vision, leadership and willingness to take risks in the right proportion. Sachin Dev Duggal, co-founder of Builder.ai, has perfected the art of this balance, creating a company culture where creativity and growth are nurtured at each stage.
Generating a custom Ruby SDK for your web service or Rails API using Smithyg2nightmarescribd
Have you ever wanted a Ruby client API to communicate with your web service? Smithy is a protocol-agnostic language for defining services and SDKs. Smithy Ruby is an implementation of Smithy that generates a Ruby SDK using a Smithy model. In this talk, we will explore Smithy and Smithy Ruby to learn how to generate custom feature-rich SDKs that can communicate with any web service, such as a Rails JSON API.
UiPath Test Automation using UiPath Test Suite series, part 4DianaGray10
Welcome to UiPath Test Automation using UiPath Test Suite series part 4. In this session, we will cover Test Manager overview along with SAP heatmap.
The UiPath Test Manager overview with SAP heatmap webinar offers a concise yet comprehensive exploration of the role of a Test Manager within SAP environments, coupled with the utilization of heatmaps for effective testing strategies.
Participants will gain insights into the responsibilities, challenges, and best practices associated with test management in SAP projects. Additionally, the webinar delves into the significance of heatmaps as a visual aid for identifying testing priorities, areas of risk, and resource allocation within SAP landscapes. Through this session, attendees can expect to enhance their understanding of test management principles while learning practical approaches to optimize testing processes in SAP environments using heatmap visualization techniques
What will you get from this session?
1. Insights into SAP testing best practices
2. Heatmap utilization for testing
3. Optimization of testing processes
4. Demo
Topics covered:
Execution from the test manager
Orchestrator execution result
Defect reporting
SAP heatmap example with demo
Speaker:
Deepak Rai, Automation Practice Lead, Boundaryless Group and UiPath MVP
3. 3
1. Introduction
The Crafito theme is an e-commerce theme specifically made to enhance your online odoo e-commerce
store. Crafito provides numerous snippets with various possible options for you to customize your store
with attractive look & feel.
2. Pre-requisites
Following points must be followed before starting the plug in installation:
o You should login as an Admin in Odoo.
o Check that your Odoo Instance is compatible for Crafito Theme.
o An e-commerce module should be present in your instance to use this theme.
3. Installation
Step 1: Download and extract the zip file.
Step 2: Check your Odoo add-ons path.
o It should be same as defined in Odoo Config file.
o Config files are mostly saved in /etc folder. For e.g. /etc/odoo.conf
o Open Config file:
Give the command: sudo/etc/odoo.conf
Config file content: addons_path = /opt/odoo/addons
Step 3: Open Terminal and go to download location
o For e.g. if the download location path is : /home/odoo/Downloads then the command to
be written in the terminal would be:
cd/home/odoo/Downloads
Step 4: Copy download modules to addons path
o Give the below mentioned commands to perform copy operation:
$cd /home/odoo/Downloads/theme_crafito
$cd v9
$sudo cp theme_crafito /opt/odoo/addons
4. 4
Step 5: Restart Odoo server
Step 6: Login with the admin credentials in your odoo instance.
Step 7: Go to Settings/Update Module List.
o Click on “Update” button.
Step 8: Go to Settings/Local Modules
o Remove search filter
5. 5
o Enter module name in the search box provided in the top right corner of the page. For
e.g. here write “Crafito”.
o Click on install button.
6. 6
4. Plugin Configuration
Step 1: Configuring Main Title Snippet
Go to Website -> Edit -> Insert Blocks -> Main Title. Drag and drop Main Title Snippet on the
page where you want it.
Click on Customize to customize Style, Background and Color of the Snippet. You can Move,
Copy and Delete the snippet from here. You can also resize the Snippet as per the need.
Click on any Text to customize text of the Title Block. Click on the Title to customize Title of the
block.
Step 2: Configuring Upper Banner Snippet
Go to Website -> Edit -> Insert Blocks -> Upper Banner. Drag and drop Upper Banner Snippet on
the page where you want it.
Click on Customize to customize Style, Background and Color of the Snippet. You can Move,
Copy and Delete the snippet from here. You can also resize the Snippet as per the need.
For Breadcrumbs you can set links for the pages as well as unlink them upon requirement.
7. 7
Step 3: Configuring Home Slider Snippet
Go to Website -> Edit -> Insert Blocks -> Home Slider. Drag and drop Upper Banner Snippet on
the page where you want it.
Click on Customize to customize Style, Background and Color of the Snippet. You can Move,
Copy and Delete the snippet from here. You can also resize the Snippet as per the need.
You can click on any image to change the image or remove the image. Along with image you can
also add Text, Document, Pictogram and Video to the snippet. You can also Manage Slideshow
speed along with number of slides in the snippet.
8. 8
You can also add text to the banner along with any button that can redirect your customer to
any page. You can also manage links of the button by clicking button and then clicking on link
button.
Step 4: Configuring About Us Snippet
Go to Website -> Edit -> Insert Blocks -> About Company / About Us 2 / About Us 3. Drag and
drop any of the 3 Snippet on the page where you want it.
Click on Customize to customize Style, Background and Color of the Snippet. You can Move,
Copy and Delete the snippet from here. You can also resize the Snippet as per the need.
You can customize every block of the snippet. You can click on any image to change the image or
remove the image. Along with image you can also add Text, Document, Pictogram and Video to
the snippet.
10. 10
About Us 3 Snippet
Step 5: Configuring About Me Snippet
Go to Website -> Edit -> Insert Blocks -> About Me. Drag and drop About Me Snippet on the
page where you want it.
Click on Customize to customize Style, Background and Color of the Snippet. You can Move,
Copy and Delete the snippet from here. You can also resize the Snippet as per the need.
You can customize every block of the snippet. You can click on any image to change the image or
remove the image. You can also resize the image according to the need. Along with image you
can also add Text, Document, Pictogram and Video to the snippet.
11. 11
Step 6: Configuring Features Snippet
Go to Website -> Edit -> Insert Blocks -> Special Features 1 / Special Features 2 / Special
Features 3. Drag and drop any of the 3 Snippet on the page where you want it.
Click on Customize to customize Style, Background and Color of the Snippet. You can Move,
Copy and Delete the snippet from here. You can also resize the Snippet as per the need.
You can customize every block of the snippet. You can customize single feature block as well as
combined feature block. You can click on any image to change the image or remove the image.
Along with image you can also add Text, Document, Pictogram and Video to the snippet.
13. 13
Special Features 3
Step 7: Configuring News Letter Snippet
Go to Website -> Edit -> Insert Blocks -> Subscribe / News Letter. Drag and drop any of the 2
Snippet on the page where you want it.
Click on Customize to customize Style, Background and Color of the Snippet. You can Move,
Copy and Delete the snippet from here. You can also resize the Snippet as per the need.
You can customize every block of the snippet. You can click on any image to change the image or
remove the image. Along with image you can also add Text, Document, Pictogram and Video to
the snippet.
News Letter
14. 14
Subscribe
Step 8: Configuring Contact Us Snippet
Go to Website -> Edit -> Insert Blocks -> Contact Us. Drag and drop Contact Us Snippet on the
page where you want it.
Click on Customize to customize Style, Background and Color of the Snippet. You can Move,
Copy and Delete the snippet from here. You can also resize the Snippet as per the need.
You can customize every block of the snippet. You can click on any image to change the image or
remove the image. Along with image you can also add Text, Document, Pictogram and Video to
the snippet.
15. 15
Step 9: Configuring Fact Sheet Snippet
Go to Website -> Edit -> Insert Blocks -> Facts Sheet. Drag and drop Fact Sheet Snippet on the
page where you want it. Choose the Icons, Labels along with the number you want to display on
the Fact Sheet.
Click on Customize to customize Style, Background and Color of the Snippet. You can Move,
Copy and Delete the snippet from here. You can also resize the Snippet as per the need.
You can customize every block of the snippet. You can click on any image to change the image or
remove the image. Along with image you can also add Text, Document, Pictogram and Video to
the snippet.
16. 16
Step 10: Configuring Skills Snippet
Go to Website -> Edit -> Insert Blocks -> Skills. Drag and drop Skills Snippet on the page where
you want it. Choose the Icons, Labels along with the number you want to display on the Skills.
17. 17
Click on Customize to customize Style, Background and Color of the Snippet. You can Move,
Copy and Delete the snippet from here. You can also resize the Snippet as per the need.
You can customize every block of the snippet. You can click on any image to change the image or
remove the image. Along with image you can also add Text, Document, Pictogram and Video to
the snippet.
Step 11: Configuring Why Choose Us Snippet
Go to Website -> Edit -> Insert Blocks -> Why Choose Us. Drag and drop Why Choose US Snippet
on the page where you want it. Choose the Icons, Labels along with the number you want to
display on the Skills.
Click on Customize to customize Style, Background and Color of the Snippet. You can Move,
Copy and Delete the snippet from here. You can also resize the Snippet as per the need.
You can customize every block of the snippet. You can click on any image to change the image or
remove the image. Along with image you can also add Text, Document, Pictogram and Video to
the snippet.
You can also customize accordion block data along with images, texts and other blocks.
18. 18
Step 12: Configuring Maintenance Mode Snippet
Go to Website -> Edit -> Insert Blocks -> Maintenance Mode 1 / Maintenance Mode 2. Drag and
drop any of the 2 Snippet on the page where you want it. You can set the time remaining in
making your site live and display counter for that period of time.
19. 19
Click on Customize to customize Style, Background and Color of the Snippet. You can Move,
Copy and Delete the snippet from here. You can also resize the Snippet as per the need.
You can customize every block of the snippet. You can click on any image to change the image or
remove the image. Along with image you can also add Text, Document, Pictogram and Video to
the snippet.
Maintenance Mode 1
20. 20
Maintenance Mode 2
Step 13: Configuring Testimonial Snippet
Go to Website -> Edit -> Insert Blocks -> Testimonial 1 / Testimonial 2 / Testimonial 3 /
Testimonial 4. Drag and drop any of the 4 Snippet on the page where you want it.
Click on Customize to customize Style, Background and Color of the Snippet. You can Move,
Copy and Delete the snippet from here. You can also resize the Snippet as per the need. You can
customize client area background as well as whole snippet background. You can also add
multiple slides to the snippet to show numerous testimonials.
You can customize every block of the snippet. You can customize single testimonial block as well
as combined testimonial blocks. You can click on any image to change the image or remove the
image. Along with image you can also add Text, Document, Pictogram and Video to the snippet.
23. 23
Step 14: Configuring Pricing Table Snippet
Go to Website -> Edit -> Insert Blocks -> Pricing Table 1 / Pricing Table 2 / Pricing Table 3 /
Pricing Table 4 / Pricing Table 5 / Pricing Table 6 / Pricing Table 7 / Pricing Table 8. Drag and drop
any of the 8 Snippet on the page where you want it.
Click on Customize to customize Style, Background and Color of the Snippet. You can Move,
Copy and Delete the snippet from here. You can also resize the Snippet as per the need.
You can customize every block of the snippet. You can customize single pricing block as well as
combined pricing block. You can click on any image to change the image or remove the image.
Along with image you can also add Text, Document, Pictogram and Video to the snippet. You
can also add button to navigate customer to Buy Now Page.
Pricing Table 1
27. 27
Pricing Table 8
Step 15: Configuring Our Services Snippet
Go to Website -> Edit -> Insert Blocks -> Emphasized Services / Our Services 1 / Our Services 2 /
Our Services 3/ Our Services 4 / Service New. Drag and drop any of the 6 Snippet on the page
where you want it.
Click on Customize to customize Style, Background and Color of the Snippet. You can Move,
Copy and Delete the snippet from here. You can also resize the Snippet as per the need.
You can customize every block of the snippet. You can customize single Service block as well as
combined Service blocks. You can click on any image to change the image or remove the image.
Along with image you can also add Text, Document, Pictogram and Video to the snippet.
Our Services 1
29. 29
Emphasized Services
Service New
Step 16: Configuring Multi Product Slider Snippet
Go to Website -> Edit -> Insert Blocks -> Multi Product Slider. Drag and drop Multi Product Slider
Snippet on the page where you want it.
Select the Type of slider which you want to display on the page.
Click on Customize to customize Style, Background and Color of the Snippet. You can Move,
Copy and Delete the snippet from here. You can also resize the Snippet as per the need.
30. 30
Managing Slider Configurations:
Go to Sales -> Slider Configurations -> Multi Product Slider Configurations. Click on Create
button to create a new slider category.
Set Following attributes to display Multi Product Slider on website.
o Slider Name: Slider Name
o Auto Rotate Slider: Enable this to set slider on Auto Rotation
o Slider Sliding Speed: Manage Slider Speed if set on Auto Rotation
o No. Of Collections to Show: Number of collections that are displayed on the page.
o Collection Name: Name of the Collection
o Product Collection: Set products which are displayed in the collection.
o Special Offer Product for Collection: Set special product which will be displayed in the
collection
31. 31
Step 17: Configuring Category Slider Snippet
Go to Website -> Edit -> Insert Blocks -> Category Slider. Drag and drop Category Slider Snippet
on the page where you want it.
Select the Type of slider which you want to display on the page.
Click on Customize to customize Style, Background and Color of the Snippet. You can Move,
Copy and Delete the snippet from here. You can also resize the Snippet as per the need.
Managing Slider Configurations:
Go to Sales -> Slider Configurations -> Category Slider Configurations. Click on Create button to
create a new slider category.
Set Following attributes to display Category Slider on website.
o Slider Name: Slider Name
32. 32
o Counts: Number of Categories to display on the page.
o Auto Rotate Slider: Enable this to set slider on Auto Rotation
o Slider Sliding Speed: Manage Slider Speed if set on Auto Rotation
o Collection of Category: Add the categories which are needed to be added in the
collection.
Step 18: Configuring Products Slider Snippet
Go to Website -> Edit -> Insert Blocks -> Products Slider. Drag and drop Products Slider Snippet
on the page where you want it.
Select the Type of slider which you want to display on the page.
Click on Customize to customize Style, Background and Color of the Snippet. You can Move,
Copy and Delete the snippet from here. You can also resize the Snippet as per the need.
33. 33
Managing Slider Configurations:
Go to Sales -> Slider Configurations -> Products Slider Configurations. Click on Create button to
create a new slider category.
Set Following attributes to display Category Slider on website.
o Slider Name: Slider Name
o Counts: Number of Categories to display on the page.
o Auto Rotate Slider: Enable this to set slider on Auto Rotation
o Slider Sliding Speed: Manage Slider Speed if set on Auto Rotation
o Collection of Products: Add the products which are needed to be added in the
collection.
Step 19: Configuring Featured Products Slider Snippet
Go to Website -> Edit -> Insert Blocks -> Featured Products Slider. Drag and drop Featured
Products Slider Snippet on the page where you want it.
Select the Type of slider which you want to display on the page.
Click on Customize to customize Style, Background and Color of the Snippet. You can Move,
Copy and Delete the snippet from here. You can also resize the Snippet as per the need.
34. 34
Managing Slider Configurations:
Go to Sales -> Slider Configurations -> Featured Products Slider Configurations. Click on Create
button to create a new slider category.
Set Following attributes to display Category Slider on website.
o Slider Name: Slider Name
o Slider Label: Set the label for the slider
o Products Collection: Set the products displayed in the slider.
Step 20: Configuring Blog Slider snippet
Go to Website -> Edit -> Insert Blocks -> Blog Slider / News 1 / News 2 / News 3. Drag and drop
Any of the 4 Snippet on the page where you want it.
Select the type of Blog which you want to display from the menu.
Click on Customize to customize Style, Background and Color of the Snippet. You can Move,
Copy and Delete the snippet from here. You can also resize the Snippet as per the need.
35. 35
Adding Blogs to the Snippet
Go to Website Admin-> Blog -> Blog Slider Configuration Click on Create button to create a new
Blog category.
Set Following attributes to display Blog Slider on website.
o Slider Name: Slider Name
o Slider Label: Set the label for the slider
o Products Collection: Set the products displayed in the slider.
o Collection of Blog Posts: Add the Blogs which are needed to be added in the collection.
38. 38
News 3
Changing Cover for The Blog
Go to Website -> Blog. Click on any blog of which you want to change cover.
Click on Edit -> Customize -> Change Cover to change the cover of the blog page.
39. 39
Step 21: Configuring Client Slider snippet
Go to Website -> Edit -> Insert Blocks -> Our Clients / Partner. Drag and drop Our Clients /
Partner Snippet on the page where you want it.
Click on Customize to customize Style, Background and Color of the Snippet. You can Move,
Copy and Delete the snippet from here. You can also resize the Snippet as per the need.
Adding Clients to the Snippet
Go to Sales -> Customers. Click on the customer which you want to add in the snippet.
Click on Edit and Enable Add to client slider option.
40. 40
Step 22: Configuring Showcase Snippet
Go to Website -> Edit -> Insert Blocks -> Showcase / Showcase 4 Column / Showcase 2 Column.
Drag and drop any of the 3 Snippet on the page where you want it.
Click on Customize to customize Style, Background and Color of the Snippet. You can Move,
Copy and Delete the snippet from here. You can also resize the Snippet as per the need.
You can customize every block of the snippet. You can customize single Showcase block as well
as combined Showcase blocks. You can click on any image to change the image or remove the
image. Along with image you can also add Text, Document, Pictogram and Video to the snippet.
You can also change images of the multiple tabs as per requirement.
Showcase 4 Column
43. 43
Step 23: Configuring Our Team Snippet
Go to Website -> Edit -> Insert Blocks -> Our Team 1 / Our Team 2 / Our Team 3. Drag and drop
any of the 3 Snippet on the page where you want it.
Click on Customize to customize Style, Background and Color of the Snippet. You can Move,
Copy and Delete the snippet from here. You can also resize the Snippet as per the need.
Adding Team Members to the Snippet
Go to Employees. Click on the employee which you want to add in the snippet.
Click on Edit and go to Slider Configuration and click on Enable to make the employee visible in
snippet option.
45. 45
Our Team 3
Step 24: Configuring Promo Block Snippet
Go to Website -> Edit -> Insert Blocks -> Promo Block. Drag and drop Promo Block Snippet on
the page where you want it.
Click on Customize to customize Style, Background and Color of the Snippet. You can Move,
Copy and Delete the snippet from here. You can also resize the Snippet as per the need.
You can customize every block of the snippet. You can customize single product block as well as
combined product blocks. You can click on any image to change the image or remove the image.
Along with image you can also add Text, Document, Pictogram and Video to the snippet.
46. 46
Step 25: Configuring Text and Image Blocks
Go to Website -> Edit -> Insert Blocks -> Text + Image / Image + Text. Drag and drop any of the 2
Snippet on the page where you want it.
Click on Customize to customize Style, Background and Color of the Snippet. You can Move,
Copy and Delete the snippet from here. You can also resize the Snippet as per the need.
You can customize text and images of the block. Image will be set as the background of the
snippet. You can add text as well as button to the snippet which will be used to navigate
customer to specific product page.
48. 48
Step 26: Configuring Collection Snippet
Go to Website -> Edit -> Insert Blocks -> Collection. Drag and drop Collection Snippet on the
page where you want it.
Click on Customize to customize Style, Background and Color of the Snippet. You can Move,
Copy and Delete the snippet from here. You can also resize the Snippet as per the need.
You can customize every block of the snippet. You can customize single collection block as well
as combined Collection block. You can click on any image to change the image or remove the
image. Along with image you can also add Text, Document, Pictogram and Video to the snippet.
You can set button for your customer to navigate him / her directly to the collection Page.
Step 27: Configuring FAQ Snippet
Go to Website -> Edit -> Insert Blocks -> FAQ 1 / FAQ 2 / FAQ 3. Drag and drop any of the 3
Snippet on the page where you want it.
Click on Customize to customize Style, Background and Color of the Snippet. You can Move,
Copy and Delete the snippet from here. You can also resize the Snippet as per the need.
You can customize every block of the snippet. You can customize single collection block as well
as combined Collection block. You can click on any image to change the image or remove the
image. Along with image you can also add Text, Document, Pictogram and Video to the snippet.
You can set button for your customer to navigate him / her directly to the collection Page. You
can also change images and content of the multiple tabs as per requirement. You can also add /
remove tabs if required.
50. 50
FAQ 3
Step 28: Advance Mega Menu Settings
Step 28.1: Creating Mega Menu
o Go to Website Admin ->Configuration -> Menu -> Configure Website Menus. In this you
will find Create Button. Click on it to create a menu.
o There you will have options to add Web Site, Menu Name, URL for Menu, Option to
open menu in new window, Parent Menu & If the new menu is mega menu or not.
51. 51
Step 28.2: Mega Menu Configuration
o Select Is megamenu…? Option to create mega menu & give configurations as required.
o You can directly add URL for the Mega Menu and can also add it in New Window.
o Mega Menu Type: No. of columns needed in Mega Menu.
o Mega Menu Background: If you want background in Mega Menu you can set it from
here. It can be Image or Color.
For Image: You have to upload image and it will be set in mega menu.
For Color: Hash code of color is needed to define background color.
52. 52
o Category Slider: To display category slider, select display category slider option &
additional functionalities like Slider label & Position will be displayed.
o Menu Icon & Colors:
To give icon to menu select option Display Menu Icon and upload image for the menu.
To change font Color for Categories & Subcategories, enable Customize Menu Color
Option & give hash code for Main & Sub Category Fonts.
53. 53
o Menu Footer:
To display menu footer enable Display Menu Footer option and give text for the footer.
Step 28.3: Mega Menu Categories & Sub Categories
o Go to Sales -> Products -> Web Site Product Categories. In this you will find Create
Button. Click on it to create a Product Category.
To create Main Category: Give Name of category, Click on Include in Megamenu
Option, Give Main Menu as the menu in which you want to create category in.
You can also give sequence No. for deciding sequence in Mega menu list.
54. 54
To create Sub Category: Give Name of category and give category name in which
you want to create sub category in. You can also give sequence No. for deciding
sequence in Category List.
Step 29: Product Image Gallery Configurations
Step 29.1: Creating New Product
o Go to Sales -> Products. In this you will find Create Button. Click on it to create a New
Product.
o There you will have options to add Multiple Images. After clicking that you can set
multiple images for the product.
55. 55
Step 29.2: Add Multiple Images to the product
o Click on Product Multiple Images tab.
o Click on Add an item option to start adding images for the product.
Step 29.3: Creating a new Image
o After adding an item you’ll be redirected to create image pop up.
o Give proper Title, Alt text, Type (Image / Video), Image and Sorting order.
o If you don’t want to include this image in Custom Product Image Gallery click on More
View Exclude.
o Click on Save & Close to create new image.
o To create another image / video click on Save & New.
56. 56
Step 29.4: Creating a new Video
o After adding an item you’ll be redirected to create image pop up.
o Give proper Title, Alt text, Type (Image / Video), Image and Sorting order.
o To create Video click on Video option.
o Give proper type to video which can be of
You Tube Video
Vimeo Video
HTML 5 Video
o If you don’t want to include this video in Custom Product Image Gallery click on More
View Exclude.
o Click on Save & Close to create new Video.
o To create another image / video click on Save & New.
Step 29.5: Panel Options
o Go to Website Admin -> Configuration -> Multiple Product Image. You’ll see settings for
Multiple Product Image.
o Which includes settings for:
Slider Effect: Select this option to enable slider effects.
Thumbnail Panel Position: This drop down allows admin to select Thumbnail
panel position from Left, Right or Bottom.
Play Interval of Slideshow: This allows admin to manage interval between two
images in slideshow.
Enable Text Panel: Select this option to show text along with images in panel.
Thumbnail Overlay Effect: This option allows admin to choose thumbnail overlay
effects from Default, B/W, Sepia or Blur.
Change Thumbnail Size: To change thumbnail height and width, enable this
option.
57. 57
Step 30: Adding Different Filters in Shop
Go to Website -> Customize. In this you will find multiple options to customize your
webpage. Select any option and that will be shown on the Shop page as per defined
criteria.
59. 59
5. Technical Support
We accept all kinds of Odoo queries and provide customized Odoo solutions, focusing on
unique business requirements.
We provide all technical support. Get in touch with us by filling in our online message form to
contact our support team or send us an email at
support@biztechconsultancy.com
Your IT Partner, With You Anytime, Anywhere!
6. About of Biztech Consultancy
We simplify your business, by offering unique business solutions in digital web and IT
landscapes.
Our core expertise includes
Odoo Expertise
We are Odoo specialist! We do
Odoo Customization
Odoo apps development
Odoo support and maintenance
Theme development
We offer reliable and best Solutions!