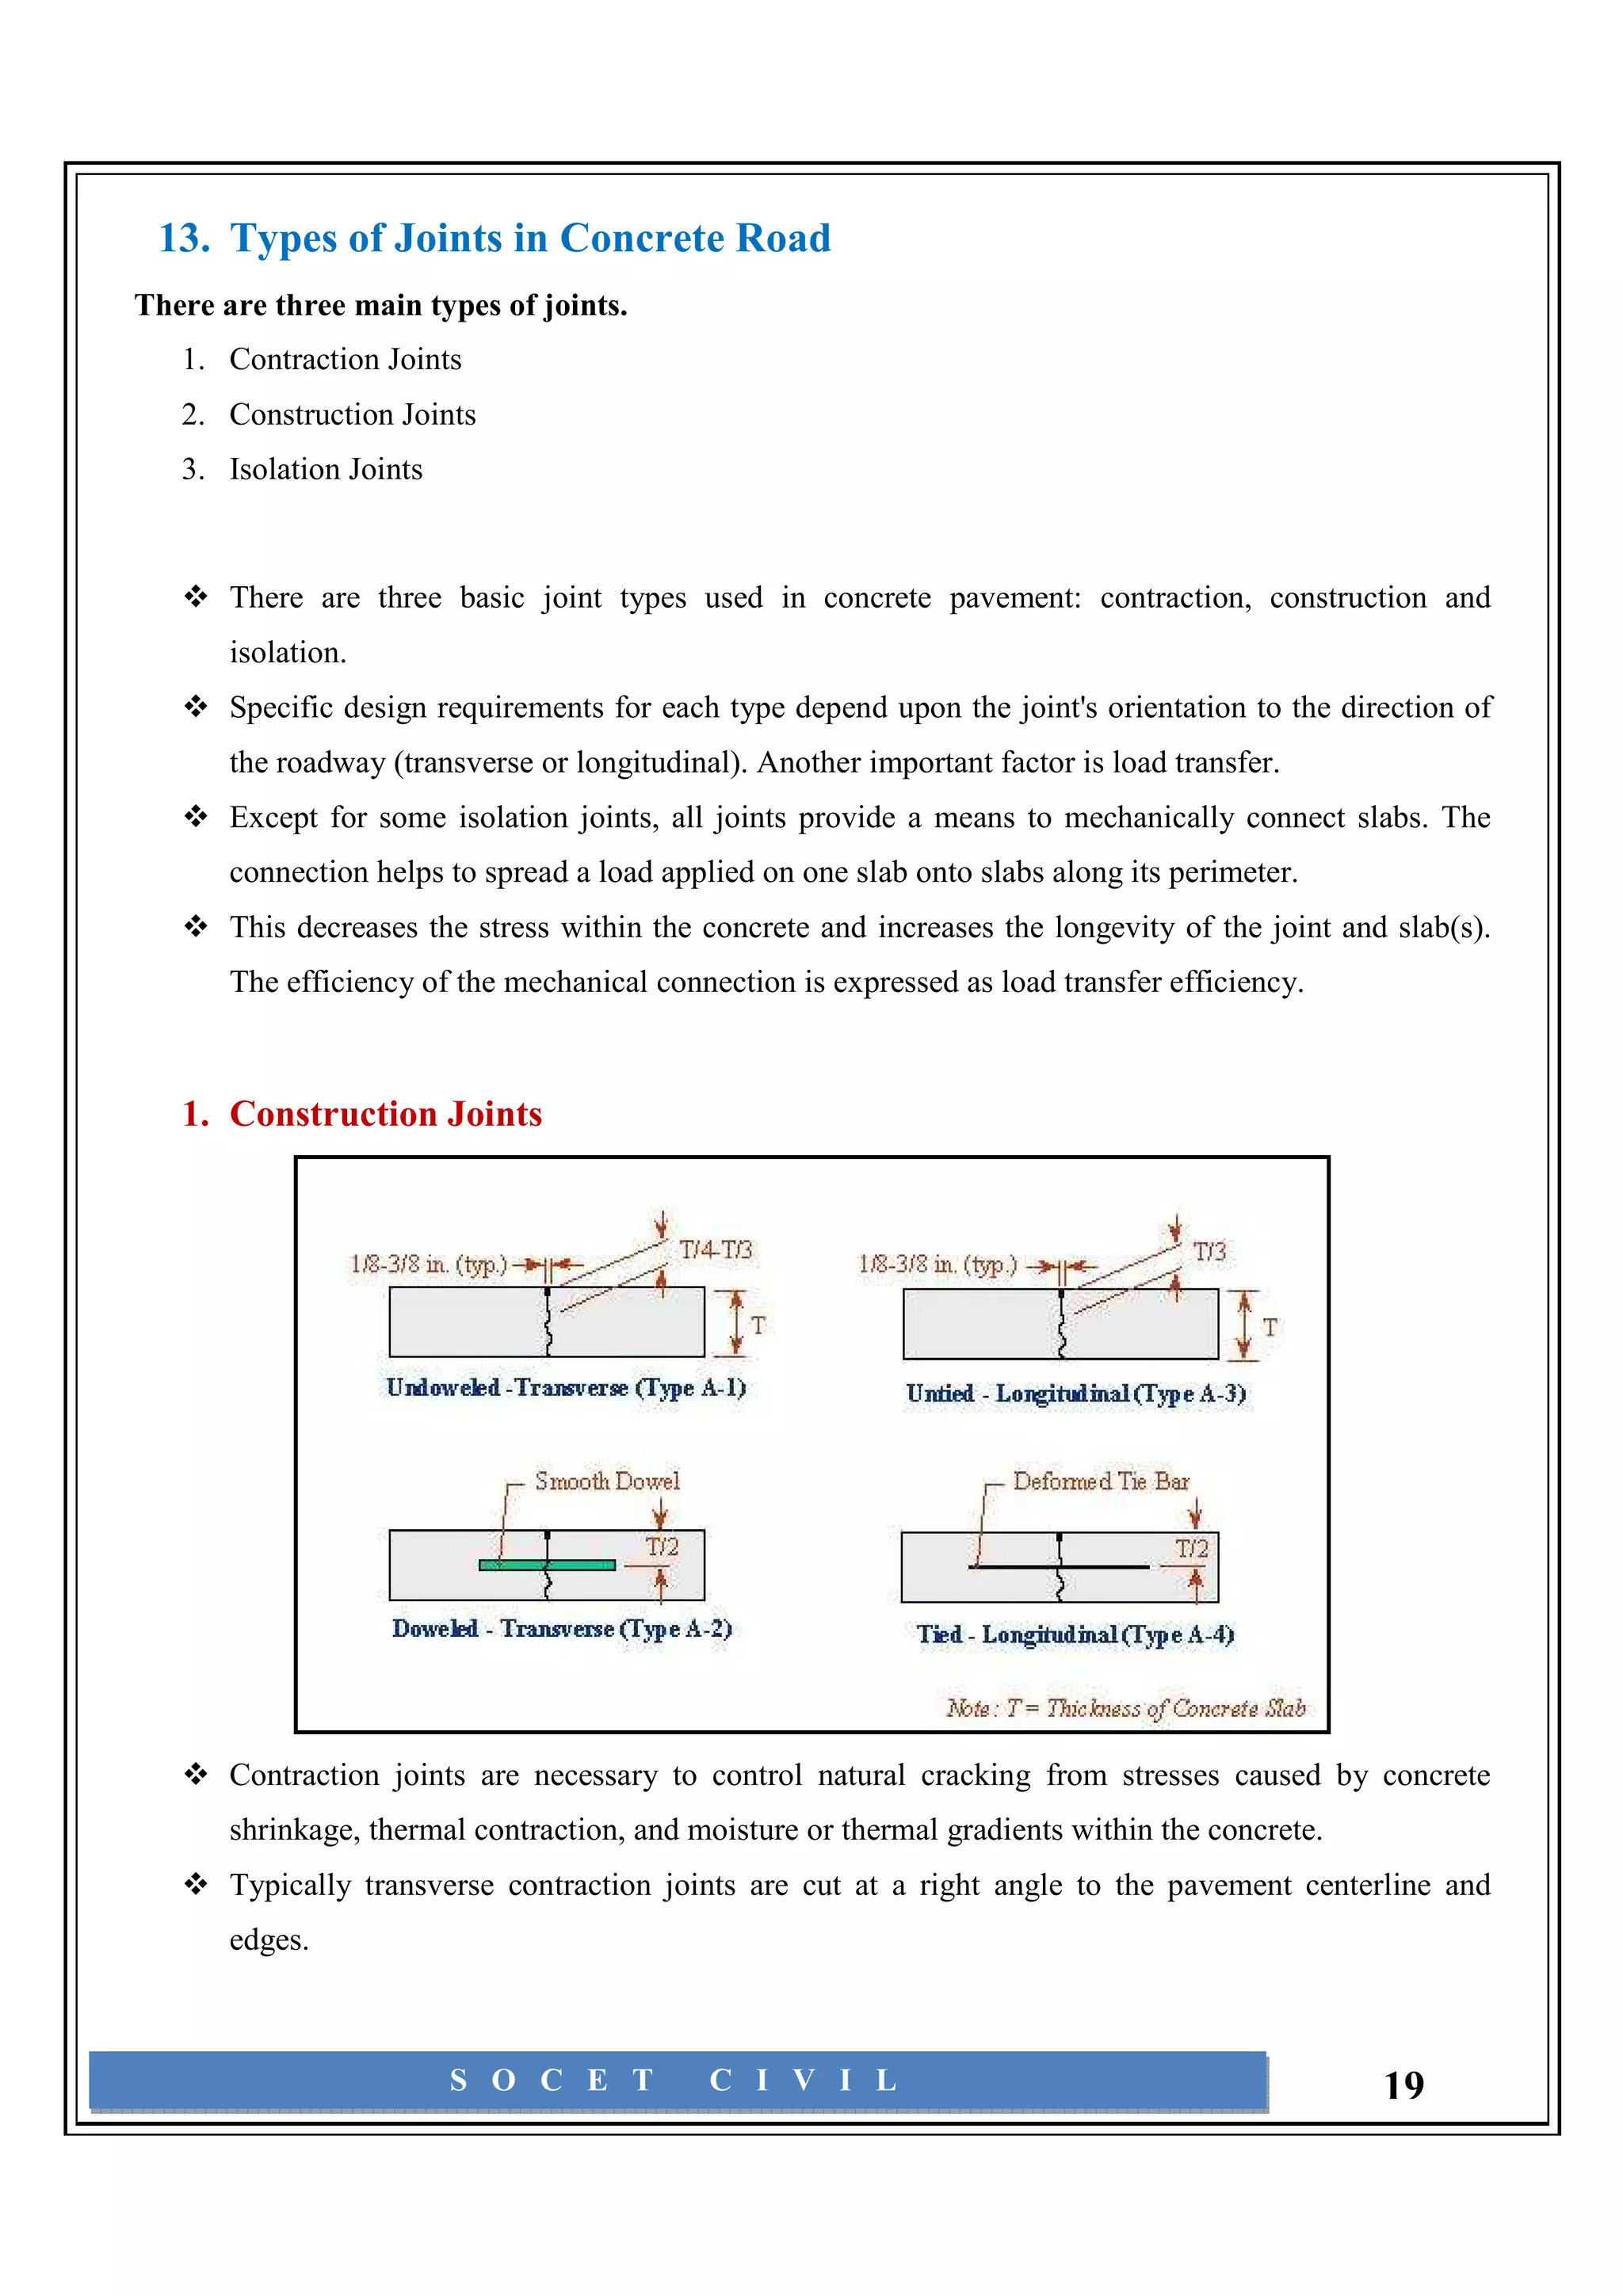
Silver Oak College of Engineering and Technology (SOCET) is a degree engineering college located in Ahmedabad, India approved by AICTE. The 9-page document describes the process of constructing a concrete road on the SOCET campus, including site preparation, materials used, construction steps, equipment needed, and cost analysis. The contractor has 8 years of experience building concrete and asphalt roads. Proper preparation of the subgrade and subbase is essential for a durable concrete pavement.
The Benkelman beam is the simplest and the oldest deflection
test device, developed in the United States in the mid-1950s. Its used to measure the structural capacity of a flexible pavement.
Introduction of Pavement Design
Functions of the Pavement
Requirement of Pavement
Types of Pavement
Component of Flexible Pavement
Load Distribution
types of failure
Highway Engineering for BE Civil Engineering Students
History of Roads in India, IRC, CRRI, Classification of Roads, Three 20 year Road Development Plans, Road patterns, Accident Studies,
The project provides an insight on pavement Management Systems.PMS helps in making informed decisions enabling the maintenance of the network in a serviceable and safe condition at a minimum cost to both the agency and the road users. To adequately meet this requirement, well-documented information is essential to make defensible decisions on the basis of sound principles of engineering and management
Objective and classification of highway maintenance works. Distresses and maintenance measures in flexible and rigid pavements. Concept of pavement evaluation: Functional and Structural
Methodology of some items of construction works are summarized as power point presentation under various heading as stated in summery part. The power point presentation is based on The CPWD Specifications being published by CPWD as CPWD SPECIFICATIONS (VOL. 1) and (VOL. 1) 2009. This is very comprehensive and useful in execution of works and are used as guide by a number of Engineering Departments. The power point presentations are very useful for students and engineers to understand specifications, standards and methodology for building materials, guidelines for execution of works, measurements and rates.
Fibre reinforced and ferrocement car park pavers by R Sri RavindrarajahSriravindrarajah Rasiah
Published at the Proceedings of the X International Symposium on Ferrocement and Thin Reinforced Cement Composites (FERRO 10),held in Havana, Cuba in Oct. 2012
Welcome to TechSoup New Member Orientation and Q&A (May 2024).pdfTechSoup
In this webinar you will learn how your organization can access TechSoup's wide variety of product discount and donation programs. From hardware to software, we'll give you a tour of the tools available to help your nonprofit with productivity, collaboration, financial management, donor tracking, security, and more.
How to Create Map Views in the Odoo 17 ERPCeline George
The map views are useful for providing a geographical representation of data. They allow users to visualize and analyze the data in a more intuitive manner.
Students, digital devices and success - Andreas Schleicher - 27 May 2024..pptxEduSkills OECD
Andreas Schleicher presents at the OECD webinar ‘Digital devices in schools: detrimental distraction or secret to success?’ on 27 May 2024. The presentation was based on findings from PISA 2022 results and the webinar helped launch the PISA in Focus ‘Managing screen time: How to protect and equip students against distraction’ https://www.oecd-ilibrary.org/education/managing-screen-time_7c225af4-en and the OECD Education Policy Perspective ‘Students, digital devices and success’ can be found here - https://oe.cd/il/5yV
2024.06.01 Introducing a competency framework for languag learning materials ...Sandy Millin
http://sandymillin.wordpress.com/iateflwebinar2024
Published classroom materials form the basis of syllabuses, drive teacher professional development, and have a potentially huge influence on learners, teachers and education systems. All teachers also create their own materials, whether a few sentences on a blackboard, a highly-structured fully-realised online course, or anything in between. Despite this, the knowledge and skills needed to create effective language learning materials are rarely part of teacher training, and are mostly learnt by trial and error.
Knowledge and skills frameworks, generally called competency frameworks, for ELT teachers, trainers and managers have existed for a few years now. However, until I created one for my MA dissertation, there wasn’t one drawing together what we need to know and do to be able to effectively produce language learning materials.
This webinar will introduce you to my framework, highlighting the key competencies I identified from my research. It will also show how anybody involved in language teaching (any language, not just English!), teacher training, managing schools or developing language learning materials can benefit from using the framework.
How to Make a Field invisible in Odoo 17Celine George
It is possible to hide or invisible some fields in odoo. Commonly using “invisible” attribute in the field definition to invisible the fields. This slide will show how to make a field invisible in odoo 17.
Ethnobotany and Ethnopharmacology:
Ethnobotany in herbal drug evaluation,
Impact of Ethnobotany in traditional medicine,
New development in herbals,
Bio-prospecting tools for drug discovery,
Role of Ethnopharmacology in drug evaluation,
Reverse Pharmacology.
Read| The latest issue of The Challenger is here! We are thrilled to announce that our school paper has qualified for the NATIONAL SCHOOLS PRESS CONFERENCE (NSPC) 2024. Thank you for your unwavering support and trust. Dive into the stories that made us stand out!
1. 1. About SOCET
Silver Oak College of Engineering and Technology (SOCET) is established in June 2009 and is
located near Bhavik Publication, Gota Cross road, S.G. Highway, Ahmedabad.
This is a Degree Engineering College, leading to Bachelor’s Degree in Engineering.
The College is approved by AICTE, Govt. Of India, and is affiliated with Gujarat Technological
University.
This College also runs IGNOU Courses.
Silver Oak College of Engineering and Technology
Front View
S O C E T C I V I L 1
2. 2. Location of Site/Address
352,353 A , Nr. Bhavik Publications,
Opp. Bhagwat Vidyapith,
Near Gota Cross Road,
Ahmedabad- 382481.
Phone: +91-79-30180000/1/2/3
Fax: +91-79-30180005
Email: info@socet.edu.in
Web: www.socet.edu.in
Key Plan
S O C E T C I V I L 2
3. 3. Background of Contractor
Contractor Name : Mr. Bharat Patel
Phone : +91-9904599666
Qualification : 12th (Comm.) Pass
Native Place : Amreli, Gujarat, India
Mr. Bharat Patel has 8 years of experience in Construction Technology (Civil Field).
He has 5 years of experience in making Cement Concrete Road & R.C.C. Road.
Mr. Bharat Patel has own consultancy named “Patel Developers”.
This consultancy located at;
B/104, Akshar Residency,
Nr. Itihas Bunglow,
Nikol-Naroda Road,
Ahmedabad-382350
This consultancy includes R.C.C., Asphalt Road & Power Block Contractor type of civil
engineering works.
S O C E T C I V I L 3
4. 4. Description of Concrete Road Construction
Layout Plan of Concrete Road
S O C E T C I V I L 4
5. 5. Materials Used
Cement
Ordinary Portland cement (OPC)
This should comply with the requirements of IS 269-1976 “Specification for Ordinary and Low-
Heat Portland Cement (Third Revision)”, or of IS 8112 -1976 “Specification or High Strength
Ordinary Portland Cement.”
Ordinary Portland cement and High Strength Ordinary Portland Cement are most widely used for
concrete pavements.
Rapid hardening Portland cement
This should comply with the requirement of IS: 8041E-l976 “Emergency Specification for Rapid
Hardening Portland Cement.”
In general, this cement would be used only where time is a critical factor and the road is required
to be opened to traffic at an earlier date than would be possible if Ordinary Portland Cement or
High Strength Ordinary Portland Cement is used.
Aggregates
In general, Aggregates should comply with IS : 383-1970 “Specification for Coarse and Fine
Aggregates from Natural Sources for Concrete (Second Revision)” with special reference to the
additional requirements stipulated for use in road works excepting in the case of Los Angeles
Abrasion Test limit.
The Los Angeles Abrasion Test limits shall be not more than 35 % and 50 % for concrete wearing
course and sub-base course respectively.
Maximum size of aggregate should not exceed 1/4th of the pavement slab thickness.
In case of pavements having reinforcement, Maximum size of aggregate should not exceed 1/4th
of minimum clear spacing between reinforcing bars.
Water
Water used in mixing or curing of concrete shall be clean and free from injurious amounts of oil,
salt, acid, vegetable matter or other substances harmful to the finished concrete.
It shall meet the requirements stipulated in clause 4.3. Of IS: 456-1978 “Code of Practice for Plain
and Reinforced Concrete (Second Revision)”.
Potable waters are generally considered satisfactory for mixing or curing.
S O C E T C I V I L 5
6. Reinforcement
Steel wire fabric
This shall conform to the requirements of IS: 1566-1967 “Specification for Hard-drawn Steel Wire
Fabric for Concrete Reinforcement.”
Bar mats
The steel in bar mats shall conform to the requirement of IS: 432-1966 “Specification for Mild
Steel and Medium Tensile Steel Bars and Hard-drawn Steel Wire for Concrete Reinforcement.”
The bars shall be of the size and spacing shown on the plans.
All junctions of longitudinal and transverse bars shall be securely tied or welded together.
Dowel & Tie Bars
Dowel and tie bars shall be plain round steel bars conforming to the requirements of IS: 432-1966.
Pre-Moulded Joint Filler
Pre-Moulded joint filler shall be of the thickness shown on the drawings within a tolerance of ±1.5
mm.
It shall be 25 mm less in depth than the thickness of the slab, within a tolerance of ±3 mm and of
the full width between road forms.
Holes to accommodate dowel bars shall be accurately bored or punched out.
The joint filler shall comply with the requirements of IS: 1838-1961 “Specification for Preformed
Fillers for Expansion Joint in Concrete, Non-extruding and Resilient Type (Bitumen-impregnated
Fiber).”
Joint Sealing Compound
The sealing compound shall comply with the requirements of the IS: 1834-1961 “Specification for
Hot Applied Sealing Compounds for Joints in Concrete.”
S O C E T C I V I L 6
7. Cross section of Road
Cross section of Road
Concrete Road Cross section
S O C E T C I V I L 7
8. 6. Leveling Detail For Concrete Road
Leveling Detail For Road
7. Cost Analysis
The total road constructed is divided into 17 blocks.
In 1 block, the quantity is used includes the materials such as Cement, Sand, Aggregates, Metal
Aggregates, R.C.C., etc. is estimated up to 6467.17 m³.
For 17 blocks, total quantity is about 6467.17 m³ x 17.
Total estimated amount of cement road construction is about Rs. 1, 24,652.00 (INR).
S O C E T C I V I L 8
9. 8. List of Equipment
A list of tools, equipment and appliances required for the different phases of concrete road
construction is given below.
This list pertains to semi-mechanized type of construction only, as practiced most in this country.
Sub-grade and Sub-base Compaction
Compaction equipment - Three wheeled or tandem roller, pneumatic roller, vibratory roller or
sheep-foot roller
Watering devices - Water Lorries, bhisties/water carriers or watering cans
Preparation of Sub-base for Concreting and Formwork
Scratch templates or strike boards
Bulk-heads
Pick axes, shovels and spades
Formwork and iron stakes
Concrete Manufacture
Shovels and spades
Sieving screens
Weigh batcher
Aggregate measuring boxes (only where volume batching of aggregates is permitted as a special
case)
Water pump
Water measures
Concrete mixer
Transportation, Laying and Compaction of Concrete
Wheel barrows/iron pans
Wooden bridges
Spades
Concrete vibrators (both internal and screed board types)
Wooden hand tampers
S O C E T C I V I L 9
10. Finishing Operations - Surface and Joints
Wooden bridges
Floats (longitudinal and long-handled wooden floats)
Templates
Three-meter long straight edges including one master straight edge
Graduated wedge gauges
Mild steel sections and blocks for making joint grooves
Edging tools including double-edging tools
Canvas belts
Long handled brooms
Diamond cutter (when making saw-cut joints)
Grinder (for grinding local high spots)
Curing
Hessian cloth burlap or polyethylene sheeting
Watering devices (for ponding operation)
Cleaning and Sealing of Joints
Iron raker
Coir brush
Cycle pump/pneumatic air blower
Kerosene stove
Thermometer
Transferring pot
Painter’s brush
Pouring kettle
Scraper
S O C E T C I V I L 10
11. 9. Site Preparation
Before construction begins, the construction site must be carefully prepared.
This includes preparing the grade, establishing control mechanisms (the string line), and placing
dowel baskets.
Preparing the grade, or roadbed
The majority of concrete pavement failures are not caused by failure of the concrete slab but by
problems with the materials beneath the slab.
These problems can include poor drainage, unstable or no uniform materials, or poor compaction.
Adequate preparation of the roadbed the sub grade, sub-base, and base is essential for a strong,
durable concrete pavement system.
Sub grade
Earth has been graded to the desired elevation. (In county and municipal paving projects with low
traffic volumes, concrete is often placed directly on the prepared earth sub grade.)
Sub base
A course of material is placed on the sub grade to provide drainage and stability.
Three kinds of sub bases may be used based on the need to balance drain ability and stability:
Granular sub base is the most drainable sub base.
It is a mixture of granular material that is uniformly shaped and minimally compacted. It does not
provide significant structural support; no construction traffic is allowed on a granular sub base.
Modified sub base is moderately drainable.
It contains a greater percentage of crushed particles and a denser gradation than granular sub base,
providing more stability.
Special backfill provides more stability and support but is the least drainable. It is generally a uniform
mixture of crushed concrete or crushed limestone, or a mixture of gravel, sand, and soil, with or
without crushed stone.
Special backfill or modified sub base is often used under pavement in urban areas to support
S O C E T C I V I L 11
12. construction traffic.
Base
A course of fairly rigid material, sometimes cement- or asphalt-treated, that is placed on the sub base
to provide a stable platform for the concrete pavement slab.
Grading
First the site is graded to cut high points and fill low areas to the desired roadway profile elevations.
Generally, cut material can be used as embankment fill.
However, peat, organic silt, or soil with high organic content should not be used; borrow material
should be used instead.
Stabilization
Stable soils are generally defined as those that can support loads. Loam or clay loam of glacial till
origin or clean sand is typically desirable.
Just as important as the soil’s quality, however, is its uniformity. During excavation, localized pockets
of various kinds of soil may be encountered where water absorption rates, densities, and expansion
and contraction rates may vary.
These pockets lead to different levels of support.
To stabilize the sub grade so that it will provide uniform support to the rest of the pavement structure,
localized pockets of undesirable material should be removed and replaced with the dominant soil
type or with select backfill, or the soil should be treated with additives.
Typical stabilizing materials are select soils or back-fill—loam or clay loam, clean sand, or other
stable soil material excavated from road cuts or borrow sites.
S O C E T C I V I L 12
13. 10. Proportioning of Concrete Mixed
Proportioning on the Basis of Strength
As the stresses induced in concrete pavements are mainly flexural, it is desirable that their design
is based on the flexural strength of concrete.
For economical design, the design value adopted for flexural strength of pavement concrete shall
not be less than 40 kg/sq. cm at 28 days.
The mix shall be so designed as to ensure the minimum structural strength in the field with the
desired tolerance level.
The paving concrete mix should preferably be designed in the laboratory and controlled in the
field on the basis of its flexural strength.
Where this is not possible, correlation between flexural and compressive strengths should first be
established on the basis of actual tests on additional samples made for the purpose at the time of
designing the mix in the laboratory and quality control then exercised on the basis of compressive
strength, so long as the materials and mix proportions remain substantially unaltered.
Approximate Proportions
The approximate proportions by weight (or by volume, only in unavoidable cases) necessary to
produce concrete satisfying the above conditions using aggregates from the sources designated
may be furnished in the tender documents, for guidance only, it being expressly understood that
this information is only for the convenience of the bidder.
Field Mix
After the award of the contract, the proportions, that is, the field mix, determined by the laboratory
for the particular aggregates approved by the engineer shall govern.
These proportions will be corrected and adjusted by the engineer to compensate for moisture
content in the aggregates or fluctuations in the grading of coarse and fine aggregates at the time of
use.
Where fine aggregate is permitted to be measured volumetrically, due allowance should be made
for its bulking.
Water Content & Workability
The water content per batch of concrete should be maintained constantly except for suitable
allowances to be made for free moisture and absorption by aggregates determined from time to
time during construction.
S O C E T C I V I L 13
14. Adjustments for workability shall be made by variations in the ratio of the course to fine aggregate
or improving upon their grading without change in cement content or water cement ratio.
The slump of the concrete mix for pavements compacted by vibration should not be more than 25
mm, preferably between 0 and 12 mm, and that by manual compaction not more than 50 mm.
No price adjustment would be permissible for variations in the gradations of the aggregates or in
the ratio of course to fine aggregates necessitated from adjustment at site.
11. Construction Process
Storage of Concrete
Cement shall not be stored for a long time and should be used normally within six months of its
date of receipt.
Even during this period of storage it is essential that cement shall be protected from moisture by
storing it in suitable sheds.
A storage shed with a concrete floor laid on a well-drained foundation may be satisfactory.
Cement in bags shall be stored on boards raised above the floor level for the purpose of
ventilation, and the bags shall not touch the walls of the shed.
Handling of Concrete
Aggregates from different sources and/or of different grading shall not be stacked together.
Each separate size of coarse aggregate shall be stacked separately.
If aggregates are stored in conical stacks, segregation will be increased by the rolling of the
coarser particles down the sides of the stacks.
To avoid this, stacks should be built up in approximately horizontal layers.
Dry fine aggregate segregates and gets blown away easily; it may be helpful to moisten it.
The aggregates shall be handled from the stacks and fed into the mixer in such a manner as to
secure the stipulated grading of the material.
Aggregates that have become mixed with earth or other foreign material shall not be used. They
shall be washed clean before use.
S O C E T C I V I L 14
15. Forms
Steel Form Used
Steel Forms
The steel forms shall be mild steel channel sections of depth equal to the thickness of the
pavement.
The sections shall have a length of at least 3 m except on curves of less than 45 m radius, where
shorter sections may be used.
When set to grade and staked in place, the maximum deviation of the top surface of any section
from a straight line shall not exceed 3 mm in the vertical plane and 5 mm in the horizontal plane.
The method of connection between sections shall be such that the joint formed shall be free from
difference in level, play or movement in any direction.
The use of bent, twisted or worn-out forms will not be permitted. At least three stake pockets for
bracing pins or stakes shall be provided for each 3 m of form and the bracing and support must be
ample to prevent springing of the forms under the pressure of concrete or the weight or thrust of
machinery operating on the forms.
The supply of forms shall be sufficient to permit their remaining in place for 12 hours after the
concrete has been placed, or longer if necessary in the opinion of the Engineer-in-charge.
S O C E T C I V I L 15
16. Setting of Forms
The forms shall be jointed neatly and shall be set with exactness to the required grade and
alignment. Both before and after the forms are placed and set, the sub-grade or sub-base under the
forms shall be thoroughly tamped in an approved manner.
Sufficient rigidity shall be obtained to support the forms in such a position that during the entire
operation of compacting and finishing of concrete they shall not at any time deviate more than 3
mm from a straight edge 3 m in length.
Forms which show a variation from the required rigidity or alignment and levels shown in the
drawing, shall he reset or removed, as directed.
The length and number of stakes shall be such as to maintain the forms at the correct line and
grade.
All forms shall be cleaned and oiled each time before they are used.
Forms shall be set for about 200 m ahead of the actual placing of concrete.
S O C E T C I V I L 16
17. 12. Transporting & Placing of Concrete
Slip Formworks
S O C E T C I V I L 17
18. The concrete shall be mixed in quantities required for immediate use and shall be deposited on the
sub-grade/sub-base to the required depth and width of the pavement section, in successive batches
and in continuous operation without the use of intermediate forms or bulk-heads between joints.
Care shall be taken to see that no segregation of materials results whilst the concrete is being
transported from the mixer to the place where it is deposited.
The usual method of transport of concrete in India is in pans as head loads or in small wheel
barrows.
The spreading shall be as uniform as possible to avoid rehandling of the concrete. Where,
however, a certain amount of re-distribution is necessary, it shall be done with shovels and not
with rakes.
While being placed, the concrete shall be rodded with suitable tools for slab thicknesses of 12.5
cm and less, so that formation of voids or honeycomb pockets is prevented.
The concrete shall be particularly well placed and tapped against the forms and along all joints.
For higher thicknesses an internal vibrator shall be employed in lieu of rodding of the concrete.
To effect adequate compaction, the concrete shall be placed with appropriate surcharge over the
final slab thickness.
The amount of surcharge will depend on the mode of placement of concrete and shall be
determined by trial.
In general, the required surcharge is about 20 per cent of the required slab thickness.
Any portion of the batch of concrete that becomes segregated white depositing it on sub-grade
shall be thoroughly mixed with the main body of the batch during the process of spreading.
In case of unavoidable interruption, a full depth transverse joint shall be made at the point of
stoppage of work provided the section on which the work has been suspended is about 2 to 3 m
tong.
In placing of concrete for two course construction, necessitated by either positioning of the
reinforcement, a richer mix for the wearing surface, or when thickness of the concrete is beyond
20 cm, the bottom layer of concrete shall be struck off to the required levels by a vibrating screed
working on the side forms with notches corresponding to the depth of the top course of concrete.
The vibrating screed should have a vibrating unit mounted on it similar to that of the screed used
for compaction of the final surface of concrete. The time lag between lying of the two courses
shall not exceed the initial setting time of cement.
S O C E T C I V I L 18
19. 13. Types of Joints in Concrete Road
There are three main types of joints.
1. Contraction Joints
2. Construction Joints
3. Isolation Joints
There are three basic joint types used in concrete pavement: contraction, construction and
isolation.
Specific design requirements for each type depend upon the joint's orientation to the direction of
the roadway (transverse or longitudinal). Another important factor is load transfer.
Except for some isolation joints, all joints provide a means to mechanically connect slabs. The
connection helps to spread a load applied on one slab onto slabs along its perimeter.
This decreases the stress within the concrete and increases the longevity of the joint and slab(s).
The efficiency of the mechanical connection is expressed as load transfer efficiency.
1. Construction Joints
Contraction joints are necessary to control natural cracking from stresses caused by concrete
shrinkage, thermal contraction, and moisture or thermal gradients within the concrete.
Typically transverse contraction joints are cut at a right angle to the pavement centerline and
edges.
S O C E T C I V I L 19
20. However, some agencies skew transverse contraction joints to decrease dynamic loading across
the joints by eliminating the simultaneous crossing of each wheel on a vehicle’s axle.
Contraction joints are usually sawed into the concrete, but they might be formed or tooled on
smaller projects.
The details below show the different types of contraction joints and their dimensions.
2. Construction Joints
Construction joints join concrete that is paved at different times.
Transverse construction joints are necessary at the end of a paving segment or at a placement
interruption for a driveway, cross road or bridge.
Longitudinal construction joints join lanes that are paved at different times, or join through-lanes
to curb and gutter or auxiliary lanes. The details below show the different types of construction
joints and their dimensions.
S O C E T C I V I L 20
21. 3. Isolation Joints
Isolation joints separate the pavement from objects or structures, and allow independent
movement of the pavement, object or structure without any connection that could cause damage.
Isolation joints are used where a pavement abuts certain manholes, drainage fixtures, sidewalks
and buildings, and intersects other pavements or bridges.
The details below show the different types of isolation joints and their dimensions.
S O C E T C I V I L 21
22. Load Transfer Devices- DOWELS
Cross Section of Dowel Joints
Transverse expansion joints shall be equipped with dowels of the dimension and at the spacing
and location indicated on the drawing.
They shall be firmly supported in place, accurately aligned parallel to the sub-grade/sub-base,
parallel to each other and parallel to the centre line of the pavement, by means of appropriate
dowel supports.
The dowel supports shall ensure that the dowels are not displaced during construction.
One-half of each dowel shall be painted with a thin film of bitumen and equipped with a tight
fitting metal sleeve of the dimensions shown on the drawing to provide space for the dowel when
pavement expands and the joint closes.
This sleeve shall be partly filled with cotton waste to prevent it being pushed too far on the dowel
during construction.
These sleeves are not required on dowels, if used, in dummy contraction or construction joints.
Dowel bars transfer heavy loads across joints in the pavement, preventing faulting at the joint that
can lead to pavement damage.
Practices vary from state to state, but dowel bars are typically required in eight-inch or thicker
pavements.
Dowels must be positioned and aligned perfectly so that, as joints open in winter and close in
summer with contraction and expansion of the concrete, the pavement on either side of the joints
can move in a straight line along the smooth dowels.
If a dowel bar is not aligned truly across the joint, the pavement can’t move and a stress results.
The stress can crack the pavement.
S O C E T C I V I L 22
23. Without dowels, the slab on either side of a joint tends to move up and down; that is, there is little
“load transfer” at the joint.
Dowels help provide load transfer at the joint.
S O C E T C I V I L 23
24. Basket placement
After the sub base has been properly trimmed and inspected, dowel baskets are set on the road bed,
perpendicular to the pavement edge or at a slight skew.
The bars should be located at the mid-depth of the slab and carefully aligned, horizontally and
vertically.
As mentioned above, location and alignment of the bars is critical. If they are too close to the edge,
the paving equipment will snag them.
When the bars are correctly aligned, the baskets must be secured with stakes. Practices vary from
state to state, but a minimum of eight stakes (for 12- or 14-foot lane widths) are placed on the leave
side of the basket wire to secure the basket against movement.
The location of dowel centers is then marked on both sides of the roadbed, either by setting pins or
painting marks. The markers indicate where joints should be sawed, ensuring that they will be sawed
across the center of the dowel assembly.
Final check
Dowel positions should be checked from three perspectives:
Sight down the grade to make sure all dowels is parallel to center line.
Sight across the dowel baskets to make sure all dowels is level. The basket assemblies should be
parallel to and aligned with each other.
Sight across the basket, imagining a line from the pin or mark on one side to the pin or mark on the
other side. Make sure the middle of the dowels falls exactly along that line.
After dowels have been placed, an inspector should check basket spacing, alignment, and skew.
S O C E T C I V I L 24
25. 14. Compaction and Finishing of the top Surface
Since PCC is an open-graded mix design, finishing takes on a different meaning than standard
concrete pavement.
Finishing and compaction are the most crucial steps to producing a durable pavement. Properly
finishing PCC provides a uniform and level surface that prevents surface raveling of the aggregate,
while remaining aethstetically pleasing to the public.
Dry, poorly finished slabs can ravel and appear to have failed even though they are structurally
sound. Properly finished PCC provides a surface suitable for wheelchair and rollerblade use and
an ideal surface for recreational trails.
Many methods exist to finish and compact PCC and they range from those that strictly are for
finishing, to those that only provide compaction, but most operations provide some degree of both.
Historically, PCC is struck off ¾ in. to 1 in. above the forms using a shim and vibratory screen as
shown in Figure.
Then the shims are removed and the pavement is compacted to final grade using a weighted roller
as in Figure.
Strike off with a vibratory screed
S O C E T C I V I L 25
26. Compacting using a weight roller
Most recently, roller screeds have been used to finish many PCC pavements.
Roller screeds have been used for many years on traditional concrete, and provide a rapid method
to produce smooth PCC pavements.
Roller screeds are hydraulically driven, stainless steel tubes that rotate against the direction of
placement. Small width slabs (<15 ft.) can easily be finished with a manual roller screed such as
the screed used to finish the pervious test slab at the Road facility.
Finishing using a manual roller screed, finished surface
S O C E T C I V I L 26
27. Finishing using a power screed
Figure shows striking a slab off ¾ in. above the final thickness using a hand-held vibrating screed.
The shims were then removed and compaction was achieved using a plate compactor on top of a
sheet of plywood.
The entire sidewalk at the hospital site was finished using this method and has weathered its first
winter without any raveling.
Striking off using a vibrating screed
S O C E T C I V I L 27
28. Compaction using plywood and a plate compactor
Compaction using plywood and a plate compactor
PCC edge raveling can be minimized by using a standard edging tool around the forms.
The edging also adds to the aesthetics of the finished PCC.
Figure shows use of an edging tool at the Road placement.
S O C E T C I V I L 28
29. 15. Making Grooves
Avoid too much water
The right amount of water is carefully measured at the plant. Extra water weakens the mix. More
water makes it easier to work with right away, but will lead to a weaker slab.
If you're mixing your own concrete, do this test: Plow a groove in a mound of concrete with a
shovel or hoe.
The groove should be fairly smooth and hold its shape. If it's rough and chunky, add a smidgen of
water. If it caves in, add more dry concrete.
Don't delay floating
Bull float in action: Use a bull float to flatten large areas immediately after placing the concrete.
S O C E T C I V I L 29
30. Close up of Groove
Purpose: Used to tool control joints in plastic concrete (as an alternative to saw cutting).
Close-up of groove: A groove has a blade (typically 1-in.) on the underside that cuts the groove
Grooves are usually made of bronze or stainless steel and have a V-shaped bit that cuts the groove.
Like edger’s, they come with wood or comfort-grip handles.
The most common groove size is 6 inches long and 4 1/2 inches wide, but many other sizes are
available, ranging from 2 to 8 inches wide and 3 to 10 inches long.
However, more important is the dimension of the bit, which can be anywhere from 1/2 inch to 2
inches deep and 1/8 to 1 inch wide. Bi-directional grooves are also available and have double-end
bits that give you the flexibility to cut forward or backward.
S O C E T C I V I L 30
31. Finish with a broom
Broom the finish: A stiff broom creates a slightly roughened concrete surface
A smooth, steel trowel finish is too slippery for outdoor concrete.
Instead, drag a broom over the concrete. You'll get a nonslip texture and hide imperfections left by
floating or troweling.
You can use a plain old push broom, but a special concrete broom cuts finer lines.
The sooner you start, the rougher the finish. Make your first pass about 15 minutes after floating.
If the texture is too rough, smooth it over with a mag float and try again in 15 minutes.
Drag the broom over the concrete in parallel, slightly overlapping strokes. You may have to rinse
off the broom occasionally to avoid a too-rough finish.
S O C E T C I V I L 31
32. 16. Curing of Concrete
Immediately after the finishing operations have been completed, the entire surface of the newly
laid concrete shall be covered against rapid drying, and cured.
Failure to provide sufficient cover material of the stipulated type, or inadequate supplies of water
for curing shall be adequate cause for immediate.
1. Initial Curing
After completion of the finishing operations, the surface of the pavement shall be entirely covered
with wet hessian cloth, burlap or jute mats.
The coverings used shall be of such length (or width) that when laid wilt extend at least 500 mm
beyond the edges of the slab, shall be so placed that the entire surface and both the edges of the
stab are completely covered.
They shall be placed as soon as the concrete has set sufficiently to prevent marring of the surface.
Prior to their being placed, the coverings shall be thoroughly wetted with water and placed with
the wettest side down.
They shall be so weighed down as to cause them to remain in intimate contact with the surface
covered.
They shall be maintained fully wetted and in position for 24 hours after the concrete has been
placed, or until the concrete is sufficiently hard to be walked upon without suffering any damage.
To maintain the coverings wet, water shall be gently sprayed so as to avoid damage to the fresh
concrete.
If it becomes necessary to remove the coverings for any reason, the concrete stab shall not be kept
exposed for a period of more than half an hour.
Worn coverings or coverings with holes shall not be permitted.
Coverings reclaimed from previous use other than curing concrete shall be thoroughly washed
prior to use for curing purposes.
If the covering is furnished in strips, the strips shall be laid to overlap at least 150 mm.
S O C E T C I V I L 32
33. 2. Final Curing
Upon the removal of the covering the slab shall be thoroughly wetted and then cured by one of the
following methods of final curing:
Curing with wet earth
Exposed edges of the slab shall be banked with a substantial berm of earth.
Upon the slab shall then be laid a system of transverse and longitudinal dykes of clay about 50
mm high, covered with a blanket of sandy soil free from stones to prevent the drying up and
cracking of clay.
The rest of the slab shall then be covered with sufficient sandy soil so as to produce a blanket of
earth not less than 40 mm depths after wetting.
The earth covering shall be thoroughly wetted white it is being placed on the surface and against
the sides of the slab and kept thoroughly saturated with water for 14 days and thoroughly wetted
down during the morning of the 15th day and shall thereafter remain in place until the concrete has
attained the required strength and permission is given to open the pavement to traffic.
When such permission is granted, the covering shall be removed and the pavement swept clean.
If the earth covering becomes displaced during the curing period, it shall be replaced to the
original depth and re-saturated.
3. Impervious membrane method
The membrane shall consist of a practically colorless impervious liquid of a type approved by the
Engineer-in-charge.
The use of any membrane material which would impart a slippery surface to the pavement or alter
its natural color will not be permitted.
Liquid shall be applied under pressure with a spray nozzle in such a manner as to cover the entire
surface with a uniform film, and shall be of such character that it will harden within 30 minutes
after application.
The amount of liquid applied shall be ample to seal the surface of the pavement thoroughly.
The liquid shall be applied immediately after the finishing of the surface and before the cement
has set, or, if the pavement is first covered with burlap or hessian cloth or the like, it may be
applied upon their removal.
The impervious coating used for membrane curing shall be such that when applied to the surface
of test slabs made of cement sand mortar in the manner prescribed for the use of the materials in
S O C E T C I V I L 33
34. the field, the mortar shall retain at least 90 per cent of the mixing water when exposed for 144
hours to temperatures between 32 to 38°C at a relative humidity of 30 % to 50 %.
Insulating
If air temperatures drop quickly during the first night after placement, the concrete surface will cool
quickly com-pared to the rest of the concrete.
Such extreme temperature variations in the slab can cause concrete to change volume at different
rates (differential thermal contraction), which in turn can cause tensile stress and random cracking in
the slab.
Covering the new concrete can help reduce extreme variations in temperature throughout the depth
of the slab.
Removing of Forms
Forms shall not be removed from freshly placed concrete until it has set, or at least 12 hours,
whichever is later.
They shall be carefully removed in such a manner that no damage is done to the edges of the
pavement.
After the forms have been removed, time slab edges shall be cleaned and any limited honey-
combed areas pointed up with 1:2 cement sand mortar, after which the sides of the slab shall be
covered with earth to the level of the top of the stab for final curing.
Slabs with excessive honey-combing as a result of inadequate compaction shall be removed
between nearest transverse joints.
S O C E T C I V I L 34
35. 17. Protection of Concrete
1. Protection against drying out
The quality of hardened concrete, and in particular, the durability of the surface, depends directly on
the protection of the fresh concrete against drying out.
It is detrimental both to the strength and to the shrinkage (risk of cracks forming) and also to the
durability when the fresh concrete loses water.
As a result of their large exposed areas, pavements are greatly subjected to drying out.
E.g. at an ambient temperature of 20°C, a relative humidity of 60 %, a temperature of the concrete of
25°C and a wind speed of 25 km/h, 1litre of water will evaporate every hour from every m2 of
pavement surface.
Note that the upper surface layer (a few cm thick) of the concrete only contains about 4 liters of water
per m2.
A curing compound is usually used to protect road concrete against drying out.
In case of an exposed aggregate finish, the setting retarder must also have the property that it protects
the concrete against drying out.
If not, the concrete must be covered with a plastic sheet as soon as the setting retarder is applied.
As stated above, subsequent to the removal of the skin of concrete mortar, the concrete is protected
against drying out a second time by spraying a curing compound or by covering the surface with a
plastic sheet.
The latter method is particularly used in urban areas on colored exposed aggregate concrete.
S O C E T C I V I L 35
36. 2. Protection against rain
Concreting is stopped if it rains. Furthermore, the necessary measures have to be taken to prevent that the
concrete surface is washed out by rain.
This applies both to freshly spread concrete that has not been compacted yet and to smoothed concrete.
Plastic sheets or mobile shelters are suitable means of protection.
3. Protection against frost
S O C E T C I V I L 36
37. When concrete is placed in cold weather the pavement surface has to be effectively protected against
frost in such a way that the temperature at the surface of the concrete does not drop below + 1 ºC for
72 hours after placement.
This protection can consist of, for example, non-woven geotextile or polystyrene foam plates with
ballast.
4. Protection against mechanical influences (traffic signposting)
Every necessary measure shall be taken to protect the fresh concrete from damage due to all kinds of
mechanical influences (Car, Bicycle, Pedestrian, Animals, Bikes, etc.)
S O C E T C I V I L 37
38. 18. Advantages of Concrete Road
Durability and maintenance free life:
Concrete roads have a long service life of forty years, whereas asphalt roads last for ten years. Moreover,
during this service life concrete road do not require frequent repair or patching work like asphalt roads.
Vehicles consume less fuel:
A vehicle, when run over a concrete road, consumes 15-20% less fuel than that on asphalt roads. This is
because of the fact that a concrete road does not get deflected under the wheels of loaded trucks.
Resistant to automobile fuel spillage and extreme weather:
Unlike asphalt roads, concrete roads do not get damaged by the leaking oils from the vehicles or by the
extreme weather conditions like excess rain or extreme heat.
Greener process:
Asphalt (bitumen) produces lots of highly polluting gases at the time of melting it for paving. Also, less fuel
consumption by the vehicle running on a concrete road means less pollution.
Saving of natural resources:
Asphalt (bitumen) is produced from imported petroleum, the reserve of which is becoming reduced
drastically. On the other hand, concrete (cement) is produced from abundantly available limestone.
S O C E T C I V I L 38
39. 19. Special Measures of Concrete
1. Workability period
It must always be ensured that the concrete is processed as quickly as possible, certainly within 2 hours
after batching including the surface treatment and the protection measures.
In hot, dry weather an even shorter workability time has to be observed (maximum 90 minutes).
Unless special precautions are taken that have been approved by the manager of the works, concrete can
only be laid if the air temperature at 1.5 m above ground under thermometer shelter does not exceed
25°C.
Furthermore, all necessary measures shall be taken to keep the water content of the concrete as
constant as possible from the time of batching until completion of the placement.
2. Paving interruptions
Whenever the supply of concrete is interrupted, the driver of the paving machine shall immediately
take the necessary measures to lower the speed of the paving train and to ensure that the machine
stops as little possible.
For a short interruption, the machine should be stopped before the deposited concrete in the vibrating
chamber has dropped to such a level that the vibrators become visible. If the supply is interrupted for
more than 60 minutes (45 min. in hot weather), a construction joint has to be made.
Upon a long-lasting defect of the paving equipment, the supply of fresh concrete has to be stopped
immediately and an attempt must be made to complete the current paving phase.
If the circumstances and the elapsed workability time no longer make a proper completion
possible, the concrete, that has been deposited but not yet finished, has to be removed.
To achieve a continuous profile, particular care is taken of the execution of the construction
joints, both at the end of the day and every time work is resumed.
The concrete is compacted preferably with a separate vibrating needle before the paving machine is
passing in order to obtain properly compacted concrete on both sides of the joint.
S O C E T C I V I L 39
40. 3. Placement of concrete on a slope
When placing concrete on a slope of less than 4 % it is recommended to work uphill, in order to
prevent tension cracks at the surface.
Furthermore, the consistency of the concrete and the working speed of the paver have to be adapted to
the working conditions.
However, if the longitudinal slope is more than 4 %, unevenness can occur as concrete falls back when
the machines have passed. In that case, a suitable composition of the concrete mix has to be realized and
it is recommended to work downhill.
It must be ensured that enough concrete is deposited in front of the paving machine to prevent the
concrete from sliding down.
Concrete pavements have been successfully executed on slopes of 10 to 12 %. At one time the slope
was even 18%.
S O C E T C I V I L 40
41. 20. Weather Consideration
1. Hot, dry weather paving
Definition
Temperatures generally above 90°F (32°C), low relative humidity, high wind speed, sunny conditions
Challenges
Concrete loses moisture more rapidly during hauling and placing.
Aggregate stockpiles dry out, affecting moisture consistency between batches.
The pavement sub base dries out before the mixture is placed, then absorbs water from the mixture.
Rapid water evaporation at the pavement surface can result in shrinkage cracks.
It’s more difficult to entrain air when temperatures are high. Entrained air is important for pavement
Durability.
Concrete sets rapidly, perhaps twice as fast, making finishing more difficult.
Sawing operations must proceed more rapidly. Additional saws may be required.
Once heat-related problems develop, it may be too late to fix them.
Precautions
If possible, do not pave in very hot, dry weather.
Pave in the morning, evening, or night when air temperatures are cooler.
Maintain uniform moisture in stockpiles.
Use retarders in the mixture to slow hydration.
Use fly ash and slag in the mixture.
Keep sub base, forms, and equipment damp and cool.
Apply curing compound as soon as possible. Additional compound may be required.
S O C E T C I V I L 41
42. 2. Cold weather paving
Definition
Air temperature of 50°F or less (10°C) for more than half of any 24-hour period, or when the
average daily air temperature is less than 40°F (5°C) for three consecutive days.
Challenges
During cold weather, hydration slows, slowing strength development.
Concrete cools faster at the surface than inside the slab, causing stress in the slab.
If the stress is severe enough, the slab will crack randomly.
Precautions
Do not pave on frozen sub grade.
Do not use aggregates with frozen lumps.
Heat materials to raise concrete temperature and promote hydration.
Minimize use of fly ash and slag.
Do not pave if the concrete cannot reach adequate strength before it freezes.
For the first two to three days, protect concrete from freezing with insulating material.
3. Rain
Challenges
Before final set, rain can damage the new pavement surface by leaving imprints or washing away
paste at the surface.
After final set, rain can induce rapid cooling at the surface, leading to rapid development of thermal
restraint stresses and possibly early-age, uncontrolled cracking.
Precautions
If it starts to rain during operations, take the following actions:
Stop batching and placing operations and cover the fresh concrete immediately with protective
coverings like polyethylene sheeting or burlap. (Do not try to remove extra surface water first. Do not
add dry cement to the surface.)
S O C E T C I V I L 42
43. As soon as the surface has dried, apply curing membrane.
After the curing period, diamond grinding may be required to remove surface blemishes and provide
texture to any surface exposed to rain where damage has occurred.
S O C E T C I V I L 43