
Recommended
More Related Content
What's hot
What's hot (20)
Viewers also liked
Viewers also liked (15)
Similar to Chimera progression
Similar to Chimera progression (20)
More from MoltenPhoenix
More from MoltenPhoenix (20)
Chimera progression
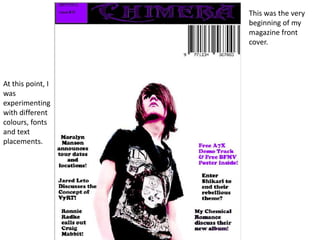
- 1. This was the very beginning of my magazine front cover. At this point, I was experimenting with different colours, fonts and text placements.
- 2. Here, I decided to make my main image larger as to emphasize the fact that this character is the main focus of the magazine. I added in some more information to try and make it look less empty.
- 3. I added a title so that the readers know exactly what the main focus of this magazine is.
- 4. I changed the font style of the ‘D’ so that it matched the font used in the magazines title.
- 5. I changed the font colour in order to make the text match.
- 6. Peer Feedback I was informed that my work was too white and that this made it look bland and empty. I was also told that the main image used was not aesthetically pleasing and that the colours used were not up to the standard expected. Also, the layout did not look professional enough as it looked rather bad and left too much space.
- 7. I changed the image to a better, clearer one to make my magazine seem more professional.
- 8. I made the magazine title larger in order to let the readers know which I moved the box magazine they are holding the reading. magazine information (Date, issue number and price) in order to make the magazine title larger. The colour of certain areas of text were changed in order to make the magazine more appealing.
- 9. I changed the magazine title’s colour in order to make it stand out more. The background was changed to accommodate a purple mid- section in order to make it more appealing.
- 10. I changed the placement of the different areas of text in order to fill more space. I changed the colour of the main article’s title in order to make that stand out as well.
- 11. I changed the font styles of the different text areas in order to make them stand out from each other. An outer bevel was added to the main article’s title in order to make it stand out from the image on which it is placed.
- 12. I changed the layout of the different text areas in order to make it more organised.
- 13. Peer Feedback After gaining feedback on my work, I was told that the adjustments made had definitely improved my work. However, there was the fact that I had only used red and purple colours throughout the entire page, meaning that there wasn’t enough variation. Also, the text used on the right side of the page didn’t flow smoothly with the image used. I was told that this should have an opposite layout to the text set on the left side of the page. Furthermore, the use of a banner was recommended as many other magazines within my selected genre did this, as well as the fact that there was a useable amount of space at the bottom.
- 14. I changed the text placed at the top of the magazine in order to make it look more appealing. I changed the colour of the main article’s title in order to make it stand out further from the image on which it is placed.
- 15. I changed the colours of the text used at the top of the magazine to make them more attractive. I changed the colour of the text used in order to make it more appealing and seem more professional.
- 16. I made the text located at the top of the page larger in order to make it stand out more. I moved the main article’s title to make space for more text at the bottom of the page. Also, this made it more central, which made it stand out more.
- 17. I added a banner at the I also moved the bottom of the barcode and magazine page in order information so that to tell the they didn’t take up reader more too much space and about what is looked professional. inside this magazine.
- 18. I changed the font of the text within the banner to make it stand out more.
- 19. I added an album cover onto the magazine in order to see what it would look like to have an album cover located in that area.
- 20. I changed the settings on my image in order to make the model less pale and more professional.
- 21. I changed the image settings further to make it even less pale.
- 22. I changed the hue, saturation and lightness in order to get the setting which I wanted for my model. I created my own album cover to go onto the magazine in order to keep to the laws of copyright.
- 23. This is the finished version of my front cover. I made the final adjustments to my main image and moved the album cover in order to utilize most of the free space.