Download to read offline


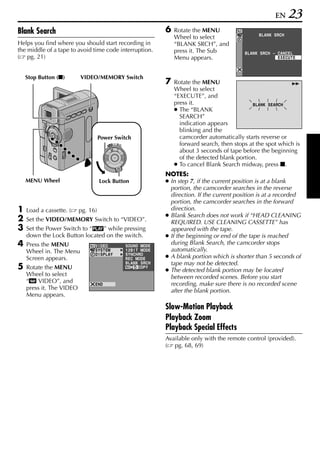
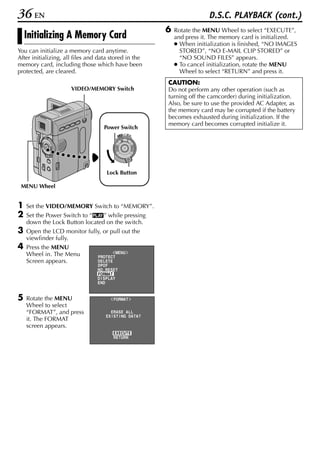
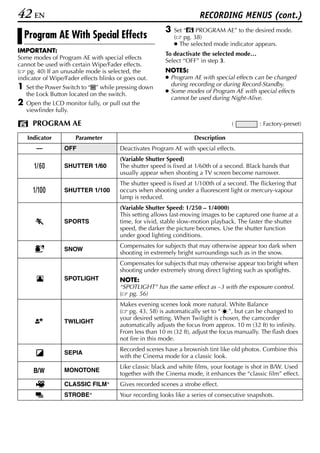
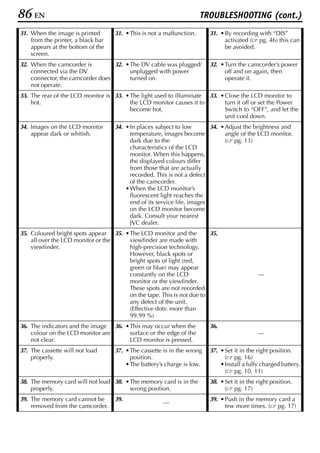
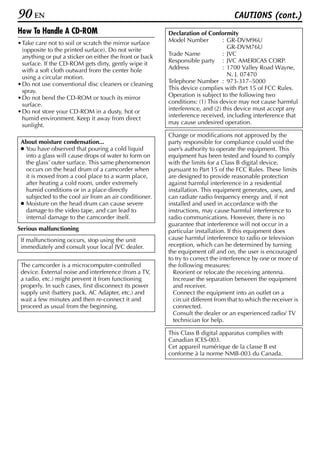
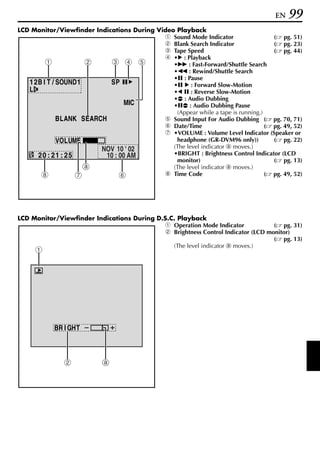
![28 EN D.S.C. PLAYBACK
● Images shot in a file size other than “640 x 480”,
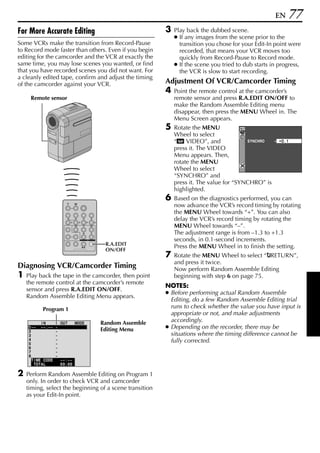
Normal Playback Of Images “1024 x 768” and “1280 x 960” (GR-DVM96
only) with another devices will be displayed
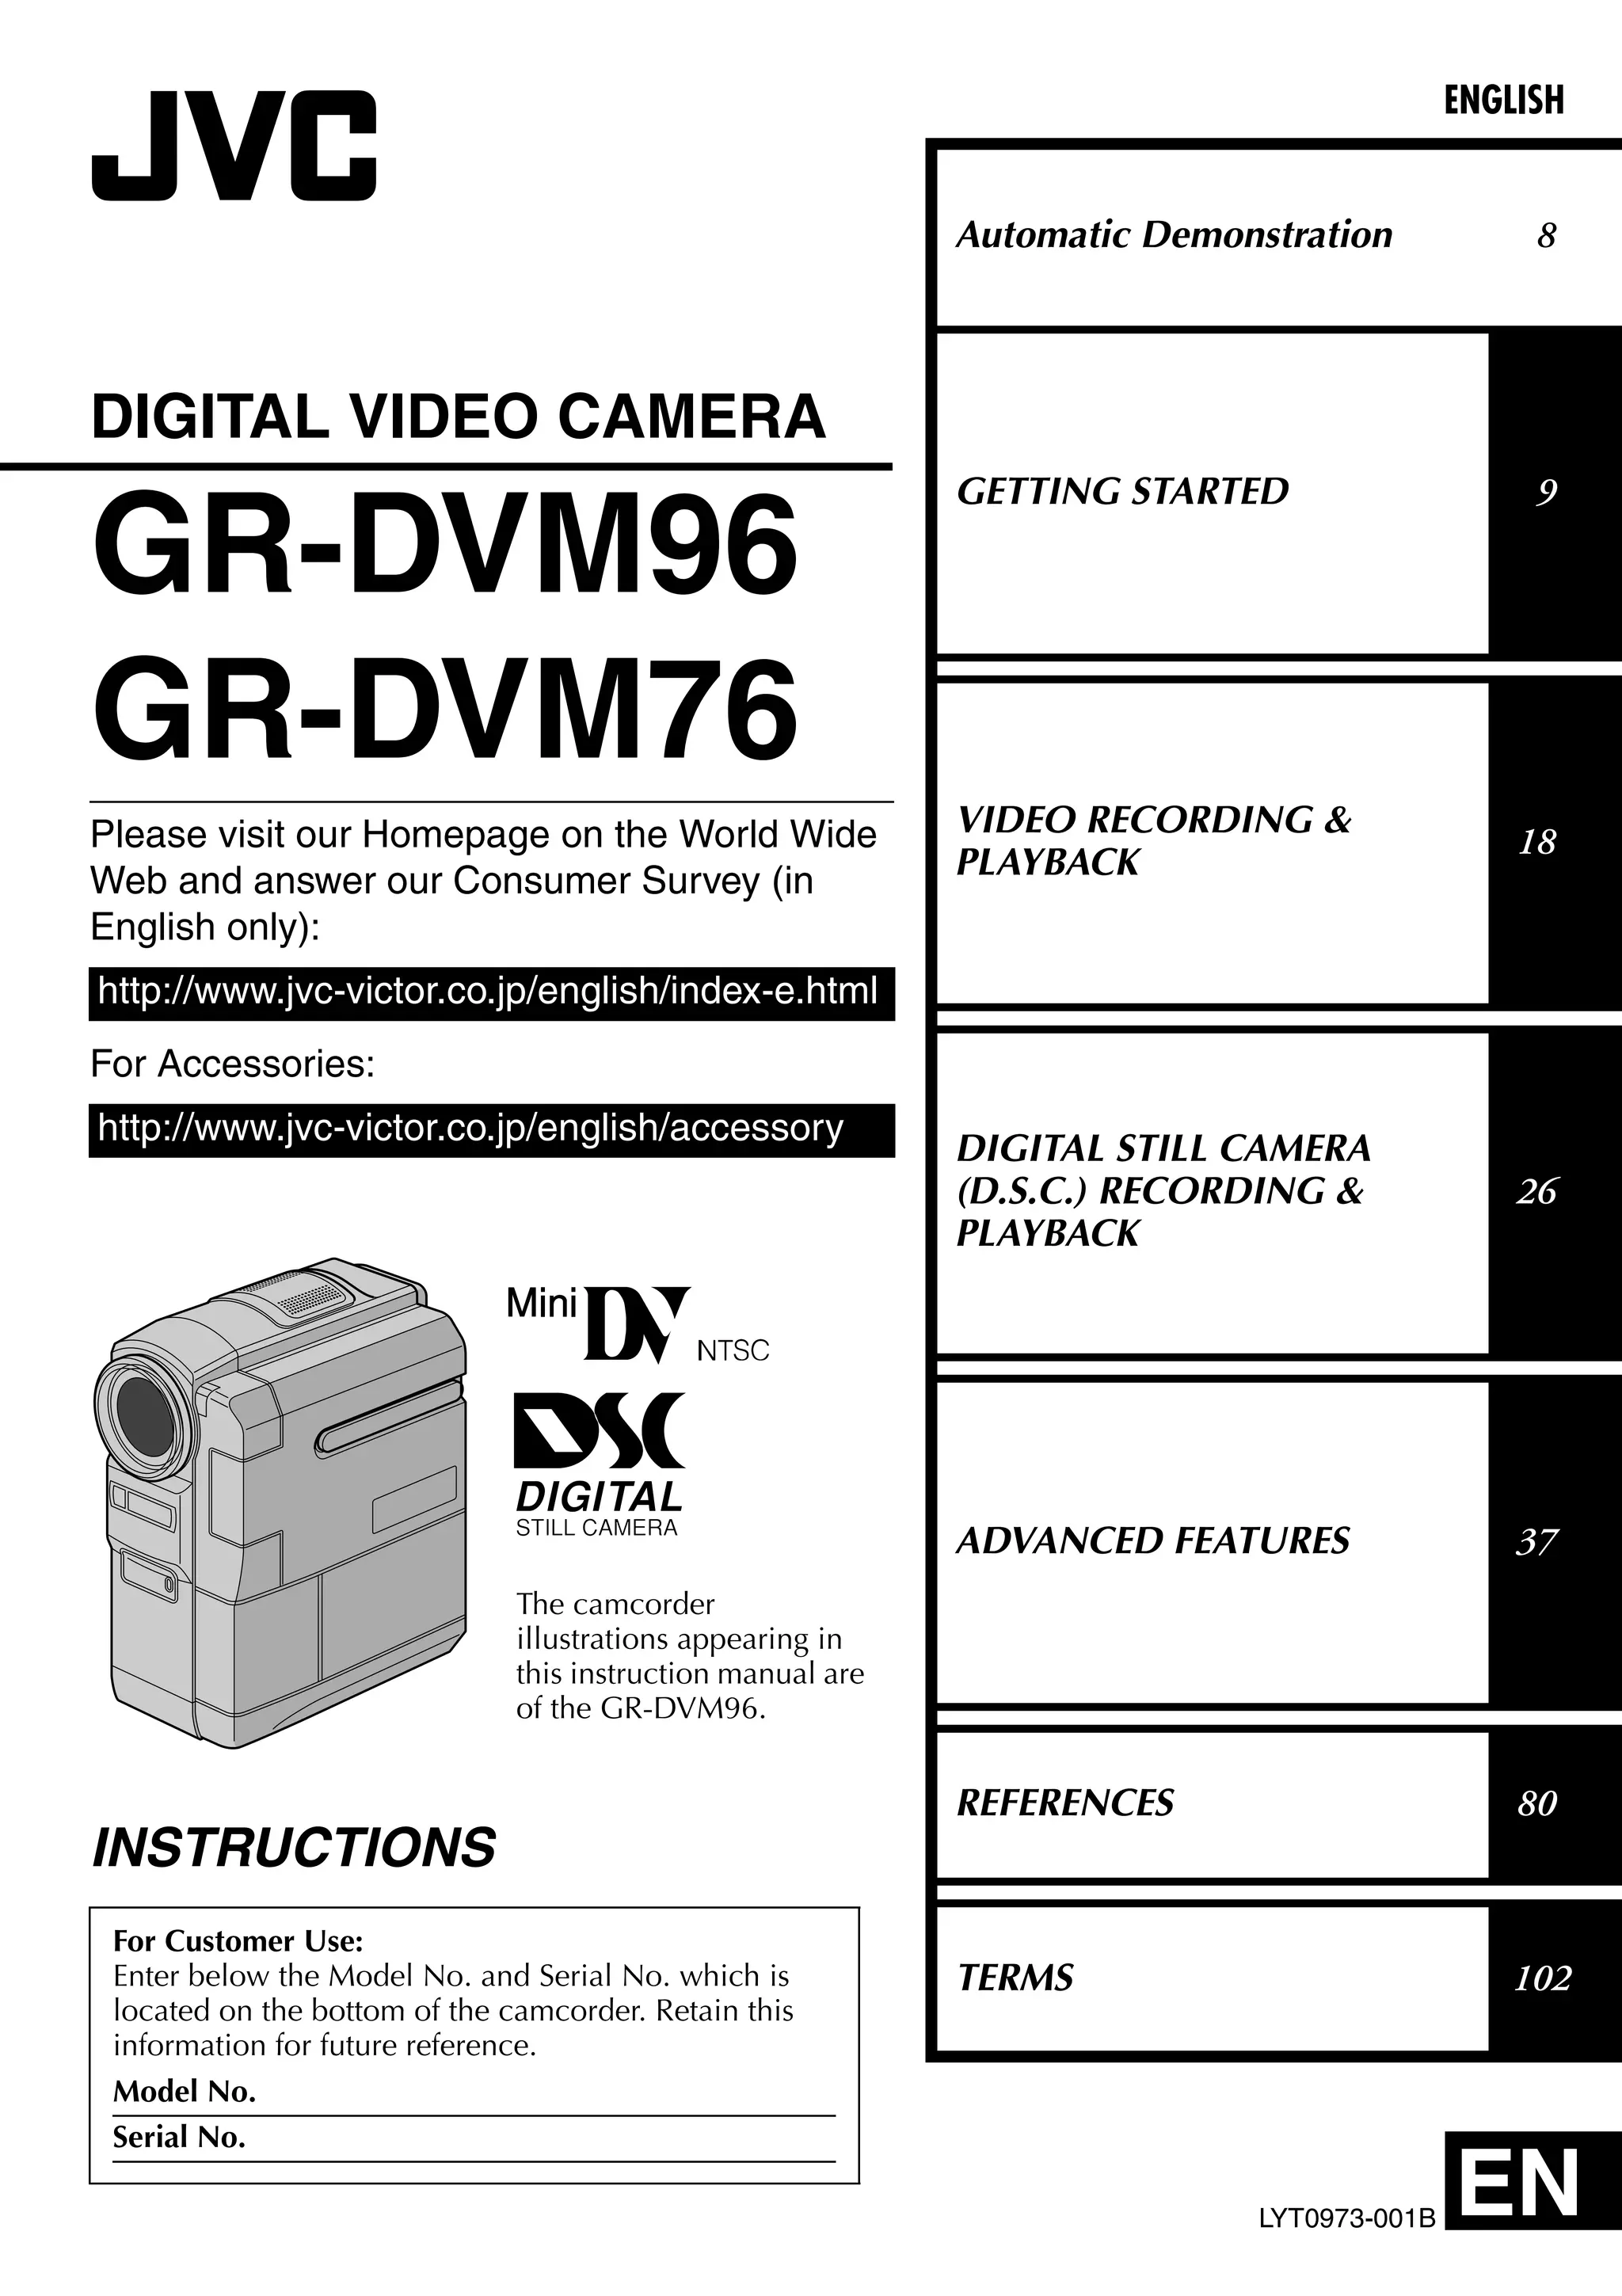
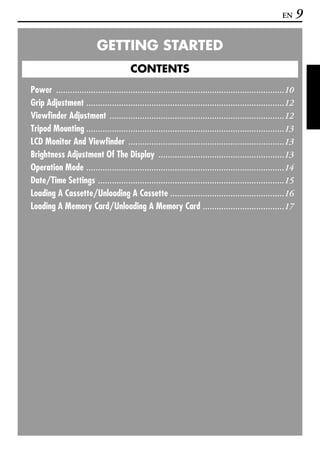
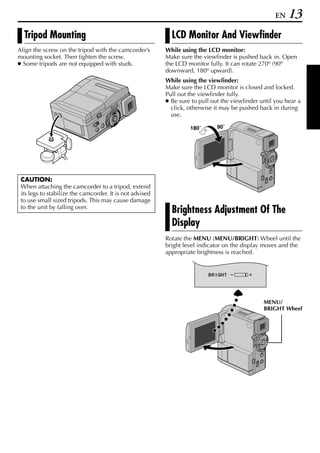
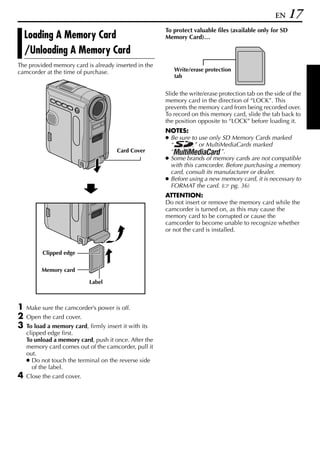
Images shot with the camcorder are automatically thumbnail images. These thumbnail images
numbered, then stored in numerical order in the cannot be transferred to a PC.
memory card. You can view the stored images, one ● Images shot with devices (such as
at a time, much like flipping through a photo album. JVC GR-DVM70) that are not compatible with
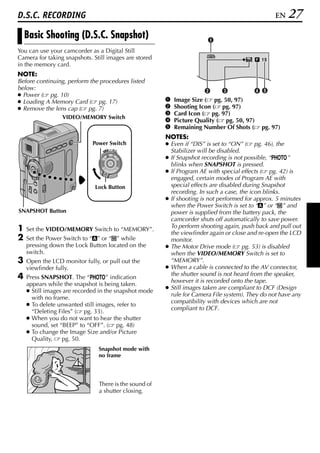
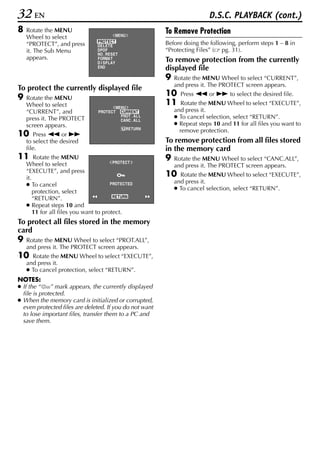
Stop Button (8)/ DCF cannot be viewed with this
Rewind Button (3)
SELECT Button camcorder; “UNSUPPORTED FILES” will be
(GR-DVM96 only) displayed.
Play/Pause Button (4/9)
Fast-Forward Button
(5) Auto Playback Of Images
VIDEO/MEMORY You can run through all the images stored in
Switch memory card automatically.
1 Perform steps 1 – 6 in “Normal Playback Of
Images”.
2 Press 4/9 to start Auto Playback.
Power Switch ● If you press 3 during Auto Playback, files
OFF A M
PLAY
are displayed in descending order.
● If you press 5 during Auto Playback, files
are displayed in ascending order.
MENU Wheel 3 To end Auto Playback, press 8.
Lock Button [For Normal Playback]
To display the next image [For Auto Playback]
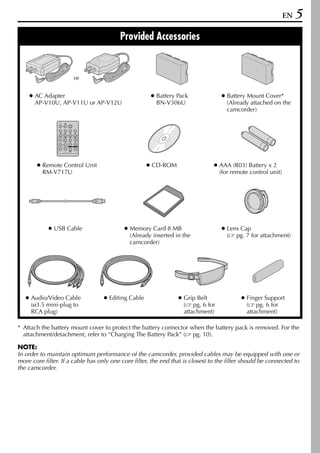
Image playback screen
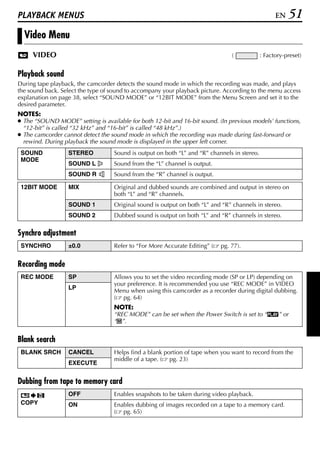
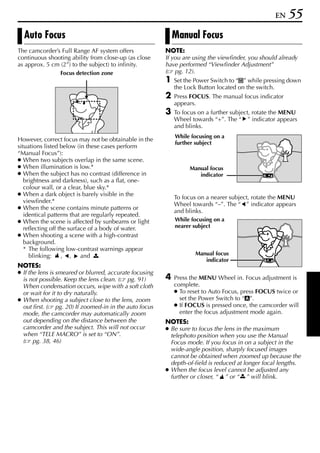
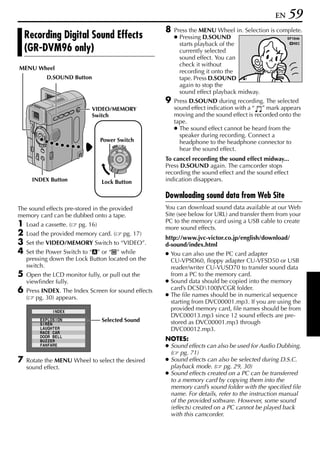
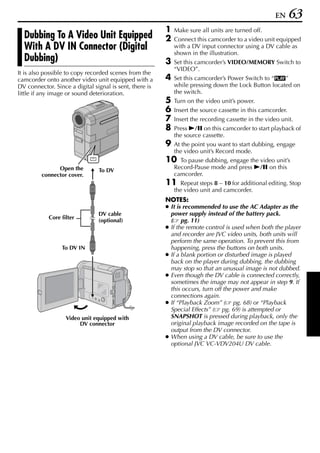
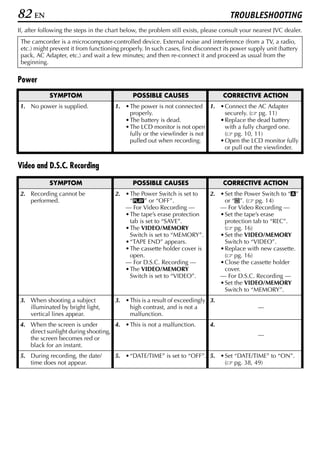
1 Load a memory card. ( pg. 17) (IMAGE)
2 Set the VIDEO/MEMORY Switch to “MEMORY”.
3 Set the Power Switch to “P” while pressing
down the Lock Button located on the switch.
4 Open the LCD monitor fully, or pull out the
viewfinder fully.
● The type of file (IMAGE, E-MAIL CLIP or
SOUND) which has been played back at the
last time is displayed.
5 If the video clip playback (E-MAIL CLIP,
( pg. 29)) or the digital sound playback
(SOUND, ( pg. 29)) screen appears, press
SELECT. The MEMORY SELECT screen appears.
6 Rotate the MENU Wheel to select “IMAGE”, and
press it. The image playback screen (IMAGE)
appears.
7 Press 3 to display the previous file. Press 5
to display the next file.
● Pressing INFO gives you details on the
displayed file. ( pg. 30)
● You can also look for the desired file using
Index Screen. ( pg. 30)
● You can turn off the on-screen playback
display. ( pg. 31)
NOTES:
● Even if you shoot a new image after playing back a To display the previous
low-numbered one, this will not overwrite an image
existing image, because new images are
automatically stored after the last-recorded one.](https://image.slidesharecdn.com/camera-manual-1258484536-phpapp01/85/Camera-Manual-28-320.jpg)
![EN 37
ADVANCED FEATURES
CONTENTS
MENUS FOR DETAILED ADJUSTMENT ............................................................ 38
Changing The Menu Settings ........................................................................ 38
RECORDING MENUS .................................................................................... 40
Wipe Or Fader Effects ................................................................................ 40
Program AE With Special Effects ................................................................... 42
Exposure Control ....................................................................................... 43
White Balance Adjustment ........................................................................... 43
PLAYBACK MENUS ...................................................................................... 51
FEATURES FOR RECORDING ......................................................................... 53
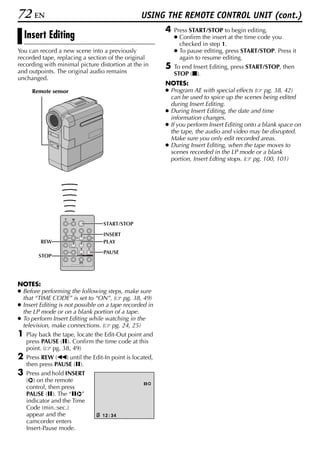
Night-Alive .............................................................................................. 53
Snapshot (For Video Recording) .................................................................... 53
Snapshot Flash ......................................................................................... 54
Flash Brightness Adjustment ........................................................................ 54
Auto Focus ............................................................................................... 55
Manual Focus ........................................................................................... 55
Exposure Control ....................................................................................... 56
Iris Lock .................................................................................................. 57
Backlight Compensation .............................................................................. 57
White Balance Adjustment ........................................................................... 58
Manual White Balance Adjustment ................................................................ 58
Recording Digital Sound Effects (GR-DVM96 only) ............................................ 59
E-Mail Clip Recording (GR-DVM96 only) ......................................................... 60
DUBBING ................................................................................................... 62
Dubbing To A VCR ..................................................................................... 62
Dubbing To A Video Unit Equipped With A DV IN Connector (Digital Dubbing) .......... 63
Dubbing From A Video Unit Equipped With A DV OUT Connector (Digital Dubbing) .... 64
Dubbing Still Images Recorded On A Tape To A Memory Card .............................. 65
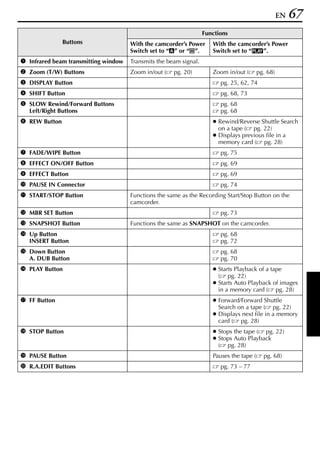
USING THE REMOTE CONTROL UNIT ............................................................. 66
Audio Dubbing .......................................................................................... 70
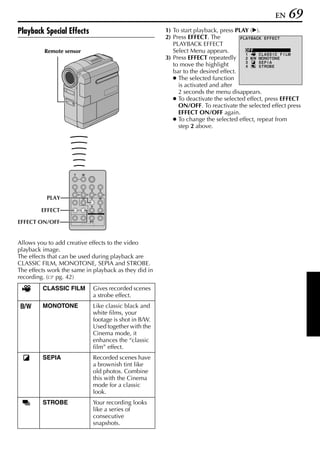
Audio Dubbing Using Digital Sound Effects (GR-DVM96 only) .............................. 71
Insert Editing ............................................................................................ 72
Random Assemble Editing [R.A.Edit] .............................................................. 73
SYSTEM CONNECTIONS ............................................................................... 78
Connection To A Personal Computer ............................................................... 78
Using The Camcorder As A WebCam (GR-DVM96 only) ...................................... 79](https://image.slidesharecdn.com/camera-manual-1258484536-phpapp01/85/Camera-Manual-37-320.jpg)


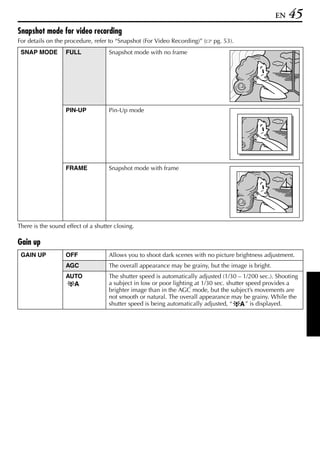

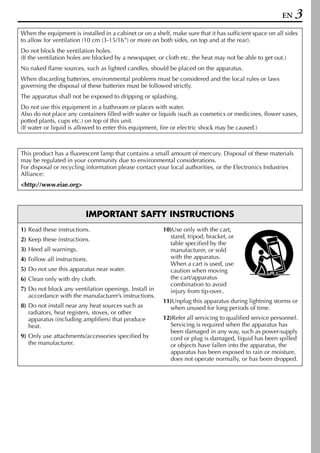
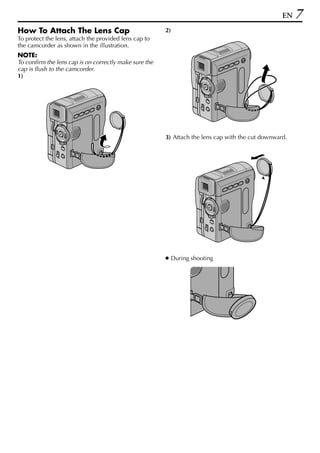
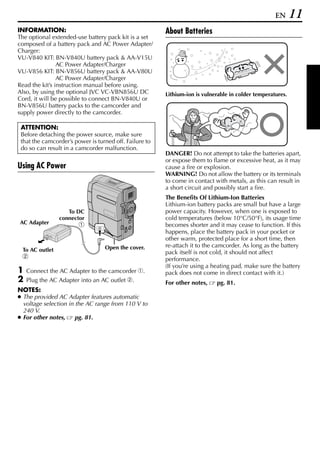
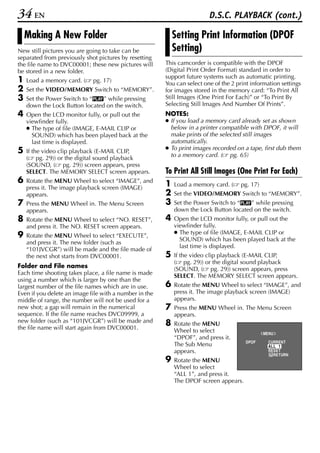
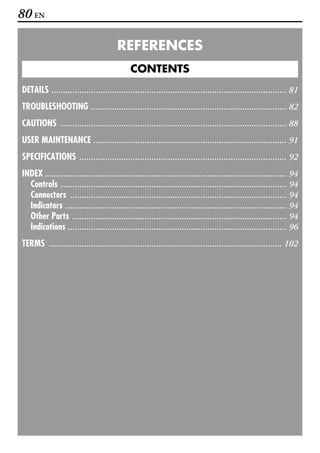
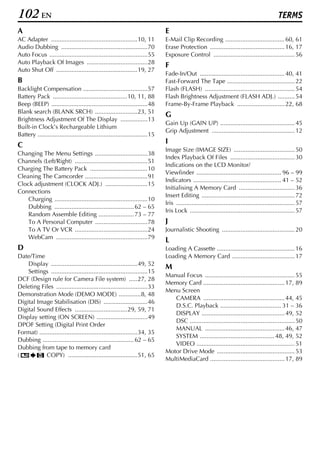
![EN 73
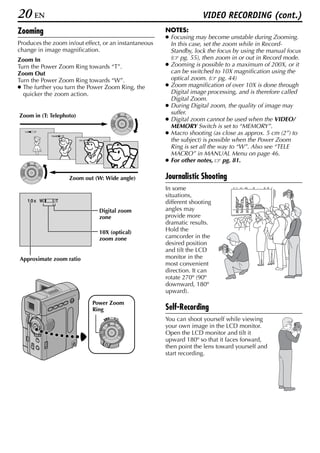
NOTES:
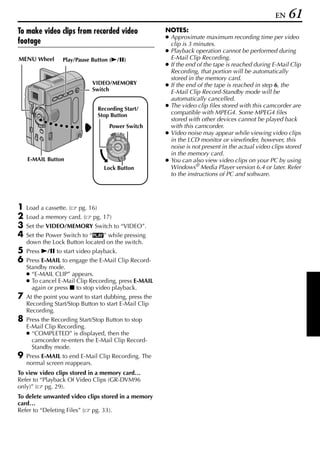
Random Assemble Editing ● If the VCR’s power does not come on in step 1, try
another code from the VCR CODE LIST.
[R.A.Edit] ● Some brands of VCR do not come on
automatically. In this case, turn the power on
Create edited videos easily using your camcorder as manually and try step 2.
the source player. You can select up to 8 “cuts” for ● If the remote control is not able to control the
automatic editing, in any order you like. R.A.Edit is VCR, use the controls on the VCR.
more easily performed when the MBR (Multi-Brand ● When the remote control’s batteries run out, the
Remote) is set to operate with your brand of VCR VCR brand you have set will be erased. In that
(see “VCR CODE LIST”), but can also be performed case, replace the old battery with a new one to
by operating the VCR manually. reset the VCR brand.
Before operation, make sure the batteries are
installed in the remote control. ( pg. 66) VCR CODE LIST
VCR BRAND CODE VCR BRAND CODE
VCR NAME NAME
DAEWOO A H PANASONIC A C
A G
GE A A A A
I B I D
I A H
I D
RCA I B
HITACHI F F
I D
F C
SHIFT MBR SET F F
JVC A I A F C
B I F I
C I C
SAMSUNG I D
LG/GOLDSTAR A A SANYO C F
MAGNAVOX I E C E
A A
SHARP A E
G A
A
G F
SONY F E
MITSUBISHI F G
F
F H
Set Remote/VCR Code C I
NEC C G C A
1 Turn off the power to the VCR and point the
remote towards the VCR’s infrared sensor. Then, C H TOSHIBA F I
referring to the VCR CODE LIST, press and hold PHILIPS A I F A
MBR SET, and enter the brand code. I E
The code is automatically set once you release ZENITH A F
A A
MBR SET, and the VCR’s power comes on. I D
2 Make sure the VCR’s power is on. Then, while I A
holding SHIFT, press the button on the remote I F
for the desired function. The functions the remote A B
can control are PLAY, STOP, PAUSE, FF, REW C C
and VCR REC STBY (you do not need to press G B
SHIFT for this one).
You are now ready to try Random Assemble
Editing.
IMPORTANT
Although the MBR is compatible with JVC VCRs
and those of many other makers, it may not work
with yours or may offer limited functions.
CONTINUED ON NEXT PAGE](https://image.slidesharecdn.com/camera-manual-1258484536-phpapp01/85/Camera-Manual-73-320.jpg)
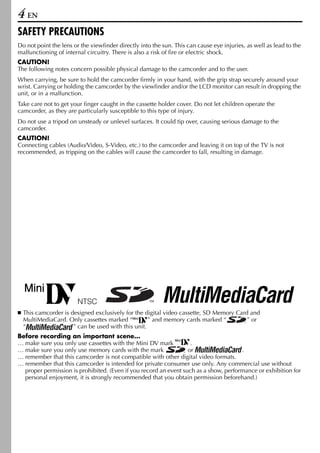
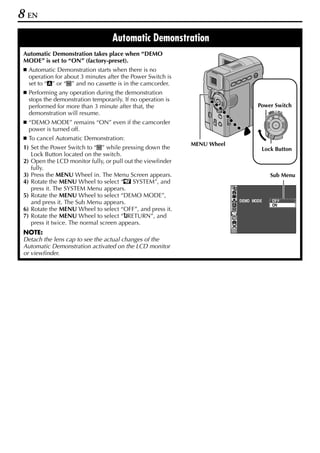
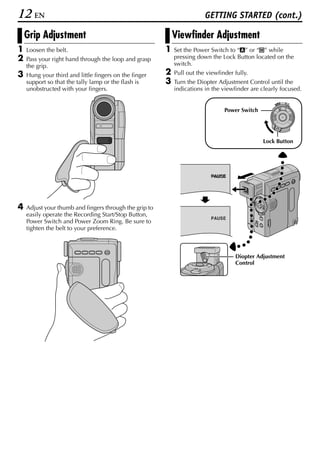
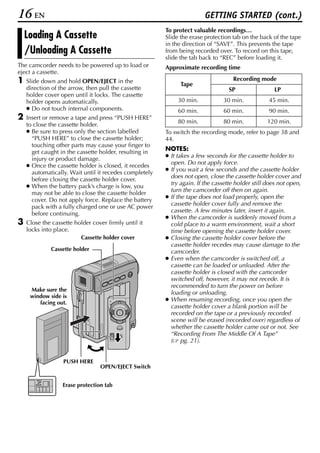
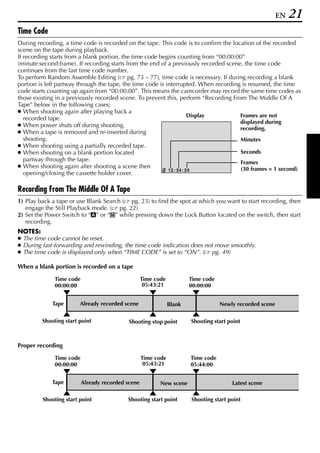
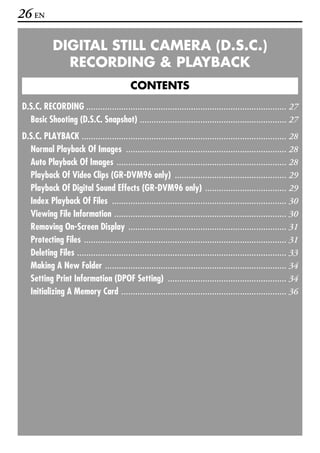
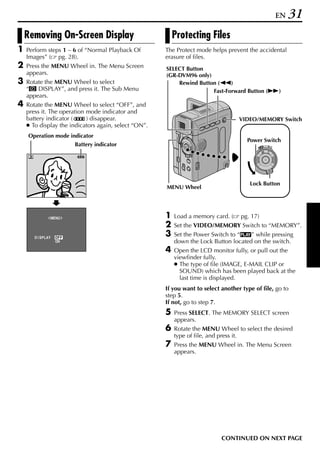
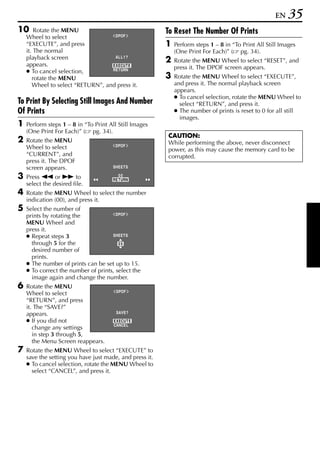
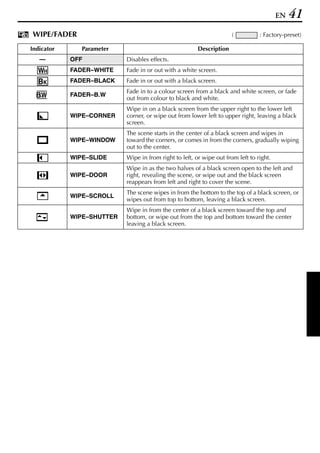
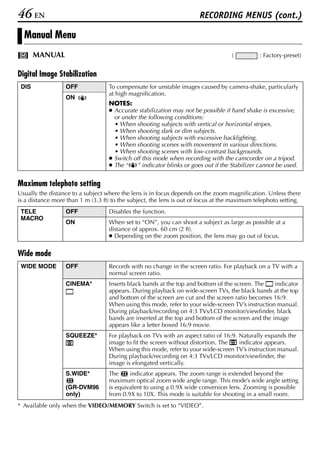
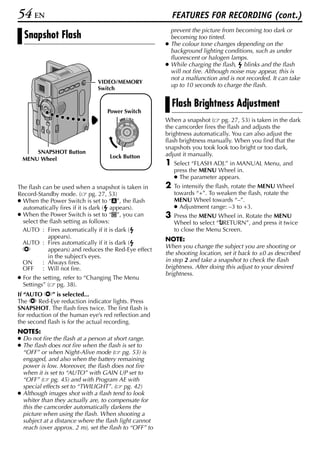
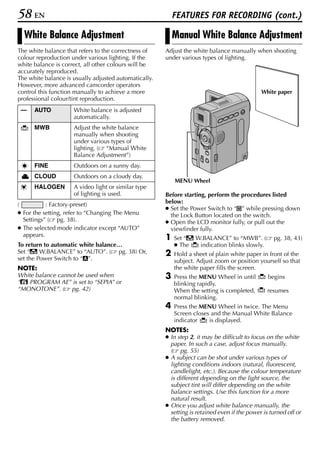
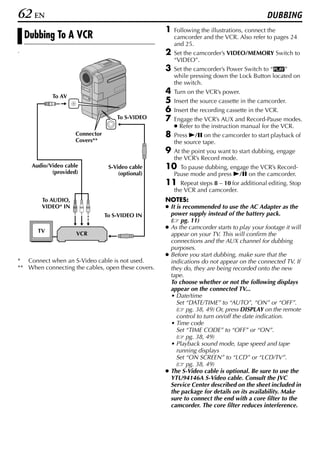
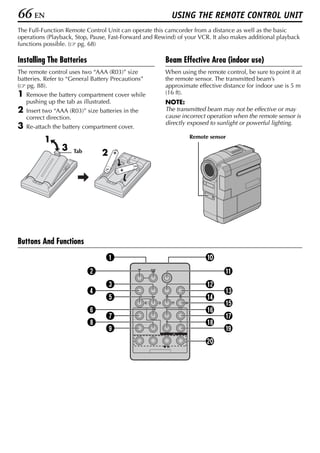
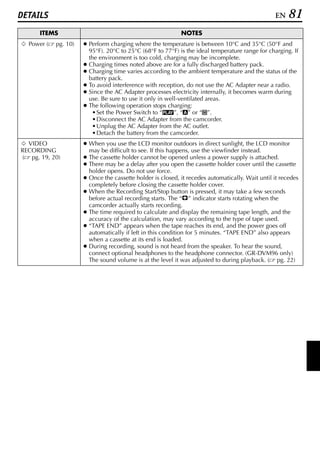
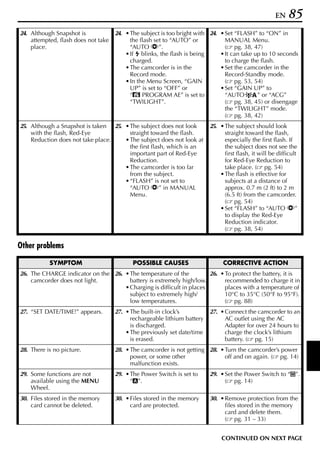
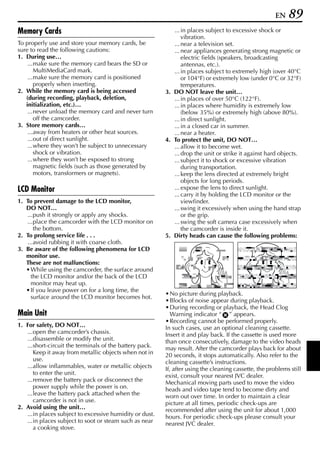
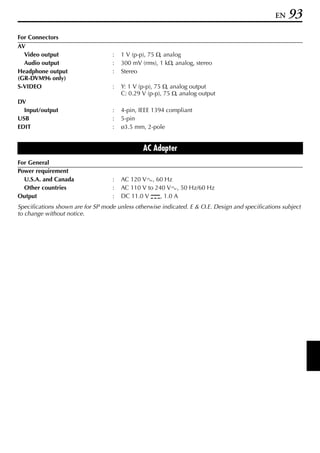
![78 EN SYSTEM CONNECTIONS
Connection To A Personal Computer
[A] Using USB cable
To USB To USB connector
USB cable (provided)
Open the
connector
cover. PC
OR
[B] Using DV cable
DV cable To DV
To DV (optional) connector
Core filter Core filter
PC with DV
connector
Open the connector cover.
[A] Using USB cable ● Never connect the USB cable and the DV cable
simultaneously to the camcorder. Connect only
This camcorder can transfer still images to a PC by the cable you wish to use to the camcorder.
using the provided software. ● When using a DV cable, be sure to use the
optional JVC VC-VDV206U or VC-VDV204U DV
[B] Using DV cable cable depending on the type of DV connector (4
It is also possible to transfer still images to a PC with or 6 pins) on the PC, or use the DV cable
a DV connector by using software equipped with the provided with the capture board.
PC or commercially available software. ● If the PC connected to the camcorder via the USB
cable is not powered, the camcorder does not
1 Connect the camcorder to your PC using the enter the USB mode.
appropriate cable as shown in the illustration. ● The date/time information cannot be captured into
2 If you are using the USB connection, set the the PC.
VIDEO/MEMORY switch to “MEMORY”. ● Refer to the instruction manuals of the PC and
3 Turn the camcorder’s Power Switch to “P” Software.
while pressing down the Lock Button located on ● The still images can also be transferred to a PC
the switch and turn on the PC. with a DV connector-equipped capture board.
● Refer to the instruction manual of the software ● The system may not work properly depending on
on how to transfer a still image to the PC. the PC or capture board you are using.
NOTES: “USB MODE” and/or “ACCESSING FILES”
● Refer to “SOFTWARE INSTALLATION AND USB appears on the LCD monitor while the PC is
CONNECTION GUIDE” for the installation of the accessing data in the camcorder or the camcorder
bundled software and drivers. is transferring a file to the PC.
● It is recommended to use the AC Adapter as the NEVER disconnect the USB cable while
power supply instead of the battery pack. ( pg. 11) “ACCESSING FILES” is displayed on the LCD
monitor since this can result in product damage.](https://image.slidesharecdn.com/camera-manual-1258484536-phpapp01/85/Camera-Manual-78-320.jpg)
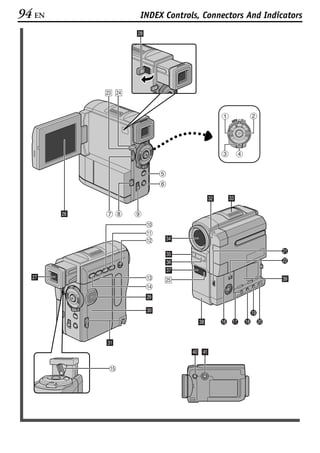
![EN 95
Controls Indicators
a •Power Zoom Ring [T/W].................... pg. 20 A Power Lamp [POWER].................... pg. 14, 19
•Speaker Volume Control.................... pg. 22 B Charge Lamp [CHARGE] ...................... pg. 10
b Recording Start/Stop Button ................ pg. 19 C Tally Lamp ...................................... pg. 19, 48
c Power Switch [A, M, P, OFF].......... pg. 14
d Lock Button ......................................... pg. 14
e •Snapshot Button [SNAPSHOT] .... pg. 27, 53
Other Parts
•Information Button [INFO] ............... pg. 30 a LCD Monitor .................................. pg. 13, 20
f •E-Mail Clip Recording Button [E-MAIL] b Viewfinder............................................ pg. 12
(GR-DVM96 only)........................ pg. 60, 61 c Viewfinder Cleaning Hatch .................. pg. 91
•Index Button [INDEX] .......... pg. 30, 59, 71 d Speaker ................................................ pg. 22
g •Menu Wheel [MENU, +,–] ................. pg. 38 e Cassette Holder Cover.......................... pg. 16
•LCD Monitor Brightness Control f Grip Belt Eyelet ...................................... pg. 6
[BRIGHT, +,–].................................... pg. 13 g Camera Sensor
h Battery Release Tab [BATT.RELEASE].... pg. 10 Be careful not to cover this area, a sensor
i Cassette Open/Eject Switch necessary for shooting is built-in here.
[OPEN/EJECT]...................................... pg. 16 h Stereo Microphone............................... pg. 70
j •Play/Pause Button [4/9] .................. pg. 22 i Lens
•Backlight Compensation Button j Flash Sensor
[BACKLIGHT] .................................... pg. 57 Be careful not to cover this area, as it contains a
k •Fast-Forward Button [5]................ pg. 22 sensor required by the flash.
•Night-Alive Button [NIGHT].............. pg. 53 k Flash..................................................... pg. 54
l VIDEO/MEMORY Switch l Remote Sensor ..................................... pg. 66
[VIDEO/MEMORY] ............................. pg. 14 m Card Cover [MEMORY CARD] ............ pg. 17
m •Rewind Button [3] ........................ pg. 22 n Battery Pack Mount .............................. pg. 10
•Focus Adjustment Button o Stud Hole
[FOCUS] ............................................ pg. 55 p Tripod Mounting Socket ....................... pg. 13
n •Stop Button [8] ................................. pg. 22
•Digital Sound Button [D.SOUND]
(GR-DVM96 only).............................. pg. 59
•D.S.C. Playback Select Button [SELECT]
(GR-DVM96 only)...................... pg. 28 – 34
o Diopter Adjustment Control ................ pg. 12
Connectors
The connectors are located beneath the covers.
P S-Video Output Connector
[S-VIDEO]................................ pg. 24, 62, 74
Q Headphone Connector [ ]
(GR-DVM96 only)................................ pg. 70
No sound is output from the speaker when
headphones are connected to this connector.
R Edit Connector [EDIT] ........................ pg. 74
S Audio/Video Output Connector
[AV] ......................................... pg. 24, 62, 74
T DC Input Connector [DC] ............. pg. 10, 11
U USB (Universal Serial Bus)
Connector .......................................... pg. 78
V Digital Video Connector [DV IN/OUT]
(i.Link*).................................... pg. 63, 64, 78
* i.Link refers to the IEEE1394-1995 industry
specification and extensions thereof. The logo
is used for products compliant with the i.Link
standard.](https://image.slidesharecdn.com/camera-manual-1258484536-phpapp01/85/Camera-Manual-95-320.jpg)


This document provides safety instructions and precautions for a digital video camera. It recommends reading all instructions before use and contains warnings about electric shock and fire hazards. Ventilation around the camera is necessary, and it should be kept away from water, heat sources, and direct sunlight. The camera is designed exclusively for digital video cassettes and memory cards marked with specific logos.


