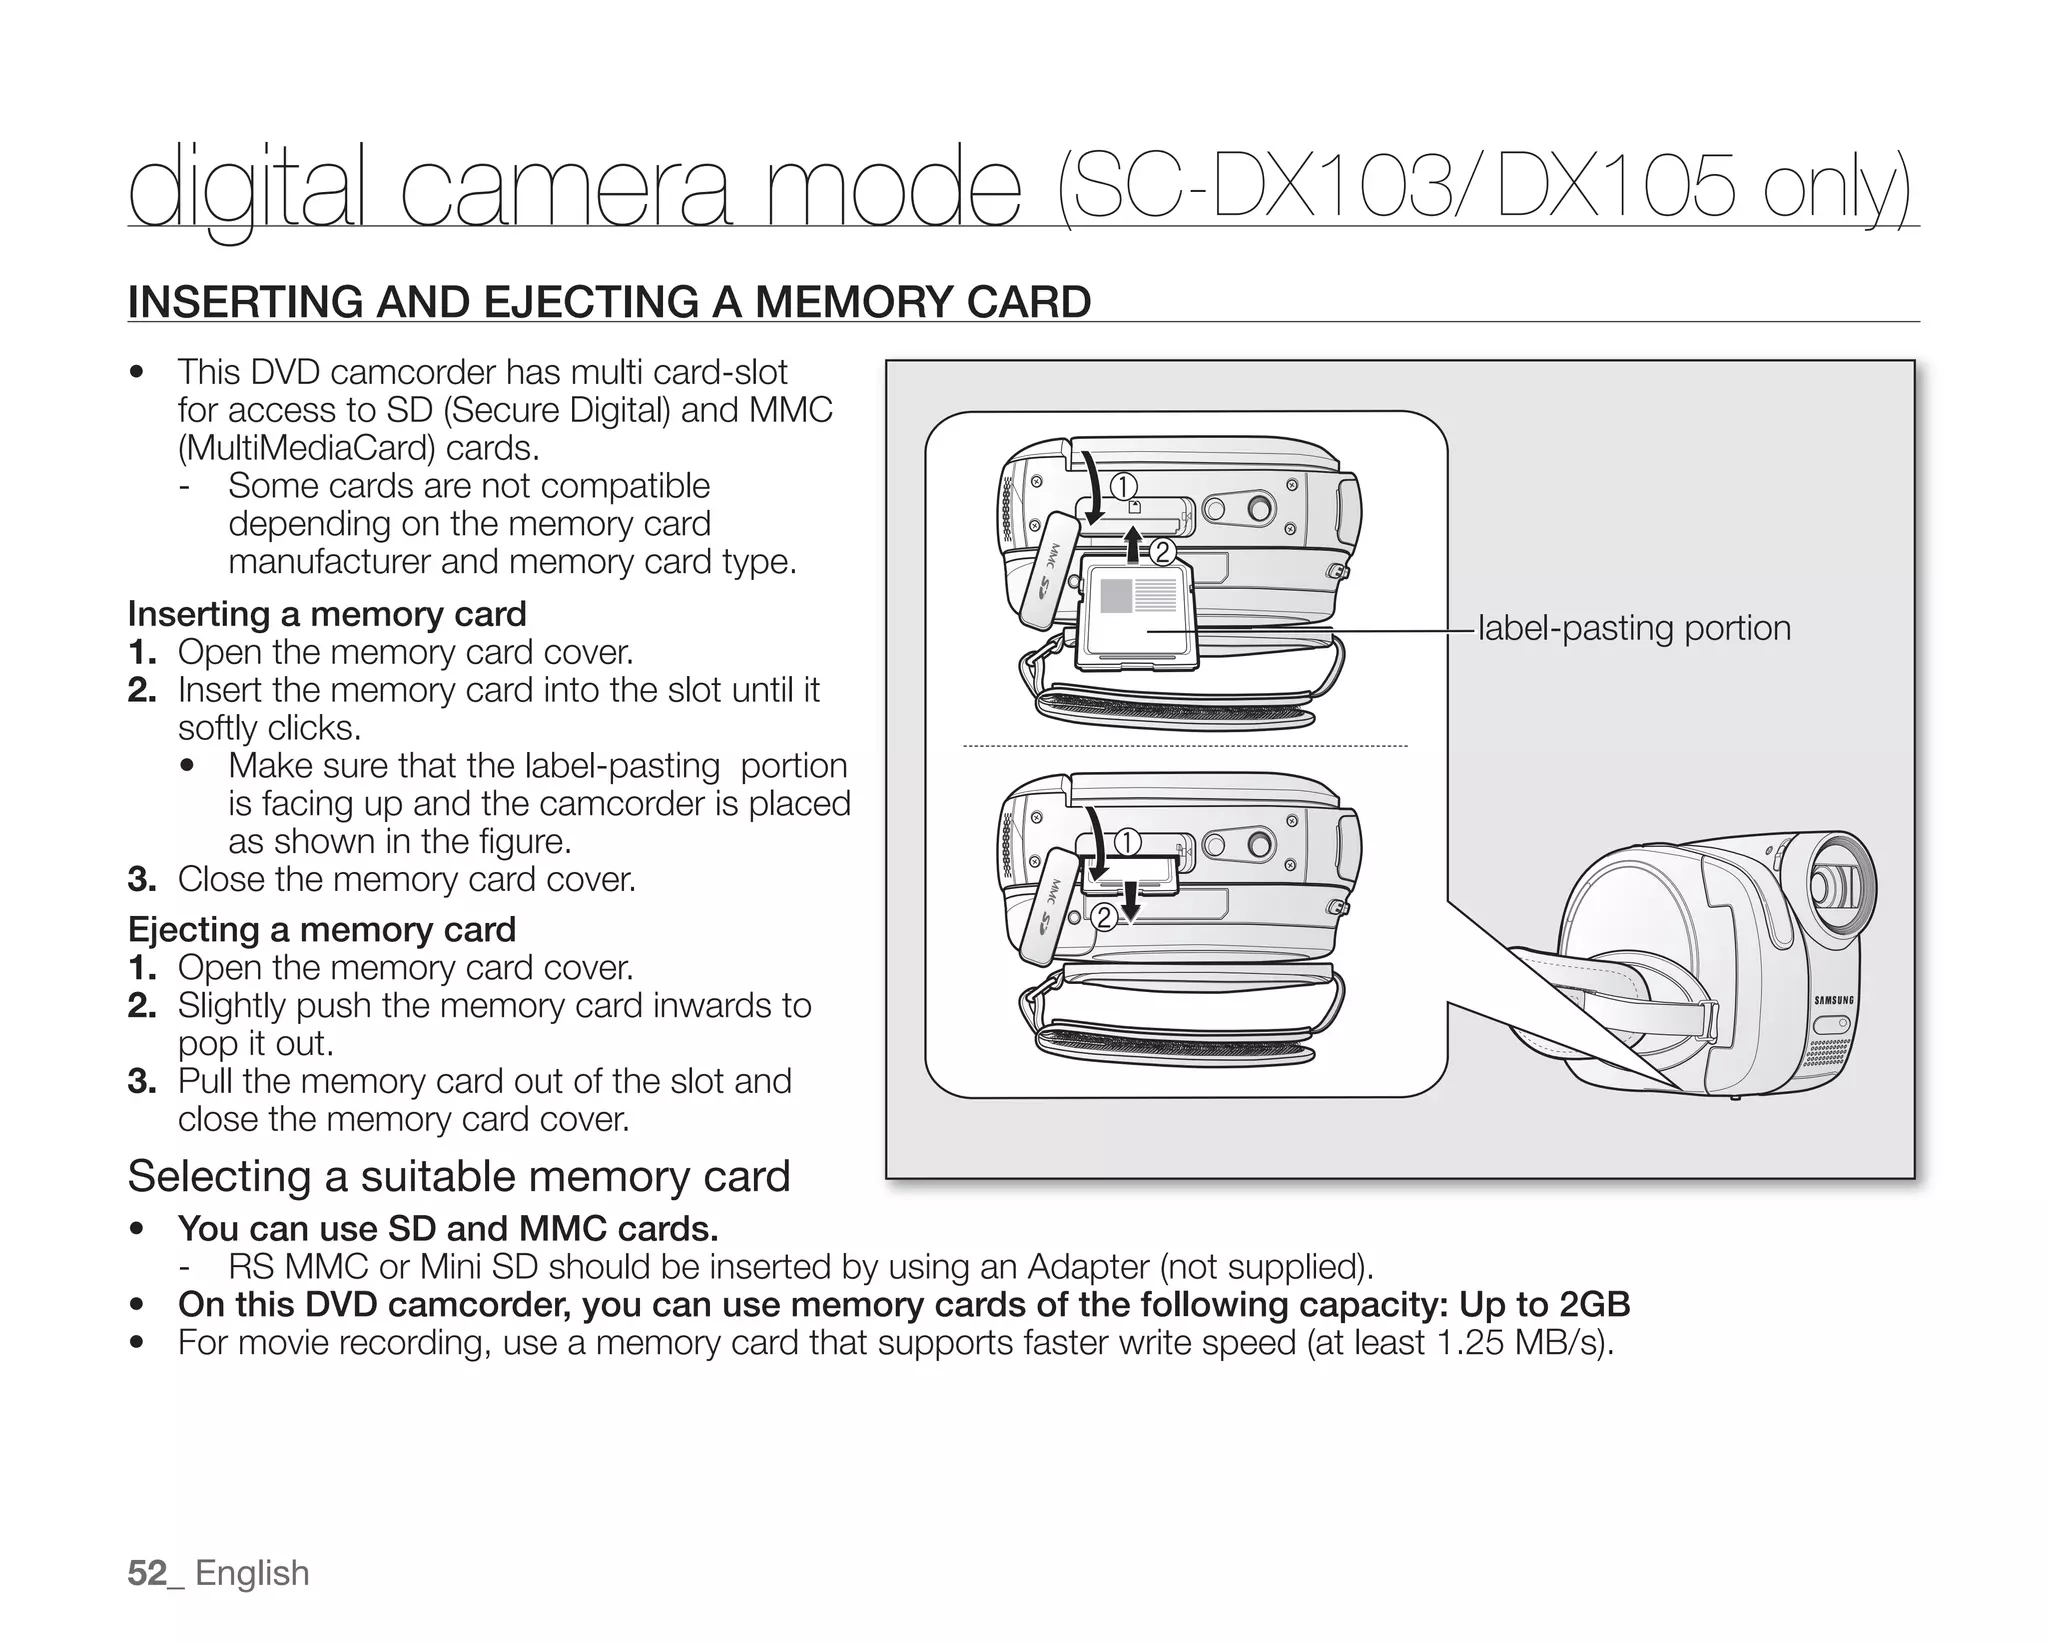
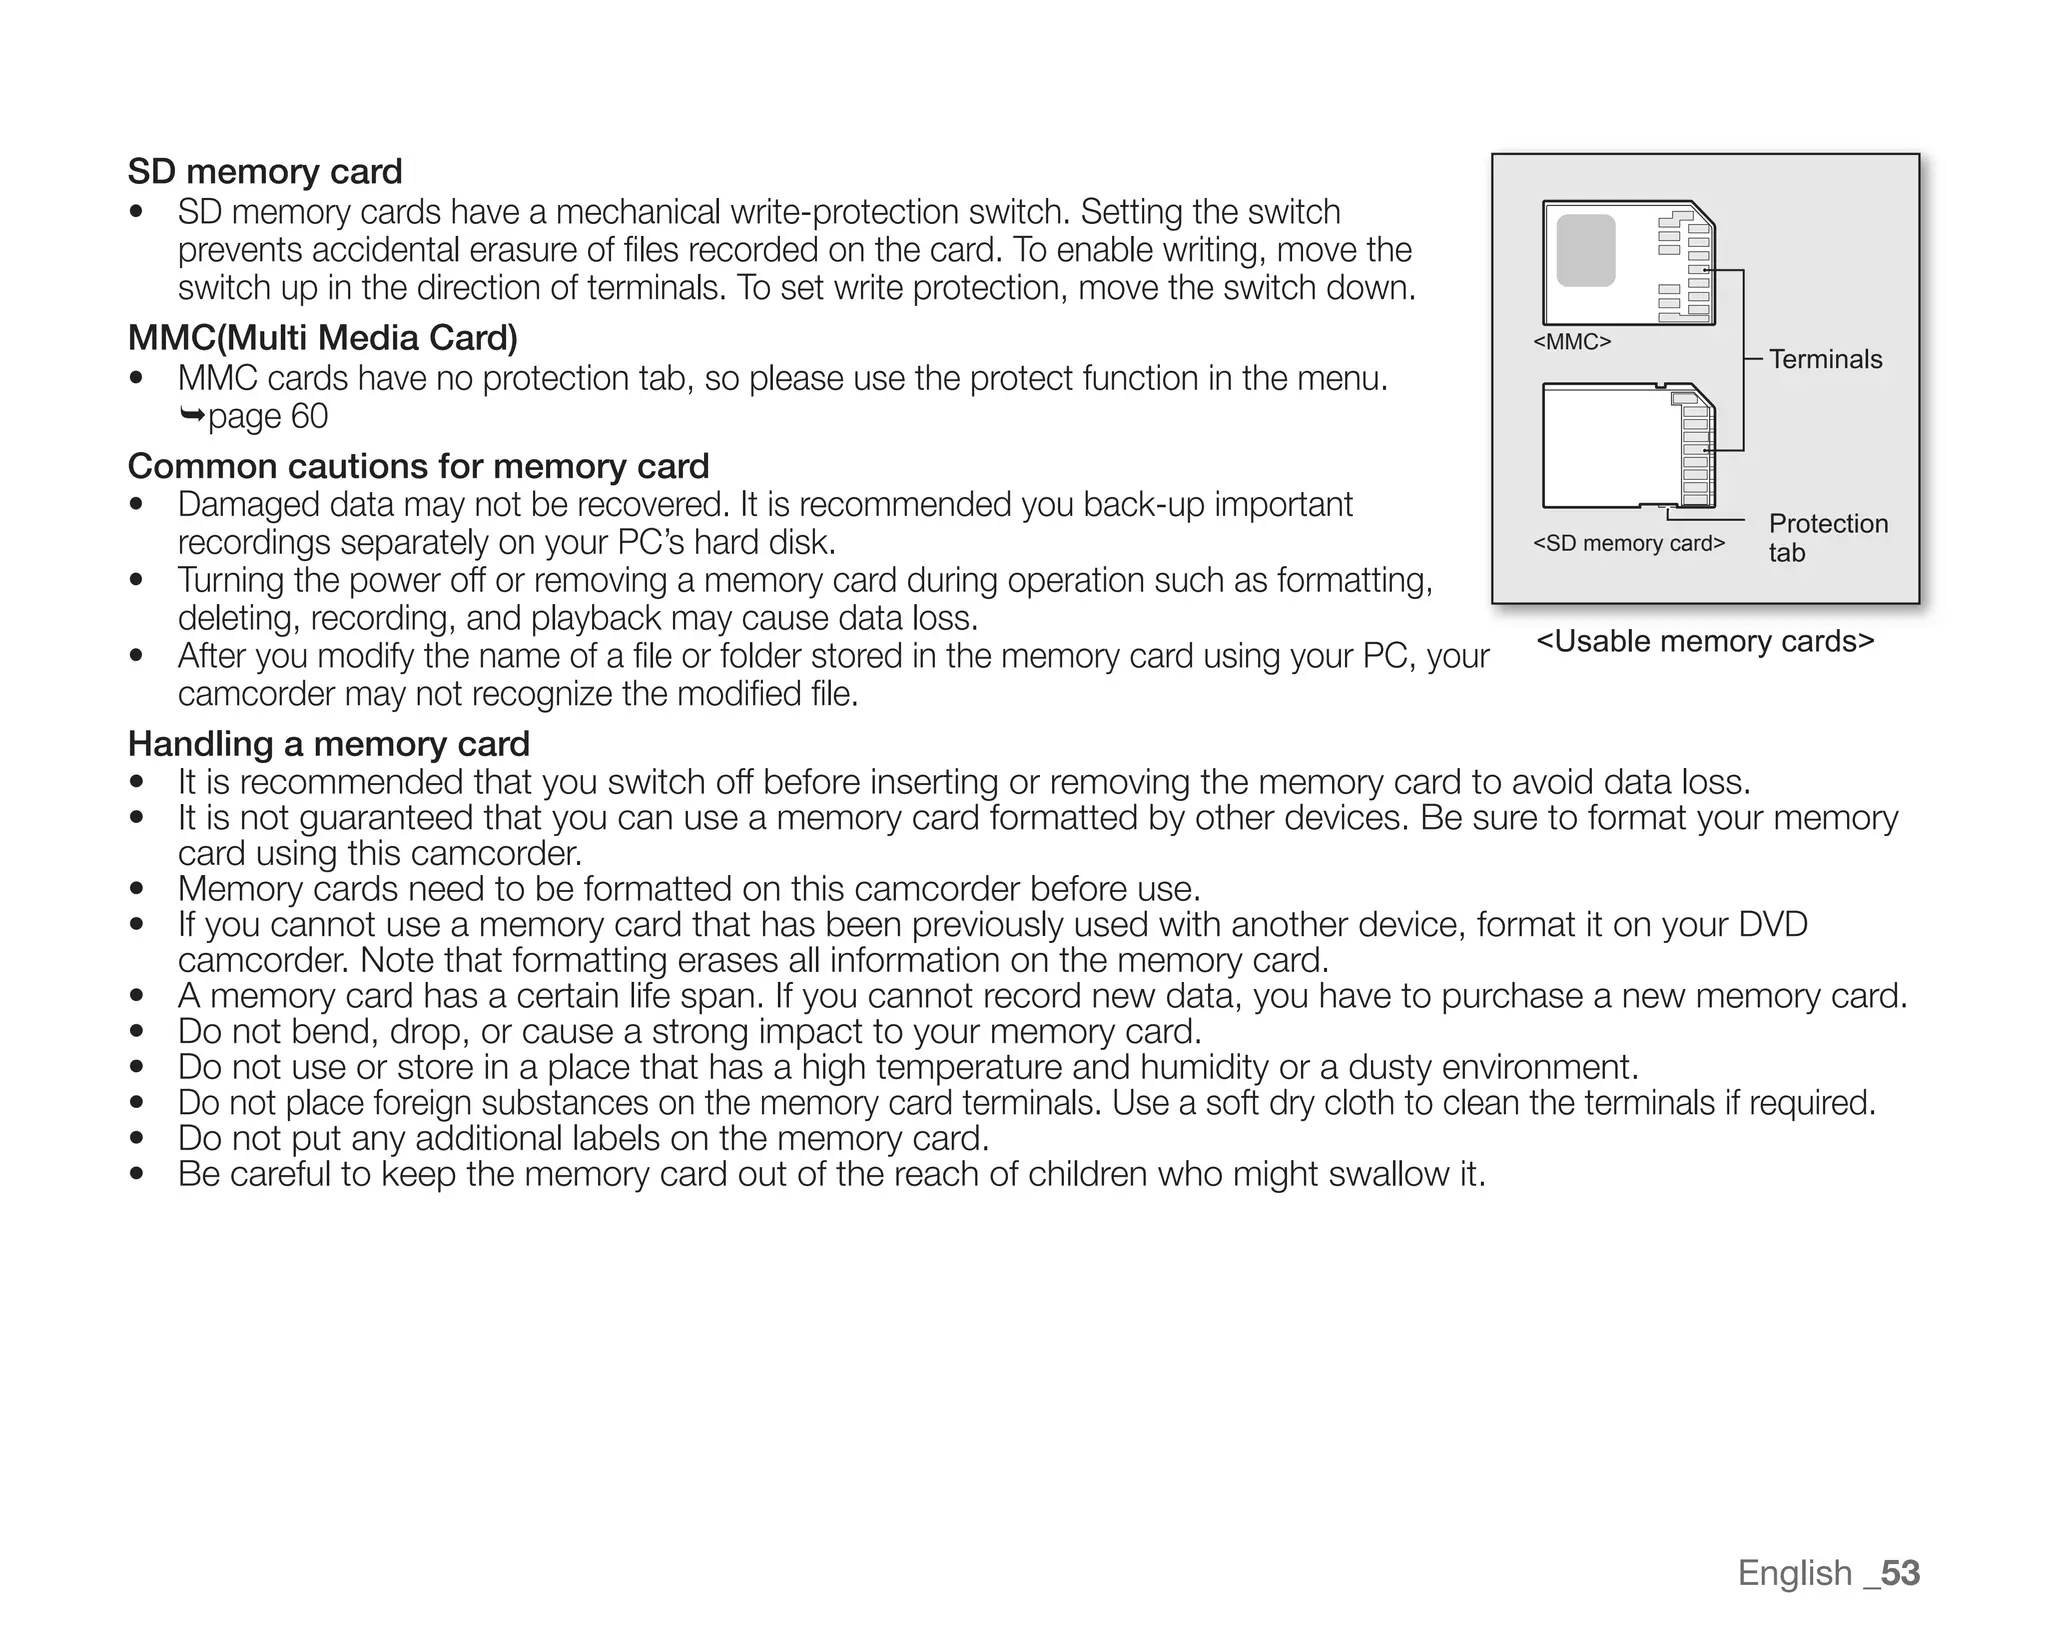
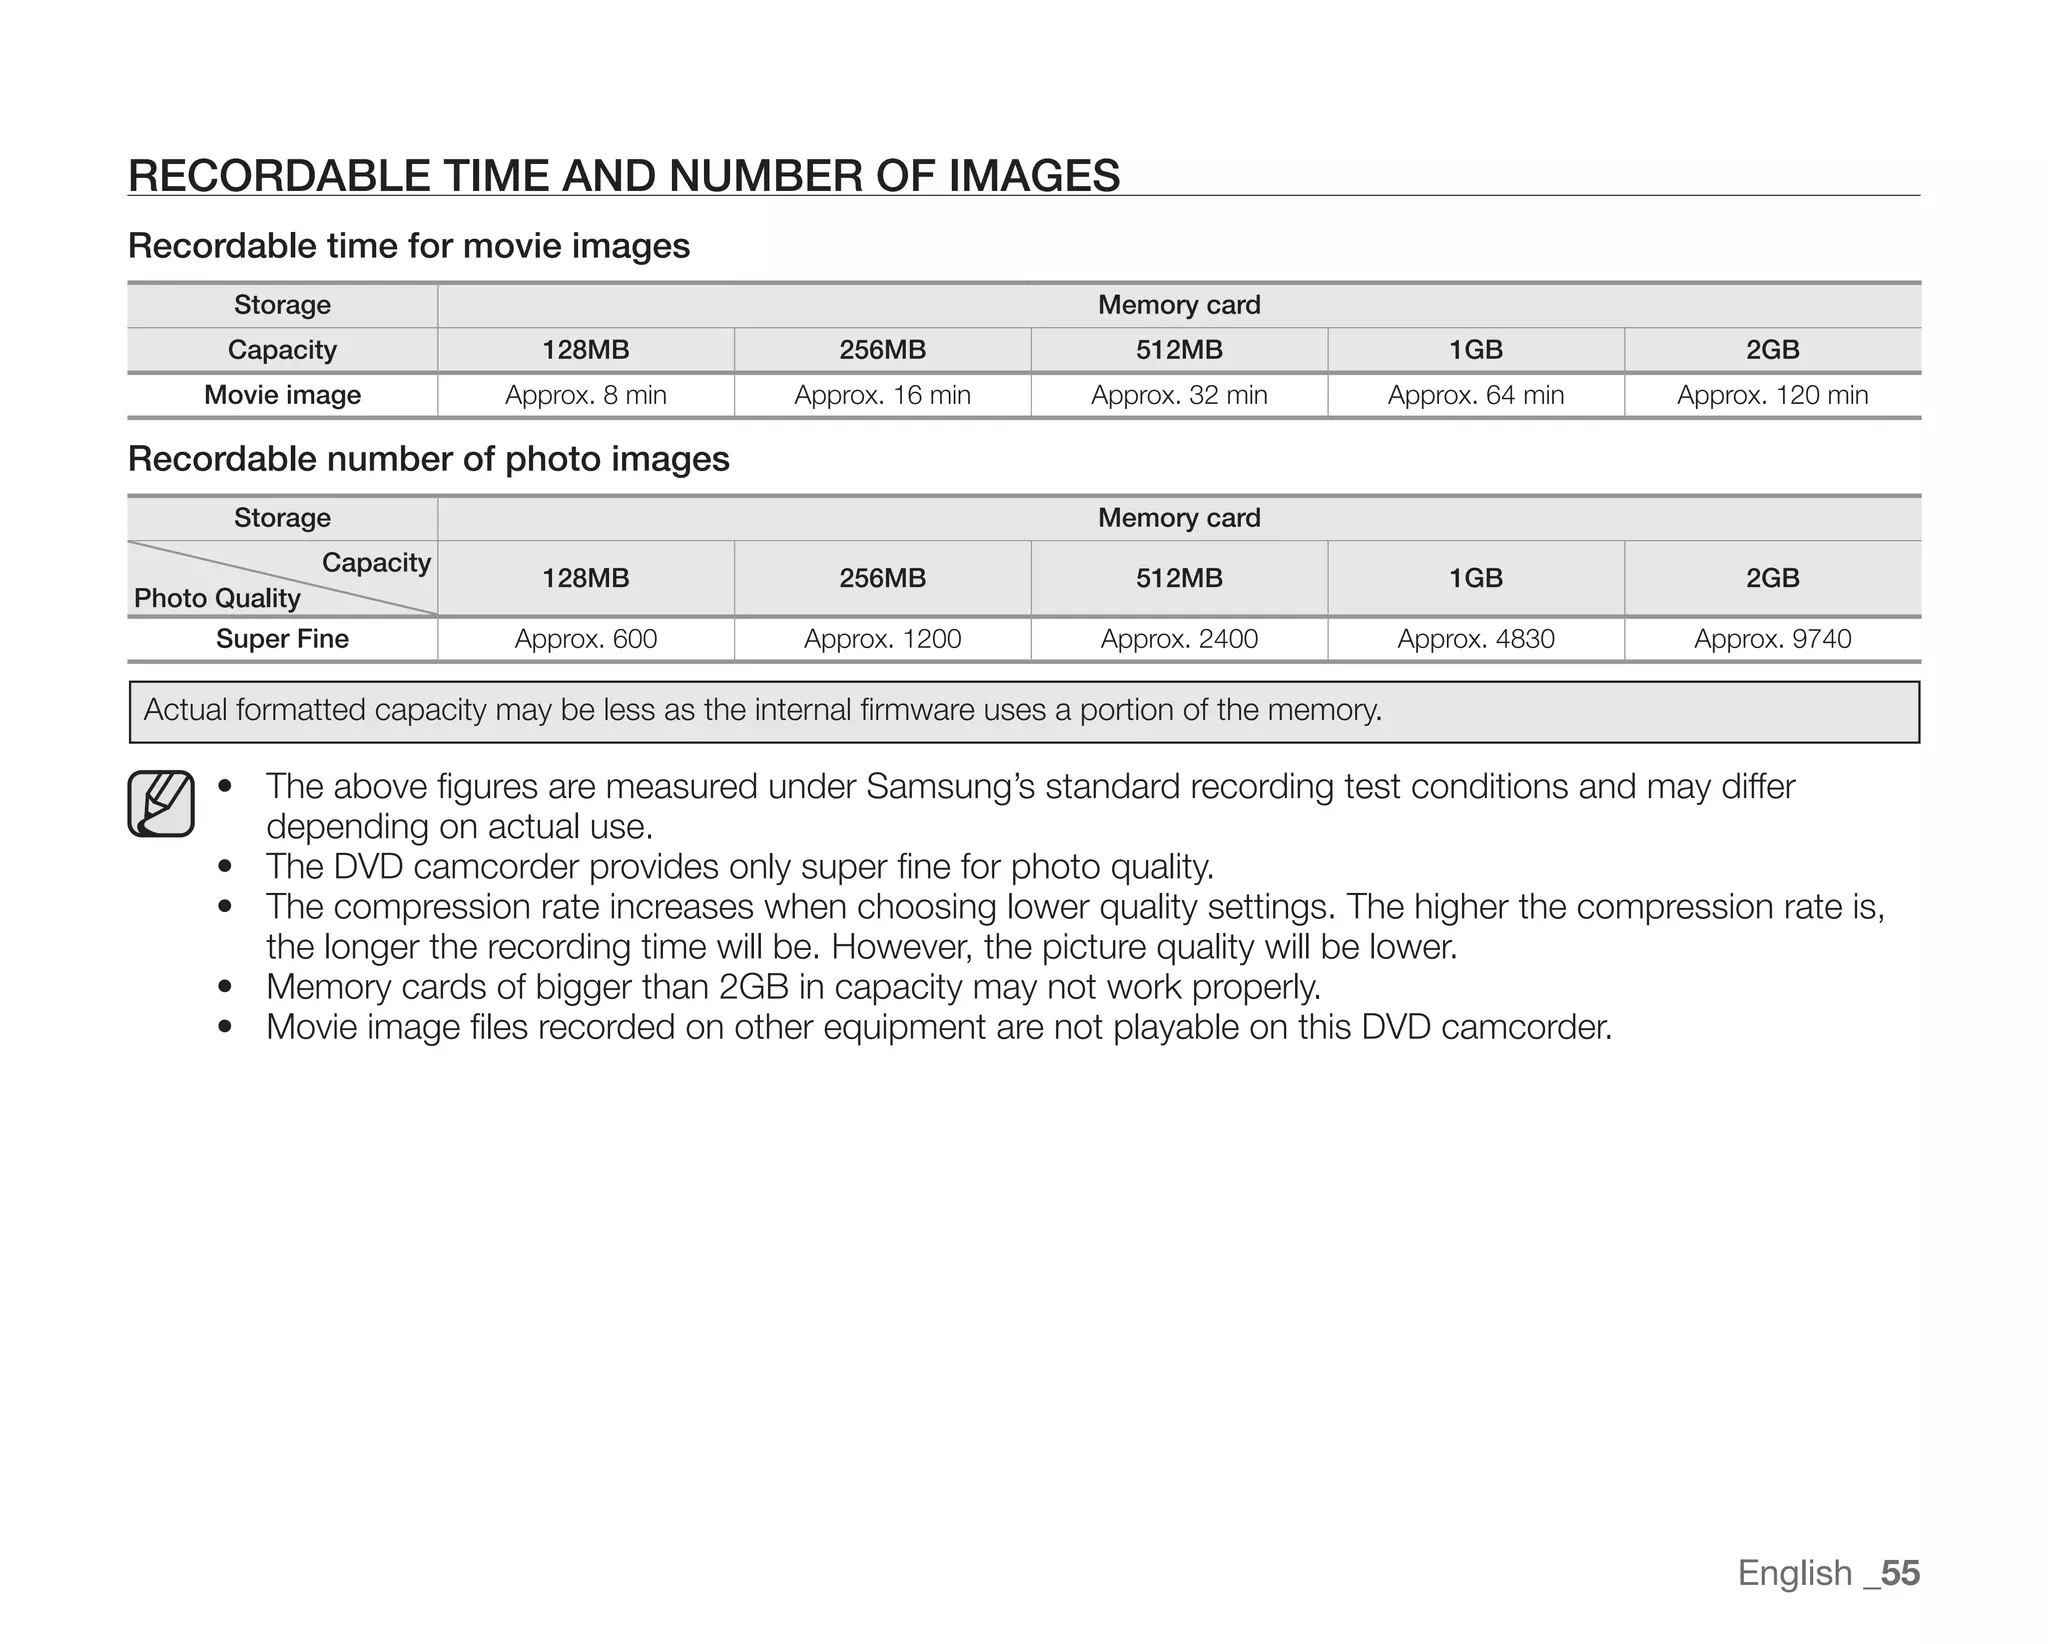
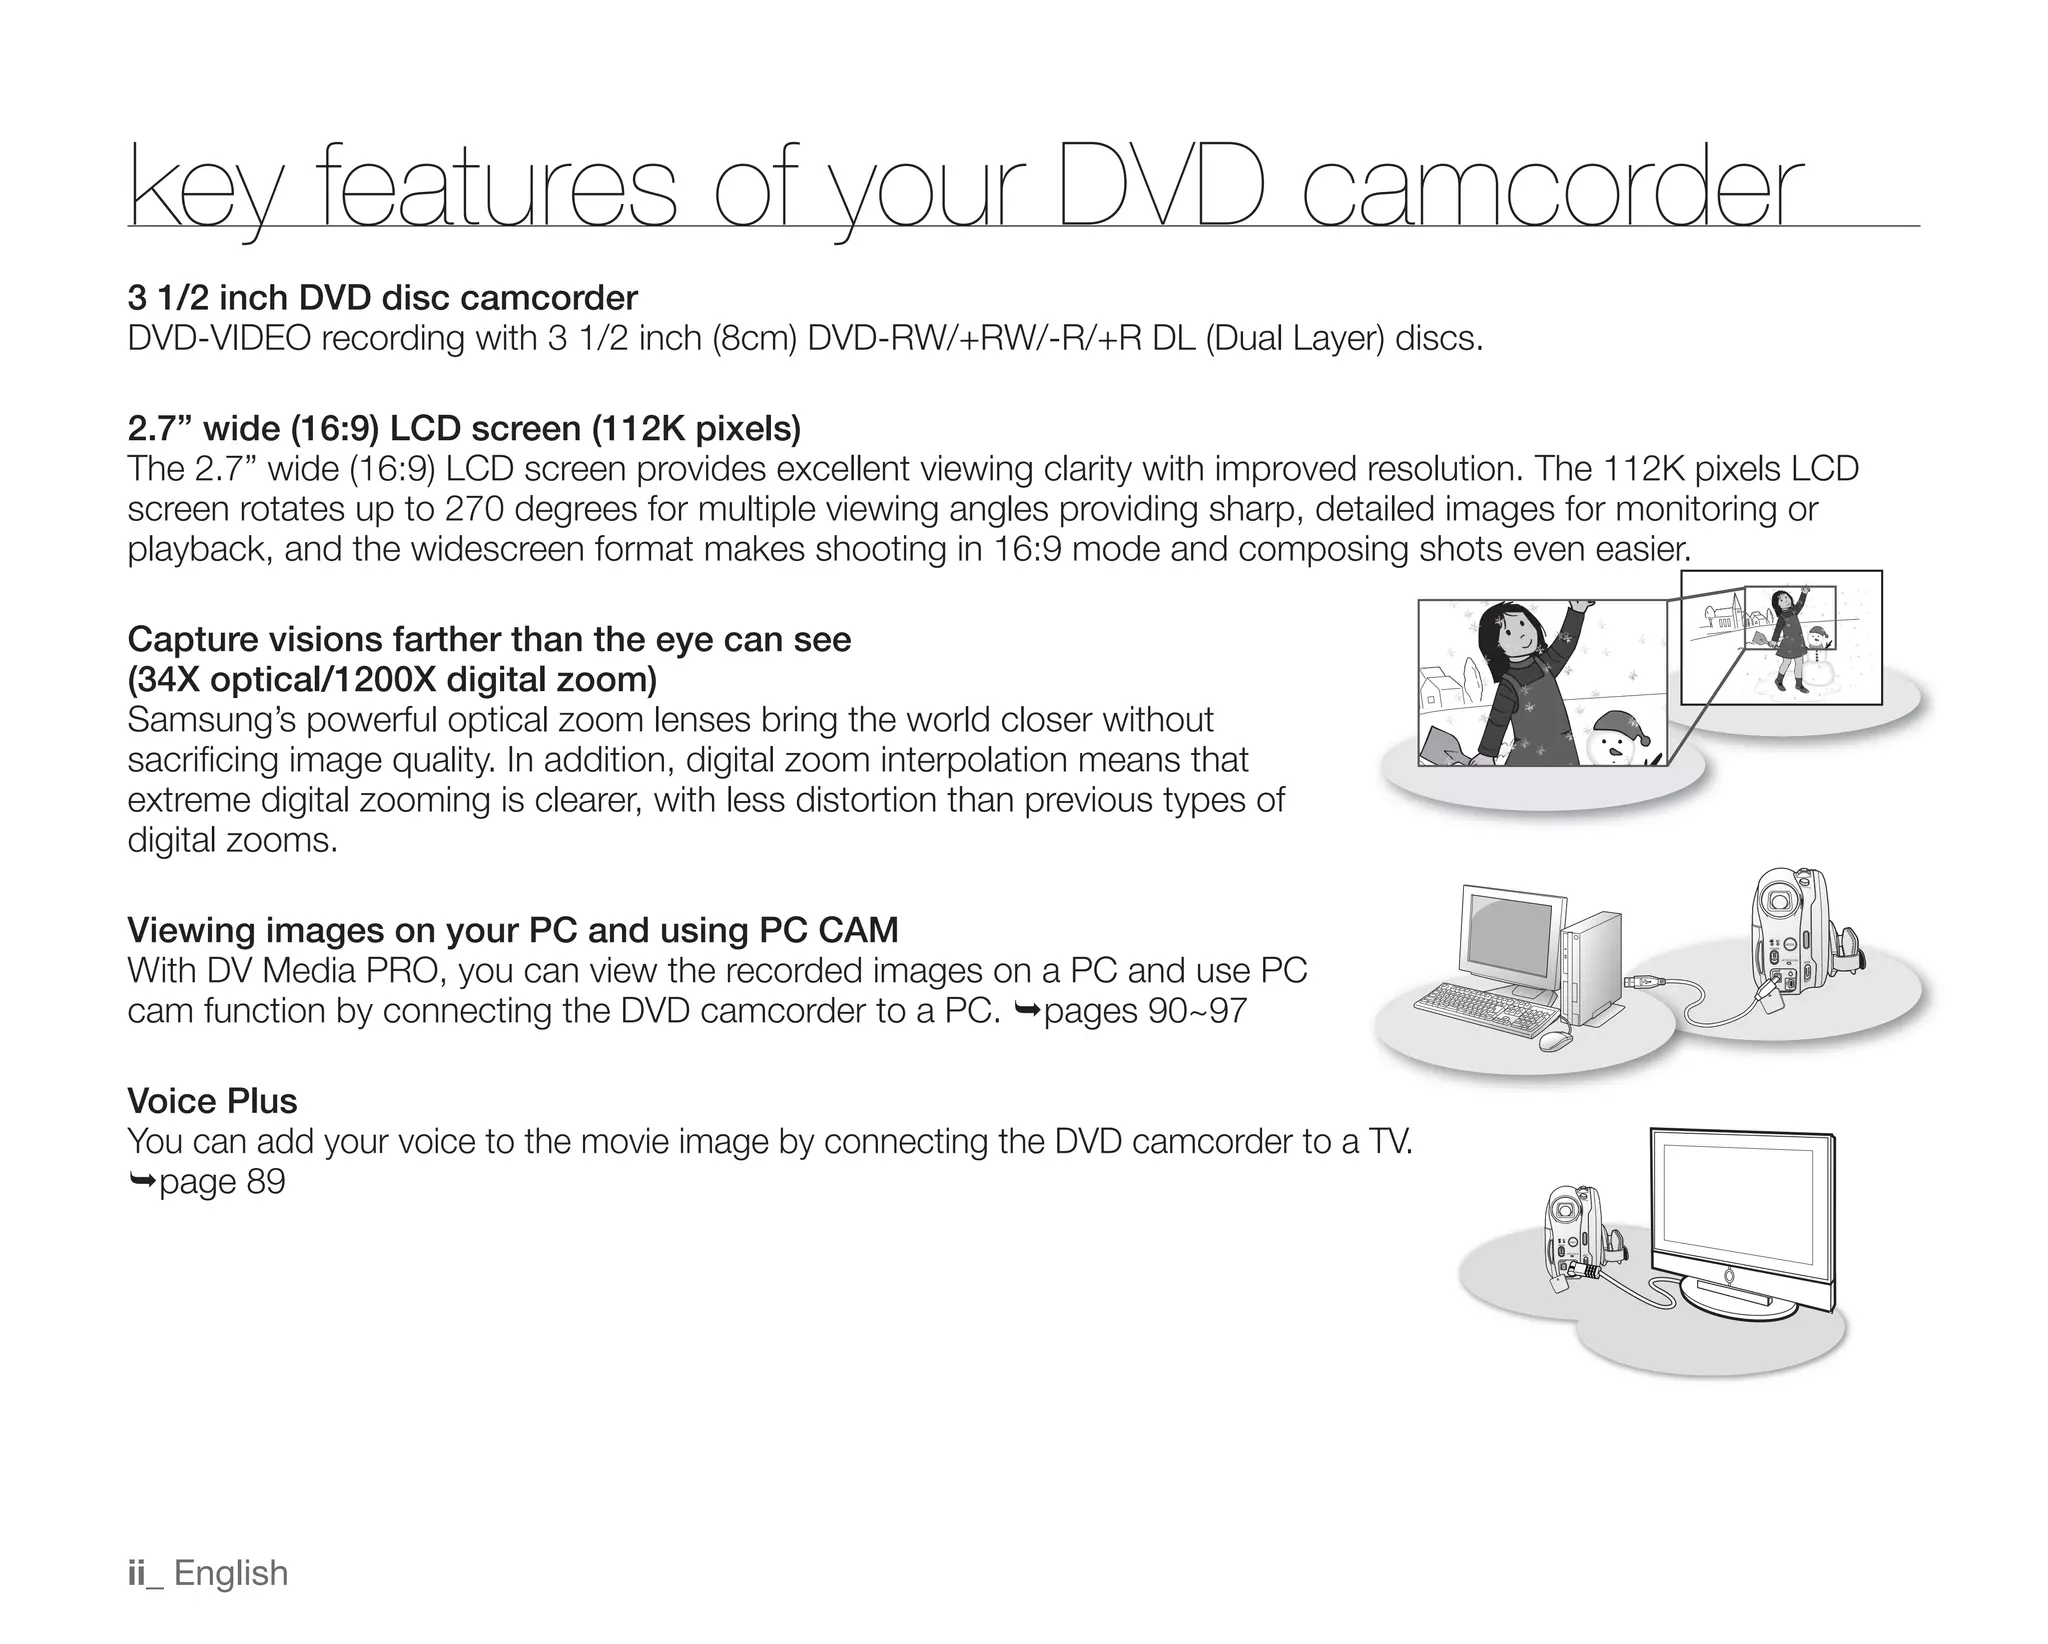
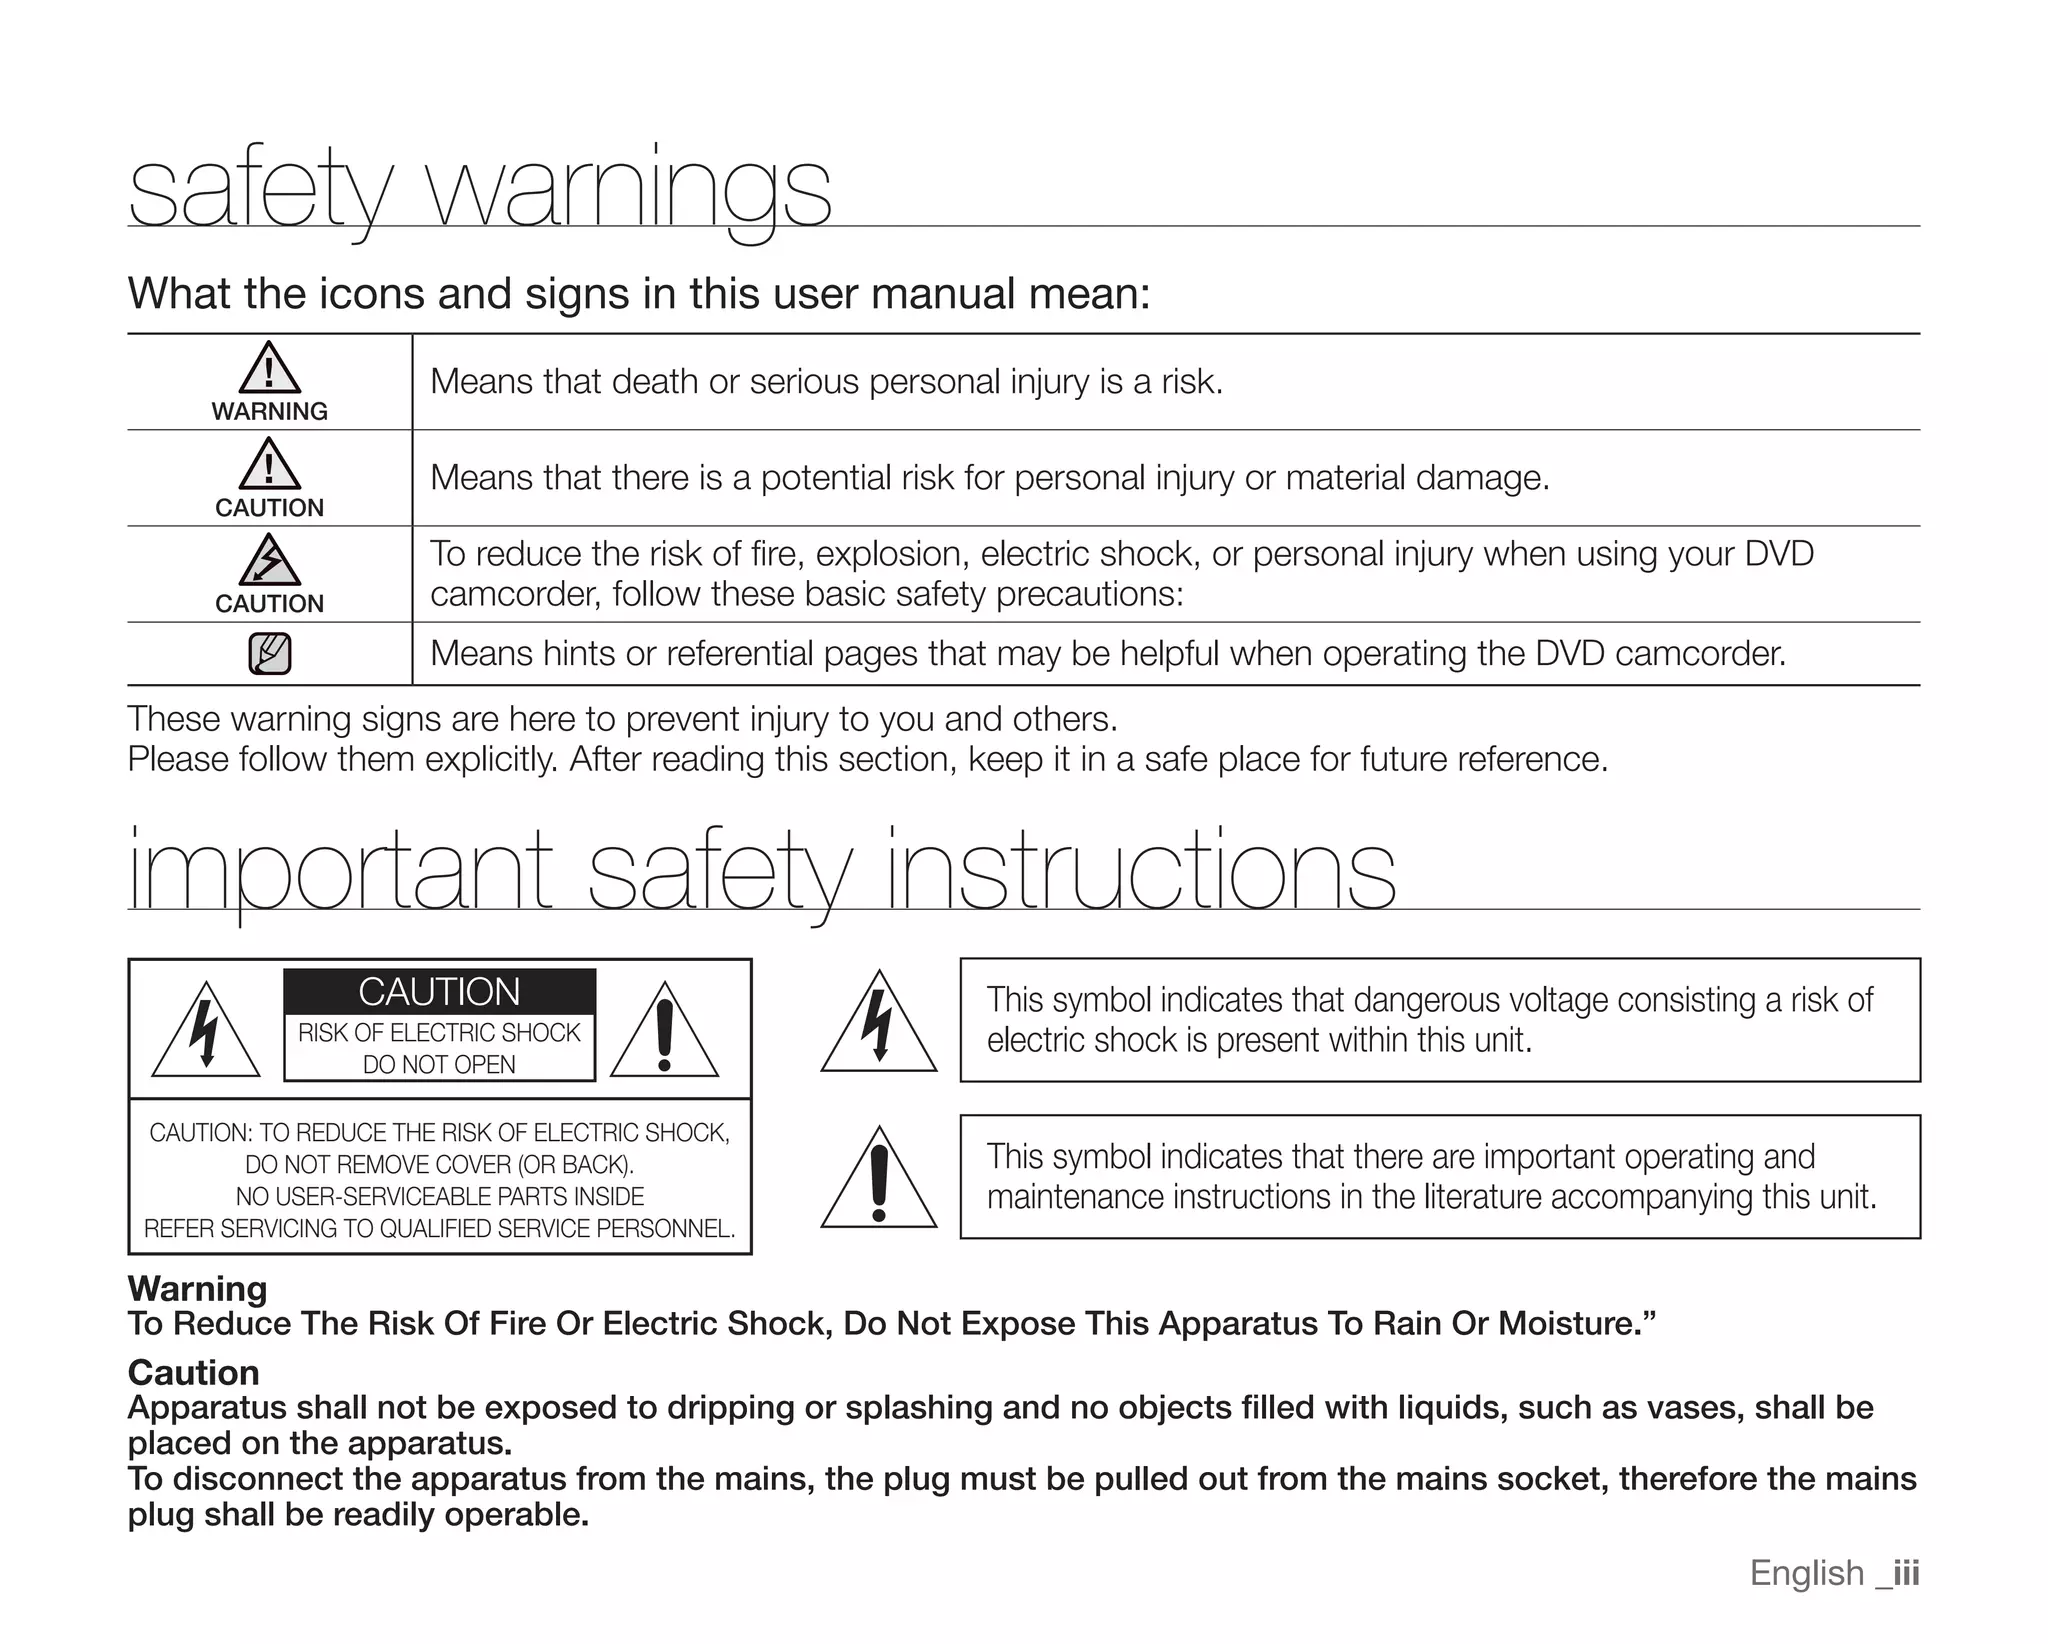
SlideShare a Scribd company logo
1 of 124
Download to read offline
SC-DX100
                                                          SC-DX103
                                                          SC-DX105


DVD Camcorder
user manual


         imagine the possibilities
         Thank you for purchasing this Samsung product.
         To receive more complete service, please
         register your product at
         www.samsung.com/global/register
key features of your DVD camcorder
3 1/2 inch DVD disc camcorder
DVD-VIDEO recording with 3 1/2 inch (8cm) DVD-RW/+RW/-R/+R DL (Dual Layer) discs.

2.7” wide (16:9) LCD screen (112K pixels)
The 2.7” wide (16:9) LCD screen provides excellent viewing clarity with improved resolution. The 112K pixels LCD
screen rotates up to 270 degrees for multiple viewing angles providing sharp, detailed images for monitoring or
playback, and the widescreen format makes shooting in 16:9 mode and composing shots even easier.

Capture visions farther than the eye can see
(34X optical/1200X digital zoom)
Samsung’s powerful optical zoom lenses bring the world closer without
sacrificing image quality. In addition, digital zoom interpolation means that
extreme digital zooming is clearer, with less distortion than previous types of
digital zooms.

Viewing images on your PC and using PC CAM
With DV Media PRO, you can view the recorded images on a PC and use PC
cam function by connecting the DVD camcorder to a PC. pages 90~97

Voice Plus
You can add your voice to the movie image by connecting the DVD camcorder to a TV.
page 89


ii_ English
safety warnings
What the icons and signs in this user manual mean:
                       Means that death or serious personal injury is a risk.
      WARNING

                       Means that there is a potential risk for personal injury or material damage.
      CAUTION

                       To reduce the risk of fire, explosion, electric shock, or personal injury when using your DVD
      CAUTION          camcorder, follow these basic safety precautions:
                       Means hints or referential pages that may be helpful when operating the DVD camcorder.
These warning signs are here to prevent injury to you and others.
Please follow them explicitly. After reading this section, keep it in a safe place for future reference.


important safety instructions
                  CAUTION                                   This symbol indicates that dangerous voltage consisting a risk of
             RISK OF ELECTRIC SHOCK                         electric shock is present within this unit.
                  DO NOT OPEN

 CAUTION: TO REDUCE THE RISK OF ELECTRIC SHOCK,
         DO NOT REMOVE COVER (OR BACK).                     This symbol indicates that there are important operating and
        NO USER-SERVICEABLE PARTS INSIDE                    maintenance instructions in the literature accompanying this unit.
 REFER SERVICING TO QUALIFIED SERVICE PERSONNEL.

Warning
To Reduce The Risk Of Fire Or Electric Shock, Do Not Expose This Apparatus To Rain Or Moisture.”
Caution
Apparatus shall not be exposed to dripping or splashing and no objects filled with liquids, such as vases, shall be
placed on the apparatus.
To disconnect the apparatus from the mains, the plug must be pulled out from the mains socket, therefore the mains
plug shall be readily operable.
                                                                                                                    English _iii
important safety instructions
1. Read these instructions.                                    12. Use only with the cart, stand, tripod, bracket, or
2. Keep these instructions.                                        table specified by the manufacturer, or sold with the
                                                                   apparatus. When a cart is used, use caution when
3. Heed all warnings.                                              moving the cart/apparatus combination
4. Follow all instructions.                                        to avoid injury from tip-over.
5. Do not use this apparatus near water.                       13. Unplug this apparatus during lightning
6. Clean only with dry cloth.                                      storms or when unused for long periods
                                                                   of time.
7. Do not block any ventilation openings. Install in
   accordance with the manufacturer’s instructions.            14. Refer all servicing to qualified service personnel.
                                                                   Servicing is required when the apparatus has been
8. Do not install near any heat sources such as radiators,
                                                                   damaged in any way, such as power-supply cord or
   heat registers, stoves, or other apparatus (including
                                                                   plug is damaged, liquid has been spilled or objects
   amplifiers) that produce heat.
                                                                   have fallen into the apparatus, the apparatus has been
9. Do not defeat the safety purpose of the polarized or            exposed to rain or moisture, does not operate normally,
   grounding-type plug. A polarized plug has two blades            or has been dropped.
   with one wider than the other. A grounding type plug
                                                               15. Apparatus shall not be exposed to dripping or
   has two blades and a third grounding prong. The wide
                                                                   splashing and no objects filled with liquids, such as
   blade or the third prong are provided for your safety. If
                                                                   vases, shall be placed on the apparatus.
   the provided plug does not fit into your outlet, consult
   an electrician for replacement of the obsolete outlet.      16. VENTILATION:
                                                                   Slots and openings in the cabinet are provided
10. Protect the power cord from being walked on or
                                                                   for ventilation to ensure reliable operation of the
    pinched particularly at plugs, convenience receptacles,
                                                                   CAMCORDER and to protect it from overheating.
    and the point where they exit from the apparatus.
                                                                   These openings must not be blocked or covered.
11. Only use attachment/accessories specified by the               Never place your CAMCORDER on a bed, sofa, rug,
    manufacturer.                                                  or other similar surface: on or near a radiator or heat
                                                                   register. This CAMCORDER should not be placed in a
                                                                   built-in installation such as a bookcase or rack unless
                                                                   proper ventilation is provided or the manufacturer’s
                                                                   instructions have been adhered to.
iv_ English
17. POWER SOURCES:                                                       70-1984, provides information with respect to proper
    The CAMCORDER should be operated only from the                       grounding of the mast and supporting structure,
    type of power source indicated on the label. If you are              grounding of the lead-in wire and supporting structure,
    not sure of the type of power supply at your home,                   grounding of the mast and supporting structure,
    consult your appliance dealer or local power company.                grounding of the lead-in wire to an antenna discharge
    A CAMCORDER is intended to be operated from                          unit, size of grounding to conductors, location of
    battery power, or other sources, refer to the operating              antenna-discharge unit, connection to grounding
    instructions.                                                        electrodes and requirements for the grounding
18. GROUNDING OR POLARIZATION:                                           electrode.
    This CAMCORDER may be equipped with either a                         See figure below.
    polarized 2-wire AC line plug (a plug having one blade
    wider than the other) or a 3-wire grounding type plug,                                                                              ANTENNA


    a plug having a third (grounding) pin. If you are unable
                                                                                                                                        LEAD IN
                                                                                                                                        WIRE
                                                                                                         GROUND


    to insert the plug fully into the outlet, try reversing the
                                                                                                         CLAMP


    plug. If the plug still fails to fit, contact your electrician                                                                     ANTENNA
                                                                                                                                       DISCHARGE UNIT
                                                                                                                                       (NEC SECTION 810-20)


    to replace your outlet. Do not defeat the safety purpose                               ELECTRIC
                                                                                           SERVICE
                                                                                           EQUIPMENT                                  GROUNDING CONDUCTORS
                                                                                                                                      (NEC SECTION 810-21)

    of the polarized plug.                                                                                               GROUND CLAMPS


                                                                                                                              POWER SERVICE GROUNDING


19. POWER-CORD PROTECTION:
                                                                                                                              ELECTRODE SYSTEM
                                                                                                                              (NEC ART 250, PART H)


    Power-supply cords should be routed so that they are                                       NEC NATIONAL ELECTRICAL CODE


    not likely to be walked on or pinched by items placed
    upon or against them, paying particular attention to             21. LIGHTNING:
    cords or plugs, convenient receptacles, and the point                For added protection of this CAMCORDER during a
    where they exit from the unit.                                       lightning storm or when it is left unattended and unused
20. OUTDOOR ANTENNA GROUNDING:                                           for long periods of time, unplug it from the wall outlet
    CAMCORDER, be sure the antenna or cable system is                    and disconnect the antenna or cable system. This will
                                                                         prevent damage to the CAMCORDER due to lightning
    grounded to provide some protection against voltage
                                                                         and powerline surges.
    surges and built-up static charges, Section 810 of the
    National Electrical Code, ANSI/NFPA No.


                                                                                                                                                              English _v
important safety instructions
22. POWER LINES:                                                       a. When the power-supply cord or plug is damaged.
    An outside antenna system should not be located in                 b. If any liquid has been spilled onto, or objects have
    the vicinity of overhead power lines or other electric                fallen into the CAMCORDER.
    light or power circuits where it can fall into such power          c. If the CAMCORDER has been exposed to rain or
    lines or circuits. When installing an outside antenna                 water.
    system, extreme care should be taken to keep from                  d. If the CAMCORDER does not operate normally
    touching such power lines or circuits as contact with                 by following the operating instructions, adjust only
    them might be fatal.                                                  those controls that are covered by the operating
23. OVERLOADING:                                                          instructions. Improper adjustment of other controls
    Do not overload wall outlets and extension cords as                   may result in damage and will often require
    this can result in a risk of fire or electric shock.                  extensive work by a qualified technician to restore
                                                                          the CAMCORDER to its normal operation.
24. OBJECTS AND LIQUIDS:                                               e. If the CAMCORDER has been dropped or the
    Never push objects of any kind into this CAMCORDER                    cabinet has been damaged.
    through openings as they may touch dangerous                       f. When the CAMCORDER exhibits a distinct change
    voltage points or short out a part that could result in a             in performance, this indicates a need for service.
    fire or electric shock. Never spill liquids of any kind onto
    the CAMCORDER. Should spillage occur, unplug unit              27. REPLACEMENT PARTS:
    and have it checked by a technician before use.                    When replacement parts are required, be sure the
                                                                       service technician has used replacement parts
25. SERVICING:                                                         specified by the manufacturer and having the same
    Do not attempt to service this CAMCORDER yourself.                 characteristics as the original part. Unauthorized
    Opening or removing covers may expose you to                       substitutions may result in fire, electric shock or other
    dangerous voltage or other hazards. Refer all servicing            hazards.
    to qualified service personnel.
                                                                   28. SAFETY CHECK:
26. DAMAGE REQUIRING SERVICE:                                          Upon completion of any service or repairs to this
    Unplug this CAMCORDER from the wall outlet and                     CAMCORDER, ask the service technician to perform
    refer servicing to qualified service personnel under the           safety checks to determine that the CAMCORDER is in
    following conditions:                                              safe operating order.


vi_ English
29. To prevent damage which may result in fire or shock              NOTE: This equipment has been tested and found to comply
    hazard, do not expose this appliance to rain or                  with the limits for a Class B digital device, pursuant to part 15
    moisture.                                                        of the FCC Rules.
30. If this power supply is used at 240V ac, a suitable plug         These limits are designed to provide reasonable protection
    adaptor should be used.                                          against harmful interference in a residential installation.
31. This product is covered by one or more of the following          This equipment generates, uses and can radiate radio
    U.S. patents:                                                    frequency energy and, if not installed and used in accordance
    5,060,220 5,457,669 5,561,649 5,705,762 6,043,912                with the instructions, may cause harmful interference to
    6,438,099 6,467,061 6,556,521 6,578,163 6,697,307                radio communications. However, there is no guarantee that
    6,728,474 6,771,891 6,894,963 6,895,593 6,937,815                interference will not occur in a particular installation.
    6,996,327 7,009,926 7,085,221 7,088,649 7,092,327                If this equipment does cause harmful interference to radio or
    7,099,566 7,123,564 7,142,493 7,142,495 7,145,861                television reception, which can be determined by turning the
                                                                     equipment off and on, the user is encouraged to try to correct
    7,146,624 7,151,729 7,161,879 7,164,647 7,167,437                the interference by one or more of the following measures:
    7,173,891 7,177,250 7,194,187 7,203,891 7,209,423                - Reorient or relocate the receiving antenna.
    7,210,067 7,228,062 7,245,566 7,245,567 7,257,065                - Increase the separation between the equipment and
    7,263,045 7,269,110 7,272,086 7,272,106 7,280,460                     receiver.
    7,283,729 7,286,454 7,304,938                                    - Connect the equipment into an outlet on a circuit different
USER INSTALLER CAUTION:
                                                                          from that to which the receiver is connected.
                                                                     - Consult the dealer or an experienced radio/TV technician
Your authority to operate this FCC certified equipment could be           for help and for additional suggestions.
voided if you make changes or modifications not expressly approved        The user may find the following booklet prepared by the
by this party responsible for compliance to part 15 FCC rules.            Federal Communications Commission helpful: “How to
                                                                          Identify and Resolve Radio-TV Interference Problems.”
NOTE:                                                                     This Booklet is available from the U.S. Government
Hg LAMP(S) INSIDE THIS PRODUCT CONTAIN MERCURY AND                        Printing Office, Washington, D.C. 20402, Stock No.
   MUST BE RECYCLED OR DISPOSED OF ACCORDING                              004-000-00345-4.
   TO LOCAL, STATE OR FEDERAL LAWS. For details see                  FCC Warning
   lamprecycle.org, eiae.org, or call 1-800-Samsung (7267864)        The user is cautioned that changes or modifications not
                                                                     expressly approved by the manufacturer could void the user’s
 CALIFORNIA USA ONLY                                                 authority to operate the equipment.
 This Perchlorate warning applies only to primary CR                 This device complies with Part 15 of FCC Rules.
 (Manganese Dioxide) Lithium coin cells in the product sold          Operation is subject to the following two conditions;
 or distributed ONLY in California USA                               (1) This device may not cause harmful interference, and
 “ Perchlorate Material - special handling may apply,                (2) This device must accept any interference received,
 See www.dtsc.ca.gov/hazardouswaste/perchlorate.”                         including interference that may cause undesired operation.


                                                                                                                        English _vii
precautions
                                                    Warning!
       • This camcorder should always be connected to an AC outlet with a protective grounding connection.
       • Batteries shall not be exposed to excessive heat such as sunshine, fire or the like.

                                                    Caution
                              Danger of explosion if battery is incorrectly replaced.
                                Replace only with the same or equivalent type.

                 If this power supply is used at 240V ac, a suitable plug adaptor should be used.

                                           CLASS 1 LASER PRODUCT
                                          KLASSE 1 LASER PRODUKT
                                            LUOKAN 1 LASER LAITE
                                           KLASS 1 LASER APPARAT
                                          PRODUCTO LASER CLASE 1


important information on use
BEFORE USING THIS CAMCORDER
• This DVD camcorder records video in MPEG2 format in the DVD camcorder mode, MPEG4 format in the
  digital camera mode and at Standard Resolution (SD-VIDEO).
• Please note that this DVD camcorder is not compatible with other digital video.
• Before recording important video, make a trial recording.
  Play back your trial recording to make sure the video and audio have been recorded properly.
• The recorded contents cannot be compensated for:
- Samsung cannot compensate for any damage caused when a recording cannot be played back because of
  a defect in the DVD camcorder or memory card. Samsung cannot be responsible for your recorded video and
  audio.
- Recorded contents may be lost due to a mistake when handling this DVD camcorder or memory card, etc.
  Samsung shall not be responsible for compensation for damages due to the loss of recorded contents.

viii_ English
•     Make a backup of important recorded data.
      Protect your important recorded data by copying the files to PC. We also recommend you copy it from your PC to other recording
      media for storage. Refer to the software installation and USB connection guide.
•     Copyright: Please note that this DVD camcorder is intended for personal use only.
      Data recorded on the card in this DVD camcorder using other digital/analog media or devices is protected by the copyright act and
      cannot be used without permission of the owner of copyright, except for personal enjoyment. Even if you record an event such as a
      show, performance or exhibition for personal enjoyment, it is strongly recommended that you obtain permission beforehand.

ABOUT THIS USER MANUAL
• This user manual covers models SC-DX100/ DX103/DX105. SC-DX103/ DX105 have two storage media, Disc
  and Card. Although the external appearance is different, they operate in the same way.
•     Illustrations of model SC-DX105 are used in this user manual.
•     The displays in this user manual may not be exactly the same as those you see on the LCD screen.
•     Designs and specifications of the camcorder and other accessories are subject to change without any notice.

(       ,    ) MARKS NEXT TO MENU HEADINGS
•     Some functions of this DVD camcorder are unavailable with memory card or disc.
      Refer to the marks to the right of each function to identify whether the memory card or disc is compatible with the
      function. Refer to these marks and identify the functions and operation to match the memory card or disc you use.

NOTES REGARDING TRADEMARKS
•     All the trade names and registered trademarks mentioned in this manual or other documentation provided with your Samsung
      product are trademarks or registered trademarks of their respective holders.
•     Windows® is registered trademark or trademark of Microsoft Corporation, registered in the United States and other countries.
•     Macintosh is the trademark of Apple Computer, Inc.
•     All the other product names mentioned herein may be the trademark or registered trademarks of their respective companies.
•     Furthermore, “TM” and “R” are not mentioned in each case in this manual.

                  •   Manufactured under license from Dolby Laboratories.
                  •   “Dolby” and the double-D symbol are trademarks of Dolby Laboratories.


    Portions of this software are copyright © 2006 The Free Type Project. Website: http://www.freetype.org. All rights reserved.

                                                                                                                           English _ix
precautions when using
IMPORTANT NOTE
• Handle the liquid crystal display (LCD) with care:
  - The LCD is a very delicate display device: Do not press its surface with force, hit it or prick it with a sharp object.
  - If you push the LCD surface, unevenness in display may occur. If unevenness does not disappear, turn the
     camcorder off, wait for a few moments, then turn it on again.
  - Do not place the camcorder with the open LCD screen down.
  - Close the LCD monitor when not using the camcorder.
• Liquid crystal display :
  - The LCD screen will be slightly dimmer than usual when the camcorder is at low temperature, as in cold areas,
     or immediately after power is turned on. Normal brightness will be restored when the temperature inside the
     camcorder rises. This has no effect on the images in the storage media, so there is no cause for concern.
• Hold the DVD camcorder correctly:
  - Do not hold the DVD camcorder by the LCD monitor when lifting it: the viewfinder or LCD monitor could detach
     and the DVD camcorder may fall.
• Do not subject the DVD camcorder to impact:
  - This DVD camcorder is a precision machine. Take great care that you do not strike it against a hard object or let it
     fall.
  - Do not use the DVD camcorder on a tripod in a place where it is subject to severe vibrations or impact.
• No sand or dust!
  Fine sand or dust entering the DVD camcorder or AC power adaptor could cause malfunctions or defects.
• No water or oil!
  Water or oil entering the DVD camcorder or AC power adaptor could cause electric shock, malfunctions or defects.
• Heat on surface of product:
  The surface of the DVD camcorder will be slightly warm when in use, but this does not indicate a fault.
• Be careful of ambient temperature:
  - Using the DVD camcorder in a place where the temperature is over 60°C (140°F) or under 0°C (32°F) will result in
     abnormal recording/playback.
  - Do not leave the DVD camcorder on a beach or in a closed vehicle where the temperature is very high for a long
     time: This could cause a malfunction.
• Do not point directly at the sun:
  - If direct sunlight strikes the lens, the DVD camcorder could malfunction or a fire could occur.
  - Do not leave the DVD camcorder with the LCD screen exposed to direct sunlight: This could cause a malfunction.
• Do not use the DVD camcorder near TV or radio:
  - This could cause noise to appear on the TV screen or in radio broadcasts.

x_ English
• Do not use the DVD camcorder near strong radio waves or magnetism:
  - If the DVD camcorder is used near strong radio waves or magnetism, such as near a radio transmitter or
      electric appliances, noise could enter video and audio that are being recorded. During playback of normally
      recorded video and audio, noise may also be present in picture and sound. At worst, the DVD camcorder could
      malfunction.
• Do not expose the DVD camcorder to soot or steam:
  - Thick soot or steam could damage the DVD camcorder case or cause a malfunction.
• Do not use the DVD camcorder near corrosive gas:
  - If the DVD camcorder is used in a place where there is dense exhaust gas generated by gasoline or diesel
      engines, or corrosive gas such as hydrogen sulphide, the external or internal terminals could corrode, disabling
      normal operation, or the battery connecting terminals could corrode, so that power will not turn on.
• Do not expose the DVD camcorder to insecticide:
  Insecticide entering the DVD camcorder could dirty the lens in the laser pickup block, and in such a case the DVD
  camcorder might not operate normally. Turn the DVD camcorder off and cover it with vinyl sheet, etc. before using
  insecticide.
• Do not use a 3 1/2 inch(8cm) CD lens cleaner:
  - Cleaning the lens is not necessary when using this DVD camcorder in the usual way.
  - Using a 3 1/2 inch(8cm) CD lens cleaner could cause this DVD camcorder to malfunction.
• Do not touch the lens in the laser pickup block.
  If you touch the lens in the laser pickup block directly it may cause a malfunction. The laser pickup block is not
  warranted for damage caused by misuse. Therefore, pay much attention when operating this camcorder.
• Do not wipe the DVD camcorder body with benzene or a thinner:
  - The coating of exterior could peel off or the case surface could deteriorate.
• Keep the memory card out of reach of children to prevent swallowing.


                                                                                                            English _xi
contents
          INTRODUCTION TO BASIC   06
                      FEATURES

    GETTING TO KNOW YOUR DVD      09   What’s included with your DVD camcorder
                  CAMCORDER       10   Front and right view
                                  11   Left side and bottom view
                                  12   Rear and top view


                   PREPARATION    13   Remote control (SC-DX105 only)


                       13
                                  14   Installing the button-type battery
                                  15   Holding the DVD camcorder
                                  16   Charging the battery pack
                                  21   Basic DVD camcorder operation
                                  22   Screen indicators
                                  26   Using the display ( ) button
                                  26   Using the joystick
                                  27   Using the LCD screen
                                  27   Using the viewfinder
                                  28   Initial setting: OSD language & date and time


          DVD CAMCORDER MODE:     30   Selecting the storage media (SC-DX103/ DX105 only)
             BEFORE RECORDING     30   Inserting and removing a disc
                                  32   Recordable time


                       30
02_ English
DVD CAMCORDER MODE:     33   Recording movie images on a disc
 RECORDING/PLAYBACK     35   Recording with ease for beginners (EASY.Q mode)


             33
                        36   Capturing still images during movie image playback
                             (SC-DX103/ DX105 only)
                        37   Zooming
                        38   Playing movie images


DVD CAMCORDER MODE:     40   Deleting images
  EDITING MOVIE IMAGE   41   Deleting a section of a movie image (partial delete)


             40
                        42   Playlist


DVD CAMCORDER MODE:     47   Disc finalize
        DISC MANAGE     49   Disc unfinalize


             47
                        50   Disc format
                        51   Disc information


                                                                            English _03
contents
              DIGITAL CAMERA MODE      52   Inserting and ejecting a memory card
              (SC-DX103/ DX105 ONLY)   55   Recordable time and number of images


                           52
                                       56   Recording movie images on a memory card
                                       57   Taking photo images
                                       58   Playing movie images
                                       59   Viewing photo images
                                       60   Protection from accidental erasure
                                       61   Deleting images


              USING THE MENU ITEMS     62   Handling menus


                           62
                                       63   Menu items
                                       65   Recording menu items
                                       78   Playback menu item
                                       78   Setting menu items


          PRINTING PHOTO IMAGES        83   DPOF print setting
           (SC-DX103/ DX105 ONLY)      84   Direct printing with a PictBridge


                           83
04_ English
CONNECTING TO AV DEVICES      86    Connecting to a TV


                  86
                              88    Dubbing images from the Camcorder to a VCR or DVD/
                                    HDD recorder
                              89    Using Voice Plus


       CONNECTING TO A PC
     (SC-DX103/ DX105 ONLY)   90    System requirements
                              91    Installing DV Media PRO


                  90          93
                              94
                              96
                                    Connecting the USB cable
                                    Viewing the contents of storage media (memory card)
                                    Transferring files on the memory card from the DVD
                                    camcorder to your PC
                              97    Using the PC cam function

          MAINTENANCE &       98  Maintenance
  ADDITIONAL INFORMATION      99  Additional information
                              102 Using your DVD camcorder abroad

        TROUBLESHOOTING       103 Troubleshooting

           SPECIFICATIONS     112

WARRANTY (SEA USERS ONLY)


                                                                               English _05
introduction to basic features
This chapter introduces the basic features of your DVD camcorder.
See the reference pages below for more information.

    Step 1 : Preparation
   • Charging the battery pack page 18                                                         INSERT
                                                                                                BATTERY

   • Setting OSD language and the date/time pages 28-29                                        PACK


   • Selecting the storage media (DISC and CARD) (SC-DX103/ DX105 only)
     page 30
      You can record movie and photo images.
      - You can take a photo only on the memory card. DVD discs do not support photo mode.
      - Refer to pages 52~54 for the supported memory cards before purchasing them.

        When recording movie images on a DVD disc
          Select the proper disc for use.
          Do you want to delete or edit movie images on the DVD camcorder?
                 YES                                NO


                          Do you want to reuse the disc after formatting ?
                                       YES                                   NO


                                                      When recording for a long time


              DVD -RW        DVD -RW        DVD +RW           DVD +R DL                DVD -R
             VR              VIDEO
        • DVD+RW, DVD+R DL and DVD-R do not have Video or VR mode selection.
        • You can delete the movie image only on a DVD-RW disc (VR mode).
        • Selecting the desired disc and disc formatting. pages 30-31


06_ English
Step 2 : Recording
• Recording movie images pages 33~37, 56
• Taking the photo images (SC-DX103/ DX105 only) page 57                                     ����


  Step 3: Playing back / Editing
• Selecting an image to play back from the thumbnail index views
  pages 38, 58~59
• Viewing playback from your DVD camcorder on your PC (SC-DX103/ DX105
  only) or TV pages 86~89, 96
• Editing movie images as your preference (Editing function is available only in
  DVD-RW(VR mode)) pages 40~46

  Step 4: Viewing on DVD devices
You must finalize the disc in advance to view the movie images recorded on a DVD camcorder on other
DVD devices. (Finalize is a function that enables a disc recorded on the DVD camcorder to be playable on
DVD devices such as DVD players.)


                                             Finalize


                                                                                                     continued

                                                                                                        English _07
introduction to basic features
     The function of the finalized disc depends on the disc type.
                        Finalized
       DVD -R
                                                                                                You cannot make more
                        Finalized                                                               recordings, even if the disc
       DVD +R                               The finalized DVD disc can be                       has enough space.
         DL                                 played on most DVD devices.
                        Finalized
                          VIDEO
      DVD -RW                                                                                   You can record more after
                        Finalized           You can play back the disc only on a                unfinalizing. page 49
                                            DVD player that supports DVD-RW
                            VR              discs recorded in VR mode.

      DVD +RW                               You can play back the disc on other DVD devices without finalizing it.


        •     You cannot use the following discs.
              - 5 inch (12cm) CD/DVD discs
              - CD/CD-R/CD-RW/DVD-ROM/DVD+R (Single Layer)/DVD-RAM/DVD-R (Dual Layer), Floppy Disk, MO, MD, iD,
                    LD
        •     We are not responsible for data loss on a disc.
        •     We do not warranty any damage or loss incurred due to recording and playback failure caused by disc or card
              malfunction.
        •     We take no responsibility and offer no compensation for any recording failure, loss of recorded or edited material
              and/or damage to the recorder arising from the misuse of discs.
        •     For stable and perpetual recording and playback, use TDK, MKM, Verbatim discs that have the “                ”
              designation. If you do not use them, recording and playback operation may not work properly or you may not be
              able to eject the disc from the camcorder.
        •     The time it takes to finalize a disc may vary depending on the recording time.
        •     You cannot overwrite, edit, or format a finalized disc. If needed, unfinalize the disc. (DVD-RW only) page 49
        •     It is not guaranteed that all DVD players/recorders/drives can play discs finalized in this DVD camcorder.
              For compatibility details, refer to the DVD players/recorders/drives owner’s manual.
        •     For more information about available discs, see page 101.
08_ English
getting to know your DVD camcorder
WHAT’S INCLUDED WITH YOUR DVD CAMCORDER
Your new DVD camcorder comes with the following accessories. If any of these items is missing from your box, call
Samsung’s Customer Care Center.
✪ The exact appearance of each item may vary by model.


       Battery pack              AC power adaptor                                             USB cable
                                                                   AV cable
        (IA-BP80W)                  (AA-E9 type)                                            (AK39-00095A)
                                                                (AD39-00001A)
      (AD43-00186A)               (AD44-00116B)                                         (SC-DX103/ DX105 only)


                                                                    Button-type battery(AD43-10130H)
       User manual                Quick start guide
                                                                     for internal clock(TYPE: CR2025)
      (AD68-02550A)                (AD68-02561A)
                                                                     or remote control(SC-DX105 only)


     Remote control                 Software CD               3 1/2 inch(8cm)
      (AD59-00155A)                (AD46-00097A)            DVD-RW disc(Option)
     (SC-DX105 only)           (SC-DX103/DX105 only)          (AD46-00090A)
      The contents may vary depending on the sales region.
      Parts and accessories are available at your local Samsung dealer.
      A memory card is not included. See pages 52~53 for memory cards compatible with your DVD camcorder.
       (SC-DX103/ DX105 only)
      To buy this optional accessory, contact your nearest Samsung dealer.
                                                                                                 English _09
getting to know your DVD camcorder
FRONT AND RIGHT VIEW


                                                           CLOSE


                                                    OPEN
                                                    ����


   Lens open/close switch          Grip belt hook
   Lens                            Grip belt
   Remote sensor (SC-DX105 only)   Swivel handle
   Light (SC-DX105 only)           Disc cover
   Internal microphone


10_ English
LEFT AND BOTTOM VIEW


  Display (    ) button             Battery pack
  EASY Q button                     LCD screen
  Built-in speaker                  Recording start/stop button
  FINALIZE button                   Joystick (up/down/right/left/Select, W/T)
  BATT. (battery release) switch    MENU button
  Storage mode switch (DISC/CARD)   Tripod receptacle
  (SC-DX103/ DX105 only)            Memory card slot (SC-DX103/ DX105 only)


                                                                          English _11
getting to know your DVD camcorder
REAR AND TOP VIEW


   Viewfinder                            OPEN switch
   Zoom (W/T) lever/ Volume control      AV jack
   PHOTO button (SC-DX103/ DX105 only)   USB jack (SC-DX103/ DX105 only)
   Focus adjustment knob                 DC IN/ USB (SC-DX103/ DX105 only) /
   MODE button / Mode indicator          AV jack cover
   (Record ( )/Play ( ) mode)            DC IN jack
   Recording start/stop button           POWER switch
   ACCESS/CHG indicator


12_ English
preparation
This section provides information on using this DVD camcorder; such as how to use the provided accessories, how
to charge the battery, how to setup the operation mode and initial setup.

REMOTE CONTROL (SC-DX105 only)


                                                                  START/STOP button
                                                                  DISPLAY button
                                                                  Skip ( / ) button
                                                                  Stop ( ) button
                                                                  Play/Pause ( ) button
                                                                  MENU button
                                                                  Control ( / / / / )buttons
                                                                  PHOTO button
                                                                  Zoom (W/T) button
                                                                  Search ( / ) button
                                                                  Slow playback ( ) button

                                                                    The buttons on the remote control function
                                                                    the same as those on DVD camcorder.

                                                                                                     English _13
preparation
INSTALLING THE BUTTON-TYPE BATTERY
Installation for the internal clock (battery release) switch
1. Open the LCD screen, then slide the BATT. (battery release) switch in the arrow direction
     to remove the battery pack.
2. Remove the battery cover.
3. Insert the button-type battery then place the battery cover back.
     - Position the button type battery with the positive (+) terminal face out in the button
         type battery slot.
                                                                                                    Battery release
                                                                                                    switch


Battery installation for the internal clock
The button type battery maintains the clock function and preset contents of the memory
: even if the battery pack or AC power adapter is removed.                                      1
The button type battery for the DVD camcorder lasts about 6 months under normal
operation from the time of installation.
When the button type battery becomes weak or dead, the date/time indicator will display
“JAN/01/2008 12:00 AM” when you turn the date and time display on.
Installing the button-type battery in the remote control (SC-DX105 only)
1. Turn the battery holder counterclockwise (as indicated with () mark) using your
     fingernail or a coin to open it. The battery holder opens.
                                                                                                2
2. Insert the battery into the battery holder with the positive (+) terminal facing down and
     press it firmly until you hear a locking sound.
                                                                                                    Battery
3. Place the battery holder back in the remote control, matching its () mark with the ()
     mark on the remote control, and turn the battery holder clockwise to lock it.                  holder
                                                                                                3
Precautions regarding the button type battery
• There is a danger of explosion if button type battery is incorrectly replaced. Replace only
     with the same or equivalent type.
• Do not pick up the battery using tweezers or other metal tools. This will cause a short
     circuit.
• Do not recharge, disassemble, heat or immerse the battery in water to avoid the risk of
     explosion.
        Keep the button type battery out of the reach of the children. Should any battery
WARNING
        be swallowed, seek medical attention immediately.
14_ English
HOLDING THE DVD CAMCORDER

Attaching the grip belt
Insert your right hand from the bottom of the DVD
camcorder up to the base of your thumb.
Put your hand in a position where you can easily                                 
operate the Recording start/stop button,
PHOTO button, and the Zoom lever.
Adjust the length of grip belt so that the DVD
camcorder is stable when you press the
Recording start/stop button with your thumb.
1. Pull and detach the grip belt.
   Insert the grip belt into its hook as shown in the figure.
2. Insert your hand into the grip belt and adjust its length.
3. Close the grip belt.

Angle Adjustment
Rotate the swivel handle to the most convenient angle.
You can rotate it downwards upto 140°.

      Please be careful not to turn the swivel handle backward as it
      may cause damage.

                                                                           140°


                                                                                      English _15
preparation
CHARGING THE BATTERY PACK
• There are two types of power source that can be connected to your DVD camcorder.
• Do not use provided power supply units with other equipment.
  - The battery pack: used for outdoor recording.
  - The AC power adaptor: used for indoor recording.
To charge the battery pack
Be sure to charge the battery pack before you start using your DVD camcorder.
Attaching the battery pack to the DVD camcorder
1. Open up the LCD screen 90 degrees with your finger.
2. Fit the battery pack to the battery attachment platform and push the battery
     pack as shown in the figure until a click is heard.
Removing the battery pack from the DVD camcorder
1. Open up the LCD screen 90 degrees with your finger.
2. Slide the BATT. (battery release) switch in the direction as shown in the figure
     and pull out the battery pack.
        Insert the battery pack in the accurate direction as shown in the figure.
WARNING
        When the battery pack is wrongly inserted, it may cause malfunction of the
        DVD camcorder and battery pack.
         It is recommended that you purchase one or more additional battery
           packs to allow continuous use of your DVD camcorder.
         Additional battery packs are available at your local Samsung dealer.
         If the DVD camcorder will not be in use for a while, remove the battery
           from the DVD camcorder.                                                    �����

   Use only Samsung-approved battery packs. Do not use batteries from other
   manufacturers.
   Otherwise, there is a danger of overheating, fire or explosion.
   Samsung is not responsible for problems occurring due to using unapproved
   batteries.

16_ English
About battery packs
• The battery pack should be recharged in an environment that is between 0°C (32°F) and 40°C (104°F).
  However, when it is exposed to cold temperatures (below 0°C (32°F)), its usage time becomes reduced and it
  may cease to function. If this happens, place the battery pack in your pocket or other warm, protected place for a
  short time, then re-insert it to the DVD camcorder.
• Do not put the battery pack near any heat source (i.e. fire or a heater).
• Do not disassemble, apply pressure to, or heat the battery pack.
• Do not allow battery pack terminals to be short-circuited. It may cause leakage, heat generation, induce
  overheating or fire.
Maintaining the battery pack
• The recording time is affected by temperature and environmental conditions.
• The recording time shortens dramatically in a cold environment. The continuous recording times in the user
  manual are measured using a fully charged battery pack at 25°C (77°F). As the environmental temperature and
  conditions vary, the remaining battery time may differ from the approximate continuous recording times given in
  the instructions.
• We recommend only using the original battery pack that is available from your Samsung retailer. When the battery
  reaches the end of its life, please contact your local dealer. The batteries have to be treated as chemical waste.
• Make sure that the battery pack is fully charged before starting to record.
• When fully discharged, a battery pack damages the internal cells. The battery pack may be prone to leakage
  when fully discharged.
• Remove the battery from the camcorder when it is not in use. Even when the power is switched off, the battery
  pack will still discharge if it is left attached to the DVD camcorder.
• For power saving purposes, the DVD camcorder enters the sleep mode automatically if no operation is performed
  for 3 minutes in the STBY mode and thumbnail index view. If no operation is made for 3 more minutes while the
  unit is sleep mode, the camcorder turns off automatically. However, if any operation is made, the DVD camcorder
  comes out of sleep mode. This function works only if “Auto Power Off” is set to “6 Min.”page 80
• Make sure that the battery pack fits firmly into place. Do not drop the battery pack as it may cause damage.
About the battery life
Battery capacity decreases over time and through repeated use.
If decreased usage time between charges becomes significant, it is probably time to replace it with a new one.
Each battery’s life is affected by storage, operating and environmental conditions.


                                                                                                         English _17
preparation
Charging the battery pack
                                                                                                      POWER switch
• Use the IA-BP80W battery pack only.
• The battery pack may be charged a little at the
   time of purchase.
1. Slide the POWER switch downwards to turn off
   the power.
2. Open the LCD screen and attach the battery pack
   to the DVD camcorder. page 16
3. Open the DC IN/USB/AV jack cover.
4. Connect the AC power adaptor to the DC IN jack
   of your DVD camcorder.
5. Connect the AC power adaptor to a wall socket.
   • The ACCESS/CHG (charging) indicator
       lights up in orange and charging starts. The
       ACCESS/CHG (charging) indicator lights up in
       green when the battery is fully charged.
6. Once charged, disconnect the AC power adaptor
   from the DC IN jack on your DVD camcorder.
   • Even with the power switched off, the battery pack will still discharge if it is left attached to the DVD camcorder.
       It is recommended that you remove the battery pack from the DVD camcorder.

Charging indicator
The color of the ACCESS/CHG (charging) indicator indicates the power or                    ����
charging state.
- If the battery has been fully charged, the charging indicator is green.
- If you are charging the battery, the color of the charging indicator is orange.
- If an error occurs while the battery pack in charging, the charging indicator
   blinks orange.


18_ English
Charging, recording and playback times with a fully charged battery pack
(with no zoom operation, etc.)
For your reference, the approximate time with a fully charged battery pack:
                                                    Battery Pack
               Charging time                                            1 hr 50 min
      Quality                               Continuous recording time                     Playback time
                            LCD
     Super Fine                                        50min                                  55min
                         Viewfinder
                            LCD
        Fine                                           60min                                  65min
                         Viewfinder
                            LCD
      Normal                                           70min                                  75min
                         Viewfinder
-   The time is only for reference. Figures shown above are measured under Samsung’s test environment, and may
    differ from your actual use.
-   The charging time will vary depending on the remaining battery level.

Continuous recording time (without zoom)
The times shown in the table reflect the available recording time when the DVD camcorder is in the recording mode
without using any other functions. In actual recording, the battery pack may discharge 2-3 times faster than this
reference since the record start/stop and zoom are being operated, and playback is performed. Assume that the
recordable time with a fully charged battery pack is between 1/2 and 1/3 of the time in the table, so prepare enough
battery packs to allow for the time you are planning to record on the DVD camcorder.
Note that the battery pack discharges faster in a cold environment.


                                                                                                          English _19
preparation
Using the DVD camcorder with the AC power adaptor
It is recommended that you use the AC power adaptor to power the DVD camcorder from a household AC outlet
when you perform settings on it, finalize a disc, play back, or edit images, or use it indoors. page 18
           Be sure to use the provided AC power adaptor to power the DVD camcorder. Using other AC power
            adaptors could cause electric shock or result in fire.
           The AC power adaptor can be used around the world. An AC plug adaptor is required in some foreign
            countries. If you need one, purchase it at your local Samsung dealer.
          • Before detaching the power source, make sure that the DVD camcorder’s power is turned off.
CAUTION
            Failure to do so can result in DVD camcorder malfunction.
          • Use a nearby wall outlet when using the AC power adaptor. Disconnect the AC power adaptor from the wall
            outlet immediately if any malfunction occurs while using your DVD camcorder.
          • Do not use the AC power adaptor in a narrow space, such as between a wall and furniture.


20_ English
BASIC DVD CAMCORDER OPERATION

Turning the DVD camcorder on and off                                                               ����


You can turn the camcorder on or off by sliding the POWER switch down.

Selecting the operating modes
• Set the operation mode by adjusting the Storage mode switch (SC-DX103/ DX105 only)
   and MODE button before recording or operating any functions.
1. Set the Storage mode switch to DISC or CARD. (SC-DX103/DX105 only)                    STBY 0:00:00 [30 min]

   - DVD camcorder mode: To record movie on a DVD disc. page 33
   - Digital camera mode: To record movie or photo images on a memory card.
      pages 56~57
2. Press the MODE button to set Record( ) or Play( ) mode. Each press of the MODE
   button toggles between the Record( ) mode and Play( ) mode.
                                                                                     <DVD camcorder record mode>
     When the DVD camcorder is turned on, the self-diagnosis function operates and a
     message may appear. In this case, refer to warning indicators and messages (on
     pages 103~105) and take corrective action.
                                                                                                                             12/12


                                                                                           <DVD camcorder play mode>


 When using this camcorder first time
 • When you use your DVD camcorder for the first time or you reset it, you will see the        Date/Time Set
   “Date/Time Set” screen for the startup display. If you do not set the date and time,   Month Day Year Hour Min

   the “Date/Time Set” screen appears every time you turn on your camcorder.              JAN / 01 / 2008   12 : 00 AM    Ok
                                                                                                                         Cancel


                                                                                                               English _21
preparation
SCREEN INDICATORS
                                                           DVD camcorder (disc) record mode
                                                             Movie record mode
              STBY     0:00:00 [30 min]                      Operating mode (STBY (standby) or  (recording))
                                                             Warning indicators and messages
                                                             Time counter (movie recording time)
                                                             Remaining time
                                                             Storage media (disc)
                       Insert Disc                           Battery info.(remaining battery level)
          21
                                                             Disc format type (DVD-RW disc only)
          1/60                                               Quality
      JAN/01/2008 12:00 AM                1/30               Anti-Shake (DIS)
                                                             Wind Cut
                                                             Back Light
                                                             Fader*
                                                             Light* (SC-DX105 only)
                                                             C. Nite*
                                                             Zoom/Digital Zoom position*
                                                             Date/Time
     • This OSD indicators are based on using a DVD-         Manual Shutter*
       RW disc.                                              Manual Exposure*
     • The above screen is an example for explanation:
       It is different from the actual display.              Digital Effect
     • Functions marked with * will not be retained when     Manual Focus*
       the DVD camcorder is powered on after turning it      White Balance
       off.                                                  Scene Mode (AE)/ EASY.Q
     • The battery indicator appears 8 seconds after
       power on. If the battery is low, it appears right
       after power on.
22_ English
DVD camcorder (disc) play mode
                                           Movie play mode
                                           Operating status (Play/Pause)
                 0:00:59                   Warning indicators and messages
                                           Time code (elapsed time)
                                           Storage media (disc)
                                           Battery info (remaining battery level)
         Activate Remote Control           Disc Format (-RW Video/VR mode only)
                                           Quality
                 02
                                           Voice plus
JAN/01/2008 12:00 AM               001     Movie No.
                                           Date/Time
                                           Volume control


                                                                                    English _23
preparation
                                                       Digital camera (memory card) record mode
                                                         Record mode
                                                         Operating mode (STBY (standby) or ●(recording))
                                                         Warning indicators and messages
               STBY         0:00:00 [64 min]
                                                         Time counter (movie recording time)
                                               4830
                                                         Remaining time
                                                         Storage media (memory card)
                                                         Battery info (remaining battery level)
                         Insert Card                     The total number of recordable photos
              29
                                                         Back Light
                                                         Zoom position
         JAN/01/2008 12:00 AM
                                                         Date/Time
                                                         Manual Exposure*
                                                         Manual Focus*
                                                         White Balance


     The digital camera mode is for models SC-DX103/
     DX105 only.


24_ English
Digital camera (memory card) play mode (Video)
                                           Video play mode
                                           Operating status (Play/Pause)
               0:00:03                     Time code (elapsed time)
                                           Warning indicators and messages
                                           Storage media (memory card)
                                           Battery info (remaining battery level)
                                           Erase Protection
        Activate Remote Control
        Activate Remote Control            File Name (folder-file name)
                  02
                                           Volume control
                  02

                                           Date/Time
JAN/01/2008 12:00 AM         100-0002

                                        Digital camera (memory card) play mode (Photo)
                                           Photo play mode
                                           Slide Show
                                           Image counter
                                           (current image/total number of recorded images)
                                           Warning indicators and messages
                   9/9                     Storage media (memory card)
                                           Battery info (remaining level)
    1
                                           Erase Protection
                                           File Name (folder-file name)
                                           Date/Time
        Activate Remote Control
        Activate Remote Control            Print Mark(DPOF)
                                           Photo size
JAN/01/2008 12:00 AM         100-0002       The digital camera mode is for models SC-DX103/
                                            DX105 only.


                                                                                    English _25
preparation
USING THE DISPLAY (             ) BUTTON
Switching the information display mode
You can switch between the on-screen information display modes:
Slide the POWER switch downwards to turn on the power, and then press the Display
(    ) button.
Each press of the Display button toggles the OSD (On Screen Display) function on and off.
• Full display mode: All information will appear.
• Minimum display mode: Only operating status indicators will appear.
If the DVD camcorder has warning information, a warning message will appear.


USING THE JOYSTICK
The Joystick is used to make a selection and to move the cursor left, right, up and down.
Using the Joystick, you can easily make your selection and navigate the menu.
1. Move to a previous menu item / Adjust the selected item (to the left).
2. Move to a sub menu item / Adjust the selected item (to the right).
3. Move to a lower menu item.
4. Move to an upper menu item.
5. Press to select the chosen item (Select).

    1               2               3                4               5


26_ English
USING THE LCD SCREEN
Adjusting the LCD screen
1. Open up the LCD screen 90° with your finger.
2. Rotate it to the best angle to record or play.

          Do not lift the DVD camcorder by holding the LCD screen.
WARNING


          • Over-rotation may cause damage to the inside of the hinge that
            connects the LCD screen to the DVD camcorder.
          • See page 79 to adjust brightness and color of the LCD screen.


USING THE VIEWFINDER
You can view pictures through the viewfinder or see correct images when the picture on the
LCD screen is poor.
The viewfinder will work when the LCD screen is closed.

Adjusting the focus
The focus adjustment knob of the viewfinder enables individuals with vision problems to see
clearer images.
1. Close the LCD screen.
2. Use the focus adjustment knob of the viewfinder to focus the picture.
          Viewing the sun or any strong light source through the viewfinder for a prolonged period may be harmful, or
          cause temporary impairment.


                                                                                                             English _27
preparation
INITIAL SETTING: OSD LANGUAGE & DATE AND TIME
• Initial setting is available in all operating modes. page 21                               STBY      0:00:00 [30 min]

• To read the menus or messages in your desired language, set the OSD language.
  To store the date and time during record, set the date/time.
• Set the date and time when using this camcorder for the first time. page 21
  You can also set the date and time using the setting menu. page 29

Selecting the OSD language                                                                    STBY      0:00:00 [30 min]

You can select the desired language to display the menu screen and the messages.              Setting
1. Press the MENU button.                                                                  Date/Time Set
   • The menu will appear.                                                                 Date/Time
                                                                                           LCD Brightness
                                                                                                                   Off
                                                                                                                   18
2. Move the Joystick right or left to select “Setting.”                                    LCD Color               18

   • The setting menu will appear.                                                                        Select

3. Move the Joystick up or down to select “Language,” then press the Joystick.                STBY      0:00:00 [30 min]
4. Move the Joystick up or down to select the desired language, then press the Joystick.
5. To exit, press the MENU button.                                                            Setting
                                                                                           Transparency            20%
     • Even if the battery pack or AC power were removed, the language setting would       Language
                                                                                           Demo
                                                                                                                   English
                                                                                                                   On
       still be preserved.
     • “Language” options may be changed without prior notice.                                            Select


28_ English
Setting the date and time
Set the date and time when using this DVD camcorder for the first time.
The recording date/time is recorded on the movie/photo(SC-DX103/DX105 only) images.
1. Press the MENU button.
   • The menu will appear.                                                                        STBY      0:00:00 [30 min]
2. Move the Joystick right or left to select “Setting.”
   • The setting menu will appear.
3. Move the Joystick up or down to select “Date/Time Set,” then press the Joystick.
   • The month will be selected.
4. Move the Joystick right or left to the desired item(Month, Day, Year, Hour, Min AM/PM)
   and then move the Joystick up or down to set values.
5. To save the date and time, move the Joystick right or left to “Ok,” then press the
   Joystick.                                                                                      Setting

   • To cancel the setting, move the Joystick to select “Cancel,” then press the Joystick.     Date/Time Set
                                                                                               Date/Time                Off
6. To exit, press the MENU button.                                                             LCD Brightness           18
                                                                                               LCD Color                18
     • If the button type battery is exhausted, the date and time will be reset as                             Select

       “JAN/01/2008 12:00 AM.”
       Replace with the button type battery for internal clock. page 14                          Date/Time Set
     • You can set the year up to 2040.                                                      Month Day Year Hour Min

     • The date and time do not appear during recording, but they are automatically          JAN / 01 / 2008     12 : 00 AM     Ok
                                                                                                                               Cancel
       recorded on the storage media, and can be displayed when you turn the date and
       time display on.
Turning the date and time display on/off
To switch the date and time display on or off, access the menu and change the date/time mode. page 79


                                                                                                                  English _29
DVD camcorder mode: before recording
SELECTING THE STORAGE MEDIA (SC-DX103/ DX105 only)
You can record movies onto a DVD disc, and you can record both movies and photos onto a memory card. With
models SC-DX103/DX105, you must select the desired storage media before starting recording or playback.
Selecting the desired storage
• Set the Storage mode switch to DISC or CARD. (DISC  CARD)                              ����       ����

  - DVD camcorder mode: To record movies on a DVD disc. page 33
  - Digital camera mode: To record movies or photo images on memory card.
     pages 56~57
INSERTING AND REMOVING A DISC
• When inserting a disc or closing the disc cover, do not apply excessive force. It may
  cause a malfunction.                                                                    1
• You cannot open the disc cover while loading.
• You can use a new 3 1/2 inch(8cm) DVD-RW, DVD+RW, DVD-R or DVD+R DL (Dual                   ����

  Layer) disc for movie recording. Photos can not be recorded onto a DVD disc.
Inserting a disc
1. Slide the OPEN switch in the direction of the arrow.
   • The disc cover will partially open.
2. Gently open the cover the rest of the way by hand.
3. Push the disc into the disc compartment until a click is heard.                        3
   • The recording side of the disc must face the inside of the DVD camcorder.
   • Do not touch the pickup lens.
4. Gently push the disc cover to close it.
   • Once inserted, the disc is recognized and the ACCESS/CHG indicator blinks.
       Do not cut off the power supply during this time. Do not shake nor apply impact.
       It may cause a malfunction.
   • Set the Storage mode switch to DISC. (SC-DX103/ DX105 only)
                                                                                          4


30_ English
• Move the grip belt so it does not interfere with inserting or ejecting the disc.
     • The disc cover can be opened when the device is connected to an AC power adaptor or the battery pack,
       even if the power is off.

                    Caution
                    This product utilises a laser. Use of controls or adjustments or performance of procedures
                    other than those specified herein may result in hazardous radiation exposure.
                    Do not open covers and do not look inside the product if interlock mechanism is damaged.
                    Warning
                    Be careful not to damage the interlock mechanism.
  pickup lens


When using a new disc: formatting a new disc
Formatting may be required if a new disc is inserted.
Recognition of the disc will start.
For a DVD-R/+R DL disc: Formatting will automatically begin.
For a DVD-RW disc: The Format menu is offered. Select the recording format, Video mode or VR mode.
Format the disc in the “Disc Manage” menu when you want to format again. page 50

                 Video (Video Mode) : If the disc has been finalized, you will be able
 Differences     to play the disc on most DVD players/recorders/drives.                            Format the disc in Video mode?
                                                                                                   - Can play in DVD devices.
 between Video                                                                                     - Cannot edit in camcorder.
                                                                                                   If not, Remove the disc.
 and VR mode     VR (VR Mode) : You can edit the disc on a DVD camcorder, but playback            Video                VR
                 is possible only on a DVD recorder that supports VR mode.

                                        - Refer to page 8 for finalized disc compatibility. <When a DVD-RW disc is formatted.>

For a DVD+RW disc: The Format menu is offered. Formatting makes the recorded disc new and reusable by
deleting all the data recorded on the disc.


                                                                                                                       English _31
DVD camcorder mode: before recording
Removing a disc
1. Slide the OPEN switch in the direction of the arrow.
   • The disc cover will partially open.
2. Gently open the cover the rest of the way by hand.
3. Remove the disc.
   • While pushing down the center portion of the disc spindle, pick up the disc by the edges to remove.
4. Gently push the disc cover to close it.
      •    The Finalize/Format functions are not available when the battery level is low ( ).
           Use the AC power adaptor when finalizing/formatting a DVD disc.
      •    You cannot open the disc cover while loading. Wait until disc loading is completed.
      •    Do not operate the POWER switch or remove a disc while accessing it.
           Doing so may damage the disc or the data on it.
      •    You can not proceed with recording when the disc cover is open. An icon and message are shown that recording is
           impossible with the disc cover open.
      •    It may take longer to open the cover when using a DVD+RW. More than 5 minutes may be required if there are a lot of
           movie images recorded on the disc.

RECORDABLE TIME
Recordable time for movie images
           Storage                             DVD+RW/-RW/-R                                           DVD+R DL
                       Capacity
                                                    1.4GB                                                2.6GB
Movie Quality
          Super Fine                             Approx. 20min                                        Approx. 35min
             Fine                                Approx. 30min                                        Approx. 53min
           Normal                                Approx. 60min                                       Approx. 106min

Actual formatted capacity may be less as the internal firmware uses a portion of the memory.
      •    The above figures are measured under Samsung’s standard recording test conditions and may differ depending on actual use.
      •    The DVD camcorder provides three quality options for movie recordings: “Super Fine,” “Fine” and “Normal.”
           The higher the quality setting is, the more memory is used.
      •    The compression rate increases when choosing lower quality settings. The higher the compression rate is, the longer the
           recording time will be. However, the picture quality will be lower.
      •    Movie image files recorded on other equipment are not playable on this DVD camcorder.

32_ English
DVD camcorder mode: recording/playback
RECORDING MOVIE IMAGES ON A DISC
• Set the Storage mode switch to DISC before recording on a disc.                         STBY   0:00:00 [30 min]

   (SC-DX103/ DX105 only) page 30
• You can record movie images using the remote control. (SC-DX105 only) page 13
• This DVD camcorder provides two Recording start/stop buttons. One is on the rear
   side of the camcorder and the other is on the LCD panel. Select the Recording start/
   stop button that works best for you.
1. Turn the DVD camcorder on.
   • Connect a power source to the DVD camcorder.
      (A battery pack or an AC power adaptor)
   • Slide the POWER switch downwards to turn the DVD camcorder on.
   • Set the Storage mode switch to DISC. (SC-DX103/ DX105 only) page 30                               ����


2. Check the subject on the LCD screen. (Lens and LCD)
   • Set the Lens open/close switch to open ( ). page 10
3. Press the Recording start/stop button.
   • The () recording indicator will display, and recording will start.
   • Press the Recording start/stop button again to stop recording.
                                                                                                               ����


4. When recording is finished, turn the DVD camcorder off.


                                                                                                0:00:00 [30 min]


                                                                                                      English _33
DVD camcorder mode: recording/playback
     • The recorded movie image size is 720X480.
     • Eject the battery pack when you have finished recording to prevent unnecessary battery power
       consumption.
     • For on-screen information display, see page 22.
     • For approximate recording time, see page 32.
     • Sound is recorded from the internal stereo microphone at the front of the DVD camcorder. Take care that
       this microphone is not blocked.
     • Before recording an important movie, make sure to test the recording function by checking if there is any
       problem with the audio and video recording.
     • For various functions available when you record movie images. pages 65~77
     • Do not operate the power switch or remove a disc while accessing it. Doing so may damage the disc or the
       data on it.
     • If you set the storage media to DVD, up to 253 movie images can be created on DVD-R/+RW/+R DL/ -RW
       (Video mode) discs, and up to 999 on DVD-RW (VR mode).
     • You cannot proceed with recording when the disc cover is open. An icon and message are shown that
       recording is impossible with the disc cover open.
     • If you press the Recording start/stop button while a menu operation is in process, the DVD camcorder
       starts to record.
     • If you turn the DVD camcorder off while recording, turn it on again with the storage media inserted
       in it: Repair of the storage media will be executed automatically with a message. Do not turn off the
       power or remove storage media while the DVD camcorder is recovering it, or it will damage the data or the
       storage media itself. The data recovery completes within a few minutes but sometimes it may take more
       time. Use the AC power adaptor when recovering data.


34_ English
RECORDING WITH EASE FOR BEGINNERS (EASY.Q MODE)
• With the EASY.Q function, most of the DVD camcorder settings are automatically
   adjusted, which relieves you of detailed adjustments.
1. Slide the POWER switch downwards to turn on the power.
   • Set the Storage mode switch to DISC. (SC-DX103/ DX105 only)  page 30
2. Press the EASY Q button.
   • When you press the EASY Q button, most functions are set to off and the following
       functions are set to “Auto.”                                                                STBY   0:00:00 [30 min]

       - “Scene Mode(AE),” “White Balance,” “Exposure,” “Anti-Shake(DIS),” “Digital
          Effect,” “Focus,” “Shutter,” “Back Light,” “C. Nite” etc.
   • The (         and Anti-Shake(DIS) (     )) indicators appear on the screen at the same
       time.
3. To record movie images, press the Recording start/stop button.
To cancel EASY.Q mode
Press the EASY Q button once again.
• The (        and Anti-Shake(DIS) (       )) indicators disappear from the screen.
• Almost all the settings will return to the settings that were set prior to activating EASY.Q mode.
• You cannot cancel the EASY.Q mode during recording.
     • Unavailable buttons during EASY.Q operation.
       The following controls are unavailable because the items are automatically set.
       And the corresponding message (“Release the EASY.Q!”) may appear if unavailable operations are
       attempted.
       - Menu button, Joystick.
     • Release the EASY.Q function if you want to add any effect or settings to the images.
     • The EASY.Q mode settings are released when the DVD camcorder is turned off.


                                                                                                               English _35
DVD camcorder mode: recording/playback
CAPTURING STILL IMAGES DURING MOVIE IMAGE PLAYBACK(SC-DX103/ DX105 only)
• This function works only in the Play mode. page 21
• If you press the PHOTO button during playback, it stops playing and saves one image
   of the current movie scene that is paused to the memory card.
1. Slide the POWER switch downwards to turn on the power and set the Storage mode
   switch to DISC.
   • Press the MODE button to set the Play mode. page 21
   • The thumbnail index screen appears.
2. Use the Joystick to select the desired movie image.                                                     12/12


   • To change the current thumbnail page, move the Joystick down to highlight the
       page bar, then move the Joystick right or left to select the page.
3. Press the Joystick.
   The selected file fills the screen and is played automatically.
4. Press the PHOTO button at the desired point.                                                  0:00:59
   • A shutter sound is heard. The photo image is recorded on the memory card and the
       “Photo capture” message appears.
     • The still images captured from the movie images to the storage media are saved in
       800x600 format.                                                                                       012


                                                                                           Photo capture


36_ English
ZOOMING
Use the zoom function for close-up or wide-angle recording.
This DVD camcorder allows you to record using optical 34x power zoom and 1200x digital
                                                                                                                            VOL


zoom.
• Zoom lever is on the top of the camcorder.
• You can also use zoom function by moving the Joystick (W/T) up or down.                                 ����


To zoom in
Slide the zoom lever towards T (telephoto).
                                                                                             W : Wide angle         T : Telephoto

To zoom out
Slide the zoom lever towards W (wide-angle).
• The farther you slide the zoom lever, the quicker the zoom action.
• Zoom magnification over 34x is done through digital image processing, and is, therefore,
  called digital zoom. Digital zooming is possible up to 1200x.                                  STBY    0:00:00 [30 min]
  Set “Digital Zoom” to the desired value. page 76
  You can set the digital zoom up to 1200x in movie mode.
     • Be sure to keep your finger on the Zoom lever. If you move your finger off the zoom
       lever, the operation sound of the Zoom lever may be also recorded.
     • The minimum possible distance between camcorder and subject while maintaining
       sharp focus is about 1 cm (about 0.39 inch) for wide angle and 50 cm (about 19.68
       inch) for telephoto.
     • The focus changes when zooming after focusing manually. Focus automatically or
       seize the desired scene by zooming before focusing manually. page 70
     • Optical zoom preserves the movie quality, but during digital zoom the image quality
       may suffer.


                                                                                                                 English _37
DVD camcorder mode: recording/playback
PLAYING MOVIE IMAGES
•  This function works only in the Play mode. page 21
•  You can switch to the Play mode by using the MODE button.
•  You can find a desired movie image quickly using thumbnail index views.
•  Use the playback-related buttons on the remote control. (SC-DX105 only) page 13
1. Slide the POWER switch downwards to turn on the power and open the LCD screen.
                                                                                                        ����


   • Set the Storage mode switch to DISC. (SC-DX103/ DX105 only) page 30
   • Adjust brightness or color of the LCD screen. page 79
2. Press the MODE button to set the Play mode.                                                                 12/12


   • The thumbnail index view appears. The thumbnail highlight is on the latest created or
       played file.
   • To change the current thumbnail page, move the Joystick down to highlight the
       page bar, then move the Joystick right or left to select the page.
3. Move the Joystick to select the desired movie image, then press the Joystick.              0:00:59

   • The selected file fills the screen and is played automatically.
   • To stop playback, move the Joystick down.
      • Press Display (       )button to toggle the OSD (On Screen Display) function on and
          off.                                                                                                   012

      • Depending on the amount of data to be played back, it may take some time for the
          playback images to appear.
      • Movies edited on a PC may not be displayed on this DVD camcorder.
      • Movies recorded on another camcorder may not be played on this DVD camcorder.


38_ English
Adjusting the volume
• You can control the volume by using the zoom lever during playback.                                  0:00:59

• You can hear the recorded sound from the built-in speaker.
• The level can be adjusted anywhere between 0 and 19.
     If you close the LCD screen while playing, you will not hear the sound from the speaker.          02


                                                                                                                   012


Various playback operations
Playback / Pause / Stop                                                                             0:00:59

• Playback and Pause functions alternate when you press the Joystick.
• Move the Joystick down to stop playback.
• You can do the same operation by using the remote control ( / ). (SC-DX105 only)
Search playback                                                                                                    012
• Move the Joystick right or left and hold during playback.
   - RPS (Reverse Playback Search) rate: x2  x16  x2
   - FPS (Forward Playback Search) rate: x2  x16  x2                                              0:00:59

• To resume normal playback, press the Joystick.
• You can do the same operation by using the remote control ( / ). (SC-DX105 only)
Skip playback
• Move the Joystick right or left during playback.                                                                 012
   - If you move the Joystick left within 3 seconds after the movie image starts, the
       previous image is played back.
   - If you move the Joystick left 3 seconds after the movie image starts, the current
       image starts from the beginning.
   - If you move the Joystick right, the next image is played back.
• You can do the same operation by using the remote control ( / ). (SC-DX105 only)
Slow playback
• Pause the playback by pressing the Joystick, then move the Joystick right or left. The
   movie image plays forward or reverse at the 1/2x speed.
• To resume normal playback, press the Joystick.
• Slow playback continues for 3 minutes.                                                       <SC-DX105 only>
• You can do the same operation by using the remote control ( ). (SC-DX105 only)
• When pressing the ( ) or ( ) buttons on the remote control during slow playback, it slowly plays back in reverse
   or forward. (SC-DX105 only)
                                                                                                          English _39
DVD camcorder mode: editing movie image
DELETING IMAGES                                                                                                    ( (                       ))
•    This function works only in the Play mode.
•    You can delete undesired movie images recorded on the disc.                                                                     12/12

•    This function works only on a DVD-RW disc(VR mode).
•    An image that has been deleted cannot be recovered.
1.   Slide the POWER switch downwards to turn on the power.
     • Set the Storage mode switch to DISC. page 30
2.   Press the MODE button to set the Play mode.
     • The thumbnail index view appears.                                                             Video
3.   Press the MENU button.
4.   Move the Joystick right or left to select “Delete.”                                              Delete
                                                                                                  Select file
5.   Move the Joystick up or down to select the desired option (“Select file” or “Select All”),   Select All

     then press the Joystick.
     • “Select file”: Deletes the individual image.
         - To delete the individual image, use the Joystick to select the image to delete.
            The ( ) indicator is displayed on the selected images.                                   Delete
            Pressing the Joystick toggles between the thumbnail image being selected for             Back
                                                                                                                                     7/12
                                                                                                                                Execute

            deletion (the ( ) indicator appears on image) or not (the ( ) indicator is removed
            from image). Move the Joystick up to select “Execute,” then press the Joystick.
     • “Select All”: Deletes all images.
         - Move the Joystick up to select “Execute,” then press the Joystick.                      Move         Select

6.   The message according to the selected option will appear. Move the Joystick right or left
     to select “Yes,” the press the Joystick.                                                        Delete

     • After completion, the selected images will be deleted.
                                                                                                       Delete selected files?
         (Accordingly, the deleted files also disappear in playlist. page 45)
                                                                                                       Yes                      No


                                                                                                   Move         Select


40_ English
DELETING A SECTION OF A MOVIE IMAGE (PARTIAL DELETE)                                                                   ( (                      ))
•    This function works only in the Play mode. page 21                                                                                12/12


•    Set the Storage mode switch to DISC. (SC-DX103/ DX105 only) page 30
•    A movie image can be partially deleted.
1.   Press the MENU button, then move the Joystick right or left to select “Edit.”
2.   Press the Joystick to select “Partial Delete.”
3.   Use the Joystick to select the desired movie image, then press the Joystick.                       Video
     • The selected file fills the screen with paused.
     • To return, use the Joystick to select “Back,” then press the Joystick.                             Edit
                                                                                                   Partial Delete
4.   Move the Joystick right to play the movie image.
5.   Press the Joystick at the start point you want to delete.
     • The start point of deletion will be marked with “.”
6.   Move the Joystick right to search the end point of deletion. Press the Joystick.                   Partial Delete
     • The end point of deletion will be marked with “.”                                               Back
                                                                                                                                        11/12


7.   Press the Joystick to delete the selected part.
     • The message “Partial Delete? Selected part of a file will be deleted.” will appear.
8.   Move the Joystick left to select “Yes,” then press the Joystick.
     • The selected part of the movie image will be deleted.
                                                                                                                   0:00:59/0:02:00

       • Do not remove the battery pack or the AC power adaptor while the partial deletion       011
                                                                                                 Partial Delete
         is in progress. The file can be damaged.
       • A deleted part of the movie image can not be recovered.
                                                                                                                     
       • Partial deletion is not available when the recording is less than 3 seconds.                                    


                                                                                                       Play        Frame           Delete
       • Partial deletion is not available when the section or remaining time is less than 3
         seconds.                                                                                                  0:00:59/0:02:00

       • When partial deletion is executed, related movie images in the playlist are partially   001
                                                                                                 Partial Delete Delete?
                                                                                                         Partial
         deleted.                                                                                        Selected part of a file
                                                                                                         will be deleted.
                                                                                                       Yes          Cancel           Exit
                                                                                                                       


                                                                                                       Play        Frame           Delete


                                                                                                                         English _41
Samsung Camcorder SC-DX100 User Manual

More Related Content

Similar to Samsung Camcorder SC-DX100 User Manual

Samsung Camcorder SC-MX20 User Manual
Samsung Camcorder SC-MX20 User ManualSamsung Camcorder SC-MX20 User Manual
Samsung Camcorder SC-MX20 User ManualImaging Samsung
 
ASL Intercom PS279
ASL Intercom PS279ASL Intercom PS279
ASL Intercom PS279AV ProfShop
 
ASL Intercom PS 279
ASL Intercom PS 279ASL Intercom PS 279
ASL Intercom PS 279AV ProfShop
 
JVC VF-HP790 LCD Studio Viewfinder
JVC VF-HP790 LCD Studio ViewfinderJVC VF-HP790 LCD Studio Viewfinder
JVC VF-HP790 LCD Studio ViewfinderAV ProfShop
 
ASL Intercom PS6379
ASL Intercom PS6379ASL Intercom PS6379
ASL Intercom PS6379AV ProfShop
 
ASL Intercom PS 6379
ASL Intercom PS 6379ASL Intercom PS 6379
ASL Intercom PS 6379AV ProfShop
 
JVC SR-HD1350EU Blu-ray recorder + 250GB HDD
JVC SR-HD1350EU Blu-ray recorder + 250GB HDDJVC SR-HD1350EU Blu-ray recorder + 250GB HDD
JVC SR-HD1350EU Blu-ray recorder + 250GB HDDAV ProfShop
 
Home cinema sherwood r 772
Home cinema sherwood r 772Home cinema sherwood r 772
Home cinema sherwood r 772pacomase
 
sr6007_owners_manual.pdf
sr6007_owners_manual.pdfsr6007_owners_manual.pdf
sr6007_owners_manual.pdfluckwill
 
JVC RM-LP25U Remote Control Panel
JVC RM-LP25U Remote Control PanelJVC RM-LP25U Remote Control Panel
JVC RM-LP25U Remote Control PanelAV ProfShop
 
High Definition Digital Camcorder Samsung H300 User Manual
High Definition Digital Camcorder Samsung H300 User ManualHigh Definition Digital Camcorder Samsung H300 User Manual
High Definition Digital Camcorder Samsung H300 User Manualdigicaminfo
 
ASL Intercom PS289
ASL Intercom PS289ASL Intercom PS289
ASL Intercom PS289AV ProfShop
 
ASL Intercom PS 289
ASL Intercom PS 289ASL Intercom PS 289
ASL Intercom PS 289AV ProfShop
 
Manual do piano digital Fenix TG8810 (PORTUGUÊS)
Manual do piano digital Fenix TG8810 (PORTUGUÊS)Manual do piano digital Fenix TG8810 (PORTUGUÊS)
Manual do piano digital Fenix TG8810 (PORTUGUÊS)Habro Group
 
Manual do piano digital Fenix SP-30 (PORTUGUÊS)
Manual do piano digital Fenix SP-30 (PORTUGUÊS)Manual do piano digital Fenix SP-30 (PORTUGUÊS)
Manual do piano digital Fenix SP-30 (PORTUGUÊS)Habro Group
 
Denon MC6000 MK1 Manual de Usuario en ingles
Denon MC6000 MK1 Manual de Usuario en inglesDenon MC6000 MK1 Manual de Usuario en ingles
Denon MC6000 MK1 Manual de Usuario en inglesGabrielFuentes92
 
T748 a v surround sound receiver english manual
T748 a v surround sound receiver   english manualT748 a v surround sound receiver   english manual
T748 a v surround sound receiver english manualweerawatplc
 
T748 a v surround sound receiver english manual
T748 a v surround sound receiver   english manualT748 a v surround sound receiver   english manual
T748 a v surround sound receiver english manualweerawatplc
 
Roland V-800HD Multi-format Video Switcher
Roland V-800HD Multi-format Video SwitcherRoland V-800HD Multi-format Video Switcher
Roland V-800HD Multi-format Video SwitcherAV ProfShop
 

Similar to Samsung Camcorder SC-DX100 User Manual (20)

Samsung Camcorder SC-MX20 User Manual
Samsung Camcorder SC-MX20 User ManualSamsung Camcorder SC-MX20 User Manual
Samsung Camcorder SC-MX20 User Manual
 
Dpc3010
Dpc3010Dpc3010
Dpc3010
 
ASL Intercom PS279
ASL Intercom PS279ASL Intercom PS279
ASL Intercom PS279
 
ASL Intercom PS 279
ASL Intercom PS 279ASL Intercom PS 279
ASL Intercom PS 279
 
JVC VF-HP790 LCD Studio Viewfinder
JVC VF-HP790 LCD Studio ViewfinderJVC VF-HP790 LCD Studio Viewfinder
JVC VF-HP790 LCD Studio Viewfinder
 
ASL Intercom PS6379
ASL Intercom PS6379ASL Intercom PS6379
ASL Intercom PS6379
 
ASL Intercom PS 6379
ASL Intercom PS 6379ASL Intercom PS 6379
ASL Intercom PS 6379
 
JVC SR-HD1350EU Blu-ray recorder + 250GB HDD
JVC SR-HD1350EU Blu-ray recorder + 250GB HDDJVC SR-HD1350EU Blu-ray recorder + 250GB HDD
JVC SR-HD1350EU Blu-ray recorder + 250GB HDD
 
Home cinema sherwood r 772
Home cinema sherwood r 772Home cinema sherwood r 772
Home cinema sherwood r 772
 
sr6007_owners_manual.pdf
sr6007_owners_manual.pdfsr6007_owners_manual.pdf
sr6007_owners_manual.pdf
 
JVC RM-LP25U Remote Control Panel
JVC RM-LP25U Remote Control PanelJVC RM-LP25U Remote Control Panel
JVC RM-LP25U Remote Control Panel
 
High Definition Digital Camcorder Samsung H300 User Manual
High Definition Digital Camcorder Samsung H300 User ManualHigh Definition Digital Camcorder Samsung H300 User Manual
High Definition Digital Camcorder Samsung H300 User Manual
 
ASL Intercom PS289
ASL Intercom PS289ASL Intercom PS289
ASL Intercom PS289
 
ASL Intercom PS 289
ASL Intercom PS 289ASL Intercom PS 289
ASL Intercom PS 289
 
Manual do piano digital Fenix TG8810 (PORTUGUÊS)
Manual do piano digital Fenix TG8810 (PORTUGUÊS)Manual do piano digital Fenix TG8810 (PORTUGUÊS)
Manual do piano digital Fenix TG8810 (PORTUGUÊS)
 
Manual do piano digital Fenix SP-30 (PORTUGUÊS)
Manual do piano digital Fenix SP-30 (PORTUGUÊS)Manual do piano digital Fenix SP-30 (PORTUGUÊS)
Manual do piano digital Fenix SP-30 (PORTUGUÊS)
 
Denon MC6000 MK1 Manual de Usuario en ingles
Denon MC6000 MK1 Manual de Usuario en inglesDenon MC6000 MK1 Manual de Usuario en ingles
Denon MC6000 MK1 Manual de Usuario en ingles
 
T748 a v surround sound receiver english manual
T748 a v surround sound receiver   english manualT748 a v surround sound receiver   english manual
T748 a v surround sound receiver english manual
 
T748 a v surround sound receiver english manual
T748 a v surround sound receiver   english manualT748 a v surround sound receiver   english manual
T748 a v surround sound receiver english manual
 
Roland V-800HD Multi-format Video Switcher
Roland V-800HD Multi-format Video SwitcherRoland V-800HD Multi-format Video Switcher
Roland V-800HD Multi-format Video Switcher
 

More from Imaging Samsung

Samsung Camera WB550 User Manual
Samsung Camera WB550 User ManualSamsung Camera WB550 User Manual
Samsung Camera WB550 User ManualImaging Samsung
 
Samsung Camera WB500 User Manual
Samsung Camera WB500 User ManualSamsung Camera WB500 User Manual
Samsung Camera WB500 User ManualImaging Samsung
 
Samsung Camera TL100 User Manual
Samsung Camera TL100 User ManualSamsung Camera TL100 User Manual
Samsung Camera TL100 User ManualImaging Samsung
 
Samsung Camera TL9 User Manual
Samsung Camera TL9 User ManualSamsung Camera TL9 User Manual
Samsung Camera TL9 User ManualImaging Samsung
 
Samsung Camera ST50 User Manual
Samsung Camera ST50 User ManualSamsung Camera ST50 User Manual
Samsung Camera ST50 User ManualImaging Samsung
 
Samsung Camera ST10 User Manual
Samsung Camera ST10 User ManualSamsung Camera ST10 User Manual
Samsung Camera ST10 User ManualImaging Samsung
 
Samsung Camera SL820 User Manual
Samsung Camera SL820 User ManualSamsung Camera SL820 User Manual
Samsung Camera SL820 User ManualImaging Samsung
 
Samsung Camera SL620 User Manual
Samsung Camera SL620 User ManualSamsung Camera SL620 User Manual
Samsung Camera SL620 User ManualImaging Samsung
 
Samsung Camera SL420 User Manual
Samsung Camera SL420 User ManualSamsung Camera SL420 User Manual
Samsung Camera SL420 User ManualImaging Samsung
 
Samsung Camera SL202 User Manual
Samsung Camera SL202 User ManualSamsung Camera SL202 User Manual
Samsung Camera SL202 User ManualImaging Samsung
 
Samsung Camera SL201 User Manual
Samsung Camera SL201 User ManualSamsung Camera SL201 User Manual
Samsung Camera SL201 User ManualImaging Samsung
 
Samsung Camera SL30 User Manual
Samsung Camera SL30 User ManualSamsung Camera SL30 User Manual
Samsung Camera SL30 User ManualImaging Samsung
 
Samsung Camcorder SC-HMX20C User Manual
Samsung Camcorder SC-HMX20C User ManualSamsung Camcorder SC-HMX20C User Manual
Samsung Camcorder SC-HMX20C User ManualImaging Samsung
 
Samsung Camera S1060 User Manual
Samsung Camera S1060 User ManualSamsung Camera S1060 User Manual
Samsung Camera S1060 User ManualImaging Samsung
 
Samsung Camera PL65 User Manual
Samsung Camera PL65 User ManualSamsung Camera PL65 User Manual
Samsung Camera PL65 User ManualImaging Samsung
 
Samsung Camera PL60 User Manual
Samsung Camera PL60 User ManualSamsung Camera PL60 User Manual
Samsung Camera PL60 User ManualImaging Samsung
 
Samsung Camera PL50 User Manual
Samsung Camera PL50 User ManualSamsung Camera PL50 User Manual
Samsung Camera PL50 User ManualImaging Samsung
 
Samsung Camera PL10 User Manual
Samsung Camera PL10 User ManualSamsung Camera PL10 User Manual
Samsung Camera PL10 User ManualImaging Samsung
 
Samsung Camera NV100HD User Manual
Samsung Camera NV100HD User ManualSamsung Camera NV100HD User Manual
Samsung Camera NV100HD User ManualImaging Samsung
 
Samsung Camera NV40 User Manual
Samsung Camera NV40 User ManualSamsung Camera NV40 User Manual
Samsung Camera NV40 User ManualImaging Samsung
 

More from Imaging Samsung (20)

Samsung Camera WB550 User Manual
Samsung Camera WB550 User ManualSamsung Camera WB550 User Manual
Samsung Camera WB550 User Manual
 
Samsung Camera WB500 User Manual
Samsung Camera WB500 User ManualSamsung Camera WB500 User Manual
Samsung Camera WB500 User Manual
 
Samsung Camera TL100 User Manual
Samsung Camera TL100 User ManualSamsung Camera TL100 User Manual
Samsung Camera TL100 User Manual
 
Samsung Camera TL9 User Manual
Samsung Camera TL9 User ManualSamsung Camera TL9 User Manual
Samsung Camera TL9 User Manual
 
Samsung Camera ST50 User Manual
Samsung Camera ST50 User ManualSamsung Camera ST50 User Manual
Samsung Camera ST50 User Manual
 
Samsung Camera ST10 User Manual
Samsung Camera ST10 User ManualSamsung Camera ST10 User Manual
Samsung Camera ST10 User Manual
 
Samsung Camera SL820 User Manual
Samsung Camera SL820 User ManualSamsung Camera SL820 User Manual
Samsung Camera SL820 User Manual
 
Samsung Camera SL620 User Manual
Samsung Camera SL620 User ManualSamsung Camera SL620 User Manual
Samsung Camera SL620 User Manual
 
Samsung Camera SL420 User Manual
Samsung Camera SL420 User ManualSamsung Camera SL420 User Manual
Samsung Camera SL420 User Manual
 
Samsung Camera SL202 User Manual
Samsung Camera SL202 User ManualSamsung Camera SL202 User Manual
Samsung Camera SL202 User Manual
 
Samsung Camera SL201 User Manual
Samsung Camera SL201 User ManualSamsung Camera SL201 User Manual
Samsung Camera SL201 User Manual
 
Samsung Camera SL30 User Manual
Samsung Camera SL30 User ManualSamsung Camera SL30 User Manual
Samsung Camera SL30 User Manual
 
Samsung Camcorder SC-HMX20C User Manual
Samsung Camcorder SC-HMX20C User ManualSamsung Camcorder SC-HMX20C User Manual
Samsung Camcorder SC-HMX20C User Manual
 
Samsung Camera S1060 User Manual
Samsung Camera S1060 User ManualSamsung Camera S1060 User Manual
Samsung Camera S1060 User Manual
 
Samsung Camera PL65 User Manual
Samsung Camera PL65 User ManualSamsung Camera PL65 User Manual
Samsung Camera PL65 User Manual
 
Samsung Camera PL60 User Manual
Samsung Camera PL60 User ManualSamsung Camera PL60 User Manual
Samsung Camera PL60 User Manual
 
Samsung Camera PL50 User Manual
Samsung Camera PL50 User ManualSamsung Camera PL50 User Manual
Samsung Camera PL50 User Manual
 
Samsung Camera PL10 User Manual
Samsung Camera PL10 User ManualSamsung Camera PL10 User Manual
Samsung Camera PL10 User Manual
 
Samsung Camera NV100HD User Manual
Samsung Camera NV100HD User ManualSamsung Camera NV100HD User Manual
Samsung Camera NV100HD User Manual
 
Samsung Camera NV40 User Manual
Samsung Camera NV40 User ManualSamsung Camera NV40 User Manual
Samsung Camera NV40 User Manual
 

Recently uploaded

Alambagh Call Girl 9548273370 , Call Girls Service Lucknow
Alambagh Call Girl 9548273370 , Call Girls Service LucknowAlambagh Call Girl 9548273370 , Call Girls Service Lucknow
Alambagh Call Girl 9548273370 , Call Girls Service Lucknowmakika9823
 
Call Girls In Munirka>༒9599632723 Incall_OutCall Available
Call Girls In Munirka>༒9599632723 Incall_OutCall AvailableCall Girls In Munirka>༒9599632723 Incall_OutCall Available
Call Girls In Munirka>༒9599632723 Incall_OutCall AvailableCall Girls in Delhi
 
如何办理(NUS毕业证书)新加坡国立大学毕业证成绩单留信学历认证原版一比一
如何办理(NUS毕业证书)新加坡国立大学毕业证成绩单留信学历认证原版一比一如何办理(NUS毕业证书)新加坡国立大学毕业证成绩单留信学历认证原版一比一
如何办理(NUS毕业证书)新加坡国立大学毕业证成绩单留信学历认证原版一比一ga6c6bdl
 
Gaya Call Girls #9907093804 Contact Number Escorts Service Gaya
Gaya Call Girls #9907093804 Contact Number Escorts Service GayaGaya Call Girls #9907093804 Contact Number Escorts Service Gaya
Gaya Call Girls #9907093804 Contact Number Escorts Service Gayasrsj9000
 
vip Krishna Nagar Call Girls 9999965857 Call or WhatsApp Now Book
vip Krishna Nagar Call Girls 9999965857 Call or WhatsApp Now Bookvip Krishna Nagar Call Girls 9999965857 Call or WhatsApp Now Book
vip Krishna Nagar Call Girls 9999965857 Call or WhatsApp Now Bookmanojkuma9823
 
Vip Udupi Call Girls 7001305949 WhatsApp Number 24x7 Best Services
Vip Udupi Call Girls 7001305949 WhatsApp Number 24x7 Best ServicesVip Udupi Call Girls 7001305949 WhatsApp Number 24x7 Best Services
Vip Udupi Call Girls 7001305949 WhatsApp Number 24x7 Best Servicesnajka9823
 
如何办理伦敦大学伯贝克学院毕业证(BBK毕业证) 成绩单留信学历认证原版一比一
如何办理伦敦大学伯贝克学院毕业证(BBK毕业证) 成绩单留信学历认证原版一比一如何办理伦敦大学伯贝克学院毕业证(BBK毕业证) 成绩单留信学历认证原版一比一
如何办理伦敦大学伯贝克学院毕业证(BBK毕业证) 成绩单留信学历认证原版一比一ga6c6bdl
 
Papular No 1 Online Istikhara Amil Baba Pakistan Amil Baba In Karachi Amil B...
Papular No 1 Online Istikhara Amil Baba Pakistan  Amil Baba In Karachi Amil B...Papular No 1 Online Istikhara Amil Baba Pakistan  Amil Baba In Karachi Amil B...
Papular No 1 Online Istikhara Amil Baba Pakistan Amil Baba In Karachi Amil B...Authentic No 1 Amil Baba In Pakistan
 
Call Girls in Dwarka Sub City 💯Call Us 🔝8264348440🔝
Call Girls in Dwarka Sub City 💯Call Us 🔝8264348440🔝Call Girls in Dwarka Sub City 💯Call Us 🔝8264348440🔝
Call Girls in Dwarka Sub City 💯Call Us 🔝8264348440🔝soniya singh
 
Hifi Defence Colony Call Girls Service WhatsApp -> 9999965857 Available 24x7 ...
Hifi Defence Colony Call Girls Service WhatsApp -> 9999965857 Available 24x7 ...Hifi Defence Colony Call Girls Service WhatsApp -> 9999965857 Available 24x7 ...
Hifi Defence Colony Call Girls Service WhatsApp -> 9999965857 Available 24x7 ...srsj9000
 
Beautiful Sapna Call Girls CP 9711199012 ☎ Call /Whatsapps
Beautiful Sapna Call Girls CP 9711199012 ☎ Call /WhatsappsBeautiful Sapna Call Girls CP 9711199012 ☎ Call /Whatsapps
Beautiful Sapna Call Girls CP 9711199012 ☎ Call /Whatsappssapnasaifi408
 
Slim Call Girls Service Badshah Nagar * 9548273370 Naughty Call Girls Service...
Slim Call Girls Service Badshah Nagar * 9548273370 Naughty Call Girls Service...Slim Call Girls Service Badshah Nagar * 9548273370 Naughty Call Girls Service...
Slim Call Girls Service Badshah Nagar * 9548273370 Naughty Call Girls Service...nagunakhan
 
定制(UI学位证)爱达荷大学毕业证成绩单原版一比一
定制(UI学位证)爱达荷大学毕业证成绩单原版一比一定制(UI学位证)爱达荷大学毕业证成绩单原版一比一
定制(UI学位证)爱达荷大学毕业证成绩单原版一比一ss ss
 
威廉玛丽学院毕业证学位证成绩单-安全学历认证
威廉玛丽学院毕业证学位证成绩单-安全学历认证威廉玛丽学院毕业证学位证成绩单-安全学历认证
威廉玛丽学院毕业证学位证成绩单-安全学历认证kbdhl05e
 
原版1:1复刻斯坦福大学毕业证Stanford毕业证留信学历认证
原版1:1复刻斯坦福大学毕业证Stanford毕业证留信学历认证原版1:1复刻斯坦福大学毕业证Stanford毕业证留信学历认证
原版1:1复刻斯坦福大学毕业证Stanford毕业证留信学历认证gwhohjj
 
(办理学位证)加州州立大学北岭分校毕业证成绩单原版一比一
(办理学位证)加州州立大学北岭分校毕业证成绩单原版一比一(办理学位证)加州州立大学北岭分校毕业证成绩单原版一比一
(办理学位证)加州州立大学北岭分校毕业证成绩单原版一比一Fi sss
 
定制宾州州立大学毕业证(PSU毕业证) 成绩单留信学历认证原版一比一
定制宾州州立大学毕业证(PSU毕业证) 成绩单留信学历认证原版一比一定制宾州州立大学毕业证(PSU毕业证) 成绩单留信学历认证原版一比一
定制宾州州立大学毕业证(PSU毕业证) 成绩单留信学历认证原版一比一ga6c6bdl
 
Call Girls Delhi {Rohini} 9711199012 high profile service
Call Girls Delhi {Rohini} 9711199012 high profile serviceCall Girls Delhi {Rohini} 9711199012 high profile service
Call Girls Delhi {Rohini} 9711199012 high profile servicerehmti665
 

Recently uploaded (20)

Alambagh Call Girl 9548273370 , Call Girls Service Lucknow
Alambagh Call Girl 9548273370 , Call Girls Service LucknowAlambagh Call Girl 9548273370 , Call Girls Service Lucknow
Alambagh Call Girl 9548273370 , Call Girls Service Lucknow
 
Call Girls In Munirka>༒9599632723 Incall_OutCall Available
Call Girls In Munirka>༒9599632723 Incall_OutCall AvailableCall Girls In Munirka>༒9599632723 Incall_OutCall Available
Call Girls In Munirka>༒9599632723 Incall_OutCall Available
 
如何办理(NUS毕业证书)新加坡国立大学毕业证成绩单留信学历认证原版一比一
如何办理(NUS毕业证书)新加坡国立大学毕业证成绩单留信学历认证原版一比一如何办理(NUS毕业证书)新加坡国立大学毕业证成绩单留信学历认证原版一比一
如何办理(NUS毕业证书)新加坡国立大学毕业证成绩单留信学历认证原版一比一
 
Gaya Call Girls #9907093804 Contact Number Escorts Service Gaya
Gaya Call Girls #9907093804 Contact Number Escorts Service GayaGaya Call Girls #9907093804 Contact Number Escorts Service Gaya
Gaya Call Girls #9907093804 Contact Number Escorts Service Gaya
 
vip Krishna Nagar Call Girls 9999965857 Call or WhatsApp Now Book
vip Krishna Nagar Call Girls 9999965857 Call or WhatsApp Now Bookvip Krishna Nagar Call Girls 9999965857 Call or WhatsApp Now Book
vip Krishna Nagar Call Girls 9999965857 Call or WhatsApp Now Book
 
Vip Udupi Call Girls 7001305949 WhatsApp Number 24x7 Best Services
Vip Udupi Call Girls 7001305949 WhatsApp Number 24x7 Best ServicesVip Udupi Call Girls 7001305949 WhatsApp Number 24x7 Best Services
Vip Udupi Call Girls 7001305949 WhatsApp Number 24x7 Best Services
 
如何办理伦敦大学伯贝克学院毕业证(BBK毕业证) 成绩单留信学历认证原版一比一
如何办理伦敦大学伯贝克学院毕业证(BBK毕业证) 成绩单留信学历认证原版一比一如何办理伦敦大学伯贝克学院毕业证(BBK毕业证) 成绩单留信学历认证原版一比一
如何办理伦敦大学伯贝克学院毕业证(BBK毕业证) 成绩单留信学历认证原版一比一
 
Papular No 1 Online Istikhara Amil Baba Pakistan Amil Baba In Karachi Amil B...
Papular No 1 Online Istikhara Amil Baba Pakistan  Amil Baba In Karachi Amil B...Papular No 1 Online Istikhara Amil Baba Pakistan  Amil Baba In Karachi Amil B...
Papular No 1 Online Istikhara Amil Baba Pakistan Amil Baba In Karachi Amil B...
 
Call Girls in Dwarka Sub City 💯Call Us 🔝8264348440🔝
Call Girls in Dwarka Sub City 💯Call Us 🔝8264348440🔝Call Girls in Dwarka Sub City 💯Call Us 🔝8264348440🔝
Call Girls in Dwarka Sub City 💯Call Us 🔝8264348440🔝
 
Hifi Defence Colony Call Girls Service WhatsApp -> 9999965857 Available 24x7 ...
Hifi Defence Colony Call Girls Service WhatsApp -> 9999965857 Available 24x7 ...Hifi Defence Colony Call Girls Service WhatsApp -> 9999965857 Available 24x7 ...
Hifi Defence Colony Call Girls Service WhatsApp -> 9999965857 Available 24x7 ...
 
Beautiful Sapna Call Girls CP 9711199012 ☎ Call /Whatsapps
Beautiful Sapna Call Girls CP 9711199012 ☎ Call /WhatsappsBeautiful Sapna Call Girls CP 9711199012 ☎ Call /Whatsapps
Beautiful Sapna Call Girls CP 9711199012 ☎ Call /Whatsapps
 
CIVIL ENGINEERING
CIVIL ENGINEERINGCIVIL ENGINEERING
CIVIL ENGINEERING
 
Slim Call Girls Service Badshah Nagar * 9548273370 Naughty Call Girls Service...
Slim Call Girls Service Badshah Nagar * 9548273370 Naughty Call Girls Service...Slim Call Girls Service Badshah Nagar * 9548273370 Naughty Call Girls Service...
Slim Call Girls Service Badshah Nagar * 9548273370 Naughty Call Girls Service...
 
定制(UI学位证)爱达荷大学毕业证成绩单原版一比一
定制(UI学位证)爱达荷大学毕业证成绩单原版一比一定制(UI学位证)爱达荷大学毕业证成绩单原版一比一
定制(UI学位证)爱达荷大学毕业证成绩单原版一比一
 
威廉玛丽学院毕业证学位证成绩单-安全学历认证
威廉玛丽学院毕业证学位证成绩单-安全学历认证威廉玛丽学院毕业证学位证成绩单-安全学历认证
威廉玛丽学院毕业证学位证成绩单-安全学历认证
 
Low rate Call girls in Delhi Justdial | 9953330565
Low rate Call girls in Delhi Justdial | 9953330565Low rate Call girls in Delhi Justdial | 9953330565
Low rate Call girls in Delhi Justdial | 9953330565
 
原版1:1复刻斯坦福大学毕业证Stanford毕业证留信学历认证
原版1:1复刻斯坦福大学毕业证Stanford毕业证留信学历认证原版1:1复刻斯坦福大学毕业证Stanford毕业证留信学历认证
原版1:1复刻斯坦福大学毕业证Stanford毕业证留信学历认证
 
(办理学位证)加州州立大学北岭分校毕业证成绩单原版一比一
(办理学位证)加州州立大学北岭分校毕业证成绩单原版一比一(办理学位证)加州州立大学北岭分校毕业证成绩单原版一比一
(办理学位证)加州州立大学北岭分校毕业证成绩单原版一比一
 
定制宾州州立大学毕业证(PSU毕业证) 成绩单留信学历认证原版一比一
定制宾州州立大学毕业证(PSU毕业证) 成绩单留信学历认证原版一比一定制宾州州立大学毕业证(PSU毕业证) 成绩单留信学历认证原版一比一
定制宾州州立大学毕业证(PSU毕业证) 成绩单留信学历认证原版一比一
 
Call Girls Delhi {Rohini} 9711199012 high profile service
Call Girls Delhi {Rohini} 9711199012 high profile serviceCall Girls Delhi {Rohini} 9711199012 high profile service
Call Girls Delhi {Rohini} 9711199012 high profile service
 

Samsung Camcorder SC-DX100 User Manual

  • 1. SC-DX100 SC-DX103 SC-DX105 DVD Camcorder user manual imagine the possibilities Thank you for purchasing this Samsung product. To receive more complete service, please register your product at www.samsung.com/global/register
  • 2. key features of your DVD camcorder 3 1/2 inch DVD disc camcorder DVD-VIDEO recording with 3 1/2 inch (8cm) DVD-RW/+RW/-R/+R DL (Dual Layer) discs. 2.7” wide (16:9) LCD screen (112K pixels) The 2.7” wide (16:9) LCD screen provides excellent viewing clarity with improved resolution. The 112K pixels LCD screen rotates up to 270 degrees for multiple viewing angles providing sharp, detailed images for monitoring or playback, and the widescreen format makes shooting in 16:9 mode and composing shots even easier. Capture visions farther than the eye can see (34X optical/1200X digital zoom) Samsung’s powerful optical zoom lenses bring the world closer without sacrificing image quality. In addition, digital zoom interpolation means that extreme digital zooming is clearer, with less distortion than previous types of digital zooms. Viewing images on your PC and using PC CAM With DV Media PRO, you can view the recorded images on a PC and use PC cam function by connecting the DVD camcorder to a PC. pages 90~97 Voice Plus You can add your voice to the movie image by connecting the DVD camcorder to a TV. page 89 ii_ English
  • 3. safety warnings What the icons and signs in this user manual mean: Means that death or serious personal injury is a risk. WARNING Means that there is a potential risk for personal injury or material damage. CAUTION To reduce the risk of fire, explosion, electric shock, or personal injury when using your DVD CAUTION camcorder, follow these basic safety precautions: Means hints or referential pages that may be helpful when operating the DVD camcorder. These warning signs are here to prevent injury to you and others. Please follow them explicitly. After reading this section, keep it in a safe place for future reference. important safety instructions CAUTION This symbol indicates that dangerous voltage consisting a risk of RISK OF ELECTRIC SHOCK electric shock is present within this unit. DO NOT OPEN CAUTION: TO REDUCE THE RISK OF ELECTRIC SHOCK, DO NOT REMOVE COVER (OR BACK). This symbol indicates that there are important operating and NO USER-SERVICEABLE PARTS INSIDE maintenance instructions in the literature accompanying this unit. REFER SERVICING TO QUALIFIED SERVICE PERSONNEL. Warning To Reduce The Risk Of Fire Or Electric Shock, Do Not Expose This Apparatus To Rain Or Moisture.” Caution Apparatus shall not be exposed to dripping or splashing and no objects filled with liquids, such as vases, shall be placed on the apparatus. To disconnect the apparatus from the mains, the plug must be pulled out from the mains socket, therefore the mains plug shall be readily operable. English _iii
  • 4. important safety instructions 1. Read these instructions. 12. Use only with the cart, stand, tripod, bracket, or 2. Keep these instructions. table specified by the manufacturer, or sold with the apparatus. When a cart is used, use caution when 3. Heed all warnings. moving the cart/apparatus combination 4. Follow all instructions. to avoid injury from tip-over. 5. Do not use this apparatus near water. 13. Unplug this apparatus during lightning 6. Clean only with dry cloth. storms or when unused for long periods of time. 7. Do not block any ventilation openings. Install in accordance with the manufacturer’s instructions. 14. Refer all servicing to qualified service personnel. Servicing is required when the apparatus has been 8. Do not install near any heat sources such as radiators, damaged in any way, such as power-supply cord or heat registers, stoves, or other apparatus (including plug is damaged, liquid has been spilled or objects amplifiers) that produce heat. have fallen into the apparatus, the apparatus has been 9. Do not defeat the safety purpose of the polarized or exposed to rain or moisture, does not operate normally, grounding-type plug. A polarized plug has two blades or has been dropped. with one wider than the other. A grounding type plug 15. Apparatus shall not be exposed to dripping or has two blades and a third grounding prong. The wide splashing and no objects filled with liquids, such as blade or the third prong are provided for your safety. If vases, shall be placed on the apparatus. the provided plug does not fit into your outlet, consult an electrician for replacement of the obsolete outlet. 16. VENTILATION: Slots and openings in the cabinet are provided 10. Protect the power cord from being walked on or for ventilation to ensure reliable operation of the pinched particularly at plugs, convenience receptacles, CAMCORDER and to protect it from overheating. and the point where they exit from the apparatus. These openings must not be blocked or covered. 11. Only use attachment/accessories specified by the Never place your CAMCORDER on a bed, sofa, rug, manufacturer. or other similar surface: on or near a radiator or heat register. This CAMCORDER should not be placed in a built-in installation such as a bookcase or rack unless proper ventilation is provided or the manufacturer’s instructions have been adhered to. iv_ English
  • 5. 17. POWER SOURCES: 70-1984, provides information with respect to proper The CAMCORDER should be operated only from the grounding of the mast and supporting structure, type of power source indicated on the label. If you are grounding of the lead-in wire and supporting structure, not sure of the type of power supply at your home, grounding of the mast and supporting structure, consult your appliance dealer or local power company. grounding of the lead-in wire to an antenna discharge A CAMCORDER is intended to be operated from unit, size of grounding to conductors, location of battery power, or other sources, refer to the operating antenna-discharge unit, connection to grounding instructions. electrodes and requirements for the grounding 18. GROUNDING OR POLARIZATION: electrode. This CAMCORDER may be equipped with either a See figure below. polarized 2-wire AC line plug (a plug having one blade wider than the other) or a 3-wire grounding type plug, ANTENNA a plug having a third (grounding) pin. If you are unable LEAD IN WIRE GROUND to insert the plug fully into the outlet, try reversing the CLAMP plug. If the plug still fails to fit, contact your electrician ANTENNA DISCHARGE UNIT (NEC SECTION 810-20) to replace your outlet. Do not defeat the safety purpose ELECTRIC SERVICE EQUIPMENT GROUNDING CONDUCTORS (NEC SECTION 810-21) of the polarized plug. GROUND CLAMPS POWER SERVICE GROUNDING 19. POWER-CORD PROTECTION: ELECTRODE SYSTEM (NEC ART 250, PART H) Power-supply cords should be routed so that they are NEC NATIONAL ELECTRICAL CODE not likely to be walked on or pinched by items placed upon or against them, paying particular attention to 21. LIGHTNING: cords or plugs, convenient receptacles, and the point For added protection of this CAMCORDER during a where they exit from the unit. lightning storm or when it is left unattended and unused 20. OUTDOOR ANTENNA GROUNDING: for long periods of time, unplug it from the wall outlet CAMCORDER, be sure the antenna or cable system is and disconnect the antenna or cable system. This will prevent damage to the CAMCORDER due to lightning grounded to provide some protection against voltage and powerline surges. surges and built-up static charges, Section 810 of the National Electrical Code, ANSI/NFPA No. English _v
  • 6. important safety instructions 22. POWER LINES: a. When the power-supply cord or plug is damaged. An outside antenna system should not be located in b. If any liquid has been spilled onto, or objects have the vicinity of overhead power lines or other electric fallen into the CAMCORDER. light or power circuits where it can fall into such power c. If the CAMCORDER has been exposed to rain or lines or circuits. When installing an outside antenna water. system, extreme care should be taken to keep from d. If the CAMCORDER does not operate normally touching such power lines or circuits as contact with by following the operating instructions, adjust only them might be fatal. those controls that are covered by the operating 23. OVERLOADING: instructions. Improper adjustment of other controls Do not overload wall outlets and extension cords as may result in damage and will often require this can result in a risk of fire or electric shock. extensive work by a qualified technician to restore the CAMCORDER to its normal operation. 24. OBJECTS AND LIQUIDS: e. If the CAMCORDER has been dropped or the Never push objects of any kind into this CAMCORDER cabinet has been damaged. through openings as they may touch dangerous f. When the CAMCORDER exhibits a distinct change voltage points or short out a part that could result in a in performance, this indicates a need for service. fire or electric shock. Never spill liquids of any kind onto the CAMCORDER. Should spillage occur, unplug unit 27. REPLACEMENT PARTS: and have it checked by a technician before use. When replacement parts are required, be sure the service technician has used replacement parts 25. SERVICING: specified by the manufacturer and having the same Do not attempt to service this CAMCORDER yourself. characteristics as the original part. Unauthorized Opening or removing covers may expose you to substitutions may result in fire, electric shock or other dangerous voltage or other hazards. Refer all servicing hazards. to qualified service personnel. 28. SAFETY CHECK: 26. DAMAGE REQUIRING SERVICE: Upon completion of any service or repairs to this Unplug this CAMCORDER from the wall outlet and CAMCORDER, ask the service technician to perform refer servicing to qualified service personnel under the safety checks to determine that the CAMCORDER is in following conditions: safe operating order. vi_ English
  • 7. 29. To prevent damage which may result in fire or shock NOTE: This equipment has been tested and found to comply hazard, do not expose this appliance to rain or with the limits for a Class B digital device, pursuant to part 15 moisture. of the FCC Rules. 30. If this power supply is used at 240V ac, a suitable plug These limits are designed to provide reasonable protection adaptor should be used. against harmful interference in a residential installation. 31. This product is covered by one or more of the following This equipment generates, uses and can radiate radio U.S. patents: frequency energy and, if not installed and used in accordance 5,060,220 5,457,669 5,561,649 5,705,762 6,043,912 with the instructions, may cause harmful interference to 6,438,099 6,467,061 6,556,521 6,578,163 6,697,307 radio communications. However, there is no guarantee that 6,728,474 6,771,891 6,894,963 6,895,593 6,937,815 interference will not occur in a particular installation. 6,996,327 7,009,926 7,085,221 7,088,649 7,092,327 If this equipment does cause harmful interference to radio or 7,099,566 7,123,564 7,142,493 7,142,495 7,145,861 television reception, which can be determined by turning the equipment off and on, the user is encouraged to try to correct 7,146,624 7,151,729 7,161,879 7,164,647 7,167,437 the interference by one or more of the following measures: 7,173,891 7,177,250 7,194,187 7,203,891 7,209,423 - Reorient or relocate the receiving antenna. 7,210,067 7,228,062 7,245,566 7,245,567 7,257,065 - Increase the separation between the equipment and 7,263,045 7,269,110 7,272,086 7,272,106 7,280,460 receiver. 7,283,729 7,286,454 7,304,938 - Connect the equipment into an outlet on a circuit different USER INSTALLER CAUTION: from that to which the receiver is connected. - Consult the dealer or an experienced radio/TV technician Your authority to operate this FCC certified equipment could be for help and for additional suggestions. voided if you make changes or modifications not expressly approved The user may find the following booklet prepared by the by this party responsible for compliance to part 15 FCC rules. Federal Communications Commission helpful: “How to Identify and Resolve Radio-TV Interference Problems.” NOTE: This Booklet is available from the U.S. Government Hg LAMP(S) INSIDE THIS PRODUCT CONTAIN MERCURY AND Printing Office, Washington, D.C. 20402, Stock No. MUST BE RECYCLED OR DISPOSED OF ACCORDING 004-000-00345-4. TO LOCAL, STATE OR FEDERAL LAWS. For details see FCC Warning lamprecycle.org, eiae.org, or call 1-800-Samsung (7267864) The user is cautioned that changes or modifications not expressly approved by the manufacturer could void the user’s CALIFORNIA USA ONLY authority to operate the equipment. This Perchlorate warning applies only to primary CR This device complies with Part 15 of FCC Rules. (Manganese Dioxide) Lithium coin cells in the product sold Operation is subject to the following two conditions; or distributed ONLY in California USA (1) This device may not cause harmful interference, and “ Perchlorate Material - special handling may apply, (2) This device must accept any interference received, See www.dtsc.ca.gov/hazardouswaste/perchlorate.” including interference that may cause undesired operation. English _vii
  • 8. precautions Warning! • This camcorder should always be connected to an AC outlet with a protective grounding connection. • Batteries shall not be exposed to excessive heat such as sunshine, fire or the like. Caution Danger of explosion if battery is incorrectly replaced. Replace only with the same or equivalent type. If this power supply is used at 240V ac, a suitable plug adaptor should be used. CLASS 1 LASER PRODUCT KLASSE 1 LASER PRODUKT LUOKAN 1 LASER LAITE KLASS 1 LASER APPARAT PRODUCTO LASER CLASE 1 important information on use BEFORE USING THIS CAMCORDER • This DVD camcorder records video in MPEG2 format in the DVD camcorder mode, MPEG4 format in the digital camera mode and at Standard Resolution (SD-VIDEO). • Please note that this DVD camcorder is not compatible with other digital video. • Before recording important video, make a trial recording. Play back your trial recording to make sure the video and audio have been recorded properly. • The recorded contents cannot be compensated for: - Samsung cannot compensate for any damage caused when a recording cannot be played back because of a defect in the DVD camcorder or memory card. Samsung cannot be responsible for your recorded video and audio. - Recorded contents may be lost due to a mistake when handling this DVD camcorder or memory card, etc. Samsung shall not be responsible for compensation for damages due to the loss of recorded contents. viii_ English
  • 9. Make a backup of important recorded data. Protect your important recorded data by copying the files to PC. We also recommend you copy it from your PC to other recording media for storage. Refer to the software installation and USB connection guide. • Copyright: Please note that this DVD camcorder is intended for personal use only. Data recorded on the card in this DVD camcorder using other digital/analog media or devices is protected by the copyright act and cannot be used without permission of the owner of copyright, except for personal enjoyment. Even if you record an event such as a show, performance or exhibition for personal enjoyment, it is strongly recommended that you obtain permission beforehand. ABOUT THIS USER MANUAL • This user manual covers models SC-DX100/ DX103/DX105. SC-DX103/ DX105 have two storage media, Disc and Card. Although the external appearance is different, they operate in the same way. • Illustrations of model SC-DX105 are used in this user manual. • The displays in this user manual may not be exactly the same as those you see on the LCD screen. • Designs and specifications of the camcorder and other accessories are subject to change without any notice. ( , ) MARKS NEXT TO MENU HEADINGS • Some functions of this DVD camcorder are unavailable with memory card or disc. Refer to the marks to the right of each function to identify whether the memory card or disc is compatible with the function. Refer to these marks and identify the functions and operation to match the memory card or disc you use. NOTES REGARDING TRADEMARKS • All the trade names and registered trademarks mentioned in this manual or other documentation provided with your Samsung product are trademarks or registered trademarks of their respective holders. • Windows® is registered trademark or trademark of Microsoft Corporation, registered in the United States and other countries. • Macintosh is the trademark of Apple Computer, Inc. • All the other product names mentioned herein may be the trademark or registered trademarks of their respective companies. • Furthermore, “TM” and “R” are not mentioned in each case in this manual. • Manufactured under license from Dolby Laboratories. • “Dolby” and the double-D symbol are trademarks of Dolby Laboratories. Portions of this software are copyright © 2006 The Free Type Project. Website: http://www.freetype.org. All rights reserved. English _ix
  • 10. precautions when using IMPORTANT NOTE • Handle the liquid crystal display (LCD) with care: - The LCD is a very delicate display device: Do not press its surface with force, hit it or prick it with a sharp object. - If you push the LCD surface, unevenness in display may occur. If unevenness does not disappear, turn the camcorder off, wait for a few moments, then turn it on again. - Do not place the camcorder with the open LCD screen down. - Close the LCD monitor when not using the camcorder. • Liquid crystal display : - The LCD screen will be slightly dimmer than usual when the camcorder is at low temperature, as in cold areas, or immediately after power is turned on. Normal brightness will be restored when the temperature inside the camcorder rises. This has no effect on the images in the storage media, so there is no cause for concern. • Hold the DVD camcorder correctly: - Do not hold the DVD camcorder by the LCD monitor when lifting it: the viewfinder or LCD monitor could detach and the DVD camcorder may fall. • Do not subject the DVD camcorder to impact: - This DVD camcorder is a precision machine. Take great care that you do not strike it against a hard object or let it fall. - Do not use the DVD camcorder on a tripod in a place where it is subject to severe vibrations or impact. • No sand or dust! Fine sand or dust entering the DVD camcorder or AC power adaptor could cause malfunctions or defects. • No water or oil! Water or oil entering the DVD camcorder or AC power adaptor could cause electric shock, malfunctions or defects. • Heat on surface of product: The surface of the DVD camcorder will be slightly warm when in use, but this does not indicate a fault. • Be careful of ambient temperature: - Using the DVD camcorder in a place where the temperature is over 60°C (140°F) or under 0°C (32°F) will result in abnormal recording/playback. - Do not leave the DVD camcorder on a beach or in a closed vehicle where the temperature is very high for a long time: This could cause a malfunction. • Do not point directly at the sun: - If direct sunlight strikes the lens, the DVD camcorder could malfunction or a fire could occur. - Do not leave the DVD camcorder with the LCD screen exposed to direct sunlight: This could cause a malfunction. • Do not use the DVD camcorder near TV or radio: - This could cause noise to appear on the TV screen or in radio broadcasts. x_ English
  • 11. • Do not use the DVD camcorder near strong radio waves or magnetism: - If the DVD camcorder is used near strong radio waves or magnetism, such as near a radio transmitter or electric appliances, noise could enter video and audio that are being recorded. During playback of normally recorded video and audio, noise may also be present in picture and sound. At worst, the DVD camcorder could malfunction. • Do not expose the DVD camcorder to soot or steam: - Thick soot or steam could damage the DVD camcorder case or cause a malfunction. • Do not use the DVD camcorder near corrosive gas: - If the DVD camcorder is used in a place where there is dense exhaust gas generated by gasoline or diesel engines, or corrosive gas such as hydrogen sulphide, the external or internal terminals could corrode, disabling normal operation, or the battery connecting terminals could corrode, so that power will not turn on. • Do not expose the DVD camcorder to insecticide: Insecticide entering the DVD camcorder could dirty the lens in the laser pickup block, and in such a case the DVD camcorder might not operate normally. Turn the DVD camcorder off and cover it with vinyl sheet, etc. before using insecticide. • Do not use a 3 1/2 inch(8cm) CD lens cleaner: - Cleaning the lens is not necessary when using this DVD camcorder in the usual way. - Using a 3 1/2 inch(8cm) CD lens cleaner could cause this DVD camcorder to malfunction. • Do not touch the lens in the laser pickup block. If you touch the lens in the laser pickup block directly it may cause a malfunction. The laser pickup block is not warranted for damage caused by misuse. Therefore, pay much attention when operating this camcorder. • Do not wipe the DVD camcorder body with benzene or a thinner: - The coating of exterior could peel off or the case surface could deteriorate. • Keep the memory card out of reach of children to prevent swallowing. English _xi
  • 12. contents INTRODUCTION TO BASIC 06 FEATURES GETTING TO KNOW YOUR DVD 09 What’s included with your DVD camcorder CAMCORDER 10 Front and right view 11 Left side and bottom view 12 Rear and top view PREPARATION 13 Remote control (SC-DX105 only) 13 14 Installing the button-type battery 15 Holding the DVD camcorder 16 Charging the battery pack 21 Basic DVD camcorder operation 22 Screen indicators 26 Using the display ( ) button 26 Using the joystick 27 Using the LCD screen 27 Using the viewfinder 28 Initial setting: OSD language & date and time DVD CAMCORDER MODE: 30 Selecting the storage media (SC-DX103/ DX105 only) BEFORE RECORDING 30 Inserting and removing a disc 32 Recordable time 30 02_ English
  • 13. DVD CAMCORDER MODE: 33 Recording movie images on a disc RECORDING/PLAYBACK 35 Recording with ease for beginners (EASY.Q mode) 33 36 Capturing still images during movie image playback (SC-DX103/ DX105 only) 37 Zooming 38 Playing movie images DVD CAMCORDER MODE: 40 Deleting images EDITING MOVIE IMAGE 41 Deleting a section of a movie image (partial delete) 40 42 Playlist DVD CAMCORDER MODE: 47 Disc finalize DISC MANAGE 49 Disc unfinalize 47 50 Disc format 51 Disc information English _03
  • 14. contents DIGITAL CAMERA MODE 52 Inserting and ejecting a memory card (SC-DX103/ DX105 ONLY) 55 Recordable time and number of images 52 56 Recording movie images on a memory card 57 Taking photo images 58 Playing movie images 59 Viewing photo images 60 Protection from accidental erasure 61 Deleting images USING THE MENU ITEMS 62 Handling menus 62 63 Menu items 65 Recording menu items 78 Playback menu item 78 Setting menu items PRINTING PHOTO IMAGES 83 DPOF print setting (SC-DX103/ DX105 ONLY) 84 Direct printing with a PictBridge 83 04_ English
  • 15. CONNECTING TO AV DEVICES 86 Connecting to a TV 86 88 Dubbing images from the Camcorder to a VCR or DVD/ HDD recorder 89 Using Voice Plus CONNECTING TO A PC (SC-DX103/ DX105 ONLY) 90 System requirements 91 Installing DV Media PRO 90 93 94 96 Connecting the USB cable Viewing the contents of storage media (memory card) Transferring files on the memory card from the DVD camcorder to your PC 97 Using the PC cam function MAINTENANCE & 98 Maintenance ADDITIONAL INFORMATION 99 Additional information 102 Using your DVD camcorder abroad TROUBLESHOOTING 103 Troubleshooting SPECIFICATIONS 112 WARRANTY (SEA USERS ONLY) English _05
  • 16. introduction to basic features This chapter introduces the basic features of your DVD camcorder. See the reference pages below for more information. Step 1 : Preparation • Charging the battery pack page 18 INSERT BATTERY • Setting OSD language and the date/time pages 28-29 PACK • Selecting the storage media (DISC and CARD) (SC-DX103/ DX105 only) page 30 You can record movie and photo images. - You can take a photo only on the memory card. DVD discs do not support photo mode. - Refer to pages 52~54 for the supported memory cards before purchasing them. When recording movie images on a DVD disc Select the proper disc for use. Do you want to delete or edit movie images on the DVD camcorder? YES NO Do you want to reuse the disc after formatting ? YES NO When recording for a long time DVD -RW DVD -RW DVD +RW DVD +R DL DVD -R VR VIDEO • DVD+RW, DVD+R DL and DVD-R do not have Video or VR mode selection. • You can delete the movie image only on a DVD-RW disc (VR mode). • Selecting the desired disc and disc formatting. pages 30-31 06_ English
  • 17. Step 2 : Recording • Recording movie images pages 33~37, 56 • Taking the photo images (SC-DX103/ DX105 only) page 57 ���� Step 3: Playing back / Editing • Selecting an image to play back from the thumbnail index views pages 38, 58~59 • Viewing playback from your DVD camcorder on your PC (SC-DX103/ DX105 only) or TV pages 86~89, 96 • Editing movie images as your preference (Editing function is available only in DVD-RW(VR mode)) pages 40~46 Step 4: Viewing on DVD devices You must finalize the disc in advance to view the movie images recorded on a DVD camcorder on other DVD devices. (Finalize is a function that enables a disc recorded on the DVD camcorder to be playable on DVD devices such as DVD players.) Finalize continued English _07
  • 18. introduction to basic features The function of the finalized disc depends on the disc type. Finalized DVD -R You cannot make more Finalized recordings, even if the disc DVD +R The finalized DVD disc can be has enough space. DL played on most DVD devices. Finalized VIDEO DVD -RW You can record more after Finalized You can play back the disc only on a unfinalizing. page 49 DVD player that supports DVD-RW VR discs recorded in VR mode. DVD +RW You can play back the disc on other DVD devices without finalizing it. • You cannot use the following discs. - 5 inch (12cm) CD/DVD discs - CD/CD-R/CD-RW/DVD-ROM/DVD+R (Single Layer)/DVD-RAM/DVD-R (Dual Layer), Floppy Disk, MO, MD, iD, LD • We are not responsible for data loss on a disc. • We do not warranty any damage or loss incurred due to recording and playback failure caused by disc or card malfunction. • We take no responsibility and offer no compensation for any recording failure, loss of recorded or edited material and/or damage to the recorder arising from the misuse of discs. • For stable and perpetual recording and playback, use TDK, MKM, Verbatim discs that have the “ ” designation. If you do not use them, recording and playback operation may not work properly or you may not be able to eject the disc from the camcorder. • The time it takes to finalize a disc may vary depending on the recording time. • You cannot overwrite, edit, or format a finalized disc. If needed, unfinalize the disc. (DVD-RW only) page 49 • It is not guaranteed that all DVD players/recorders/drives can play discs finalized in this DVD camcorder. For compatibility details, refer to the DVD players/recorders/drives owner’s manual. • For more information about available discs, see page 101. 08_ English
  • 19. getting to know your DVD camcorder WHAT’S INCLUDED WITH YOUR DVD CAMCORDER Your new DVD camcorder comes with the following accessories. If any of these items is missing from your box, call Samsung’s Customer Care Center. ✪ The exact appearance of each item may vary by model. Battery pack AC power adaptor USB cable AV cable (IA-BP80W) (AA-E9 type) (AK39-00095A) (AD39-00001A) (AD43-00186A) (AD44-00116B) (SC-DX103/ DX105 only) Button-type battery(AD43-10130H) User manual Quick start guide for internal clock(TYPE: CR2025) (AD68-02550A) (AD68-02561A) or remote control(SC-DX105 only) Remote control Software CD 3 1/2 inch(8cm) (AD59-00155A) (AD46-00097A) DVD-RW disc(Option) (SC-DX105 only) (SC-DX103/DX105 only) (AD46-00090A)  The contents may vary depending on the sales region.  Parts and accessories are available at your local Samsung dealer.  A memory card is not included. See pages 52~53 for memory cards compatible with your DVD camcorder. (SC-DX103/ DX105 only)  To buy this optional accessory, contact your nearest Samsung dealer. English _09
  • 20. getting to know your DVD camcorder FRONT AND RIGHT VIEW CLOSE OPEN ���� Lens open/close switch Grip belt hook Lens Grip belt Remote sensor (SC-DX105 only) Swivel handle Light (SC-DX105 only) Disc cover Internal microphone 10_ English
  • 21. LEFT AND BOTTOM VIEW Display ( ) button Battery pack EASY Q button LCD screen Built-in speaker Recording start/stop button FINALIZE button Joystick (up/down/right/left/Select, W/T) BATT. (battery release) switch MENU button Storage mode switch (DISC/CARD) Tripod receptacle (SC-DX103/ DX105 only) Memory card slot (SC-DX103/ DX105 only) English _11
  • 22. getting to know your DVD camcorder REAR AND TOP VIEW Viewfinder OPEN switch Zoom (W/T) lever/ Volume control AV jack PHOTO button (SC-DX103/ DX105 only) USB jack (SC-DX103/ DX105 only) Focus adjustment knob DC IN/ USB (SC-DX103/ DX105 only) / MODE button / Mode indicator AV jack cover (Record ( )/Play ( ) mode) DC IN jack Recording start/stop button POWER switch ACCESS/CHG indicator 12_ English
  • 23. preparation This section provides information on using this DVD camcorder; such as how to use the provided accessories, how to charge the battery, how to setup the operation mode and initial setup. REMOTE CONTROL (SC-DX105 only) START/STOP button DISPLAY button Skip ( / ) button Stop ( ) button Play/Pause ( ) button MENU button Control ( / / / / )buttons PHOTO button Zoom (W/T) button Search ( / ) button Slow playback ( ) button The buttons on the remote control function the same as those on DVD camcorder. English _13
  • 24. preparation INSTALLING THE BUTTON-TYPE BATTERY Installation for the internal clock (battery release) switch 1. Open the LCD screen, then slide the BATT. (battery release) switch in the arrow direction to remove the battery pack. 2. Remove the battery cover. 3. Insert the button-type battery then place the battery cover back. - Position the button type battery with the positive (+) terminal face out in the button type battery slot. Battery release switch Battery installation for the internal clock The button type battery maintains the clock function and preset contents of the memory : even if the battery pack or AC power adapter is removed. 1 The button type battery for the DVD camcorder lasts about 6 months under normal operation from the time of installation. When the button type battery becomes weak or dead, the date/time indicator will display “JAN/01/2008 12:00 AM” when you turn the date and time display on. Installing the button-type battery in the remote control (SC-DX105 only) 1. Turn the battery holder counterclockwise (as indicated with () mark) using your fingernail or a coin to open it. The battery holder opens. 2 2. Insert the battery into the battery holder with the positive (+) terminal facing down and press it firmly until you hear a locking sound. Battery 3. Place the battery holder back in the remote control, matching its () mark with the () mark on the remote control, and turn the battery holder clockwise to lock it. holder 3 Precautions regarding the button type battery • There is a danger of explosion if button type battery is incorrectly replaced. Replace only with the same or equivalent type. • Do not pick up the battery using tweezers or other metal tools. This will cause a short circuit. • Do not recharge, disassemble, heat or immerse the battery in water to avoid the risk of explosion. Keep the button type battery out of the reach of the children. Should any battery WARNING be swallowed, seek medical attention immediately. 14_ English
  • 25. HOLDING THE DVD CAMCORDER Attaching the grip belt Insert your right hand from the bottom of the DVD camcorder up to the base of your thumb. Put your hand in a position where you can easily   operate the Recording start/stop button, PHOTO button, and the Zoom lever. Adjust the length of grip belt so that the DVD camcorder is stable when you press the Recording start/stop button with your thumb. 1. Pull and detach the grip belt. Insert the grip belt into its hook as shown in the figure. 2. Insert your hand into the grip belt and adjust its length. 3. Close the grip belt. Angle Adjustment Rotate the swivel handle to the most convenient angle. You can rotate it downwards upto 140°. Please be careful not to turn the swivel handle backward as it may cause damage. 140° English _15
  • 26. preparation CHARGING THE BATTERY PACK • There are two types of power source that can be connected to your DVD camcorder. • Do not use provided power supply units with other equipment. - The battery pack: used for outdoor recording. - The AC power adaptor: used for indoor recording. To charge the battery pack Be sure to charge the battery pack before you start using your DVD camcorder. Attaching the battery pack to the DVD camcorder 1. Open up the LCD screen 90 degrees with your finger. 2. Fit the battery pack to the battery attachment platform and push the battery pack as shown in the figure until a click is heard. Removing the battery pack from the DVD camcorder 1. Open up the LCD screen 90 degrees with your finger. 2. Slide the BATT. (battery release) switch in the direction as shown in the figure and pull out the battery pack. Insert the battery pack in the accurate direction as shown in the figure. WARNING When the battery pack is wrongly inserted, it may cause malfunction of the DVD camcorder and battery pack.  It is recommended that you purchase one or more additional battery packs to allow continuous use of your DVD camcorder.  Additional battery packs are available at your local Samsung dealer.  If the DVD camcorder will not be in use for a while, remove the battery from the DVD camcorder. ����� Use only Samsung-approved battery packs. Do not use batteries from other manufacturers. Otherwise, there is a danger of overheating, fire or explosion. Samsung is not responsible for problems occurring due to using unapproved batteries. 16_ English
  • 27. About battery packs • The battery pack should be recharged in an environment that is between 0°C (32°F) and 40°C (104°F). However, when it is exposed to cold temperatures (below 0°C (32°F)), its usage time becomes reduced and it may cease to function. If this happens, place the battery pack in your pocket or other warm, protected place for a short time, then re-insert it to the DVD camcorder. • Do not put the battery pack near any heat source (i.e. fire or a heater). • Do not disassemble, apply pressure to, or heat the battery pack. • Do not allow battery pack terminals to be short-circuited. It may cause leakage, heat generation, induce overheating or fire. Maintaining the battery pack • The recording time is affected by temperature and environmental conditions. • The recording time shortens dramatically in a cold environment. The continuous recording times in the user manual are measured using a fully charged battery pack at 25°C (77°F). As the environmental temperature and conditions vary, the remaining battery time may differ from the approximate continuous recording times given in the instructions. • We recommend only using the original battery pack that is available from your Samsung retailer. When the battery reaches the end of its life, please contact your local dealer. The batteries have to be treated as chemical waste. • Make sure that the battery pack is fully charged before starting to record. • When fully discharged, a battery pack damages the internal cells. The battery pack may be prone to leakage when fully discharged. • Remove the battery from the camcorder when it is not in use. Even when the power is switched off, the battery pack will still discharge if it is left attached to the DVD camcorder. • For power saving purposes, the DVD camcorder enters the sleep mode automatically if no operation is performed for 3 minutes in the STBY mode and thumbnail index view. If no operation is made for 3 more minutes while the unit is sleep mode, the camcorder turns off automatically. However, if any operation is made, the DVD camcorder comes out of sleep mode. This function works only if “Auto Power Off” is set to “6 Min.”page 80 • Make sure that the battery pack fits firmly into place. Do not drop the battery pack as it may cause damage. About the battery life Battery capacity decreases over time and through repeated use. If decreased usage time between charges becomes significant, it is probably time to replace it with a new one. Each battery’s life is affected by storage, operating and environmental conditions. English _17
  • 28. preparation Charging the battery pack POWER switch • Use the IA-BP80W battery pack only. • The battery pack may be charged a little at the time of purchase. 1. Slide the POWER switch downwards to turn off the power. 2. Open the LCD screen and attach the battery pack to the DVD camcorder. page 16 3. Open the DC IN/USB/AV jack cover. 4. Connect the AC power adaptor to the DC IN jack of your DVD camcorder. 5. Connect the AC power adaptor to a wall socket. • The ACCESS/CHG (charging) indicator lights up in orange and charging starts. The ACCESS/CHG (charging) indicator lights up in green when the battery is fully charged. 6. Once charged, disconnect the AC power adaptor from the DC IN jack on your DVD camcorder. • Even with the power switched off, the battery pack will still discharge if it is left attached to the DVD camcorder. It is recommended that you remove the battery pack from the DVD camcorder. Charging indicator The color of the ACCESS/CHG (charging) indicator indicates the power or ���� charging state. - If the battery has been fully charged, the charging indicator is green. - If you are charging the battery, the color of the charging indicator is orange. - If an error occurs while the battery pack in charging, the charging indicator blinks orange. 18_ English
  • 29. Charging, recording and playback times with a fully charged battery pack (with no zoom operation, etc.) For your reference, the approximate time with a fully charged battery pack: Battery Pack Charging time 1 hr 50 min Quality Continuous recording time Playback time LCD Super Fine 50min 55min Viewfinder LCD Fine 60min 65min Viewfinder LCD Normal 70min 75min Viewfinder - The time is only for reference. Figures shown above are measured under Samsung’s test environment, and may differ from your actual use. - The charging time will vary depending on the remaining battery level. Continuous recording time (without zoom) The times shown in the table reflect the available recording time when the DVD camcorder is in the recording mode without using any other functions. In actual recording, the battery pack may discharge 2-3 times faster than this reference since the record start/stop and zoom are being operated, and playback is performed. Assume that the recordable time with a fully charged battery pack is between 1/2 and 1/3 of the time in the table, so prepare enough battery packs to allow for the time you are planning to record on the DVD camcorder. Note that the battery pack discharges faster in a cold environment. English _19
  • 30. preparation Using the DVD camcorder with the AC power adaptor It is recommended that you use the AC power adaptor to power the DVD camcorder from a household AC outlet when you perform settings on it, finalize a disc, play back, or edit images, or use it indoors. page 18  Be sure to use the provided AC power adaptor to power the DVD camcorder. Using other AC power adaptors could cause electric shock or result in fire.  The AC power adaptor can be used around the world. An AC plug adaptor is required in some foreign countries. If you need one, purchase it at your local Samsung dealer. • Before detaching the power source, make sure that the DVD camcorder’s power is turned off. CAUTION Failure to do so can result in DVD camcorder malfunction. • Use a nearby wall outlet when using the AC power adaptor. Disconnect the AC power adaptor from the wall outlet immediately if any malfunction occurs while using your DVD camcorder. • Do not use the AC power adaptor in a narrow space, such as between a wall and furniture. 20_ English
  • 31. BASIC DVD CAMCORDER OPERATION Turning the DVD camcorder on and off ���� You can turn the camcorder on or off by sliding the POWER switch down. Selecting the operating modes • Set the operation mode by adjusting the Storage mode switch (SC-DX103/ DX105 only) and MODE button before recording or operating any functions. 1. Set the Storage mode switch to DISC or CARD. (SC-DX103/DX105 only) STBY 0:00:00 [30 min] - DVD camcorder mode: To record movie on a DVD disc. page 33 - Digital camera mode: To record movie or photo images on a memory card. pages 56~57 2. Press the MODE button to set Record( ) or Play( ) mode. Each press of the MODE button toggles between the Record( ) mode and Play( ) mode. <DVD camcorder record mode> When the DVD camcorder is turned on, the self-diagnosis function operates and a message may appear. In this case, refer to warning indicators and messages (on pages 103~105) and take corrective action. 12/12 <DVD camcorder play mode> When using this camcorder first time • When you use your DVD camcorder for the first time or you reset it, you will see the Date/Time Set “Date/Time Set” screen for the startup display. If you do not set the date and time, Month Day Year Hour Min the “Date/Time Set” screen appears every time you turn on your camcorder. JAN / 01 / 2008 12 : 00 AM Ok Cancel English _21
  • 32. preparation SCREEN INDICATORS DVD camcorder (disc) record mode Movie record mode STBY 0:00:00 [30 min] Operating mode (STBY (standby) or  (recording)) Warning indicators and messages Time counter (movie recording time) Remaining time Storage media (disc) Insert Disc Battery info.(remaining battery level) 21 Disc format type (DVD-RW disc only) 1/60 Quality JAN/01/2008 12:00 AM 1/30 Anti-Shake (DIS) Wind Cut Back Light Fader* Light* (SC-DX105 only) C. Nite* Zoom/Digital Zoom position* Date/Time • This OSD indicators are based on using a DVD- Manual Shutter* RW disc. Manual Exposure* • The above screen is an example for explanation: It is different from the actual display. Digital Effect • Functions marked with * will not be retained when Manual Focus* the DVD camcorder is powered on after turning it White Balance off. Scene Mode (AE)/ EASY.Q • The battery indicator appears 8 seconds after power on. If the battery is low, it appears right after power on. 22_ English
  • 33. DVD camcorder (disc) play mode Movie play mode Operating status (Play/Pause) 0:00:59 Warning indicators and messages Time code (elapsed time) Storage media (disc) Battery info (remaining battery level) Activate Remote Control Disc Format (-RW Video/VR mode only) Quality 02 Voice plus JAN/01/2008 12:00 AM 001 Movie No. Date/Time Volume control English _23
  • 34. preparation Digital camera (memory card) record mode Record mode Operating mode (STBY (standby) or ●(recording)) Warning indicators and messages STBY 0:00:00 [64 min] Time counter (movie recording time) 4830 Remaining time Storage media (memory card) Battery info (remaining battery level) Insert Card The total number of recordable photos 29 Back Light Zoom position JAN/01/2008 12:00 AM Date/Time Manual Exposure* Manual Focus* White Balance The digital camera mode is for models SC-DX103/ DX105 only. 24_ English
  • 35. Digital camera (memory card) play mode (Video) Video play mode Operating status (Play/Pause) 0:00:03 Time code (elapsed time) Warning indicators and messages Storage media (memory card) Battery info (remaining battery level) Erase Protection Activate Remote Control Activate Remote Control File Name (folder-file name) 02 Volume control 02 Date/Time JAN/01/2008 12:00 AM 100-0002 Digital camera (memory card) play mode (Photo) Photo play mode Slide Show Image counter (current image/total number of recorded images) Warning indicators and messages 9/9 Storage media (memory card) Battery info (remaining level) 1 Erase Protection File Name (folder-file name) Date/Time Activate Remote Control Activate Remote Control Print Mark(DPOF) Photo size JAN/01/2008 12:00 AM 100-0002 The digital camera mode is for models SC-DX103/ DX105 only. English _25
  • 36. preparation USING THE DISPLAY ( ) BUTTON Switching the information display mode You can switch between the on-screen information display modes: Slide the POWER switch downwards to turn on the power, and then press the Display ( ) button. Each press of the Display button toggles the OSD (On Screen Display) function on and off. • Full display mode: All information will appear. • Minimum display mode: Only operating status indicators will appear. If the DVD camcorder has warning information, a warning message will appear. USING THE JOYSTICK The Joystick is used to make a selection and to move the cursor left, right, up and down. Using the Joystick, you can easily make your selection and navigate the menu. 1. Move to a previous menu item / Adjust the selected item (to the left). 2. Move to a sub menu item / Adjust the selected item (to the right). 3. Move to a lower menu item. 4. Move to an upper menu item. 5. Press to select the chosen item (Select). 1 2 3 4 5 26_ English
  • 37. USING THE LCD SCREEN Adjusting the LCD screen 1. Open up the LCD screen 90° with your finger. 2. Rotate it to the best angle to record or play. Do not lift the DVD camcorder by holding the LCD screen. WARNING • Over-rotation may cause damage to the inside of the hinge that connects the LCD screen to the DVD camcorder. • See page 79 to adjust brightness and color of the LCD screen. USING THE VIEWFINDER You can view pictures through the viewfinder or see correct images when the picture on the LCD screen is poor. The viewfinder will work when the LCD screen is closed. Adjusting the focus The focus adjustment knob of the viewfinder enables individuals with vision problems to see clearer images. 1. Close the LCD screen. 2. Use the focus adjustment knob of the viewfinder to focus the picture. Viewing the sun or any strong light source through the viewfinder for a prolonged period may be harmful, or cause temporary impairment. English _27
  • 38. preparation INITIAL SETTING: OSD LANGUAGE & DATE AND TIME • Initial setting is available in all operating modes. page 21 STBY 0:00:00 [30 min] • To read the menus or messages in your desired language, set the OSD language. To store the date and time during record, set the date/time. • Set the date and time when using this camcorder for the first time. page 21 You can also set the date and time using the setting menu. page 29 Selecting the OSD language STBY 0:00:00 [30 min] You can select the desired language to display the menu screen and the messages. Setting 1. Press the MENU button. Date/Time Set • The menu will appear. Date/Time LCD Brightness Off 18 2. Move the Joystick right or left to select “Setting.” LCD Color 18 • The setting menu will appear. Select 3. Move the Joystick up or down to select “Language,” then press the Joystick. STBY 0:00:00 [30 min] 4. Move the Joystick up or down to select the desired language, then press the Joystick. 5. To exit, press the MENU button. Setting Transparency 20% • Even if the battery pack or AC power were removed, the language setting would Language Demo English On still be preserved. • “Language” options may be changed without prior notice. Select 28_ English
  • 39. Setting the date and time Set the date and time when using this DVD camcorder for the first time. The recording date/time is recorded on the movie/photo(SC-DX103/DX105 only) images. 1. Press the MENU button. • The menu will appear. STBY 0:00:00 [30 min] 2. Move the Joystick right or left to select “Setting.” • The setting menu will appear. 3. Move the Joystick up or down to select “Date/Time Set,” then press the Joystick. • The month will be selected. 4. Move the Joystick right or left to the desired item(Month, Day, Year, Hour, Min AM/PM) and then move the Joystick up or down to set values. 5. To save the date and time, move the Joystick right or left to “Ok,” then press the Joystick. Setting • To cancel the setting, move the Joystick to select “Cancel,” then press the Joystick. Date/Time Set Date/Time Off 6. To exit, press the MENU button. LCD Brightness 18 LCD Color 18 • If the button type battery is exhausted, the date and time will be reset as Select “JAN/01/2008 12:00 AM.” Replace with the button type battery for internal clock. page 14 Date/Time Set • You can set the year up to 2040. Month Day Year Hour Min • The date and time do not appear during recording, but they are automatically JAN / 01 / 2008 12 : 00 AM Ok Cancel recorded on the storage media, and can be displayed when you turn the date and time display on. Turning the date and time display on/off To switch the date and time display on or off, access the menu and change the date/time mode. page 79 English _29
  • 40. DVD camcorder mode: before recording SELECTING THE STORAGE MEDIA (SC-DX103/ DX105 only) You can record movies onto a DVD disc, and you can record both movies and photos onto a memory card. With models SC-DX103/DX105, you must select the desired storage media before starting recording or playback. Selecting the desired storage • Set the Storage mode switch to DISC or CARD. (DISC  CARD) ���� ���� - DVD camcorder mode: To record movies on a DVD disc. page 33 - Digital camera mode: To record movies or photo images on memory card. pages 56~57 INSERTING AND REMOVING A DISC • When inserting a disc or closing the disc cover, do not apply excessive force. It may cause a malfunction. 1 • You cannot open the disc cover while loading. • You can use a new 3 1/2 inch(8cm) DVD-RW, DVD+RW, DVD-R or DVD+R DL (Dual ���� Layer) disc for movie recording. Photos can not be recorded onto a DVD disc. Inserting a disc 1. Slide the OPEN switch in the direction of the arrow. • The disc cover will partially open. 2. Gently open the cover the rest of the way by hand. 3. Push the disc into the disc compartment until a click is heard. 3 • The recording side of the disc must face the inside of the DVD camcorder. • Do not touch the pickup lens. 4. Gently push the disc cover to close it. • Once inserted, the disc is recognized and the ACCESS/CHG indicator blinks. Do not cut off the power supply during this time. Do not shake nor apply impact. It may cause a malfunction. • Set the Storage mode switch to DISC. (SC-DX103/ DX105 only) 4 30_ English
  • 41. • Move the grip belt so it does not interfere with inserting or ejecting the disc. • The disc cover can be opened when the device is connected to an AC power adaptor or the battery pack, even if the power is off. Caution This product utilises a laser. Use of controls or adjustments or performance of procedures other than those specified herein may result in hazardous radiation exposure. Do not open covers and do not look inside the product if interlock mechanism is damaged. Warning Be careful not to damage the interlock mechanism. pickup lens When using a new disc: formatting a new disc Formatting may be required if a new disc is inserted. Recognition of the disc will start. For a DVD-R/+R DL disc: Formatting will automatically begin. For a DVD-RW disc: The Format menu is offered. Select the recording format, Video mode or VR mode. Format the disc in the “Disc Manage” menu when you want to format again. page 50 Video (Video Mode) : If the disc has been finalized, you will be able Differences to play the disc on most DVD players/recorders/drives. Format the disc in Video mode? - Can play in DVD devices. between Video - Cannot edit in camcorder. If not, Remove the disc. and VR mode VR (VR Mode) : You can edit the disc on a DVD camcorder, but playback Video VR is possible only on a DVD recorder that supports VR mode. - Refer to page 8 for finalized disc compatibility. <When a DVD-RW disc is formatted.> For a DVD+RW disc: The Format menu is offered. Formatting makes the recorded disc new and reusable by deleting all the data recorded on the disc. English _31
  • 42. DVD camcorder mode: before recording Removing a disc 1. Slide the OPEN switch in the direction of the arrow. • The disc cover will partially open. 2. Gently open the cover the rest of the way by hand. 3. Remove the disc. • While pushing down the center portion of the disc spindle, pick up the disc by the edges to remove. 4. Gently push the disc cover to close it. • The Finalize/Format functions are not available when the battery level is low ( ). Use the AC power adaptor when finalizing/formatting a DVD disc. • You cannot open the disc cover while loading. Wait until disc loading is completed. • Do not operate the POWER switch or remove a disc while accessing it. Doing so may damage the disc or the data on it. • You can not proceed with recording when the disc cover is open. An icon and message are shown that recording is impossible with the disc cover open. • It may take longer to open the cover when using a DVD+RW. More than 5 minutes may be required if there are a lot of movie images recorded on the disc. RECORDABLE TIME Recordable time for movie images Storage DVD+RW/-RW/-R DVD+R DL Capacity 1.4GB 2.6GB Movie Quality Super Fine Approx. 20min Approx. 35min Fine Approx. 30min Approx. 53min Normal Approx. 60min Approx. 106min Actual formatted capacity may be less as the internal firmware uses a portion of the memory. • The above figures are measured under Samsung’s standard recording test conditions and may differ depending on actual use. • The DVD camcorder provides three quality options for movie recordings: “Super Fine,” “Fine” and “Normal.” The higher the quality setting is, the more memory is used. • The compression rate increases when choosing lower quality settings. The higher the compression rate is, the longer the recording time will be. However, the picture quality will be lower. • Movie image files recorded on other equipment are not playable on this DVD camcorder. 32_ English
  • 43. DVD camcorder mode: recording/playback RECORDING MOVIE IMAGES ON A DISC • Set the Storage mode switch to DISC before recording on a disc. STBY 0:00:00 [30 min] (SC-DX103/ DX105 only) page 30 • You can record movie images using the remote control. (SC-DX105 only) page 13 • This DVD camcorder provides two Recording start/stop buttons. One is on the rear side of the camcorder and the other is on the LCD panel. Select the Recording start/ stop button that works best for you. 1. Turn the DVD camcorder on. • Connect a power source to the DVD camcorder. (A battery pack or an AC power adaptor) • Slide the POWER switch downwards to turn the DVD camcorder on. • Set the Storage mode switch to DISC. (SC-DX103/ DX105 only) page 30 ���� 2. Check the subject on the LCD screen. (Lens and LCD) • Set the Lens open/close switch to open ( ). page 10 3. Press the Recording start/stop button. • The () recording indicator will display, and recording will start. • Press the Recording start/stop button again to stop recording. ���� 4. When recording is finished, turn the DVD camcorder off.  0:00:00 [30 min] English _33
  • 44. DVD camcorder mode: recording/playback • The recorded movie image size is 720X480. • Eject the battery pack when you have finished recording to prevent unnecessary battery power consumption. • For on-screen information display, see page 22. • For approximate recording time, see page 32. • Sound is recorded from the internal stereo microphone at the front of the DVD camcorder. Take care that this microphone is not blocked. • Before recording an important movie, make sure to test the recording function by checking if there is any problem with the audio and video recording. • For various functions available when you record movie images. pages 65~77 • Do not operate the power switch or remove a disc while accessing it. Doing so may damage the disc or the data on it. • If you set the storage media to DVD, up to 253 movie images can be created on DVD-R/+RW/+R DL/ -RW (Video mode) discs, and up to 999 on DVD-RW (VR mode). • You cannot proceed with recording when the disc cover is open. An icon and message are shown that recording is impossible with the disc cover open. • If you press the Recording start/stop button while a menu operation is in process, the DVD camcorder starts to record. • If you turn the DVD camcorder off while recording, turn it on again with the storage media inserted in it: Repair of the storage media will be executed automatically with a message. Do not turn off the power or remove storage media while the DVD camcorder is recovering it, or it will damage the data or the storage media itself. The data recovery completes within a few minutes but sometimes it may take more time. Use the AC power adaptor when recovering data. 34_ English
  • 45. RECORDING WITH EASE FOR BEGINNERS (EASY.Q MODE) • With the EASY.Q function, most of the DVD camcorder settings are automatically adjusted, which relieves you of detailed adjustments. 1. Slide the POWER switch downwards to turn on the power. • Set the Storage mode switch to DISC. (SC-DX103/ DX105 only)  page 30 2. Press the EASY Q button. • When you press the EASY Q button, most functions are set to off and the following functions are set to “Auto.” STBY 0:00:00 [30 min] - “Scene Mode(AE),” “White Balance,” “Exposure,” “Anti-Shake(DIS),” “Digital Effect,” “Focus,” “Shutter,” “Back Light,” “C. Nite” etc. • The ( and Anti-Shake(DIS) ( )) indicators appear on the screen at the same time. 3. To record movie images, press the Recording start/stop button. To cancel EASY.Q mode Press the EASY Q button once again. • The ( and Anti-Shake(DIS) ( )) indicators disappear from the screen. • Almost all the settings will return to the settings that were set prior to activating EASY.Q mode. • You cannot cancel the EASY.Q mode during recording. • Unavailable buttons during EASY.Q operation. The following controls are unavailable because the items are automatically set. And the corresponding message (“Release the EASY.Q!”) may appear if unavailable operations are attempted. - Menu button, Joystick. • Release the EASY.Q function if you want to add any effect or settings to the images. • The EASY.Q mode settings are released when the DVD camcorder is turned off. English _35
  • 46. DVD camcorder mode: recording/playback CAPTURING STILL IMAGES DURING MOVIE IMAGE PLAYBACK(SC-DX103/ DX105 only) • This function works only in the Play mode. page 21 • If you press the PHOTO button during playback, it stops playing and saves one image of the current movie scene that is paused to the memory card. 1. Slide the POWER switch downwards to turn on the power and set the Storage mode switch to DISC. • Press the MODE button to set the Play mode. page 21 • The thumbnail index screen appears. 2. Use the Joystick to select the desired movie image. 12/12 • To change the current thumbnail page, move the Joystick down to highlight the page bar, then move the Joystick right or left to select the page. 3. Press the Joystick. The selected file fills the screen and is played automatically. 4. Press the PHOTO button at the desired point. 0:00:59 • A shutter sound is heard. The photo image is recorded on the memory card and the “Photo capture” message appears. • The still images captured from the movie images to the storage media are saved in 800x600 format. 012 Photo capture 36_ English
  • 47. ZOOMING Use the zoom function for close-up or wide-angle recording. This DVD camcorder allows you to record using optical 34x power zoom and 1200x digital VOL zoom. • Zoom lever is on the top of the camcorder. • You can also use zoom function by moving the Joystick (W/T) up or down. ���� To zoom in Slide the zoom lever towards T (telephoto). W : Wide angle T : Telephoto To zoom out Slide the zoom lever towards W (wide-angle). • The farther you slide the zoom lever, the quicker the zoom action. • Zoom magnification over 34x is done through digital image processing, and is, therefore, called digital zoom. Digital zooming is possible up to 1200x. STBY 0:00:00 [30 min] Set “Digital Zoom” to the desired value. page 76 You can set the digital zoom up to 1200x in movie mode. • Be sure to keep your finger on the Zoom lever. If you move your finger off the zoom lever, the operation sound of the Zoom lever may be also recorded. • The minimum possible distance between camcorder and subject while maintaining sharp focus is about 1 cm (about 0.39 inch) for wide angle and 50 cm (about 19.68 inch) for telephoto. • The focus changes when zooming after focusing manually. Focus automatically or seize the desired scene by zooming before focusing manually. page 70 • Optical zoom preserves the movie quality, but during digital zoom the image quality may suffer. English _37
  • 48. DVD camcorder mode: recording/playback PLAYING MOVIE IMAGES • This function works only in the Play mode. page 21 • You can switch to the Play mode by using the MODE button. • You can find a desired movie image quickly using thumbnail index views. • Use the playback-related buttons on the remote control. (SC-DX105 only) page 13 1. Slide the POWER switch downwards to turn on the power and open the LCD screen. ���� • Set the Storage mode switch to DISC. (SC-DX103/ DX105 only) page 30 • Adjust brightness or color of the LCD screen. page 79 2. Press the MODE button to set the Play mode. 12/12 • The thumbnail index view appears. The thumbnail highlight is on the latest created or played file. • To change the current thumbnail page, move the Joystick down to highlight the page bar, then move the Joystick right or left to select the page. 3. Move the Joystick to select the desired movie image, then press the Joystick. 0:00:59 • The selected file fills the screen and is played automatically. • To stop playback, move the Joystick down. • Press Display ( )button to toggle the OSD (On Screen Display) function on and off. 012 • Depending on the amount of data to be played back, it may take some time for the playback images to appear. • Movies edited on a PC may not be displayed on this DVD camcorder. • Movies recorded on another camcorder may not be played on this DVD camcorder. 38_ English
  • 49. Adjusting the volume • You can control the volume by using the zoom lever during playback. 0:00:59 • You can hear the recorded sound from the built-in speaker. • The level can be adjusted anywhere between 0 and 19. If you close the LCD screen while playing, you will not hear the sound from the speaker. 02 012 Various playback operations Playback / Pause / Stop 0:00:59 • Playback and Pause functions alternate when you press the Joystick. • Move the Joystick down to stop playback. • You can do the same operation by using the remote control ( / ). (SC-DX105 only) Search playback 012 • Move the Joystick right or left and hold during playback. - RPS (Reverse Playback Search) rate: x2  x16  x2 - FPS (Forward Playback Search) rate: x2  x16  x2 0:00:59 • To resume normal playback, press the Joystick. • You can do the same operation by using the remote control ( / ). (SC-DX105 only) Skip playback • Move the Joystick right or left during playback. 012 - If you move the Joystick left within 3 seconds after the movie image starts, the previous image is played back. - If you move the Joystick left 3 seconds after the movie image starts, the current image starts from the beginning. - If you move the Joystick right, the next image is played back. • You can do the same operation by using the remote control ( / ). (SC-DX105 only) Slow playback • Pause the playback by pressing the Joystick, then move the Joystick right or left. The movie image plays forward or reverse at the 1/2x speed. • To resume normal playback, press the Joystick. • Slow playback continues for 3 minutes. <SC-DX105 only> • You can do the same operation by using the remote control ( ). (SC-DX105 only) • When pressing the ( ) or ( ) buttons on the remote control during slow playback, it slowly plays back in reverse or forward. (SC-DX105 only) English _39
  • 50. DVD camcorder mode: editing movie image DELETING IMAGES ( ( )) • This function works only in the Play mode. • You can delete undesired movie images recorded on the disc. 12/12 • This function works only on a DVD-RW disc(VR mode). • An image that has been deleted cannot be recovered. 1. Slide the POWER switch downwards to turn on the power. • Set the Storage mode switch to DISC. page 30 2. Press the MODE button to set the Play mode. • The thumbnail index view appears. Video 3. Press the MENU button. 4. Move the Joystick right or left to select “Delete.” Delete Select file 5. Move the Joystick up or down to select the desired option (“Select file” or “Select All”), Select All then press the Joystick. • “Select file”: Deletes the individual image. - To delete the individual image, use the Joystick to select the image to delete. The ( ) indicator is displayed on the selected images. Delete Pressing the Joystick toggles between the thumbnail image being selected for Back 7/12 Execute deletion (the ( ) indicator appears on image) or not (the ( ) indicator is removed from image). Move the Joystick up to select “Execute,” then press the Joystick. • “Select All”: Deletes all images. - Move the Joystick up to select “Execute,” then press the Joystick. Move Select 6. The message according to the selected option will appear. Move the Joystick right or left to select “Yes,” the press the Joystick. Delete • After completion, the selected images will be deleted. Delete selected files? (Accordingly, the deleted files also disappear in playlist. page 45) Yes No Move Select 40_ English
  • 51. DELETING A SECTION OF A MOVIE IMAGE (PARTIAL DELETE) ( ( )) • This function works only in the Play mode. page 21 12/12 • Set the Storage mode switch to DISC. (SC-DX103/ DX105 only) page 30 • A movie image can be partially deleted. 1. Press the MENU button, then move the Joystick right or left to select “Edit.” 2. Press the Joystick to select “Partial Delete.” 3. Use the Joystick to select the desired movie image, then press the Joystick. Video • The selected file fills the screen with paused. • To return, use the Joystick to select “Back,” then press the Joystick. Edit Partial Delete 4. Move the Joystick right to play the movie image. 5. Press the Joystick at the start point you want to delete. • The start point of deletion will be marked with “.” 6. Move the Joystick right to search the end point of deletion. Press the Joystick. Partial Delete • The end point of deletion will be marked with “.” Back 11/12 7. Press the Joystick to delete the selected part. • The message “Partial Delete? Selected part of a file will be deleted.” will appear. 8. Move the Joystick left to select “Yes,” then press the Joystick. • The selected part of the movie image will be deleted. 0:00:59/0:02:00 • Do not remove the battery pack or the AC power adaptor while the partial deletion 011 Partial Delete is in progress. The file can be damaged. • A deleted part of the movie image can not be recovered.   • Partial deletion is not available when the recording is less than 3 seconds.  Play Frame Delete • Partial deletion is not available when the section or remaining time is less than 3 seconds. 0:00:59/0:02:00 • When partial deletion is executed, related movie images in the playlist are partially 001 Partial Delete Delete? Partial deleted. Selected part of a file will be deleted. Yes Cancel Exit    Play Frame Delete English _41