This owner's manual provides instructions for safe use and operation of a DVD player/video cassette recorder. It contains information on safety precautions, controls and connections, operation of DVD and VCR functions, and playing various types of media. The manual is intended to ensure proper use of the device to avoid hazardous situations and contains important operating and maintenance guidelines.

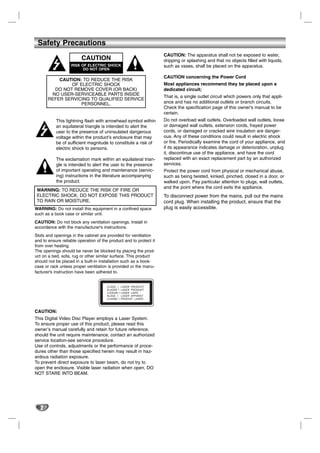

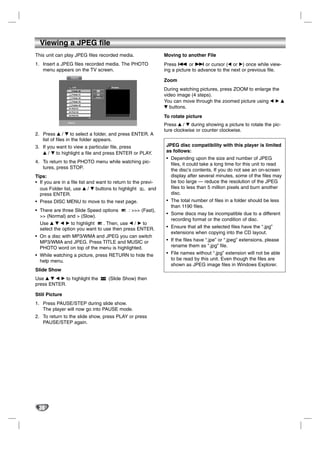
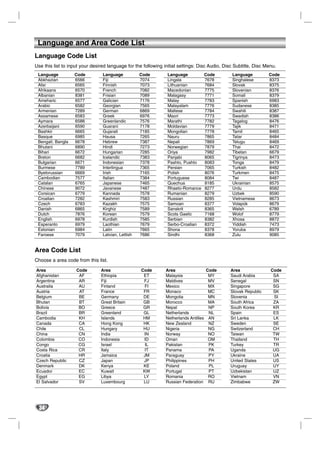
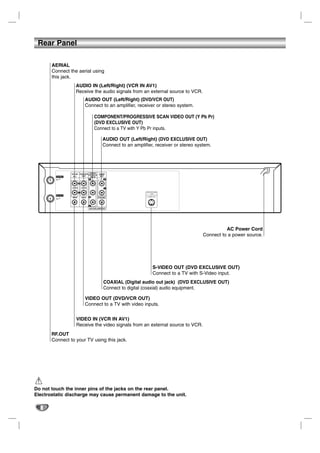
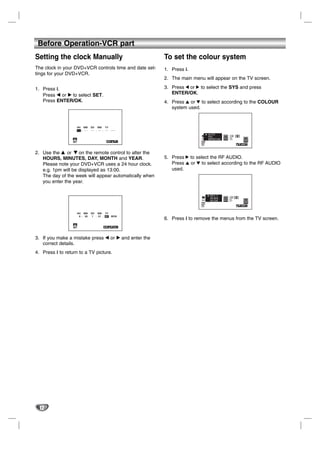
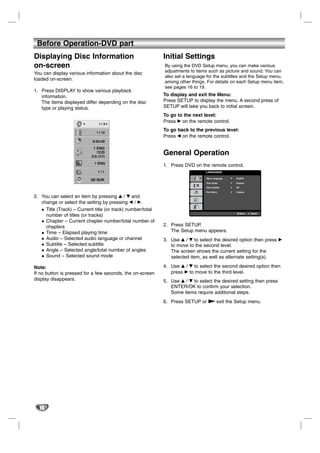
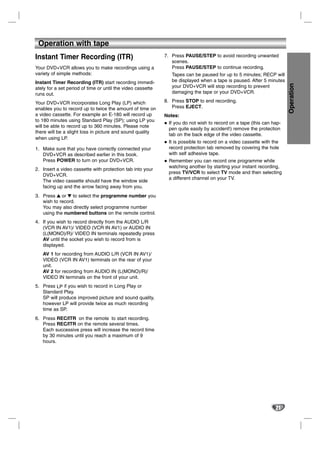
![Front Panel
1 2 3 4 5 6 7 8 9 10 11 12 13 14 15
1. Disc Tray 6. Remote Sensor
Insert a disc here. Point the remote control here.
2. 1 POWER 7. Tape Compartment
Switches the unit to ON or OFF.
8. VCR
3. PROG. (V/v) Channel Programme Selectors. Tape Eject
4. DVD 9. ./m
Opens or closes the disc tray. Go to beginning of current chapter/track or to
5. Display window PREVIOUS chapter/track.
Shows the current status of the unit. Press and hold for two seconds for a fast reverse
DVD: DVD deck is selected. search. Rewinds the tape.
: A disc is loaded in the DVD deck. 10. N
[P]: Indicates the Progressive Scan is set to On Starts playback.
mode. 11. M/>
: Indicates repeat mode. Go to NEXT chapter/track.
Press and hold for two seconds for a fast forward
: Child Lock is engaged.
search. Winds the tape forwards.
: DVD+VCR is in timer recording or a timer
12. x
recording is programmed.
Stops playback.
: A Cassette is in the VCR deck.
VCR: VCR deck is selected. 13. DVD/VCR
REC: VCR recording is engaged. DVD/VCR Selector
DVD to Video tape copy is in progress. 14. Video IN Jack
TV: Indicates TV mode. (See Notes on page 21.) 15. Audio IN (L/R) Jacks
: Indicates total playing time/elapsed
time/current time.
6](https://image.slidesharecdn.com/lgv281-091028124836-phpapp02/85/lg-6-320.jpg)
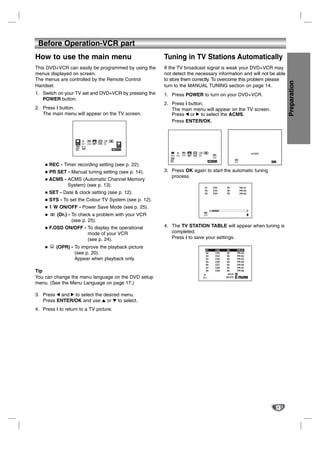
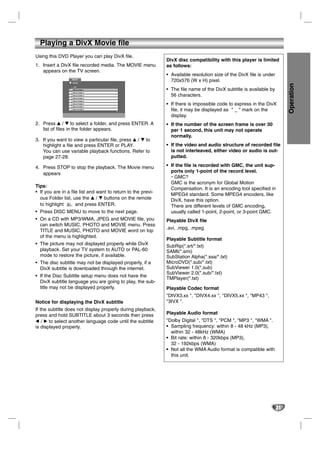
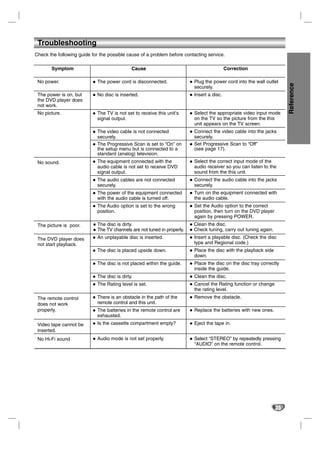
![Before Operation - DVD part
Area Code DVD DivX(R) VOD
Enter the Area Code whose standards were used to We provide you the DivX® VOD (Video On Demand)
rate the DVD video disc, based on the list in the registration code that allows you to rent and purchase
reference chapter (see page 34). videos using the DivX® VOD service. For more informa-
Preparation
tion, visit www.divx.com/vod.
1. Select “Area Code” on the LOCK menu then press
B. 1. Select “DivX(R) VOD” option then press B.
2. Follow step 2 as shown left (Rating).
2. Press ENTER/OK while “Select” is selected and the
3. Select the first character using v / V buttons. registration code will appear.
Use the registration code to purchase or rent the
4. Press B and select the second character using
v / V buttons. videos from DivX® VOD service at
www.divx.com/vod. Follow the instructions and
5. Press ENTER/OK to confirm your area code download the video onto a disc for playback on this
selection. unit.
3. Press ENTER/OK to exit.
OTHERS
Note:
The PBC and Auto Play and Divx(R) settings can be All the downloaded videos from DivX® VOD can only
changed. be played back on this unit.
OTHERS
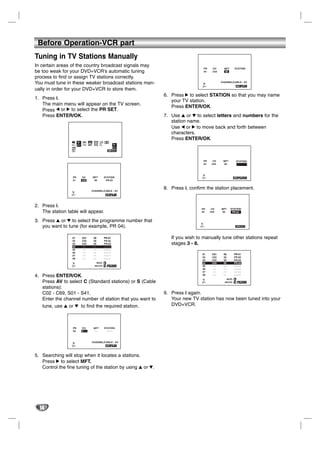
PBC On .
Auto Play Off
DivX(R) VOD Select
Move Select
PBC
Playback control provides special navigation features
that are available on some disc. Select [On] to use this
feature.
Auto Play DVD
You can set up the DVD+VCR so a DVD disc automati-
cally starts playing whenever the DVD is inserted.
If Auto Play mode is set to On, this DVD player will
search for title that has the longest playback time and
then play back the title automatically.
Note:
The Auto Play function may not work for some DVDs.
19](https://image.slidesharecdn.com/lgv281-091028124836-phpapp02/85/lg-19-320.jpg)
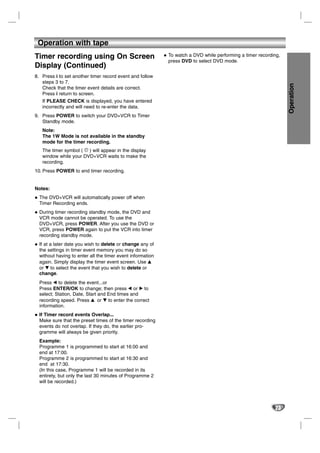

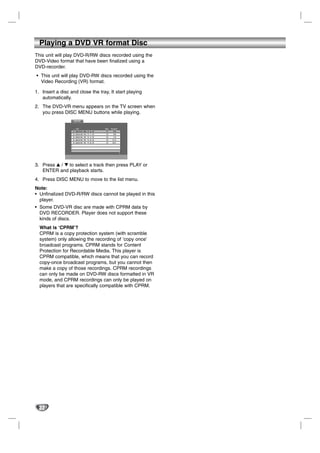
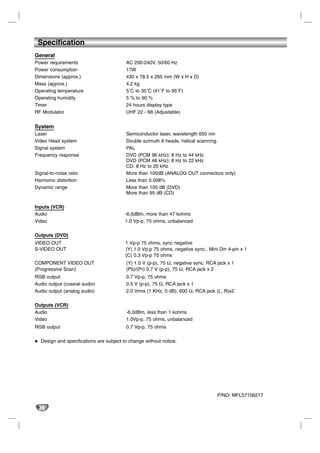
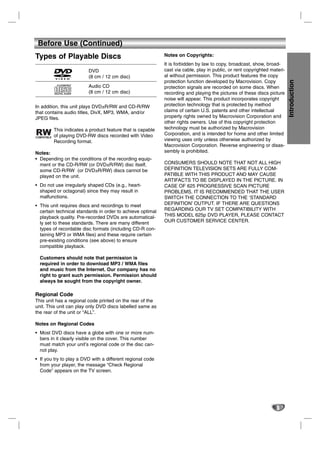
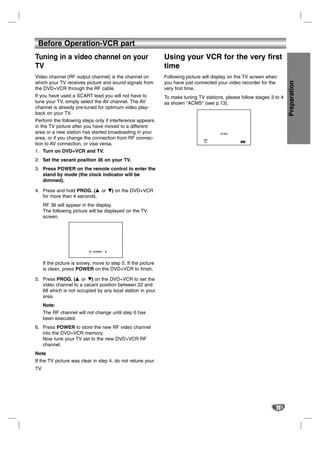
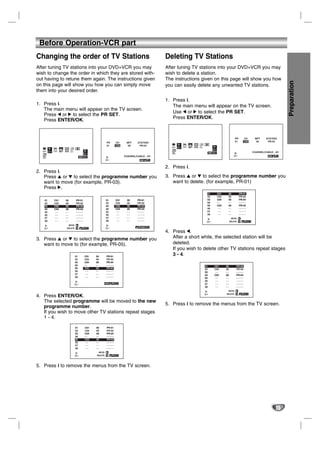
![Playing an Audio CD or MP3/WMA file
This unit can play Audio CDs or MP3/WMA files record- Programmed Playback
ed media.
The program function enables you to store your favorite
MP3/ WMA/ Audio CD
tracks from any disc in the player memory.
Once you insert an MP3/WMA files recorded media or
A program can contain 30 tracks.
Audio CD, a menu appears on the TV screen.
Operation
Press v / V to select a track/file then press PLAY or 1. Insert an Audio CD or MP3/WMA files recorded
ENTER and playback starts. You can use variable play- media. AUDIO CD or MUSIC menu appears.
back functions. Refer to page 27-28.
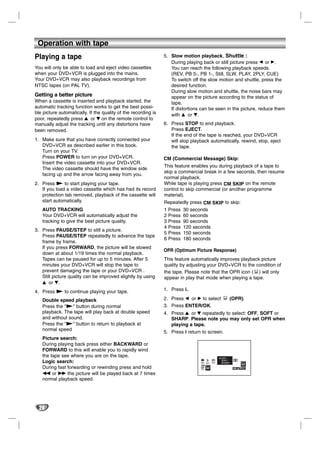
2. Press PROGRAM. The E
mark will appear.
MUSIC
AUDIO CD
0:52:07 1 / 12 0:00:00 1 / 12
Note:
List
Track1
Program List Program
Press PROGRAM again to exit the program edit mode,
Track2 1-Music1
Track3
Track4
2-Music2
3-Music3
then the E mark will disappear.
Track5 4-Music4
Track6
Track7
5-Music5
6-Music6
3. Select a track on the “List”, then press ENTER to
Clear All
place the selected track on the “Program” list.
Track8 Clear All 7-Music7
PROGRAM Edit DISPLAY Info PROGRAM Edit
Repeat to place additional tracks on the list.
ID3 TAG 4. Select the track you want to start playing on the
• When playing a file containing information such as “Program” list.
track titles, you can see the information by pressing 5. Press PLAY or ENTER to start. Playback begins in
DISPLAY. the order in which you programmed the tracks.
[ Song, Artist, Album, Comment, Genre ] Playback stops after all of the tracks on the
“Program” list have played once.
Tips:
• Press DISC MENU to move to the next page. 6. To resume normal playback from programmed play-
back, select a track on the list and then press PLAY.
• On a CD with MP3/WMA and JPEG you can switch
MP3/WMA and JPEG. Press TITLE and MUSIC or Repeat Programmed Tracks
PHOTO word on top of the menu is highlighted. Press REPEAT to select a desired repeat mode.
• Track: repeats the current track
• All: repeats all the tracks on the “Program” list.
MP3 / WMA disc compatibility with this player is • Off(No display): does not play repeatedly.
limited as follows: Note:
• Sampling frequency: within 8 - 48 kHz (MP3), within If you press > once during Repeat Track playback,
32 - 48kHz (WMA) the repeat playback cancels.
• Bit rate: within 8 - 320kbps (MP3),
Erasing a Track from “Program” List
32 - 384 kbps (WMA)
• The player cannot read an MP3/WMA file that has a 1. During STOP mode, press PROGRAM and
file extension other than “.mp3” / “.wma”. the E mark will appear
• CD-R physical format should be ISO 9660 2. Use v V b B to select the track that you wish to
• If you record MP3 / WMA files using software that erase from the Program list.
cannot create a file system (eg. Direct-CD) it is
3. Press CLEAR. Repeat step 1~3 to erase additional
impossible to playback MP3 / WMA files. We rec-
tracks on the list.
ommend that you use Easy-CD Creator, which cre-
ates an ISO 9660 file system. Erasing the Complete Program List
• File names should have a maximum of 8 letters and 1. During STOP mode, press PROGRAM and
must incorporate an .mp3 or .wma extension.
the E mark will appear
• They should not contain special letters such as / ?
* : “ < > l etc. 2. Use v V b B to select “Clear All”, then press
• The total number of files in a folder should be less ENTER.
than 1190 files. Note:
The programs are also cleared when the power is off or
the disc is removed.
29](https://image.slidesharecdn.com/lgv281-091028124836-phpapp02/85/lg-29-320.jpg)