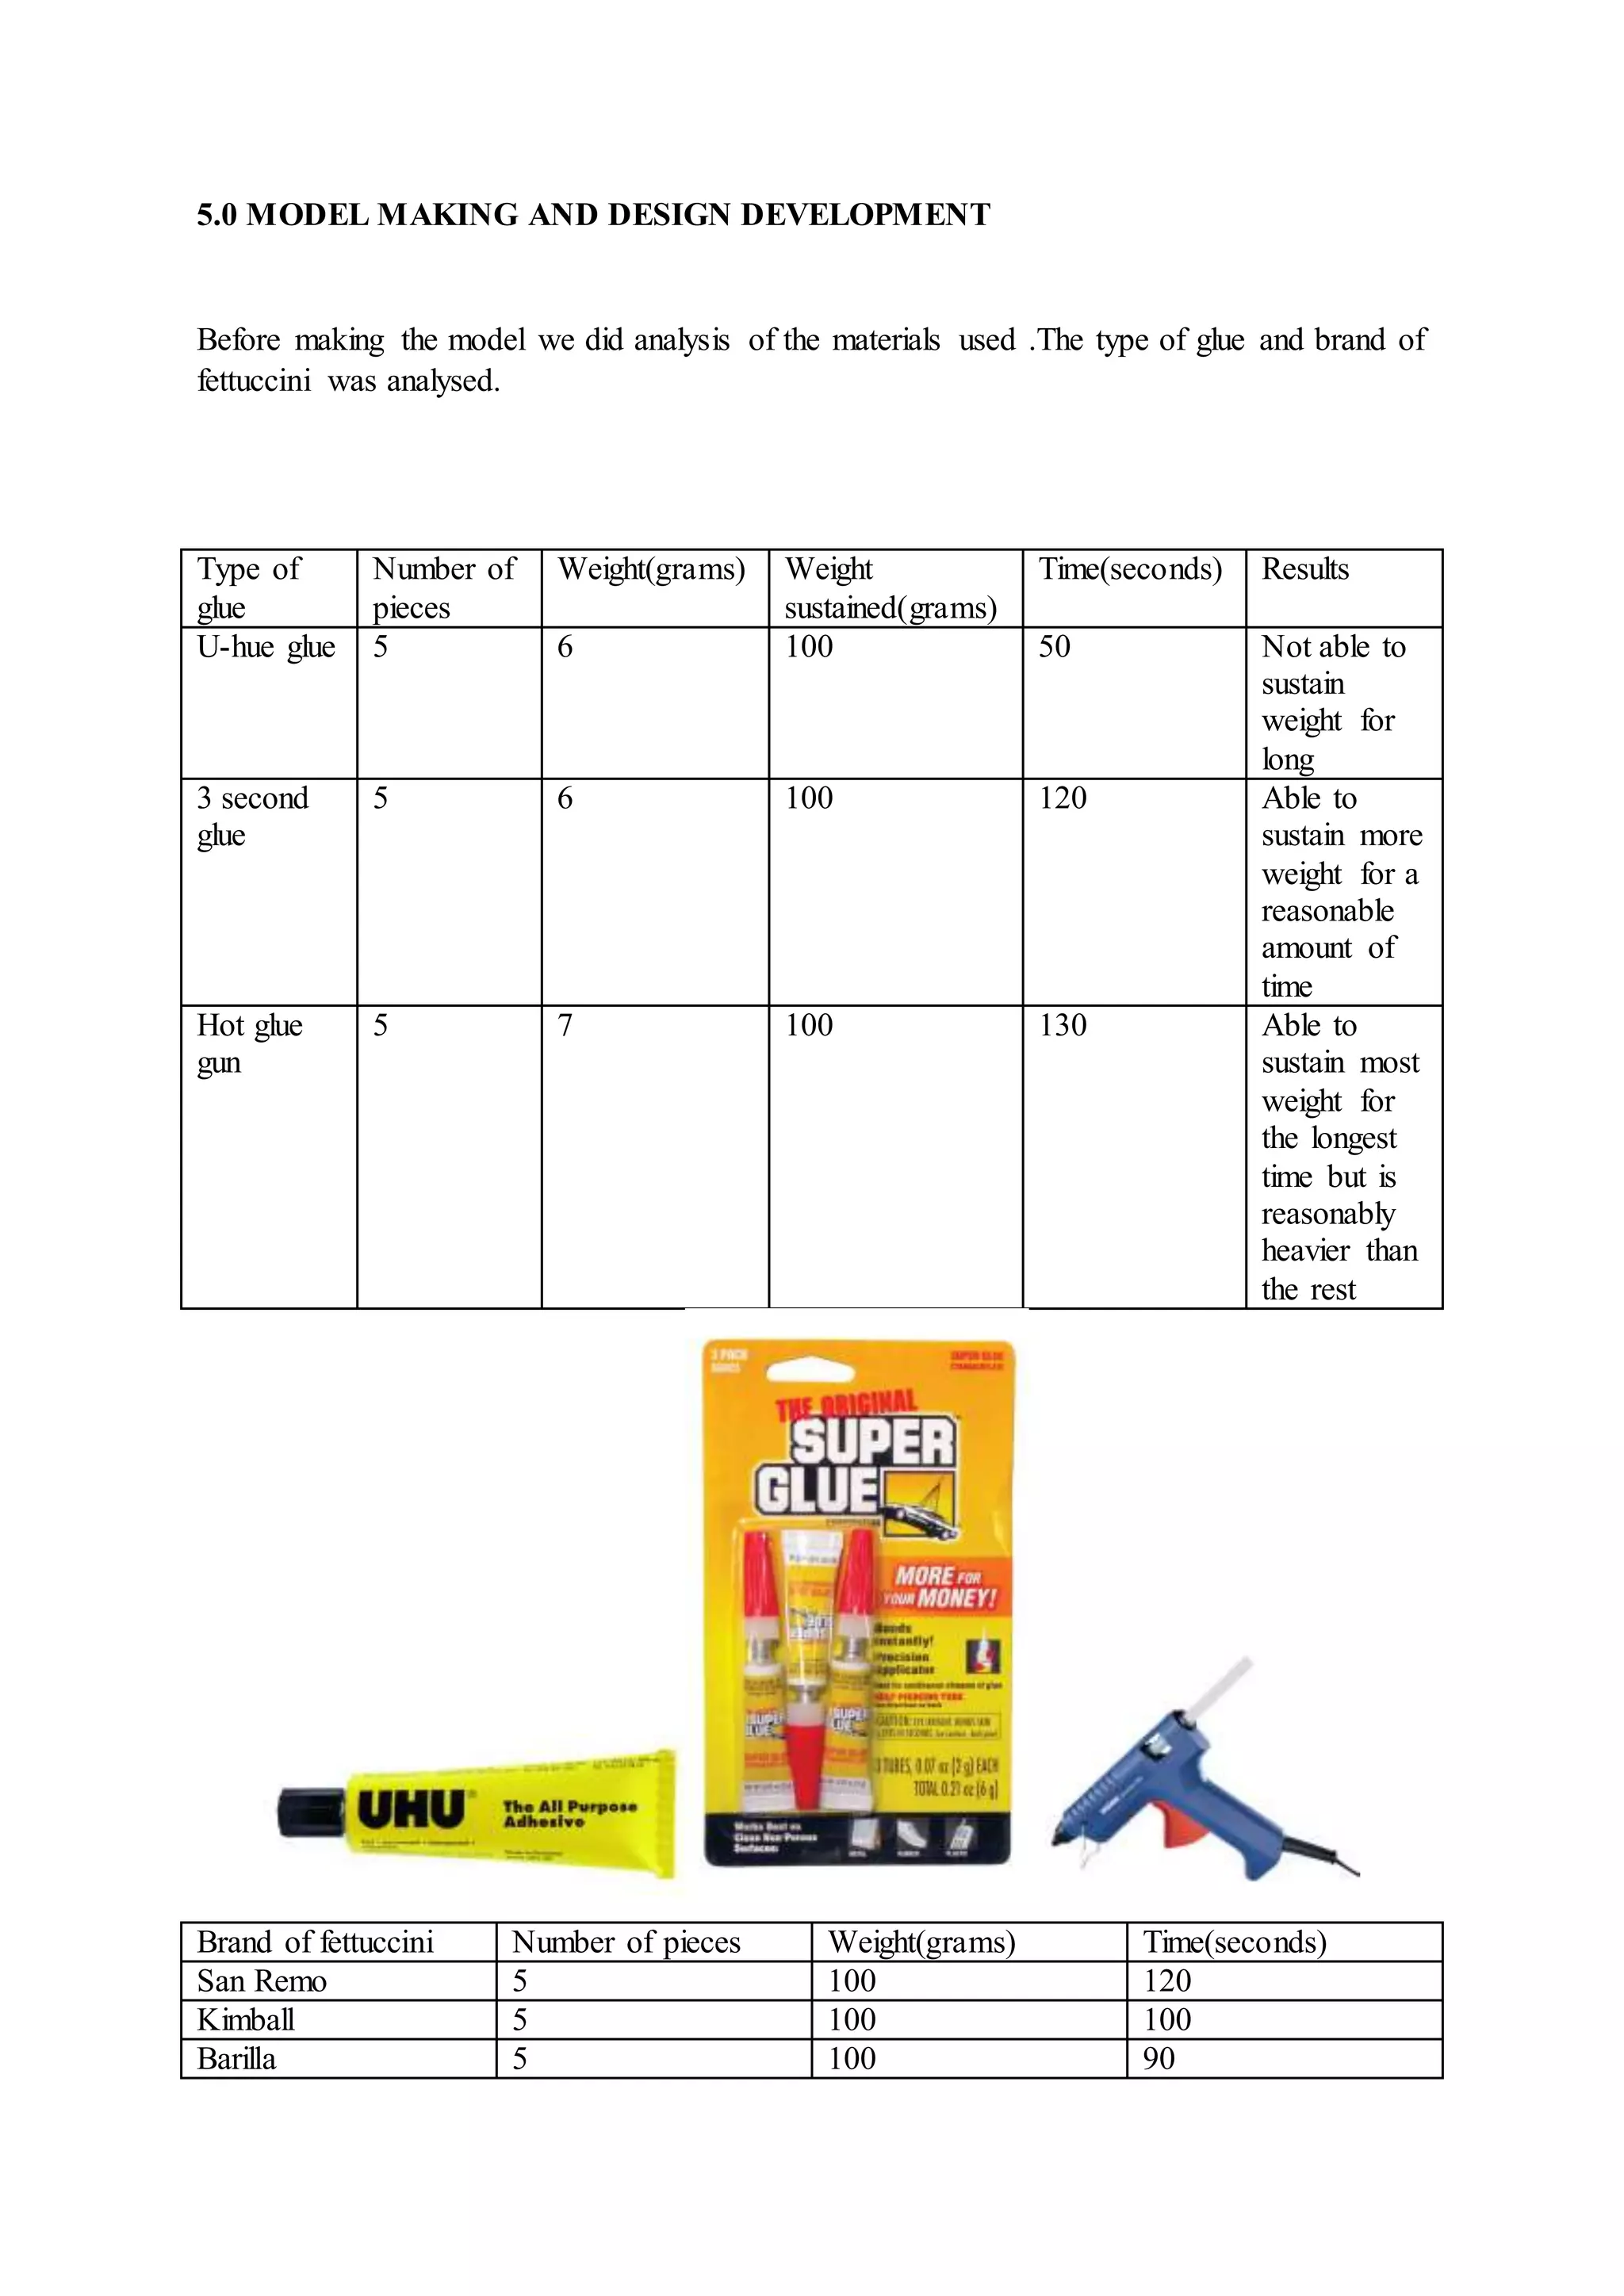
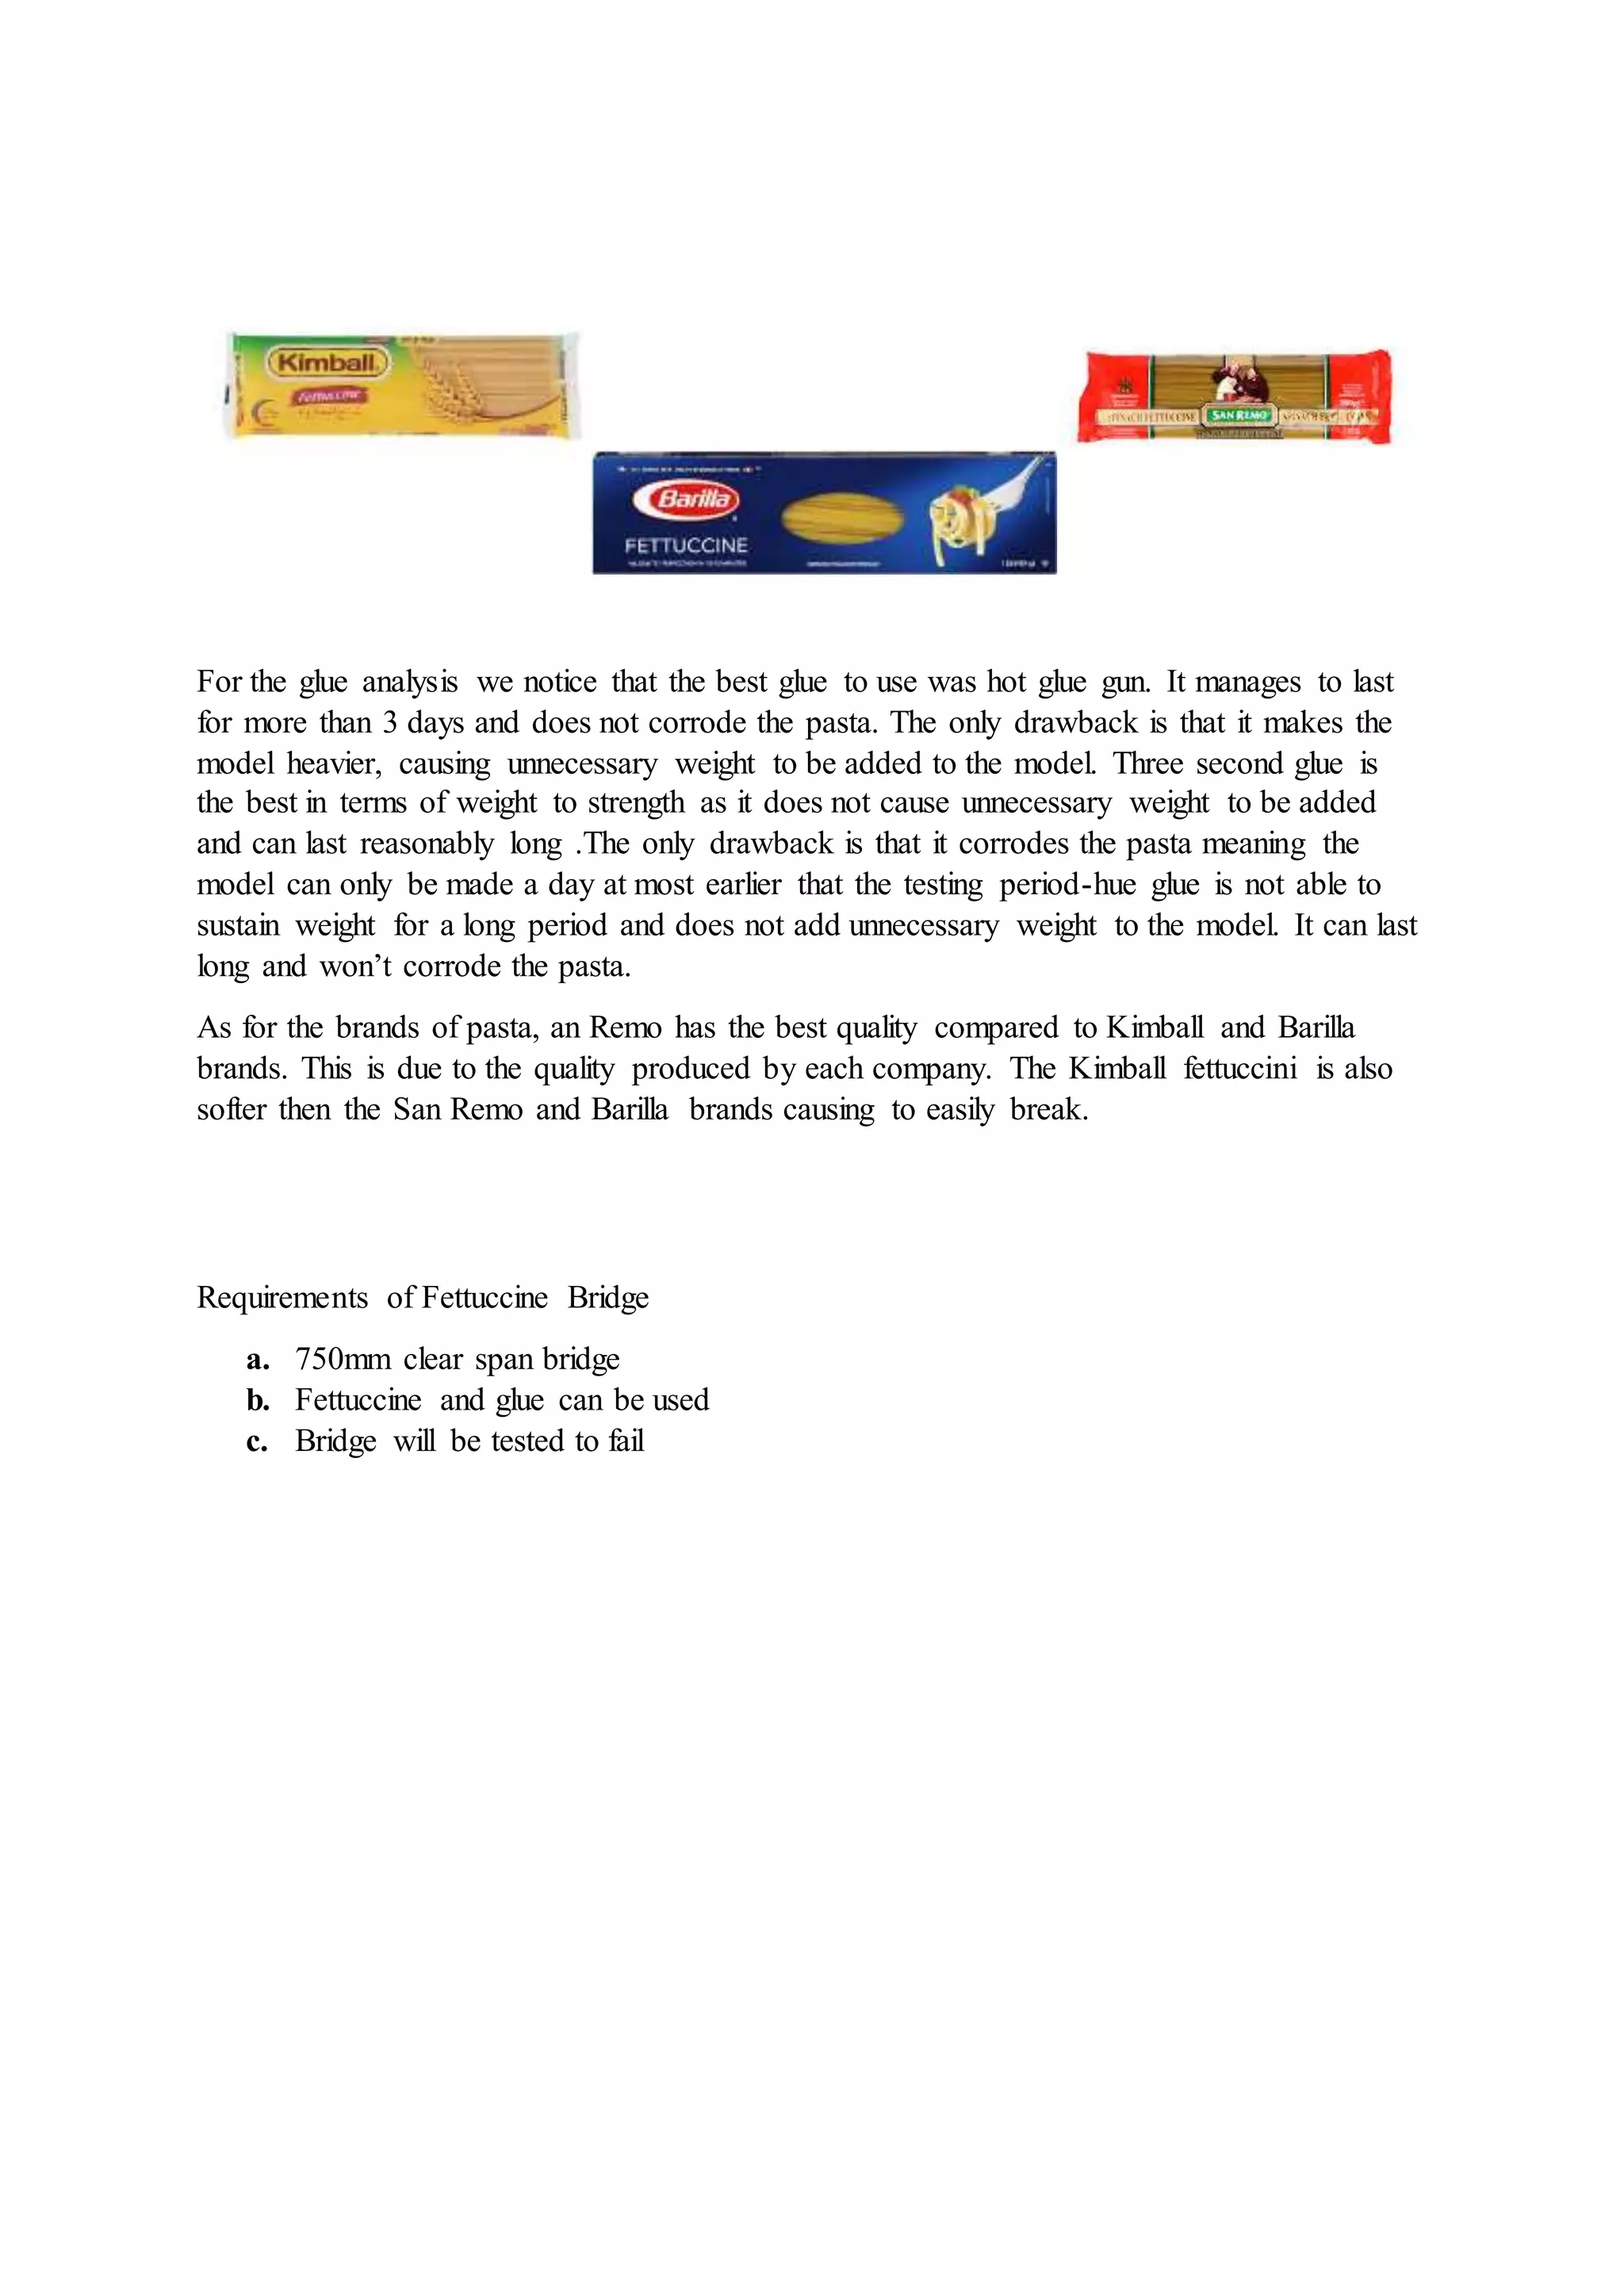
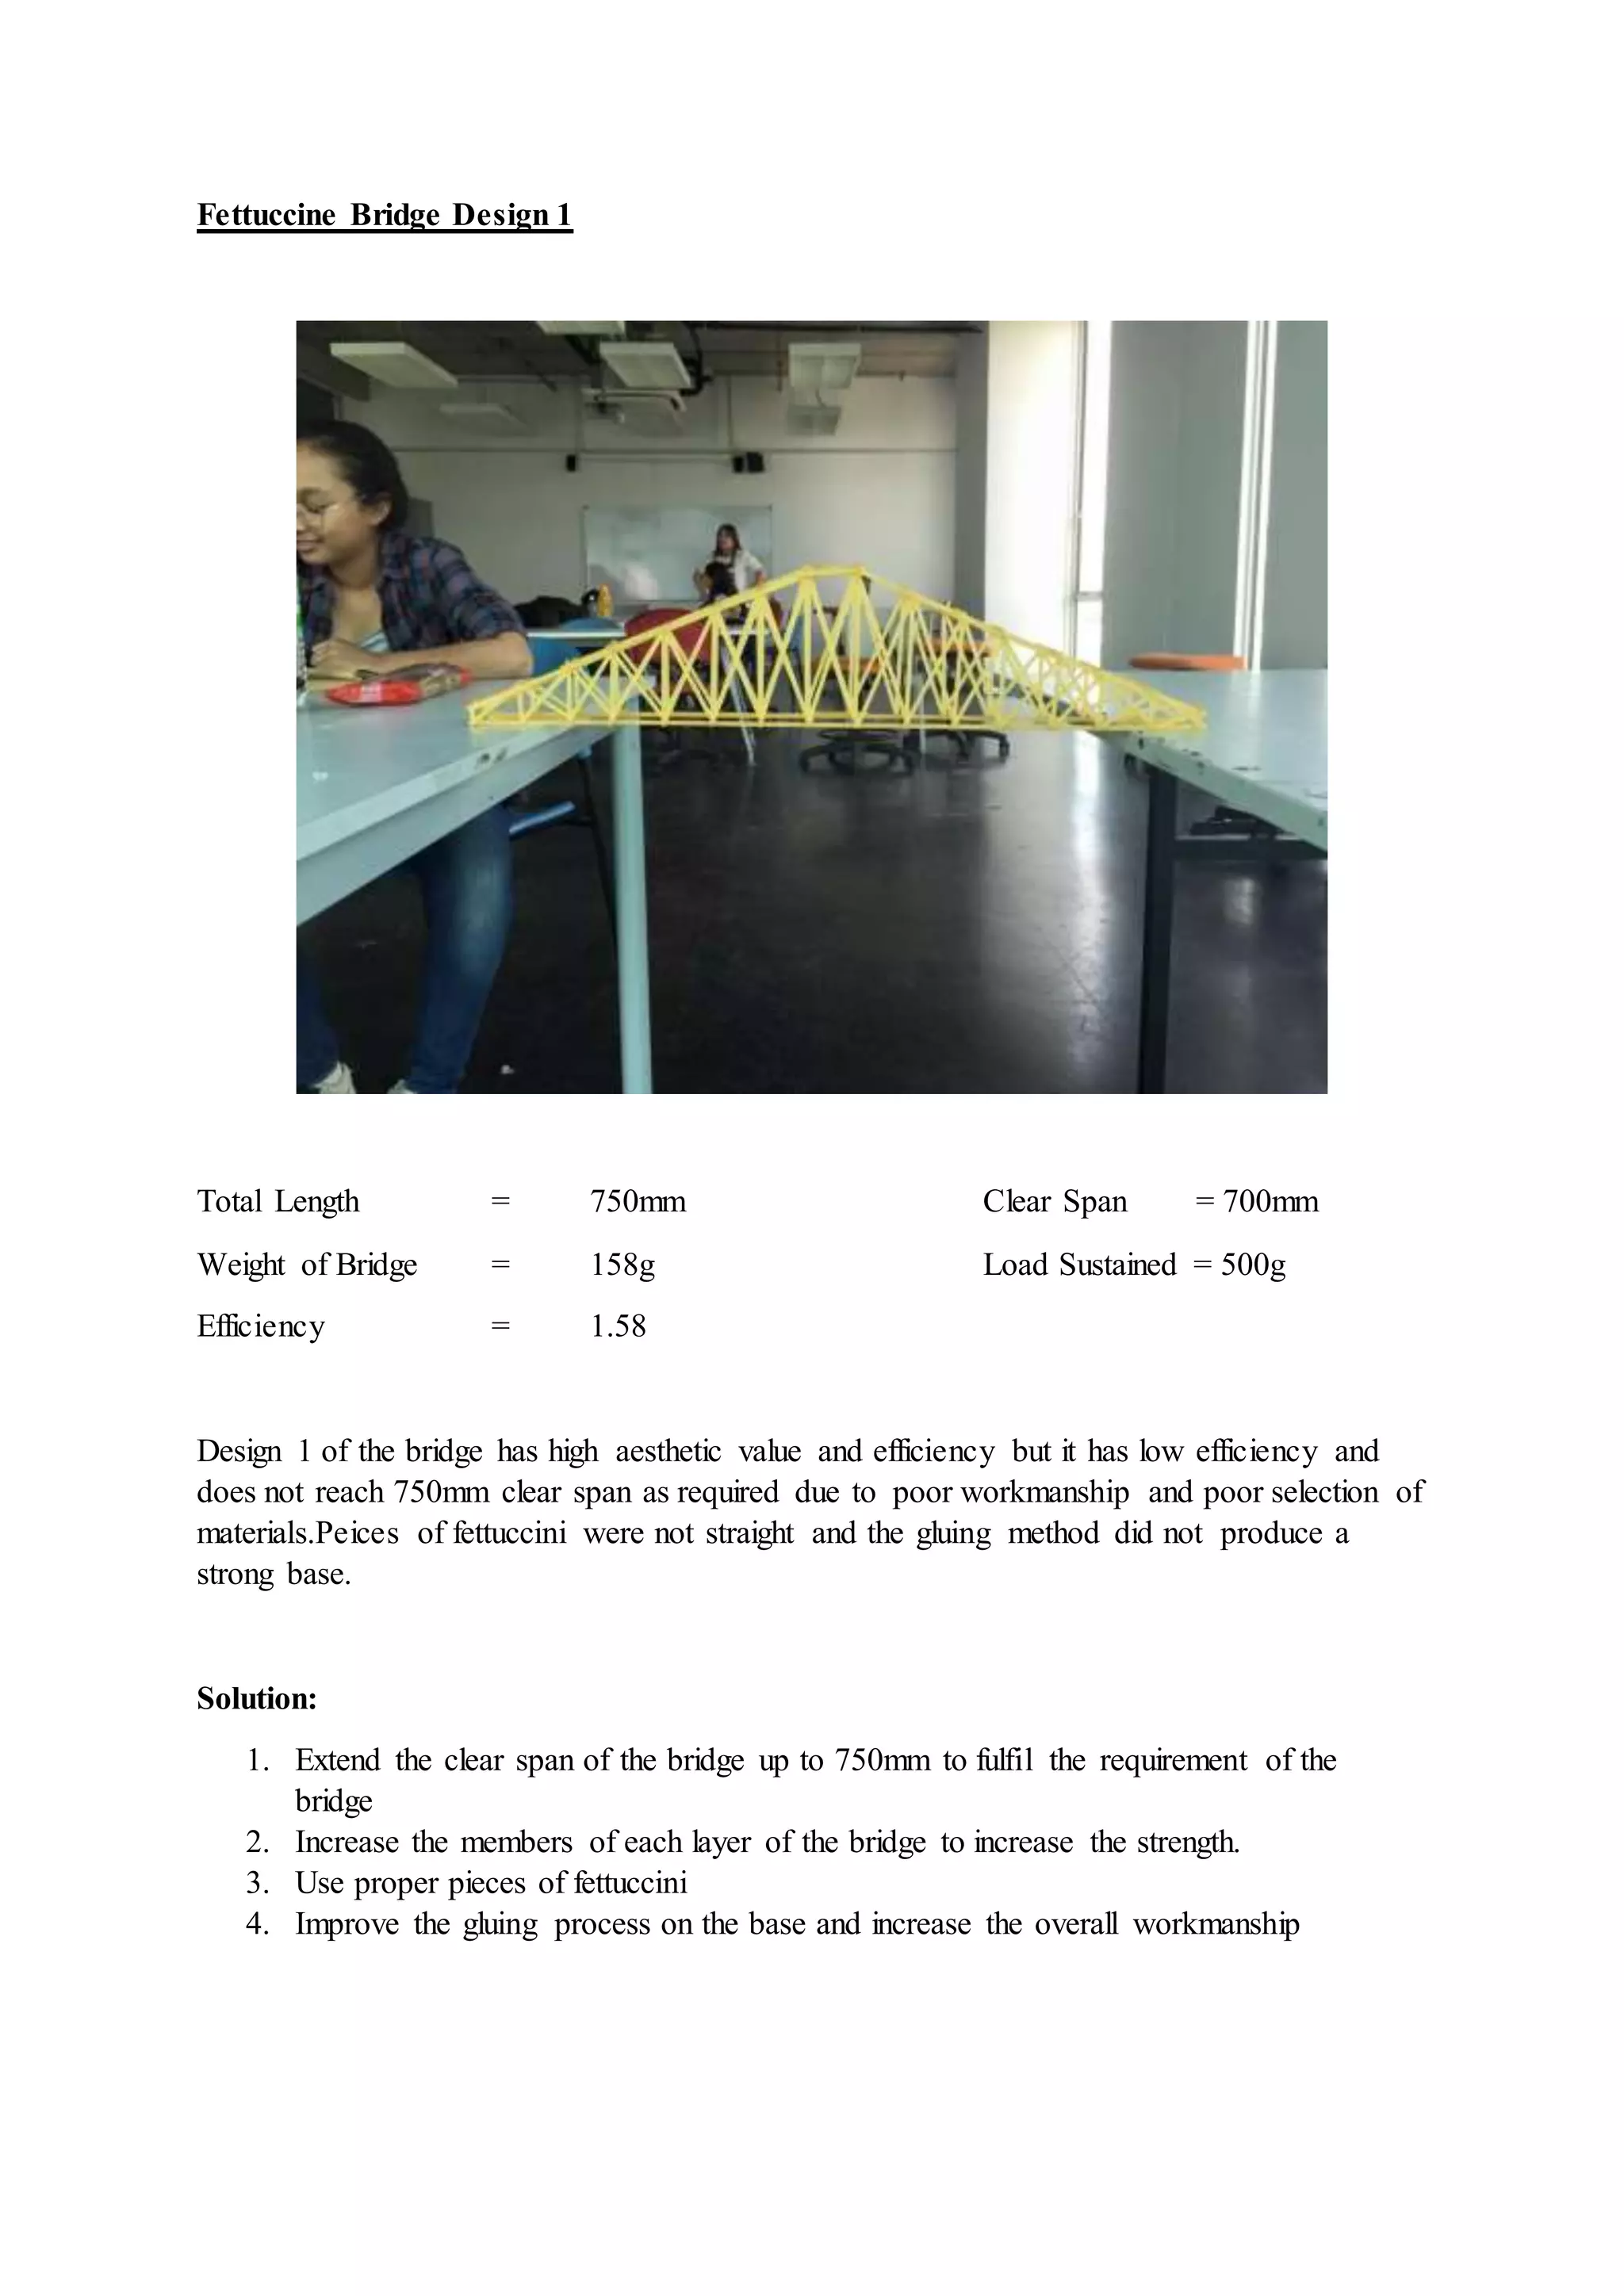
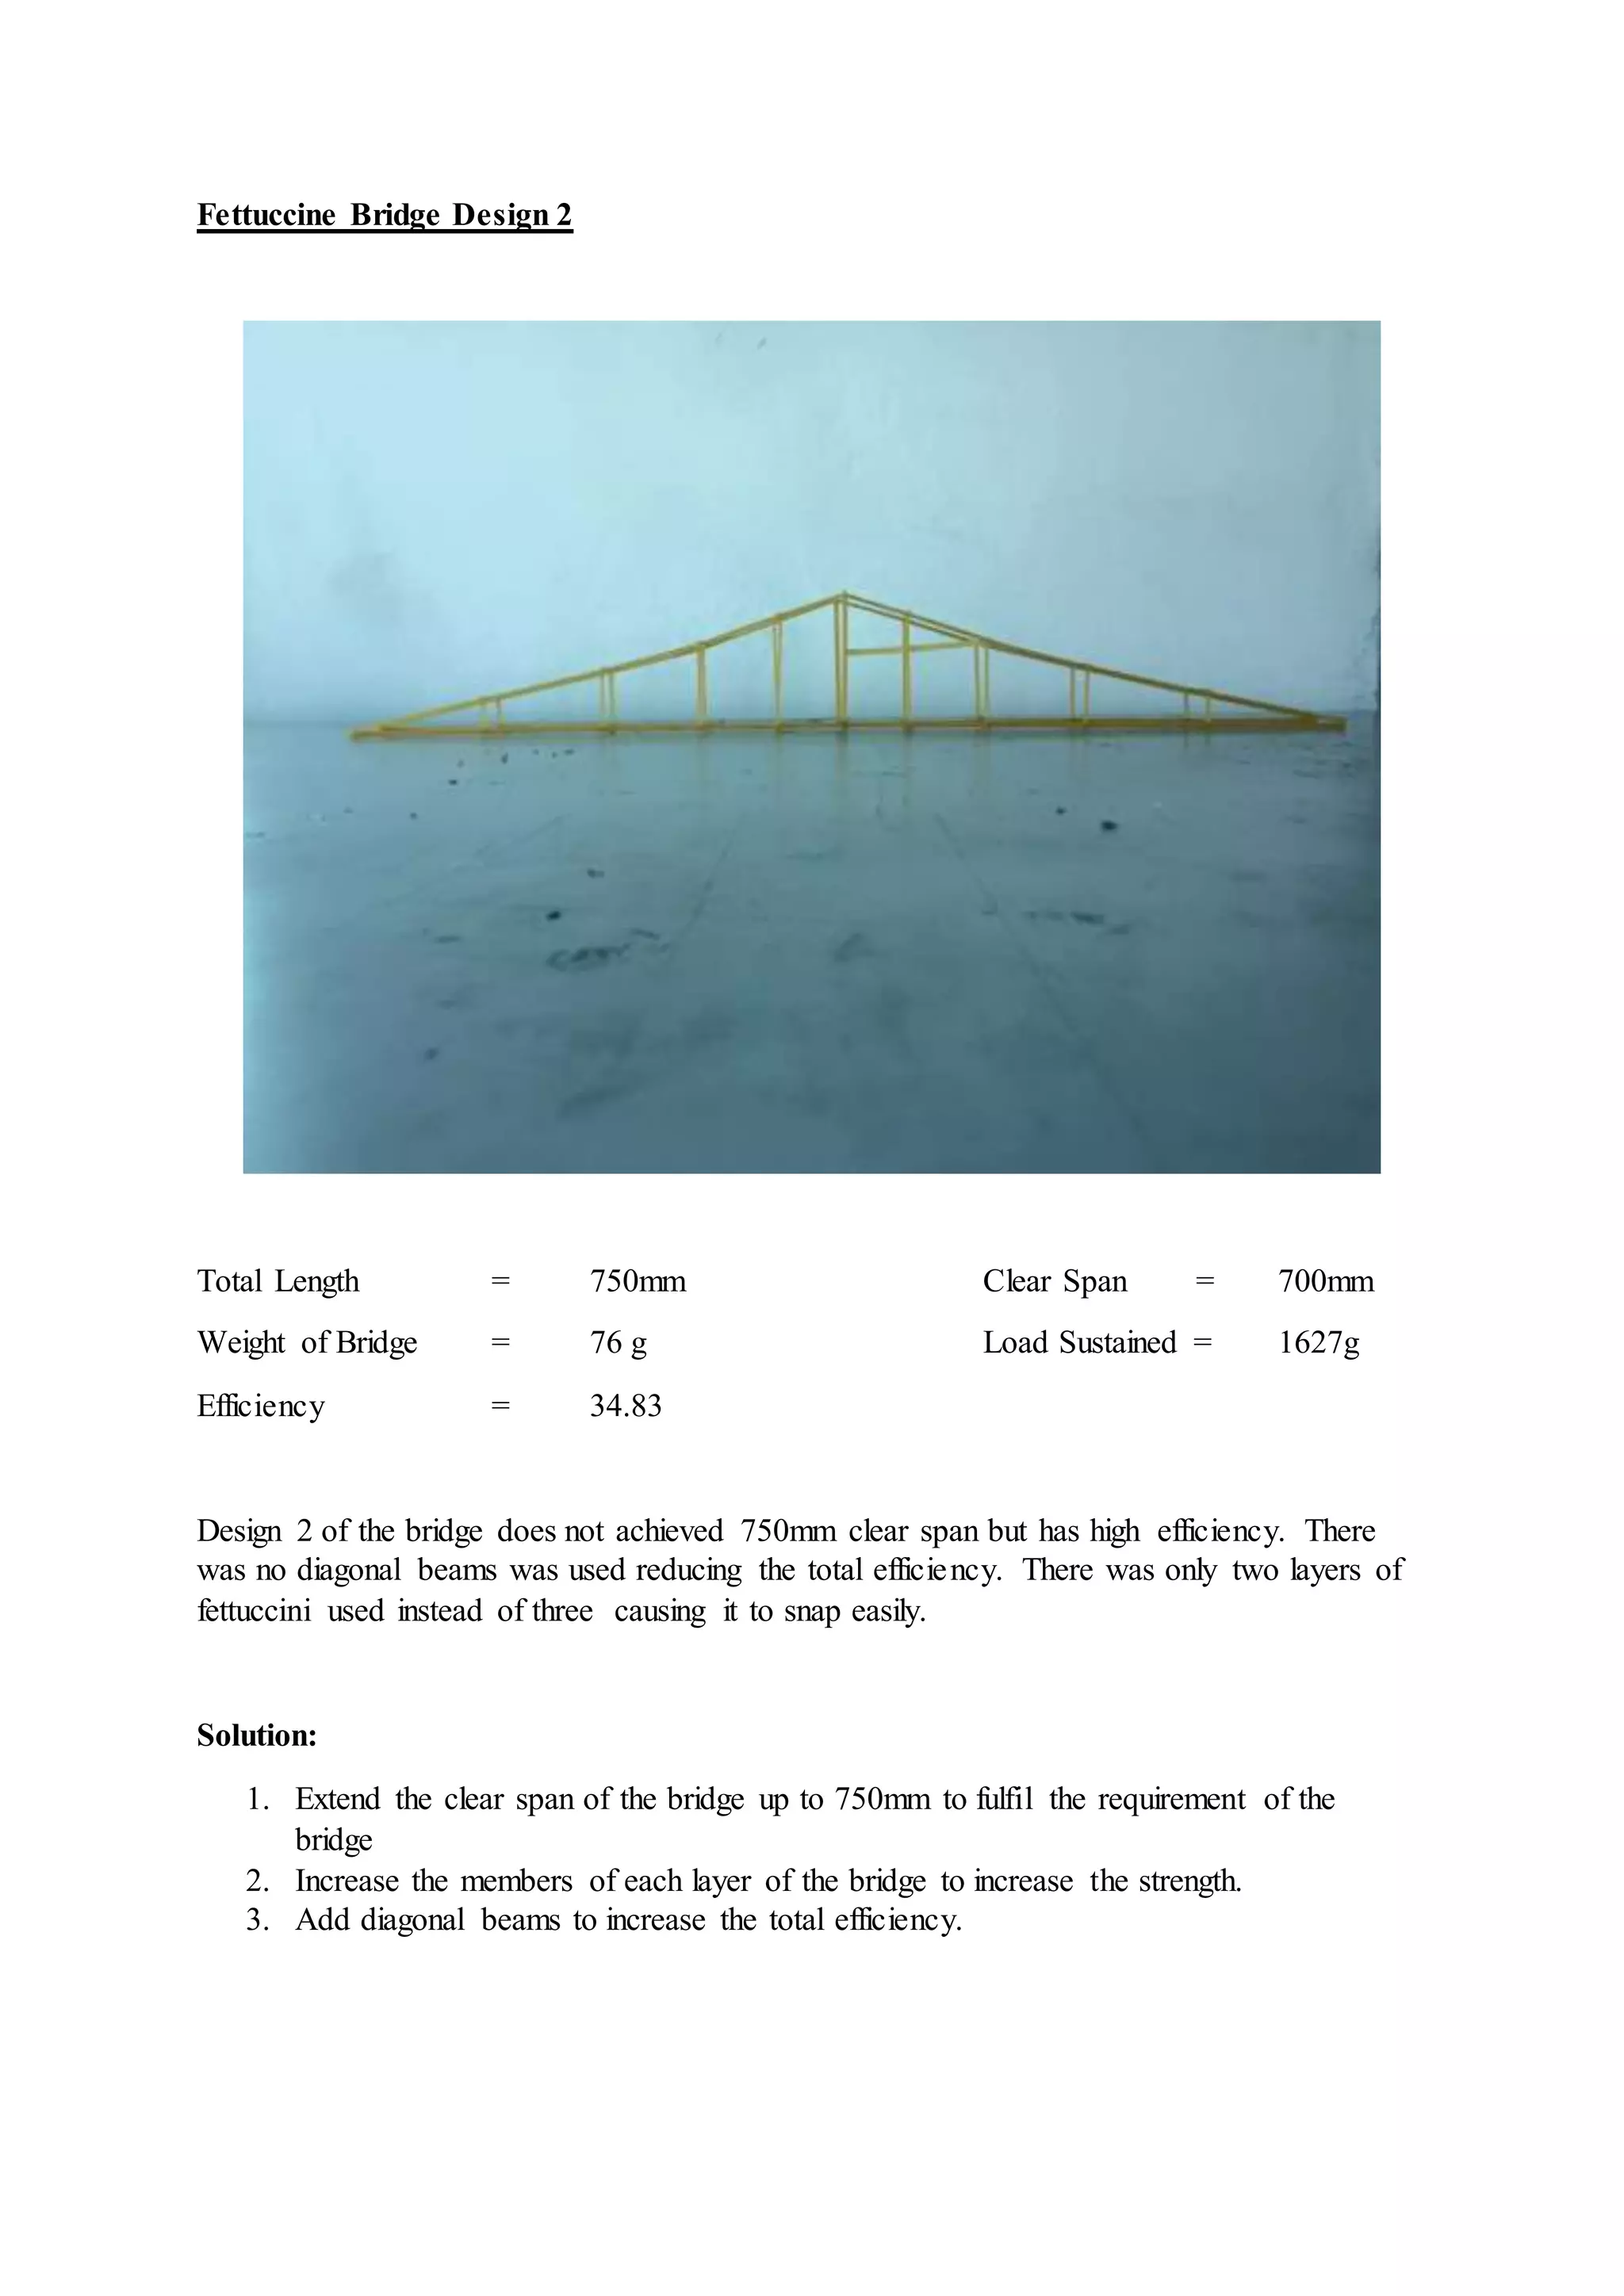
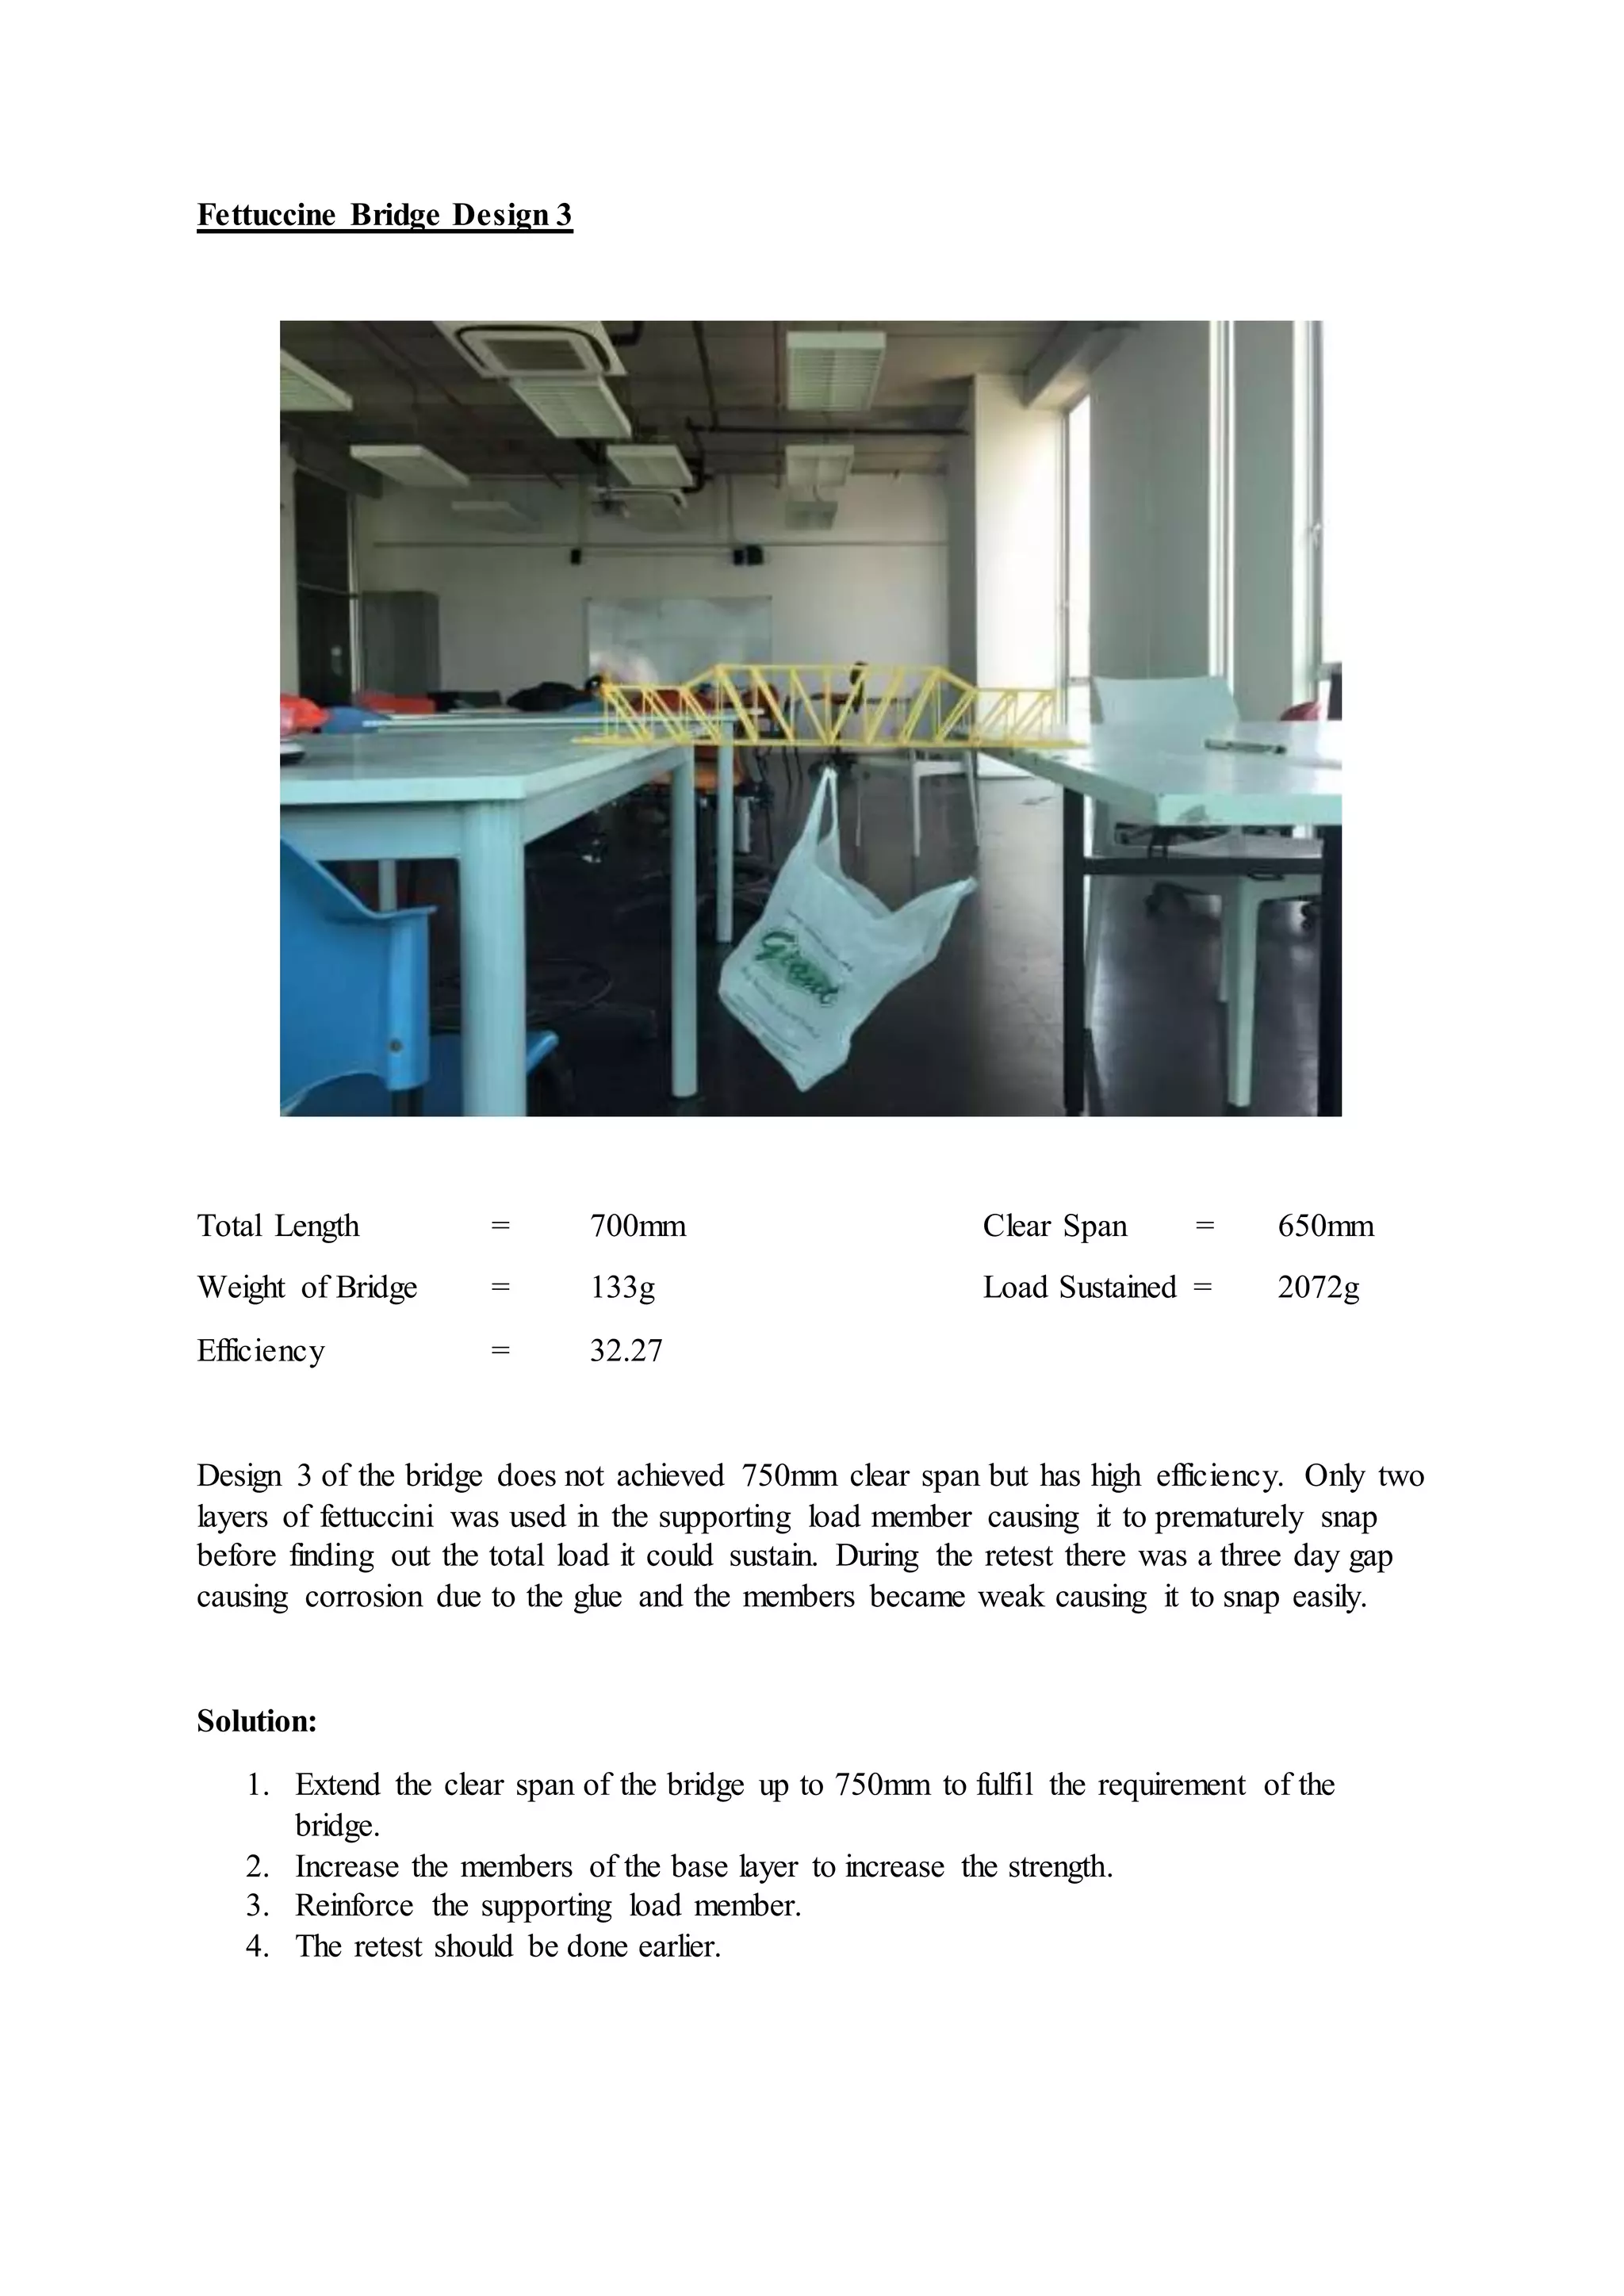
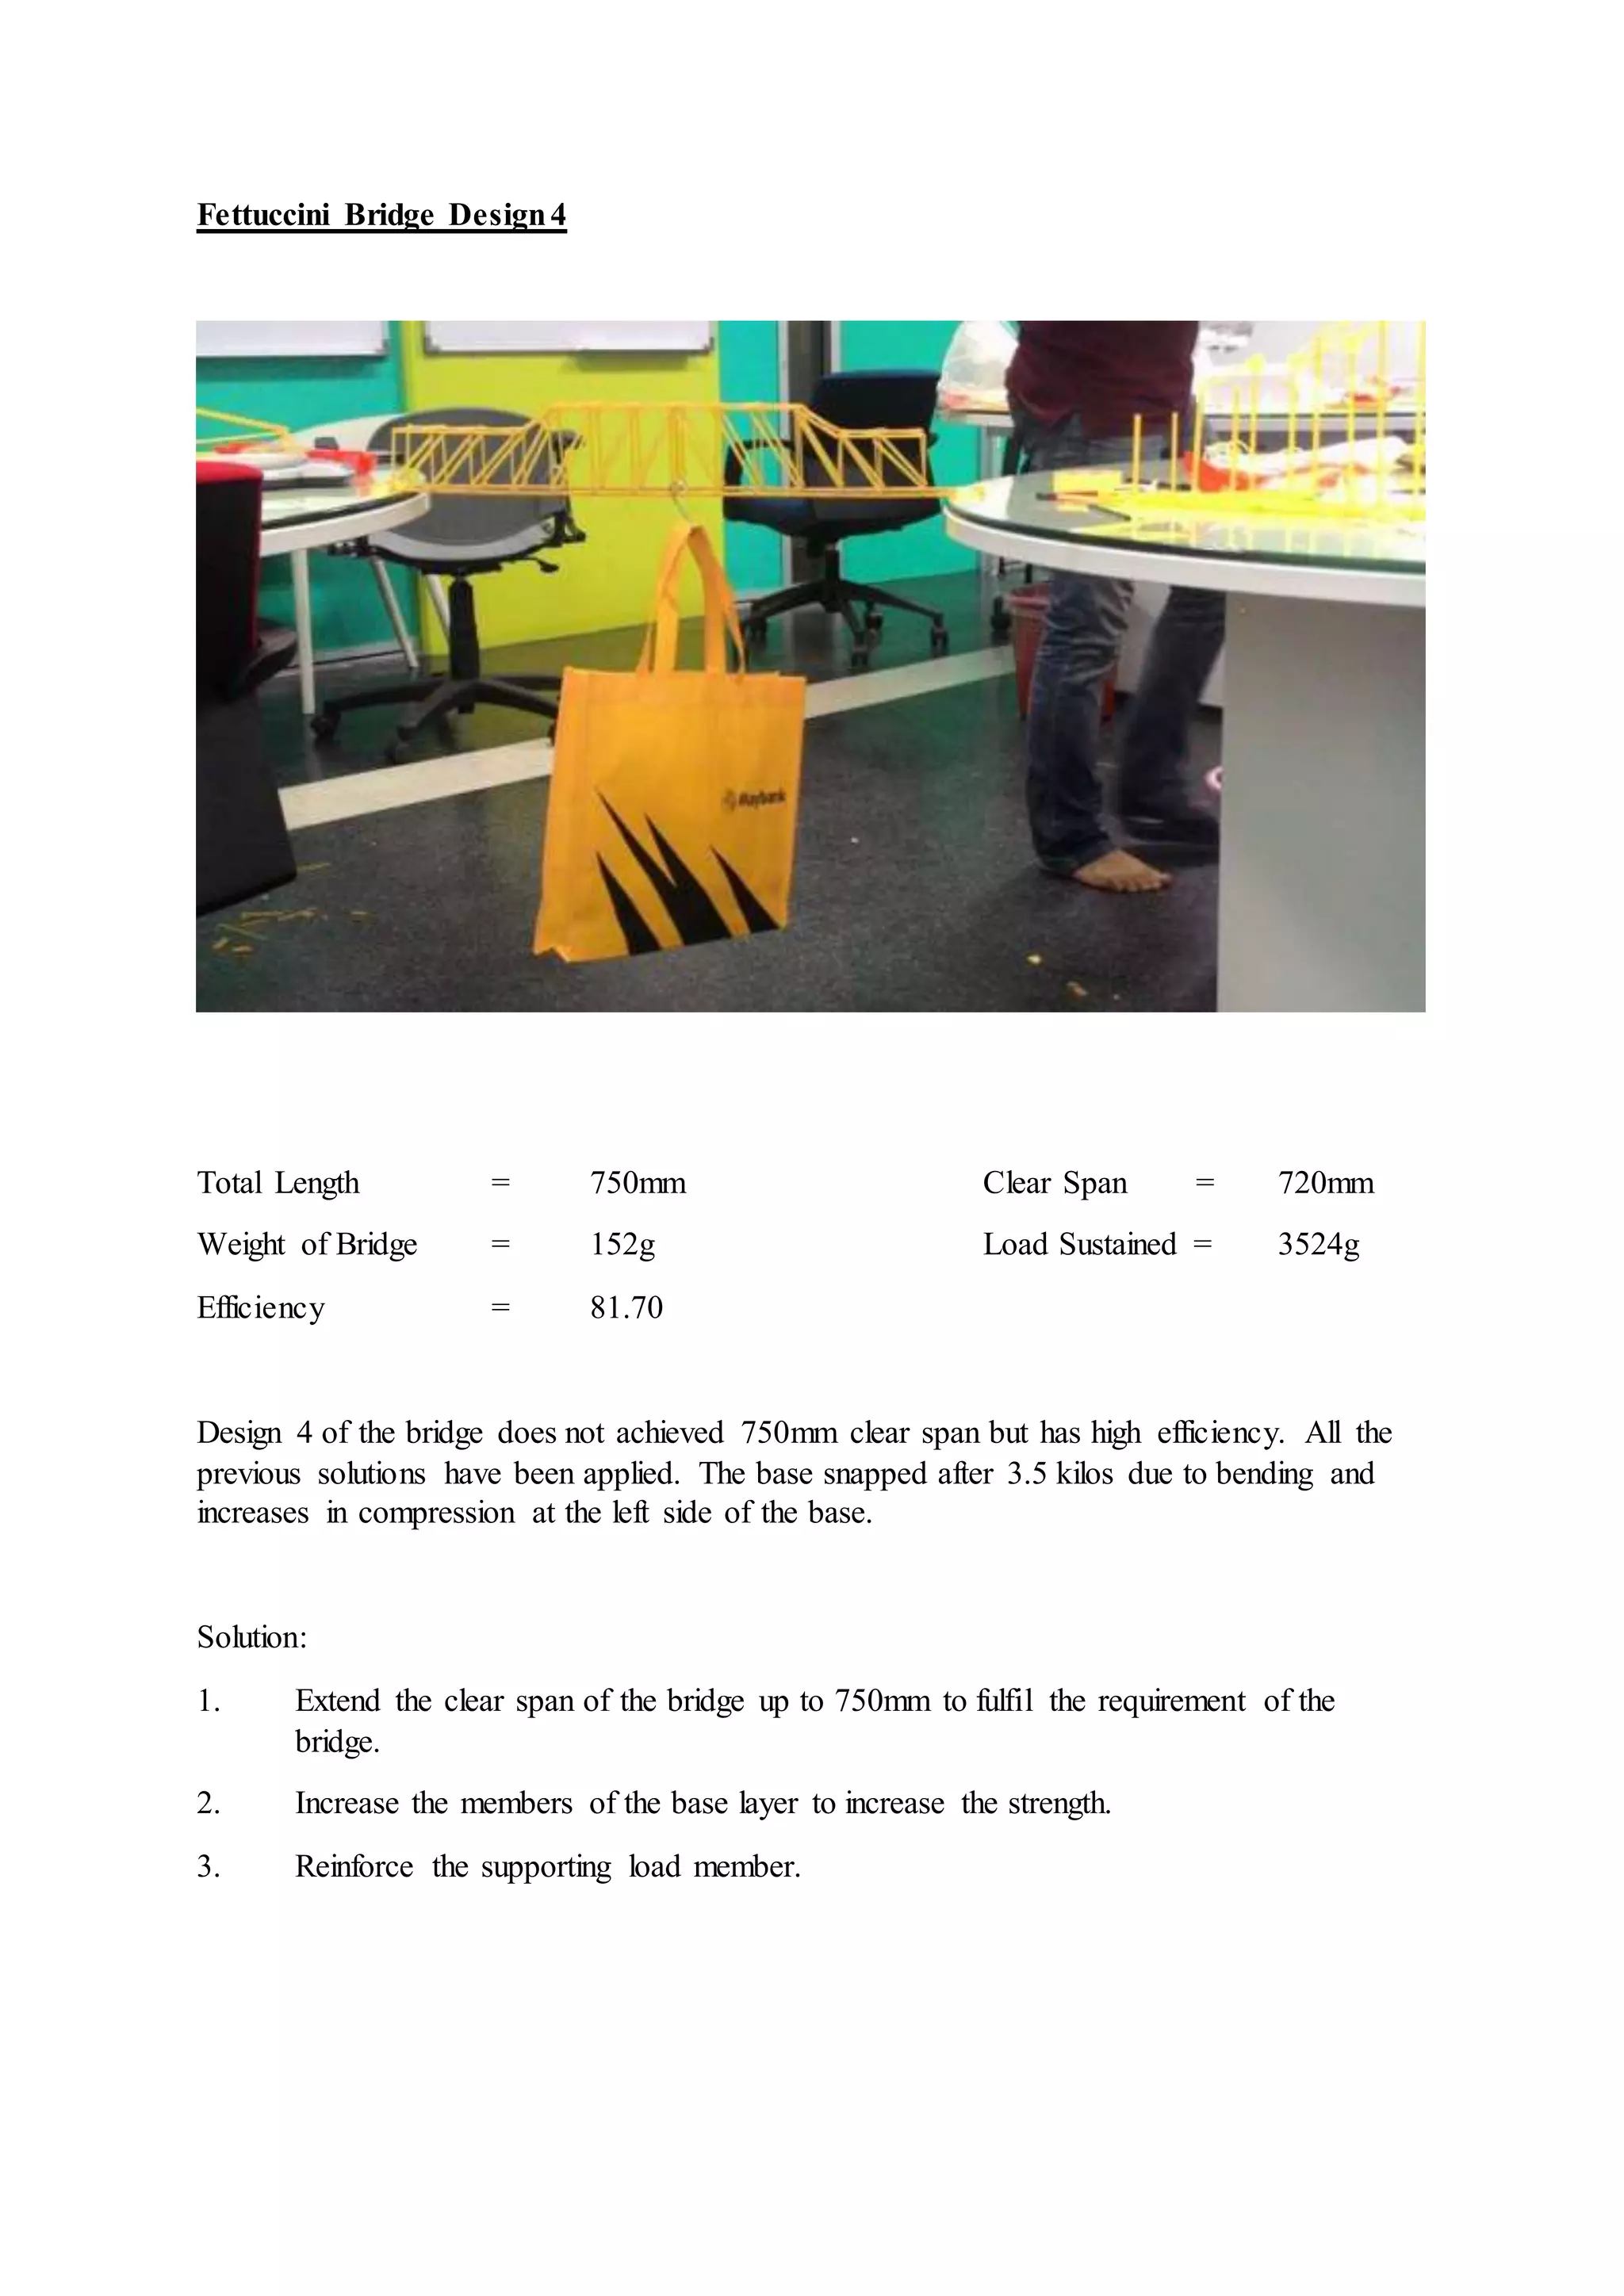
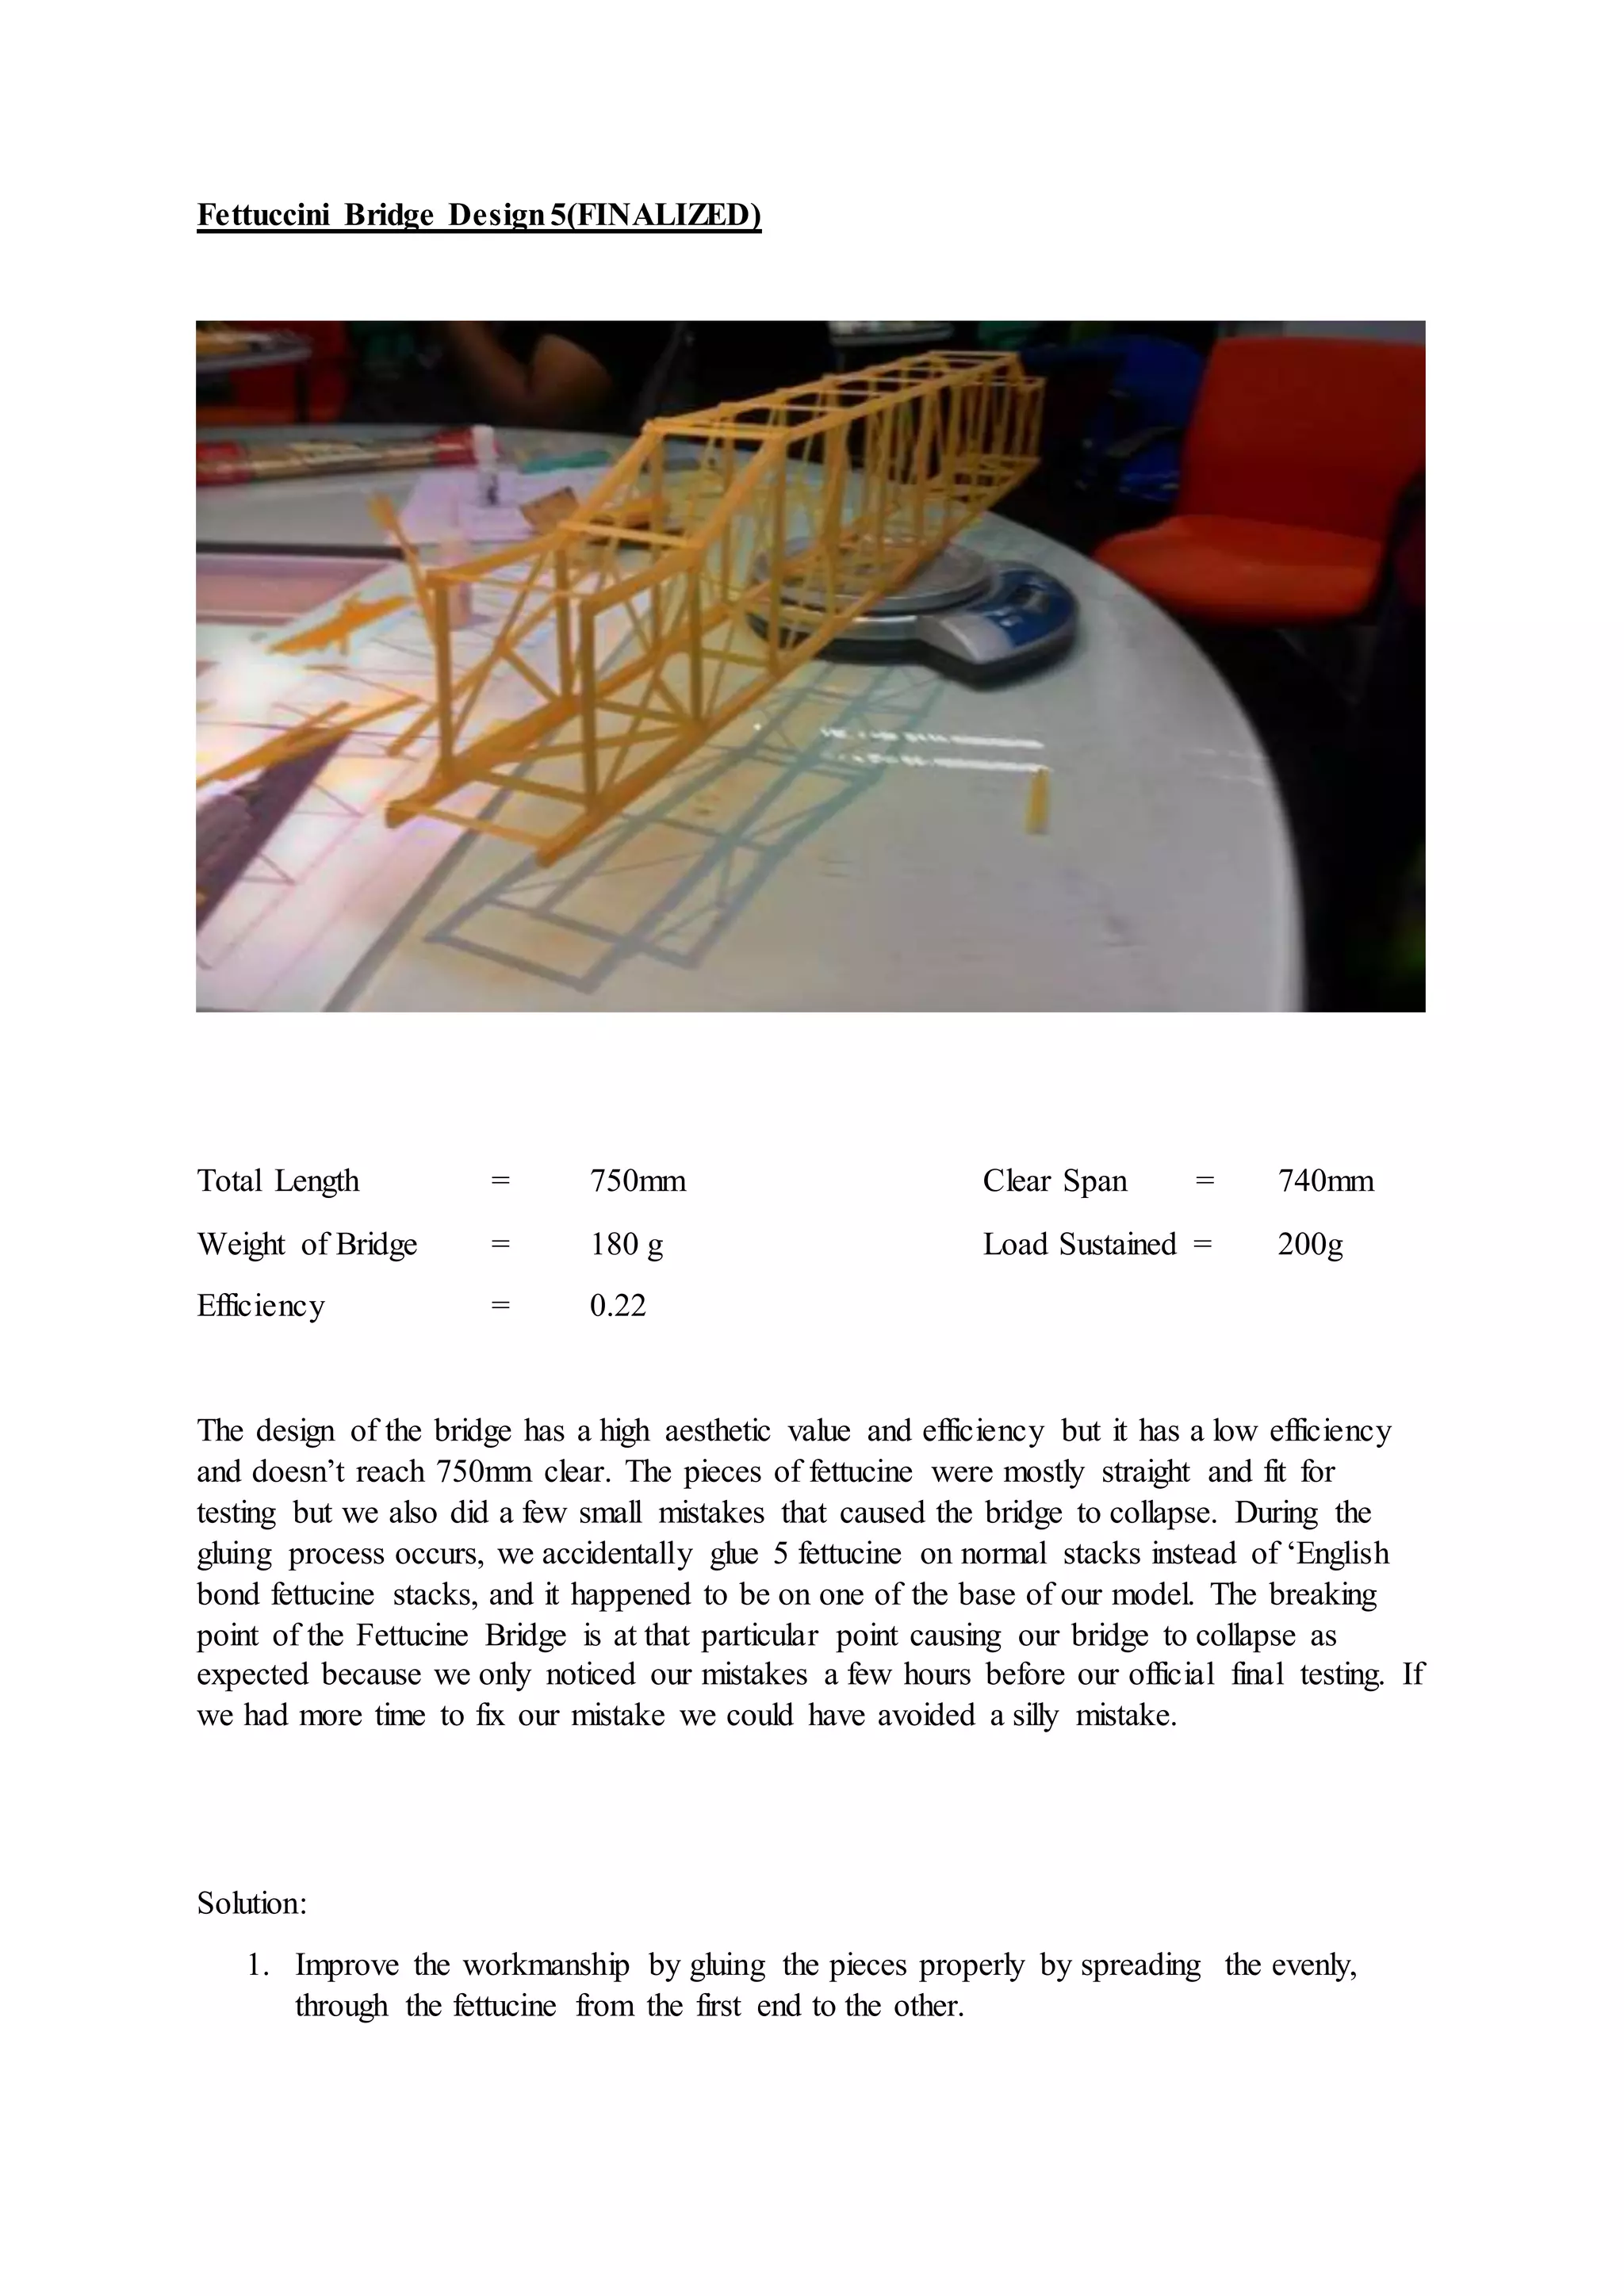
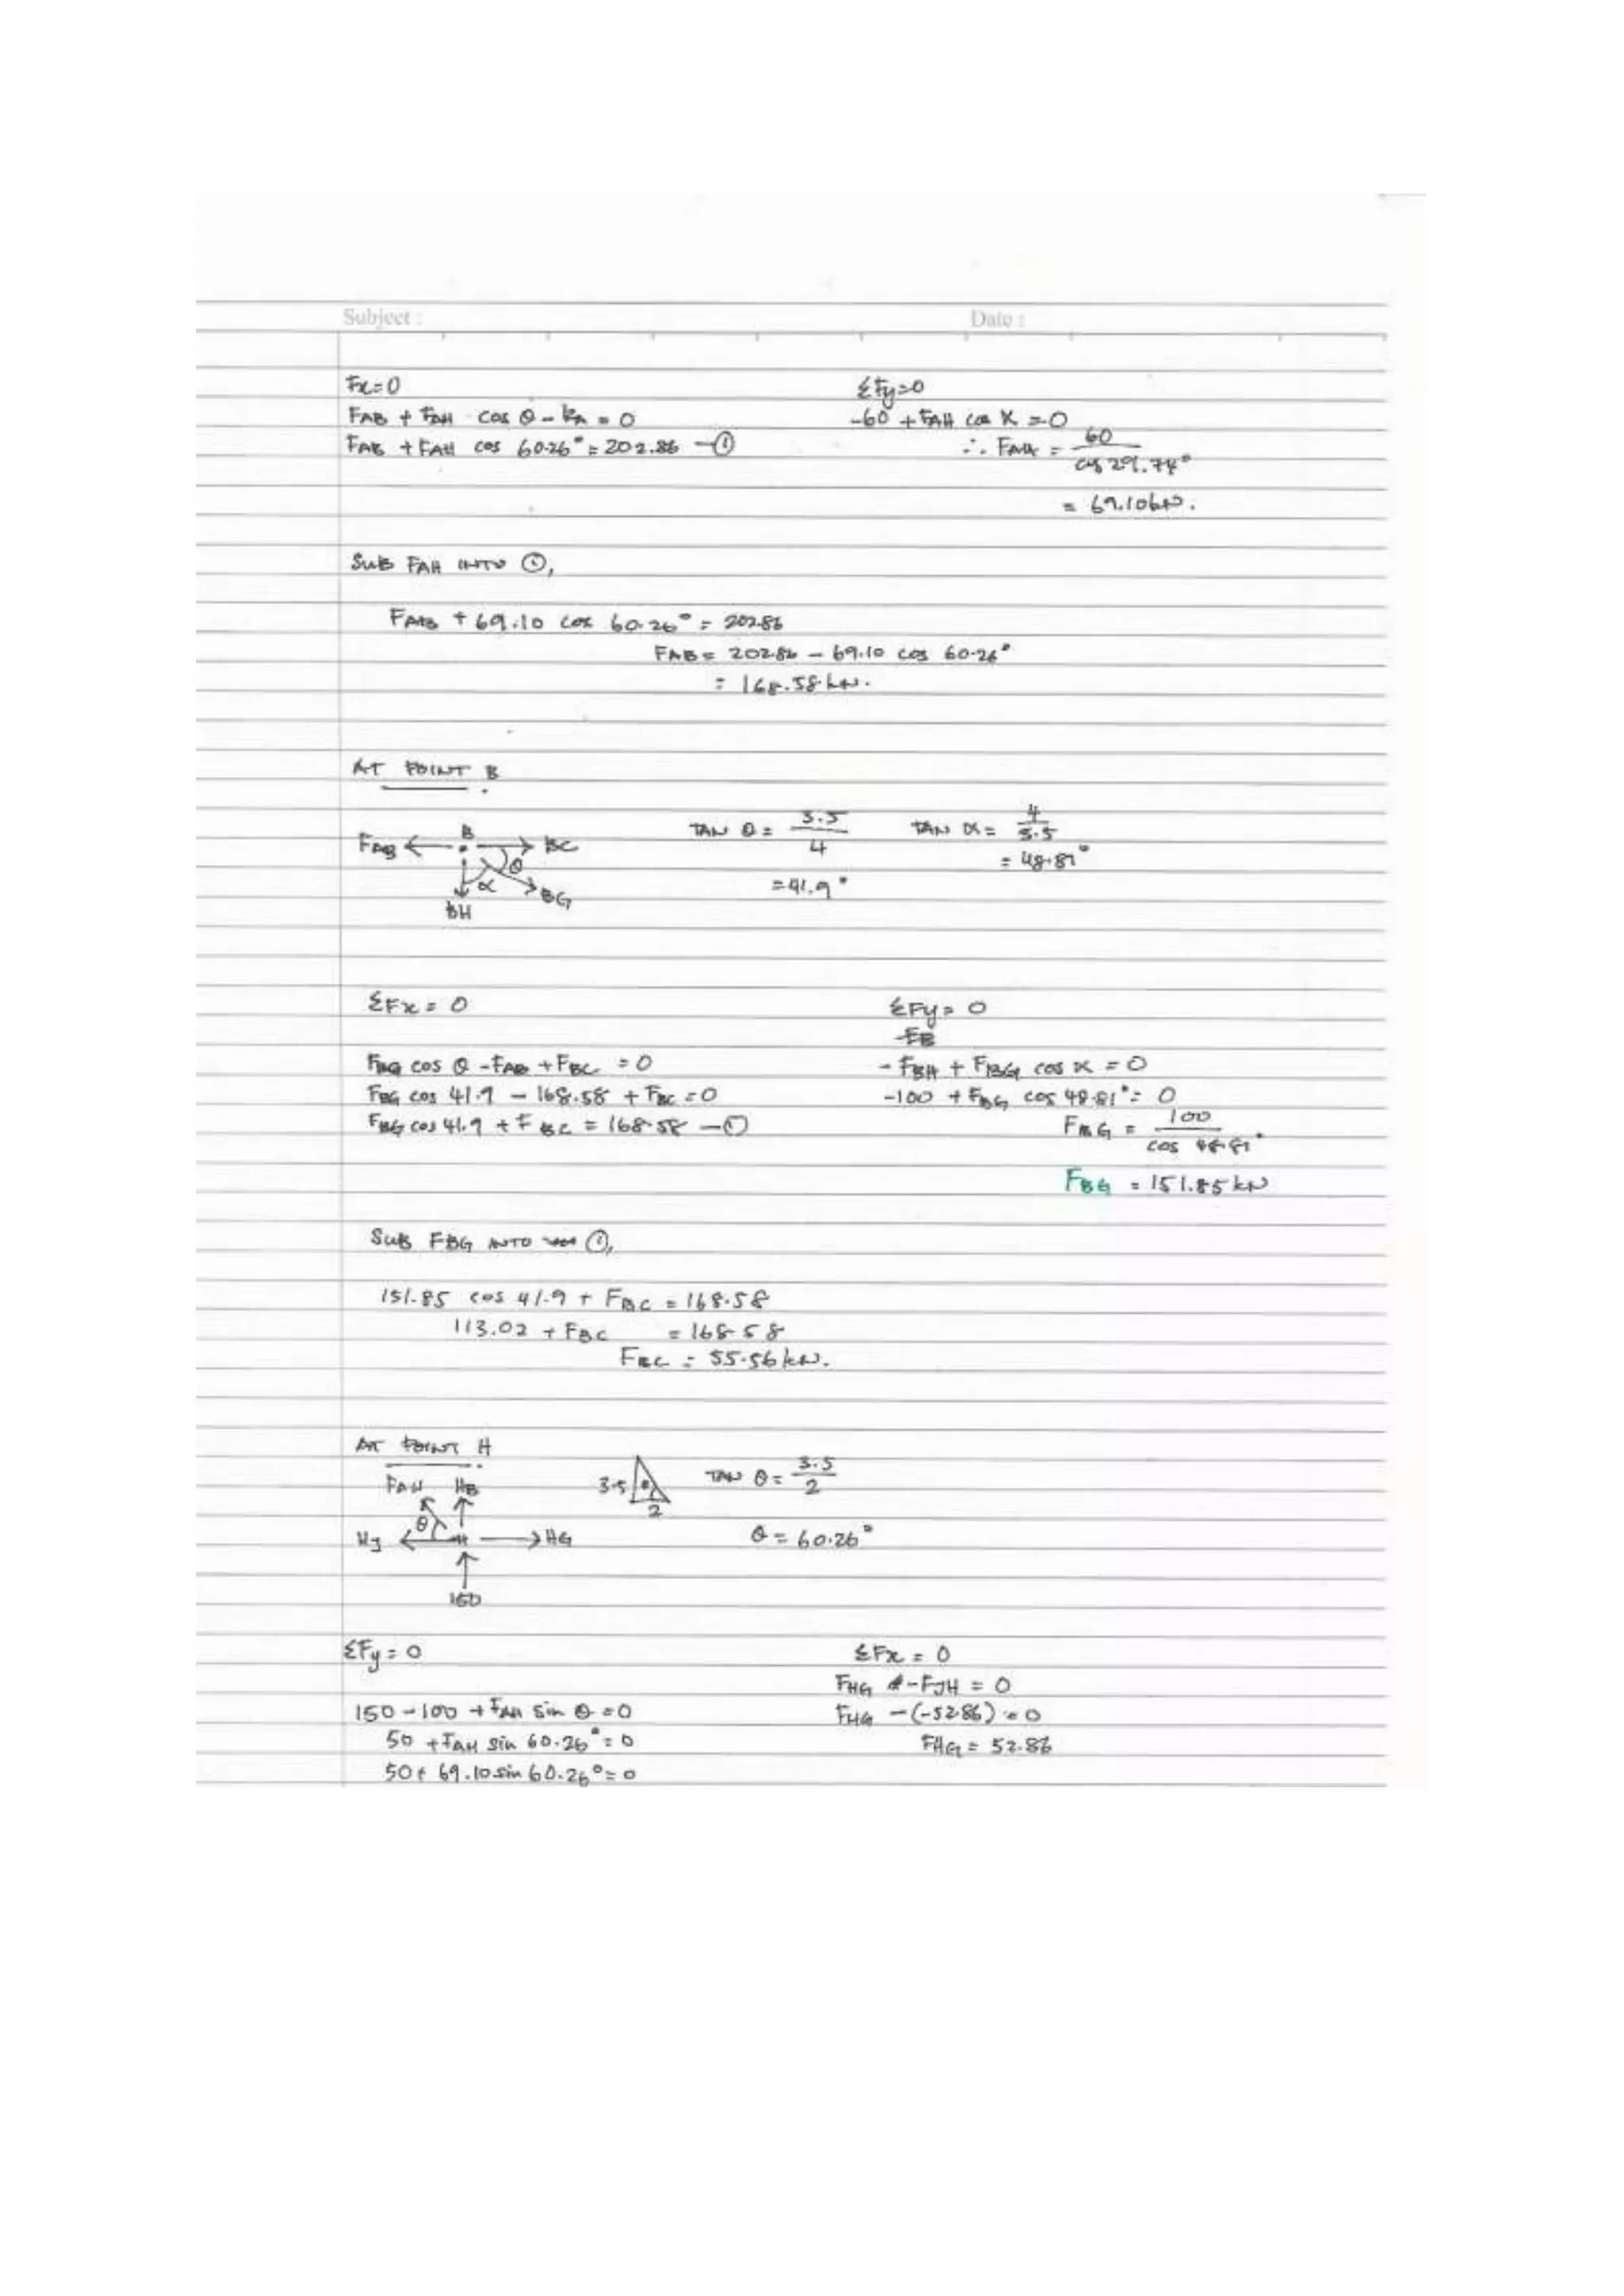
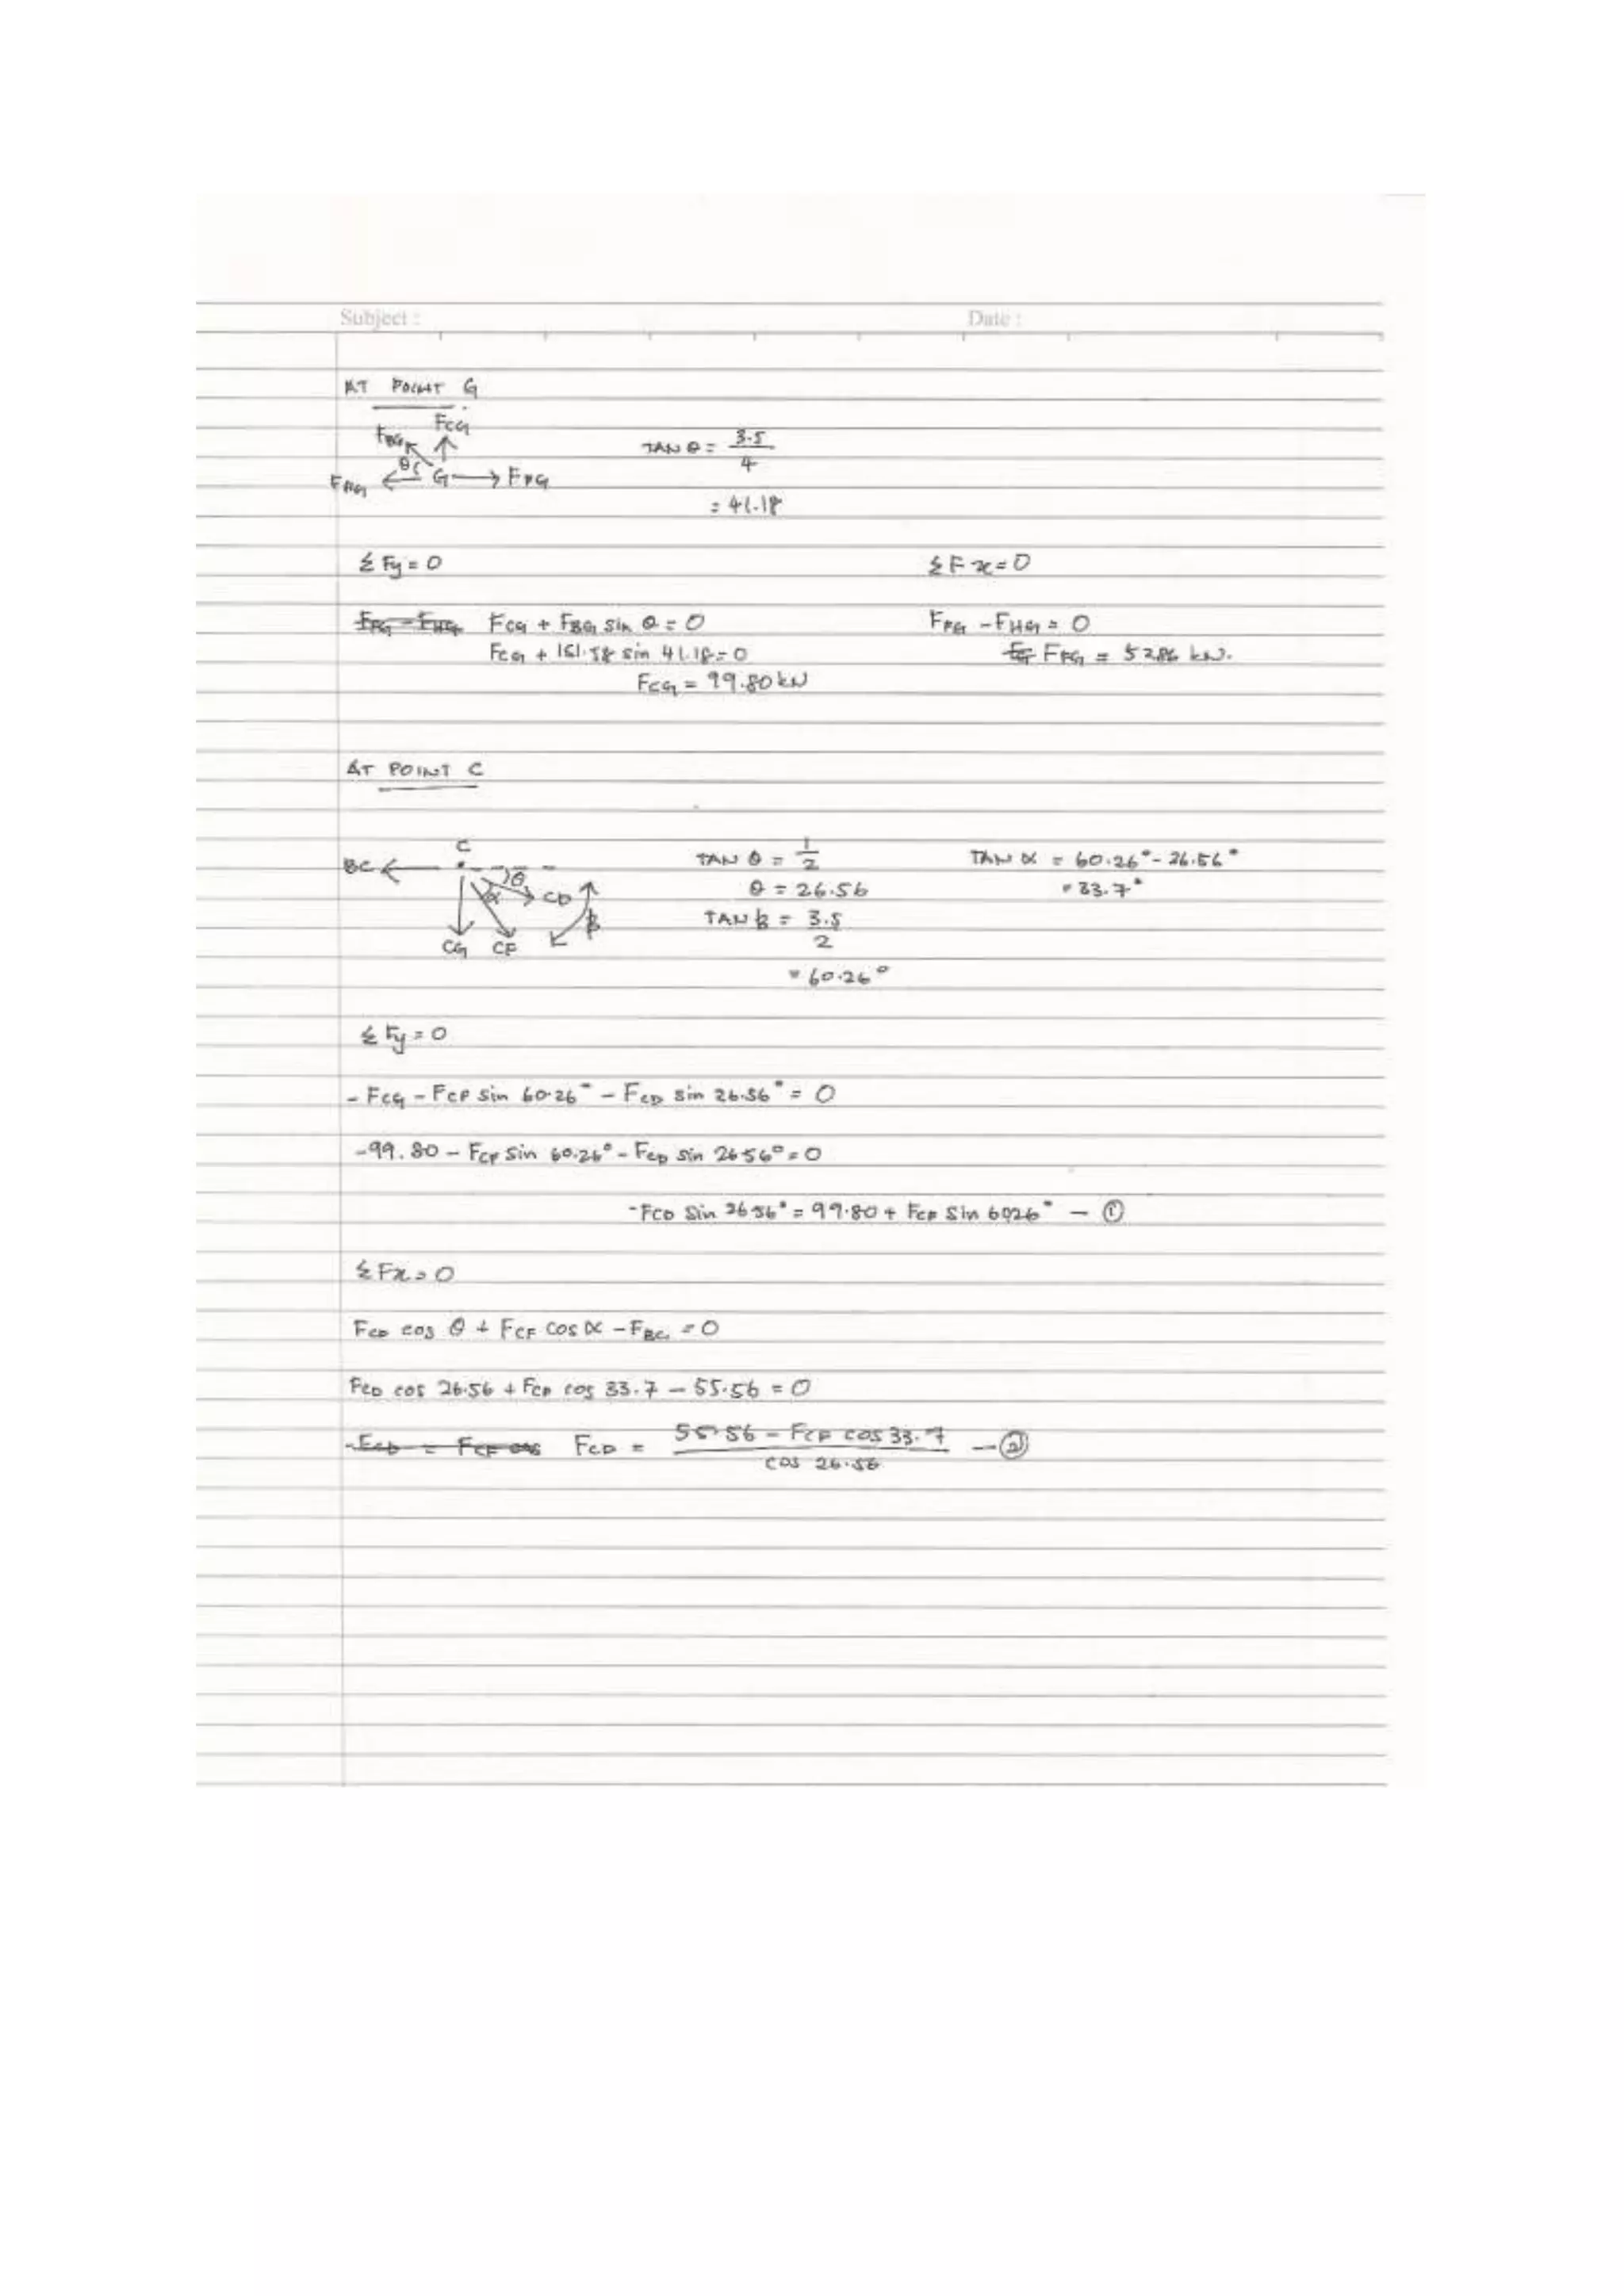
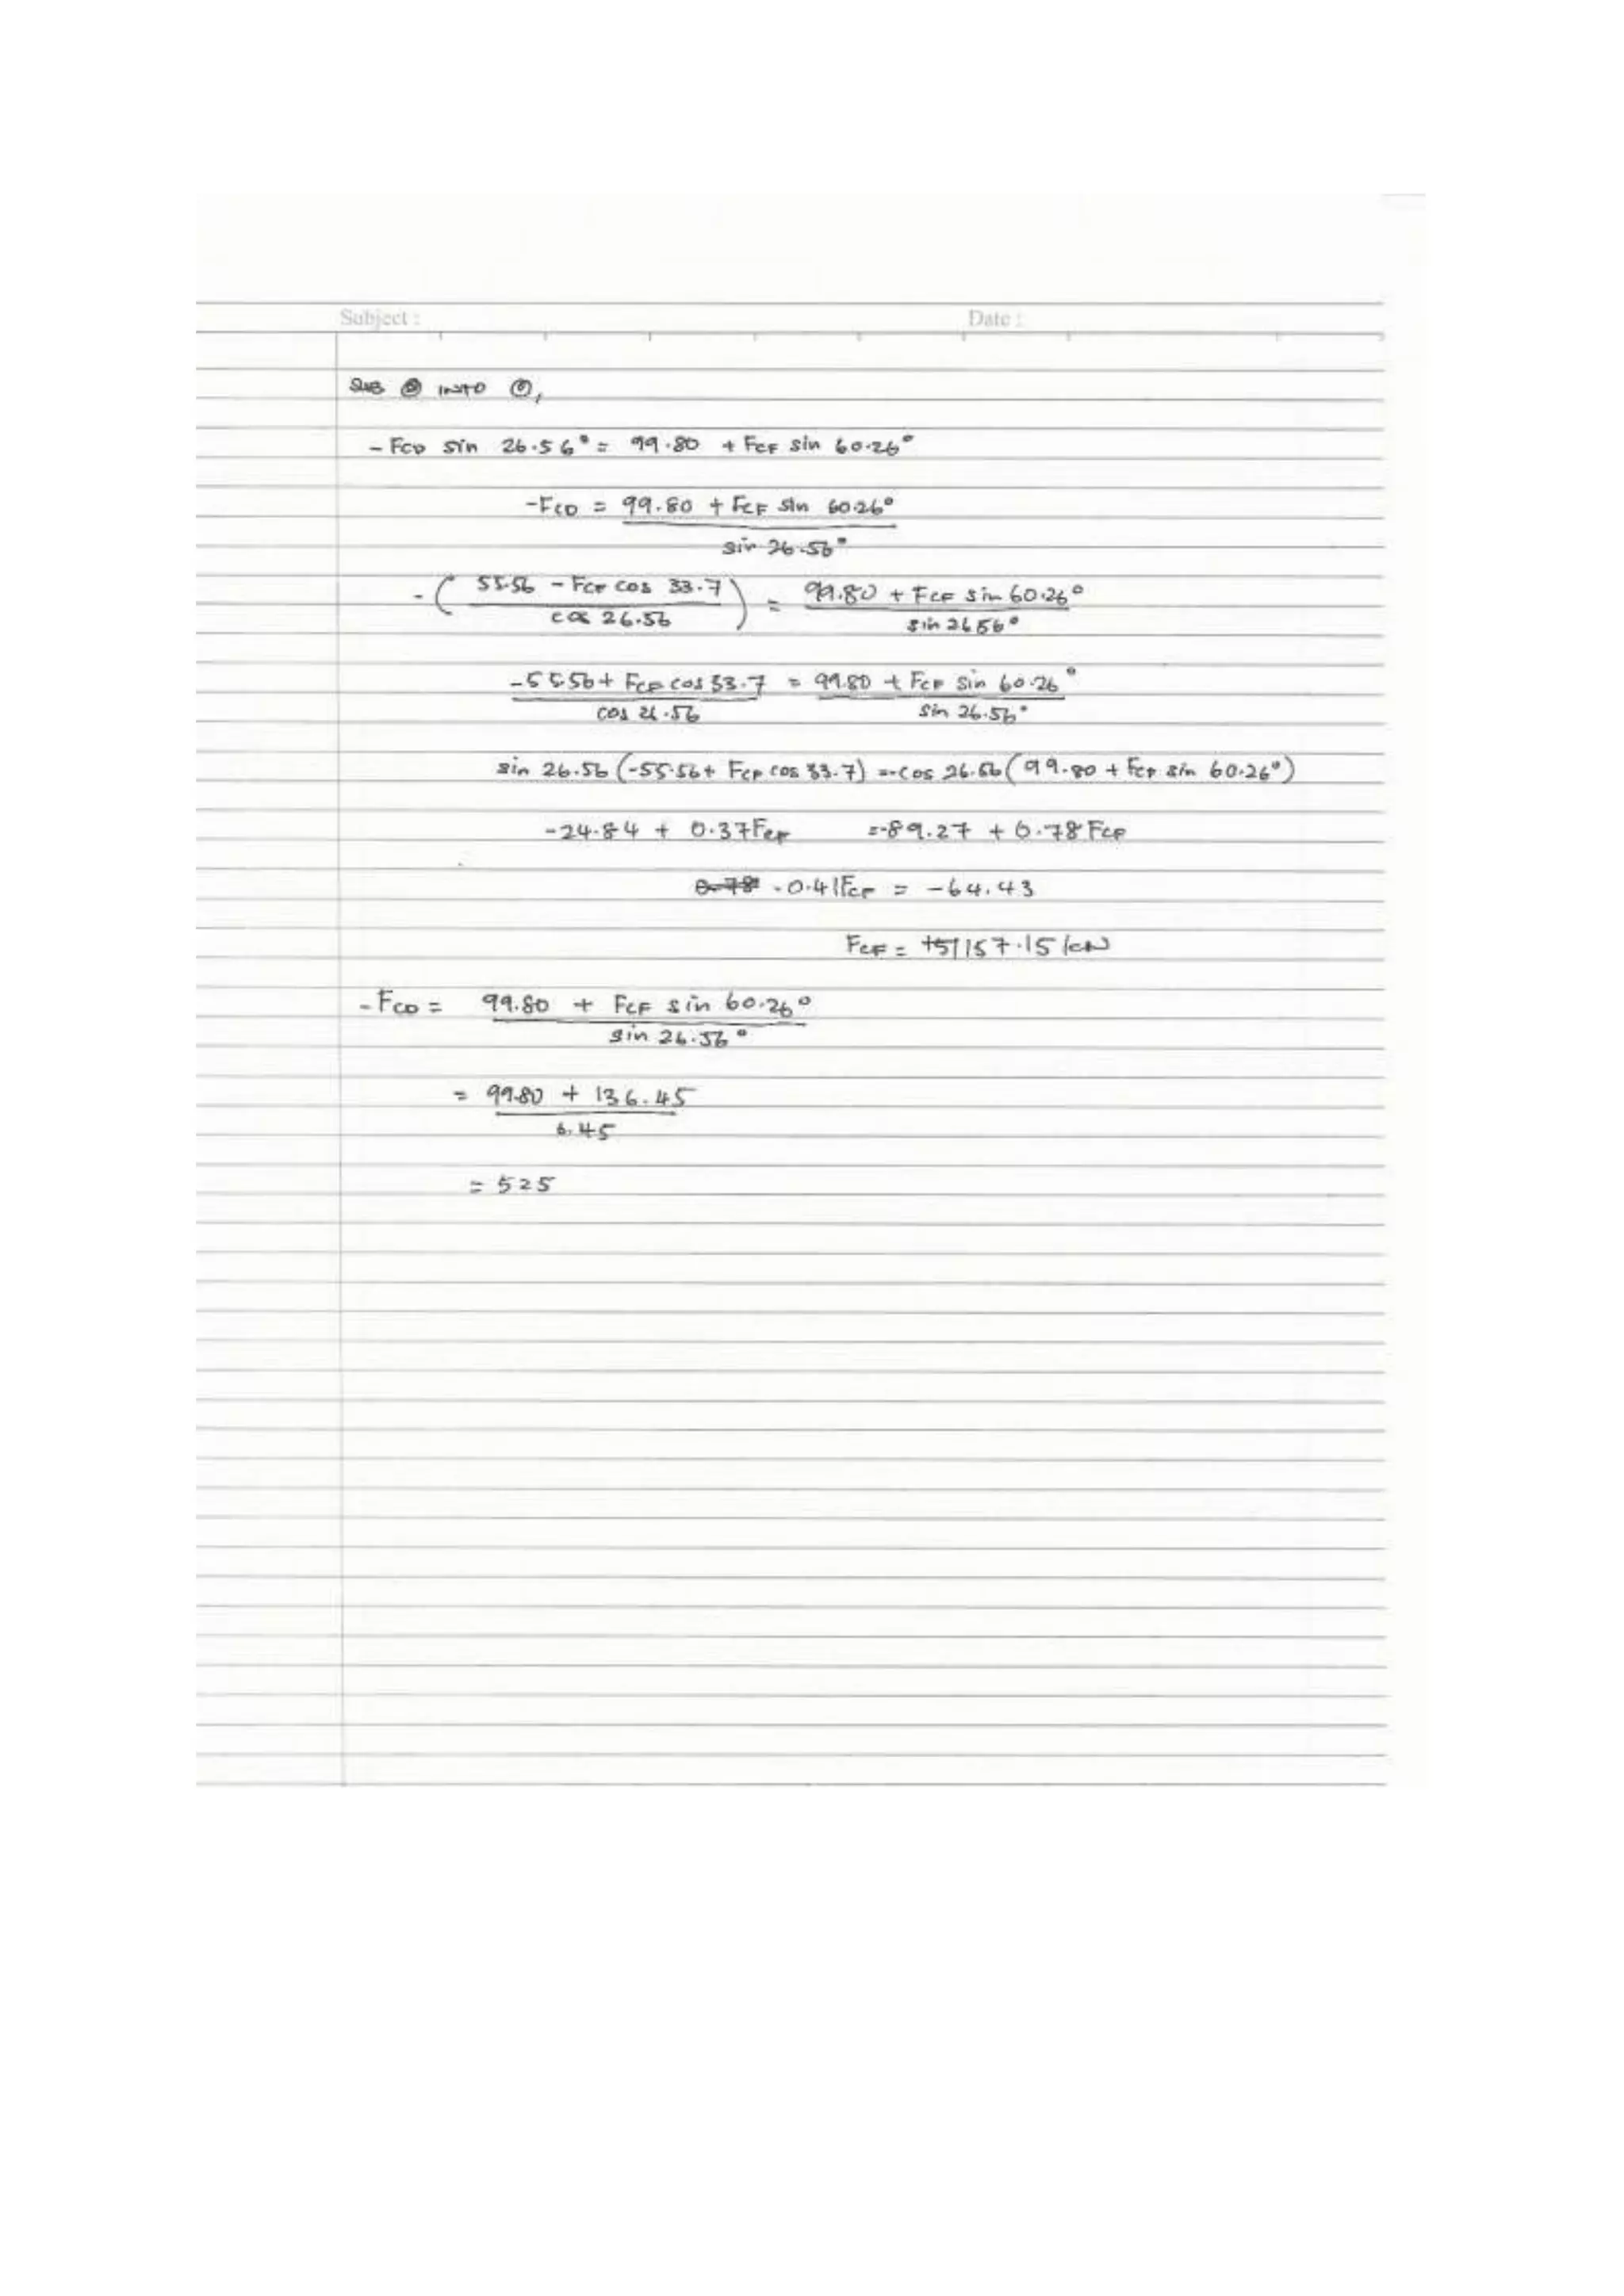
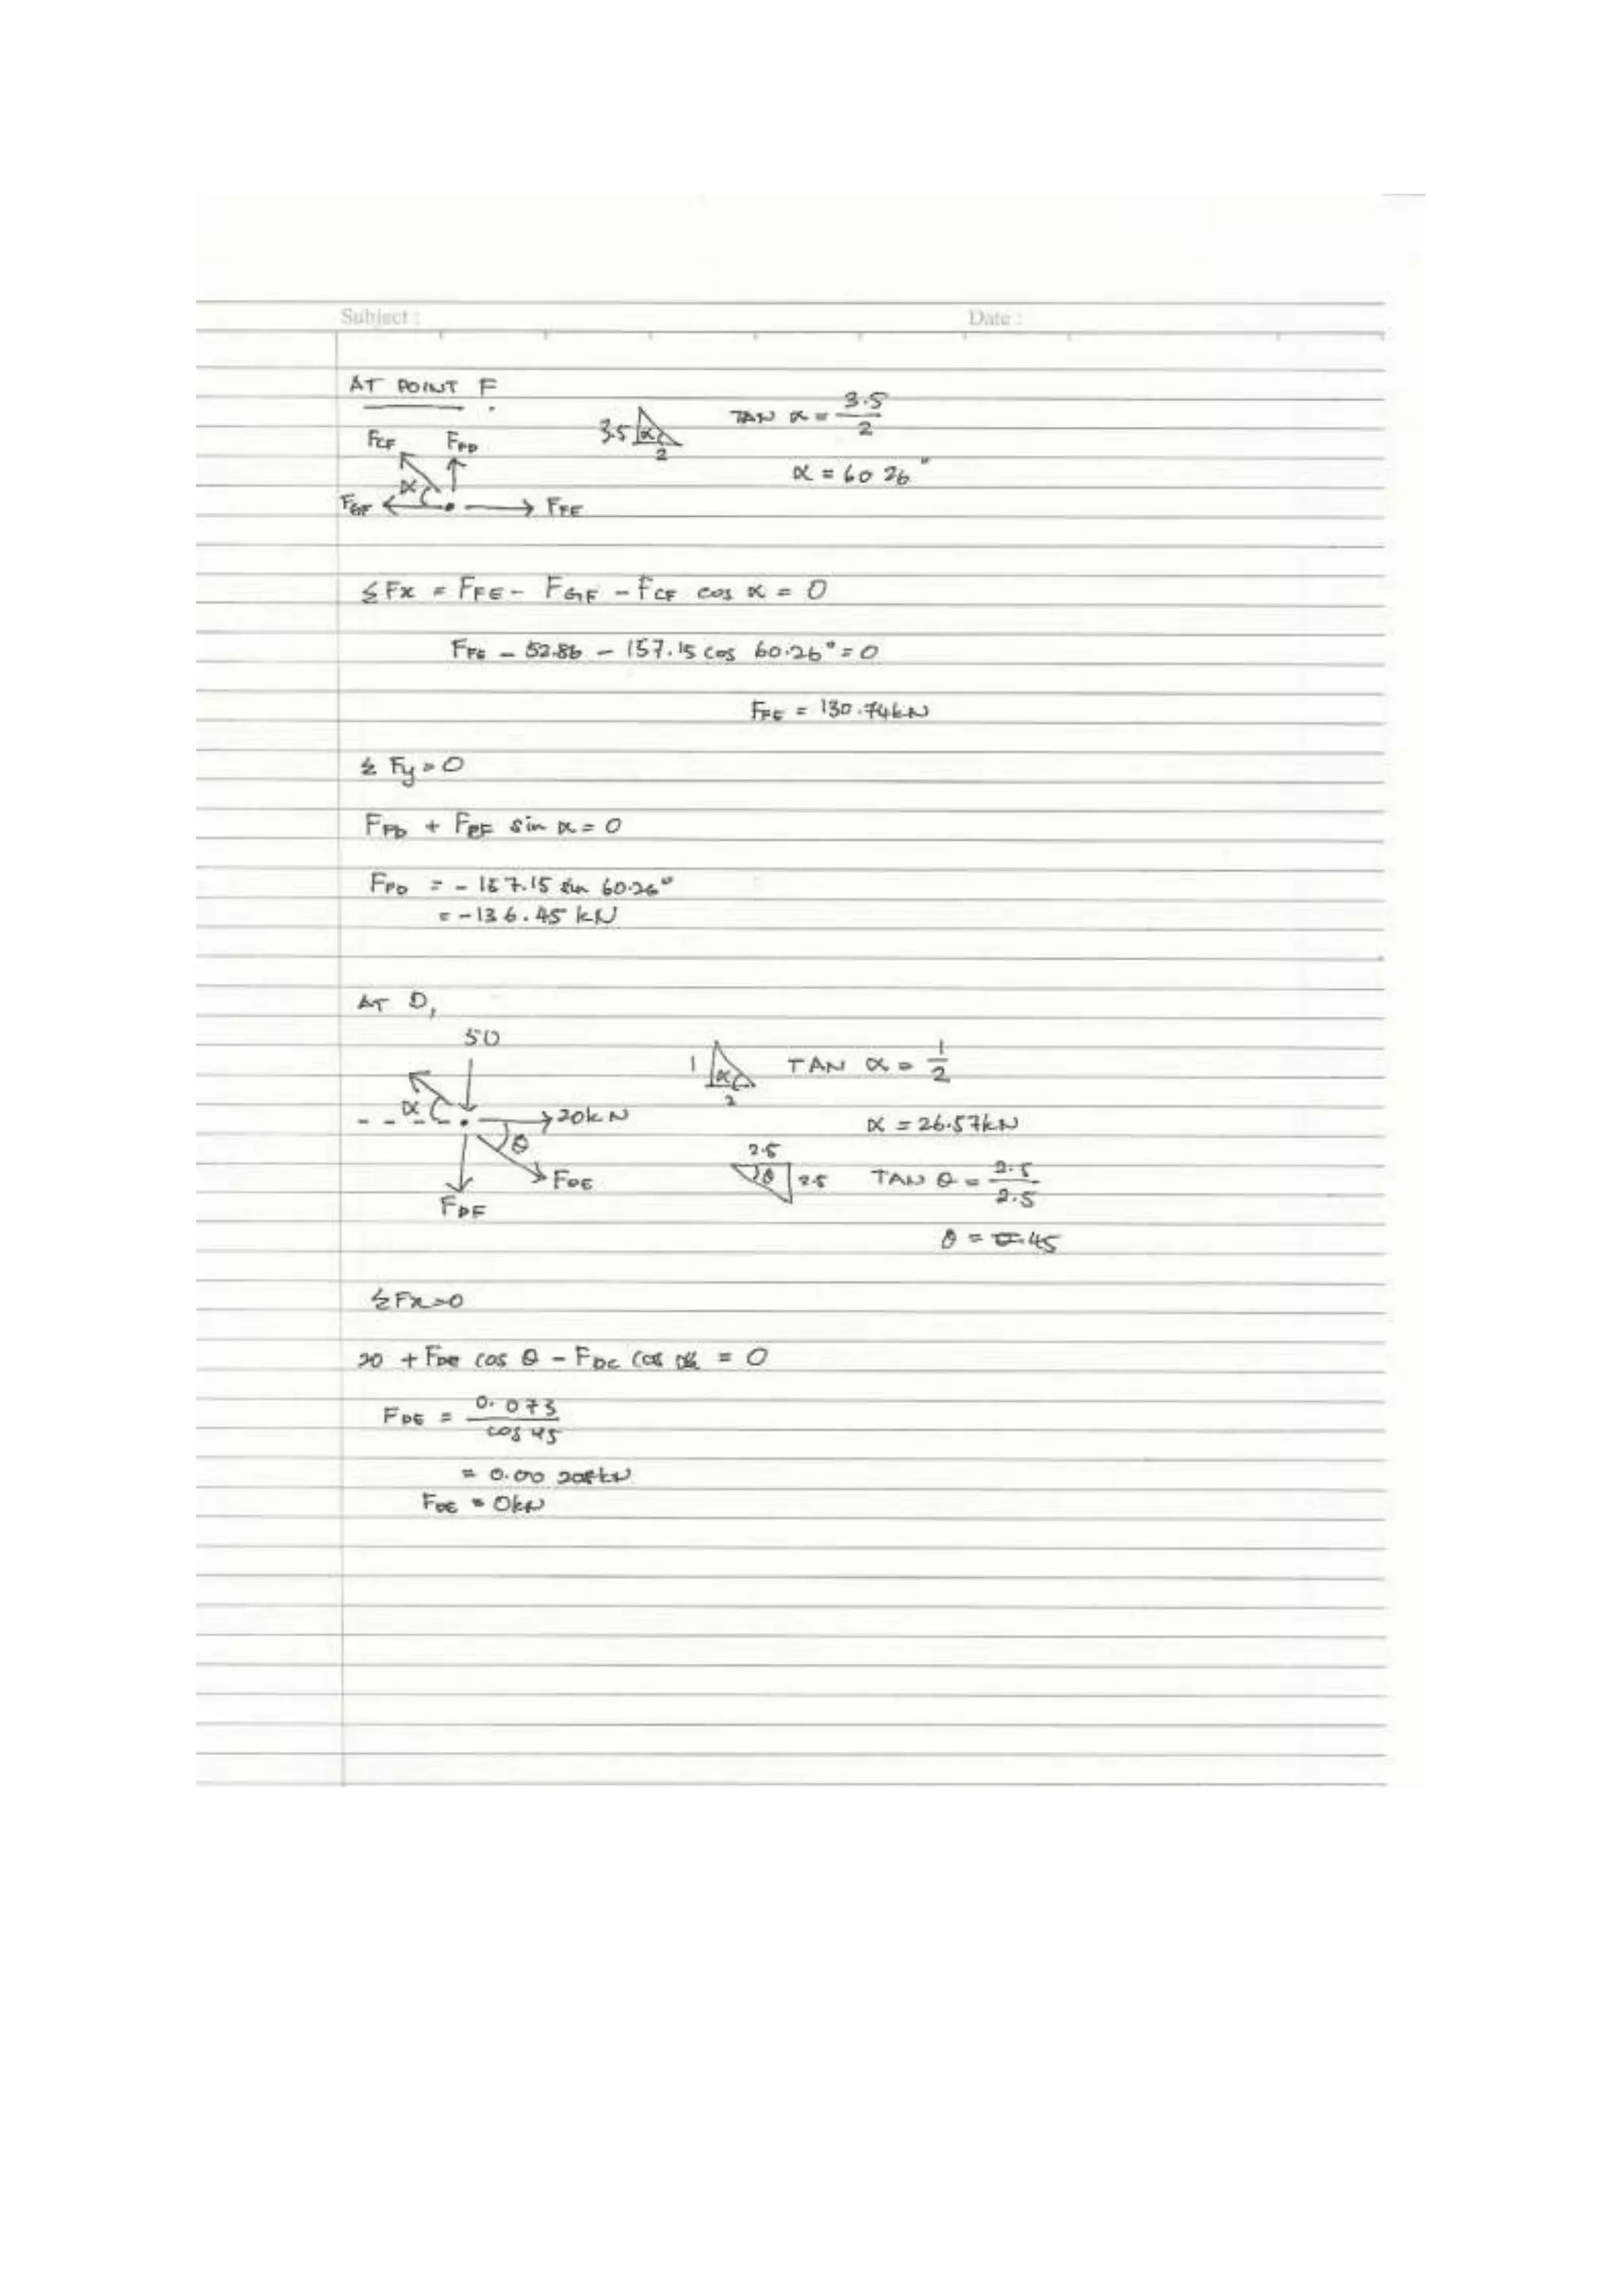
3. 1.0 INTRODUCTION
Truss is a structure built up of three or more members which are normally considered being
pinned and hinged at the joints. The following figure shows different types of trusses. Load
applied to the truss is transmitted to joint so that each individual members are in either pure
tension or compression.
1.1 GENERAL BRIEF OF TRUSS
Truss is a structure built up of three or more members which are normally considered being
pinned and hinged at the joints. The following figure shows different types of trusses. Load
applied to the truss is transmitted to joint so that each individual members are in either pure
tension or compression.
1.2 AIM OF STUDY
1. To develop student’s understanding of tension and compressive strength of
construction materials
2. To develop student’s understanding of force distribution in a truss
3. To design a perfect truss bridge which fulfils the following criterias:
High level of aesthetic value
Minimal construction material
1.3 LEARNING OUTCOMES
1. Able to evaluate, explore and improve attributes of construction materials
2. Explore and apply understanding of load distribution in a truss
3. Able to evaluate and identify tension and compression members in a truss structure
4. Explore different arrangement of members in a truss structure
4. 2.0 METHODOLOGY
2.1 Precedent Studies
We have to research and study a truss bridge in able to understand the connections,
orientation of each members and arrangement of members. Based on the studies, we have to
apply in the model of a bridge which are made out of fettuccine.
2.2 MATERIALS TESTING &EQUIPMENT PREPARATION
We explored the usage of different materials in terms of its strength by different types of
testing. All equipment are prepared before the testing of the truss bridge.
2.3 MODEL MAKING & DESIGN DEVELOPMENT
Requirements to construct a fettuccine bridge
a. 750 mm span of a bridge
b. Maximum weight of 200g
c. Only Fettuccine and glue
d. Testing and analyse until breakage
2.4 STRUCTURAL ANALYSIS
Structural analysis of the truss were tested on the determination of the efficiency of a bridge.
In order to achieve the efficiency of a bridge, we identify the critical members and the
strength of each members of the fettuccine.
2.5 BRIDGE EFFICIENCY CALCULATION
Efficiency of the bridge are calculated based on the formula,
bridgeofWeight
LoadMaximum
E,Efficiency
2
5. 3.0 PRECEDENT STUDIES
3.1 Methodology
The Jennings Randolph Bridge, built in 1977, is the largest Pratt truss bridge in North
America, spanning 754 feet over the Ohio River between Chester, West Virginia and East
Liverpool, Ohio. The bridge, which is located on U.S. Route 30, is named after West
Virginian Democratic Senator Jennings Randolph. It replaced the former Chester Bridge,
which was built in 1897. The bridge has recently undergone painting work where North Star
Painting Co. Inc. utilised a three-part system of organic zinc, intermediate coat of aluminium
carbothane, and epoxy top coat that was selected by the West Virginia Department of
Highways.
6. Type of Truss: A Pratt truss includes vertical members and diagonals that slope down
towards the centre, the opposite of the Howe truss. The interior diagonals are under tension
under balanced loading and vertical elements under compression. If pure tension elements are
used in the diagonals (such as eye bars) then crossing elements may be needed near the centre
to accept concentrated live loads as they traverse the span. It can be subdivided, creating Y-
and K-shaped patterns.
7. 4.0 MATERIALS & EQUIPMENT
1. Fettuccine
Fettuccine is the main material to build the bridge. Strengthening the fettuccine by lamination
is prohibited. Three types of fettuccine are used for testing on the strength.
2. S hook
The S hook is used to connect the fettuccine bridge and weights together and focus all the
force on one point on the bridge.
3. Weight
The weight is used to determine the strength of the fettuccine bridge by applying it as point
load on the bridge.
8. 4. Water Pail
The water pail was used to hold weight to while testing the fettuccini bridge. Its weight was
omitted from the final recording as it was a constant through the tests.
5. 3-second super glue
The 3 second super glue is used to hold fettuccine together. The reason we have chosen this
glue is because it can adhesive in instant and also its high strength.
9. 6. Pen Knife
The pen knife was used to cut the fettuccini strips to appropriate size in the model making
process.
7. Sand Paper
Sand paper was used to smoothen out the edges of the fettuccini due to mistakes that occurred
during the cutting and gluing process.
8. Weighing Scale
A weighing scale was used to measure the weight of the model to ensure that it did not
exceed 200 grams as well as during the testing period to measure the weight of the load tested
upon it.
10. 5.0 MODEL MAKING AND DESIGN DEVELOPMENT
Before making the model we did analysis of the materials used .The type of glue and brand of
fettuccini was analysed.
Type of
glue
Number of
pieces
Weight(grams) Weight
sustained(grams)
Time(seconds) Results
U-hue glue 5 6 100 50 Not able to
sustain
weight for
long
3 second
glue
5 6 100 120 Able to
sustain more
weight for a
reasonable
amount of
time
Hot glue
gun
5 7 100 130 Able to
sustain most
weight for
the longest
time but is
reasonably
heavier than
the rest
Brand of fettuccini Number of pieces Weight(grams) Time(seconds)
San Remo 5 100 120
Kimball 5 100 100
Barilla 5 100 90
11. For the glue analysis we notice that the best glue to use was hot glue gun. It manages to last
for more than 3 days and does not corrode the pasta. The only drawback is that it makes the
model heavier, causing unnecessary weight to be added to the model. Three second glue is
the best in terms of weight to strength as it does not cause unnecessary weight to be added
and can last reasonably long .The only drawback is that it corrodes the pasta meaning the
model can only be made a day at most earlier that the testing period-hue glue is not able to
sustain weight for a long period and does not add unnecessary weight to the model. It can last
long and won’t corrode the pasta.
As for the brands of pasta, an Remo has the best quality compared to Kimball and Barilla
brands. This is due to the quality produced by each company. The Kimball fettuccini is also
softer then the San Remo and Barilla brands causing to easily break.
Requirements of Fettuccine Bridge
a. 750mm clear span bridge
b. Fettuccine and glue can be used
c. Bridge will be tested to fail
12. Fettuccine Bridge Design 1
Total Length = 750mm Clear Span = 700mm
Weight of Bridge = 158g Load Sustained = 500g
Efficiency = 1.58
Design 1 of the bridge has high aesthetic value and efficiency but it has low efficiency and
does not reach 750mm clear span as required due to poor workmanship and poor selection of
materials.Peices of fettuccini were not straight and the gluing method did not produce a
strong base.
Solution:
1. Extend the clear span of the bridge up to 750mm to fulfil the requirement of the
bridge
2. Increase the members of each layer of the bridge to increase the strength.
3. Use proper pieces of fettuccini
4. Improve the gluing process on the base and increase the overall workmanship
13. Fettuccine Bridge Design 2
Total Length = 750mm Clear Span = 700mm
Weight of Bridge = 76 g Load Sustained = 1627g
Efficiency = 34.83
Design 2 of the bridge does not achieved 750mm clear span but has high efficiency. There
was no diagonal beams was used reducing the total efficiency. There was only two layers of
fettuccini used instead of three causing it to snap easily.
Solution:
1. Extend the clear span of the bridge up to 750mm to fulfil the requirement of the
bridge
2. Increase the members of each layer of the bridge to increase the strength.
3. Add diagonal beams to increase the total efficiency.
14. Fettuccine Bridge Design 3
Total Length = 700mm Clear Span = 650mm
Weight of Bridge = 133g Load Sustained = 2072g
Efficiency = 32.27
Design 3 of the bridge does not achieved 750mm clear span but has high efficiency. Only two
layers of fettuccini was used in the supporting load member causing it to prematurely snap
before finding out the total load it could sustain. During the retest there was a three day gap
causing corrosion due to the glue and the members became weak causing it to snap easily.
Solution:
1. Extend the clear span of the bridge up to 750mm to fulfil the requirement of the
bridge.
2. Increase the members of the base layer to increase the strength.
3. Reinforce the supporting load member.
4. The retest should be done earlier.
15. Fettuccini Bridge Design4
Total Length = 750mm Clear Span = 720mm
Weight of Bridge = 152g Load Sustained = 3524g
Efficiency = 81.70
Design 4 of the bridge does not achieved 750mm clear span but has high efficiency. All the
previous solutions have been applied. The base snapped after 3.5 kilos due to bending and
increases in compression at the left side of the base.
Solution:
1. Extend the clear span of the bridge up to 750mm to fulfil the requirement of the
bridge.
2. Increase the members of the base layer to increase the strength.
3. Reinforce the supporting load member.
16. Fettuccini Bridge Design5(FINALIZED)
Total Length = 750mm Clear Span = 740mm
Weight of Bridge = 180 g Load Sustained = 200g
Efficiency = 0.22
The design of the bridge has a high aesthetic value and efficiency but it has a low efficiency
and doesn’t reach 750mm clear. The pieces of fettucine were mostly straight and fit for
testing but we also did a few small mistakes that caused the bridge to collapse. During the
gluing process occurs, we accidentally glue 5 fettucine on normal stacks instead of ‘English
bond fettucine stacks, and it happened to be on one of the base of our model. The breaking
point of the Fettucine Bridge is at that particular point causing our bridge to collapse as
expected because we only noticed our mistakes a few hours before our official final testing. If
we had more time to fix our mistake we could have avoided a silly mistake.
Solution:
1. Improve the workmanship by gluing the pieces properly by spreading the evenly,
through the fettucine from the first end to the other.
17. 2. Mark on the fettucine with a marker pen, at the first end the middle and the other end
so that the ‘English Bond’ stacks of the fettuccine could be made so that the strongest
possible bond could happen.
20. 7.0 CONCLUSION
After we completed the project, we have a deeper understanding on the topic of structural
Analysis and we are able to identify and understand bow tension and compression works on a
bridge. We also learnt how to calculate the force acting on each member on a bridge.
Based on the efficiency equation, a bridge with a high efficiency is a bridge is a bridge that is
able withstands a high load with a minimal weight. We did several test to test different
designs and recorded and improved the design to sustain a higher load and hence a better
efficiency.
Throughout the project, we have learned to identify important design elements and features
(height, reinforcements, distance between members etc.) that could affect the structural
integrity of the bridge to achieve a high efficiency. After analysing the load distribution in the
bridge we did, we strengthened the weaker part of the bridges.
Besides that, we also came to realise that the crucial and determining factor in the efficiency
of the bridge is the workmanship of the bridge. Any slight unevenness could transfer the load
differently, causing the low efficiency of the bridge. In every model we did, we tried to keep
our workmanship uniform by delegating certain task only to certain people to carry out.
Proper way of adhesive and consistency of jointing the members are important to ensure the
connections are strong.
In conclusion, this project taught us the importance of working together as a team and how to
think critically and apply our individual designs when it comes to the construction details.
22. Exercise: Truss analysis
Following are 6 different truss systems which carry exactly the same loads. Each group member
analyses one of the following case. Determine which truss arrangement is the most effective and
explain why.
(Note : Please write your name on your calculation sheets. Omit case 6 if your group has only 5
members).
Case1
Case2