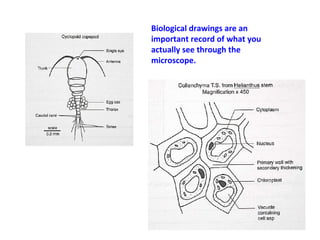
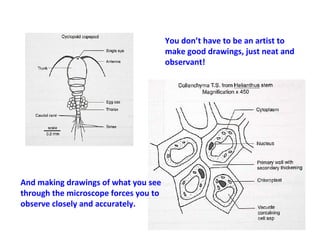
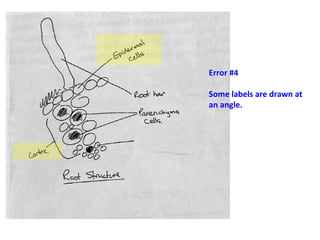
Making Biological Drawings
Biological drawings are an
important record of what you
actually see through the
microscope.
You don’t have to be an artist to
                                       make good drawings, just neat and
                                       observant!


And making drawings of what you see
through the microscope forces you to
observe closely and accurately.
What makes a good
biological drawing?
the drawings are sharp and clear
they’re large enough to make
the details easy to see and not
crowded on the page or in the
space
each specimen has a title
each drawing either shows the size
of the specimen or indicates the
magnification that was used while
viewing it
known and visible structures should be
                                labeled with straight, neat lines that DO
                                NOT cross over each other


when possible, keep the label
lines vertical and make sure
the line is right on the
structure you are identifying
Most importantly, draw what you
ACTUALLY SEE and not what you THINK
you should see or what you think
SHOULD be there.
Here are the main points:

•Don’t crowd things in your drawing.
•Title your drawing as exactly as possible.
•Include the magnification or size.
•Label all known structures.
•Label lines should be straight and NOT crossed over each other.
•Keep label lines vertical.
•Label lines should clearly end on the appropriate structure.
•Draw what you actually see and don’t embellish.
Now, examine the picture here. It’s
an image you might see through
the microscope. Read the
description below:
Here’s a student’s
drawing of that
microscope image
on the last slide.
This drawing
should be a lot
better. Can you
pick out all the
errors? Pause
the slideshow and
try to pick out as
many as you can.
Error#1

Some lines cross
over each other
and are angled
instead of straight
Error#2

Cell shapes are inaccurate
and don’t represent the
layers as they are seen in
the specimen; some of
the “cells” have open
lines and are just round
instead of being shaped
like the real cells in the
slide
Error #3

There is no magnification
or size information given.
Error #4

Some labels are drawn at
an angle.
Error #5

There’s a line to a cell
type that has no label.
Error #6

The title isn’t specific
enough. What kind of
root?
Here’s your assignment:

•On a clean sheet of paper with a proper heading,
make a biological drawing of the same microscope
image from the example. Improve upon the one made
by our fictitious student and correct all the errors that
were made.

•Bring this drawing with you to your next class
meeting. If you do not have it with you, you will not be
allowed to participate in the microscope lab that day
and will have to make arrangements with me to make
it up.

The image is on the next slide. Have fun!!!!
Bio drawings

Bio drawings

  • 1.
  • 2.
    Biological drawings arean important record of what you actually see through the microscope.
  • 3.
    You don’t haveto be an artist to make good drawings, just neat and observant! And making drawings of what you see through the microscope forces you to observe closely and accurately.
  • 4.
    What makes agood biological drawing?
  • 5.
    the drawings aresharp and clear
  • 6.
    they’re large enoughto make the details easy to see and not crowded on the page or in the space
  • 7.
  • 8.
    each drawing eithershows the size of the specimen or indicates the magnification that was used while viewing it
  • 9.
    known and visiblestructures should be labeled with straight, neat lines that DO NOT cross over each other when possible, keep the label lines vertical and make sure the line is right on the structure you are identifying
  • 10.
    Most importantly, drawwhat you ACTUALLY SEE and not what you THINK you should see or what you think SHOULD be there.
  • 11.
    Here are themain points: •Don’t crowd things in your drawing. •Title your drawing as exactly as possible. •Include the magnification or size. •Label all known structures. •Label lines should be straight and NOT crossed over each other. •Keep label lines vertical. •Label lines should clearly end on the appropriate structure. •Draw what you actually see and don’t embellish.
  • 12.
    Now, examine thepicture here. It’s an image you might see through the microscope. Read the description below:
  • 13.
    Here’s a student’s drawingof that microscope image on the last slide. This drawing should be a lot better. Can you pick out all the errors? Pause the slideshow and try to pick out as many as you can.
  • 14.
    Error#1 Some lines cross overeach other and are angled instead of straight
  • 15.
    Error#2 Cell shapes areinaccurate and don’t represent the layers as they are seen in the specimen; some of the “cells” have open lines and are just round instead of being shaped like the real cells in the slide
  • 16.
    Error #3 There isno magnification or size information given.
  • 17.
    Error #4 Some labelsare drawn at an angle.
  • 18.
    Error #5 There’s aline to a cell type that has no label.
  • 19.
    Error #6 The titleisn’t specific enough. What kind of root?
  • 20.
    Here’s your assignment: •Ona clean sheet of paper with a proper heading, make a biological drawing of the same microscope image from the example. Improve upon the one made by our fictitious student and correct all the errors that were made. •Bring this drawing with you to your next class meeting. If you do not have it with you, you will not be allowed to participate in the microscope lab that day and will have to make arrangements with me to make it up. The image is on the next slide. Have fun!!!!