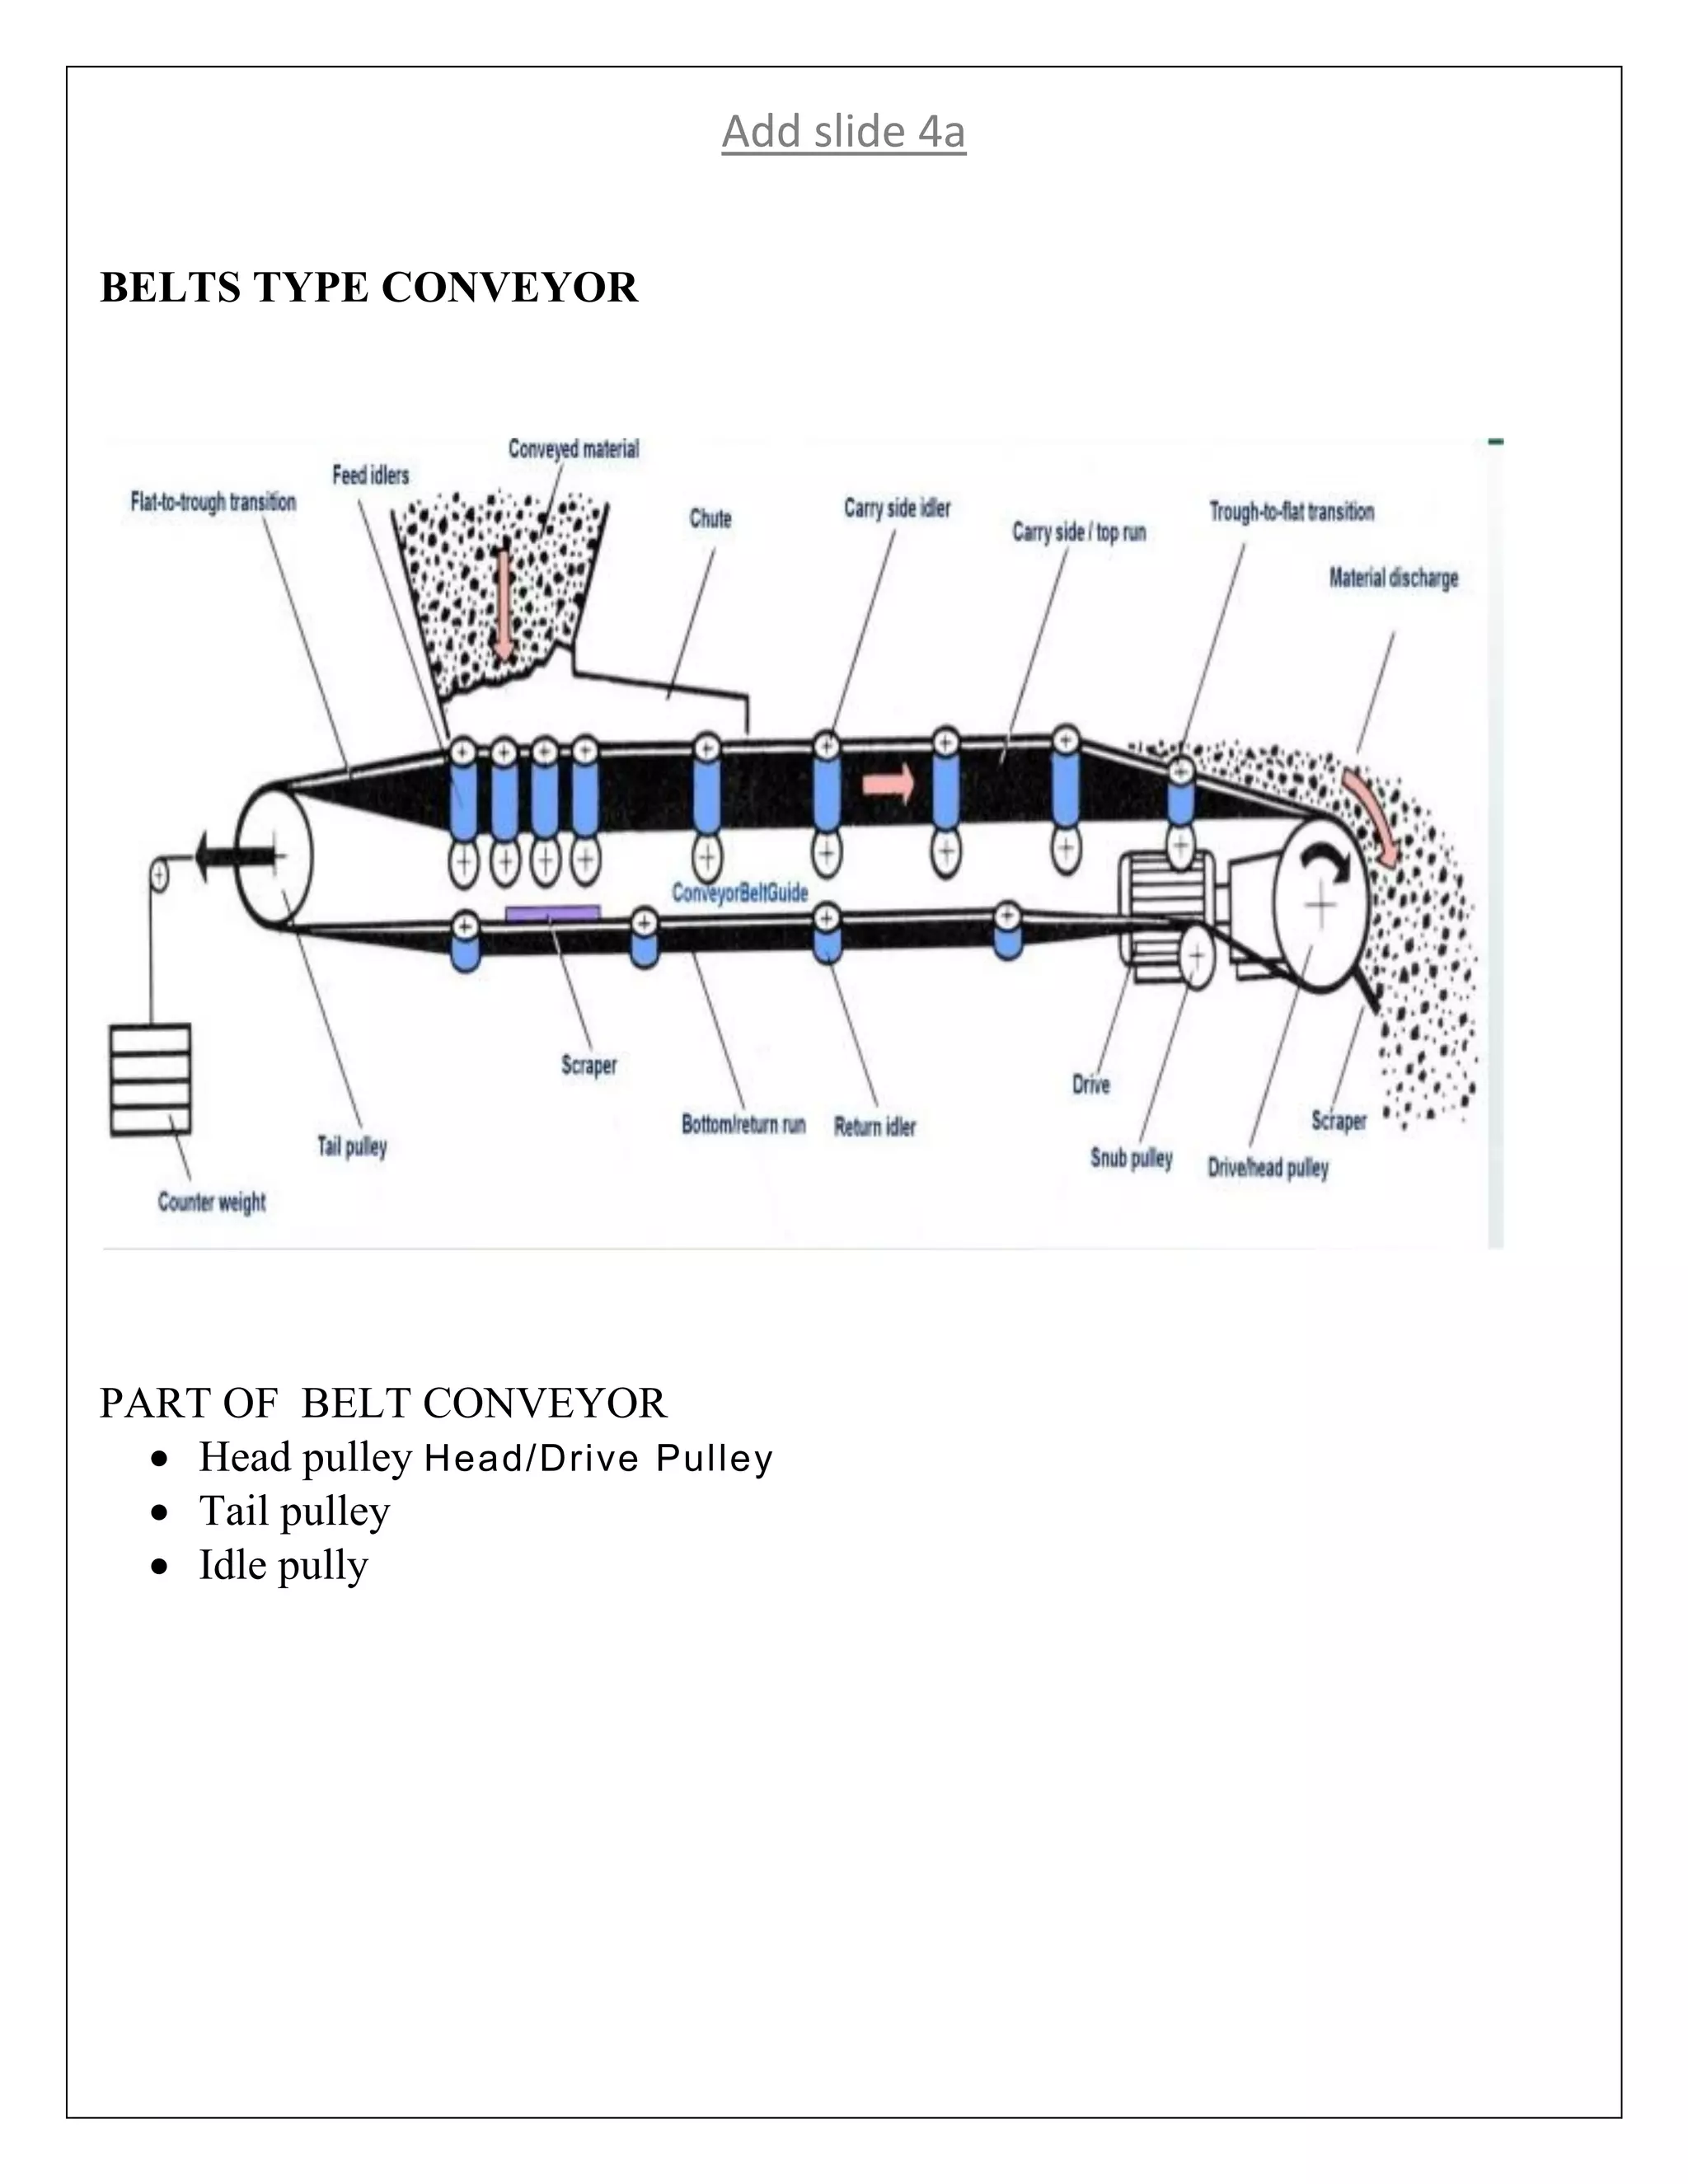
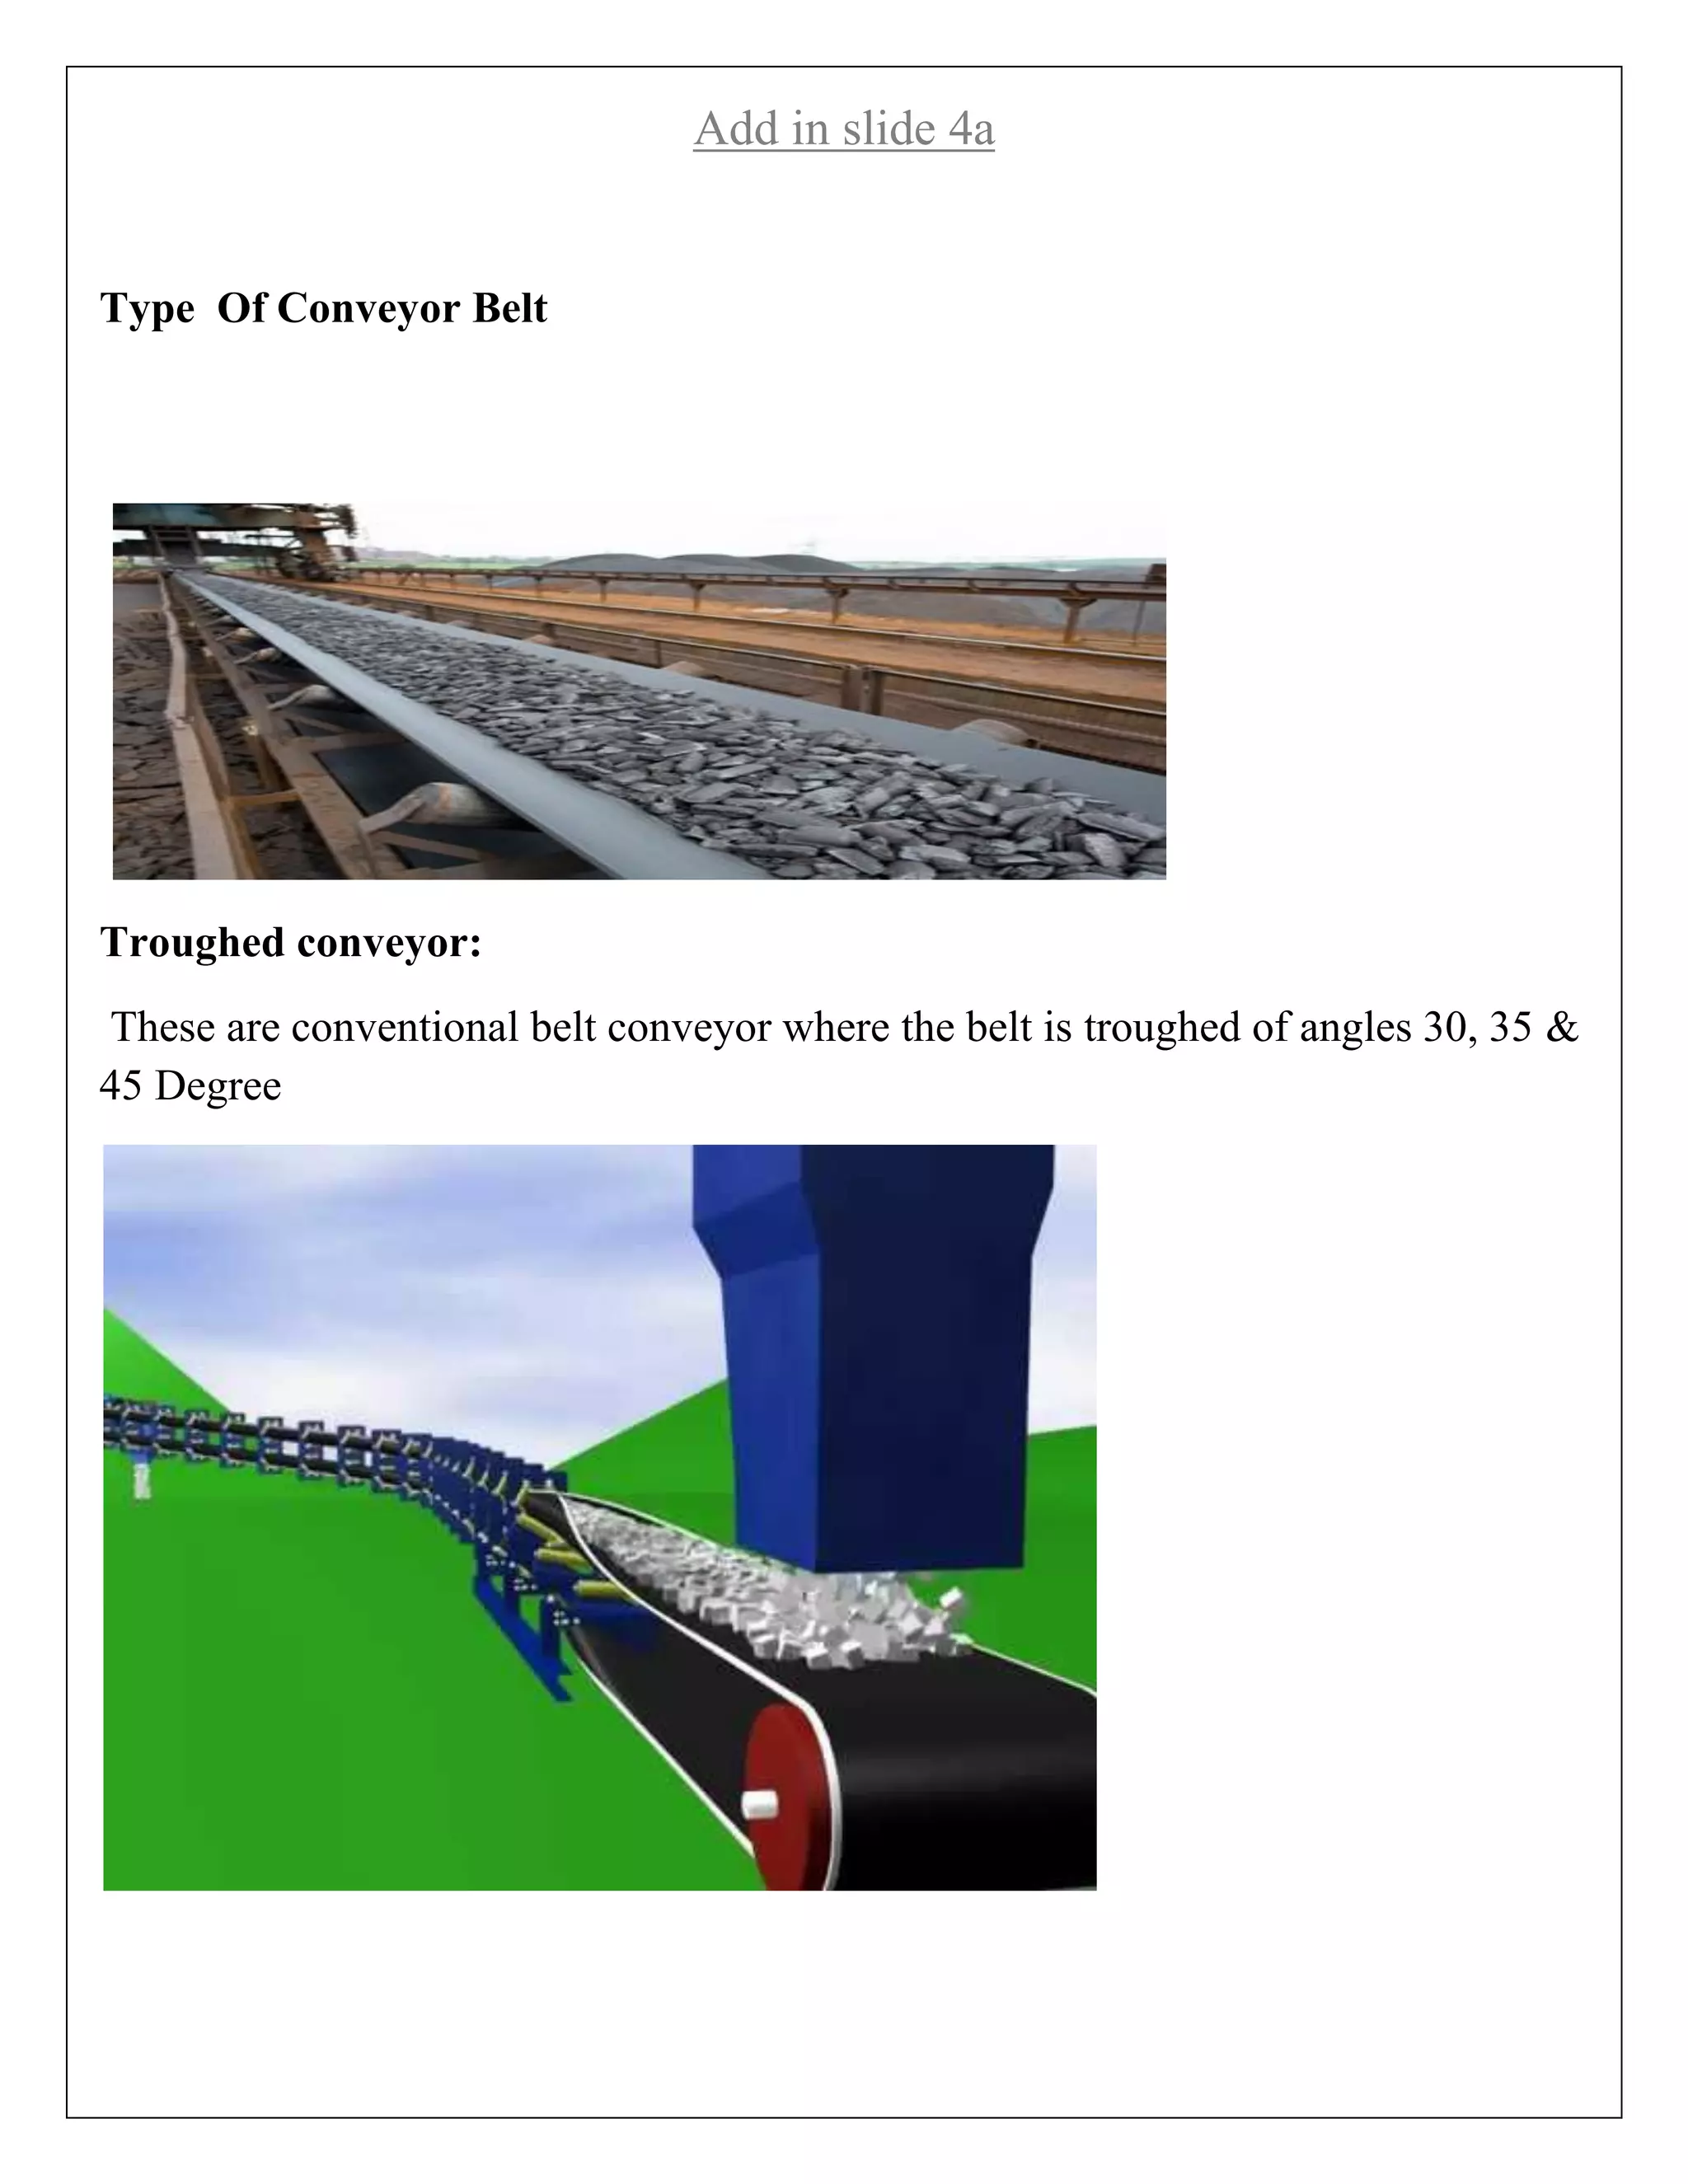
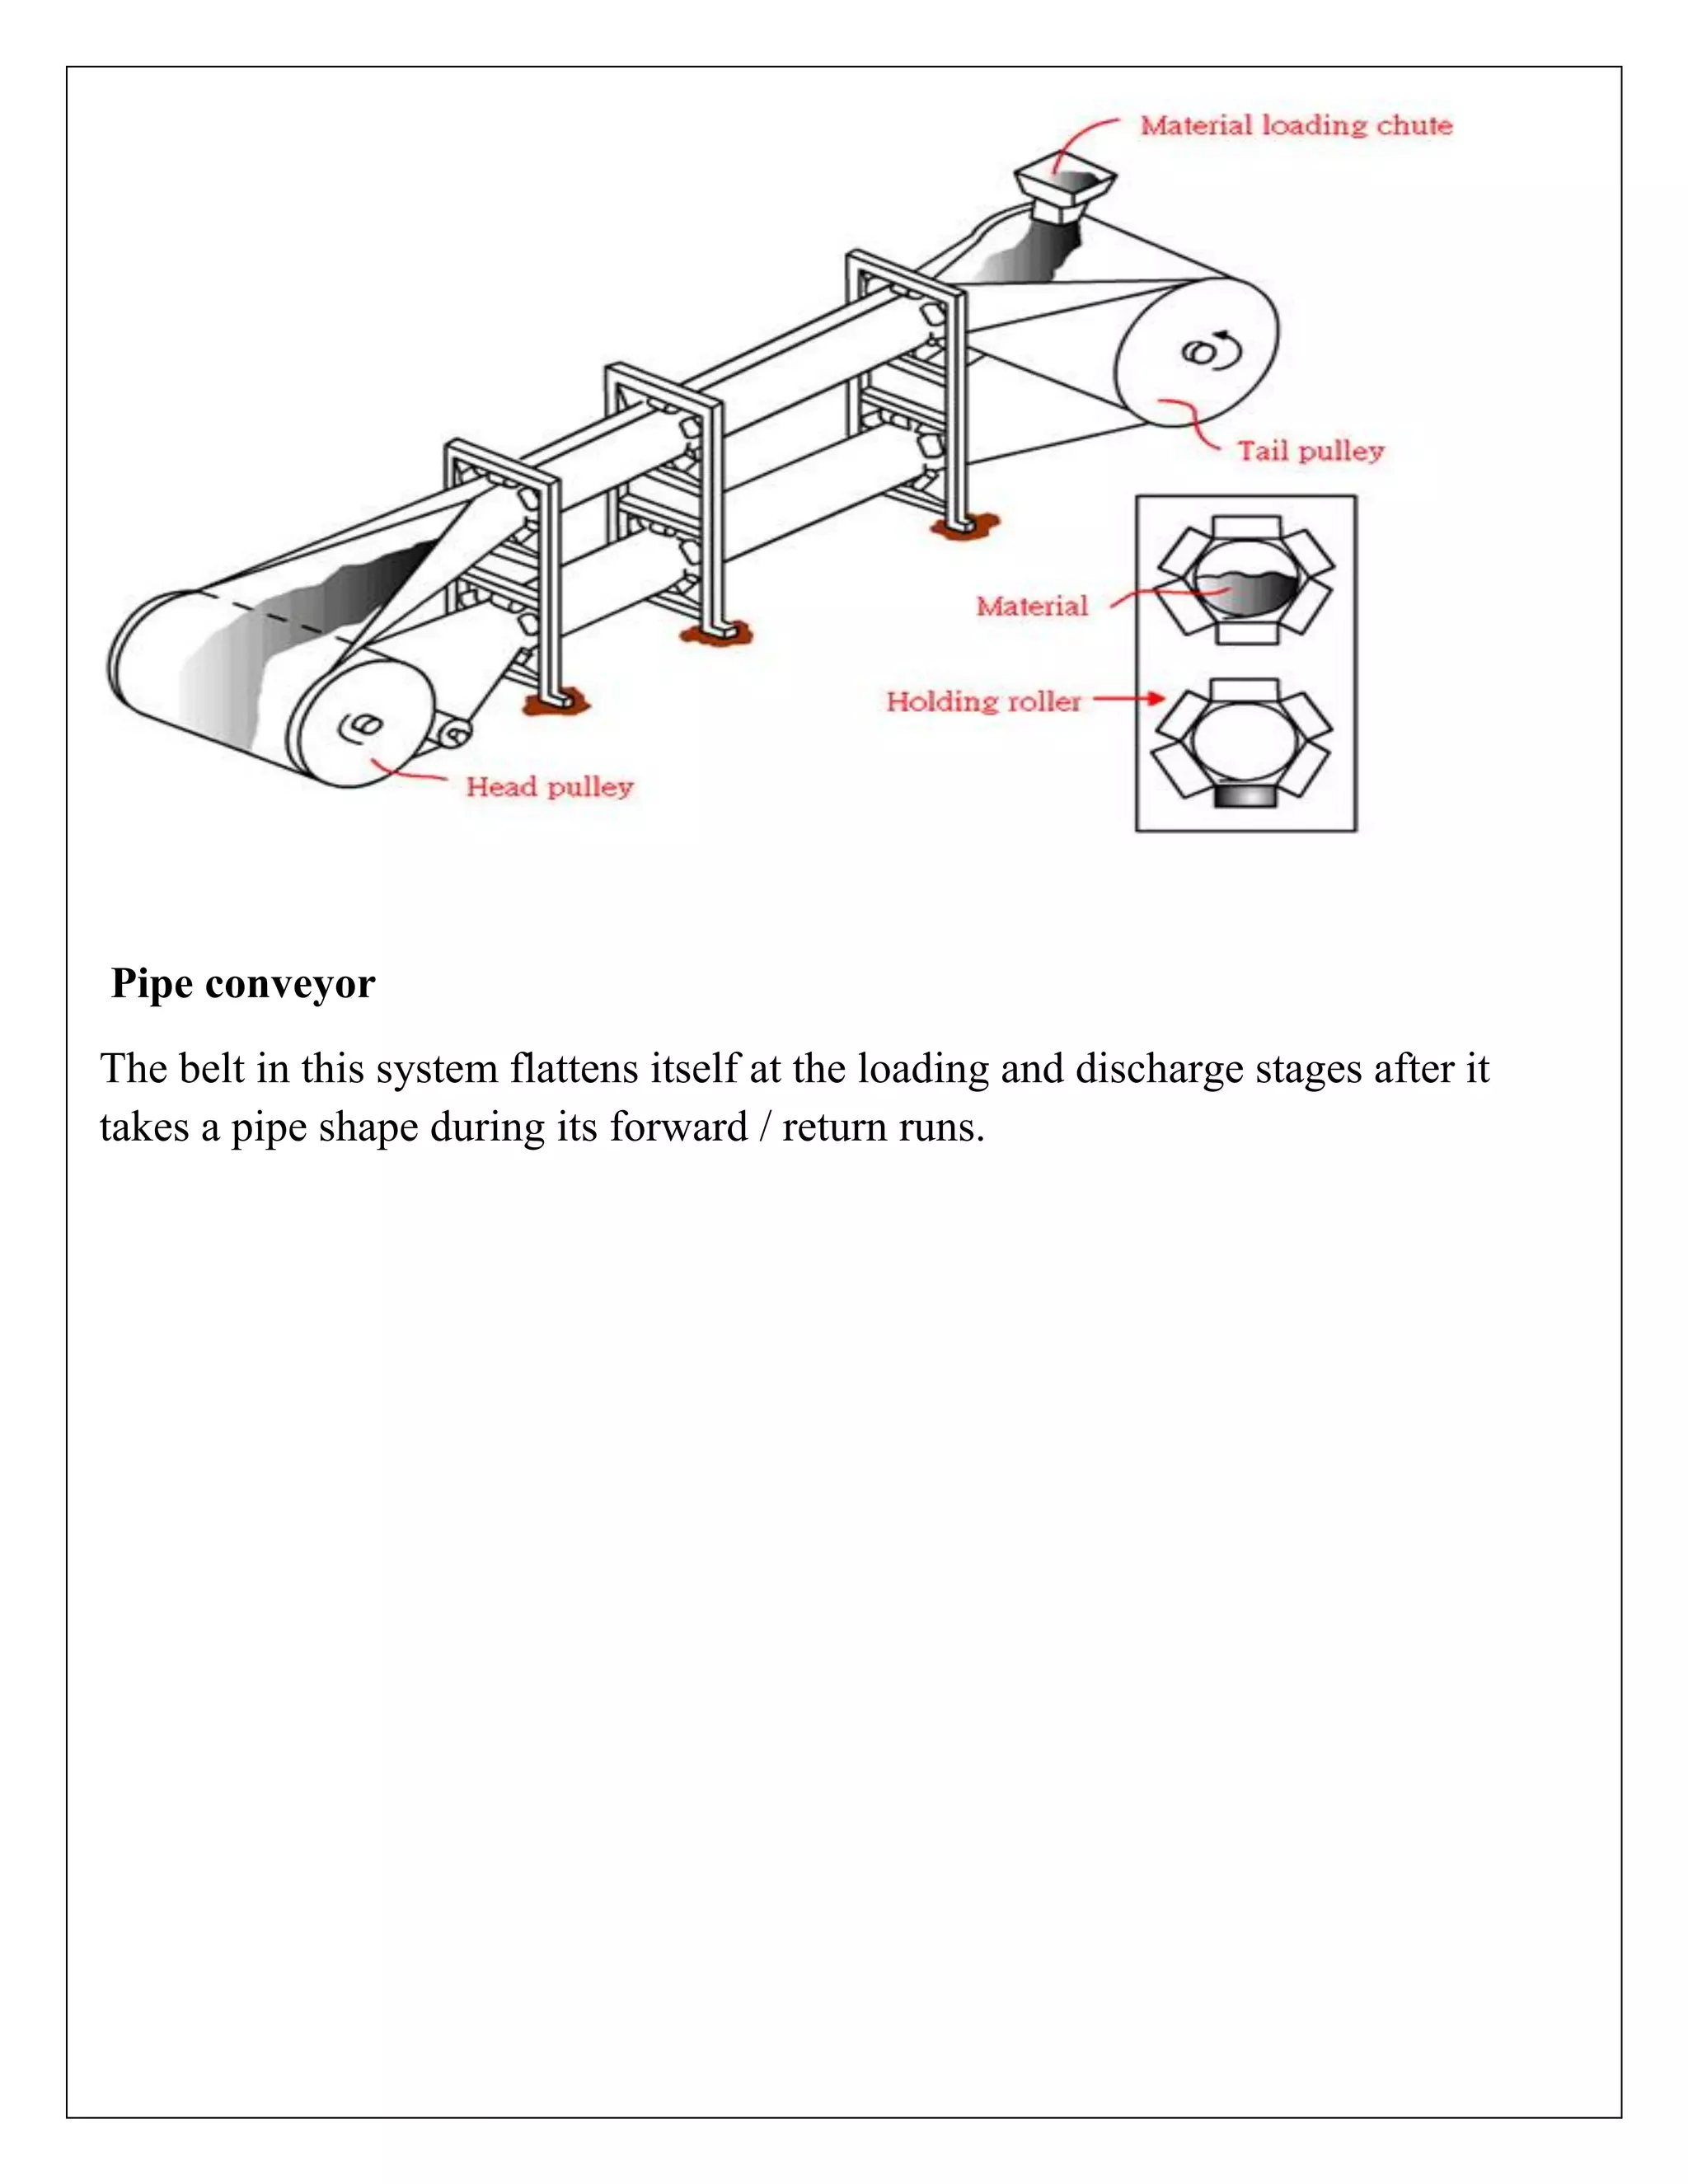
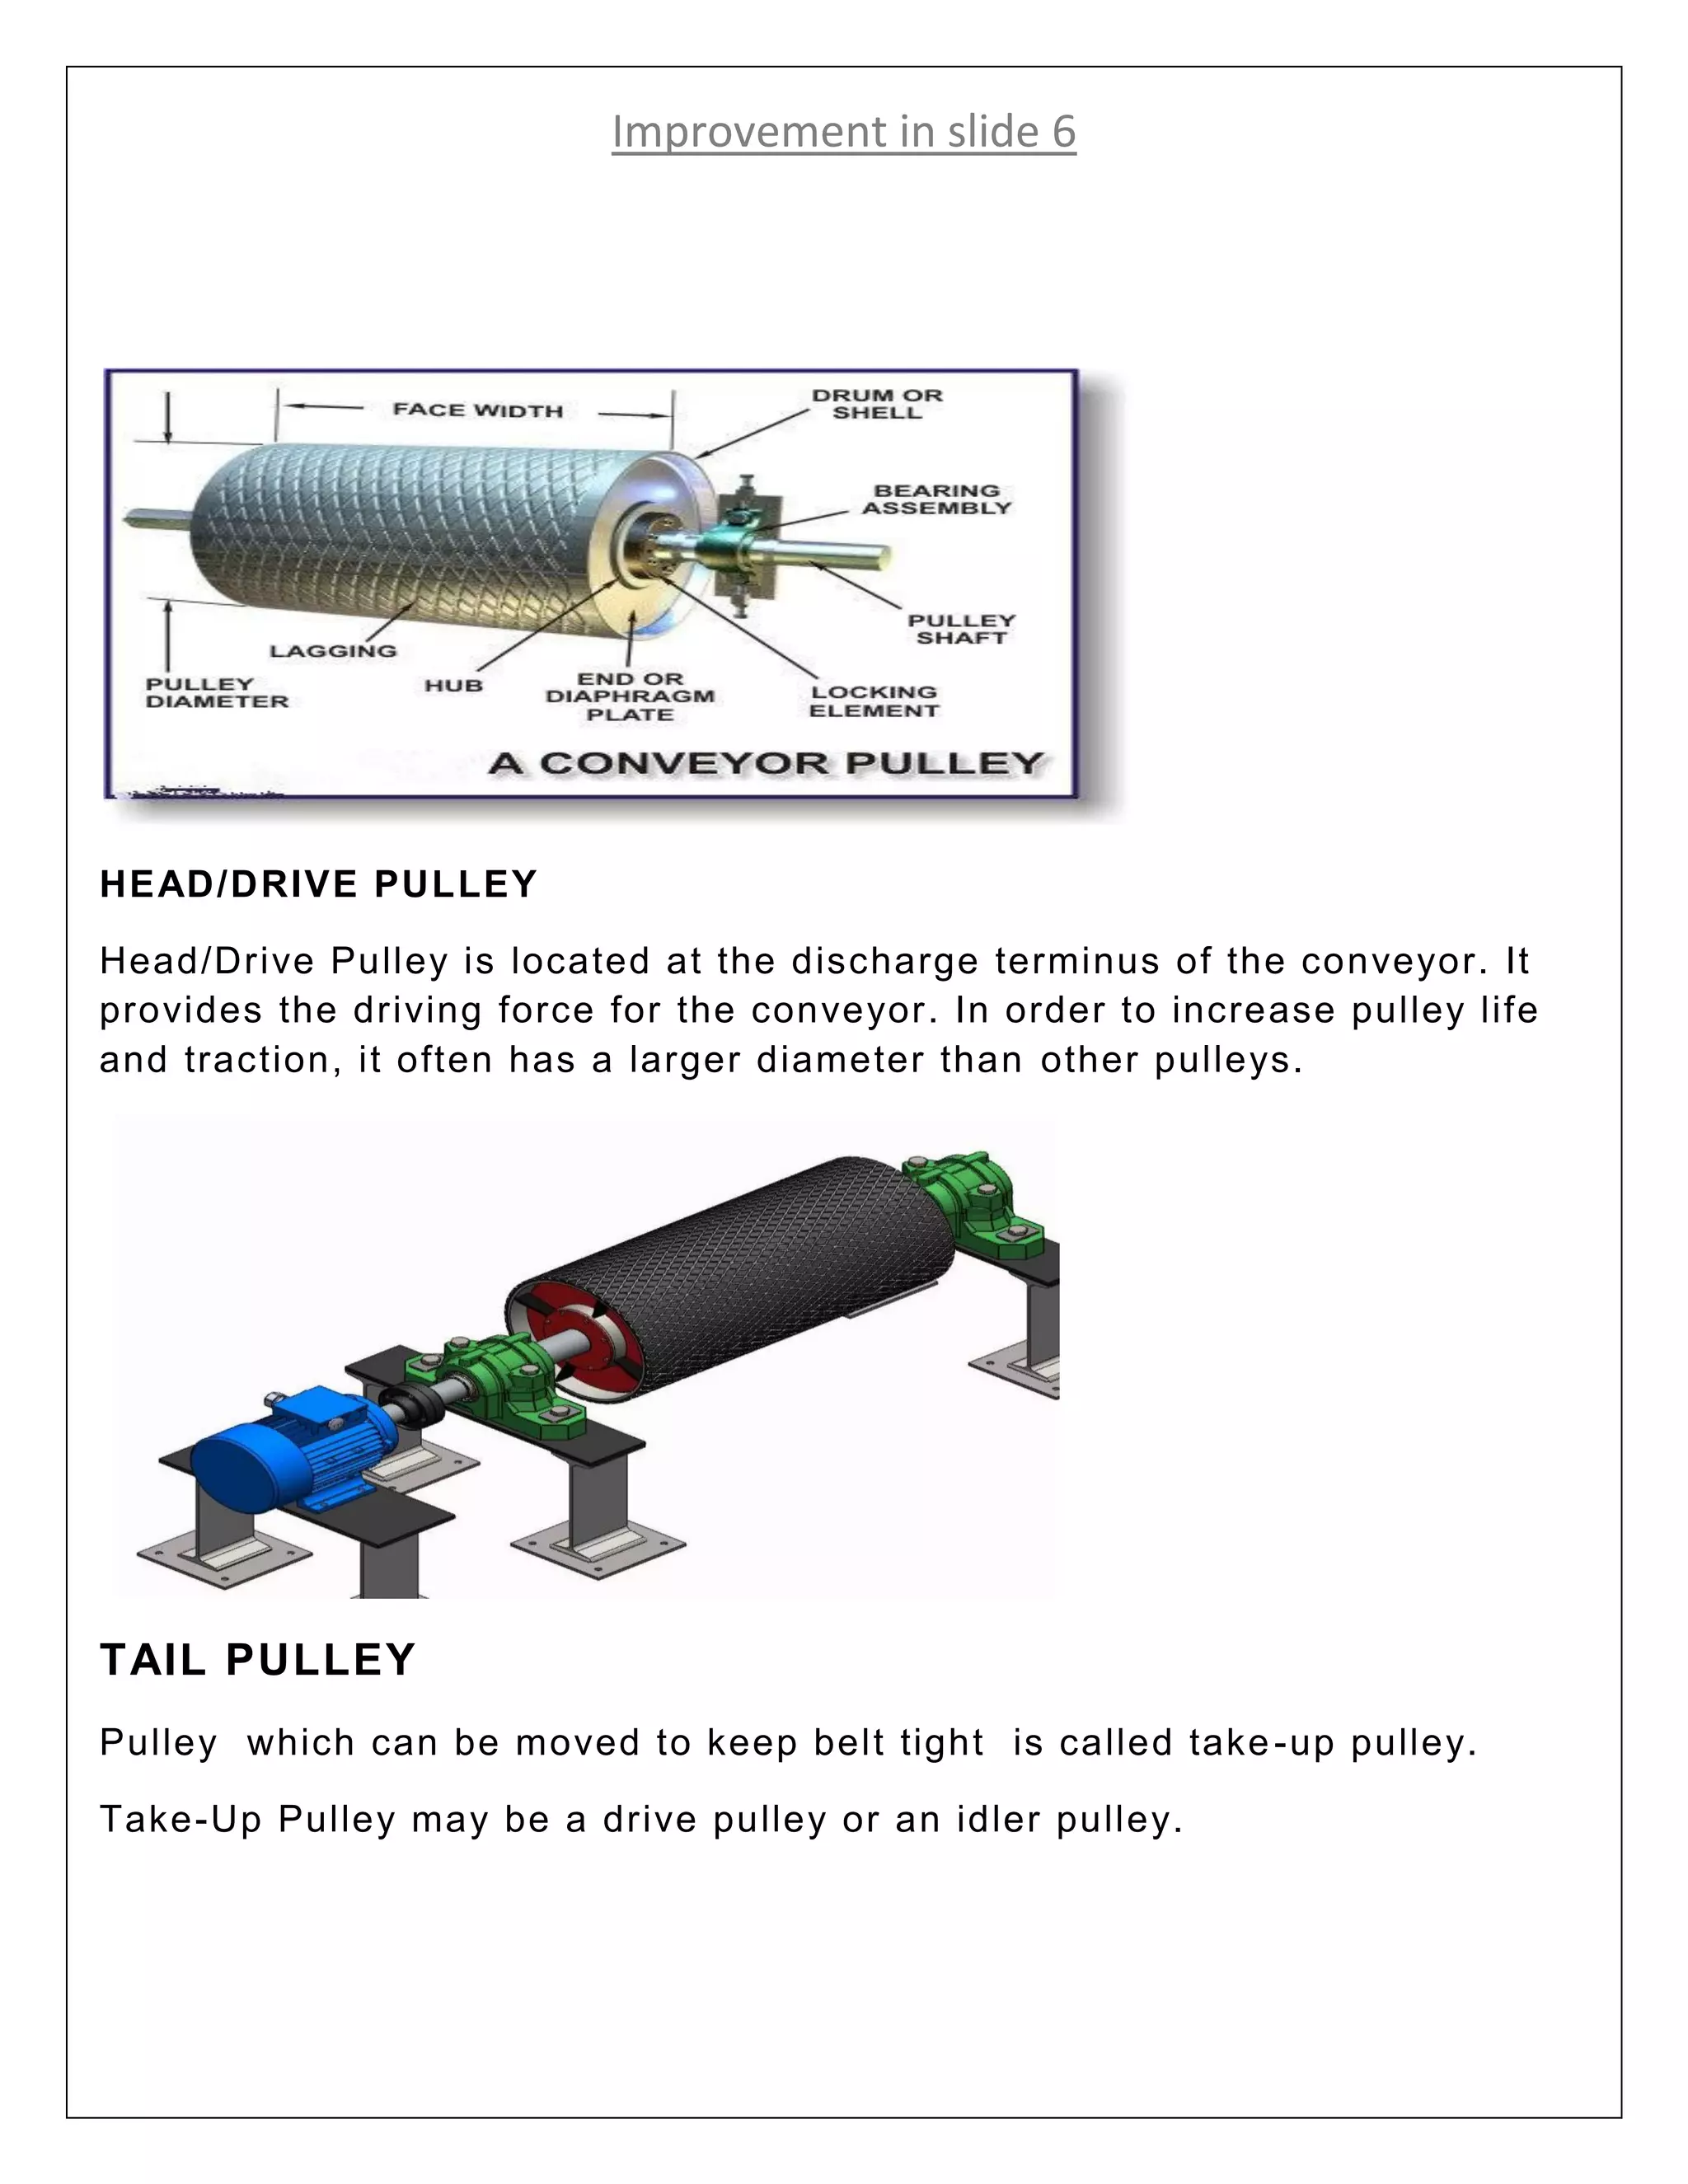
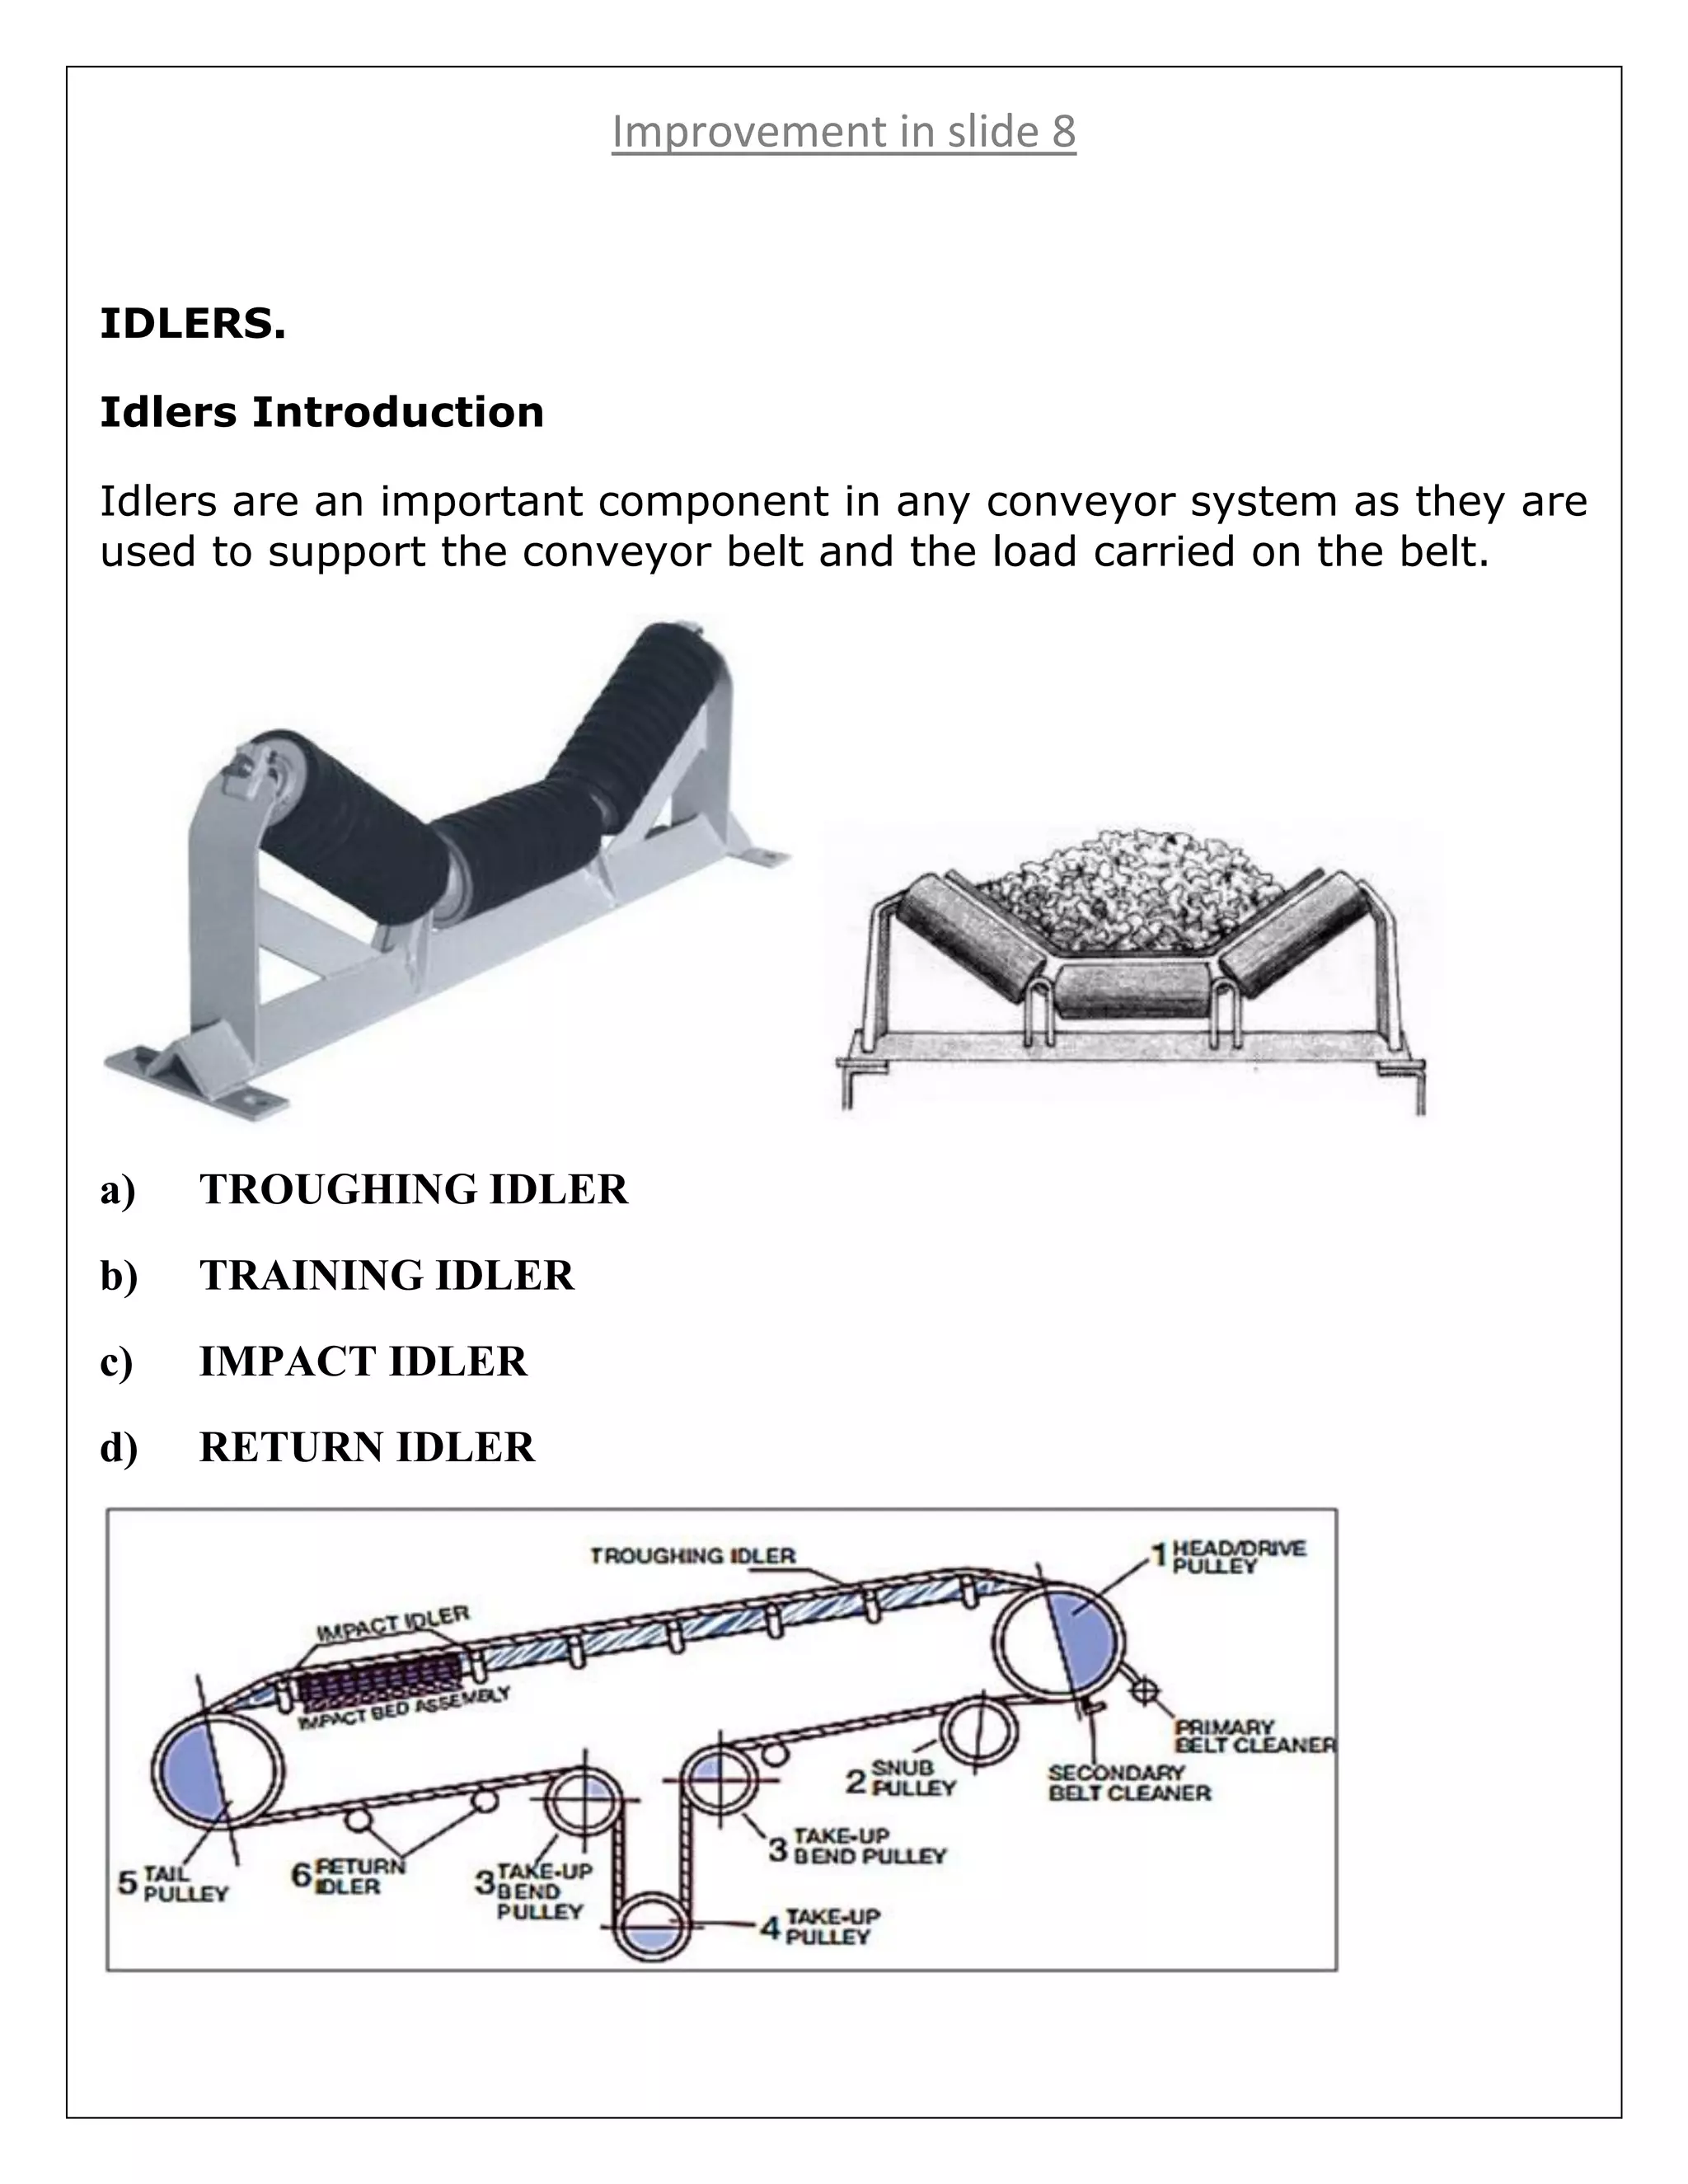
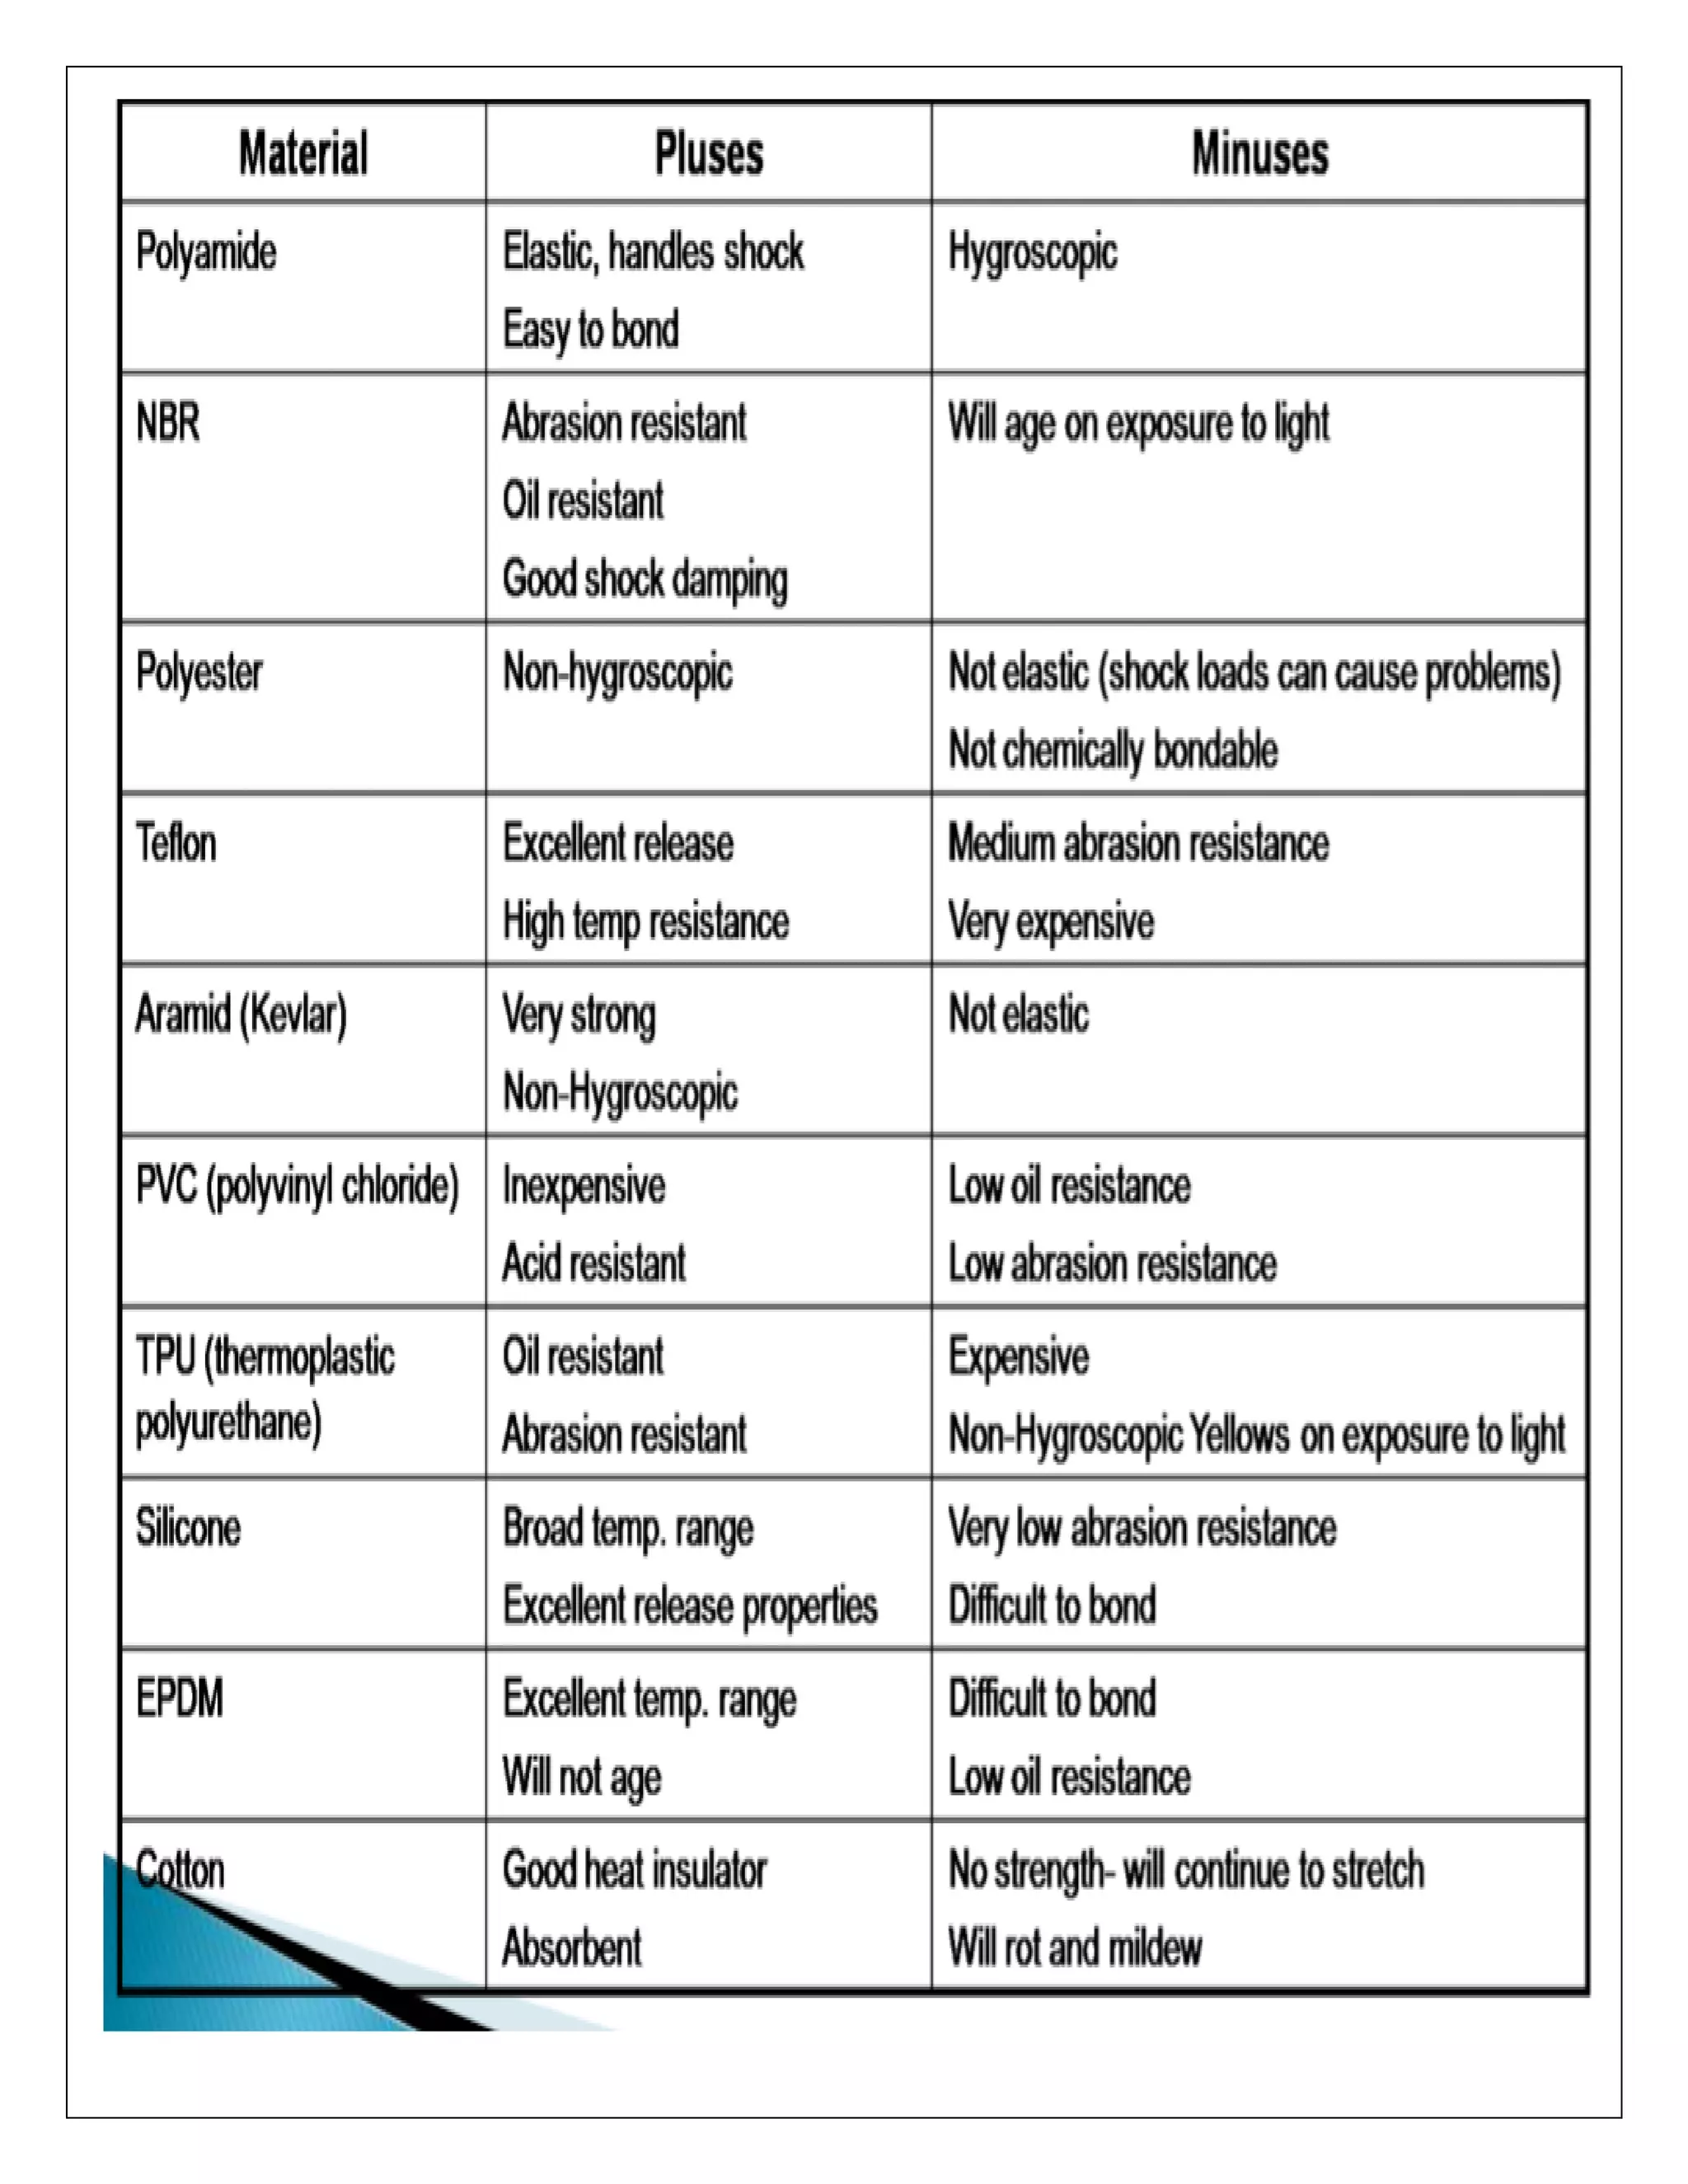
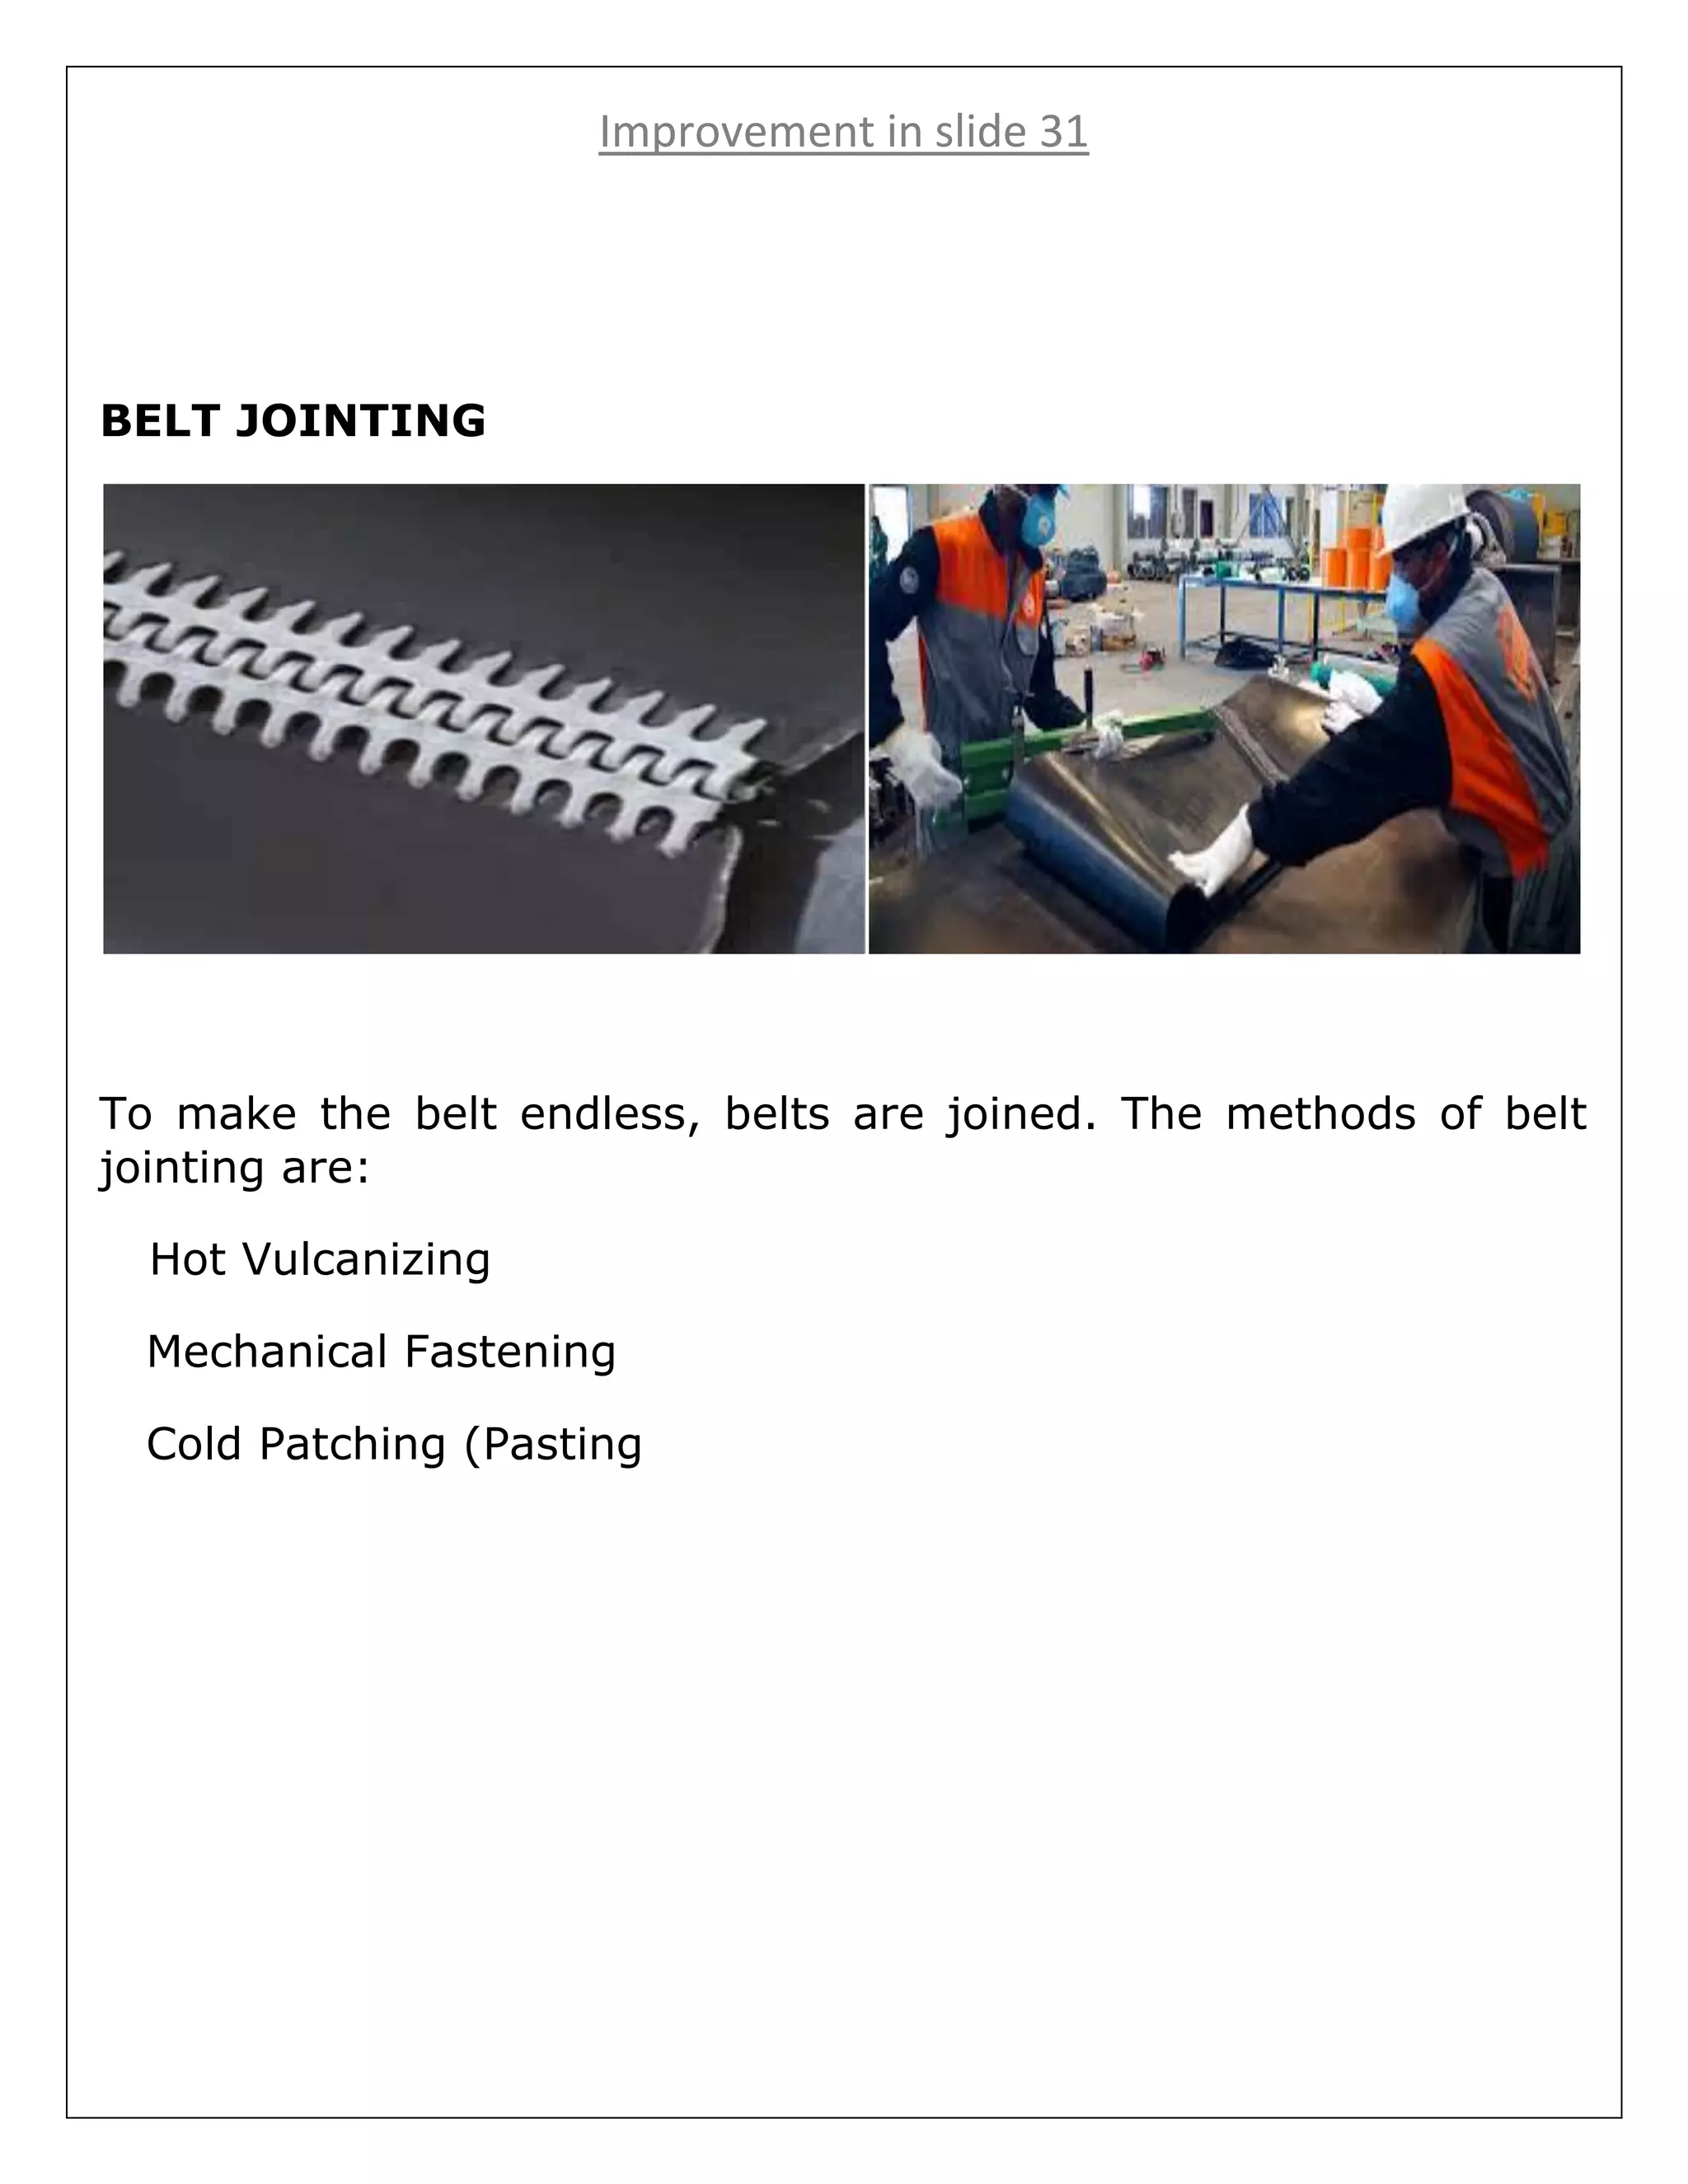
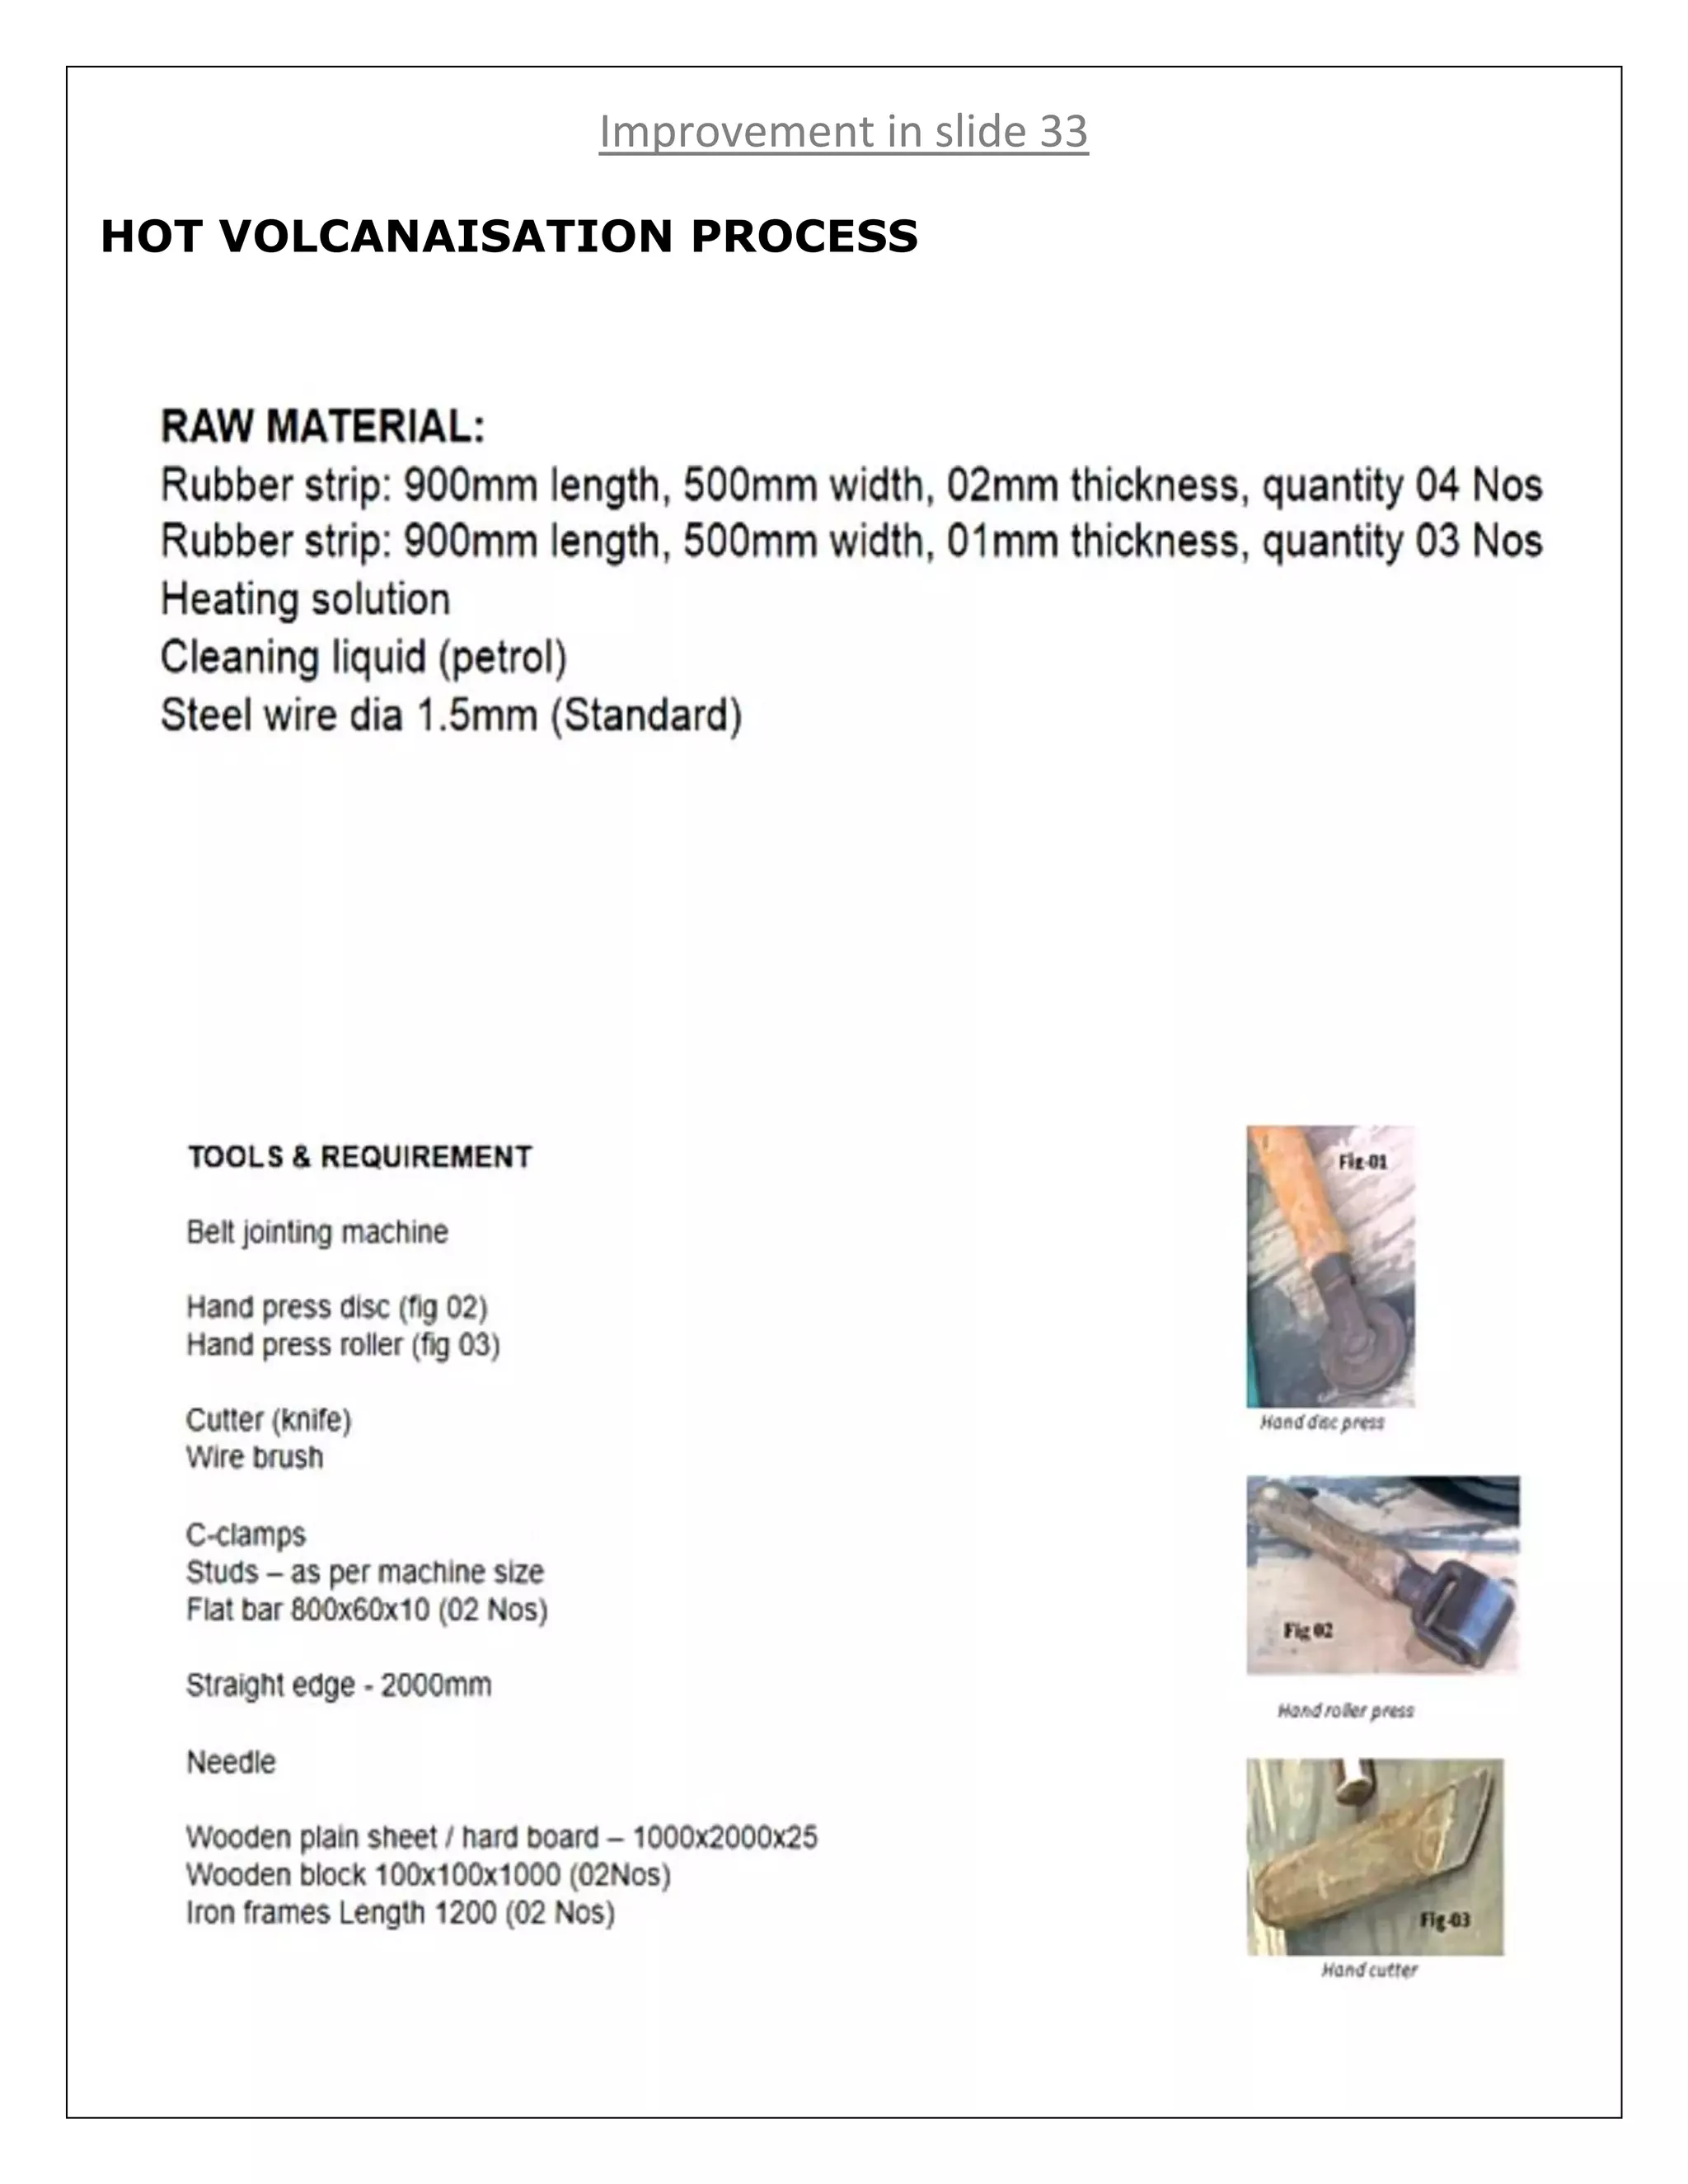
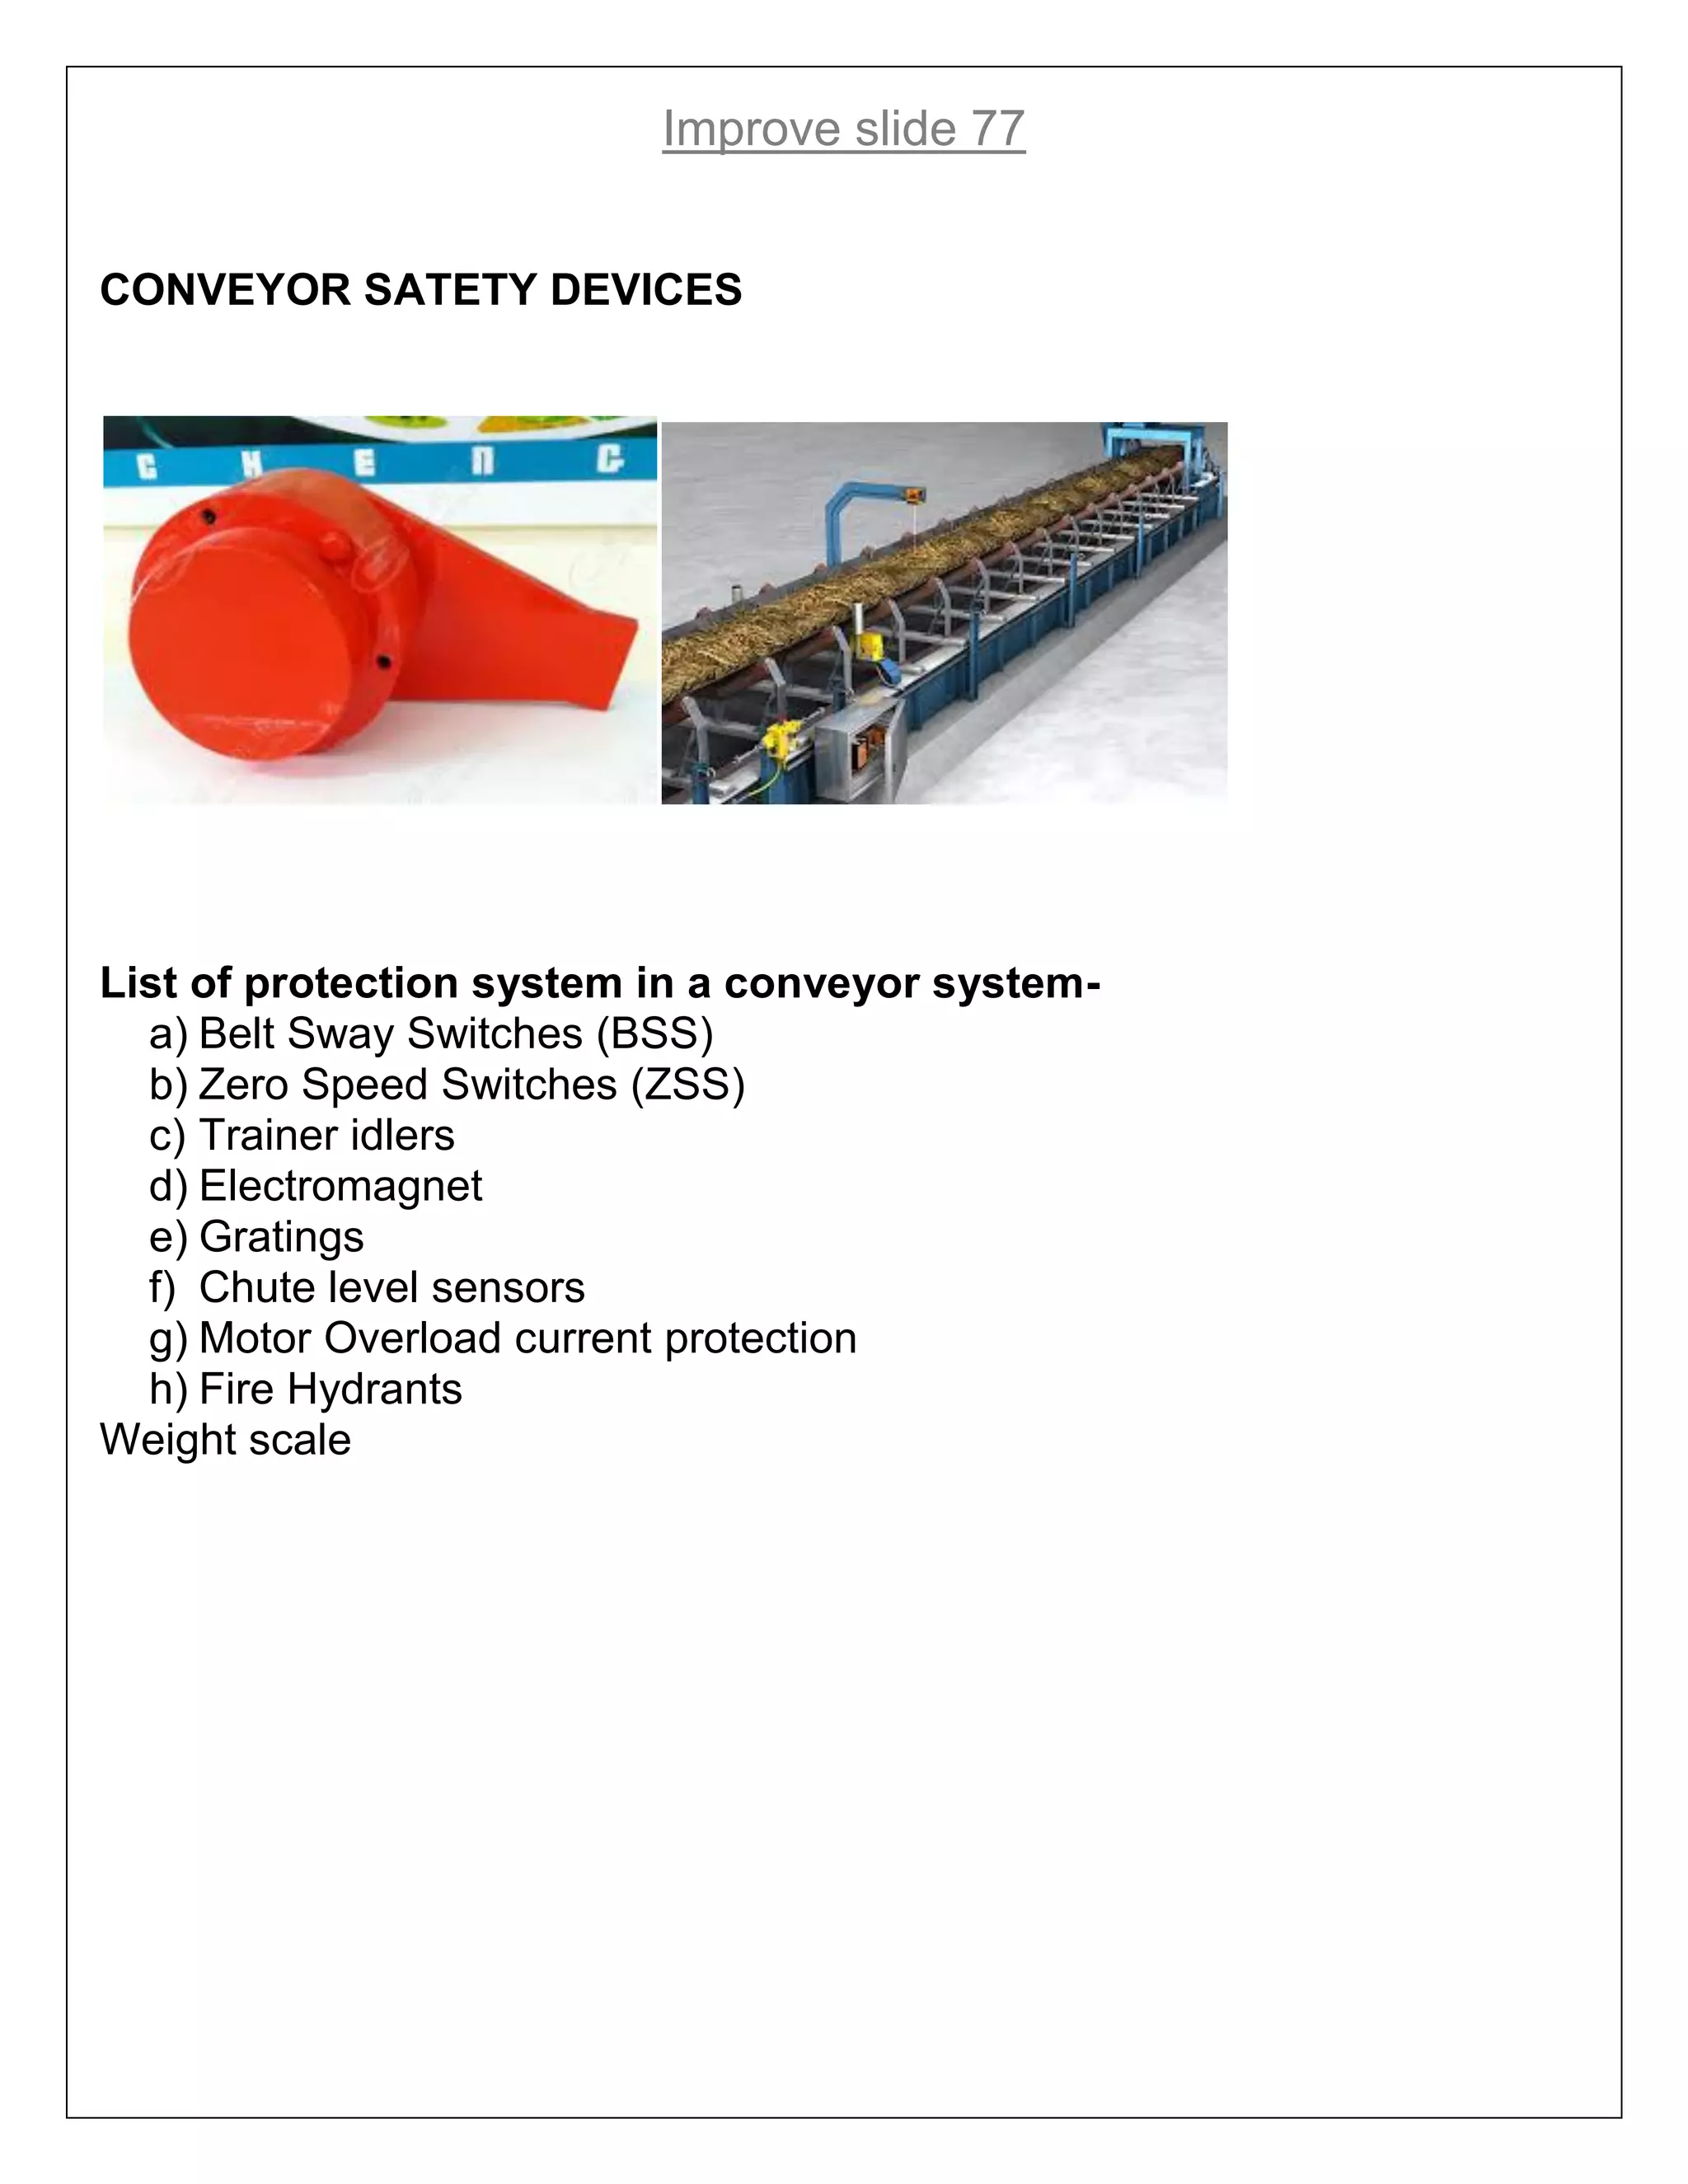
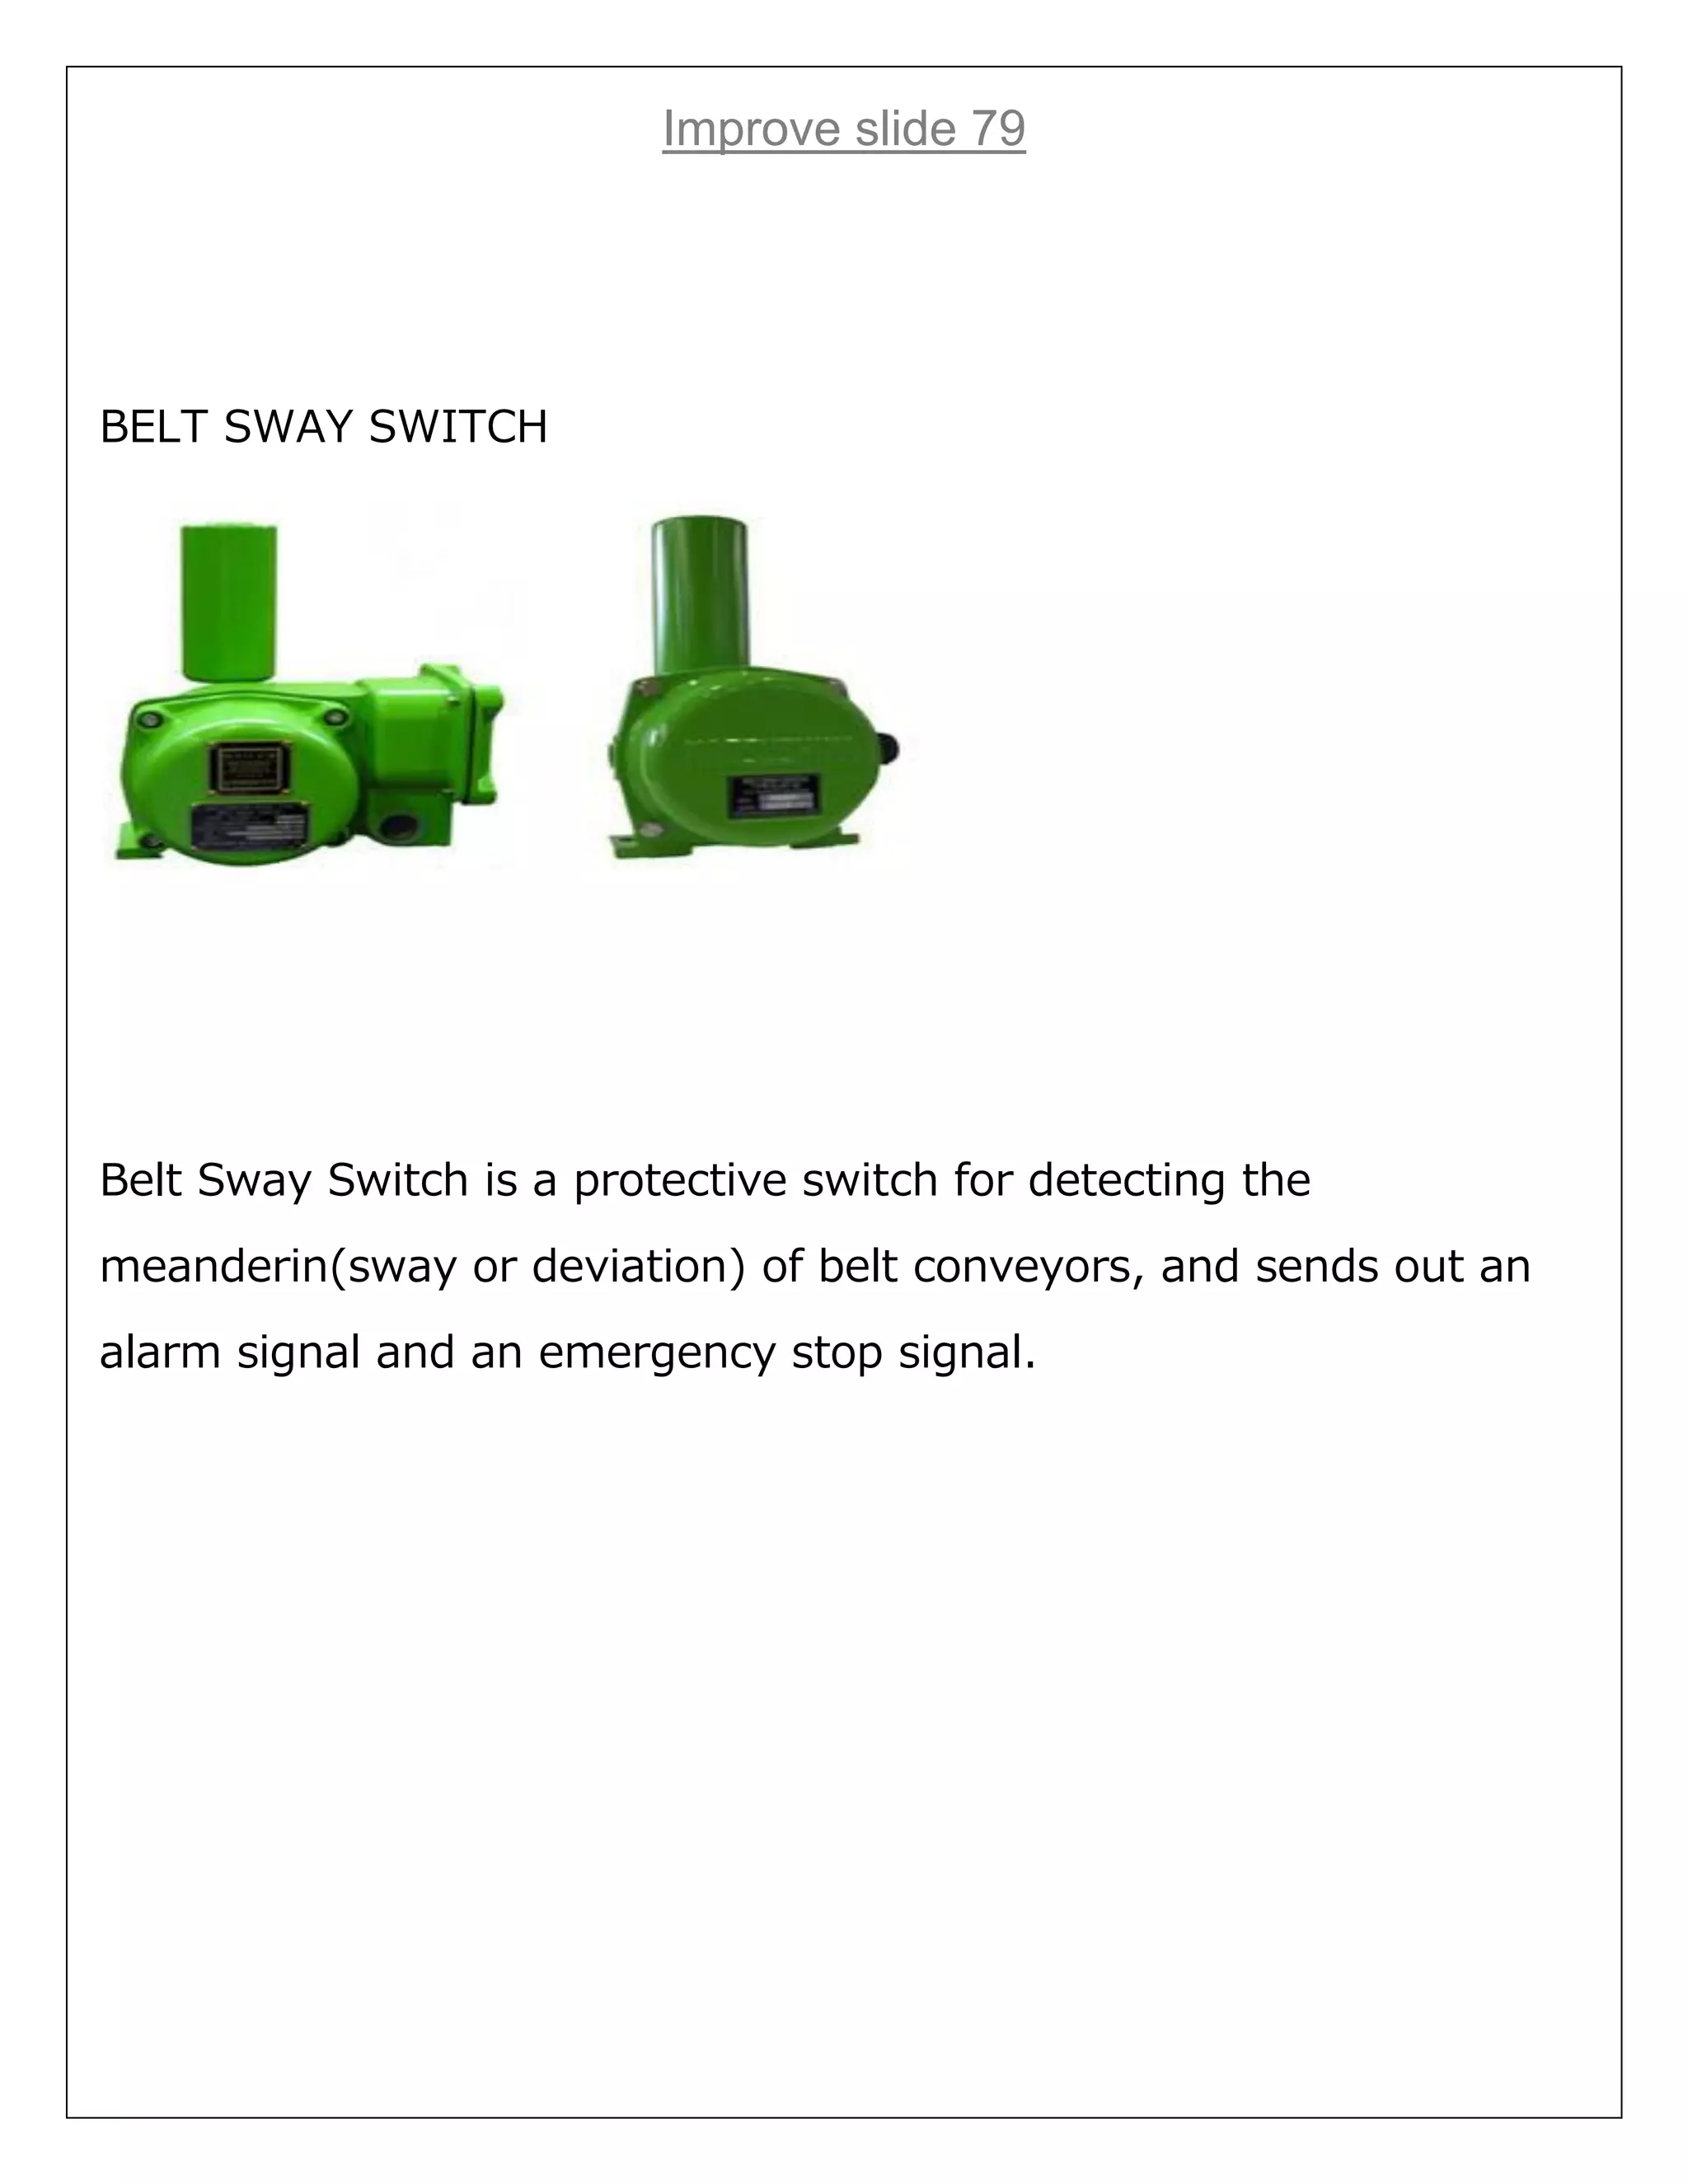
E-LEARNING ON CONVEYOR BELT SYSTEM OR BULK
MATERIAL HANDING
NAME NITESH KUMAR
REGISTRATION NO 20290401709131
SUBJECT CONVEYOR BELT SYSTEM
SUBMITTED TO MR.NIKUNJ AGARWAL SIR
IMPROVEMENT IN GIVEN PRESENTATION
Improvement in slide 2
CONVEYOR
 machine or thing that transports material from one place to another.
CONVEYORS ARE USED:
 When material is to be moved frequently between specific points
 To move materials over a fixed path
 When there is a sufficient flow volume to justify the fixed conveyor
investment
Add in slide 3
CONVEYORS CAN BE CLASSIFIED IN DIFFERENT WAYS:
 Type of product being handled: unit load or bulk load
 Location of the conveyor: overhead, on-floor, or in-floor
 Whether or not loads can accumulate on the conveyor
TYPE OF CONVEYOR
1 Chute Conveyor
Unit/Bulk + On-Floor + Accumulate
2. Wheel Conveyor
Unit + On-Floor + Ac
3. Roller Conveyor
Unit + On-Floor +
4. Chain Conveyor
Unit + In-/On-Floor + No Accumulate
Add in slide 4
5. Slat Conveyor
Unit + In-/On-Floor + No Accumulate
, 6. Flat Belt Conveyor
Unit + On-Floor + No Accumulate
7. Magnetic Belt Conveyor
Bulk + On-Floor
8. Troughed Belt Conveyor
Bulk + On-Floor
9. Bucket Conveyor
Bulk + On-Floor
10. Screw Conveyor
Bulk + On-Floor
12. Pneumatic Conveyor
Bulk/Unit + Overhead
Add slide 4a
BELTS TYPE CONVEYOR
PART OF BELT CONVEYOR
 Head pulley Head/Drive Pulley
 Tail pulley
 Idle pully
Add in slide 5
WORKING PRINCIPLE OF CONVEYOR BELT
A conveyor belt is composed by two endpoint pulleys and a closed conveyor belt.
The pulley that drives conveyor belt rotating is called drive pulley or transmission
drum; the other one–only used to change its movement direction–is called bend
pulley.
Drive pulley is driven by the motor through reducer, and conveyor belt dragging
relies on the friction drag between the drive pulley and the belt.
Conveyor belts generally are composed of three main components:
1. Carcass
2. Skims
3. Covers
There are two types of belt available:
1. Rubber belt
2. Steel Cord
Add in slide 4a
Type Of Conveyor Belt
Troughed conveyor:
These are conventional belt conveyor where the belt is troughed of angles 30, 35 &
45 Degree
Pipe conveyor
The belt in this system flattens itself at the loading and discharge stages after it
takes a pipe shape during its forward / return runs.
Improvement in slide 6
Component of teough conveyor belt system
Improvement in slide 6
HEAD/DRIVE PULLEY
Head/Drive Pulley is located at the discharge terminus of the conveyor. It
provides the driving force for the conveyor. In order to increase pulley life
and traction, it often has a larger diameter than other pulleys.
TAIL PULLEY
Pulley which can be moved to keep belt tight is called take-up pulley.
Take-Up Pulley may be a drive pulley or an idler pulley.
Improvement in slide 7
SNUB PULLEY
Pulley, which is provided to increase/decrease, warp/contact angle of belt
on nearby pulley, is called Snub Pulley.
BEND PULLEY
The Bend Pulley is used for changing the direction of the belt.The Bend
Pulleyis usually installed at the tail part or
Improvement in slide 8
IDLERS.
Idlers Introduction
Idlers are an important component in any conveyor system as they are
used to support the conveyor belt and the load carried on the belt.
a) TROUGHING IDLER
b) TRAINING IDLER
c) IMPACT IDLER
d) RETURN IDLER
Improvement in slide 10
Conveyor chutes are used in bulk handling to perform a variety of
operations. In particular, the loading of a belt conveyor, and the transfer
of material from one moving belt conveyor to another, are important
tasks. Such operations are widely used for the transport of both coarse
grain material
Slide 11
TAKE UP: -Take up devices, the name from the fact that it takes up
changes in belt length. In taking up length they maintain tension. Often the
critical point lies immediately following the drive since it is necessary to
maintain tensions at the point to prevent slippage on the drive pulley
Improvement in slide 13
A conveyor belt is the carrying medium of a belt conveyor system A belt conveyor
system is one of many types of conveyor systems. A belt conveyor system consists
of two or more pulleys (sometimes referred to as drums), with an endless loop of
carrying medium the conveyor belt that rotates about them. One or both of the
pulleys are powered, moving the belt and the material on the belt forward. The
powered pulley is called the drive pulley
Improvement in slide 14
CONVEYOR BELT BASIC REQUIREMENT
 Flexibility
 Transverse rigidity
 Low mass per unit length
 High strength
 Simplicity and inexpensive
 Longer life
 Should not stretch under normal working
 stresses ,i.e., low relative elongation.
 Wear resistant
Fire resistant
Improvement in slide 15
CONVEYOR BELT CONSTRUCTION
The belt consists of one or more layers of material.
◦ An under layer-to provide linear strength and shape called a carcass(polyester,
nylon and cotton)
◦ An over layer called the cover. (rubber or plastic compounds)
Belts are typically made from cotton, canvas, Kevlar, nitrile, nylon, polyester,
polyurethane/urethane, PVC, rubber, silicone,
steel cord, Teflon, wire mesh or weave
Add slide 16
Type of belt
Textile Conveyor Belting
Width up to 2400 mm
Strength up to 3000 KN / m width
Steel Cord Conveyor Belting
Width up to 2400 mm
Strength up to 7500 KN / m width
Improvement in slide 31
BELT JOINTING
To make the belt endless, belts are joined. The methods of belt
jointing are:
Hot Vulcanizing
Mechanical Fastening
Cold Patching (Pasting
Improvement in slide 33
HOT VOLCANAISATION PROCESS
Improvement in slide 35
SPLICING PROCESS
 General preparation
 Preparation of the lower part of the belt
 Preparation of the upper part of the belt
 Joining of the splice
 Vulcanizing the splice
 Final measures
SPLICING TOOLS
 Safety Glasses
 Tape Measure - 16' x 3/4" Blade
 Angle square
 Plumb line
 White Mechanical Marking Pencil w/ Pocket Clip (Soft Crayon)
 Claw hammer
 Duplex belt nails
 Smooth Flat Face Roller #50D - 2" x 2"
 Smooth Flat Face Roller #50C - 1/2" x 2"
 Corrugated Face Stitcher #50B - 1/4" x 2"
 Corrugated Face Stitcher #50E - 1/8" x 2"
 Needle Face Roller - 2” x 2”
 Electric Stripping Cable Winch
 Drying hood (not for use with Flammable Solvents & Cements)
 Stainless Steel Stripping Frame or Grip tongs
 Whetstone #68
 Foxtail Hand Dust Brush
 Curved Hand Rasp - #51
 Drill Arbor for Wire Wheel
 3" Rotary Wire Brush
 Air buffer
 Pincers - 250mm
 Ply Lifter #78
 Offset Knife #77
 Rubber Knife - 6" Long #72
 Bevel Point Knife - 4" x 1"
 Curve V-Trim Knife - 2 1/4" X 3/4"
 Mill Knife Handle (Dull & Rounded Tip)
 Off Set Single Ply Knife - .065 Cutting Depth
 11.5" Heavy Duty Bent Handle Sicissors w / Grips
 18mm Break Off Tip Cutter with Rubber Grip
 Replacement Blades for 18mm Cutter - 50 Pack
 Splice Kit
 Rags
 Cement brush
 White Marking Rubber
 Belt Clamps
 Come-a-longs
 H.D. C-Clamps
 Screw clamps
 Vulcanizing press
Improvement in slide 36
GENERAL PREPARATION
 clean and dry conveyor belts
 .Remove oily or greasy substances
 Provide tools, equipment and splicing products.
 If a new belt is installed, place a working platform at the head or tail of
the conveyor.Otherwise install it in the conveyor construction (remove
carrying idlers, if necessary).
 Position it in such a way that the conveyor belt lies on it even and
straight without tension.
 The working platform (approx. 10 - 13 ft long) consists of three parts
aligned in the direction of the conveyor belt: the lower part of the
vulcanizing press,
 The belt ends have to be aligned in the direction of the conveyor belt in
such a way that they overlap each other on the lower part of the
vulcanizing press and that the belt center lines are exactly
superimposed.
 The length of the overlapping area has to be splice length plus bias cut
Improvement in slide 38
PREPARING THE BELT ENDS
 The establishment of the center line is easiest done with two rulers. The three
center markings on each belt end are then connected by means of a chalk line
which represents the belt center line.
 This center line ensures exact alignment of the belt ends, which indispensable
for straight belt running.
 Destroyed or missing belt edges must be considered. The width of the belt
edge is established by measuring the width of the belt at suitable areas of the
undamaged belt ends
 Establish a perpendicular square line across the upper belt end at the end of
the splice area.
Improvement in slide 39
C on the center line equidistant to point A (AB=AC).
Now describe a circle with the same radius around points B and C by means of a
plumb line and a pen. The points of intersection of both circles must still be on the
belt. These intersections are points D and E.
A line drawn between these two points will be perdendicular to the belt edges
and forms the square line, which should pass point A for additional control.
This square line will be the starting point from which the splice will be laid out.
Improvement in slide 40
PREPARATION OF THE LOWER PART OF THE BELT
1. Fold back the upper part of the belt. Make a bias cut on the lower belt
part .Splicing process With an off-set knife, cut the rubber edges flush with
the upper fabric ply.
2. Fold back the lower part of the belt and draw a line parallel to the bias cut
on the pulley side,at 1 inch from the belt end.
Cut the rubber cover along that 1inch line with a dull & rounded tip Mill Knife
held at an angle (of approx.45°), without damaging the top fabric ply.
Also cut the rubber cover along the marked rubber edges with the mill knife
held vertically, without damaging the top fabric ply.
3. Fold back the lower part of the belt again and mark the splice length (lv
according to the chart), step length (ls) and rubber edges.
Draw another line 1inch parallel to the splice length line.
Cut the rubber cover along this line with a dull tipped Mill Knife held at an
angle of approx. 45°. Also cut the rubber edges with a Mill knife held
vertically.
Improvement in slide 41,42
.
4. Cut the rubber cover in narrow strips (approx. 1 -1.5 inch wide) and strip
them using pincers or griptongs.
5. Cut the top fabric ply with the one ply knife 1 in.from the rubber
cover,detach this ply using a plylifter and strip it with pincers or grip tongs.
Mark the subsequent fabric plies according to thestep length (ls), cut them
and detach these plies.
Improvement in slide 40
JOINING OF THE SPLICE
Step1
 Carefully buff the cut edges of the rubber covers and the surface of the rubber
edges with a buffing tool (e.g. a rotating wire brush).
 Buff the intermediate rubber and buff even any un-even spots.
When buffing, do not scorch or smear the rubber nor leave shiny spots on it.
 Round the edges of the fabric steps, without damaging the fabric (e.g. protect it
with a thin tin plate).
 Carefully remove the buffing dust with a dry brush.
2.step
 Thoroughly stir the required quantity of splicing cement before use.
 The splicing cement should remain covered until use and then recovered to
min thicking.
 Apply two coats of the splicing cement to the whole splicing area and the joint
gaps of both belt ends.
 Use a brush with short bristles.
 Let the first coat dry completely (minimum: 30 min.)
 Let the second coat dry (for approx. 30 mins. at 68°F), until it is just a little sticky
(check with the back of your finger).
Step3
 Cover the fabric steps of the lower belt part with uncured tie gum
rubber.
Step4
 Cover the rubber edges and fabric steps with anapprox. 1 inch wide
strip of uncured tie gum rubber.
Step5
 For the joint gap on the pulley side cut to size an exactly fitting filler
strip consisting of a strip of uncured tie gum rubber, breaker fabric and
uncured cover rubber.
Step6
. Superimpose the upper and lower belt ends, aligning them exactly using
the center line of each belt and avoiding air entrapment.
Step7
apply one strip of uncured tie gum rubber to the joint gap on the carrying
side, then fill the gap with uncured cover rubber and stitch vigorously.Trim
excess filling flush with the belt surface .
Improvement in slide 45
TYPE OF MECHANICAL FASTENERS
Most commonly used Mechanical Fasteners are-
1. Solid Plate Bolt Type Fasteners
2. SR Rivet Hinged Type Fasteners
3. Lacing Type Fasteners
Add slide 45
BELT JOINT FAILURES
Symptoms Of Joint Failure
• Bubble development.
• Bulging
• Cracks
• Development of openings
from the line of joints
• The bonding property was lost
• The quality of tension member got deteriorated
The drive pulley belt slips and turns without moving forward after the starting of
the belt conveyor motor. The belt failing in rotating is due to the insufficient belt
tension, overlong of the belt, inappropriate adjustment of the tension equipment, too
frequent start-up and the coal piled up at the end of the belt conveyor.
This problem is mainly caused by the large belt joint, poor belt buckle quality, long
time use of the belt and the unprofessional belt maintenance. In this case, we
should tighten the tension equipment, change high quality belt in time and
improve the maintenance level.
Temperature of the reducer rises too fast
It is due to the over mount of lubricant, poor heat dispersion, speed reducer burying
in coal. The lubricant oil amount should be reduced and the coal should be removed
to solve this problem.
Improve slide 71
BELT CHANGING
Remove the return roller at the identified problem area.
The Sure Align Tracker replaces the existing return roller. In cases where more
tension is required, leave the return rollers in place and install the mounting
bracket between the existing return rollers
Improve slide 73
Bolt the mounting bracket to the conveyor frame. There are 4 predrilled holes
in the mounting bracket. The 2 inside holes are used to bolt the mounting
bracket to the conveyor frame. The two outside holes are used to install the
pivoting members
Improve slide 77
CONVEYOR SATETY DEVICES
List of protection system in a conveyor system-
a) Belt Sway Switches (BSS)
b) Zero Speed Switches (ZSS)
c) Trainer idlers
d) Electromagnet
e) Gratings
f) Chute level sensors
g) Motor Overload current protection
h) Fire Hydrants
Weight scale
Improve slide 79
BELT SWAY SWITCH
Belt Sway Switch is a protective switch for detecting the
meanderin(sway or deviation) of belt conveyors, and sends out an
alarm signal and an emergency stop signal.
Improve slide 81
ZERO SPEED SWITCHES (ZSS)
Zero speed switches (ZSS) also known as Speed Actuating Sensing
Switches are used to detect whether a rotating shaft is turning (even at very
slow speeds) in various machines, conveyors, power plants, and in
industries involving the production of cement, sugar, textiles, paper, etc
Improve slide 85
PULL CORD SWITCH
Pull cord switch is mounted on the walkway side of the conveyor belt,
preferably at about every 20 mtrs or it can vary as per standard procedure.
When the rope is pulled from any side. The switch is operated. Unless and
until the handle is reset to normal position manually, the switch remains in
operated condition
Improve slide 89a
To prevent unnecessary accidents, damage to machinery and
down time, all conveyor belts are equipped with the following
(1) Interlocking devices.
(2) Tripping devices.
(3) Warning bells or sirens.
(4) Lock-out system
For safety purposes conveyor belts are normally equipped with
sirens or warning bells situated so as to warn persons of the
subsequent starting-up. These sirens or warning bells ore
connected to operate for a set period immediately prior to the belt
start-up.
Improve slide 94
CONVEYOR MAINTENANCE
Basic Conveyor Maintenance
To obtain the optimum return on conveyor systems, the following components that
typically make up a conveyor system must be maintained:
 Drives
 Take-up systems
 Control equipment
 Belting
 Pulleys
 Troughing idlers
 Return idlers
 Tail sections
 Impact-loading equipment
 Chutes
 Skirting
 Belt scrapers
 Equipment guards
 Covers
 Walkways
 Structure
 Transfer stations
 Specialized components associated with site-specific activities
Improve slide 97
Conveyor Maintenance
Here is a quick list to help you stay on top of maintenance for your conveyor
system. While the system is in operation, check the following issues and refer to all
relevant safety warnings and information:
 Regularly walk around both sides of the system and note the condition, as well
as any unusual behavior of all the moving components.
 Note points of material buildup.
 Look for any signs of misalignment or improper belt tracking.
 Check drive amperage requirements and compare amperages to previous
levels for similar loads and conditions.
Add slide 99
TRACKING THE BELT
 Basic rule: the belt moves toward the end of the roller that it contacts
first
 Rollers must be square with the housing and parallel to each other
 Belt Tension must be great enough to prevent slippage. Tension
before running the conveyor
 Run the conveyor. Check to see that the belt runs centered on the
drive roller. Turn off the machine. Adjust drive roller if necessary.
 To adjust drive roller, loosen the four nuts on the bearing holder
plate, and the jam nut on the threaded adjuster.
 add slide 101
 adjusting is complete. Normally, once the drive roller is tracked at the
factory is rarely needs adjustment
Cleaning and Lubricating Checklists
These checklists are primarily concerned with cleaning, lubricating, and
tightening activities. These jobs do not require as high a level of technical
skill as those appearing on inspection checklists. Performance frequencies
for cleaning and lubricating checklist activities are also limited to monthly,
quarterly, semiannual, and annual interval1.
Improvement in slide 107
TROUBLE SHOOTING
It is a process of trace and correct faults in a mechanical or electronic
system.
if the excessive load carry by the conveyor it create problem.
It is due to loosing of scrub pad
add in slide 109
add slide 110
add in slide 115

Belt conveyor and its type

  • 1.
    E-LEARNING ON CONVEYORBELT SYSTEM OR BULK MATERIAL HANDING NAME NITESH KUMAR REGISTRATION NO 20290401709131 SUBJECT CONVEYOR BELT SYSTEM SUBMITTED TO MR.NIKUNJ AGARWAL SIR IMPROVEMENT IN GIVEN PRESENTATION
  • 2.
    Improvement in slide2 CONVEYOR  machine or thing that transports material from one place to another. CONVEYORS ARE USED:  When material is to be moved frequently between specific points  To move materials over a fixed path  When there is a sufficient flow volume to justify the fixed conveyor investment
  • 3.
    Add in slide3 CONVEYORS CAN BE CLASSIFIED IN DIFFERENT WAYS:  Type of product being handled: unit load or bulk load  Location of the conveyor: overhead, on-floor, or in-floor  Whether or not loads can accumulate on the conveyor TYPE OF CONVEYOR 1 Chute Conveyor Unit/Bulk + On-Floor + Accumulate 2. Wheel Conveyor Unit + On-Floor + Ac 3. Roller Conveyor Unit + On-Floor + 4. Chain Conveyor Unit + In-/On-Floor + No Accumulate
  • 4.
    Add in slide4 5. Slat Conveyor Unit + In-/On-Floor + No Accumulate , 6. Flat Belt Conveyor Unit + On-Floor + No Accumulate 7. Magnetic Belt Conveyor Bulk + On-Floor 8. Troughed Belt Conveyor Bulk + On-Floor 9. Bucket Conveyor Bulk + On-Floor 10. Screw Conveyor Bulk + On-Floor 12. Pneumatic Conveyor Bulk/Unit + Overhead
  • 5.
    Add slide 4a BELTSTYPE CONVEYOR PART OF BELT CONVEYOR  Head pulley Head/Drive Pulley  Tail pulley  Idle pully
  • 6.
    Add in slide5 WORKING PRINCIPLE OF CONVEYOR BELT A conveyor belt is composed by two endpoint pulleys and a closed conveyor belt. The pulley that drives conveyor belt rotating is called drive pulley or transmission drum; the other one–only used to change its movement direction–is called bend pulley. Drive pulley is driven by the motor through reducer, and conveyor belt dragging relies on the friction drag between the drive pulley and the belt. Conveyor belts generally are composed of three main components: 1. Carcass 2. Skims 3. Covers There are two types of belt available: 1. Rubber belt 2. Steel Cord
  • 7.
    Add in slide4a Type Of Conveyor Belt Troughed conveyor: These are conventional belt conveyor where the belt is troughed of angles 30, 35 & 45 Degree
  • 8.
    Pipe conveyor The beltin this system flattens itself at the loading and discharge stages after it takes a pipe shape during its forward / return runs.
  • 9.
    Improvement in slide6 Component of teough conveyor belt system
  • 10.
    Improvement in slide6 HEAD/DRIVE PULLEY Head/Drive Pulley is located at the discharge terminus of the conveyor. It provides the driving force for the conveyor. In order to increase pulley life and traction, it often has a larger diameter than other pulleys. TAIL PULLEY Pulley which can be moved to keep belt tight is called take-up pulley. Take-Up Pulley may be a drive pulley or an idler pulley.
  • 11.
    Improvement in slide7 SNUB PULLEY Pulley, which is provided to increase/decrease, warp/contact angle of belt on nearby pulley, is called Snub Pulley. BEND PULLEY The Bend Pulley is used for changing the direction of the belt.The Bend Pulleyis usually installed at the tail part or
  • 12.
    Improvement in slide8 IDLERS. Idlers Introduction Idlers are an important component in any conveyor system as they are used to support the conveyor belt and the load carried on the belt. a) TROUGHING IDLER b) TRAINING IDLER c) IMPACT IDLER d) RETURN IDLER
  • 13.
    Improvement in slide10 Conveyor chutes are used in bulk handling to perform a variety of operations. In particular, the loading of a belt conveyor, and the transfer of material from one moving belt conveyor to another, are important tasks. Such operations are widely used for the transport of both coarse grain material
  • 14.
    Slide 11 TAKE UP:-Take up devices, the name from the fact that it takes up changes in belt length. In taking up length they maintain tension. Often the critical point lies immediately following the drive since it is necessary to maintain tensions at the point to prevent slippage on the drive pulley
  • 15.
    Improvement in slide13 A conveyor belt is the carrying medium of a belt conveyor system A belt conveyor system is one of many types of conveyor systems. A belt conveyor system consists of two or more pulleys (sometimes referred to as drums), with an endless loop of carrying medium the conveyor belt that rotates about them. One or both of the pulleys are powered, moving the belt and the material on the belt forward. The powered pulley is called the drive pulley
  • 16.
    Improvement in slide14 CONVEYOR BELT BASIC REQUIREMENT  Flexibility  Transverse rigidity  Low mass per unit length  High strength  Simplicity and inexpensive  Longer life  Should not stretch under normal working  stresses ,i.e., low relative elongation.  Wear resistant Fire resistant
  • 17.
    Improvement in slide15 CONVEYOR BELT CONSTRUCTION The belt consists of one or more layers of material. ◦ An under layer-to provide linear strength and shape called a carcass(polyester, nylon and cotton) ◦ An over layer called the cover. (rubber or plastic compounds) Belts are typically made from cotton, canvas, Kevlar, nitrile, nylon, polyester, polyurethane/urethane, PVC, rubber, silicone, steel cord, Teflon, wire mesh or weave
  • 19.
    Add slide 16 Typeof belt Textile Conveyor Belting Width up to 2400 mm Strength up to 3000 KN / m width Steel Cord Conveyor Belting Width up to 2400 mm Strength up to 7500 KN / m width
  • 20.
    Improvement in slide31 BELT JOINTING To make the belt endless, belts are joined. The methods of belt jointing are: Hot Vulcanizing Mechanical Fastening Cold Patching (Pasting
  • 21.
    Improvement in slide33 HOT VOLCANAISATION PROCESS
  • 22.
    Improvement in slide35 SPLICING PROCESS  General preparation  Preparation of the lower part of the belt  Preparation of the upper part of the belt  Joining of the splice  Vulcanizing the splice  Final measures SPLICING TOOLS  Safety Glasses  Tape Measure - 16' x 3/4" Blade  Angle square  Plumb line  White Mechanical Marking Pencil w/ Pocket Clip (Soft Crayon)  Claw hammer  Duplex belt nails  Smooth Flat Face Roller #50D - 2" x 2"  Smooth Flat Face Roller #50C - 1/2" x 2"  Corrugated Face Stitcher #50B - 1/4" x 2"
  • 23.
     Corrugated FaceStitcher #50E - 1/8" x 2"  Needle Face Roller - 2” x 2”  Electric Stripping Cable Winch  Drying hood (not for use with Flammable Solvents & Cements)  Stainless Steel Stripping Frame or Grip tongs  Whetstone #68  Foxtail Hand Dust Brush  Curved Hand Rasp - #51  Drill Arbor for Wire Wheel  3" Rotary Wire Brush  Air buffer  Pincers - 250mm  Ply Lifter #78  Offset Knife #77  Rubber Knife - 6" Long #72  Bevel Point Knife - 4" x 1"  Curve V-Trim Knife - 2 1/4" X 3/4"  Mill Knife Handle (Dull & Rounded Tip)  Off Set Single Ply Knife - .065 Cutting Depth  11.5" Heavy Duty Bent Handle Sicissors w / Grips  18mm Break Off Tip Cutter with Rubber Grip  Replacement Blades for 18mm Cutter - 50 Pack  Splice Kit  Rags  Cement brush  White Marking Rubber  Belt Clamps  Come-a-longs  H.D. C-Clamps  Screw clamps  Vulcanizing press
  • 24.
    Improvement in slide36 GENERAL PREPARATION  clean and dry conveyor belts  .Remove oily or greasy substances  Provide tools, equipment and splicing products.  If a new belt is installed, place a working platform at the head or tail of the conveyor.Otherwise install it in the conveyor construction (remove carrying idlers, if necessary).  Position it in such a way that the conveyor belt lies on it even and straight without tension.  The working platform (approx. 10 - 13 ft long) consists of three parts aligned in the direction of the conveyor belt: the lower part of the vulcanizing press,  The belt ends have to be aligned in the direction of the conveyor belt in such a way that they overlap each other on the lower part of the vulcanizing press and that the belt center lines are exactly superimposed.  The length of the overlapping area has to be splice length plus bias cut
  • 25.
    Improvement in slide38 PREPARING THE BELT ENDS  The establishment of the center line is easiest done with two rulers. The three center markings on each belt end are then connected by means of a chalk line which represents the belt center line.  This center line ensures exact alignment of the belt ends, which indispensable for straight belt running.  Destroyed or missing belt edges must be considered. The width of the belt edge is established by measuring the width of the belt at suitable areas of the undamaged belt ends  Establish a perpendicular square line across the upper belt end at the end of the splice area.
  • 26.
    Improvement in slide39 C on the center line equidistant to point A (AB=AC). Now describe a circle with the same radius around points B and C by means of a plumb line and a pen. The points of intersection of both circles must still be on the belt. These intersections are points D and E. A line drawn between these two points will be perdendicular to the belt edges and forms the square line, which should pass point A for additional control. This square line will be the starting point from which the splice will be laid out.
  • 27.
    Improvement in slide40 PREPARATION OF THE LOWER PART OF THE BELT 1. Fold back the upper part of the belt. Make a bias cut on the lower belt part .Splicing process With an off-set knife, cut the rubber edges flush with the upper fabric ply. 2. Fold back the lower part of the belt and draw a line parallel to the bias cut on the pulley side,at 1 inch from the belt end. Cut the rubber cover along that 1inch line with a dull & rounded tip Mill Knife held at an angle (of approx.45°), without damaging the top fabric ply. Also cut the rubber cover along the marked rubber edges with the mill knife held vertically, without damaging the top fabric ply. 3. Fold back the lower part of the belt again and mark the splice length (lv according to the chart), step length (ls) and rubber edges. Draw another line 1inch parallel to the splice length line. Cut the rubber cover along this line with a dull tipped Mill Knife held at an angle of approx. 45°. Also cut the rubber edges with a Mill knife held vertically.
  • 28.
    Improvement in slide41,42 . 4. Cut the rubber cover in narrow strips (approx. 1 -1.5 inch wide) and strip them using pincers or griptongs. 5. Cut the top fabric ply with the one ply knife 1 in.from the rubber cover,detach this ply using a plylifter and strip it with pincers or grip tongs. Mark the subsequent fabric plies according to thestep length (ls), cut them and detach these plies.
  • 29.
    Improvement in slide40 JOINING OF THE SPLICE Step1  Carefully buff the cut edges of the rubber covers and the surface of the rubber edges with a buffing tool (e.g. a rotating wire brush).  Buff the intermediate rubber and buff even any un-even spots. When buffing, do not scorch or smear the rubber nor leave shiny spots on it.  Round the edges of the fabric steps, without damaging the fabric (e.g. protect it with a thin tin plate).  Carefully remove the buffing dust with a dry brush. 2.step  Thoroughly stir the required quantity of splicing cement before use.  The splicing cement should remain covered until use and then recovered to min thicking.  Apply two coats of the splicing cement to the whole splicing area and the joint gaps of both belt ends.  Use a brush with short bristles.  Let the first coat dry completely (minimum: 30 min.)  Let the second coat dry (for approx. 30 mins. at 68°F), until it is just a little sticky (check with the back of your finger).
  • 30.
    Step3  Cover thefabric steps of the lower belt part with uncured tie gum rubber. Step4  Cover the rubber edges and fabric steps with anapprox. 1 inch wide strip of uncured tie gum rubber. Step5  For the joint gap on the pulley side cut to size an exactly fitting filler strip consisting of a strip of uncured tie gum rubber, breaker fabric and uncured cover rubber. Step6 . Superimpose the upper and lower belt ends, aligning them exactly using the center line of each belt and avoiding air entrapment.
  • 31.
    Step7 apply one stripof uncured tie gum rubber to the joint gap on the carrying side, then fill the gap with uncured cover rubber and stitch vigorously.Trim excess filling flush with the belt surface .
  • 32.
    Improvement in slide45 TYPE OF MECHANICAL FASTENERS Most commonly used Mechanical Fasteners are- 1. Solid Plate Bolt Type Fasteners 2. SR Rivet Hinged Type Fasteners 3. Lacing Type Fasteners
  • 33.
    Add slide 45 BELTJOINT FAILURES Symptoms Of Joint Failure • Bubble development. • Bulging • Cracks • Development of openings from the line of joints • The bonding property was lost • The quality of tension member got deteriorated The drive pulley belt slips and turns without moving forward after the starting of the belt conveyor motor. The belt failing in rotating is due to the insufficient belt tension, overlong of the belt, inappropriate adjustment of the tension equipment, too frequent start-up and the coal piled up at the end of the belt conveyor. This problem is mainly caused by the large belt joint, poor belt buckle quality, long time use of the belt and the unprofessional belt maintenance. In this case, we should tighten the tension equipment, change high quality belt in time and improve the maintenance level.
  • 34.
    Temperature of thereducer rises too fast It is due to the over mount of lubricant, poor heat dispersion, speed reducer burying in coal. The lubricant oil amount should be reduced and the coal should be removed to solve this problem.
  • 35.
    Improve slide 71 BELTCHANGING Remove the return roller at the identified problem area. The Sure Align Tracker replaces the existing return roller. In cases where more tension is required, leave the return rollers in place and install the mounting bracket between the existing return rollers
  • 36.
    Improve slide 73 Boltthe mounting bracket to the conveyor frame. There are 4 predrilled holes in the mounting bracket. The 2 inside holes are used to bolt the mounting bracket to the conveyor frame. The two outside holes are used to install the pivoting members
  • 37.
    Improve slide 77 CONVEYORSATETY DEVICES List of protection system in a conveyor system- a) Belt Sway Switches (BSS) b) Zero Speed Switches (ZSS) c) Trainer idlers d) Electromagnet e) Gratings f) Chute level sensors g) Motor Overload current protection h) Fire Hydrants Weight scale
  • 38.
    Improve slide 79 BELTSWAY SWITCH Belt Sway Switch is a protective switch for detecting the meanderin(sway or deviation) of belt conveyors, and sends out an alarm signal and an emergency stop signal.
  • 39.
    Improve slide 81 ZEROSPEED SWITCHES (ZSS) Zero speed switches (ZSS) also known as Speed Actuating Sensing Switches are used to detect whether a rotating shaft is turning (even at very slow speeds) in various machines, conveyors, power plants, and in industries involving the production of cement, sugar, textiles, paper, etc
  • 40.
    Improve slide 85 PULLCORD SWITCH Pull cord switch is mounted on the walkway side of the conveyor belt, preferably at about every 20 mtrs or it can vary as per standard procedure. When the rope is pulled from any side. The switch is operated. Unless and until the handle is reset to normal position manually, the switch remains in operated condition
  • 41.
    Improve slide 89a Toprevent unnecessary accidents, damage to machinery and down time, all conveyor belts are equipped with the following (1) Interlocking devices. (2) Tripping devices. (3) Warning bells or sirens. (4) Lock-out system For safety purposes conveyor belts are normally equipped with sirens or warning bells situated so as to warn persons of the subsequent starting-up. These sirens or warning bells ore connected to operate for a set period immediately prior to the belt start-up.
  • 42.
    Improve slide 94 CONVEYORMAINTENANCE Basic Conveyor Maintenance To obtain the optimum return on conveyor systems, the following components that typically make up a conveyor system must be maintained:  Drives  Take-up systems  Control equipment  Belting  Pulleys  Troughing idlers  Return idlers  Tail sections  Impact-loading equipment  Chutes  Skirting  Belt scrapers  Equipment guards  Covers  Walkways  Structure  Transfer stations  Specialized components associated with site-specific activities
  • 43.
    Improve slide 97 ConveyorMaintenance Here is a quick list to help you stay on top of maintenance for your conveyor system. While the system is in operation, check the following issues and refer to all relevant safety warnings and information:  Regularly walk around both sides of the system and note the condition, as well as any unusual behavior of all the moving components.  Note points of material buildup.  Look for any signs of misalignment or improper belt tracking.  Check drive amperage requirements and compare amperages to previous levels for similar loads and conditions.
  • 44.
    Add slide 99 TRACKINGTHE BELT  Basic rule: the belt moves toward the end of the roller that it contacts first  Rollers must be square with the housing and parallel to each other  Belt Tension must be great enough to prevent slippage. Tension before running the conveyor  Run the conveyor. Check to see that the belt runs centered on the drive roller. Turn off the machine. Adjust drive roller if necessary.  To adjust drive roller, loosen the four nuts on the bearing holder plate, and the jam nut on the threaded adjuster.
  • 45.
     add slide101  adjusting is complete. Normally, once the drive roller is tracked at the factory is rarely needs adjustment Cleaning and Lubricating Checklists These checklists are primarily concerned with cleaning, lubricating, and tightening activities. These jobs do not require as high a level of technical skill as those appearing on inspection checklists. Performance frequencies for cleaning and lubricating checklist activities are also limited to monthly, quarterly, semiannual, and annual interval1.
  • 46.
    Improvement in slide107 TROUBLE SHOOTING It is a process of trace and correct faults in a mechanical or electronic system. if the excessive load carry by the conveyor it create problem. It is due to loosing of scrub pad
  • 47.
  • 48.
  • 49.