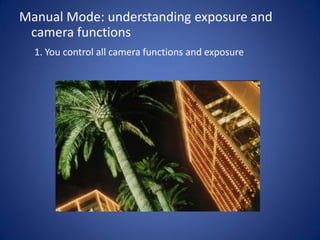
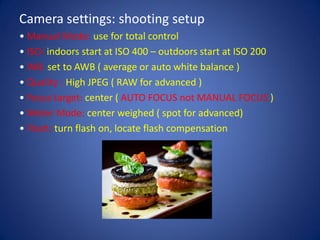
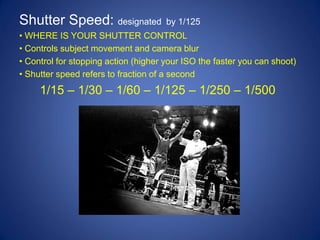
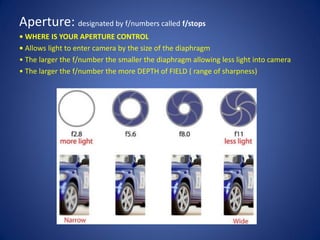
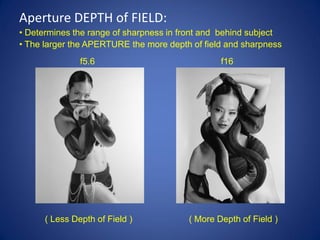
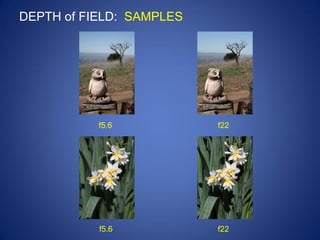
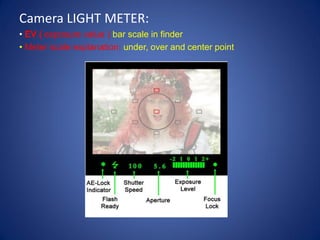
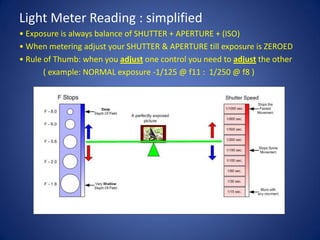
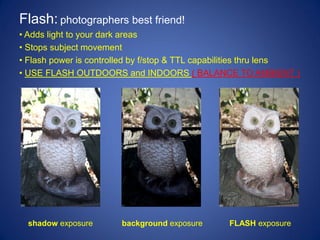
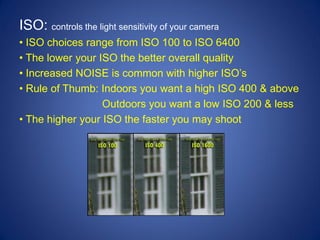
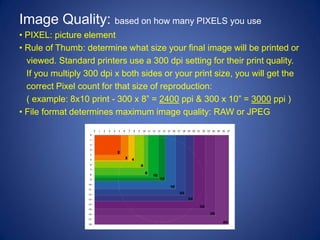
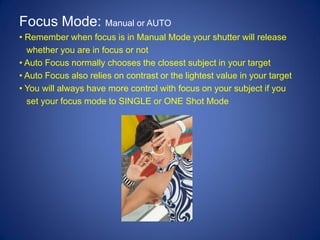
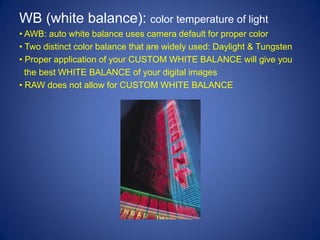
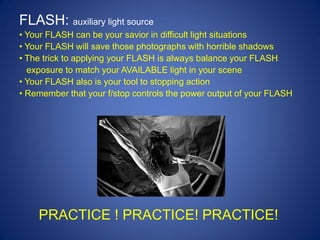
Digital Basics
  Capture Light
  Manual Mode
TERMINOLOGY:
• Exposure: combination of Shutter & Aperture & ISO
• Exposure Reading: light meter reading of your shutter & aperture combination
                           example: ( 1/125 @ f11 )
• Exposure ZEROED: EV scale is centered ( balance of Shutter + Aperture )
• EV: exposure value – measurement of light
• Shutter: curtain that opens allowing light to expose sensor- 1/sec.
• Aperture: bladed diaphragm in lens that opens and closes
• ISO: sensitivity of your camera to record light
• Over Exposure: to much light creating bright photographs
• Under Exposure: not enough light creating dark photographs
• Density: the amount of light detail in your photographs
• Shadow density: the darkest area in your photograph
• Highlight density: the lightest area in your photograph
• Depth of Field: the focus distance in front and behind subject
• Shoot (shooting): slang for taking picture
• Scene: the total area in your view finder
• Subject: the area in your photography that is your point of interest
• Ambient or Available Light: the existing light in your scene indoor or outdoor
Manual Mode: understanding exposure and
 camera functions
  1. You control all camera functions and exposure
Camera settings: shooting setup
• Manual Mode: use for total control
• ISO: indoors start at ISO 400 – outdoors start at ISO 200
• WB: set to AWB ( average or auto white balance )
• Quality : High JPEG ( RAW for advanced )
• Focus target: center ( AUTO FOCUS not MANUAL FOCUS )
• Meter Mode: center weighed ( spot for advanced)
• Flash: turn flash on, locate flash compensation
Shutter Speed: designated             by 1/125
• WHERE IS YOUR SHUTTER CONTROL
• Controls subject movement and camera blur
• Control for stopping action (higher your ISO the faster you can shoot)
• Shutter speed refers to fraction of a second
     1/15 – 1/30 – 1/60 – 1/125 – 1/250 – 1/500
Aperture: designated by f/numbers called f/stops
• WHERE IS YOUR APERTURE CONTROL
• Allows light to enter camera by the size of the diaphragm
• The larger the f/number the smaller the diaphragm allowing less light into camera
• The larger the f/number the more DEPTH of FIELD ( range of sharpness)
Aperture DEPTH of FIELD:
• Determines the range of sharpness in front and behind subject
• The larger the APERTURE the more depth of field and sharpness
               f5.6                             f16


      ( Less Depth of Field )           ( More Depth of Field )
DEPTH of FIELD: SAMPLES


           f5.6           f22


           f5.6           f22
Camera LIGHT METER:
• EV ( exposure value ) bar scale in finder
• Meter scale explanation: under, over and center point
Light Meter Reading : simplified
• Exposure is always balance of SHUTTER + APERTURE + (ISO)
• When metering adjust your SHUTTER & APERTURE till exposure is ZEROED
• Rule of Thumb: when you adjust one control you need to adjust the other
       ( example: NORMAL exposure -1/125 @ f11 : 1/250 @ f8 )
Flash: photographers best friend!
• Adds light to your dark areas
• Stops subject movement
• Flash power is controlled by f/stop & TTL capabilities thru lens
• USE FLASH OUTDOORS and INDOORS ( BALANCE TO AMBIENT )


  shadow exposure       background exposure      FLASH exposure
• Lets Take some FOTOS •
1. Team up for OUTDOORS: Canon/Nikon
       • Normal EXPOSURE in sunlight
       • Normal EXPOSURE in shadow
       • Normal EXPOSURE with flash
ISO: controls the light sensitivity of your camera
• ISO choices range from ISO 100 to ISO 6400
• The lower your ISO the better overall quality
• Increased NOISE is common with higher ISO’s
• Rule of Thumb: Indoors you want a high ISO 400 & above
                  Outdoors you want a low ISO 200 & less
• The higher your ISO the faster you may shoot
Image Quality: based on how many PIXELS you use
• PIXEL: picture element
• Rule of Thumb: determine what size your final image will be printed or
  viewed. Standard printers use a 300 dpi setting for their print quality.
  If you multiply 300 dpi x both sides or your print size, you will get the
  correct Pixel count for that size of reproduction:
  ( example: 8x10 print - 300 x 8” = 2400 ppi & 300 x 10” = 3000 ppi )
• File format determines maximum image quality: RAW or JPEG
Focus Mode: Manual or AUTO
• Remember when focus is in Manual Mode your shutter will release
  whether you are in focus or not
• Auto Focus normally chooses the closest subject in your target
• Auto Focus also relies on contrast or the lightest value in your target
• You will always have more control with focus on your subject if you
  set your focus mode to SINGLE or ONE Shot Mode
WB (white balance): color temperature of light
• AWB: auto white balance uses camera default for proper color
• Two distinct color balance that are widely used: Daylight & Tungsten
• Proper application of your CUSTOM WHITE BALANCE will give you
  the best WHITE BALANCE of your digital images
• RAW does not allow for CUSTOM WHITE BALANCE
FLASH: auxiliary light source
• Your FLASH can be your savior in difficult light situations
• Your FLASH will save those photographs with horrible shadows
• The trick to applying your FLASH is always balance your FLASH
  exposure to match your AVAILABLE light in your scene
• Your FLASH also is your tool to stopping action
• Remember that your f/stop controls the power output of your FLASH


    PRACTICE ! PRACTICE! PRACTICE!

Citizen Classes, Beginners Photography

  • 1.
    Digital Basics Capture Light Manual Mode
  • 2.
    TERMINOLOGY: • Exposure: combinationof Shutter & Aperture & ISO • Exposure Reading: light meter reading of your shutter & aperture combination example: ( 1/125 @ f11 ) • Exposure ZEROED: EV scale is centered ( balance of Shutter + Aperture ) • EV: exposure value – measurement of light • Shutter: curtain that opens allowing light to expose sensor- 1/sec. • Aperture: bladed diaphragm in lens that opens and closes • ISO: sensitivity of your camera to record light • Over Exposure: to much light creating bright photographs • Under Exposure: not enough light creating dark photographs • Density: the amount of light detail in your photographs • Shadow density: the darkest area in your photograph • Highlight density: the lightest area in your photograph • Depth of Field: the focus distance in front and behind subject • Shoot (shooting): slang for taking picture • Scene: the total area in your view finder • Subject: the area in your photography that is your point of interest • Ambient or Available Light: the existing light in your scene indoor or outdoor
  • 3.
    Manual Mode: understandingexposure and camera functions 1. You control all camera functions and exposure
  • 4.
    Camera settings: shootingsetup • Manual Mode: use for total control • ISO: indoors start at ISO 400 – outdoors start at ISO 200 • WB: set to AWB ( average or auto white balance ) • Quality : High JPEG ( RAW for advanced ) • Focus target: center ( AUTO FOCUS not MANUAL FOCUS ) • Meter Mode: center weighed ( spot for advanced) • Flash: turn flash on, locate flash compensation
  • 5.
    Shutter Speed: designated by 1/125 • WHERE IS YOUR SHUTTER CONTROL • Controls subject movement and camera blur • Control for stopping action (higher your ISO the faster you can shoot) • Shutter speed refers to fraction of a second 1/15 – 1/30 – 1/60 – 1/125 – 1/250 – 1/500
  • 6.
    Aperture: designated byf/numbers called f/stops • WHERE IS YOUR APERTURE CONTROL • Allows light to enter camera by the size of the diaphragm • The larger the f/number the smaller the diaphragm allowing less light into camera • The larger the f/number the more DEPTH of FIELD ( range of sharpness)
  • 7.
    Aperture DEPTH ofFIELD: • Determines the range of sharpness in front and behind subject • The larger the APERTURE the more depth of field and sharpness f5.6 f16 ( Less Depth of Field ) ( More Depth of Field )
  • 8.
    DEPTH of FIELD:SAMPLES f5.6 f22 f5.6 f22
  • 9.
    Camera LIGHT METER: •EV ( exposure value ) bar scale in finder • Meter scale explanation: under, over and center point
  • 10.
    Light Meter Reading: simplified • Exposure is always balance of SHUTTER + APERTURE + (ISO) • When metering adjust your SHUTTER & APERTURE till exposure is ZEROED • Rule of Thumb: when you adjust one control you need to adjust the other ( example: NORMAL exposure -1/125 @ f11 : 1/250 @ f8 )
  • 11.
    Flash: photographers bestfriend! • Adds light to your dark areas • Stops subject movement • Flash power is controlled by f/stop & TTL capabilities thru lens • USE FLASH OUTDOORS and INDOORS ( BALANCE TO AMBIENT ) shadow exposure background exposure FLASH exposure
  • 12.
    • Lets Takesome FOTOS • 1. Team up for OUTDOORS: Canon/Nikon • Normal EXPOSURE in sunlight • Normal EXPOSURE in shadow • Normal EXPOSURE with flash
  • 13.
    ISO: controls thelight sensitivity of your camera • ISO choices range from ISO 100 to ISO 6400 • The lower your ISO the better overall quality • Increased NOISE is common with higher ISO’s • Rule of Thumb: Indoors you want a high ISO 400 & above Outdoors you want a low ISO 200 & less • The higher your ISO the faster you may shoot
  • 14.
    Image Quality: basedon how many PIXELS you use • PIXEL: picture element • Rule of Thumb: determine what size your final image will be printed or viewed. Standard printers use a 300 dpi setting for their print quality. If you multiply 300 dpi x both sides or your print size, you will get the correct Pixel count for that size of reproduction: ( example: 8x10 print - 300 x 8” = 2400 ppi & 300 x 10” = 3000 ppi ) • File format determines maximum image quality: RAW or JPEG
  • 15.
    Focus Mode: Manualor AUTO • Remember when focus is in Manual Mode your shutter will release whether you are in focus or not • Auto Focus normally chooses the closest subject in your target • Auto Focus also relies on contrast or the lightest value in your target • You will always have more control with focus on your subject if you set your focus mode to SINGLE or ONE Shot Mode
  • 16.
    WB (white balance):color temperature of light • AWB: auto white balance uses camera default for proper color • Two distinct color balance that are widely used: Daylight & Tungsten • Proper application of your CUSTOM WHITE BALANCE will give you the best WHITE BALANCE of your digital images • RAW does not allow for CUSTOM WHITE BALANCE
  • 17.
    FLASH: auxiliary lightsource • Your FLASH can be your savior in difficult light situations • Your FLASH will save those photographs with horrible shadows • The trick to applying your FLASH is always balance your FLASH exposure to match your AVAILABLE light in your scene • Your FLASH also is your tool to stopping action • Remember that your f/stop controls the power output of your FLASH PRACTICE ! PRACTICE! PRACTICE!