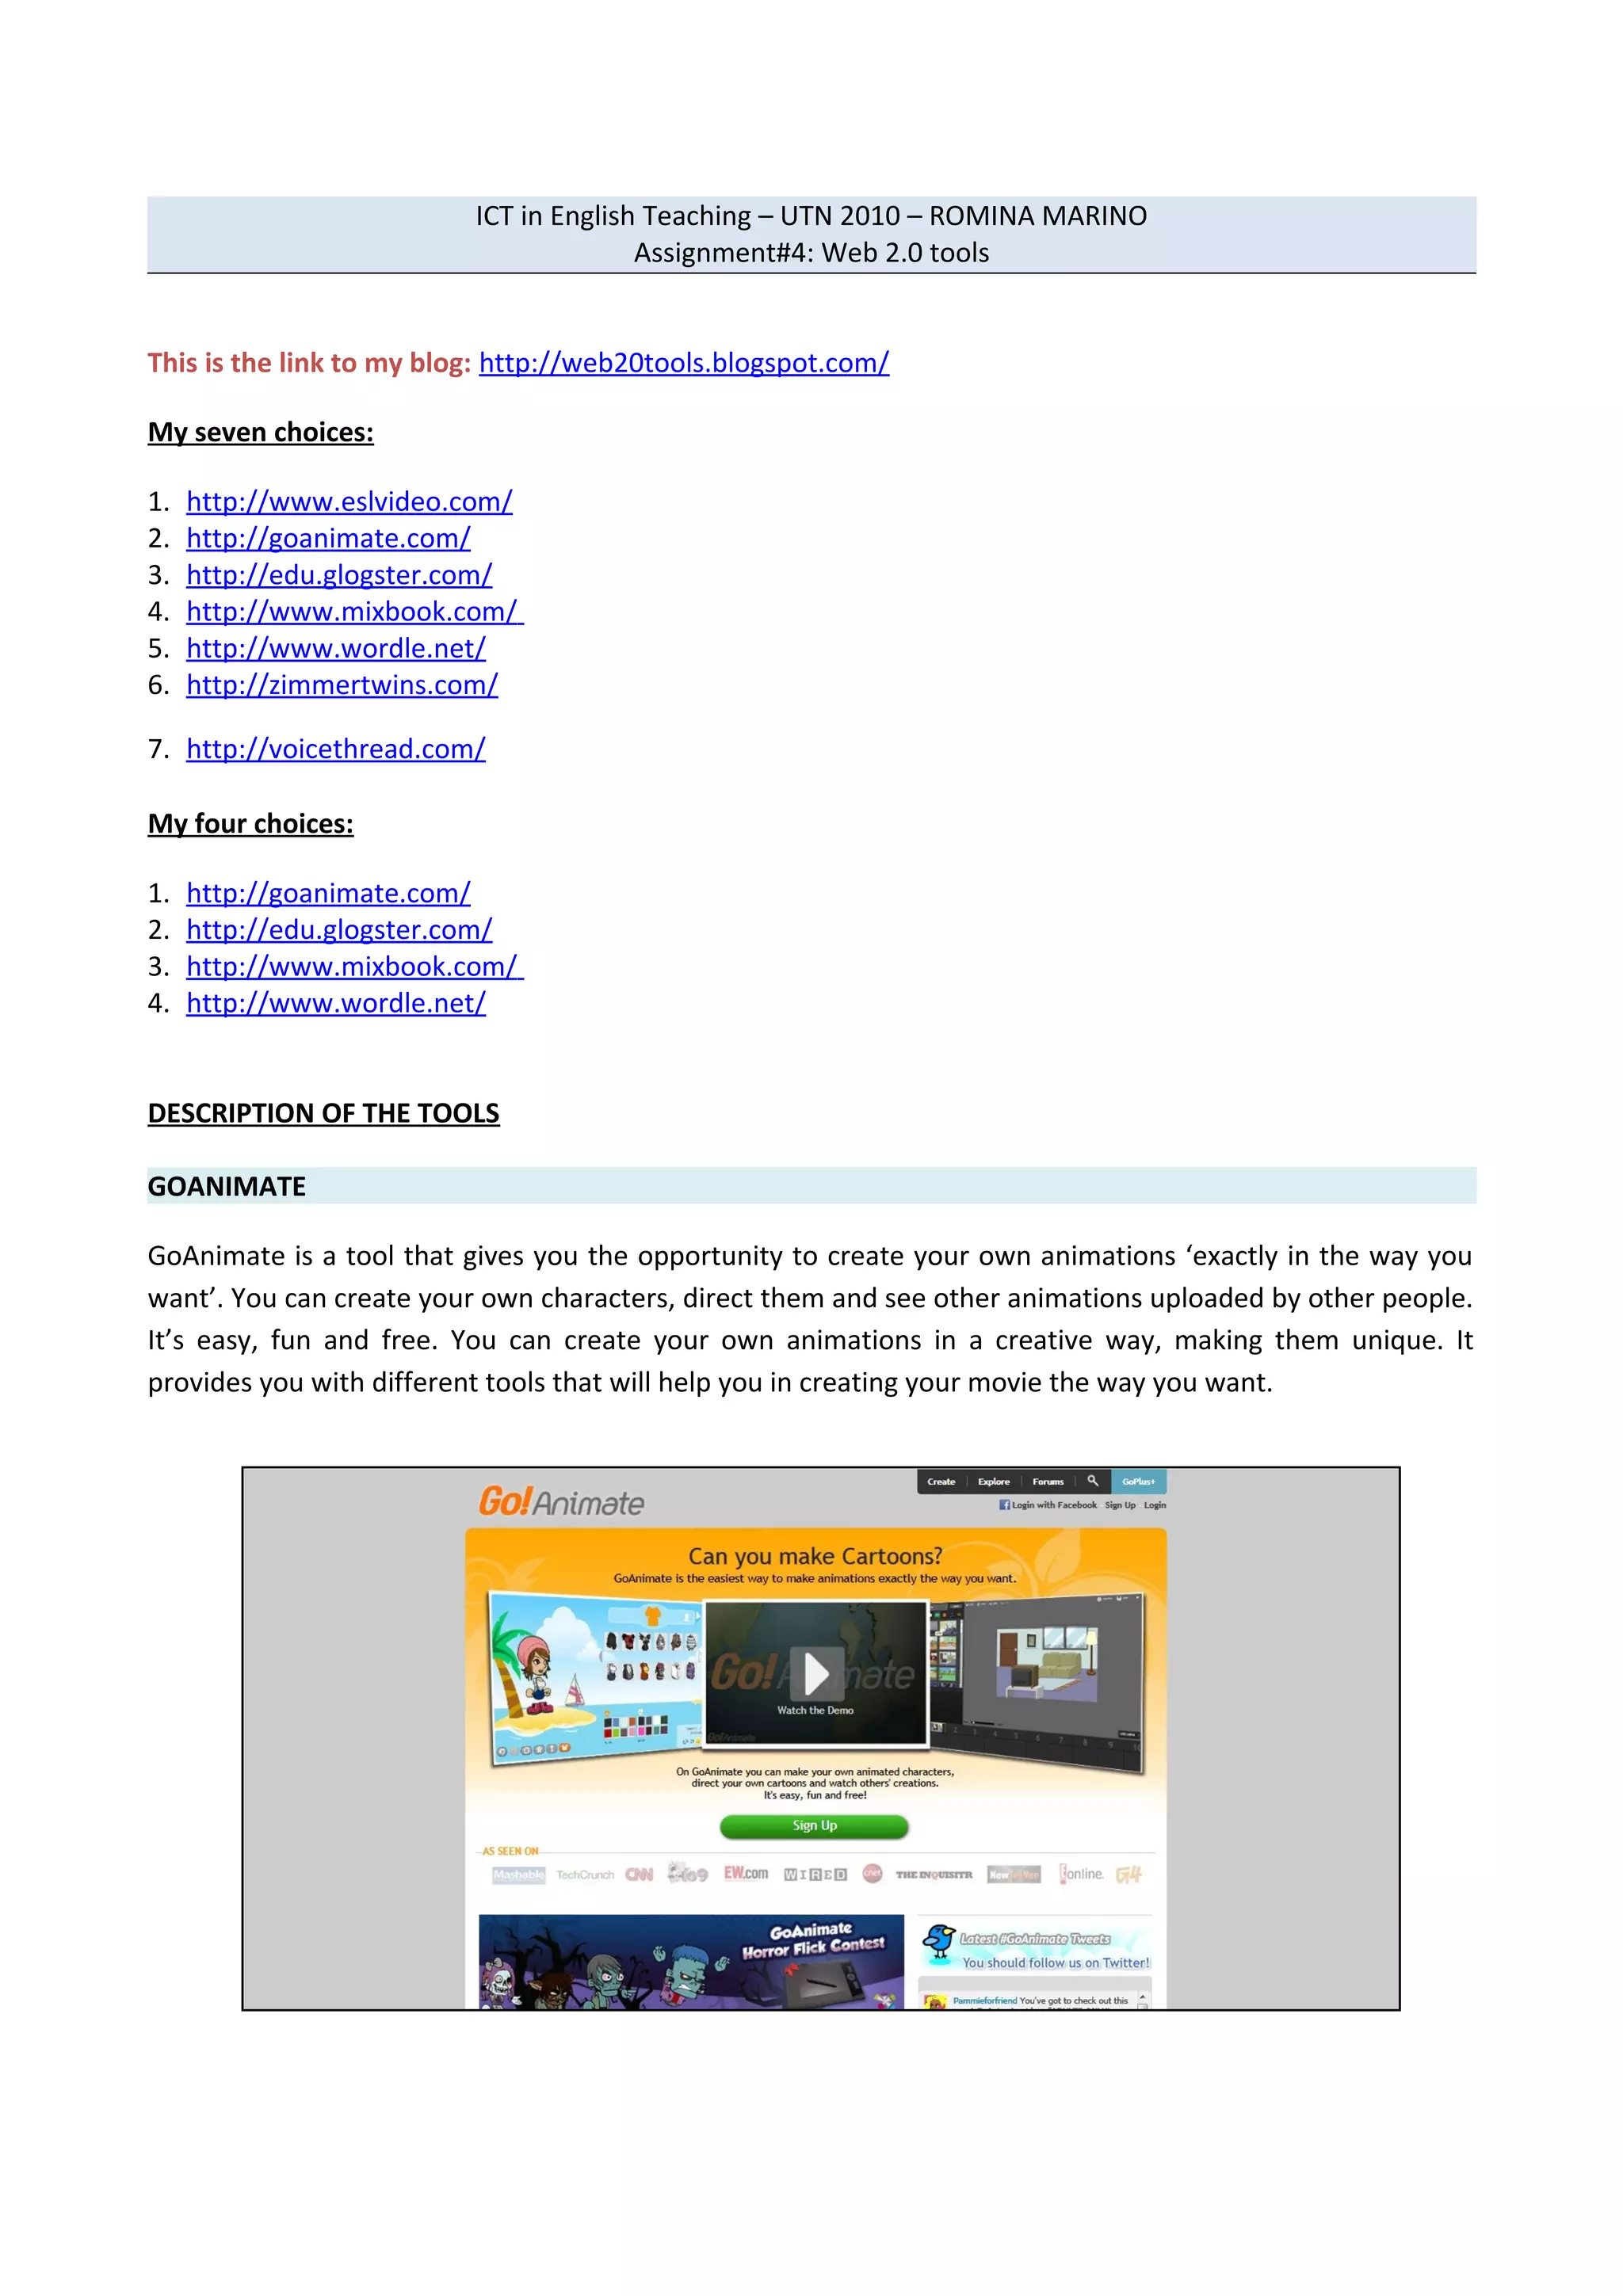
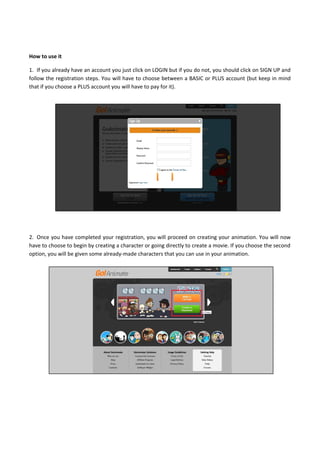
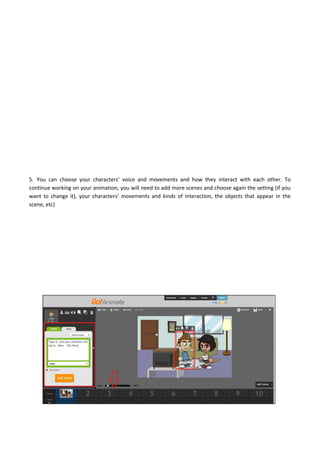
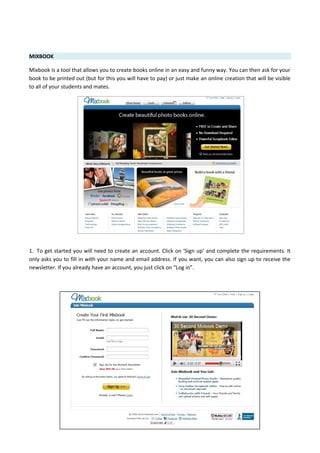
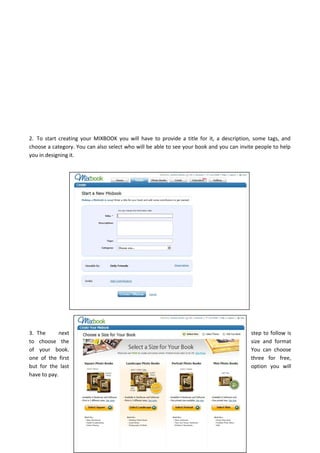
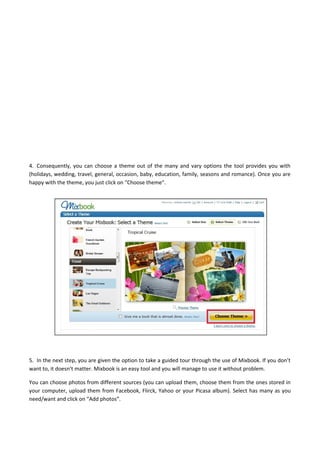
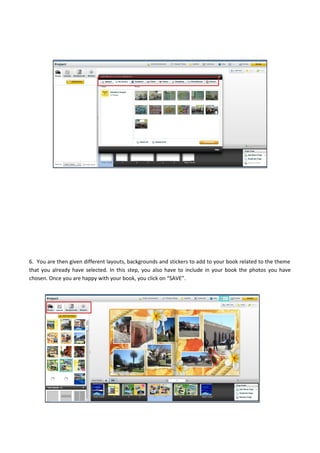
The document describes 4 Web 2.0 tools that can be used for English language teaching: GoAnimate, Glogster, Mixbook, and Wordle. It provides details on how each tool can be used, including steps to set up an account, design projects, and share or publish work. The tools allow students to create animations, interactive posters, photo books, and word clouds. They encourage writing, creative expression, and engaging students in project-based learning.
This document lists various online tools for conducting surveys, creating slide shows, and other web 2.0 applications. It provides the URLs for tools such as SurveyMonkey and Zoomerang for surveys, Animoto and SlideShare for slide shows, and Jing, TestToob, and VozMe as examples of interactive web tools. The list also includes sites for creating photo books, testing geography knowledge, and generating avatars.
Webvertise Your Teaching! Use exciting and unique Web 2.0 applications to showcase your classroom activities and create web-based student research projects. Make glog, screencasting, Shelfari and Wordle part of your everyday conversation. Give your classroom a web presence by publishing and sharing content quickly and easily. Webvertise your teaching!
Using ICT in the classroom (in a funky way)Simon Howells
This document provides instructions for using various digital tools in the classroom in an engaging way. It outlines how to use Wallwisher to post notes online and embed the wall in a virtual learning environment. Directions are given for using Diigo for social bookmarking and creating subject-specific groups. Storybird and Xtranormal are introduced for creating online storybooks and movies from student writing. Other tools covered include Quizlet for flashcards, Slideshare for sharing presentations, UMapper for interactive maps, and Glogster for online posters. The document encourages exploring additional resources on sites like Classtools.net.
This document provides an introduction and overview of Chromebooks, including what they are, how to use them, and care instructions. It explains how to log in, use apps and extensions, take screenshots, reserve Chromebook carts, and find additional resources. Keyboard shortcuts, bookmarks, signing off, and settings that travel with the user's account are also outlined. The presentation was originally created by Molly Schroeder and adapted for Heyworth Schools.
I Want It All (Educational Tools) for Free!Jonathan Bacon
Budgets are tight, no one can afford to buy what you can get free. As educators, we want the best, most innovative tools but we want it all for free! This session is an exporation of Rich Internet Applications (Web 2.0/RIA) tools that are free (or low cost) and enable you to store research notes, store and edit images, set-up social networks and more. The participants were invited to bring their favorite tool to share during the concluding 15 minutes of the session.
Apps and Websites for Use in the ClassroomChargers93
This document provides information on several apps and websites that can be used in the classroom, including Prezi for presentations, Animoto for video creation, YouTube/KeepVid/iMovie for creating voiceovers, Shutterfly for photo sharing, Dropbox and DropItToMe for digital homework submission, Quizlet for flashcards, Zondle for educational games, Weebly for easy website creation. It also recommends several iPad apps, such as Puppet Pals, SplashTop Remote Desktop, and Professor Garfield. It concludes by providing contact information for questions.
The document is a series of web pages created by Elizabeth Say that provide information on various technology topics for children. The pages cover subjects like online safety, social networking, blogs, 3D printing and more. For each topic, the pages give an overview and some key facts in a simple, child-friendly way, often including images. The goal is to help teach children about technology and online safety issues in an engaging format.
The document provides an overview of using Chromebooks in education. It discusses the key features of Chromebooks like their instant-on capability, all-day battery life, and ability to access files from any device. It explains that Chromebooks store all user files and data in the cloud so backups are not needed. The document also outlines how Chromebooks are used in Billings Public Schools, including for reading, research, creating documents and presentations, and supplementing math and reading curriculum. Teachers in the district discuss how Chromebooks motivate students and support differentiated learning.
These tools were suggested by secondary teachers to create online content and virtual learning environments. Glogster allows creating online posters with multimedia. Middlespot is a bookmarking tool to organize and share websites. Google Earth provides satellite imagery to visualize locations. Moodle is a free virtual learning platform to create online courses with lessons, quizzes and assignments.
These tools were suggested by secondary teachers to create online content and virtual learning environments. Glogster allows creating online posters with multimedia. Middlespot is a bookmarking tool to organize and share websites. Google Earth provides satellite imagery to visualize locations. Moodle is a free virtual learning platform to create online courses with lessons, assignments and assessments.
The document provides tips and shortcuts for multi-tasking and navigating Windows. It discusses enabling quick launch, dragging programs to the taskbar, minimizing windows, showing the desktop, navigating between open files, minimizing all windows with Windows key + M, organizing the start menu, using Ctrl+Alt+Del, using internet explorer shortcuts like new tabs and favorites, scrolling web pages, maximizing pages with F11, and accessing free education resources from Microsoft.
This document provides an overview and instructions for using Chromebooks, the Chrome browser, and Google Drive. It covers the following key points in 3 sentences:
Teachers will learn how to use Chromebook features and personalize the device, use the Chrome browser, access Google Drive and apps, share documents and collaborate. The document details how to set up a Chromebook by connecting to WiFi, adding users, and logging in, and explains features of the Chrome browser like searching, bookmarks, and settings. It also shows how to access and use apps in Google Drive for creating, sharing, and collaborating on documents, presentations, and more from any device.
Chromebooks are a faster and fairly inexpensive computer that start up in less than 7 seconds, offer thousands of web-based apps, have built-in virus protection, and can easily synchronization to Google’s cloud and burgeoning services infrastructure. In this webinar:
Learn Chromebook specifications.
Understand how to use a Chromebook.
Discover how to install Linux and dual boot.
Determine if Chromebooks are a good fit for your library.
This document provides a summary of mobile apps that can be used to motivate students and help them write on mobile devices. It lists various graphic organizers, mind mapping, storyboarding, messaging, blogging, journaling, book making, and creative writing apps. It also includes ideas for using the apps, such as having students sketch stories, text in character, or change environments to inspire writing. Assessment rubrics and resources are presented at the end.
Multiple Intelligences ICT Applications and ToolsJacqui Sharp
The document lists various tools that can be used to support different types of intelligences and activities for learning including logical-mathematical, interpersonal, intrapersonal, musical, visual-spatial, bodily-kinesthetic, naturalist, verbal-linguistic intelligences. It provides examples of software, websites and applications that allow students to create presentations, videos, music, books, surveys and more to demonstrate their understanding in multiple ways.
For quite a few summers, I've taught kids ages 11-14 an Introduction to Programming Course held at the Young Scholars Institute. The kids start not knowing anything and after 5 days they have written full games using Java and Processing.org. I will do an overview of how and what I teach them, their learning process and how to keep them interested, and what I've discovered through the years. There will also be a few demos of the games the kids have written, including Tron Light Cycle, a version of Guitar Hero, and others. (Demos not in the presentation) You can watched the talk at http://www.ustream.tv/recorded/2370164
This document discusses how social media can be used in education. It outlines various social media tools like Facebook, YouTube, and Twitter and how they allow for more outward and inward engagement. Examples are given of how students can use tools like Glogster for interactive assignments involving travel blogs. The challenges of implementing social media in schools are addressed, noting that buy-in from leadership is important. Next steps encourage following the presenters on social media and accessing resources on integrating tools like Twitter in teaching.
Libraries have started moving away from being places of consumption and are becoming places of production. Libraries are about discovery; giving people a safe and comfortable place to dream, think, and create is very important because it gives people a chance to explore various technologies and educational opportunities that they can use to enrich their lives. STEAM education refers to teaching and learning, mostly hands-on, in the fields of Science, Technology, Engineering, Art, and Mathematics. There are several ways to incorporate the STEAM educational framework into your libraries and this webinar will touch on the following and more:
* Learn what STEAM is
* Creating and managing a collaborative learning space, oftentimes referred to as a makerspace
* Administering a robotics league
* Organizing learning events
* Partnering with businesses and other organizations
* Assessing the success of your programs
Online Presentation for the TESOL EVO09 workshop "Multiliteracies for Social Networking and Collaborative Learning Environments" on Jan 22, 2009 at 11 am GMT.
This document provides summaries of and links to various online creativity and collaboration tools for teachers and students. It lists over 30 different tools across multiple categories like mind mapping, timeline creation, video editing, presentation tools, and more. For each tool, there is a brief description of its functionality and a screenshot along with the URL to access the tool. The overall purpose is to showcase a wide range of digital resources that can be used to boost creativity.
Webinar 2017-10-12 -Tools for Editing Digital Stories and Promoting Them to Y...TechSoup
Now that you've got raw video footage to tell your nonprofit's story, watch this webinar to learn how to turn your video into an amazing finished product. In this video, you will learn:
Post-production video editing best practices
Editing tools from free to high-end
Tips on adding sound and graphics
Resources for finding royalty-free audio and graphics
Posting to YouTube and utilizing their nonprofit program
Best practices on sharing & promoting your video effectively with tagging, social sharing, and on your own website and more!
W Eb 2.0 Aps For Differentiated Instructionccapozzoli
The document provides an overview of various Web 2.0 tools that can be effectively integrated into instruction including tools for collaboration, presentations, note-taking, mind mapping, forms/polls, podcasting, video, blogging, wikis, web pages, communication, and multimedia. It emphasizes selecting the right tool to meet lesson objectives and allowing student choice and input when integrating technology.
DoInk is a website for users ages 13 and up to create and animate art online. Users can make art without logging in, but must create an account to save their work. With an account, users can publish their art for others to view, like, comment on, and find inspiration from other users' works. The site allows users to bring drawings to life through animation by taking them frame by frame. It's a free site where users can connect, learn, and share creative works.
Web 2.0 refers to second-generation Internet-based services that emphasize online collaboration and sharing among users. It allows people to interact and collaborate with each other in a social media dialogue as creators of user-generated content in a virtual community, in contrast to websites where people are limited to the passive viewing of content. The term also refers to the trend towards greater user control over how and what information is shared.
Capzles is a free online tool that allows users to create timelines and presentations by combining multimedia content such as videos, images, audio and text. It has features that make the content easy to view and share, and allows for social networking functions. The tool is accessible for teachers and students of various ages and abilities. Capzles can be used in the classroom to have students create timelines on different subjects and encourages collaboration. Content is added using the tools on the left sidebar, and capzles can be designed and shared and with privacy settings adjusted.
This document provides a list of over 50 free online multimedia resources that can be used for various purposes including image manipulation, slideshow creation, screencasting, presentations, audio/video editing, chatrooms, and podcasting. Key resources mentioned include Flickr for photo sharing, BigHugeLabs and EasyMoza for image manipulation, Animoto and Kizoa for slideshow creation, Screencast-o-matic for screencasting, Prezi and Slide for presentations, Audacity for audio editing, and Chatzy for text chatrooms. Instructions are provided for using some of the tools and examples of past work are linked.
The document discusses photo book creation software options for making printed photo books as gifts or for profit. It provides an overview of several photo book creation programs, summarizing their key features, ease of use, and pricing. The author details their initial experiments using the Unibind MyPhotoBooks software and areas for improvement. The ideal photo book software according to the author would have automatic layout, ability to efficiently lay out many photos per page, and options for local or online printing.
This document outlines the terms of use for Mixbook.com, an online photo book and scrapbook creation service. It states that by using the service, users agree to abide by these terms. Key points include that users must be 13 or older, Mixbook can change fees and policies at any time, and users are responsible for payment and agree not to post illegal or harmful content. Mixbook owns all content and can terminate accounts at its discretion.
(10’) The teacher will ask for volunteers to read their short biographies
aloud. The rest of the class will have to guess which athlete they are talking about.
Voki is a web tool that allows users to create talking animated characters called Vokis to express themselves online. Users can customize the appearance and voice of their Voki character, choosing from a variety of options for its look, background, accent, and recorded or typed text. Once complete, the Voki can be published, shared on other websites, or embedded in blogs or other online spaces.
(10’) The teacher will ask for volunteers to read their short biographies
aloud. The rest of the class will have to guess which athlete they are talking about.
This document summarizes techniques for incorporating speaking practice into world language classes presented by Kristi Weisenburger and Laurel Schenkoske at the WAFLT conference. It discusses challenges of class size and providing feedback, and recommends using free or low-cost tools like Voki, Eyejot, and CLEAR to record student speaking practice, assign speaking homework, and provide feedback to help build student confidence and improve pronunciation.
Voki allows users to create talking avatars that can be used for communication and assessment in the classroom. Teachers can have students create Vokis to resemble story characters and provide speech, which improves pronunciation. To make a Voki, users register for a Voki account at voki.com, customize an avatar's appearance and voice, choose a background and color, then publish and embed the Voki in a blog, wiki or website using the HTML code.
This blog post introduces four different web tools - Comics Lab, GoAnimate, Glogster, and Imgur - that can be used to incorporate technology into English language lessons. For each tool, detailed instructions are provided on how to access and use the tool. Sample language learning activities are also proposed that utilize the tools, focusing on topics like greetings, future plans, free time activities, and image editing. Students' work created with the tools will be shared on the teacher's blog.
This document provides summaries and examples of using several Web 2.0 tools for English language teaching, including Avatar Maker, Tag Galaxy, Sketchcast, and Gizmoz. Sample activities are proposed that use these tools to work on skills like writing, reading comprehension, and description. Students would create avatars, search for images by tags, draw and narrate stories, or design what they would change in their country if a superhero. Instructions and links are provided to help students complete the activities.
This document provides information on various online tools that can be used for language teaching including:
- MYLO - Exercises that can be done without logging in
- Storybird - An online storytelling tool where students can illustrate stories
- Xtranormal - Allows creating movies from scripts using text-to-speech
- Quizlet - A site for making and finding flashcards
- Wallwisher/Linoit - Sites for collaborative note-taking
- Prezi - A dynamic presentation tool
- Edmodo - An online virtual learning environment
- Lingro - Allows looking up definitions by laying a dictionary over web pages
It also lists useful language teaching blogs and encourages exploring more tools on
The document discusses using various Web 2.0 tools for teaching English, including blogs, wikis, and online movie and comic creation tools. Blogs allow teachers to communicate with students outside of class time and provide exercises. Wikis enable collaborative work and student communication. Tools like Dvolver and Make Beliefs Comix allow students to creatively make movies and comics online. Sample activities are provided using these tools to teach English around Christmas and encourage student imagination and language use.
The document provides instructions for 4 activities for students to complete using different Web 2.0 tools:
1) Create an avatar using Heromachine and write a character description.
2) Create a video of holidays using Animoto and write a description.
3) Create a photo album about travel planning steps using Mixbook.
4) Create a video about a favorite singer/group using One True Media and do a presentation.
This document provides tutorials and instructions for using various educational technology tools for blogging and digital storytelling in the classroom. It includes step-by-step guides for using Fodey to create newspaper articles, Voki to make avatars, Mixbook for digital photo albums, and Xtranormal to produce videos. Various activities are proposed utilizing these tools, with evaluation criteria provided. The document aims to demonstrate how Web 2.0 technologies can enhance English language teaching.
This blog post introduces four different online tools that can be used in English language teaching: Fodey, Voki, ToonDoo, and Auto Motivator. For each tool, the blog provides a brief description of its functionality and step-by-step instructions for how to use it. It also includes sample student activities and rubrics for each tool to help teachers integrate them into their lessons. The overall aim of the blog is to share useful web tools that can motivate students and incorporate interesting multimedia activities into English learning.
The document provides descriptions and examples of how to use various online tools and websites for educational purposes, including creating timelines, mind maps, word clouds, comics, and using tools like Google Images, Google Sets, Hyperlink, Screen Hunter, Voice Thread, Animoto, blogs, and bookmarks.
This blog entry introduces activities for students to complete using various Web 2.0 tools. It begins by welcoming readers to the blog and explaining its purpose for an English teaching course. Then, it provides instructions for three activities: 1) Creating a video using Animoto about a favorite celebrity, 2) Creating an avatar on Voki to describe an ideal pet, and 3) Creating a poster on Glogster about personal likes and dislikes. Criteria for evaluating the activities are mentioned, such as language use, creativity, and on-time completion. Examples are provided before the instructions for each activity.
This book will explore 16 websites that the educators can use to help students to learn via online. Lets make the learning and teaching according to their ways!
This document discusses the use of various Web 2.0 tools for English language teaching. It begins by introducing the author's wiki containing samples and activities using these tools. The author then describes accounts created on 7 tools: Animoto, Edu.glogster, Goanimate, Slide, Voki, Pim.pam.pum.net, and Xtranormal. Four of these tools are discussed in more detail: Xtranormal for creating movies, Voki for speaking avatars, Slide for organizing photos, and Edu.glogster for creating online posters. Finally, 4 lesson plans are proposed using these tools to practice functions, introduce oneself, tell photo stories, and create health posters.
These web 2.0 tools provide opportunities for language practice and project-based activities:
1) Blogs, wikis, and online forums allow students to practice writing skills while collaborating with peers globally.
2) Animation, comic, and video creation tools like GoAnimate, Toondoo, and Dvolver enable students to tell stories and describe experiences through multimedia projects.
3) Presentation tools like EduGlogster support student projects combining written work, images, audio, and video to showcase topics of interest.
4) Teachers can assign open-ended activities where students choose characters and scenarios to develop language skills through interactive digital creations.
The document discusses various free tech tools that can be used for differentiation, including Google Docs, Sites, Slideshare, Padlet, Livebinders, Animoto, Glogster, Toondoo, and Wordles. It provides instructions for setting up and using Google accounts and sites for collaboration between teachers and students. Examples are given of how tools like Google Docs can be used for peer editing, discussion sites, homework, and interactive study guides. The goal is to showcase free resources that teachers can employ in their classrooms.
The BYOD/BYOT implementation plan for 5th grade writing selects Microsoft OneDrive as the platform since Cobb County has adopted its use for collaboration between teachers, principals, and students. The plan describes accommodating students without devices by using classroom technology and allowing device-sharing. Students will work in groups, using OneNote for collaboration and feedback on writing pieces. Six recommended apps are listed to support writing at this grade level: Storybird for creative writing; SimpleMind for mind mapping; Adobe Slate for customizing writing; Writing Challenge to gamify the process; Foldify for inspiration from 3D images; and Book Creator for publishing student work.
The document discusses several Web 2.0 tools that can be used for learning and collaboration, including Storybird for collaborative storytelling, Voicethread for multimedia slideshows and commenting, Grammarly for grammar and plagiarism checking, and Noteflight for online music notation and composition. These tools provide opportunities for student creativity, engagement, and working together even when not in the same physical space.
Add so me spice to your reading and writing classes Presented by Aysegul Lima...Aysegul Liman Kaban
Add so me spice to your reading and writing classes Presented by Aysegul Liman Kaban Do your students find reading and writing activities boring? Have you ever wished practicing reading and writing could be more fun for you and your students? If you say yes, this session is for you. As we already know it is not easy to motivate the students who are easily distracted and only think about surfing on the Internet. In this workshop we will look at ways to use technology to make your classes more fun.
27 May 2012 Yeditepe University THE IATEFL LT & TD SIG Joint Conference Yeditepe University, istanbul Turkey
THE IATEFL LT & TD SIG Joint Conference
27 May 2012
The document is a series of blog entries for an online English learning course. The blog introduces various digital tools for language learning including Odosketch (for drawing and storytelling), Penzu (for journal writing), Fodey (for creating newspaper articles), and One True Media (for making videos from pictures). Later entries provide instructions for activities where students use the tools to complete tasks like telling a story through a drawing on Odosketch or writing a news article for a school newspaper using Fodey. The blog aims to teach students digital skills while creating an online space for them to display and share their work.
This document contains a lesson on ergonomics and proper posture for computer workstations. It includes activities where students must identify appropriate and inappropriate workstation characteristics, describe workstation equipment in Spanish, label diagrams of good and bad posture, and find ways to reduce back problems related to computer use. The document also includes matching titles to paragraphs about seating, monitors, keyboards, heat and light, noise, personal safety, space, and electrical safety. It concludes with additional online activities for students to complete.
This document provides guidance on health and safety regulations for working with computers. It summarizes that employers must conduct risk assessments of workstations and consider equipment, furniture, environment, tasks and individual needs. It also outlines minimum standards for displays, keyboards, work surfaces, chairs and work environments. Users have rights to eye tests and basic spectacles if needed for computer work. Laptop users should have workstations assessed and take breaks to avoid ergonomic issues. Advice is available from ATL on health and safety matters relating to computer use.
This document provides information on ergonomic issues and suggestions to address problems related to CTD, vision, and posture when working at a computer. It asks the student to identify which suggestions are true or false, translate the true suggestions to Spanish, and correct any false suggestions. The student is then meant to fill in their responses.
This file was taken from http://www.nysut.org/files/hs_070828_computerfactsheet.pdf.
It will be used as an authoritative text to work with students about health and safety.
The document discusses the impact of technology on English language teaching. It notes that we are entering a new era where technology and information aim to change how teaching and learning occur. It argues that teachers must be trained to use technology and be open-minded about incorporating new communication methods. Specifically, it explores how concepts like Web 2.0, digital natives, blended learning, and connectivism are transforming theories of learning and the field of education with more online and collaborative opportunities emerging. The future of English language teaching is positioned to increasingly incorporate the Internet, blogs, wikis and virtual learning to radically change the learning process.
Natalia completed a peer review of Naty's blog for an assignment. Some elements like videos were not properly embedded. Natalia suggested taking screenshots and uploading images with links instead. She also recommended mentioning the assignment, subject, and teacher in the "purpose" section. While including tutorial videos was a good idea, Natalia thought Naty should have provided steps herself to complement the videos. Overall, Natalia liked the topic and activities related to it.
This chart was created as an evaluation of the links used in the Webquest SAVE THE PLANET done as Assignment#3: Internet-based project (using WebQuest), required for the subject 'ICT in English Teaching' at Universidad Tecnológica Nacional.
This self-assessment guide was done as part of the Webquest made for Assignment#3: Internet-based project (using WebQuests).
The lesson plan was required for the subject 'ICT in English Teaching' at Universidad Tecnológica Nacional.
This lesson plan is done as Assignment#3: Internet-based project (using WebQuest).
It is aimed at intermediate students who are learning about ecology and finding different ways to SAVE THE PLANET.
The lesson plan was required for the subject 'ICT in English Teaching' at Universidad Tecnológica Nacional.
This lesson plan is done in order to complement the work done with the software Hot Potatoes.
It is aimed for students who are learning about animals and their classification (mammals, reptiles, birds, fish and amphibians), can('t) structure and action verbs performed by animals.
It was required as an assigment for the subject 'ICT in English Teaching' at Universidad Tecnológica Nacional.
Observability Concepts EVERY Developer Should Know -- DeveloperWeek Europe.pdfPaige Cruz
Monitoring and observability aren’t traditionally found in software curriculums and many of us cobble this knowledge together from whatever vendor or ecosystem we were first introduced to and whatever is a part of your current company’s observability stack.
While the dev and ops silo continues to crumble….many organizations still relegate monitoring & observability as the purview of ops, infra and SRE teams. This is a mistake - achieving a highly observable system requires collaboration up and down the stack.
I, a former op, would like to extend an invitation to all application developers to join the observability party will share these foundational concepts to build on:
Full-RAG: A modern architecture for hyper-personalizationZilliz
Mike Del Balso, CEO & Co-Founder at Tecton, presents "Full RAG," a novel approach to AI recommendation systems, aiming to push beyond the limitations of traditional models through a deep integration of contextual insights and real-time data, leveraging the Retrieval-Augmented Generation architecture. This talk will outline Full RAG's potential to significantly enhance personalization, address engineering challenges such as data management and model training, and introduce data enrichment with reranking as a key solution. Attendees will gain crucial insights into the importance of hyperpersonalization in AI, the capabilities of Full RAG for advanced personalization, and strategies for managing complex data integrations for deploying cutting-edge AI solutions.
HCL Notes und Domino Lizenzkostenreduzierung in der Welt von DLAUpanagenda
Webinar Recording: https://www.panagenda.com/webinars/hcl-notes-und-domino-lizenzkostenreduzierung-in-der-welt-von-dlau/
DLAU und die Lizenzen nach dem CCB- und CCX-Modell sind für viele in der HCL-Community seit letztem Jahr ein heißes Thema. Als Notes- oder Domino-Kunde haben Sie vielleicht mit unerwartet hohen Benutzerzahlen und Lizenzgebühren zu kämpfen. Sie fragen sich vielleicht, wie diese neue Art der Lizenzierung funktioniert und welchen Nutzen sie Ihnen bringt. Vor allem wollen Sie sicherlich Ihr Budget einhalten und Kosten sparen, wo immer möglich. Das verstehen wir und wir möchten Ihnen dabei helfen!
Wir erklären Ihnen, wie Sie häufige Konfigurationsprobleme lösen können, die dazu führen können, dass mehr Benutzer gezählt werden als nötig, und wie Sie überflüssige oder ungenutzte Konten identifizieren und entfernen können, um Geld zu sparen. Es gibt auch einige Ansätze, die zu unnötigen Ausgaben führen können, z. B. wenn ein Personendokument anstelle eines Mail-Ins für geteilte Mailboxen verwendet wird. Wir zeigen Ihnen solche Fälle und deren Lösungen. Und natürlich erklären wir Ihnen das neue Lizenzmodell.
Nehmen Sie an diesem Webinar teil, bei dem HCL-Ambassador Marc Thomas und Gastredner Franz Walder Ihnen diese neue Welt näherbringen. Es vermittelt Ihnen die Tools und das Know-how, um den Überblick zu bewahren. Sie werden in der Lage sein, Ihre Kosten durch eine optimierte Domino-Konfiguration zu reduzieren und auch in Zukunft gering zu halten.
Diese Themen werden behandelt
- Reduzierung der Lizenzkosten durch Auffinden und Beheben von Fehlkonfigurationen und überflüssigen Konten
- Wie funktionieren CCB- und CCX-Lizenzen wirklich?
- Verstehen des DLAU-Tools und wie man es am besten nutzt
- Tipps für häufige Problembereiche, wie z. B. Team-Postfächer, Funktions-/Testbenutzer usw.
- Praxisbeispiele und Best Practices zum sofortigen Umsetzen
Removing Uninteresting Bytes in Software FuzzingAftab Hussain
Imagine a world where software fuzzing, the process of mutating bytes in test seeds to uncover hidden and erroneous program behaviors, becomes faster and more effective. A lot depends on the initial seeds, which can significantly dictate the trajectory of a fuzzing campaign, particularly in terms of how long it takes to uncover interesting behaviour in your code. We introduce DIAR, a technique designed to speedup fuzzing campaigns by pinpointing and eliminating those uninteresting bytes in the seeds. Picture this: instead of wasting valuable resources on meaningless mutations in large, bloated seeds, DIAR removes the unnecessary bytes, streamlining the entire process.
In this work, we equipped AFL, a popular fuzzer, with DIAR and examined two critical Linux libraries -- Libxml's xmllint, a tool for parsing xml documents, and Binutil's readelf, an essential debugging and security analysis command-line tool used to display detailed information about ELF (Executable and Linkable Format). Our preliminary results show that AFL+DIAR does not only discover new paths more quickly but also achieves higher coverage overall. This work thus showcases how starting with lean and optimized seeds can lead to faster, more comprehensive fuzzing campaigns -- and DIAR helps you find such seeds.
- These are slides of the talk given at IEEE International Conference on Software Testing Verification and Validation Workshop, ICSTW 2022.
Let's Integrate MuleSoft RPA, COMPOSER, APM with AWS IDP along with Slackshyamraj55
Discover the seamless integration of RPA (Robotic Process Automation), COMPOSER, and APM with AWS IDP enhanced with Slack notifications. Explore how these technologies converge to streamline workflows, optimize performance, and ensure secure access, all while leveraging the power of AWS IDP and real-time communication via Slack notifications.
Programming Foundation Models with DSPy - Meetup SlidesZilliz
Prompting language models is hard, while programming language models is easy. In this talk, I will discuss the state-of-the-art framework DSPy for programming foundation models with its powerful optimizers and runtime constraint system.
“An Outlook of the Ongoing and Future Relationship between Blockchain Technologies and Process-aware Information Systems.” Invited talk at the joint workshop on Blockchain for Information Systems (BC4IS) and Blockchain for Trusted Data Sharing (B4TDS), co-located with with the 36th International Conference on Advanced Information Systems Engineering (CAiSE), 3 June 2024, Limassol, Cyprus.
Unlock the Future of Search with MongoDB Atlas_ Vector Search Unleashed.pdfMalak Abu Hammad
Discover how MongoDB Atlas and vector search technology can revolutionize your application's search capabilities. This comprehensive presentation covers:
* What is Vector Search?
* Importance and benefits of vector search
* Practical use cases across various industries
* Step-by-step implementation guide
* Live demos with code snippets
* Enhancing LLM capabilities with vector search
* Best practices and optimization strategies
Perfect for developers, AI enthusiasts, and tech leaders. Learn how to leverage MongoDB Atlas to deliver highly relevant, context-aware search results, transforming your data retrieval process. Stay ahead in tech innovation and maximize the potential of your applications.
#MongoDB #VectorSearch #AI #SemanticSearch #TechInnovation #DataScience #LLM #MachineLearning #SearchTechnology
In his public lecture, Christian Timmerer provides insights into the fascinating history of video streaming, starting from its humble beginnings before YouTube to the groundbreaking technologies that now dominate platforms like Netflix and ORF ON. Timmerer also presents provocative contributions of his own that have significantly influenced the industry. He concludes by looking at future challenges and invites the audience to join in a discussion.
Cosa hanno in comune un mattoncino Lego e la backdoor XZ?Speck&Tech
ABSTRACT: A prima vista, un mattoncino Lego e la backdoor XZ potrebbero avere in comune il fatto di essere entrambi blocchi di costruzione, o dipendenze di progetti creativi e software. La realtà è che un mattoncino Lego e il caso della backdoor XZ hanno molto di più di tutto ciò in comune.
Partecipate alla presentazione per immergervi in una storia di interoperabilità, standard e formati aperti, per poi discutere del ruolo importante che i contributori hanno in una comunità open source sostenibile.
BIO: Sostenitrice del software libero e dei formati standard e aperti. È stata un membro attivo dei progetti Fedora e openSUSE e ha co-fondato l'Associazione LibreItalia dove è stata coinvolta in diversi eventi, migrazioni e formazione relativi a LibreOffice. In precedenza ha lavorato a migrazioni e corsi di formazione su LibreOffice per diverse amministrazioni pubbliche e privati. Da gennaio 2020 lavora in SUSE come Software Release Engineer per Uyuni e SUSE Manager e quando non segue la sua passione per i computer e per Geeko coltiva la sua curiosità per l'astronomia (da cui deriva il suo nickname deneb_alpha).
Communications Mining Series - Zero to Hero - Session 1DianaGray10
This session provides introduction to UiPath Communication Mining, importance and platform overview. You will acquire a good understand of the phases in Communication Mining as we go over the platform with you. Topics covered:
• Communication Mining Overview
• Why is it important?
• How can it help today’s business and the benefits
• Phases in Communication Mining
• Demo on Platform overview
• Q/A
AI 101: An Introduction to the Basics and Impact of Artificial IntelligenceIndexBug
Imagine a world where machines not only perform tasks but also learn, adapt, and make decisions. This is the promise of Artificial Intelligence (AI), a technology that's not just enhancing our lives but revolutionizing entire industries.
Essentials of Automations: The Art of Triggers and Actions in FMESafe Software
In this second installment of our Essentials of Automations webinar series, we’ll explore the landscape of triggers and actions, guiding you through the nuances of authoring and adapting workspaces for seamless automations. Gain an understanding of the full spectrum of triggers and actions available in FME, empowering you to enhance your workspaces for efficient automation.
We’ll kick things off by showcasing the most commonly used event-based triggers, introducing you to various automation workflows like manual triggers, schedules, directory watchers, and more. Plus, see how these elements play out in real scenarios.
Whether you’re tweaking your current setup or building from the ground up, this session will arm you with the tools and insights needed to transform your FME usage into a powerhouse of productivity. Join us to discover effective strategies that simplify complex processes, enhancing your productivity and transforming your data management practices with FME. Let’s turn complexity into clarity and make your workspaces work wonders!
How to Get CNIC Information System with Paksim Ga.pptxdanishmna97
Pakdata Cf is a groundbreaking system designed to streamline and facilitate access to CNIC information. This innovative platform leverages advanced technology to provide users with efficient and secure access to their CNIC details.
HCL Notes and Domino License Cost Reduction in the World of DLAUpanagenda
Webinar Recording: https://www.panagenda.com/webinars/hcl-notes-and-domino-license-cost-reduction-in-the-world-of-dlau/
The introduction of DLAU and the CCB & CCX licensing model caused quite a stir in the HCL community. As a Notes and Domino customer, you may have faced challenges with unexpected user counts and license costs. You probably have questions on how this new licensing approach works and how to benefit from it. Most importantly, you likely have budget constraints and want to save money where possible. Don’t worry, we can help with all of this!
We’ll show you how to fix common misconfigurations that cause higher-than-expected user counts, and how to identify accounts which you can deactivate to save money. There are also frequent patterns that can cause unnecessary cost, like using a person document instead of a mail-in for shared mailboxes. We’ll provide examples and solutions for those as well. And naturally we’ll explain the new licensing model.
Join HCL Ambassador Marc Thomas in this webinar with a special guest appearance from Franz Walder. It will give you the tools and know-how to stay on top of what is going on with Domino licensing. You will be able lower your cost through an optimized configuration and keep it low going forward.
These topics will be covered
- Reducing license cost by finding and fixing misconfigurations and superfluous accounts
- How do CCB and CCX licenses really work?
- Understanding the DLAU tool and how to best utilize it
- Tips for common problem areas, like team mailboxes, functional/test users, etc
- Practical examples and best practices to implement right away
Dr. Sean Tan, Head of Data Science, Changi Airport Group
Discover how Changi Airport Group (CAG) leverages graph technologies and generative AI to revolutionize their search capabilities. This session delves into the unique search needs of CAG’s diverse passengers and customers, showcasing how graph data structures enhance the accuracy and relevance of AI-generated search results, mitigating the risk of “hallucinations” and improving the overall customer journey.
1. ICT in English Teaching – UTN 2010 – ROMINA MARINO
Assignment#4: Web 2.0 tools
This is the link to my blog: http://web20tools.blogspot.com/
My seven choices:
1. http://www.eslvideo.com/
2. http://goanimate.com/
3. http://edu.glogster.com/
4. http://www.mixbook.com/
5. http://www.wordle.net/
6. http://zimmertwins.com/
7. http://voicethread.com/
My four choices:
1. http://goanimate.com/
2. http://edu.glogster.com/
3. http://www.mixbook.com/
4. http://www.wordle.net/
DESCRIPTION OF THE TOOLS
GOANIMATE
GoAnimate is a tool that gives you the opportunity to create your own animations ‘exactly in the way you
want’. You can create your own characters, direct them and see other animations uploaded by other people.
It’s easy, fun and free. You can create your own animations in a creative way, making them unique. It
provides you with different tools that will help you in creating your movie the way you want.
2. How to use it
1. If you already have an account you just click on LOGIN but if you do not, you should click on SIGN UP and
follow the registration steps. You will have to choose between a BASIC or PLUS account (but keep in mind
that if you choose a PLUS account you will have to pay for it).
2. Once you have completed your registration, you will proceed on creating your animation. You will now
have to choose to begin by creating a character or going directly to create a movie. If you choose the second
option, you will be given some already-made characters that you can use in your animation.
3.
4. 3. If you want to create your own character, you will be given plenty of options to design him/her.
4. Now, you enter the design page in which you will be able to choose the setting for your movie, the
characters, the objects that you like to appear in the scene and some music.
5. 5. You can choose your characters’ voice and movements and how they interact with each other. To
continue working on your animation, you will need to add more scenes and choose again the setting (if you
want to change it), your characters’ movements and kinds of interaction, the objects that appear in the
scene, etc)
6. 6. Once you are happy with your animation, you click on SAVE and a window will appear. You will have to
provide a title for your movie, some tags, a description, and choose the movie language. You will have to
mark it as DRAFT or PUBLISHED, and as PUBLIC or PRIVATE. You proceed by clicking on SAVE ONLY or on
SAVE & SHARE according to what you want.
Why I find it useful
GoAnimate is an useful tool to engage your students in writing, for example. They can create their stories
and create a dialogue for characters to interact with each other. Its attractive style and tools encourage
students in the use of Web 2.0 creating their own animations and sharing them with other people around
the world. The website also provides you with an embed code of the movie that you and your learners can
use to insert in other sites for people to see it.
- You may ask your students to turn their written stories into an animated movie that they themselves can
create.
- By using this tool, you are asking your students to develop their writing skills since they will have to make
their written stories into a dialogue format to create the animation.
7. - You may also ask your students to become one of the characters and make him talk about a specific topic
(as if the character was giving a lecture, for example).
8. GLOGSTER
This is a tool that will allow students to create their own Glog.
A Glog is an interactive visual platform in which users create a “poster or web page” containing multimedia
elements including: text, audio, video, images, graphics, drawings, and data.
How to use it
1. The first thing that one should do is to create an account. For that you just click on REGISTER. If you
already have an account you click on LOG IN. Once your registration is completed, you just click on “CREATE
A GLOG”.
9. 2. You may have to wait a few seconds before the interface can be seen in your screen. Then, once it is
ready, a menu will appear on the left with many options you can choose from ( you will be able to choose
the wall you like, add graphics, text, images, video, sound and data. You also have an option to ‘draw’ what
you like)
3. To upload images, sounds or videos, you click on “IMAGE; SOUND; VIDEO” respectively on the menu on
the left. You can upload them from your computer o insert a link to the one you want. You can also add
them a frame.
4. When you think your Glog is ready, you can preview it. Once it is finished, you click on “SAVE OR
PUBLISH”. You will have to provide a name for it, choose a category and define some tags. The emergent
window will provide you with the link to your Glog.
You can then find an embed code to insert your Glog in other websites if you want.
10. Why I find it useful
I find this tool useful for creating online posters full of images and colours and to which you can also add
sounds and videos. Students will be able to develop creative skills and use their knowledge to create
something that it could be really interesting and attractive to present to other people.
- You may ask your students to create their own Glogs with their likes and dislikes.
- Learners can create online posters of the topics they are working with in class.
- You may ask your learners to create a poster (Glog) to present a topic on a particular area. For example, if
you are working with endangered animals you can divide the class in groups to present different sub-topics.
They can present their work then using a Glog.
11. MIXBOOK
Mixbook is a tool that allows you to create books online in an easy and funny way. You can then ask for your
book to be printed out (but for this you will have to pay) or just make an online creation that will be visible
to all of your students and mates.
1. To get started you will need to create an account. Click on ‘Sign up’ and complete the requirements. It
only asks you to fill in with your name and email address. If you want, you can also sign up to receive the
newsletter. If you already have an account, you just click on “Log in”.
12. 2. To start creating your MIXBOOK you will have to provide a title for it, a description, some tags, and
choose a category. You can also select who will be able to see your book and you can invite people to help
you in designing it.
3. The next step to follow is
to choose the size and format
of your book. You can choose
one of the first three for free,
but for the last option you will
have to pay.
13. 4. Consequently, you can choose a theme out of the many and vary options the tool provides you with
(holidays, wedding, travel, general, occasion, baby, education, family, seasons and romance). Once you are
happy with the theme, you just click on “Choose theme”.
5. In the next step, you are given the option to take a guided tour through the use of Mixbook. If you don’t
want to, it doesn’t matter. Mixbook is an easy tool and you will manage to use it without problem.
You can choose photos from different sources (you can upload them, choose them from the ones stored in
your computer, upload them from Facebook, Flirck, Yahoo or your Picasa album). Select has many as you
need/want and click on “Add photos”.
14. 6. You are then given different layouts, backgrounds and stickers to add to your book related to the theme
that you already have selected. In this step, you also have to include in your book the photos you have
chosen. Once you are happy with your book, you click on “SAVE”.
15. 7. You will be able to see the final creation. You can email it to a friend or use the embed code to insert it in
other websites.
16. Why I find it useful
Mixbook is a funny and easy tool to use that will engage students in creating their own photos albums. Its
colours and layouts are very attractive raising learners’ motivation to try and experiment different formats
while using the tool.
- You can make your students create their own photo albums to describe their life and their family. You can
encourage them to add some text and when they are ready, they can show it to the rest of the class and
introduce themselves using the vocabulary they have learnt.
- Students can write a story and then use Mixbook to tell it. They will be able to add text and photos that
will support their story.
17. WORDLE
Wordle.net is a tool that allows you to create graphic representations of any text according to its word
occurrence. You just copy and paste the text you want, or you can specify an URL. Wordle will then analyze
the text and create the graphic according to words' frequency; those that are more frequent will be given a
bigger size. You can then change the colours, word orientation and the form of your 'cloud of words'.
In order to use this tool you don’t need to create an account.
How to use it
1. Once you have entered the site, you click on create.
18. 2. Then you are required to ‘paste in a bunch of text’, to enter the URL in which the text appears or just type
a del.iciou.s user name to see your tags and use one of those. Once you are done, you click on GO.
3. The tools itself will create the ‘cloud of words’ for you. But then, you are given the option to change the
text you have already chosen, the language, the font, the layout and the colour.
19. 4. As soon as you are happy with your work, you can open it in a new window to see how it looks, print it or
save it to public gallery. If you choose the last option, you will be required to give your ‘cloud’ a title, a
username and a description of your creation.
5. Finally, your creation will be saved. Once this is done, the site gives you an embed code to insert the
‘cloud’ in other websites. You will still be given the possibility to print it out.
20. Why I find this tool useful.
This tool allows you to use it in many different ways with your students. Of course, as it is really easy to be
used, your students will find an interesting tool that they will be able to apply to different activities.
- You may ask your students to write a description of themselves and create their own clouds. When all of
them are ready, you can encourage learners to identify each other from the cloud.
- If you are willing to work with a particular story, you can create a cloud for it and ask your students to
make predictions about what the story is going to be about.
- You can bring different clouds into the classroom for discussion on interesting topic. Then, you may ask
your students to write a paragraph on the results of that discussion and create their own clouds.
- You students can create clouds out of topics they have researched on and tell you about it taking into
account words’ prominence.
- It is an useful tool for your students to practice what they have learned. They can create clouds on the
different topics and use them to trigger their knowledge on the subject.
21. ELT ACTIVITIES USING THE TOOLS I’VE CHOSEN
GLOGSTER
Skills: reading and writing
Objectives: FOR STUDENTS TO:
• Develop writing and reading skills.
• Read and write movie reviews (to get them know about a particular type of text).
• Have fun working with an interesting and attractive tool while talking about their favourite movie.
• Develop their creative skills while creating the poster.
• Develop strategies and knowledge related to new technologies.
If you are working with movie reviews you can make use of GLOGSTER.
1. First of all, you should make your students read some reviews for them to know how are they
written and what information appears in them.
You may also want to make them write a review of their favourite movie. Although it is not stated and
described here, you will have to think the way in which to introduce the topic to your students, providing
them with some guidelines but always making it resemble a real-life activity. Make sure that the movies they
have chosen to work with are not repeated.
2. Once all the reviews are ready, you may encourage your students to create a poster of the movie
they have chosen using EDU.GLOGSTER. You will find a link at the top of this entry in which you can
find the instructions to use the tool.
3. Make them look for some pictures to add to their poster and maybe insert an audio file of one of the
movie’s soundtracks.
4. You can then create a blog to paste all the reviews and posters made by your students and get other
students to comment on the different entries, provide their opinions and tell the rest if they would
like to see the movie they kids are suggesting.
Evaluation criteria:
To evaluate this activity you will have to into account:
• Students ‘ reviews (you can ask them to prepare a first draft which you can correct and then give it
back for students to check your notes and make the necessary changes).
• Students’ involvement and commitment to the creation of the poster in Glogster.
• Students’ poster: kind of files used, written text, use of the tool (make them try to include as many
different tools as possible) and overall impression
GOANIMATE
Skills: writing, listening, reading and speaking.
Objectives: FOR STUDENTS TO:
• Express themselves in a creative way.
22. • Develop their writing, reading and listening skills.
• Develop their creative skills by using a Web 2.0 tool.
• Have fun while learning.
Maybe if you are one of those teachers that like asking their students to write stories and express
themselves, GoAnimate will be an interesting tool to include in your lessons.
Why don’t you start by sending your students attractive homework? I’m sure that they will be happy to do
homework of this kind.
1. You may start by showing your students different already-made movies on GoAnimate and also let
them explore the tool by themselves. Maybe you can also show them a video tutorial on how to use
it. On top of the page you will find a link to a blog’s entry that will provide you with the necessary
instructions to use the site.
2. Ask your learners to go home and write a short story in the form of a dialogue. It would be better to
start by using bubbles to make your characters speak (this will help you as teacher to correct their
mistakes). As time goes by and as students become more confident with the use of the tool, you can
ask them to use the voices provided by the tool or to record students’ own voices.
3. Ask them to send their animation to you by email and create a class blog to upload your students’
creations.
4. Encourage them to post a comment on each movie saying what they like and what can be improved.
5. You may want to use this activity as a kind of project and make it last a few lessons. If you do this,
you can help your learners to improve on their animations and the possible mistakes they have
made.
Evaluation criteria:
• You will need to make clear what your expectations are as regards quality and quantity of the work,
as well as what is acceptable and what is not in terms of content.
• If you are planning to carry out these activities in more than two lessons, you may want your
students to draft possible dialogues and correct mistakes before they make their animation.
• What you can also do if you don’t want to correct mistakes before students make the movie, is to
take notes of common errors that crop up and follow them up during the lesson. You can also do this
if your students make mistakes when commenting on the different animations.
• You should take into account students’ participation and commitment to the GoAnimate creation.
• You can suggest students to role play their animations. Some students love doing this!
MIXBOOK
Skills to be worked on: Reading – Writing – Speaking
Objectives: FOR STUDENTS TO:
• Develop their creative skills while creating the book.
• Develop strategies and knowledge related to new technologies.
• Express themselves in a creative way.
• Develop their writing, reading and speaking skills.
• Express themselves while performing orally in front of other people.
23. You have worked on a class Project for a long time and you do not know how to present it… MIXBOOK is a
fantastic tool that you can make use of to present your students’ work and make them participate as well.
1. Collect all the pictures, photos and information on the subtopics you have chosen for students to
work on while taking part on the BIG PROJECT, try to get them sort all that content out.
2. Make them help you in designing the book and choosing its style.
3. You can then divide the whole class into groups and assign each of them a subtopic to present in not
more than four pages of the online book.
4. First of all, you should ask them to prepare a kind of summary of all the work they have done on the
particular subtopic they have to explain. You can ask them to present this summary orally and
encourage the other students to suggest improvements or point out the good choices.
5. Once all the groups have presented their summaries, you can make them now use all that
information to design four pages of the online book. They will be asked to add photos, pictures and
some information to briefly explain the subtopic.
6. Once all the work is finished, you may need to add some extra details yourself or improve on the
general style/design of the whole book.
7. Once the presentation of the Project is finished, you may assigned one page to each student to
reflect upon the Project and the way it is presented (the use of MIXBOOK).
8. You and your students may now invite the headmistress, coordinators and parents to present the
work of, probably, a whole year. The presentation of the project will be attractive and motivating
using a tool such as MIXBOOK.
Evaluation criteria:
The mark for students’ participation in the making of the online book will be considered one more mark of
all the ones collected during the making of the BIG PROJECT. But in this case, you will have to take into
account different things.
• The first one will be students’ summary of the topic they have to present and students’ oral
presentation of it.
• Then, you will have to evaluate learners’ participation and commitment to the creation and design
of the four pages they will have to make that are part of the online book.
• Encourage your students to spot their mistakes when writing the information on the different pages.
Make sure that they notice them and correct them. Otherwise, let them know and make the
necessaries changes.
• Give another mark for the overall impression you get when reading students’ production of the
book.
24. WORDLE
Skills: reading and writing.
Objectives: FOR STUDENTS TO:
• Have fun while developing new strategies and knowledge of new technologies.
• Develop their writing and reading skills.
• Get to know each other / famous people better through the use of descriptions.
If you are working on the topic of personal/physical description, it would be a good idea to use
WORDLE.NET.
1. Here you can choose between two different options: you can work with famous people o
with your students’ own descriptions of themselves.
2. Let them know that it is of vital importance that they do not tell their mates anything about
the description they are working on.
3. No matter which option you choose, make your students turn the description into a word
cloud. If they are working with famous people, you can make them work in groups. If you
prefer to work with the other option, it will be better to make them work individually.
4. Once the word clouds are ready, ask your students to send them to you by email. You will
then have to create a blog and insert your students clouds in different entries.
5. Invite your students to comment on the entries and to guess who each particular cloud
belongs to and who it is describing. Encourage them to tell the others why they think that
way, and which they think the key words are.
6. Once all your students have participated and commented in the different entries, ask them
to post a new comment under the cloud they have created with the full text of their
description so that their mates can know the solution.
Evaluation criteria:
In order to evaluate this activity you will first have to correct your students written descriptions
taking into account the amount of specific vocabulary used in the text and some possible grammar
mistakes.
What you can do is to invite your students to write a first draft and hand it in, you correct it and
give it back for students to create a final copy that you will have to check again.
Once all the descriptions are ready, upload them to the blog.
You may not correct your students’ mistakes in the comments they post but do take note and
discuss them in class (especially those mistakes that affect communication or are related to the
topic you are teaching).
Also, take into account for the final mark students’ participation in the blog.