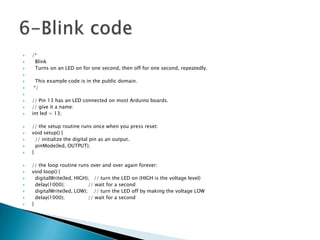
1




/*
Blink
Turns on an LED on for one second, then off for one second, repeatedly.





This example code is in the public domain.
*/




















// Pin 13 has an LED connected on most Arduino boards.
// give it a name:
int led = 13;
// the setup routine runs once when you press reset:
void setup() {
// initialize the digital pin as an output.
pinMode(led, OUTPUT);
}
// the loop routine runs over and over again forever:
void loop() {
digitalWrite(led, HIGH); // turn the LED on (HIGH is the voltage level)
delay(1000);
// wait for a second
digitalWrite(led, LOW); // turn the LED off by making the voltage LOW
delay(1000);
// wait for a second
}


















CODE
int sensorPin = A0;
int sensorValue = 0;
void setup()
{
Serial.begin(9600);
pinMode(sensorPin, INPUT);
}
void loop()
{
sensorValue = analogRead(sensorPin);
Serial.println(sensorValue);
delay(1500);
}
import processing.serial.*;
import cc.arduino.*;
Arduino arduino; //creates arduino
object
color back = color(64, 218, 255);
//variables for the 2 colors
int sensor= 0;
int read;
float value;
void setup() {
size(800, 600);
arduino = new Arduino(this,
Arduino.list()[0], 57600); //sets up
arduino
arduino.pinMode(sensor,

Arduino.INPUT);//setup
pins to be input (A0
=0?)
background(back);
}
void draw() {
read=arduino.analogR
ead(sensor);
background(back);
println (read);
value=map(read, 0, 5
00, -200, width*4);
//use to callibrate
ellipse(value, 300,30,
30);
}






Processing.org
Arduino.cc
PDF Books
Google images
Wikipedia
Thanks for listening
and
I hope you liked

Mims effect

  • 1.
  • 6.
       /* Blink Turns on anLED on for one second, then off for one second, repeatedly.    This example code is in the public domain. */                 // Pin 13 has an LED connected on most Arduino boards. // give it a name: int led = 13; // the setup routine runs once when you press reset: void setup() { // initialize the digital pin as an output. pinMode(led, OUTPUT); } // the loop routine runs over and over again forever: void loop() { digitalWrite(led, HIGH); // turn the LED on (HIGH is the voltage level) delay(1000); // wait for a second digitalWrite(led, LOW); // turn the LED off by making the voltage LOW delay(1000); // wait for a second }
  • 8.
                   CODE int sensorPin =A0; int sensorValue = 0; void setup() { Serial.begin(9600); pinMode(sensorPin, INPUT); } void loop() { sensorValue = analogRead(sensorPin); Serial.println(sensorValue); delay(1500); }
  • 9.
    import processing.serial.*; import cc.arduino.*; Arduinoarduino; //creates arduino object color back = color(64, 218, 255); //variables for the 2 colors int sensor= 0; int read; float value; void setup() { size(800, 600); arduino = new Arduino(this, Arduino.list()[0], 57600); //sets up arduino arduino.pinMode(sensor, Arduino.INPUT);//setup pins to be input (A0 =0?) background(back); } void draw() { read=arduino.analogR ead(sensor); background(back); println (read); value=map(read, 0, 5 00, -200, width*4); //use to callibrate ellipse(value, 300,30, 30); }
  • 19.
  • 20.