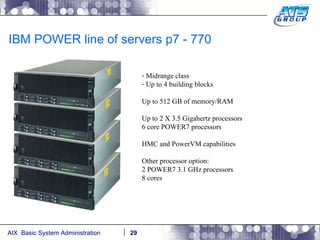
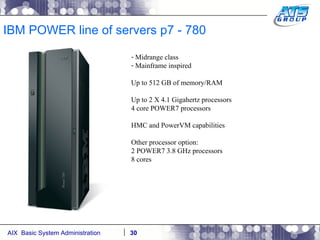
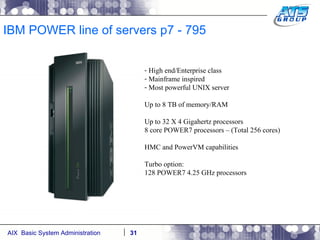
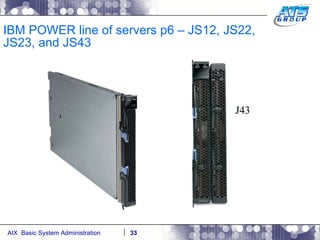
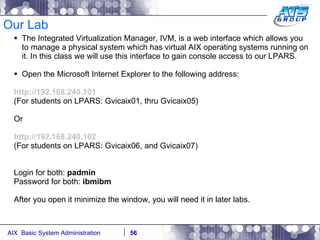
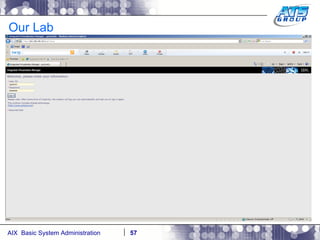
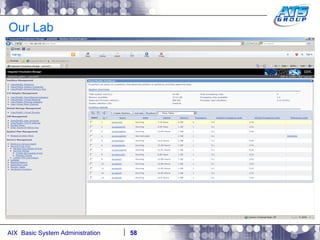
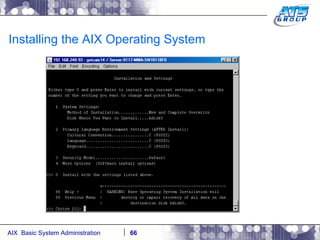
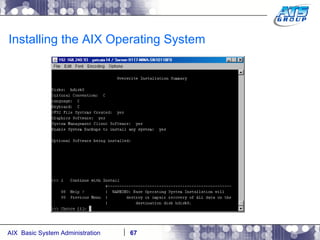
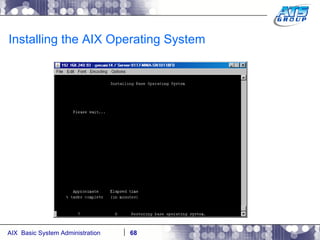
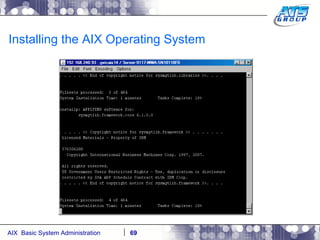
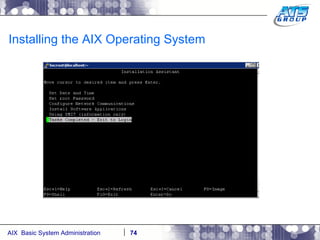
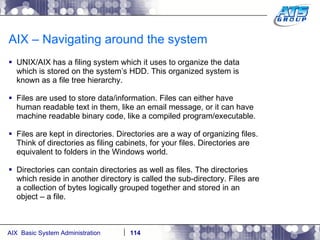
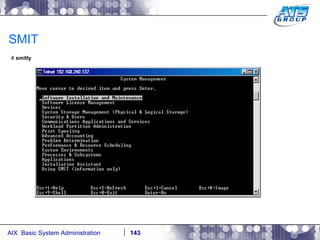
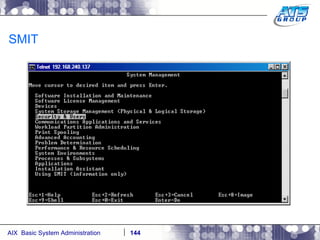
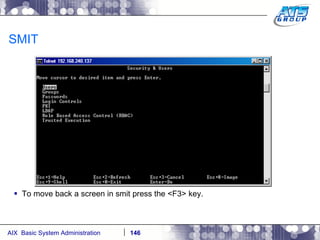
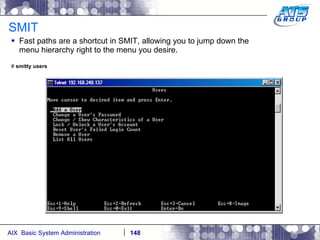
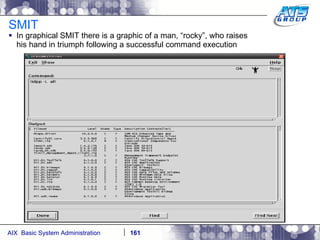
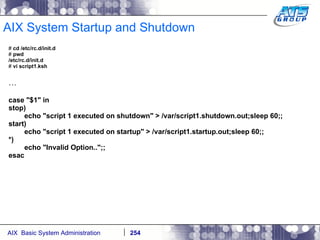
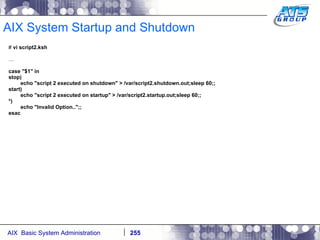
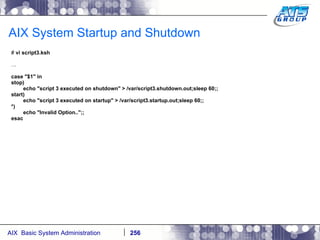
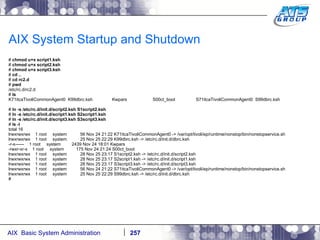
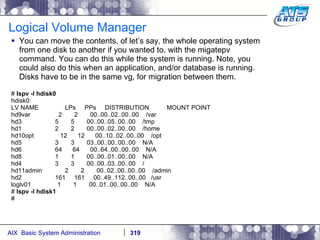
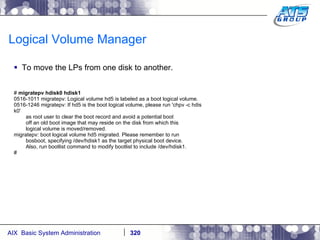
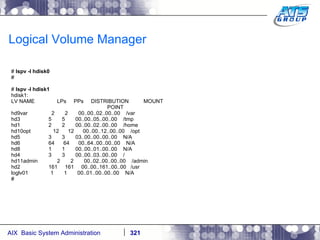
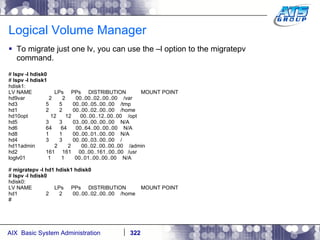
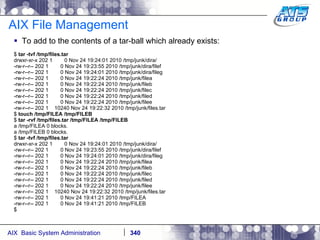
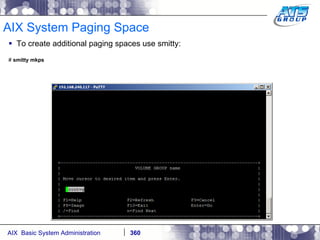
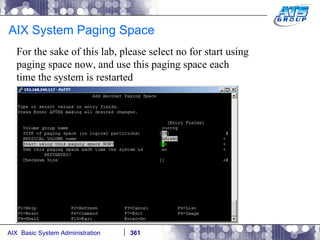
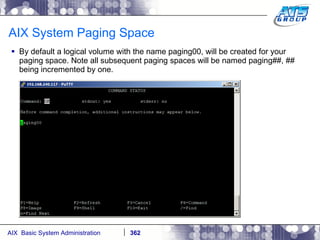
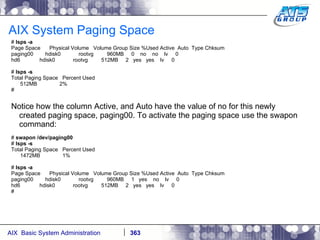
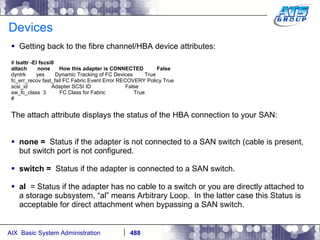
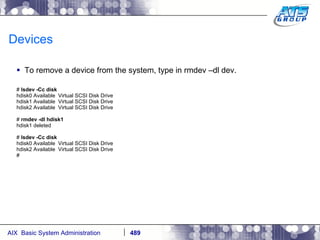
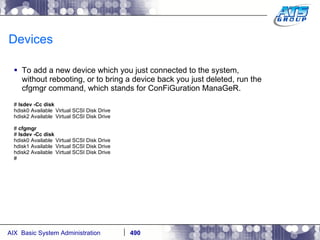
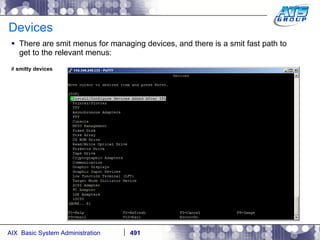
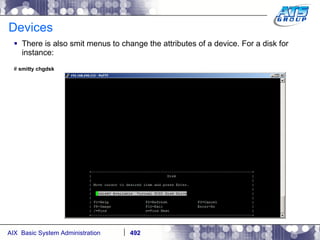
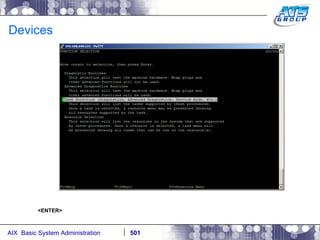
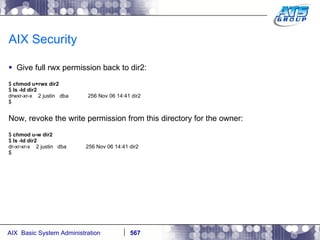
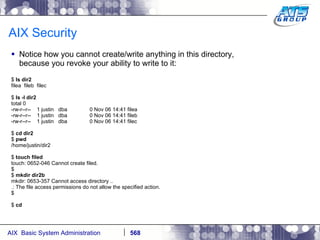
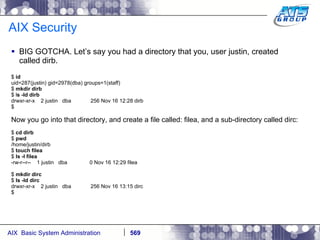
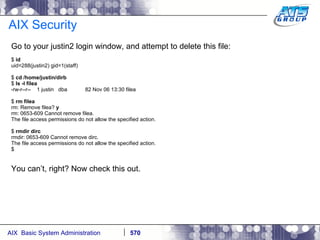
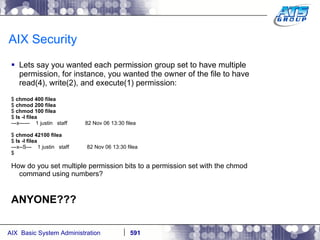
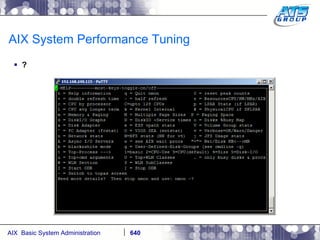
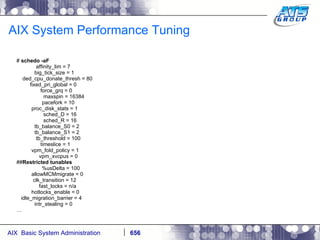
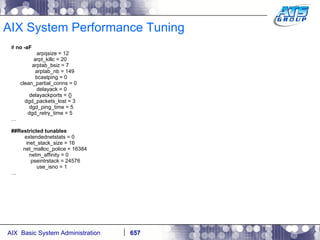
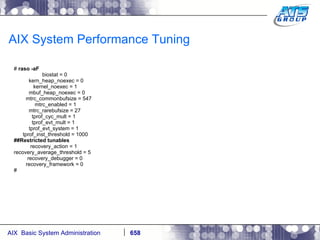
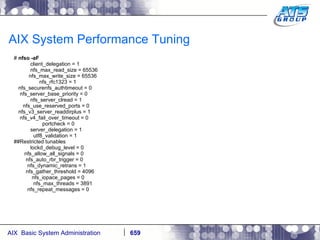
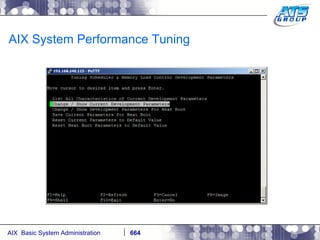
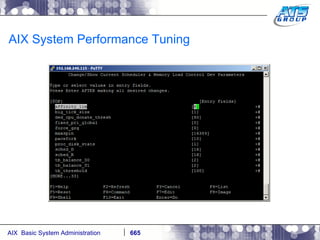
This document provides an overview and syllabus for an AIX System Administration class that will take place over 5 days from 9:30am to 5:30pm. The class will cover topics such as Unix and AIX overviews, IBM POWER servers, installing the AIX operating system, and logging into the system. Hands-on experience will be provided through virtualized AIX systems on IBM POWER7 blades in the classroom lab network.

![Class Syllabus Monday thru Friday – 9:30am to 5:30pm 9:30am – Class starts 10:30am – 15 minute morning break 10:45am – Class resumes from first break 12:00pm – Break for lunch 1:00pm – Class resumes from lunch 3:00pm – 15 minute afternoon break 3:15pm – Class resumes from second break 5:30pm – Class ends for the day Instructor: Justin Richard Bleistein Phone: (856) 912 – 0861 Email: [email_address]](https://image.slidesharecdn.com/aixoverview-120209012755-phpapp01/85/Aix-overview-2-320.jpg)


![Interacting with Unix Unix comes with a text editor called vi. This stands for VIsual editor. You can use this editor to create new text files, or edit existing ones. Note: There are other text editors which are available in Unix such as ed, emacs, etc. However, vi is more widely used. # vi /file ~ ~ ~ ~ ~ ~ ~ ~ ~ ~ “ /file” [New file] 1. Once in the editor type in a to enter input mode. 2. Start entering text, ex – “This is the best Unix class I have ever been to. <ENTER> <ENTER> I would recommend it to anyone.” 3. Now hit the Escape key to get out of input mode, and to enter command mode. 4. Type in the colon, and type in wq – ( w = write(save) q = quit vi ).](https://image.slidesharecdn.com/aixoverview-120209012755-phpapp01/85/Aix-overview-94-320.jpg)
![Interacting with Unix Unix has online help available. This is the equivalent of pressing <F1> on a Windows system. The command is man, which is short for MANual, as in manual pages. # man id Commands Reference, Volume 3, i - m id Command Purpose Displays the system identifications of a specified user. Syntax id [user] id -G [-n ] [User] id -g [-n l | [ -n r ] [User] id -u [-n l | [ -n r ] [User] Description The id command writes to standard output a message containing the system identifications (ID) for a specified user. The system IDs are numbers which identify users and user groups to the system. The id command writes the following information, when applicable: * User name and real user ID …](https://image.slidesharecdn.com/aixoverview-120209012755-phpapp01/85/Aix-overview-104-320.jpg)
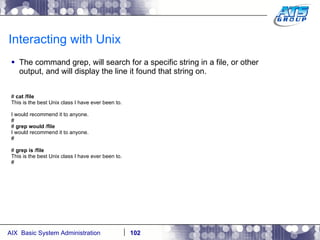
![Interacting with Unix There is a special symbol called a pipe. The symbol is |, the vertical bar. It’s located right above the <ENTER> key, on the standard American computer keyboard. # date Fri Sep 4 20:34:11 EDT 2009 # cut Usage: cut {-b <list> [-n] | -c <list> | -f <list> [-d <char>] [-s]} file ... # Note, the Unix cut command doesn’t do much without this pipe symbol, or feeding a file to it. Let’s say you wanted only to display the first three characters of the date command output. You would have to use the cut command to accomplish this. Let’s say you wanted to accomplish this with one command. What you can do is execute the date command, then tie it to the cut command with a Unix pipe. # date Fri Sep 4 20:36:48 EDT 2009 # date | cut -c1-3 Fri #](https://image.slidesharecdn.com/aixoverview-120209012755-phpapp01/85/Aix-overview-105-320.jpg)
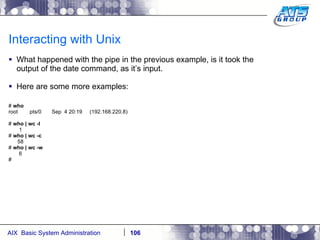
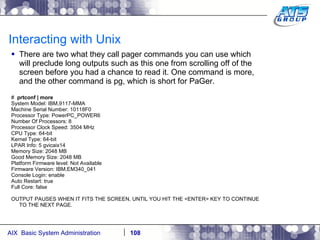
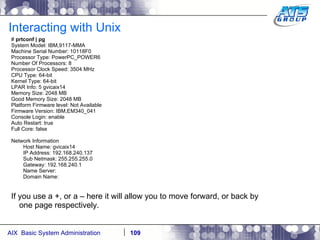
![Interacting with Unix There are some pre-defined variables which come set with the shell. These are sometimes referred to as system variables. # set AUTHSTATE=compat EDITOR=/usr/bin/vi ERRNO=0 FCEDIT=/usr/bin/ed FNAME=justin HOME=/ IFS=' ' LANG=C LC__FASTMSG=true LINENO=1 LOCPATH=/usr/lib/nls/loc LOGIN=root LOGNAME=root MAIL=/usr/spool/mail/root MAILCHECK=600 MAILMSG='[YOU HAVE NEW MAIL]' NLSPATH=/usr/lib/nls/msg/%L/%N:/usr/lib/nls/msg/%L/%N.cat ODMDIR=/etc/objrepos OPTIND=1 PATH=/usr/bin:/etc:/usr/sbin:/usr/ucb:/usr/bin/X11:/sbin:/usr/java14/jre/bin:/us r/java14/bin PPID=307422 PS1='# ' PS2='> ' PS3='#? '](https://image.slidesharecdn.com/aixoverview-120209012755-phpapp01/85/Aix-overview-111-320.jpg)
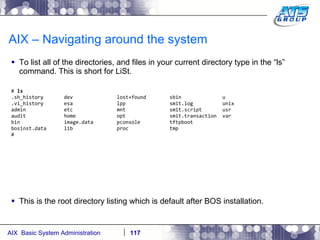
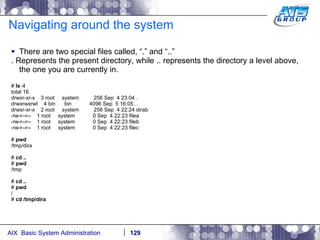
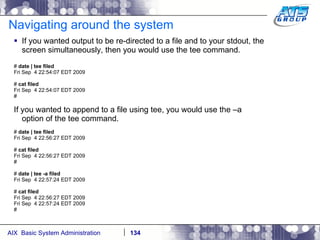
![Navigating around the system You can use wildcards as a way to display files on a Unix system. Wilds cards are a way to list files when you don’t really know the full name of them, and only know a portion of their names. The wildcard characters we use in Unix are: *, ?, and […]. # ls dirab filea fileb filec # ls f* filea fileb filec # ls file[a-b] filea fileb # ls f????a f????a not found # ls f??e? filea fileb filec #](https://image.slidesharecdn.com/aixoverview-120209012755-phpapp01/85/Aix-overview-130-320.jpg)


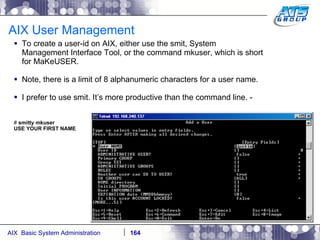
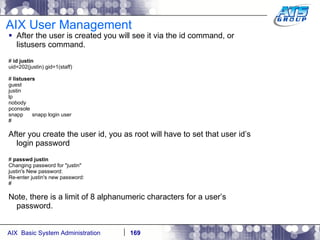
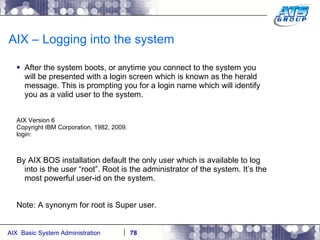
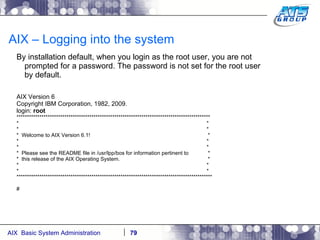
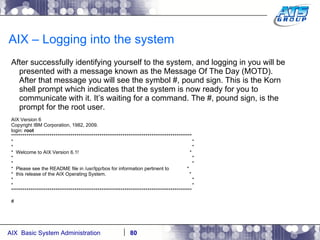
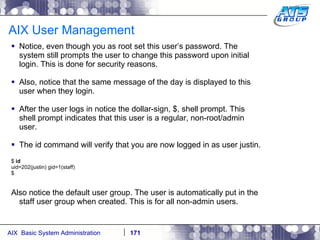
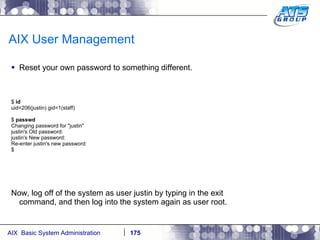
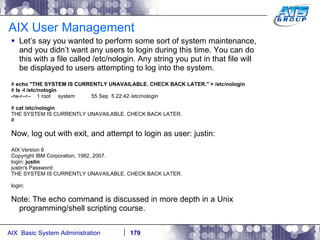
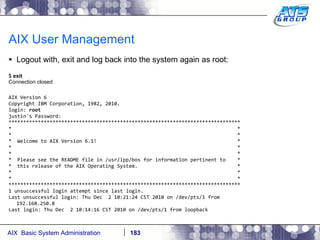
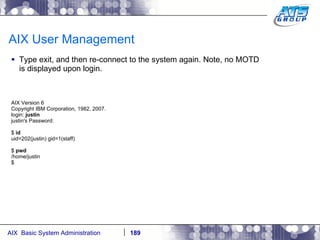
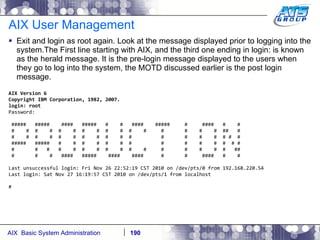
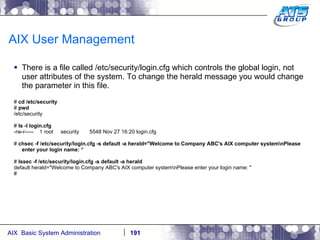
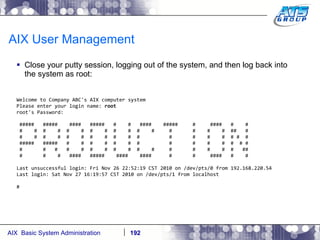
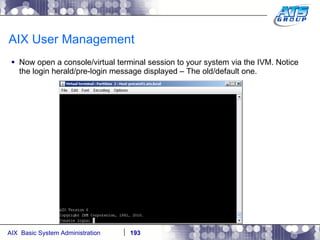
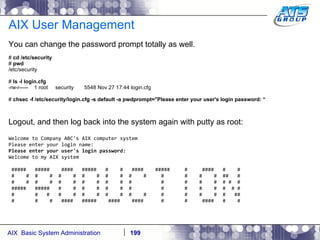
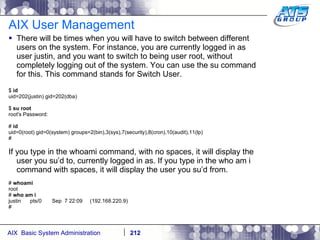
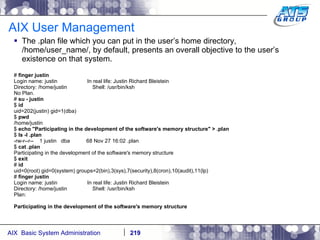
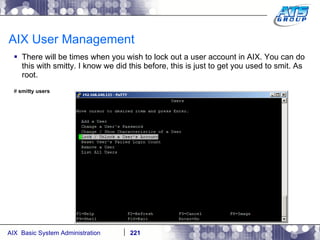
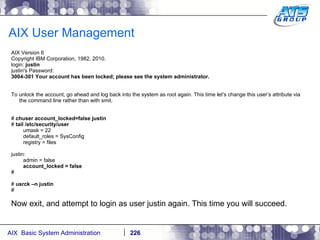
![AIX User Management Now log off, by typing in exit, and then login again as user justin. # exit Connection Closed. (Putty closes). Connect to the system again, and login as newly created user justin AIX Version 6 Copyright IBM Corporation, 1982, 2007. login: justin justin's Password: [compat]: You are required to change your password. Please choose a new one. justin's New password: Re-enter justin's new password: *************************************************************************************** * * * * * Welcome to AIX Version 6.1! * * * * * * Please see the README file in /usr/lpp/bos for information pertinent to * * this release of the AIX Operating System. * * * * * *************************************************************************************** $](https://image.slidesharecdn.com/aixoverview-120209012755-phpapp01/85/Aix-overview-170-320.jpg)


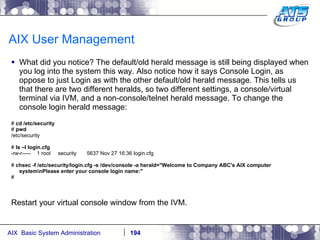

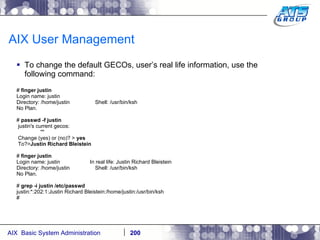


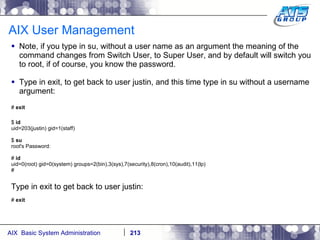
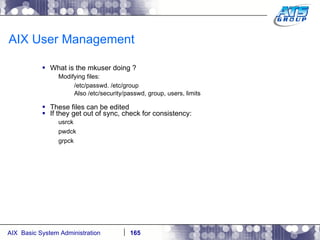
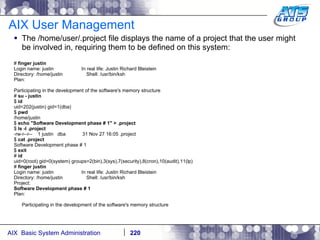
![AIX User Management You can also su to a user with a -, hyphen. This means that the user should pick up the entire environment: variables, etc, of the target user. Let’s say we appended the following to justin’s .profile file: # vi ~justin/.profile … PATH=/usr/bin:/etc:/usr/sbin:/usr/ucb:$HOME/bin:/usr/bin/X11:/sbin:. export PATH if [ -s "$MAIL" ] # This is at Shell startup. In normal then echo "$MAILMSG" # operation, the Shell checks fi # periodically. HEY=YOU echo "HELLO WELCOME TO USER JUSTIN. YOU SU'D WITH THE - ARGUMENT" #](https://image.slidesharecdn.com/aixoverview-120209012755-phpapp01/85/Aix-overview-215-320.jpg)


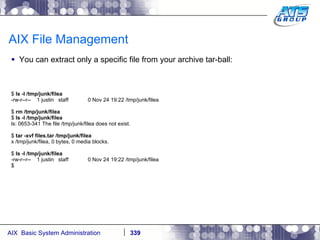


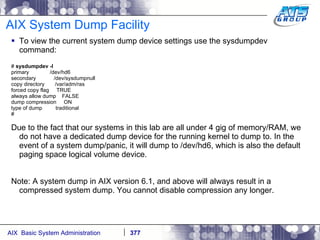
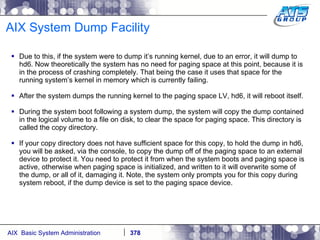
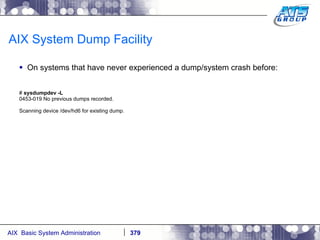
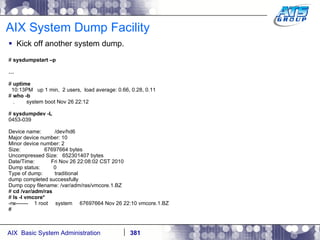
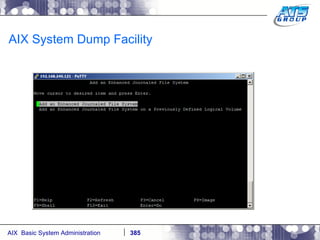
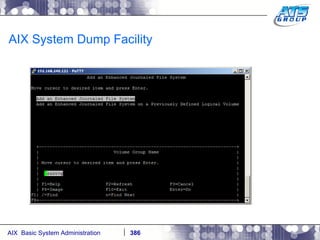
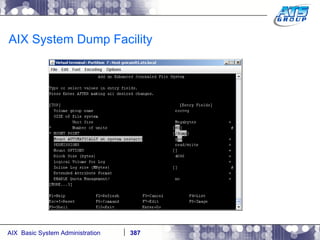
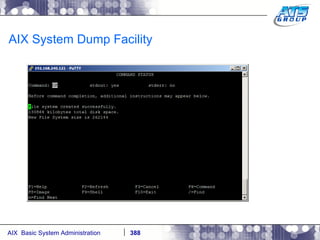
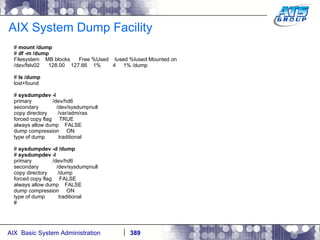
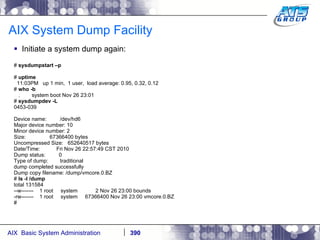
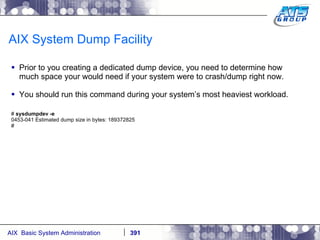
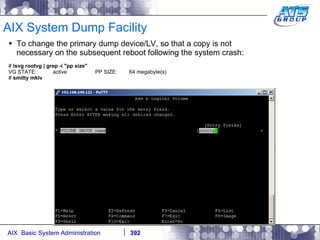
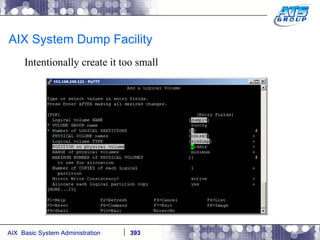
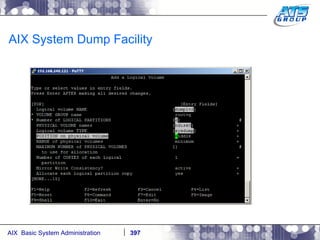
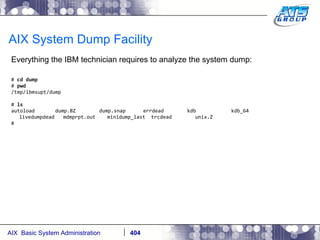
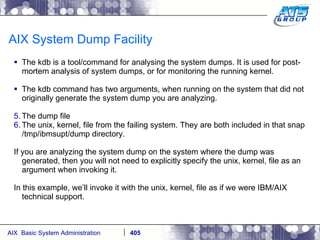
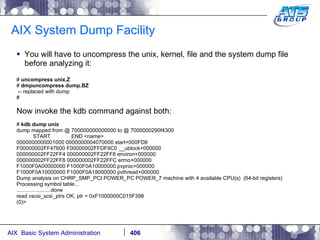
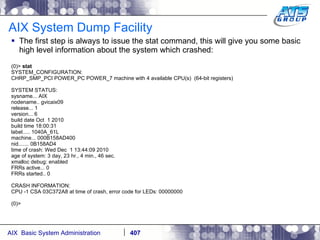
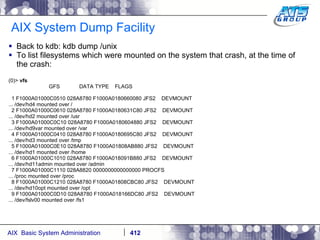
![AIX System Dump Facility There are two types of dumps. A system dump which is an entire dump of the kernel’s memory to disk, and a core dump, which is just a dump of a specific program’s memory area. Note, you will need access to the program’s source code to troubleshoot core dumps, usually. You can generate your own via the following commands: # ps -ef | grep -i sleep # ls -l core ls: 0653-341 The file core does not exist. # sleep 1000 & [1] 3080416 # ps -ef | grep -i sleep root 3080416 5570658 0 12:31:48 pts/1 0:00 sleep 1000 # kill -11 3080416 # ls -l core -rw------- 1 root system 7188 Nov 26 12:31 core [1] + Segmentation fault(coredump) sleep 1000 & # ls -l core -rw------- 1 root system 7188 Nov 26 12:31 core](https://image.slidesharecdn.com/aixoverview-120209012755-phpapp01/85/Aix-overview-376-320.jpg)


![AIX System Process Management A process can run in the foreground or the background. To run a process in the foreground, like a regular command, simply just run it in the shell by typing it in: # sleep 5 # The problem with the foreground is that you will have to wait until it completes before you gain control of your terminal again. To throw something in the background put an ampersand - & at the end of it. This way you can move on to other things, while this is running. # sleep 5 & [1] 7405732 # # [1] + Done sleep 5 & #](https://image.slidesharecdn.com/aixoverview-120209012755-phpapp01/85/Aix-overview-424-320.jpg)
![AIX System Process Management Process Management: # sleep 1000 & [1] 3735750 # jobs [1] + Running sleep 1000 & # jobs -l [1] + 3735750 Running sleep 1000 & # ps -ef | grep -i sleep root 3735750 5898262 0 09:33:38 pts/0 0:00 sleep 1000 #](https://image.slidesharecdn.com/aixoverview-120209012755-phpapp01/85/Aix-overview-425-320.jpg)
![AIX System Process Management You can take a job which is currently running in the background and move it to the foreground # fg 3735750 sleep 1000 To send your process to the background/stopping it go ahead and hit CONTROL+Z ^Z [1] + Stopped (SIGTSTP) sleep 1000 & # jobs -l [1] + 3735750 Stopped (SIGTSTP) sleep 1000 & # To re-start it in the background type in the following # bg 3735750 [1] sleep 1000 & # jobs [1] + Running sleep 1000 & # ps -ef | grep -i sleep root 3735750 5898262 0 09:33:38 pts/0 0:00 sleep 1000 #](https://image.slidesharecdn.com/aixoverview-120209012755-phpapp01/85/Aix-overview-426-320.jpg)
![AIX System Process Management To kill a process from running you can use signal number 9, which as you will recall from the previous slides output is the signal “KILL” # kill -9 3735750 # ps -ef | grep -i sleep [1] + Killed sleep 1000 & #](https://image.slidesharecdn.com/aixoverview-120209012755-phpapp01/85/Aix-overview-428-320.jpg)
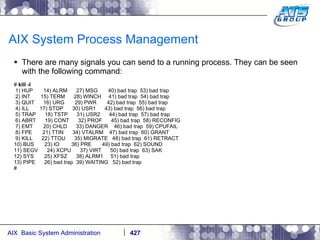
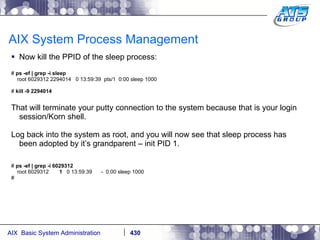
![AIX System Process Management Kick off another sleep command in the background: # sleep 1000 & [1] 6029312 # ps -ef | grep -i sleep root 6029312 2294014 0 13:59:39 pts/1 0:00 sleep 1000 # Now look at the second number in the above ps –ef output, which is the third column over. That is the PPID – Parent Process ID. This is the process who is a parent of the process running – sleep. Sleep is the child to 2294014. Now let’s see what 2294014 is? # ps -ef | grep -i 2294014 | grep -iv grep root 2294014 6881354 1 12:48:49 pts/1 0:00 -ksh root 4849772 2294014 0 14:01:16 pts/1 0:00 ps -ef root 6029312 2294014 0 13:59:39 pts/1 0:00 sleep 1000 # It is the Korn shell process that you logging onto the system launched.](https://image.slidesharecdn.com/aixoverview-120209012755-phpapp01/85/Aix-overview-429-320.jpg)
![AIX System Process Management Kick off a sleep process in the background again: # sleep 10000 & [1] 7405732 # # [1] + Done sleep 5 & # Now disconnect from the system with the exit command # exit There are running jobs. Note how you received the warning above that jobs are currently running under your user name. Ignore that and type in exit a second time, maybe a third time as well. # exit # exit Connection Closed.](https://image.slidesharecdn.com/aixoverview-120209012755-phpapp01/85/Aix-overview-433-320.jpg)
![AIX System Process Management Login again as root. # ps -ef | grep -i sleep # Note how the process died even though 10000 seconds isn’t up yet. You can tell the system not to kill the process just because you as the user who started it logged out of the system: # nohup sleep 10000& [1] 6881364 # Sending nohup output to nohup.out. # ps -ef | grep -i sleep root 6881364 7078006 0 14:23:19 pts/0 0:00 sleep 10000 # jobs [1] + Running nohup sleep 10000& #](https://image.slidesharecdn.com/aixoverview-120209012755-phpapp01/85/Aix-overview-434-320.jpg)


![AIX System Process Management Start a sleep process: # sleep 10000 & [1] 7405648 # ps -ef | grep -i sleep root 7405648 2294014 0 13:02:32 pts/1 0:00 sleep 10000 #](https://image.slidesharecdn.com/aixoverview-120209012755-phpapp01/85/Aix-overview-448-320.jpg)
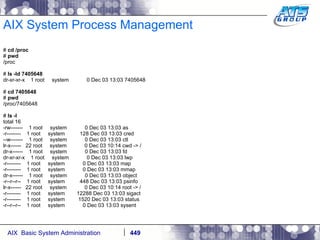
![AIX System Process Management When you kill the process, or it ends on its own then it’s references in the /proc filesystem will be removed: # cd / # ls -ld /proc/7405648 dr-xr-xr-x 1 root system 0 Dec 03 13:07 /proc/7405648 # ps -ef | grep -i sleep root 7405648 2294014 0 13:02:32 pts/1 0:00 sleep 10000 # kill -9 7405648 # ps -ef | grep -i sleep [1] + Killed sleep 10000 & # ls -ld /proc/7405648 ls: 0653-341 The file /proc/7405648 does not exist. #](https://image.slidesharecdn.com/aixoverview-120209012755-phpapp01/85/Aix-overview-451-320.jpg)


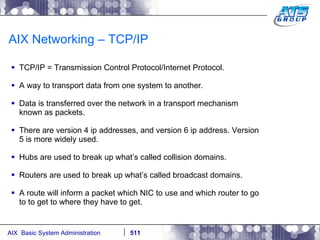


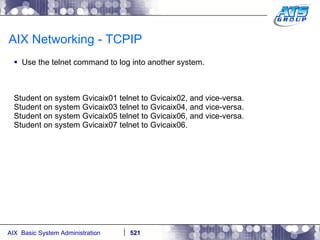
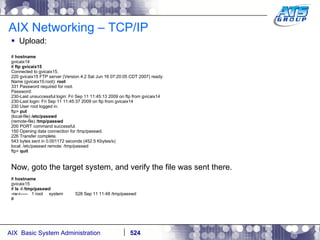
![AIX Networking - TCPIP To telnet from one system to another, use the telnet command list as follows. # hostname gvicaix14 # telnet gvicaix15 Trying... Connected to gvicaix15. Escape character is '^]'. telnet (gvicaix15) AIX Version 5 Copyright IBM Corporation, 1982, 2007. login: root … . Last login: Fri Sep 11 11:27:07 2009 on /dev/pts/0 from 192.168.240.137 # hostname gvicaix15 # who root pts/0 Sep 11 11:27 (gvicaix14) # exit Connection closed. # hostname gvicaix14](https://image.slidesharecdn.com/aixoverview-120209012755-phpapp01/85/Aix-overview-522-320.jpg)


![Linux [2005]](https://cdn.slidesharecdn.com/ss_thumbnails/linuxgsi640final1-12005-120430024710-phpapp01-thumbnail.jpg?width=640&height=640&fit=bounds)