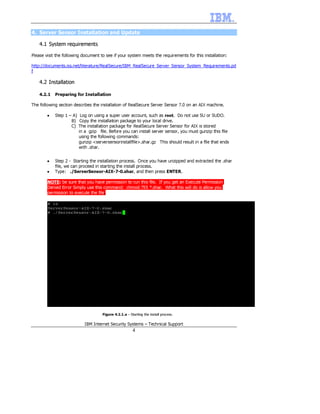
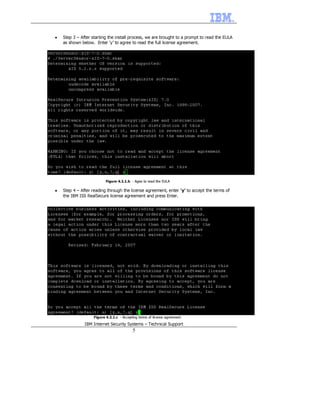
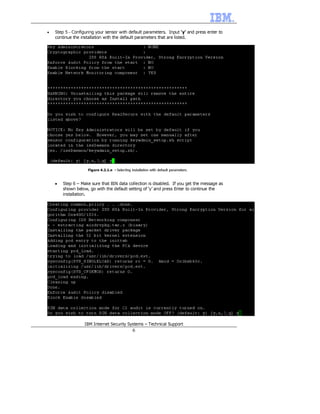
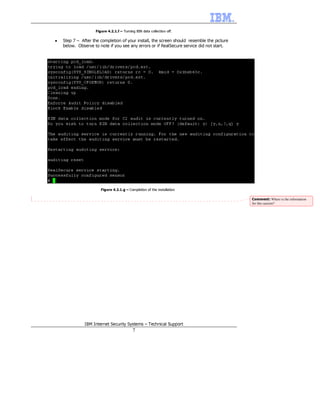
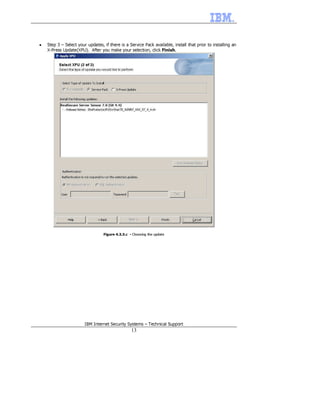
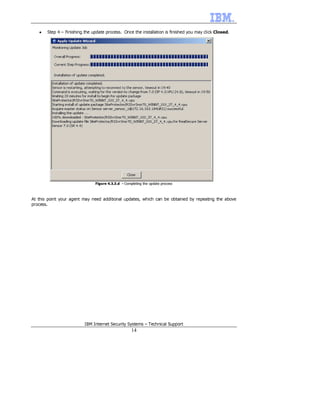
Setup Guide for IBM Internet Security Systems Products
       “Server Sensor for AIX 7.0 Installation”


             IBM Internet Security Systems – Technical Support
                                    1
Index


1. Introduction                                                               3

2. Objectives                                                                 3

3. Scope                                                                      3

4. Site Protector Installation and Components Update                          4

   4.1. System requirements                                                   4

   4.2. Installation and Configuration                                        4

   4.3. Components Update                                                     7

5. Future work                                                                10


                          IBM Internet Security Systems – Technical Support
                                                 2
1. Introduction

The following document is a proposal created by IBM Internet Security System Technical Support to allow
a rapid but seamless integration of the entire portfolio of IBM Internet Security Systems products to sales
engineers, partners, resellers and end users in general that are new to our products. It provides the basic
steps to install, configure, maintain and troubleshoot IBM Internet security Systems products.

2. Objectives

The following are the objectives of this document

    •   Provide the new user with the basic steps to perform an Installation of Real Secure Server
        Sensor 7.0 on a dedicated AIX server with Internet access
    •   Provide the new user with the basic steps on how to perform updates for their Real Secure
        Server Sensor installation on AIX

3. Scope

This document will guide the new user through the steps to perform an installation of RealSecure Server
Sensor 7.0 on an AIX operating system. This is only a setup guide that will help the customer become
familiar with the Server Sensor's process of installing and upgrading itself. No additional configurations
will be explored and only default settings will be used.

For more information about Server Sensor 7.0 features, specific management requirements, technical
details and more options please refer to the following guide:

http://www.iss.net/support/documentation/docs.php?product=15&family=7

For more information about specific functionalities and its integration with other IBM Internet Security
Systems products please refer to our product documentation at:

http://www.iss.net/support/documentation/index.php


                           IBM Internet Security Systems – Technical Support
                                                    3
4. Server Sensor Installation and Update

    4.1 System requirements

Please visit the following document to see if your system meets the requirements for this installation:

http://documents.iss.net/literature/RealSecure/IBM_RealSecure_Server_Sensor_System_Requirements.pd
f

    4.2 Installation

    4.2.1   Preparing for Installation

The following section describes the installation of RealSecure Server Sensor 7.0 on an AIX machine.

        •   Step 1 – A) Log on using a super user account, such as root. Do not use SU or SUDO.
                    B) Copy the installation package to your local drive.
                    C) The installation package for RealSecure Server Sensor for AIX is stored
                        in a gzip file. Before you can install server sensor, you must gunzip this file
                        using the following commands:
                        gunzip <serversensorinstallfile>.shar.gz This should result in a file that ends
                        with .shar.


        •   Step 2 - Starting the installation process. Once you have unzipped and extracted the .shar
            file, we can proceed in starting the install process.
        •   Type: ./ServerSensor-AIX-7-0.shar, and then press ENTER.

        NOTE: be sure that you have permission to run this file. If you get an Execute Permission
        Denied Error Simply use this command: chmod 755 *.shar. What this will do is allow you
        permission to execute the file.


                                     Figure 4.2.1.a – Starting the install process.

                           IBM Internet Security Systems – Technical Support
                                                        4
•   Step 3 – After starting the install process, we are brought to a prompt to read the EULA
    as shown below. Enter ‘y’ to agree to read the full license agreement.


                           Figure 4.2.1.b - Agee to read the EULA

•   Step 4 – After reading through the license agreement, enter ‘y’ to accept the terms of
    the IBM ISS RealSecure license agreement and press Enter.


                    Figure 4.2.1.c - Accepting terms of license agreement.

               IBM Internet Security Systems – Technical Support
                                           5
•   Step 5 – Configuring your sensor with default parameters. Input ‘y’ and press enter to
    continue the installation with the default parameters that are listed.


                    Figure 4.2.1.e - Selecting installation with default parameters.


    •   Step 6 – Make sure that BIN data collection is disabled. If you get the message as
        shown below, go with the default setting of ‘y’ and press Enter to continue the
        installation.


                   IBM Internet Security Systems – Technical Support
                                                6
Figure 4.2.1.f – Turning BIN data collection off.

•   Step 7 – After the completion of your install, the screen should resemble the picture
    below. Observe to note if you see any errors or if RealSecure service did not start.


                       Figure 4.2.1.g – Completion of the installation

                                                                                            Comment: Where is the information
                                                                                            for this section?


               IBM Internet Security Systems – Technical Support
                                           7
4.3 Server Sensor Registration and Update

    4.3.1   License Requirements

Before attempting to update any of the agent a license key is required. Please refer to your Sales
Representative or contact isskeys@iss.net for information on how to get a license key.

To upload a license key open the Site Protector Console and then go to Tools > Licenses >
Agent/Module as shown in the following figure


                                      Figure 4.3.1.a - Licenses location


The following screen will show. To adding a license, just click on Add and upload your new license.
Repeat this process for all of your agents/sensors and features. Verify the status of your license next.


                                      Figure 4.3.1.b - Adding a License


NOTE: Before adding a new license please remove the *.xml extension of the key file


                          IBM Internet Security Systems – Technical Support
                                                      8
4.3.2   Getting your Server Sensor Registered.

        •   Step 1 – Once you have decided which group to place you Server Sensor in, Right-Click
            on the group and choose New and select Agent. Doing so will cause the New Agent
            Wizard to open. Type in the name of the Asset or the IP of the machine that has Server
            Sensor installed and Click Add. Click Next once you see the Asset name and IP address
            appear in the listing


                                Figure 4.3.2.a - New Agent Wizard


•   Step 2 – Choose your Event Collector. From the pull down menu select the Event Collector that
    you want the sensor to report to. Make sure that Automatically Register Agent is selected.
    Click Next.


                             Figure 4.3.2.b - Choose the EventCollector


                      IBM Internet Security Systems – Technical Support
                                                 9
•   Step 4 – Finishing the Registration Process. Once the agent has been added, Click Finish to
        complete the process.


                               Figure 4.3.2.c - Completing the Registration Process


At this point you should be able to see your Server Sensor in the Agent view in the SiteProtector console.
It may temporarily appear in Unknown status. Press F5 to refresh your console after a minute, your
agent should now show that it is in Active status.


                           IBM Internet Security Systems – Technical Support
                                                       10
4.3.3   Update Process

•   Step 1 - In order to update Server Sensor right click on the agent and select Update > Apply
    XPU . This should open the menu window as seen in figure 4.3.3a. Choosing Run Once will
    cause the update to run immediately and only one time. Click Next.


                              Figure 4.3.3.a - Scheduling an update


                      IBM Internet Security Systems – Technical Support
                                               11
•   Step 2 – Accept the End User License Agreement (EULA) by clicking I Accept.


                           Figure 4.3.3.b - The End User License Agreement


                      IBM Internet Security Systems – Technical Support
                                                12
•   Step 3 – Select your updates, if there is a Service Pack available, install that prior to installing an
    X-Press Update(XPU). After you make your selection, click Finish.


                                  Figure 4.3.3.c - Choosing the update


                        IBM Internet Security Systems – Technical Support
                                                  13
•   Step 4 – Finishing the update process. Once the installation is finished you may click Closed.


                               Figure 4.3.3.d - Completing the update process


At this point your agent may need additional updates, which can be obtained by repeating the above
process.


                          IBM Internet Security Systems – Technical Support
                                                    14
5. Additional Information and Troubleshooting


Here are additional resources for documentation data and known issues.

All Server Sensor 7.0 documentation for all platforms:

http://www.iss.net/support/documentation/docs.php?product=15&family=7

Known issues with Server Sensor 7.0 for Solaris

https://iss.custhelp.com/cgi-bin/iss.cfg/php/enduser/std_adp.php?p_faqid=3596&

Aix install

  • 1.
    Setup Guide forIBM Internet Security Systems Products “Server Sensor for AIX 7.0 Installation” IBM Internet Security Systems – Technical Support 1
  • 2.
    Index 1. Introduction 3 2. Objectives 3 3. Scope 3 4. Site Protector Installation and Components Update 4 4.1. System requirements 4 4.2. Installation and Configuration 4 4.3. Components Update 7 5. Future work 10 IBM Internet Security Systems – Technical Support 2
  • 3.
    1. Introduction The followingdocument is a proposal created by IBM Internet Security System Technical Support to allow a rapid but seamless integration of the entire portfolio of IBM Internet Security Systems products to sales engineers, partners, resellers and end users in general that are new to our products. It provides the basic steps to install, configure, maintain and troubleshoot IBM Internet security Systems products. 2. Objectives The following are the objectives of this document • Provide the new user with the basic steps to perform an Installation of Real Secure Server Sensor 7.0 on a dedicated AIX server with Internet access • Provide the new user with the basic steps on how to perform updates for their Real Secure Server Sensor installation on AIX 3. Scope This document will guide the new user through the steps to perform an installation of RealSecure Server Sensor 7.0 on an AIX operating system. This is only a setup guide that will help the customer become familiar with the Server Sensor's process of installing and upgrading itself. No additional configurations will be explored and only default settings will be used. For more information about Server Sensor 7.0 features, specific management requirements, technical details and more options please refer to the following guide: http://www.iss.net/support/documentation/docs.php?product=15&family=7 For more information about specific functionalities and its integration with other IBM Internet Security Systems products please refer to our product documentation at: http://www.iss.net/support/documentation/index.php IBM Internet Security Systems – Technical Support 3
  • 4.
    4. Server SensorInstallation and Update 4.1 System requirements Please visit the following document to see if your system meets the requirements for this installation: http://documents.iss.net/literature/RealSecure/IBM_RealSecure_Server_Sensor_System_Requirements.pd f 4.2 Installation 4.2.1 Preparing for Installation The following section describes the installation of RealSecure Server Sensor 7.0 on an AIX machine. • Step 1 – A) Log on using a super user account, such as root. Do not use SU or SUDO. B) Copy the installation package to your local drive. C) The installation package for RealSecure Server Sensor for AIX is stored in a gzip file. Before you can install server sensor, you must gunzip this file using the following commands: gunzip <serversensorinstallfile>.shar.gz This should result in a file that ends with .shar. • Step 2 - Starting the installation process. Once you have unzipped and extracted the .shar file, we can proceed in starting the install process. • Type: ./ServerSensor-AIX-7-0.shar, and then press ENTER. NOTE: be sure that you have permission to run this file. If you get an Execute Permission Denied Error Simply use this command: chmod 755 *.shar. What this will do is allow you permission to execute the file. Figure 4.2.1.a – Starting the install process. IBM Internet Security Systems – Technical Support 4
  • 5.
    Step 3 – After starting the install process, we are brought to a prompt to read the EULA as shown below. Enter ‘y’ to agree to read the full license agreement. Figure 4.2.1.b - Agee to read the EULA • Step 4 – After reading through the license agreement, enter ‘y’ to accept the terms of the IBM ISS RealSecure license agreement and press Enter. Figure 4.2.1.c - Accepting terms of license agreement. IBM Internet Security Systems – Technical Support 5
  • 6.
    Step 5 – Configuring your sensor with default parameters. Input ‘y’ and press enter to continue the installation with the default parameters that are listed. Figure 4.2.1.e - Selecting installation with default parameters. • Step 6 – Make sure that BIN data collection is disabled. If you get the message as shown below, go with the default setting of ‘y’ and press Enter to continue the installation. IBM Internet Security Systems – Technical Support 6
  • 7.
    Figure 4.2.1.f –Turning BIN data collection off. • Step 7 – After the completion of your install, the screen should resemble the picture below. Observe to note if you see any errors or if RealSecure service did not start. Figure 4.2.1.g – Completion of the installation Comment: Where is the information for this section? IBM Internet Security Systems – Technical Support 7
  • 8.
    4.3 Server SensorRegistration and Update 4.3.1 License Requirements Before attempting to update any of the agent a license key is required. Please refer to your Sales Representative or contact isskeys@iss.net for information on how to get a license key. To upload a license key open the Site Protector Console and then go to Tools > Licenses > Agent/Module as shown in the following figure Figure 4.3.1.a - Licenses location The following screen will show. To adding a license, just click on Add and upload your new license. Repeat this process for all of your agents/sensors and features. Verify the status of your license next. Figure 4.3.1.b - Adding a License NOTE: Before adding a new license please remove the *.xml extension of the key file IBM Internet Security Systems – Technical Support 8
  • 9.
    4.3.2 Getting your Server Sensor Registered. • Step 1 – Once you have decided which group to place you Server Sensor in, Right-Click on the group and choose New and select Agent. Doing so will cause the New Agent Wizard to open. Type in the name of the Asset or the IP of the machine that has Server Sensor installed and Click Add. Click Next once you see the Asset name and IP address appear in the listing Figure 4.3.2.a - New Agent Wizard • Step 2 – Choose your Event Collector. From the pull down menu select the Event Collector that you want the sensor to report to. Make sure that Automatically Register Agent is selected. Click Next. Figure 4.3.2.b - Choose the EventCollector IBM Internet Security Systems – Technical Support 9
  • 10.
    Step 4 – Finishing the Registration Process. Once the agent has been added, Click Finish to complete the process. Figure 4.3.2.c - Completing the Registration Process At this point you should be able to see your Server Sensor in the Agent view in the SiteProtector console. It may temporarily appear in Unknown status. Press F5 to refresh your console after a minute, your agent should now show that it is in Active status. IBM Internet Security Systems – Technical Support 10
  • 11.
    4.3.3 Update Process • Step 1 - In order to update Server Sensor right click on the agent and select Update > Apply XPU . This should open the menu window as seen in figure 4.3.3a. Choosing Run Once will cause the update to run immediately and only one time. Click Next. Figure 4.3.3.a - Scheduling an update IBM Internet Security Systems – Technical Support 11
  • 12.
    Step 2 – Accept the End User License Agreement (EULA) by clicking I Accept. Figure 4.3.3.b - The End User License Agreement IBM Internet Security Systems – Technical Support 12
  • 13.
    Step 3 – Select your updates, if there is a Service Pack available, install that prior to installing an X-Press Update(XPU). After you make your selection, click Finish. Figure 4.3.3.c - Choosing the update IBM Internet Security Systems – Technical Support 13
  • 14.
    Step 4 – Finishing the update process. Once the installation is finished you may click Closed. Figure 4.3.3.d - Completing the update process At this point your agent may need additional updates, which can be obtained by repeating the above process. IBM Internet Security Systems – Technical Support 14
  • 15.
    5. Additional Informationand Troubleshooting Here are additional resources for documentation data and known issues. All Server Sensor 7.0 documentation for all platforms: http://www.iss.net/support/documentation/docs.php?product=15&family=7 Known issues with Server Sensor 7.0 for Solaris https://iss.custhelp.com/cgi-bin/iss.cfg/php/enduser/std_adp.php?p_faqid=3596&