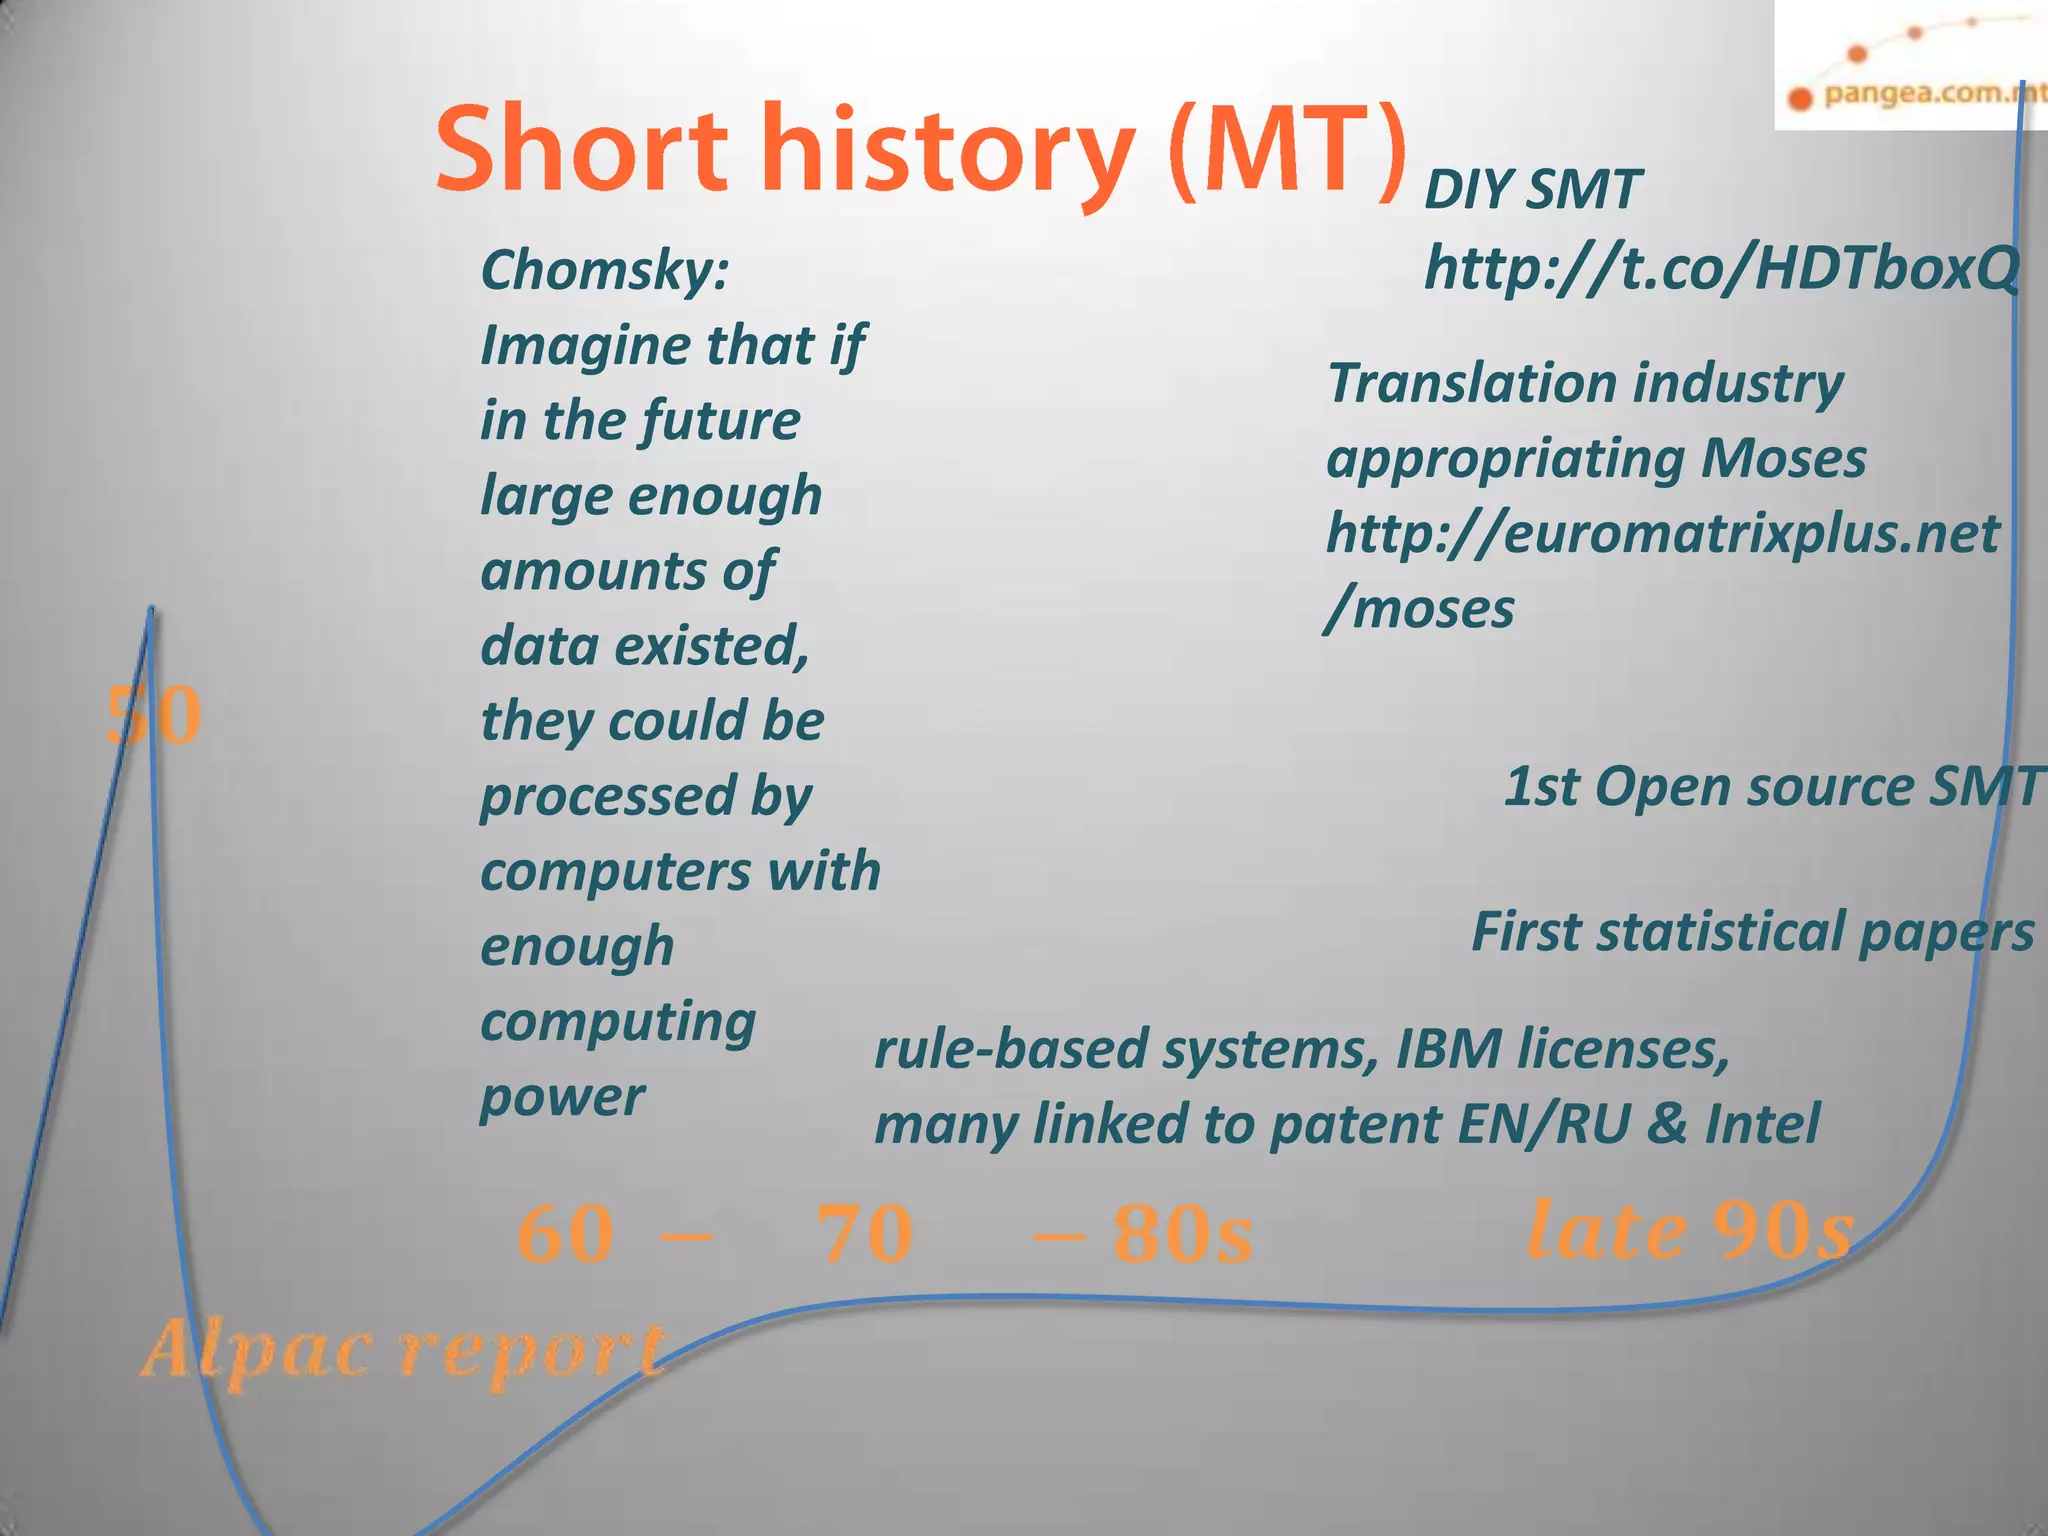
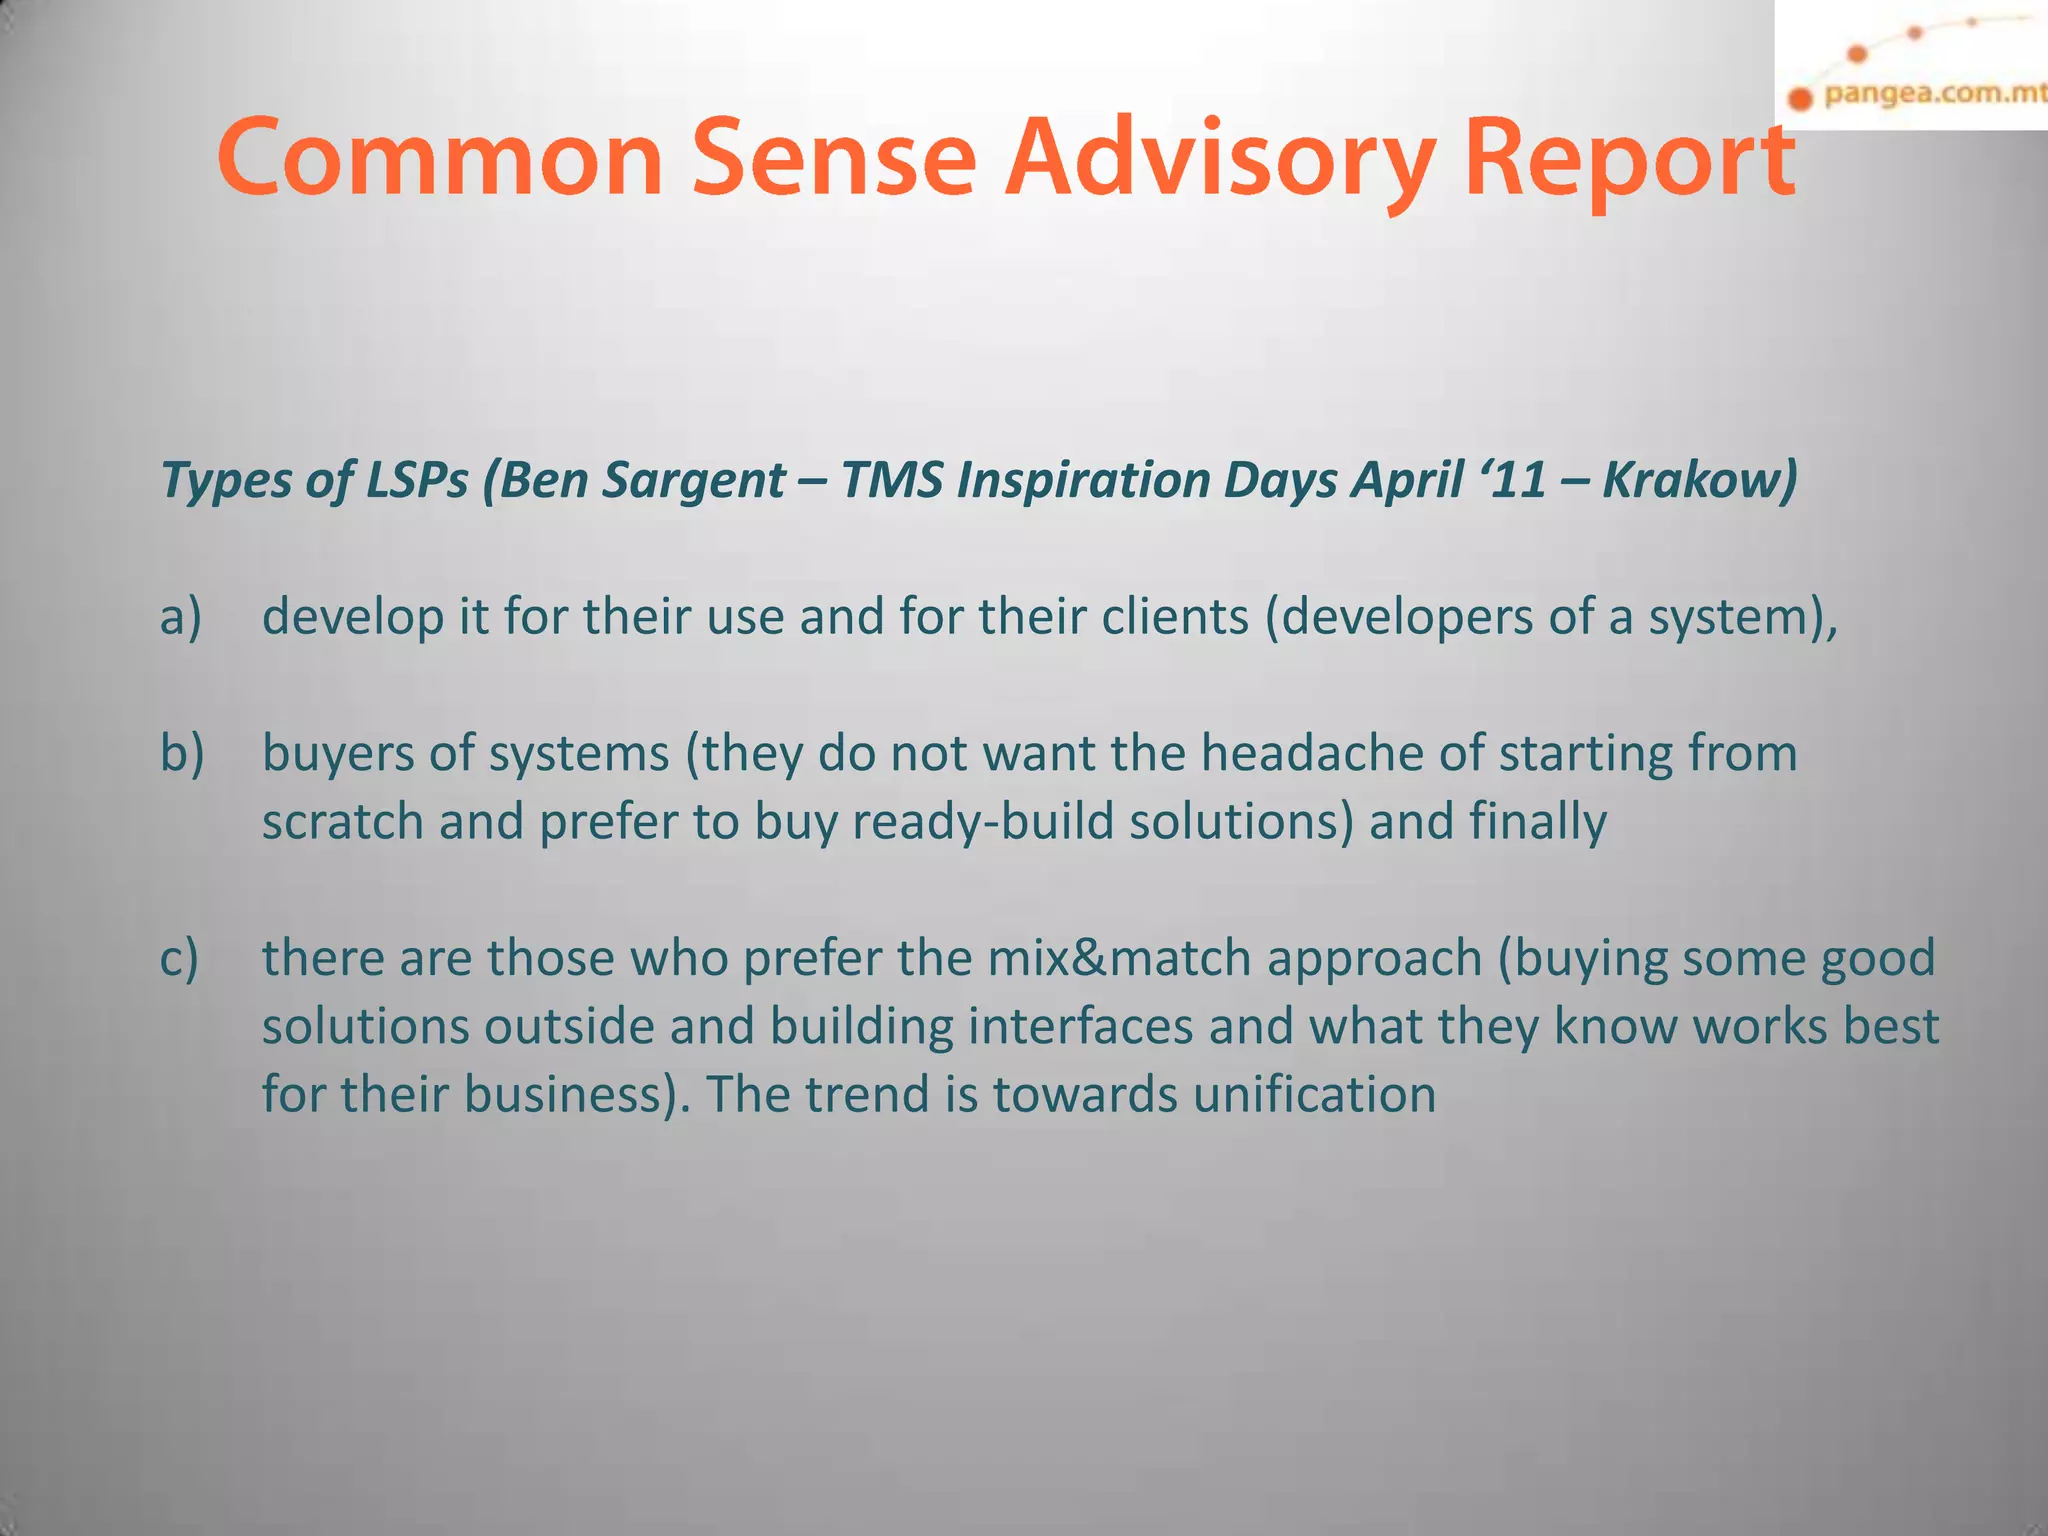
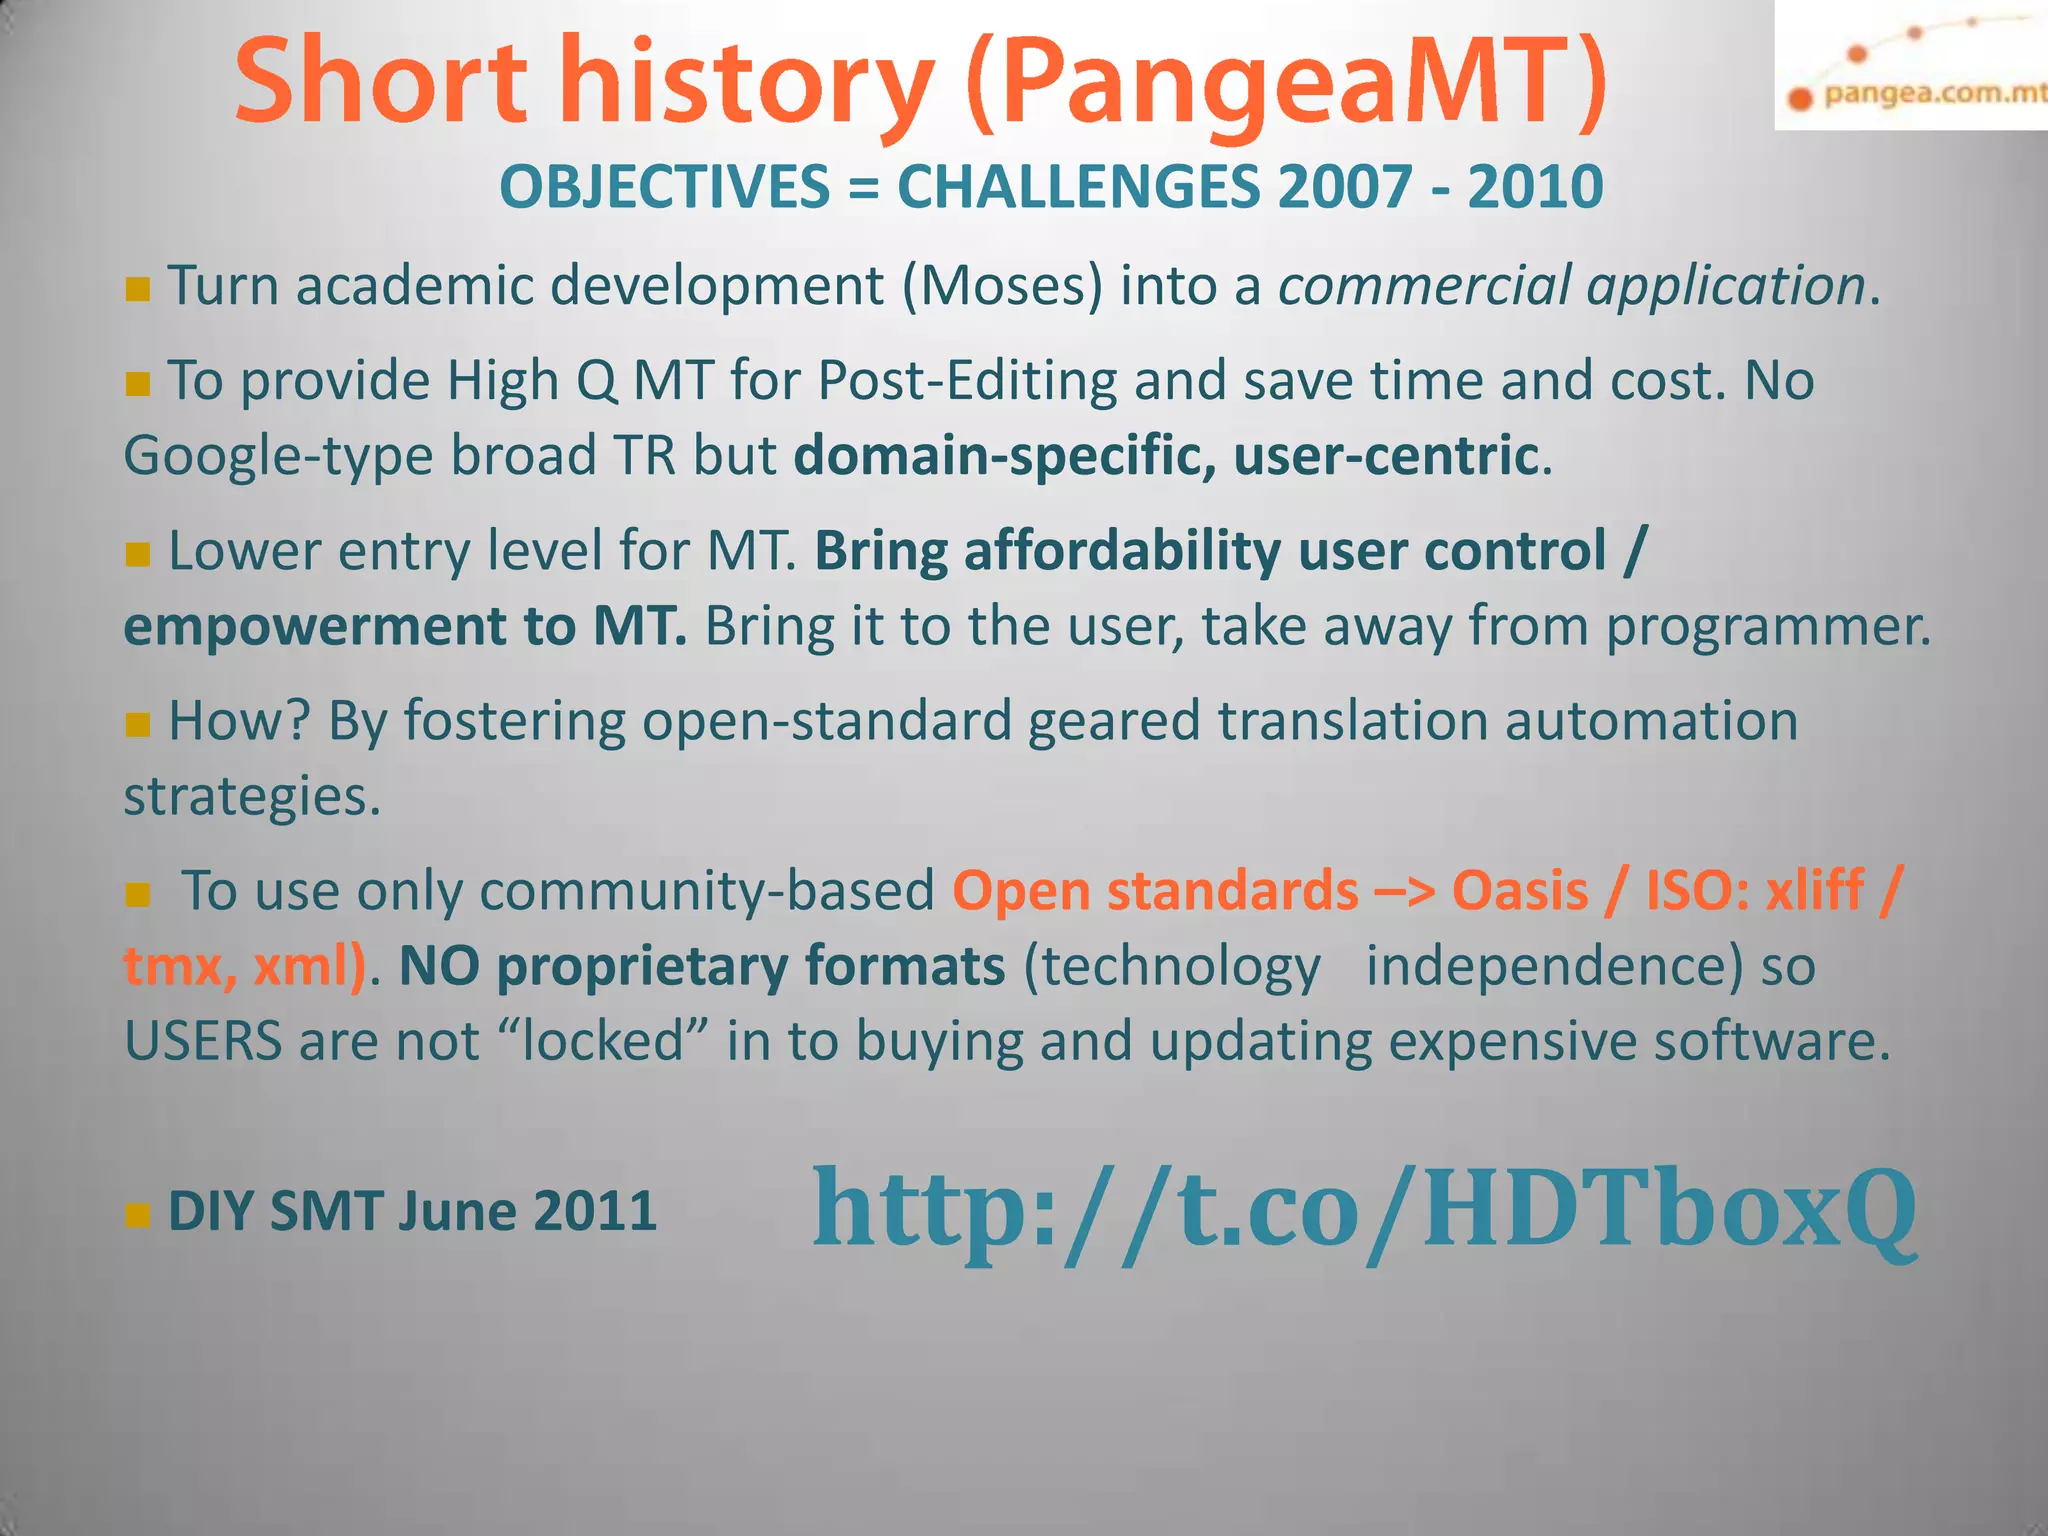
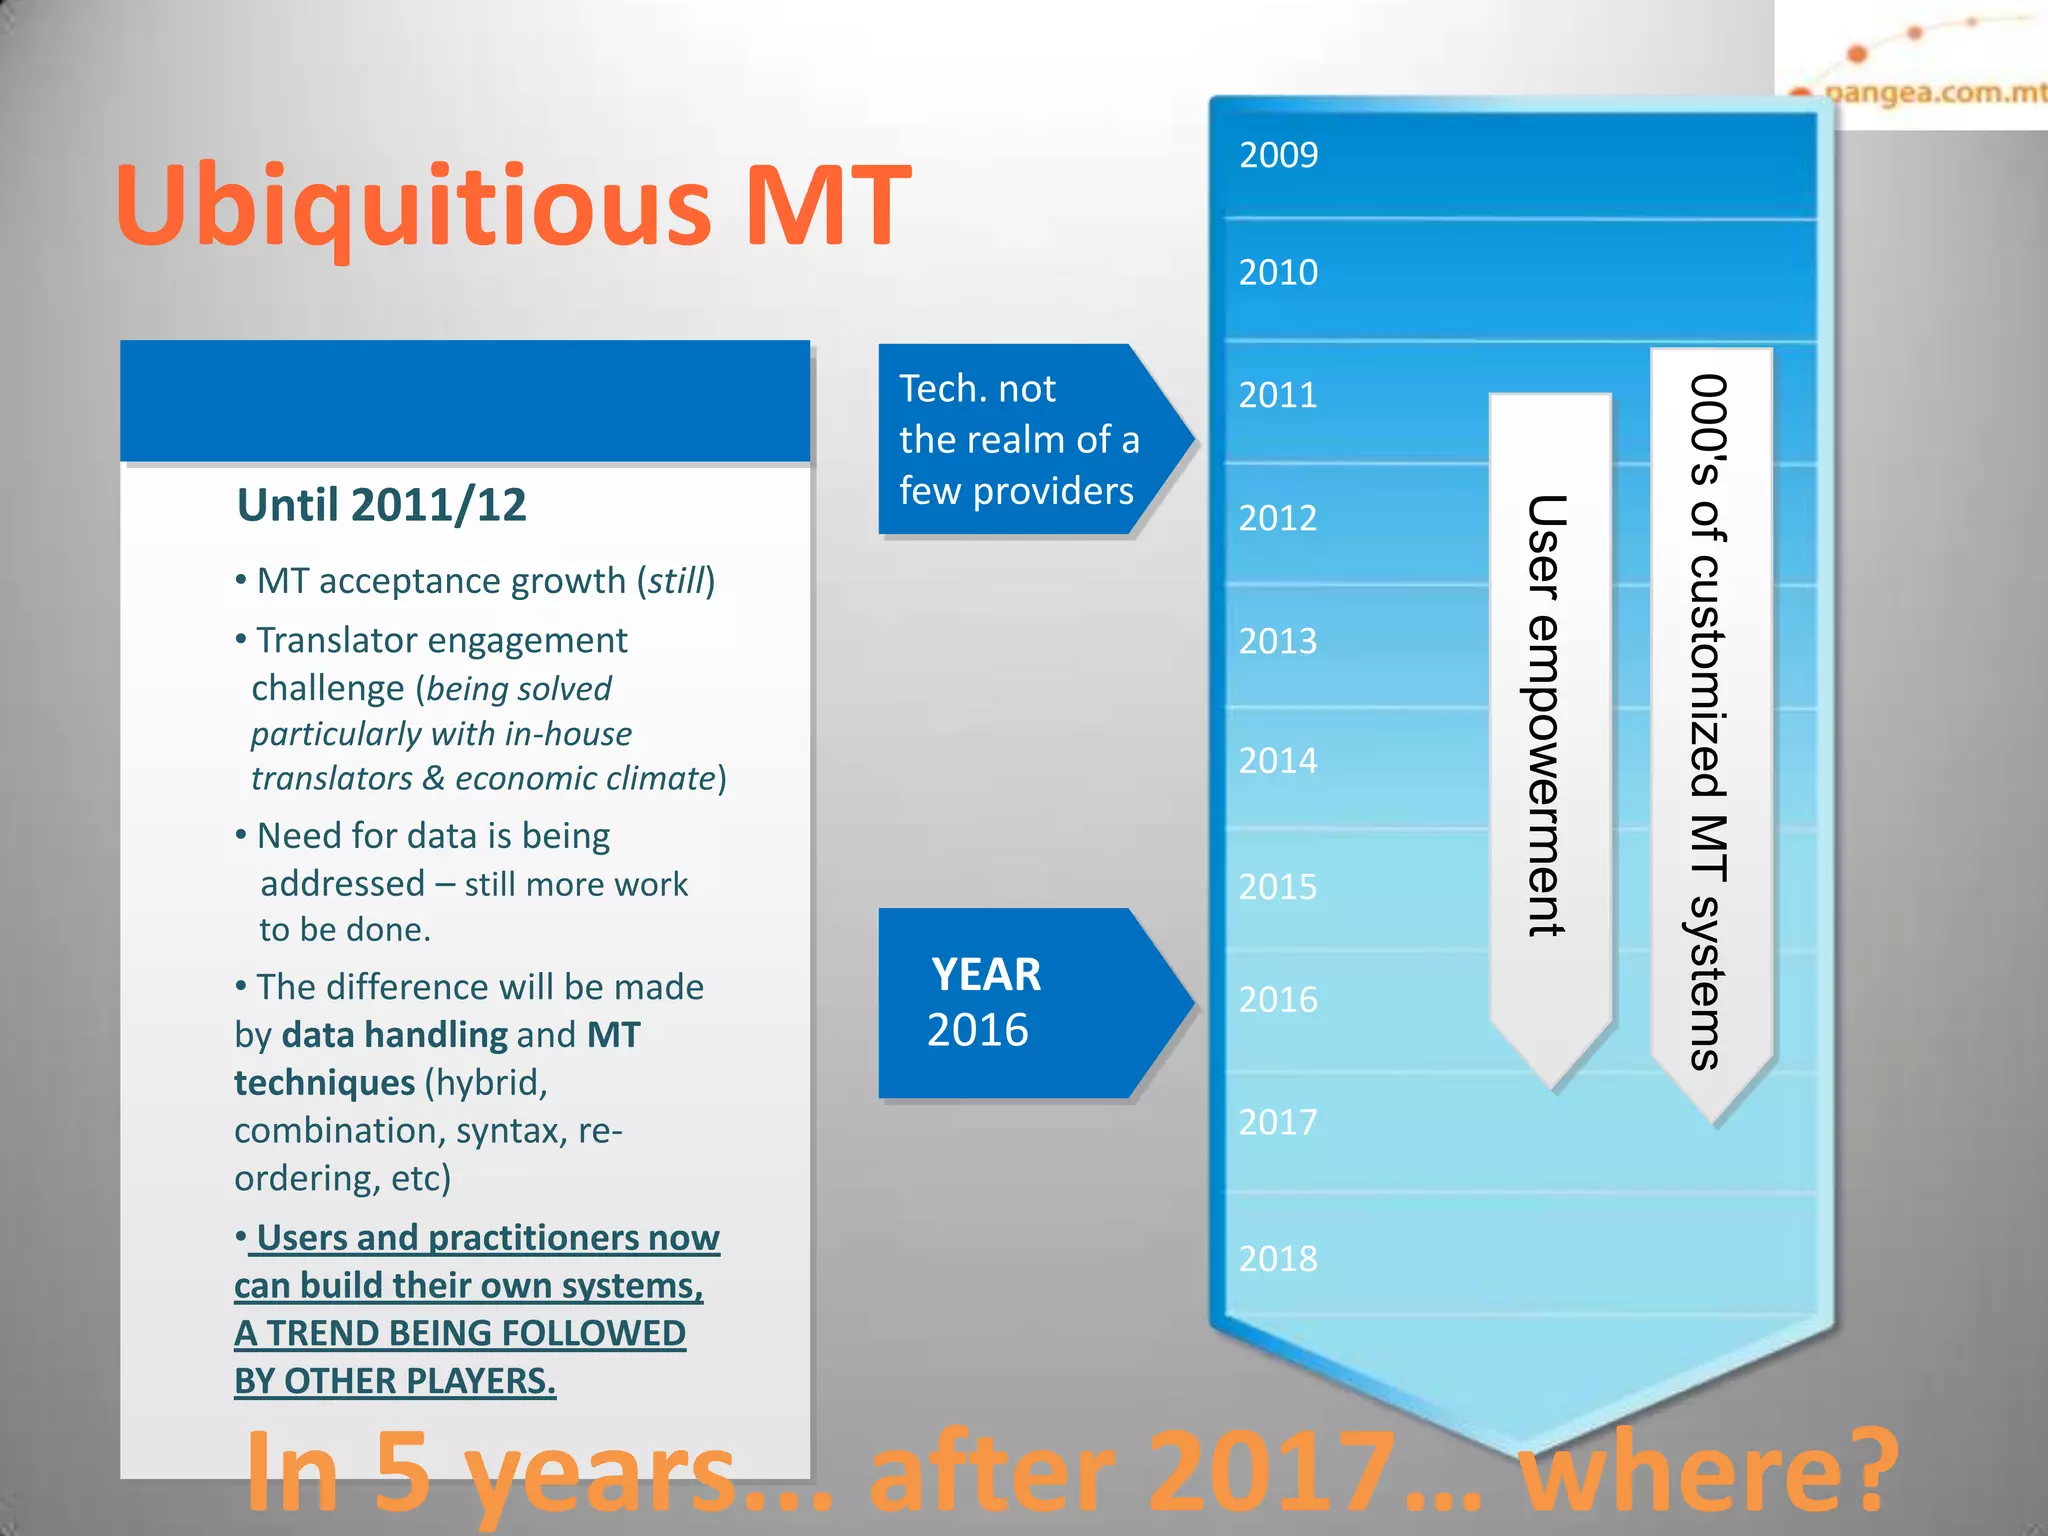
TAUS OPEN SOURCE MACHINE TRANSLATION SHOWCASE


PangeaMT Putting Open
Standards to work
16:00-16:15
Monday 4 June


Manuel Herranz
Pangeanic
PangeaMT – putting open
  standards to work… well


                 Manuel Herranz
#manuelhrrnz #pangeanic   pangeanic   E: mherranz@pangea.com.mt
MACHINE TRANSLATION
    IS NOT
•


•
•                         Make my
                          day, become
    IS                    a post-editor
•
•


•
DIY SMT
Chomsky:                             http://t.co/HDTboxQ
Imagine that if
                                 Translation industry
in the future
                                 appropriating Moses
large enough
                                 http://euromatrixplus.net
amounts of
                                 /moses
data existed,
they could be
processed by                            1st Open source SMT
computers with
enough                                 First statistical papers
computing       rule-based systems, IBM licenses,
power           many linked to patent EN/RU & Intel
Content generated BY
PEAK of Cold       USERS / CONSUMERS /
War and            CITIZENS, multilingual,
information        free information
control.           exchange across the
Products &         world
information
directed to
consumers/
users / citizens
                    BEGINNING of data
                    resources. Internet.
                    Accessability to
                    information
Types of LSPs (Ben Sargent – TMS Inspiration Days April ‘11 – Krakow)

a)   develop it for their use and for their clients (developers of a system),

b) buyers of systems (they do not want the headache of starting from
   scratch and prefer to buy ready-build solutions) and finally

c)   there are those who prefer the mix&match approach (buying some good
     solutions outside and building interfaces and what they know works best
     for their business). The trend is towards unification
2007 and before
                                                          • RB tests with commercial software
  2007/08                                                 • Insufficiently good output
                                                          • Only internal production
• V1: Small data sets (2-5M words),                       • EU Post-Editing Award
 automotive & electronics
• (ES), then Fr/It/De in other fields
                                                                           2009/10
          .                                                    • Division born
                                                               • 00's of engine trials and
 2011/12                                                        language combinations
                                                               • Open-Source to commercial
• DIY SMT                                                      • TMX / XLIFF workflows
• Empower Users
• Glossary
• Automated re-training
• Transfer architecture
                                        As of May 2009: 487 Billion gigabytes or
 and know-how to users                  1,000,000,000 * 487,000,000,000 = 4,87 x 10²⁰
• Compatibility with                    Estimates
 commercial formats                     Up 50% a year (Oracle)
 (ttx, sdlxliff, itd)                   Doubles every 11 hours (IBM)
OBJECTIVES = CHALLENGES 2007 - 2010
   Turn academic development (Moses) into a commercial application.
To provide High Q MT for Post-Editing and save time and cost. No
Google-type broad TR but domain-specific, user-centric.
Lower entry level for MT. Bring affordability user control /
empowerment to MT. Bring it to the user, take away from programmer.
 How? By fostering open-standard geared translation automation
strategies.
 To use only community-based Open standards –> Oasis / ISO: xliff /
tmx, xml). NO proprietary formats (technology independence) so
USERS are not “locked” in to buying and updating expensive software.

   DIY SMT June 2011      http://t.co/HDTboxQ
The rush for data
    Soon realised that there was a rush to gather data but that
    other resources around data were necessary


                                                      cleaning


                                                  More cleaning


9
<tu srclang="en-GB">
<tuv xml:lang="EN-GB">
<seg>A system for recovering the methane that is emitted from the manure so that
it does not leak into the atmosphere.</seg>
</tuv>
<tuv xml:lang="FR-FR">
<seg>Système permettant de r€ pérer le méthane qui se dégage de l'engrais naturel
d'origine animale de sorte qu'il ne se dissipe pas dans l'atm sphère.</seg>
</tuv>

<tuv xml:lang=“EN-US">
<seg>On 22nd May we decided not to join the group.</seg>
<tuv xml:lang=“DE-DE">                                                      cleaning
<seg>Am 22. </seg>

<tu srclang="en-GB">
<tuv xml:lang="EN-GB">
<seg>The President of the United States visited Costa Rica.</seg>
</tuv>
<tuv xml:lang=“ES-ES">
<seg>El Presidente de los Estados Unidos, el señor Obama y su esposa la señora
Michelle, visitaron Costa Rica el pasado sábado.</seg>                More cleaning
</tuv>


   10
<tuv xml:lang=“JP">
<seg>同書は「通訳・翻訳キャリアガイド」の2011-2012年度版。
英字新聞のジャパンタイムズ社が強みとするジャーナリスティックな視点で、通訳や翻訳という仕事が持つ魅
力ややりがい、プロに要求されるスキルおよび意識の持ち方などを紹介。また通訳者・翻訳者になるための道
すじから、実際の仕事の現場にいたるまで、今日の通訳・翻訳業界の実像を包括的に紹介。</seg>
<tuv xml:lang=“EN-US">                                                     cleaning
<seg>It is a journalistic point of view and strengths of the English-
language newspaper Japan Times. It includes a description of the exciting and
rewarding work of translation and interpretation, as well as the introduction of
consciousness and how to acquire the required professional skills. The road to
becoming a translator and interpreter also down to the actual work site, a
comprehensive guide to interpreting the reality of today'stranslation industry.
</seg>

                                                                     More cleaning


  11
•

•


•


•

•   
•
    
•
•

                    


•
                        Translation   MT+PE
        Automotive      400 wph       900 wph
        Marketing       250 wph       450 wph

        Software        350 wph       1,000 wph
•
•
•
•
•   
Domains are managed at TM and at engine level
I created this engine with medical, pharma TMX and added environmental
TMs to boost coverage - Client deals with plant-based natural drugs / ayurveda


                                      Tag-based TM selection
•
•
•
2009
Ubiquitious MT                                        2010

                                     Tech. not


                                                                                000's of customized MT systems
                                                      2011
                                     the realm of a
  Until 2011/12                      few providers


                                                             User empowerment
                                                      2012
  • MT acceptance growth (still)
  • Translator engagement                             2013
   challenge (being solved
   particularly with in-house
   translators & economic climate)                    2014
  • Need for data is being
    addressed – still more work                       2015
   to be done.
  • The difference will be made       YEAR            2016
  by data handling and MT             2016
  techniques (hybrid,
  combination, syntax, re-                            2017
  ordering, etc)
  • Users and practitioners now
                                                      2018
  can build their own systems,
  A TREND BEING FOLLOWED
  BY OTHER PLAYERS.

  In 5 years... after 2017… where?

TAUS OPEN SOURCE MACHINE TRANSLATION SHOWCASE, Paris, Manuel Herranz, Pangeanic, 4 June 2012

  • 1.
    TAUS OPEN SOURCEMACHINE TRANSLATION SHOWCASE PangeaMT Putting Open Standards to work 16:00-16:15 Monday 4 June Manuel Herranz Pangeanic
  • 2.
    PangeaMT – puttingopen standards to work… well Manuel Herranz #manuelhrrnz #pangeanic pangeanic E: mherranz@pangea.com.mt
  • 3.
    MACHINE TRANSLATION IS NOT • • • Make my day, become IS a post-editor • • •
  • 4.
    DIY SMT Chomsky: http://t.co/HDTboxQ Imagine that if Translation industry in the future appropriating Moses large enough http://euromatrixplus.net amounts of /moses data existed, they could be processed by 1st Open source SMT computers with enough First statistical papers computing rule-based systems, IBM licenses, power many linked to patent EN/RU & Intel
  • 5.
    Content generated BY PEAKof Cold USERS / CONSUMERS / War and CITIZENS, multilingual, information free information control. exchange across the Products & world information directed to consumers/ users / citizens BEGINNING of data resources. Internet. Accessability to information
  • 6.
    Types of LSPs(Ben Sargent – TMS Inspiration Days April ‘11 – Krakow) a) develop it for their use and for their clients (developers of a system), b) buyers of systems (they do not want the headache of starting from scratch and prefer to buy ready-build solutions) and finally c) there are those who prefer the mix&match approach (buying some good solutions outside and building interfaces and what they know works best for their business). The trend is towards unification
  • 7.
    2007 and before • RB tests with commercial software 2007/08 • Insufficiently good output • Only internal production • V1: Small data sets (2-5M words), • EU Post-Editing Award automotive & electronics • (ES), then Fr/It/De in other fields 2009/10 . • Division born • 00's of engine trials and 2011/12 language combinations • Open-Source to commercial • DIY SMT • TMX / XLIFF workflows • Empower Users • Glossary • Automated re-training • Transfer architecture As of May 2009: 487 Billion gigabytes or and know-how to users 1,000,000,000 * 487,000,000,000 = 4,87 x 10²⁰ • Compatibility with Estimates commercial formats Up 50% a year (Oracle) (ttx, sdlxliff, itd) Doubles every 11 hours (IBM)
  • 8.
    OBJECTIVES = CHALLENGES2007 - 2010  Turn academic development (Moses) into a commercial application. To provide High Q MT for Post-Editing and save time and cost. No Google-type broad TR but domain-specific, user-centric. Lower entry level for MT. Bring affordability user control / empowerment to MT. Bring it to the user, take away from programmer.  How? By fostering open-standard geared translation automation strategies.  To use only community-based Open standards –> Oasis / ISO: xliff / tmx, xml). NO proprietary formats (technology independence) so USERS are not “locked” in to buying and updating expensive software.  DIY SMT June 2011 http://t.co/HDTboxQ
  • 9.
    The rush fordata Soon realised that there was a rush to gather data but that other resources around data were necessary cleaning More cleaning 9
  • 10.
    <tu srclang="en-GB"> <tuv xml:lang="EN-GB"> <seg>Asystem for recovering the methane that is emitted from the manure so that it does not leak into the atmosphere.</seg> </tuv> <tuv xml:lang="FR-FR"> <seg>Système permettant de r€ pérer le méthane qui se dégage de l'engrais naturel d'origine animale de sorte qu'il ne se dissipe pas dans l'atm sphère.</seg> </tuv> <tuv xml:lang=“EN-US"> <seg>On 22nd May we decided not to join the group.</seg> <tuv xml:lang=“DE-DE"> cleaning <seg>Am 22. </seg> <tu srclang="en-GB"> <tuv xml:lang="EN-GB"> <seg>The President of the United States visited Costa Rica.</seg> </tuv> <tuv xml:lang=“ES-ES"> <seg>El Presidente de los Estados Unidos, el señor Obama y su esposa la señora Michelle, visitaron Costa Rica el pasado sábado.</seg> More cleaning </tuv> 10
  • 11.
    <tuv xml:lang=“JP"> <seg>同書は「通訳・翻訳キャリアガイド」の2011-2012年度版。 英字新聞のジャパンタイムズ社が強みとするジャーナリスティックな視点で、通訳や翻訳という仕事が持つ魅 力ややりがい、プロに要求されるスキルおよび意識の持ち方などを紹介。また通訳者・翻訳者になるための道 すじから、実際の仕事の現場にいたるまで、今日の通訳・翻訳業界の実像を包括的に紹介。</seg> <tuv xml:lang=“EN-US"> cleaning <seg>It is a journalistic point of view and strengths of the English- language newspaper Japan Times. It includes a description of the exciting and rewarding work of translation and interpretation, as well as the introduction of consciousness and how to acquire the required professional skills. The road to becoming a translator and interpreter also down to the actual work site, a comprehensive guide to interpreting the reality of today'stranslation industry. </seg> More cleaning 11
  • 12.
  • 13.
     • •  • Translation MT+PE Automotive 400 wph 900 wph Marketing 250 wph 450 wph Software 350 wph 1,000 wph
  • 17.
  • 18.
    Domains are managedat TM and at engine level
  • 19.
    I created thisengine with medical, pharma TMX and added environmental TMs to boost coverage - Client deals with plant-based natural drugs / ayurveda Tag-based TM selection
  • 20.
  • 24.
    2009 Ubiquitious MT 2010 Tech. not 000's of customized MT systems 2011 the realm of a Until 2011/12 few providers User empowerment 2012 • MT acceptance growth (still) • Translator engagement 2013 challenge (being solved particularly with in-house translators & economic climate) 2014 • Need for data is being addressed – still more work 2015 to be done. • The difference will be made YEAR 2016 by data handling and MT 2016 techniques (hybrid, combination, syntax, re- 2017 ordering, etc) • Users and practitioners now 2018 can build their own systems, A TREND BEING FOLLOWED BY OTHER PLAYERS. In 5 years... after 2017… where?

Editor's Notes

  • #3 Half-circle picture with accent arcs(Basic)To reproduce the shape effects on this slide, do the following:On the Home tab, in the Slides group, click Layout, and then click Blank. On the Home tab, in the Drawing group, click Shapes, and then under Basic Shapes, click Arc (third row, 12th option from the left). On the slide, drag to draw an arc.Select the arc. Under Drawing Tools, on the Format tab, in the Size group, do the following:In the Shape Height box, enter 7.5”.In the Shape Width box, enter 7.5”.Drag the right yellow diamond adjustment handle to the bottom of the slide to create a half-circle. Under Drawing Tools, on the Format tab, in the bottom right corner of the Shape Styles group, click the Format Shape dialog box launcher. In the Format Shape dialog box, click Fill in the left pane. In the Fill pane, select Pictureor texture fill, and then under Insert from, click File. In the Insert Picture dialog box, select a picture, and then click Insert. Also in the Format Shape dialog box, in the Fill pane, under Insert from, select Tile picture as texture. Also in the Format Shape dialog box, click Line Color in the left pane, and then select No line in the Line Color pane. Also in the Format Shape dialog box, click Shadow in the left pane, and then do the following in the Shadow pane: Click the button next to Presets, and then under Inner click Inside Diagonal Top Right (first row, third option from the left).In the Transparency box, enter 70%.In the Blur box, enter 20 pt.In the Distance box, enter 20 pt. Drag the half-circle to the left until the two middle yellow adjustment diamonds are lined up with the left edge of the slide. On the Home tab, in the Drawing group, click Arrange, point to Align, and then do the following:Click Align to Slide.Click Align Middle. Select the arc. On the Home tab, in the Clipboard group, click the arrow under Copy, and then click Duplicate. Select the second arc. Under Drawing Tools, on the Format tab, in the Size group, do the following:In the Shape Height box, enter 6.79”.In the Shape Width box, enter 10.03”.On the Home tab, in the bottom right corner of the Drawing group, click the Format Shape dialog box launcher. In the Format Picture dialog box, click Fill in the left pane, and then in the Fill pane, select No fill. Also in the Format Shape dialog box, click Line Color in the left pane. In the Line Color pane, select Solid line and then do the following:Click the button next to Color, and then under Theme Colors click White, Background 1 (first row, first option from the left).In the Transparency box, enter 50%.Also in the Format Shape dialog box, click Line Style in the left pane. In the Line Style pane, in the Width box, enter 1.5 pt.Drag the second arc left on the slide until the two middle yellow adjustment diamonds are lined up with the left edge of the slide. On the Home tab, in the Drawing group, click Arrange, point to Align, and then do the following:Click Align to Slide.Click Align Middle.Select the second arc. On the Home tab, in the Clipboard group, click the arrow under Copy, and then click Duplicate. Select the third arc. Under Drawing Tools, on the Format tab, in the Size group, do the following:In the Shape Height box, enter 6.86”.In the ShapeWidth box, enter 9.98”.On the Home tab, in the bottom right corner of the Drawing group, click the Format Shape dialog box launcher. In the Format Shape dialog box, click Line Color in the left pane, select Gradient line in the Line Color pane, and then do the following: In the Type list, select Linear.Click the button next to Direction, and then click Linear Down (first row, second option from the left).Under Gradient stops, click Add gradient stop or Remove gradient stop until two stops appear in the slider.Also under Gradient stops, customize the gradient stops that you added as follows:Select the first stop in the slider, and then do the following:In the Position box, enter 0%.Click the button next to Color, and then under Theme Colors click Blue, Accent 1, Lighter 40%(fourth row, fifth option from the left).In the Transparency box, enter 77%.Select the second stop in the slider, and then do the following: In the Position box, enter 100%.Click the button next to Color, click More Colors, and then in the Colors dialog box, on the Custom tab, enter values for Red: 208, Green: 215, Blue: 222.In the Format Shape dialog box, in the Line Style pane, in the Transparency box, enter 90%.Also in the Format Shape dialog box, click Line Style in the left pane. In the Line Style pane, in the Width box, enter 4.25 pt. On the Home tab, in the Drawing group, click Arrange, point to Align, and then do the following:Click Align to Slide.Click Align Left. Drag the third arc left on the slide until the two middle yellow adjustment diamonds are lined up with the left edge of the slide. Drag the third arc vertically as needed to position it slightly above the second arc on the slide. To reproduce the background on this slide, do the following: Right-click the slide background area, and then click Format Background. In the Format Background dialog box, click Fill in the left pane, select Gradient fill in the Fill pane, and then do the following:In the Type list, select Linear.Click the button next to Direction, and then click Linear Up (second row, second option from the left). In the Angle box, enter 270⁰.Under Gradient stops, click Add gradient stop or Remove gradient stop until four stops appear in the sliderAlso under Gradient stops, customize the gradient stops that you added as follows:Select the first stop in the slider, and then do the following:In the Position box, enter 0%.Click the button next to Color, click More Colors, and then in the Colors dialog box, on the Custom tab, enter values for Red: 167, Green: 185, Blue: 197.Select the second stop in the slider, and then do the following: In the Position box, enter 30%.Click the button next to Color, and then under Theme Colors click White, Background 1 (first row, first option from the left).Select the third stop in the slider, and then do the following: In the Position box, enter 70%.Click the button next to Color, and then under Theme Colors click White, Background 1 (first row, first option from the left).Select the fourth stop in the slider, and then do the following: In the Position box, enter 100%.Click the button next to Color, click More Colors, and then in the Colors dialog box, on the Custom tab, enter values for Red: 167, Green: 185, Blue: 197.
  • #4 Half-circle picture with accent arcs(Basic)To reproduce the shape effects on this slide, do the following:On the Home tab, in the Slides group, click Layout, and then click Blank. On the Home tab, in the Drawing group, click Shapes, and then under Basic Shapes, click Arc (third row, 12th option from the left). On the slide, drag to draw an arc.Select the arc. Under Drawing Tools, on the Format tab, in the Size group, do the following:In the Shape Height box, enter 7.5”.In the Shape Width box, enter 7.5”.Drag the right yellow diamond adjustment handle to the bottom of the slide to create a half-circle. Under Drawing Tools, on the Format tab, in the bottom right corner of the Shape Styles group, click the Format Shape dialog box launcher. In the Format Shape dialog box, click Fill in the left pane. In the Fill pane, select Pictureor texture fill, and then under Insert from, click File. In the Insert Picture dialog box, select a picture, and then click Insert. Also in the Format Shape dialog box, in the Fill pane, under Insert from, select Tile picture as texture. Also in the Format Shape dialog box, click Line Color in the left pane, and then select No line in the Line Color pane. Also in the Format Shape dialog box, click Shadow in the left pane, and then do the following in the Shadow pane: Click the button next to Presets, and then under Inner click Inside Diagonal Top Right (first row, third option from the left).In the Transparency box, enter 70%.In the Blur box, enter 20 pt.In the Distance box, enter 20 pt. Drag the half-circle to the left until the two middle yellow adjustment diamonds are lined up with the left edge of the slide. On the Home tab, in the Drawing group, click Arrange, point to Align, and then do the following:Click Align to Slide.Click Align Middle. Select the arc. On the Home tab, in the Clipboard group, click the arrow under Copy, and then click Duplicate. Select the second arc. Under Drawing Tools, on the Format tab, in the Size group, do the following:In the Shape Height box, enter 6.79”.In the Shape Width box, enter 10.03”.On the Home tab, in the bottom right corner of the Drawing group, click the Format Shape dialog box launcher. In the Format Picture dialog box, click Fill in the left pane, and then in the Fill pane, select No fill. Also in the Format Shape dialog box, click Line Color in the left pane. In the Line Color pane, select Solid line and then do the following:Click the button next to Color, and then under Theme Colors click White, Background 1 (first row, first option from the left).In the Transparency box, enter 50%.Also in the Format Shape dialog box, click Line Style in the left pane. In the Line Style pane, in the Width box, enter 1.5 pt.Drag the second arc left on the slide until the two middle yellow adjustment diamonds are lined up with the left edge of the slide. On the Home tab, in the Drawing group, click Arrange, point to Align, and then do the following:Click Align to Slide.Click Align Middle.Select the second arc. On the Home tab, in the Clipboard group, click the arrow under Copy, and then click Duplicate. Select the third arc. Under Drawing Tools, on the Format tab, in the Size group, do the following:In the Shape Height box, enter 6.86”.In the ShapeWidth box, enter 9.98”.On the Home tab, in the bottom right corner of the Drawing group, click the Format Shape dialog box launcher. In the Format Shape dialog box, click Line Color in the left pane, select Gradient line in the Line Color pane, and then do the following: In the Type list, select Linear.Click the button next to Direction, and then click Linear Down (first row, second option from the left).Under Gradient stops, click Add gradient stop or Remove gradient stop until two stops appear in the slider.Also under Gradient stops, customize the gradient stops that you added as follows:Select the first stop in the slider, and then do the following:In the Position box, enter 0%.Click the button next to Color, and then under Theme Colors click Blue, Accent 1, Lighter 40%(fourth row, fifth option from the left).In the Transparency box, enter 77%.Select the second stop in the slider, and then do the following: In the Position box, enter 100%.Click the button next to Color, click More Colors, and then in the Colors dialog box, on the Custom tab, enter values for Red: 208, Green: 215, Blue: 222.In the Format Shape dialog box, in the Line Style pane, in the Transparency box, enter 90%.Also in the Format Shape dialog box, click Line Style in the left pane. In the Line Style pane, in the Width box, enter 4.25 pt. On the Home tab, in the Drawing group, click Arrange, point to Align, and then do the following:Click Align to Slide.Click Align Left. Drag the third arc left on the slide until the two middle yellow adjustment diamonds are lined up with the left edge of the slide. Drag the third arc vertically as needed to position it slightly above the second arc on the slide. To reproduce the background on this slide, do the following: Right-click the slide background area, and then click Format Background. In the Format Background dialog box, click Fill in the left pane, select Gradient fill in the Fill pane, and then do the following:In the Type list, select Linear.Click the button next to Direction, and then click Linear Up (second row, second option from the left). In the Angle box, enter 270⁰.Under Gradient stops, click Add gradient stop or Remove gradient stop until four stops appear in the sliderAlso under Gradient stops, customize the gradient stops that you added as follows:Select the first stop in the slider, and then do the following:In the Position box, enter 0%.Click the button next to Color, click More Colors, and then in the Colors dialog box, on the Custom tab, enter values for Red: 167, Green: 185, Blue: 197.Select the second stop in the slider, and then do the following: In the Position box, enter 30%.Click the button next to Color, and then under Theme Colors click White, Background 1 (first row, first option from the left).Select the third stop in the slider, and then do the following: In the Position box, enter 70%.Click the button next to Color, and then under Theme Colors click White, Background 1 (first row, first option from the left).Select the fourth stop in the slider, and then do the following: In the Position box, enter 100%.Click the button next to Color, click More Colors, and then in the Colors dialog box, on the Custom tab, enter values for Red: 167, Green: 185, Blue: 197.
  • #5 Half-circle picture with accent arcs(Basic)To reproduce the shape effects on this slide, do the following:On the Home tab, in the Slides group, click Layout, and then click Blank. On the Home tab, in the Drawing group, click Shapes, and then under Basic Shapes, click Arc (third row, 12th option from the left). On the slide, drag to draw an arc.Select the arc. Under Drawing Tools, on the Format tab, in the Size group, do the following:In the Shape Height box, enter 7.5”.In the Shape Width box, enter 7.5”.Drag the right yellow diamond adjustment handle to the bottom of the slide to create a half-circle. Under Drawing Tools, on the Format tab, in the bottom right corner of the Shape Styles group, click the Format Shape dialog box launcher. In the Format Shape dialog box, click Fill in the left pane. In the Fill pane, select Pictureor texture fill, and then under Insert from, click File. In the Insert Picture dialog box, select a picture, and then click Insert. Also in the Format Shape dialog box, in the Fill pane, under Insert from, select Tile picture as texture. Also in the Format Shape dialog box, click Line Color in the left pane, and then select No line in the Line Color pane. Also in the Format Shape dialog box, click Shadow in the left pane, and then do the following in the Shadow pane: Click the button next to Presets, and then under Inner click Inside Diagonal Top Right (first row, third option from the left).In the Transparency box, enter 70%.In the Blur box, enter 20 pt.In the Distance box, enter 20 pt. Drag the half-circle to the left until the two middle yellow adjustment diamonds are lined up with the left edge of the slide. On the Home tab, in the Drawing group, click Arrange, point to Align, and then do the following:Click Align to Slide.Click Align Middle. Select the arc. On the Home tab, in the Clipboard group, click the arrow under Copy, and then click Duplicate. Select the second arc. Under Drawing Tools, on the Format tab, in the Size group, do the following:In the Shape Height box, enter 6.79”.In the Shape Width box, enter 10.03”.On the Home tab, in the bottom right corner of the Drawing group, click the Format Shape dialog box launcher. In the Format Picture dialog box, click Fill in the left pane, and then in the Fill pane, select No fill. Also in the Format Shape dialog box, click Line Color in the left pane. In the Line Color pane, select Solid line and then do the following:Click the button next to Color, and then under Theme Colors click White, Background 1 (first row, first option from the left).In the Transparency box, enter 50%.Also in the Format Shape dialog box, click Line Style in the left pane. In the Line Style pane, in the Width box, enter 1.5 pt.Drag the second arc left on the slide until the two middle yellow adjustment diamonds are lined up with the left edge of the slide. On the Home tab, in the Drawing group, click Arrange, point to Align, and then do the following:Click Align to Slide.Click Align Middle.Select the second arc. On the Home tab, in the Clipboard group, click the arrow under Copy, and then click Duplicate. Select the third arc. Under Drawing Tools, on the Format tab, in the Size group, do the following:In the Shape Height box, enter 6.86”.In the ShapeWidth box, enter 9.98”.On the Home tab, in the bottom right corner of the Drawing group, click the Format Shape dialog box launcher. In the Format Shape dialog box, click Line Color in the left pane, select Gradient line in the Line Color pane, and then do the following: In the Type list, select Linear.Click the button next to Direction, and then click Linear Down (first row, second option from the left).Under Gradient stops, click Add gradient stop or Remove gradient stop until two stops appear in the slider.Also under Gradient stops, customize the gradient stops that you added as follows:Select the first stop in the slider, and then do the following:In the Position box, enter 0%.Click the button next to Color, and then under Theme Colors click Blue, Accent 1, Lighter 40%(fourth row, fifth option from the left).In the Transparency box, enter 77%.Select the second stop in the slider, and then do the following: In the Position box, enter 100%.Click the button next to Color, click More Colors, and then in the Colors dialog box, on the Custom tab, enter values for Red: 208, Green: 215, Blue: 222.In the Format Shape dialog box, in the Line Style pane, in the Transparency box, enter 90%.Also in the Format Shape dialog box, click Line Style in the left pane. In the Line Style pane, in the Width box, enter 4.25 pt. On the Home tab, in the Drawing group, click Arrange, point to Align, and then do the following:Click Align to Slide.Click Align Left. Drag the third arc left on the slide until the two middle yellow adjustment diamonds are lined up with the left edge of the slide. Drag the third arc vertically as needed to position it slightly above the second arc on the slide. To reproduce the background on this slide, do the following: Right-click the slide background area, and then click Format Background. In the Format Background dialog box, click Fill in the left pane, select Gradient fill in the Fill pane, and then do the following:In the Type list, select Linear.Click the button next to Direction, and then click Linear Up (second row, second option from the left). In the Angle box, enter 270⁰.Under Gradient stops, click Add gradient stop or Remove gradient stop until four stops appear in the sliderAlso under Gradient stops, customize the gradient stops that you added as follows:Select the first stop in the slider, and then do the following:In the Position box, enter 0%.Click the button next to Color, click More Colors, and then in the Colors dialog box, on the Custom tab, enter values for Red: 167, Green: 185, Blue: 197.Select the second stop in the slider, and then do the following: In the Position box, enter 30%.Click the button next to Color, and then under Theme Colors click White, Background 1 (first row, first option from the left).Select the third stop in the slider, and then do the following: In the Position box, enter 70%.Click the button next to Color, and then under Theme Colors click White, Background 1 (first row, first option from the left).Select the fourth stop in the slider, and then do the following: In the Position box, enter 100%.Click the button next to Color, click More Colors, and then in the Colors dialog box, on the Custom tab, enter values for Red: 167, Green: 185, Blue: 197.
  • #6 Half-circle picture with accent arcs(Basic)To reproduce the shape effects on this slide, do the following:On the Home tab, in the Slides group, click Layout, and then click Blank. On the Home tab, in the Drawing group, click Shapes, and then under Basic Shapes, click Arc (third row, 12th option from the left). On the slide, drag to draw an arc.Select the arc. Under Drawing Tools, on the Format tab, in the Size group, do the following:In the Shape Height box, enter 7.5”.In the Shape Width box, enter 7.5”.Drag the right yellow diamond adjustment handle to the bottom of the slide to create a half-circle. Under Drawing Tools, on the Format tab, in the bottom right corner of the Shape Styles group, click the Format Shape dialog box launcher. In the Format Shape dialog box, click Fill in the left pane. In the Fill pane, select Pictureor texture fill, and then under Insert from, click File. In the Insert Picture dialog box, select a picture, and then click Insert. Also in the Format Shape dialog box, in the Fill pane, under Insert from, select Tile picture as texture. Also in the Format Shape dialog box, click Line Color in the left pane, and then select No line in the Line Color pane. Also in the Format Shape dialog box, click Shadow in the left pane, and then do the following in the Shadow pane: Click the button next to Presets, and then under Inner click Inside Diagonal Top Right (first row, third option from the left).In the Transparency box, enter 70%.In the Blur box, enter 20 pt.In the Distance box, enter 20 pt. Drag the half-circle to the left until the two middle yellow adjustment diamonds are lined up with the left edge of the slide. On the Home tab, in the Drawing group, click Arrange, point to Align, and then do the following:Click Align to Slide.Click Align Middle. Select the arc. On the Home tab, in the Clipboard group, click the arrow under Copy, and then click Duplicate. Select the second arc. Under Drawing Tools, on the Format tab, in the Size group, do the following:In the Shape Height box, enter 6.79”.In the Shape Width box, enter 10.03”.On the Home tab, in the bottom right corner of the Drawing group, click the Format Shape dialog box launcher. In the Format Picture dialog box, click Fill in the left pane, and then in the Fill pane, select No fill. Also in the Format Shape dialog box, click Line Color in the left pane. In the Line Color pane, select Solid line and then do the following:Click the button next to Color, and then under Theme Colors click White, Background 1 (first row, first option from the left).In the Transparency box, enter 50%.Also in the Format Shape dialog box, click Line Style in the left pane. In the Line Style pane, in the Width box, enter 1.5 pt.Drag the second arc left on the slide until the two middle yellow adjustment diamonds are lined up with the left edge of the slide. On the Home tab, in the Drawing group, click Arrange, point to Align, and then do the following:Click Align to Slide.Click Align Middle.Select the second arc. On the Home tab, in the Clipboard group, click the arrow under Copy, and then click Duplicate. Select the third arc. Under Drawing Tools, on the Format tab, in the Size group, do the following:In the Shape Height box, enter 6.86”.In the ShapeWidth box, enter 9.98”.On the Home tab, in the bottom right corner of the Drawing group, click the Format Shape dialog box launcher. In the Format Shape dialog box, click Line Color in the left pane, select Gradient line in the Line Color pane, and then do the following: In the Type list, select Linear.Click the button next to Direction, and then click Linear Down (first row, second option from the left).Under Gradient stops, click Add gradient stop or Remove gradient stop until two stops appear in the slider.Also under Gradient stops, customize the gradient stops that you added as follows:Select the first stop in the slider, and then do the following:In the Position box, enter 0%.Click the button next to Color, and then under Theme Colors click Blue, Accent 1, Lighter 40%(fourth row, fifth option from the left).In the Transparency box, enter 77%.Select the second stop in the slider, and then do the following: In the Position box, enter 100%.Click the button next to Color, click More Colors, and then in the Colors dialog box, on the Custom tab, enter values for Red: 208, Green: 215, Blue: 222.In the Format Shape dialog box, in the Line Style pane, in the Transparency box, enter 90%.Also in the Format Shape dialog box, click Line Style in the left pane. In the Line Style pane, in the Width box, enter 4.25 pt. On the Home tab, in the Drawing group, click Arrange, point to Align, and then do the following:Click Align to Slide.Click Align Left. Drag the third arc left on the slide until the two middle yellow adjustment diamonds are lined up with the left edge of the slide. Drag the third arc vertically as needed to position it slightly above the second arc on the slide. To reproduce the background on this slide, do the following: Right-click the slide background area, and then click Format Background. In the Format Background dialog box, click Fill in the left pane, select Gradient fill in the Fill pane, and then do the following:In the Type list, select Linear.Click the button next to Direction, and then click Linear Up (second row, second option from the left). In the Angle box, enter 270⁰.Under Gradient stops, click Add gradient stop or Remove gradient stop until four stops appear in the sliderAlso under Gradient stops, customize the gradient stops that you added as follows:Select the first stop in the slider, and then do the following:In the Position box, enter 0%.Click the button next to Color, click More Colors, and then in the Colors dialog box, on the Custom tab, enter values for Red: 167, Green: 185, Blue: 197.Select the second stop in the slider, and then do the following: In the Position box, enter 30%.Click the button next to Color, and then under Theme Colors click White, Background 1 (first row, first option from the left).Select the third stop in the slider, and then do the following: In the Position box, enter 70%.Click the button next to Color, and then under Theme Colors click White, Background 1 (first row, first option from the left).Select the fourth stop in the slider, and then do the following: In the Position box, enter 100%.Click the button next to Color, click More Colors, and then in the Colors dialog box, on the Custom tab, enter values for Red: 167, Green: 185, Blue: 197.
  • #7 Half-circle picture with accent arcs(Basic)To reproduce the shape effects on this slide, do the following:On the Home tab, in the Slides group, click Layout, and then click Blank. On the Home tab, in the Drawing group, click Shapes, and then under Basic Shapes, click Arc (third row, 12th option from the left). On the slide, drag to draw an arc.Select the arc. Under Drawing Tools, on the Format tab, in the Size group, do the following:In the Shape Height box, enter 7.5”.In the Shape Width box, enter 7.5”.Drag the right yellow diamond adjustment handle to the bottom of the slide to create a half-circle. Under Drawing Tools, on the Format tab, in the bottom right corner of the Shape Styles group, click the Format Shape dialog box launcher. In the Format Shape dialog box, click Fill in the left pane. In the Fill pane, select Pictureor texture fill, and then under Insert from, click File. In the Insert Picture dialog box, select a picture, and then click Insert. Also in the Format Shape dialog box, in the Fill pane, under Insert from, select Tile picture as texture. Also in the Format Shape dialog box, click Line Color in the left pane, and then select No line in the Line Color pane. Also in the Format Shape dialog box, click Shadow in the left pane, and then do the following in the Shadow pane: Click the button next to Presets, and then under Inner click Inside Diagonal Top Right (first row, third option from the left).In the Transparency box, enter 70%.In the Blur box, enter 20 pt.In the Distance box, enter 20 pt. Drag the half-circle to the left until the two middle yellow adjustment diamonds are lined up with the left edge of the slide. On the Home tab, in the Drawing group, click Arrange, point to Align, and then do the following:Click Align to Slide.Click Align Middle. Select the arc. On the Home tab, in the Clipboard group, click the arrow under Copy, and then click Duplicate. Select the second arc. Under Drawing Tools, on the Format tab, in the Size group, do the following:In the Shape Height box, enter 6.79”.In the Shape Width box, enter 10.03”.On the Home tab, in the bottom right corner of the Drawing group, click the Format Shape dialog box launcher. In the Format Picture dialog box, click Fill in the left pane, and then in the Fill pane, select No fill. Also in the Format Shape dialog box, click Line Color in the left pane. In the Line Color pane, select Solid line and then do the following:Click the button next to Color, and then under Theme Colors click White, Background 1 (first row, first option from the left).In the Transparency box, enter 50%.Also in the Format Shape dialog box, click Line Style in the left pane. In the Line Style pane, in the Width box, enter 1.5 pt.Drag the second arc left on the slide until the two middle yellow adjustment diamonds are lined up with the left edge of the slide. On the Home tab, in the Drawing group, click Arrange, point to Align, and then do the following:Click Align to Slide.Click Align Middle.Select the second arc. On the Home tab, in the Clipboard group, click the arrow under Copy, and then click Duplicate. Select the third arc. Under Drawing Tools, on the Format tab, in the Size group, do the following:In the Shape Height box, enter 6.86”.In the ShapeWidth box, enter 9.98”.On the Home tab, in the bottom right corner of the Drawing group, click the Format Shape dialog box launcher. In the Format Shape dialog box, click Line Color in the left pane, select Gradient line in the Line Color pane, and then do the following: In the Type list, select Linear.Click the button next to Direction, and then click Linear Down (first row, second option from the left).Under Gradient stops, click Add gradient stop or Remove gradient stop until two stops appear in the slider.Also under Gradient stops, customize the gradient stops that you added as follows:Select the first stop in the slider, and then do the following:In the Position box, enter 0%.Click the button next to Color, and then under Theme Colors click Blue, Accent 1, Lighter 40%(fourth row, fifth option from the left).In the Transparency box, enter 77%.Select the second stop in the slider, and then do the following: In the Position box, enter 100%.Click the button next to Color, click More Colors, and then in the Colors dialog box, on the Custom tab, enter values for Red: 208, Green: 215, Blue: 222.In the Format Shape dialog box, in the Line Style pane, in the Transparency box, enter 90%.Also in the Format Shape dialog box, click Line Style in the left pane. In the Line Style pane, in the Width box, enter 4.25 pt. On the Home tab, in the Drawing group, click Arrange, point to Align, and then do the following:Click Align to Slide.Click Align Left. Drag the third arc left on the slide until the two middle yellow adjustment diamonds are lined up with the left edge of the slide. Drag the third arc vertically as needed to position it slightly above the second arc on the slide. To reproduce the background on this slide, do the following: Right-click the slide background area, and then click Format Background. In the Format Background dialog box, click Fill in the left pane, select Gradient fill in the Fill pane, and then do the following:In the Type list, select Linear.Click the button next to Direction, and then click Linear Up (second row, second option from the left). In the Angle box, enter 270⁰.Under Gradient stops, click Add gradient stop or Remove gradient stop until four stops appear in the sliderAlso under Gradient stops, customize the gradient stops that you added as follows:Select the first stop in the slider, and then do the following:In the Position box, enter 0%.Click the button next to Color, click More Colors, and then in the Colors dialog box, on the Custom tab, enter values for Red: 167, Green: 185, Blue: 197.Select the second stop in the slider, and then do the following: In the Position box, enter 30%.Click the button next to Color, and then under Theme Colors click White, Background 1 (first row, first option from the left).Select the third stop in the slider, and then do the following: In the Position box, enter 70%.Click the button next to Color, and then under Theme Colors click White, Background 1 (first row, first option from the left).Select the fourth stop in the slider, and then do the following: In the Position box, enter 100%.Click the button next to Color, click More Colors, and then in the Colors dialog box, on the Custom tab, enter values for Red: 167, Green: 185, Blue: 197.
  • #8 Half-circle picture with accent arcs(Basic)To reproduce the shape effects on this slide, do the following:On the Home tab, in the Slides group, click Layout, and then click Blank. On the Home tab, in the Drawing group, click Shapes, and then under Basic Shapes, click Arc (third row, 12th option from the left). On the slide, drag to draw an arc.Select the arc. Under Drawing Tools, on the Format tab, in the Size group, do the following:In the Shape Height box, enter 7.5”.In the Shape Width box, enter 7.5”.Drag the right yellow diamond adjustment handle to the bottom of the slide to create a half-circle. Under Drawing Tools, on the Format tab, in the bottom right corner of the Shape Styles group, click the Format Shape dialog box launcher. In the Format Shape dialog box, click Fill in the left pane. In the Fill pane, select Pictureor texture fill, and then under Insert from, click File. In the Insert Picture dialog box, select a picture, and then click Insert. Also in the Format Shape dialog box, in the Fill pane, under Insert from, select Tile picture as texture. Also in the Format Shape dialog box, click Line Color in the left pane, and then select No line in the Line Color pane. Also in the Format Shape dialog box, click Shadow in the left pane, and then do the following in the Shadow pane: Click the button next to Presets, and then under Inner click Inside Diagonal Top Right (first row, third option from the left).In the Transparency box, enter 70%.In the Blur box, enter 20 pt.In the Distance box, enter 20 pt. Drag the half-circle to the left until the two middle yellow adjustment diamonds are lined up with the left edge of the slide. On the Home tab, in the Drawing group, click Arrange, point to Align, and then do the following:Click Align to Slide.Click Align Middle. Select the arc. On the Home tab, in the Clipboard group, click the arrow under Copy, and then click Duplicate. Select the second arc. Under Drawing Tools, on the Format tab, in the Size group, do the following:In the Shape Height box, enter 6.79”.In the Shape Width box, enter 10.03”.On the Home tab, in the bottom right corner of the Drawing group, click the Format Shape dialog box launcher. In the Format Picture dialog box, click Fill in the left pane, and then in the Fill pane, select No fill. Also in the Format Shape dialog box, click Line Color in the left pane. In the Line Color pane, select Solid line and then do the following:Click the button next to Color, and then under Theme Colors click White, Background 1 (first row, first option from the left).In the Transparency box, enter 50%.Also in the Format Shape dialog box, click Line Style in the left pane. In the Line Style pane, in the Width box, enter 1.5 pt.Drag the second arc left on the slide until the two middle yellow adjustment diamonds are lined up with the left edge of the slide. On the Home tab, in the Drawing group, click Arrange, point to Align, and then do the following:Click Align to Slide.Click Align Middle.Select the second arc. On the Home tab, in the Clipboard group, click the arrow under Copy, and then click Duplicate. Select the third arc. Under Drawing Tools, on the Format tab, in the Size group, do the following:In the Shape Height box, enter 6.86”.In the ShapeWidth box, enter 9.98”.On the Home tab, in the bottom right corner of the Drawing group, click the Format Shape dialog box launcher. In the Format Shape dialog box, click Line Color in the left pane, select Gradient line in the Line Color pane, and then do the following: In the Type list, select Linear.Click the button next to Direction, and then click Linear Down (first row, second option from the left).Under Gradient stops, click Add gradient stop or Remove gradient stop until two stops appear in the slider.Also under Gradient stops, customize the gradient stops that you added as follows:Select the first stop in the slider, and then do the following:In the Position box, enter 0%.Click the button next to Color, and then under Theme Colors click Blue, Accent 1, Lighter 40%(fourth row, fifth option from the left).In the Transparency box, enter 77%.Select the second stop in the slider, and then do the following: In the Position box, enter 100%.Click the button next to Color, click More Colors, and then in the Colors dialog box, on the Custom tab, enter values for Red: 208, Green: 215, Blue: 222.In the Format Shape dialog box, in the Line Style pane, in the Transparency box, enter 90%.Also in the Format Shape dialog box, click Line Style in the left pane. In the Line Style pane, in the Width box, enter 4.25 pt. On the Home tab, in the Drawing group, click Arrange, point to Align, and then do the following:Click Align to Slide.Click Align Left. Drag the third arc left on the slide until the two middle yellow adjustment diamonds are lined up with the left edge of the slide. Drag the third arc vertically as needed to position it slightly above the second arc on the slide. To reproduce the background on this slide, do the following: Right-click the slide background area, and then click Format Background. In the Format Background dialog box, click Fill in the left pane, select Gradient fill in the Fill pane, and then do the following:In the Type list, select Linear.Click the button next to Direction, and then click Linear Up (second row, second option from the left). In the Angle box, enter 270⁰.Under Gradient stops, click Add gradient stop or Remove gradient stop until four stops appear in the sliderAlso under Gradient stops, customize the gradient stops that you added as follows:Select the first stop in the slider, and then do the following:In the Position box, enter 0%.Click the button next to Color, click More Colors, and then in the Colors dialog box, on the Custom tab, enter values for Red: 167, Green: 185, Blue: 197.Select the second stop in the slider, and then do the following: In the Position box, enter 30%.Click the button next to Color, and then under Theme Colors click White, Background 1 (first row, first option from the left).Select the third stop in the slider, and then do the following: In the Position box, enter 70%.Click the button next to Color, and then under Theme Colors click White, Background 1 (first row, first option from the left).Select the fourth stop in the slider, and then do the following: In the Position box, enter 100%.Click the button next to Color, click More Colors, and then in the Colors dialog box, on the Custom tab, enter values for Red: 167, Green: 185, Blue: 197.
  • #13 Half-circle picture with accent arcs(Basic)To reproduce the shape effects on this slide, do the following:On the Home tab, in the Slides group, click Layout, and then click Blank. On the Home tab, in the Drawing group, click Shapes, and then under Basic Shapes, click Arc (third row, 12th option from the left). On the slide, drag to draw an arc.Select the arc. Under Drawing Tools, on the Format tab, in the Size group, do the following:In the Shape Height box, enter 7.5”.In the Shape Width box, enter 7.5”.Drag the right yellow diamond adjustment handle to the bottom of the slide to create a half-circle. Under Drawing Tools, on the Format tab, in the bottom right corner of the Shape Styles group, click the Format Shape dialog box launcher. In the Format Shape dialog box, click Fill in the left pane. In the Fill pane, select Pictureor texture fill, and then under Insert from, click File. In the Insert Picture dialog box, select a picture, and then click Insert. Also in the Format Shape dialog box, in the Fill pane, under Insert from, select Tile picture as texture. Also in the Format Shape dialog box, click Line Color in the left pane, and then select No line in the Line Color pane. Also in the Format Shape dialog box, click Shadow in the left pane, and then do the following in the Shadow pane: Click the button next to Presets, and then under Inner click Inside Diagonal Top Right (first row, third option from the left).In the Transparency box, enter 70%.In the Blur box, enter 20 pt.In the Distance box, enter 20 pt. Drag the half-circle to the left until the two middle yellow adjustment diamonds are lined up with the left edge of the slide. On the Home tab, in the Drawing group, click Arrange, point to Align, and then do the following:Click Align to Slide.Click Align Middle. Select the arc. On the Home tab, in the Clipboard group, click the arrow under Copy, and then click Duplicate. Select the second arc. Under Drawing Tools, on the Format tab, in the Size group, do the following:In the Shape Height box, enter 6.79”.In the Shape Width box, enter 10.03”.On the Home tab, in the bottom right corner of the Drawing group, click the Format Shape dialog box launcher. In the Format Picture dialog box, click Fill in the left pane, and then in the Fill pane, select No fill. Also in the Format Shape dialog box, click Line Color in the left pane. In the Line Color pane, select Solid line and then do the following:Click the button next to Color, and then under Theme Colors click White, Background 1 (first row, first option from the left).In the Transparency box, enter 50%.Also in the Format Shape dialog box, click Line Style in the left pane. In the Line Style pane, in the Width box, enter 1.5 pt.Drag the second arc left on the slide until the two middle yellow adjustment diamonds are lined up with the left edge of the slide. On the Home tab, in the Drawing group, click Arrange, point to Align, and then do the following:Click Align to Slide.Click Align Middle.Select the second arc. On the Home tab, in the Clipboard group, click the arrow under Copy, and then click Duplicate. Select the third arc. Under Drawing Tools, on the Format tab, in the Size group, do the following:In the Shape Height box, enter 6.86”.In the ShapeWidth box, enter 9.98”.On the Home tab, in the bottom right corner of the Drawing group, click the Format Shape dialog box launcher. In the Format Shape dialog box, click Line Color in the left pane, select Gradient line in the Line Color pane, and then do the following: In the Type list, select Linear.Click the button next to Direction, and then click Linear Down (first row, second option from the left).Under Gradient stops, click Add gradient stop or Remove gradient stop until two stops appear in the slider.Also under Gradient stops, customize the gradient stops that you added as follows:Select the first stop in the slider, and then do the following:In the Position box, enter 0%.Click the button next to Color, and then under Theme Colors click Blue, Accent 1, Lighter 40%(fourth row, fifth option from the left).In the Transparency box, enter 77%.Select the second stop in the slider, and then do the following: In the Position box, enter 100%.Click the button next to Color, click More Colors, and then in the Colors dialog box, on the Custom tab, enter values for Red: 208, Green: 215, Blue: 222.In the Format Shape dialog box, in the Line Style pane, in the Transparency box, enter 90%.Also in the Format Shape dialog box, click Line Style in the left pane. In the Line Style pane, in the Width box, enter 4.25 pt. On the Home tab, in the Drawing group, click Arrange, point to Align, and then do the following:Click Align to Slide.Click Align Left. Drag the third arc left on the slide until the two middle yellow adjustment diamonds are lined up with the left edge of the slide. Drag the third arc vertically as needed to position it slightly above the second arc on the slide. To reproduce the background on this slide, do the following: Right-click the slide background area, and then click Format Background. In the Format Background dialog box, click Fill in the left pane, select Gradient fill in the Fill pane, and then do the following:In the Type list, select Linear.Click the button next to Direction, and then click Linear Up (second row, second option from the left). In the Angle box, enter 270⁰.Under Gradient stops, click Add gradient stop or Remove gradient stop until four stops appear in the sliderAlso under Gradient stops, customize the gradient stops that you added as follows:Select the first stop in the slider, and then do the following:In the Position box, enter 0%.Click the button next to Color, click More Colors, and then in the Colors dialog box, on the Custom tab, enter values for Red: 167, Green: 185, Blue: 197.Select the second stop in the slider, and then do the following: In the Position box, enter 30%.Click the button next to Color, and then under Theme Colors click White, Background 1 (first row, first option from the left).Select the third stop in the slider, and then do the following: In the Position box, enter 70%.Click the button next to Color, and then under Theme Colors click White, Background 1 (first row, first option from the left).Select the fourth stop in the slider, and then do the following: In the Position box, enter 100%.Click the button next to Color, click More Colors, and then in the Colors dialog box, on the Custom tab, enter values for Red: 167, Green: 185, Blue: 197.
  • #14 * Si alguno de estos problema causaron una demora en el programa o se deben analizar en profundidad, coloque los detalles en la siguiente diapositiva.
  • #15 * Si alguno de estos problema causaron una demora en el programa o se deben analizar en profundidad, coloque los detalles en la siguiente diapositiva.
  • #16 * Si alguno de estos problema causaron una demora en el programa o se deben analizar en profundidad, coloque los detalles en la siguiente diapositiva.
  • #17 Half-circle picture with accent arcs(Basic)To reproduce the shape effects on this slide, do the following:On the Home tab, in the Slides group, click Layout, and then click Blank. On the Home tab, in the Drawing group, click Shapes, and then under Basic Shapes, click Arc (third row, 12th option from the left). On the slide, drag to draw an arc.Select the arc. Under Drawing Tools, on the Format tab, in the Size group, do the following:In the Shape Height box, enter 7.5”.In the Shape Width box, enter 7.5”.Drag the right yellow diamond adjustment handle to the bottom of the slide to create a half-circle. Under Drawing Tools, on the Format tab, in the bottom right corner of the Shape Styles group, click the Format Shape dialog box launcher. In the Format Shape dialog box, click Fill in the left pane. In the Fill pane, select Pictureor texture fill, and then under Insert from, click File. In the Insert Picture dialog box, select a picture, and then click Insert. Also in the Format Shape dialog box, in the Fill pane, under Insert from, select Tile picture as texture. Also in the Format Shape dialog box, click Line Color in the left pane, and then select No line in the Line Color pane. Also in the Format Shape dialog box, click Shadow in the left pane, and then do the following in the Shadow pane: Click the button next to Presets, and then under Inner click Inside Diagonal Top Right (first row, third option from the left).In the Transparency box, enter 70%.In the Blur box, enter 20 pt.In the Distance box, enter 20 pt. Drag the half-circle to the left until the two middle yellow adjustment diamonds are lined up with the left edge of the slide. On the Home tab, in the Drawing group, click Arrange, point to Align, and then do the following:Click Align to Slide.Click Align Middle. Select the arc. On the Home tab, in the Clipboard group, click the arrow under Copy, and then click Duplicate. Select the second arc. Under Drawing Tools, on the Format tab, in the Size group, do the following:In the Shape Height box, enter 6.79”.In the Shape Width box, enter 10.03”.On the Home tab, in the bottom right corner of the Drawing group, click the Format Shape dialog box launcher. In the Format Picture dialog box, click Fill in the left pane, and then in the Fill pane, select No fill. Also in the Format Shape dialog box, click Line Color in the left pane. In the Line Color pane, select Solid line and then do the following:Click the button next to Color, and then under Theme Colors click White, Background 1 (first row, first option from the left).In the Transparency box, enter 50%.Also in the Format Shape dialog box, click Line Style in the left pane. In the Line Style pane, in the Width box, enter 1.5 pt.Drag the second arc left on the slide until the two middle yellow adjustment diamonds are lined up with the left edge of the slide. On the Home tab, in the Drawing group, click Arrange, point to Align, and then do the following:Click Align to Slide.Click Align Middle.Select the second arc. On the Home tab, in the Clipboard group, click the arrow under Copy, and then click Duplicate. Select the third arc. Under Drawing Tools, on the Format tab, in the Size group, do the following:In the Shape Height box, enter 6.86”.In the ShapeWidth box, enter 9.98”.On the Home tab, in the bottom right corner of the Drawing group, click the Format Shape dialog box launcher. In the Format Shape dialog box, click Line Color in the left pane, select Gradient line in the Line Color pane, and then do the following: In the Type list, select Linear.Click the button next to Direction, and then click Linear Down (first row, second option from the left).Under Gradient stops, click Add gradient stop or Remove gradient stop until two stops appear in the slider.Also under Gradient stops, customize the gradient stops that you added as follows:Select the first stop in the slider, and then do the following:In the Position box, enter 0%.Click the button next to Color, and then under Theme Colors click Blue, Accent 1, Lighter 40%(fourth row, fifth option from the left).In the Transparency box, enter 77%.Select the second stop in the slider, and then do the following: In the Position box, enter 100%.Click the button next to Color, click More Colors, and then in the Colors dialog box, on the Custom tab, enter values for Red: 208, Green: 215, Blue: 222.In the Format Shape dialog box, in the Line Style pane, in the Transparency box, enter 90%.Also in the Format Shape dialog box, click Line Style in the left pane. In the Line Style pane, in the Width box, enter 4.25 pt. On the Home tab, in the Drawing group, click Arrange, point to Align, and then do the following:Click Align to Slide.Click Align Left. Drag the third arc left on the slide until the two middle yellow adjustment diamonds are lined up with the left edge of the slide. Drag the third arc vertically as needed to position it slightly above the second arc on the slide. To reproduce the background on this slide, do the following: Right-click the slide background area, and then click Format Background. In the Format Background dialog box, click Fill in the left pane, select Gradient fill in the Fill pane, and then do the following:In the Type list, select Linear.Click the button next to Direction, and then click Linear Up (second row, second option from the left). In the Angle box, enter 270⁰.Under Gradient stops, click Add gradient stop or Remove gradient stop until four stops appear in the sliderAlso under Gradient stops, customize the gradient stops that you added as follows:Select the first stop in the slider, and then do the following:In the Position box, enter 0%.Click the button next to Color, click More Colors, and then in the Colors dialog box, on the Custom tab, enter values for Red: 167, Green: 185, Blue: 197.Select the second stop in the slider, and then do the following: In the Position box, enter 30%.Click the button next to Color, and then under Theme Colors click White, Background 1 (first row, first option from the left).Select the third stop in the slider, and then do the following: In the Position box, enter 70%.Click the button next to Color, and then under Theme Colors click White, Background 1 (first row, first option from the left).Select the fourth stop in the slider, and then do the following: In the Position box, enter 100%.Click the button next to Color, click More Colors, and then in the Colors dialog box, on the Custom tab, enter values for Red: 167, Green: 185, Blue: 197.
  • #18 Half-circle picture with accent arcs(Basic)To reproduce the shape effects on this slide, do the following:On the Home tab, in the Slides group, click Layout, and then click Blank. On the Home tab, in the Drawing group, click Shapes, and then under Basic Shapes, click Arc (third row, 12th option from the left). On the slide, drag to draw an arc.Select the arc. Under Drawing Tools, on the Format tab, in the Size group, do the following:In the Shape Height box, enter 7.5”.In the Shape Width box, enter 7.5”.Drag the right yellow diamond adjustment handle to the bottom of the slide to create a half-circle. Under Drawing Tools, on the Format tab, in the bottom right corner of the Shape Styles group, click the Format Shape dialog box launcher. In the Format Shape dialog box, click Fill in the left pane. In the Fill pane, select Pictureor texture fill, and then under Insert from, click File. In the Insert Picture dialog box, select a picture, and then click Insert. Also in the Format Shape dialog box, in the Fill pane, under Insert from, select Tile picture as texture. Also in the Format Shape dialog box, click Line Color in the left pane, and then select No line in the Line Color pane. Also in the Format Shape dialog box, click Shadow in the left pane, and then do the following in the Shadow pane: Click the button next to Presets, and then under Inner click Inside Diagonal Top Right (first row, third option from the left).In the Transparency box, enter 70%.In the Blur box, enter 20 pt.In the Distance box, enter 20 pt. Drag the half-circle to the left until the two middle yellow adjustment diamonds are lined up with the left edge of the slide. On the Home tab, in the Drawing group, click Arrange, point to Align, and then do the following:Click Align to Slide.Click Align Middle. Select the arc. On the Home tab, in the Clipboard group, click the arrow under Copy, and then click Duplicate. Select the second arc. Under Drawing Tools, on the Format tab, in the Size group, do the following:In the Shape Height box, enter 6.79”.In the Shape Width box, enter 10.03”.On the Home tab, in the bottom right corner of the Drawing group, click the Format Shape dialog box launcher. In the Format Picture dialog box, click Fill in the left pane, and then in the Fill pane, select No fill. Also in the Format Shape dialog box, click Line Color in the left pane. In the Line Color pane, select Solid line and then do the following:Click the button next to Color, and then under Theme Colors click White, Background 1 (first row, first option from the left).In the Transparency box, enter 50%.Also in the Format Shape dialog box, click Line Style in the left pane. In the Line Style pane, in the Width box, enter 1.5 pt.Drag the second arc left on the slide until the two middle yellow adjustment diamonds are lined up with the left edge of the slide. On the Home tab, in the Drawing group, click Arrange, point to Align, and then do the following:Click Align to Slide.Click Align Middle.Select the second arc. On the Home tab, in the Clipboard group, click the arrow under Copy, and then click Duplicate. Select the third arc. Under Drawing Tools, on the Format tab, in the Size group, do the following:In the Shape Height box, enter 6.86”.In the ShapeWidth box, enter 9.98”.On the Home tab, in the bottom right corner of the Drawing group, click the Format Shape dialog box launcher. In the Format Shape dialog box, click Line Color in the left pane, select Gradient line in the Line Color pane, and then do the following: In the Type list, select Linear.Click the button next to Direction, and then click Linear Down (first row, second option from the left).Under Gradient stops, click Add gradient stop or Remove gradient stop until two stops appear in the slider.Also under Gradient stops, customize the gradient stops that you added as follows:Select the first stop in the slider, and then do the following:In the Position box, enter 0%.Click the button next to Color, and then under Theme Colors click Blue, Accent 1, Lighter 40%(fourth row, fifth option from the left).In the Transparency box, enter 77%.Select the second stop in the slider, and then do the following: In the Position box, enter 100%.Click the button next to Color, click More Colors, and then in the Colors dialog box, on the Custom tab, enter values for Red: 208, Green: 215, Blue: 222.In the Format Shape dialog box, in the Line Style pane, in the Transparency box, enter 90%.Also in the Format Shape dialog box, click Line Style in the left pane. In the Line Style pane, in the Width box, enter 4.25 pt. On the Home tab, in the Drawing group, click Arrange, point to Align, and then do the following:Click Align to Slide.Click Align Left. Drag the third arc left on the slide until the two middle yellow adjustment diamonds are lined up with the left edge of the slide. Drag the third arc vertically as needed to position it slightly above the second arc on the slide. To reproduce the background on this slide, do the following: Right-click the slide background area, and then click Format Background. In the Format Background dialog box, click Fill in the left pane, select Gradient fill in the Fill pane, and then do the following:In the Type list, select Linear.Click the button next to Direction, and then click Linear Up (second row, second option from the left). In the Angle box, enter 270⁰.Under Gradient stops, click Add gradient stop or Remove gradient stop until four stops appear in the sliderAlso under Gradient stops, customize the gradient stops that you added as follows:Select the first stop in the slider, and then do the following:In the Position box, enter 0%.Click the button next to Color, click More Colors, and then in the Colors dialog box, on the Custom tab, enter values for Red: 167, Green: 185, Blue: 197.Select the second stop in the slider, and then do the following: In the Position box, enter 30%.Click the button next to Color, and then under Theme Colors click White, Background 1 (first row, first option from the left).Select the third stop in the slider, and then do the following: In the Position box, enter 70%.Click the button next to Color, and then under Theme Colors click White, Background 1 (first row, first option from the left).Select the fourth stop in the slider, and then do the following: In the Position box, enter 100%.Click the button next to Color, click More Colors, and then in the Colors dialog box, on the Custom tab, enter values for Red: 167, Green: 185, Blue: 197.
  • #19 Half-circle picture with accent arcs(Basic)To reproduce the shape effects on this slide, do the following:On the Home tab, in the Slides group, click Layout, and then click Blank. On the Home tab, in the Drawing group, click Shapes, and then under Basic Shapes, click Arc (third row, 12th option from the left). On the slide, drag to draw an arc.Select the arc. Under Drawing Tools, on the Format tab, in the Size group, do the following:In the Shape Height box, enter 7.5”.In the Shape Width box, enter 7.5”.Drag the right yellow diamond adjustment handle to the bottom of the slide to create a half-circle. Under Drawing Tools, on the Format tab, in the bottom right corner of the Shape Styles group, click the Format Shape dialog box launcher. In the Format Shape dialog box, click Fill in the left pane. In the Fill pane, select Pictureor texture fill, and then under Insert from, click File. In the Insert Picture dialog box, select a picture, and then click Insert. Also in the Format Shape dialog box, in the Fill pane, under Insert from, select Tile picture as texture. Also in the Format Shape dialog box, click Line Color in the left pane, and then select No line in the Line Color pane. Also in the Format Shape dialog box, click Shadow in the left pane, and then do the following in the Shadow pane: Click the button next to Presets, and then under Inner click Inside Diagonal Top Right (first row, third option from the left).In the Transparency box, enter 70%.In the Blur box, enter 20 pt.In the Distance box, enter 20 pt. Drag the half-circle to the left until the two middle yellow adjustment diamonds are lined up with the left edge of the slide. On the Home tab, in the Drawing group, click Arrange, point to Align, and then do the following:Click Align to Slide.Click Align Middle. Select the arc. On the Home tab, in the Clipboard group, click the arrow under Copy, and then click Duplicate. Select the second arc. Under Drawing Tools, on the Format tab, in the Size group, do the following:In the Shape Height box, enter 6.79”.In the Shape Width box, enter 10.03”.On the Home tab, in the bottom right corner of the Drawing group, click the Format Shape dialog box launcher. In the Format Picture dialog box, click Fill in the left pane, and then in the Fill pane, select No fill. Also in the Format Shape dialog box, click Line Color in the left pane. In the Line Color pane, select Solid line and then do the following:Click the button next to Color, and then under Theme Colors click White, Background 1 (first row, first option from the left).In the Transparency box, enter 50%.Also in the Format Shape dialog box, click Line Style in the left pane. In the Line Style pane, in the Width box, enter 1.5 pt.Drag the second arc left on the slide until the two middle yellow adjustment diamonds are lined up with the left edge of the slide. On the Home tab, in the Drawing group, click Arrange, point to Align, and then do the following:Click Align to Slide.Click Align Middle.Select the second arc. On the Home tab, in the Clipboard group, click the arrow under Copy, and then click Duplicate. Select the third arc. Under Drawing Tools, on the Format tab, in the Size group, do the following:In the Shape Height box, enter 6.86”.In the ShapeWidth box, enter 9.98”.On the Home tab, in the bottom right corner of the Drawing group, click the Format Shape dialog box launcher. In the Format Shape dialog box, click Line Color in the left pane, select Gradient line in the Line Color pane, and then do the following: In the Type list, select Linear.Click the button next to Direction, and then click Linear Down (first row, second option from the left).Under Gradient stops, click Add gradient stop or Remove gradient stop until two stops appear in the slider.Also under Gradient stops, customize the gradient stops that you added as follows:Select the first stop in the slider, and then do the following:In the Position box, enter 0%.Click the button next to Color, and then under Theme Colors click Blue, Accent 1, Lighter 40%(fourth row, fifth option from the left).In the Transparency box, enter 77%.Select the second stop in the slider, and then do the following: In the Position box, enter 100%.Click the button next to Color, click More Colors, and then in the Colors dialog box, on the Custom tab, enter values for Red: 208, Green: 215, Blue: 222.In the Format Shape dialog box, in the Line Style pane, in the Transparency box, enter 90%.Also in the Format Shape dialog box, click Line Style in the left pane. In the Line Style pane, in the Width box, enter 4.25 pt. On the Home tab, in the Drawing group, click Arrange, point to Align, and then do the following:Click Align to Slide.Click Align Left. Drag the third arc left on the slide until the two middle yellow adjustment diamonds are lined up with the left edge of the slide. Drag the third arc vertically as needed to position it slightly above the second arc on the slide. To reproduce the background on this slide, do the following: Right-click the slide background area, and then click Format Background. In the Format Background dialog box, click Fill in the left pane, select Gradient fill in the Fill pane, and then do the following:In the Type list, select Linear.Click the button next to Direction, and then click Linear Up (second row, second option from the left). In the Angle box, enter 270⁰.Under Gradient stops, click Add gradient stop or Remove gradient stop until four stops appear in the sliderAlso under Gradient stops, customize the gradient stops that you added as follows:Select the first stop in the slider, and then do the following:In the Position box, enter 0%.Click the button next to Color, click More Colors, and then in the Colors dialog box, on the Custom tab, enter values for Red: 167, Green: 185, Blue: 197.Select the second stop in the slider, and then do the following: In the Position box, enter 30%.Click the button next to Color, and then under Theme Colors click White, Background 1 (first row, first option from the left).Select the third stop in the slider, and then do the following: In the Position box, enter 70%.Click the button next to Color, and then under Theme Colors click White, Background 1 (first row, first option from the left).Select the fourth stop in the slider, and then do the following: In the Position box, enter 100%.Click the button next to Color, click More Colors, and then in the Colors dialog box, on the Custom tab, enter values for Red: 167, Green: 185, Blue: 197.
  • #20 Half-circle picture with accent arcs(Basic)To reproduce the shape effects on this slide, do the following:On the Home tab, in the Slides group, click Layout, and then click Blank. On the Home tab, in the Drawing group, click Shapes, and then under Basic Shapes, click Arc (third row, 12th option from the left). On the slide, drag to draw an arc.Select the arc. Under Drawing Tools, on the Format tab, in the Size group, do the following:In the Shape Height box, enter 7.5”.In the Shape Width box, enter 7.5”.Drag the right yellow diamond adjustment handle to the bottom of the slide to create a half-circle. Under Drawing Tools, on the Format tab, in the bottom right corner of the Shape Styles group, click the Format Shape dialog box launcher. In the Format Shape dialog box, click Fill in the left pane. In the Fill pane, select Pictureor texture fill, and then under Insert from, click File. In the Insert Picture dialog box, select a picture, and then click Insert. Also in the Format Shape dialog box, in the Fill pane, under Insert from, select Tile picture as texture. Also in the Format Shape dialog box, click Line Color in the left pane, and then select No line in the Line Color pane. Also in the Format Shape dialog box, click Shadow in the left pane, and then do the following in the Shadow pane: Click the button next to Presets, and then under Inner click Inside Diagonal Top Right (first row, third option from the left).In the Transparency box, enter 70%.In the Blur box, enter 20 pt.In the Distance box, enter 20 pt. Drag the half-circle to the left until the two middle yellow adjustment diamonds are lined up with the left edge of the slide. On the Home tab, in the Drawing group, click Arrange, point to Align, and then do the following:Click Align to Slide.Click Align Middle. Select the arc. On the Home tab, in the Clipboard group, click the arrow under Copy, and then click Duplicate. Select the second arc. Under Drawing Tools, on the Format tab, in the Size group, do the following:In the Shape Height box, enter 6.79”.In the Shape Width box, enter 10.03”.On the Home tab, in the bottom right corner of the Drawing group, click the Format Shape dialog box launcher. In the Format Picture dialog box, click Fill in the left pane, and then in the Fill pane, select No fill. Also in the Format Shape dialog box, click Line Color in the left pane. In the Line Color pane, select Solid line and then do the following:Click the button next to Color, and then under Theme Colors click White, Background 1 (first row, first option from the left).In the Transparency box, enter 50%.Also in the Format Shape dialog box, click Line Style in the left pane. In the Line Style pane, in the Width box, enter 1.5 pt.Drag the second arc left on the slide until the two middle yellow adjustment diamonds are lined up with the left edge of the slide. On the Home tab, in the Drawing group, click Arrange, point to Align, and then do the following:Click Align to Slide.Click Align Middle.Select the second arc. On the Home tab, in the Clipboard group, click the arrow under Copy, and then click Duplicate. Select the third arc. Under Drawing Tools, on the Format tab, in the Size group, do the following:In the Shape Height box, enter 6.86”.In the ShapeWidth box, enter 9.98”.On the Home tab, in the bottom right corner of the Drawing group, click the Format Shape dialog box launcher. In the Format Shape dialog box, click Line Color in the left pane, select Gradient line in the Line Color pane, and then do the following: In the Type list, select Linear.Click the button next to Direction, and then click Linear Down (first row, second option from the left).Under Gradient stops, click Add gradient stop or Remove gradient stop until two stops appear in the slider.Also under Gradient stops, customize the gradient stops that you added as follows:Select the first stop in the slider, and then do the following:In the Position box, enter 0%.Click the button next to Color, and then under Theme Colors click Blue, Accent 1, Lighter 40%(fourth row, fifth option from the left).In the Transparency box, enter 77%.Select the second stop in the slider, and then do the following: In the Position box, enter 100%.Click the button next to Color, click More Colors, and then in the Colors dialog box, on the Custom tab, enter values for Red: 208, Green: 215, Blue: 222.In the Format Shape dialog box, in the Line Style pane, in the Transparency box, enter 90%.Also in the Format Shape dialog box, click Line Style in the left pane. In the Line Style pane, in the Width box, enter 4.25 pt. On the Home tab, in the Drawing group, click Arrange, point to Align, and then do the following:Click Align to Slide.Click Align Left. Drag the third arc left on the slide until the two middle yellow adjustment diamonds are lined up with the left edge of the slide. Drag the third arc vertically as needed to position it slightly above the second arc on the slide. To reproduce the background on this slide, do the following: Right-click the slide background area, and then click Format Background. In the Format Background dialog box, click Fill in the left pane, select Gradient fill in the Fill pane, and then do the following:In the Type list, select Linear.Click the button next to Direction, and then click Linear Up (second row, second option from the left). In the Angle box, enter 270⁰.Under Gradient stops, click Add gradient stop or Remove gradient stop until four stops appear in the sliderAlso under Gradient stops, customize the gradient stops that you added as follows:Select the first stop in the slider, and then do the following:In the Position box, enter 0%.Click the button next to Color, click More Colors, and then in the Colors dialog box, on the Custom tab, enter values for Red: 167, Green: 185, Blue: 197.Select the second stop in the slider, and then do the following: In the Position box, enter 30%.Click the button next to Color, and then under Theme Colors click White, Background 1 (first row, first option from the left).Select the third stop in the slider, and then do the following: In the Position box, enter 70%.Click the button next to Color, and then under Theme Colors click White, Background 1 (first row, first option from the left).Select the fourth stop in the slider, and then do the following: In the Position box, enter 100%.Click the button next to Color, click More Colors, and then in the Colors dialog box, on the Custom tab, enter values for Red: 167, Green: 185, Blue: 197.
  • #21 Half-circle picture with accent arcs(Basic)To reproduce the shape effects on this slide, do the following:On the Home tab, in the Slides group, click Layout, and then click Blank. On the Home tab, in the Drawing group, click Shapes, and then under Basic Shapes, click Arc (third row, 12th option from the left). On the slide, drag to draw an arc.Select the arc. Under Drawing Tools, on the Format tab, in the Size group, do the following:In the Shape Height box, enter 7.5”.In the Shape Width box, enter 7.5”.Drag the right yellow diamond adjustment handle to the bottom of the slide to create a half-circle. Under Drawing Tools, on the Format tab, in the bottom right corner of the Shape Styles group, click the Format Shape dialog box launcher. In the Format Shape dialog box, click Fill in the left pane. In the Fill pane, select Pictureor texture fill, and then under Insert from, click File. In the Insert Picture dialog box, select a picture, and then click Insert. Also in the Format Shape dialog box, in the Fill pane, under Insert from, select Tile picture as texture. Also in the Format Shape dialog box, click Line Color in the left pane, and then select No line in the Line Color pane. Also in the Format Shape dialog box, click Shadow in the left pane, and then do the following in the Shadow pane: Click the button next to Presets, and then under Inner click Inside Diagonal Top Right (first row, third option from the left).In the Transparency box, enter 70%.In the Blur box, enter 20 pt.In the Distance box, enter 20 pt. Drag the half-circle to the left until the two middle yellow adjustment diamonds are lined up with the left edge of the slide. On the Home tab, in the Drawing group, click Arrange, point to Align, and then do the following:Click Align to Slide.Click Align Middle. Select the arc. On the Home tab, in the Clipboard group, click the arrow under Copy, and then click Duplicate. Select the second arc. Under Drawing Tools, on the Format tab, in the Size group, do the following:In the Shape Height box, enter 6.79”.In the Shape Width box, enter 10.03”.On the Home tab, in the bottom right corner of the Drawing group, click the Format Shape dialog box launcher. In the Format Picture dialog box, click Fill in the left pane, and then in the Fill pane, select No fill. Also in the Format Shape dialog box, click Line Color in the left pane. In the Line Color pane, select Solid line and then do the following:Click the button next to Color, and then under Theme Colors click White, Background 1 (first row, first option from the left).In the Transparency box, enter 50%.Also in the Format Shape dialog box, click Line Style in the left pane. In the Line Style pane, in the Width box, enter 1.5 pt.Drag the second arc left on the slide until the two middle yellow adjustment diamonds are lined up with the left edge of the slide. On the Home tab, in the Drawing group, click Arrange, point to Align, and then do the following:Click Align to Slide.Click Align Middle.Select the second arc. On the Home tab, in the Clipboard group, click the arrow under Copy, and then click Duplicate. Select the third arc. Under Drawing Tools, on the Format tab, in the Size group, do the following:In the Shape Height box, enter 6.86”.In the ShapeWidth box, enter 9.98”.On the Home tab, in the bottom right corner of the Drawing group, click the Format Shape dialog box launcher. In the Format Shape dialog box, click Line Color in the left pane, select Gradient line in the Line Color pane, and then do the following: In the Type list, select Linear.Click the button next to Direction, and then click Linear Down (first row, second option from the left).Under Gradient stops, click Add gradient stop or Remove gradient stop until two stops appear in the slider.Also under Gradient stops, customize the gradient stops that you added as follows:Select the first stop in the slider, and then do the following:In the Position box, enter 0%.Click the button next to Color, and then under Theme Colors click Blue, Accent 1, Lighter 40%(fourth row, fifth option from the left).In the Transparency box, enter 77%.Select the second stop in the slider, and then do the following: In the Position box, enter 100%.Click the button next to Color, click More Colors, and then in the Colors dialog box, on the Custom tab, enter values for Red: 208, Green: 215, Blue: 222.In the Format Shape dialog box, in the Line Style pane, in the Transparency box, enter 90%.Also in the Format Shape dialog box, click Line Style in the left pane. In the Line Style pane, in the Width box, enter 4.25 pt. On the Home tab, in the Drawing group, click Arrange, point to Align, and then do the following:Click Align to Slide.Click Align Left. Drag the third arc left on the slide until the two middle yellow adjustment diamonds are lined up with the left edge of the slide. Drag the third arc vertically as needed to position it slightly above the second arc on the slide. To reproduce the background on this slide, do the following: Right-click the slide background area, and then click Format Background. In the Format Background dialog box, click Fill in the left pane, select Gradient fill in the Fill pane, and then do the following:In the Type list, select Linear.Click the button next to Direction, and then click Linear Up (second row, second option from the left). In the Angle box, enter 270⁰.Under Gradient stops, click Add gradient stop or Remove gradient stop until four stops appear in the sliderAlso under Gradient stops, customize the gradient stops that you added as follows:Select the first stop in the slider, and then do the following:In the Position box, enter 0%.Click the button next to Color, click More Colors, and then in the Colors dialog box, on the Custom tab, enter values for Red: 167, Green: 185, Blue: 197.Select the second stop in the slider, and then do the following: In the Position box, enter 30%.Click the button next to Color, and then under Theme Colors click White, Background 1 (first row, first option from the left).Select the third stop in the slider, and then do the following: In the Position box, enter 70%.Click the button next to Color, and then under Theme Colors click White, Background 1 (first row, first option from the left).Select the fourth stop in the slider, and then do the following: In the Position box, enter 100%.Click the button next to Color, click More Colors, and then in the Colors dialog box, on the Custom tab, enter values for Red: 167, Green: 185, Blue: 197.
  • #22 Half-circle picture with accent arcs(Basic)To reproduce the shape effects on this slide, do the following:On the Home tab, in the Slides group, click Layout, and then click Blank. On the Home tab, in the Drawing group, click Shapes, and then under Basic Shapes, click Arc (third row, 12th option from the left). On the slide, drag to draw an arc.Select the arc. Under Drawing Tools, on the Format tab, in the Size group, do the following:In the Shape Height box, enter 7.5”.In the Shape Width box, enter 7.5”.Drag the right yellow diamond adjustment handle to the bottom of the slide to create a half-circle. Under Drawing Tools, on the Format tab, in the bottom right corner of the Shape Styles group, click the Format Shape dialog box launcher. In the Format Shape dialog box, click Fill in the left pane. In the Fill pane, select Pictureor texture fill, and then under Insert from, click File. In the Insert Picture dialog box, select a picture, and then click Insert. Also in the Format Shape dialog box, in the Fill pane, under Insert from, select Tile picture as texture. Also in the Format Shape dialog box, click Line Color in the left pane, and then select No line in the Line Color pane. Also in the Format Shape dialog box, click Shadow in the left pane, and then do the following in the Shadow pane: Click the button next to Presets, and then under Inner click Inside Diagonal Top Right (first row, third option from the left).In the Transparency box, enter 70%.In the Blur box, enter 20 pt.In the Distance box, enter 20 pt. Drag the half-circle to the left until the two middle yellow adjustment diamonds are lined up with the left edge of the slide. On the Home tab, in the Drawing group, click Arrange, point to Align, and then do the following:Click Align to Slide.Click Align Middle. Select the arc. On the Home tab, in the Clipboard group, click the arrow under Copy, and then click Duplicate. Select the second arc. Under Drawing Tools, on the Format tab, in the Size group, do the following:In the Shape Height box, enter 6.79”.In the Shape Width box, enter 10.03”.On the Home tab, in the bottom right corner of the Drawing group, click the Format Shape dialog box launcher. In the Format Picture dialog box, click Fill in the left pane, and then in the Fill pane, select No fill. Also in the Format Shape dialog box, click Line Color in the left pane. In the Line Color pane, select Solid line and then do the following:Click the button next to Color, and then under Theme Colors click White, Background 1 (first row, first option from the left).In the Transparency box, enter 50%.Also in the Format Shape dialog box, click Line Style in the left pane. In the Line Style pane, in the Width box, enter 1.5 pt.Drag the second arc left on the slide until the two middle yellow adjustment diamonds are lined up with the left edge of the slide. On the Home tab, in the Drawing group, click Arrange, point to Align, and then do the following:Click Align to Slide.Click Align Middle.Select the second arc. On the Home tab, in the Clipboard group, click the arrow under Copy, and then click Duplicate. Select the third arc. Under Drawing Tools, on the Format tab, in the Size group, do the following:In the Shape Height box, enter 6.86”.In the ShapeWidth box, enter 9.98”.On the Home tab, in the bottom right corner of the Drawing group, click the Format Shape dialog box launcher. In the Format Shape dialog box, click Line Color in the left pane, select Gradient line in the Line Color pane, and then do the following: In the Type list, select Linear.Click the button next to Direction, and then click Linear Down (first row, second option from the left).Under Gradient stops, click Add gradient stop or Remove gradient stop until two stops appear in the slider.Also under Gradient stops, customize the gradient stops that you added as follows:Select the first stop in the slider, and then do the following:In the Position box, enter 0%.Click the button next to Color, and then under Theme Colors click Blue, Accent 1, Lighter 40%(fourth row, fifth option from the left).In the Transparency box, enter 77%.Select the second stop in the slider, and then do the following: In the Position box, enter 100%.Click the button next to Color, click More Colors, and then in the Colors dialog box, on the Custom tab, enter values for Red: 208, Green: 215, Blue: 222.In the Format Shape dialog box, in the Line Style pane, in the Transparency box, enter 90%.Also in the Format Shape dialog box, click Line Style in the left pane. In the Line Style pane, in the Width box, enter 4.25 pt. On the Home tab, in the Drawing group, click Arrange, point to Align, and then do the following:Click Align to Slide.Click Align Left. Drag the third arc left on the slide until the two middle yellow adjustment diamonds are lined up with the left edge of the slide. Drag the third arc vertically as needed to position it slightly above the second arc on the slide. To reproduce the background on this slide, do the following: Right-click the slide background area, and then click Format Background. In the Format Background dialog box, click Fill in the left pane, select Gradient fill in the Fill pane, and then do the following:In the Type list, select Linear.Click the button next to Direction, and then click Linear Up (second row, second option from the left). In the Angle box, enter 270⁰.Under Gradient stops, click Add gradient stop or Remove gradient stop until four stops appear in the sliderAlso under Gradient stops, customize the gradient stops that you added as follows:Select the first stop in the slider, and then do the following:In the Position box, enter 0%.Click the button next to Color, click More Colors, and then in the Colors dialog box, on the Custom tab, enter values for Red: 167, Green: 185, Blue: 197.Select the second stop in the slider, and then do the following: In the Position box, enter 30%.Click the button next to Color, and then under Theme Colors click White, Background 1 (first row, first option from the left).Select the third stop in the slider, and then do the following: In the Position box, enter 70%.Click the button next to Color, and then under Theme Colors click White, Background 1 (first row, first option from the left).Select the fourth stop in the slider, and then do the following: In the Position box, enter 100%.Click the button next to Color, click More Colors, and then in the Colors dialog box, on the Custom tab, enter values for Red: 167, Green: 185, Blue: 197.
  • #23 Half-circle picture with accent arcs(Basic)To reproduce the shape effects on this slide, do the following:On the Home tab, in the Slides group, click Layout, and then click Blank. On the Home tab, in the Drawing group, click Shapes, and then under Basic Shapes, click Arc (third row, 12th option from the left). On the slide, drag to draw an arc.Select the arc. Under Drawing Tools, on the Format tab, in the Size group, do the following:In the Shape Height box, enter 7.5”.In the Shape Width box, enter 7.5”.Drag the right yellow diamond adjustment handle to the bottom of the slide to create a half-circle. Under Drawing Tools, on the Format tab, in the bottom right corner of the Shape Styles group, click the Format Shape dialog box launcher. In the Format Shape dialog box, click Fill in the left pane. In the Fill pane, select Pictureor texture fill, and then under Insert from, click File. In the Insert Picture dialog box, select a picture, and then click Insert. Also in the Format Shape dialog box, in the Fill pane, under Insert from, select Tile picture as texture. Also in the Format Shape dialog box, click Line Color in the left pane, and then select No line in the Line Color pane. Also in the Format Shape dialog box, click Shadow in the left pane, and then do the following in the Shadow pane: Click the button next to Presets, and then under Inner click Inside Diagonal Top Right (first row, third option from the left).In the Transparency box, enter 70%.In the Blur box, enter 20 pt.In the Distance box, enter 20 pt. Drag the half-circle to the left until the two middle yellow adjustment diamonds are lined up with the left edge of the slide. On the Home tab, in the Drawing group, click Arrange, point to Align, and then do the following:Click Align to Slide.Click Align Middle. Select the arc. On the Home tab, in the Clipboard group, click the arrow under Copy, and then click Duplicate. Select the second arc. Under Drawing Tools, on the Format tab, in the Size group, do the following:In the Shape Height box, enter 6.79”.In the Shape Width box, enter 10.03”.On the Home tab, in the bottom right corner of the Drawing group, click the Format Shape dialog box launcher. In the Format Picture dialog box, click Fill in the left pane, and then in the Fill pane, select No fill. Also in the Format Shape dialog box, click Line Color in the left pane. In the Line Color pane, select Solid line and then do the following:Click the button next to Color, and then under Theme Colors click White, Background 1 (first row, first option from the left).In the Transparency box, enter 50%.Also in the Format Shape dialog box, click Line Style in the left pane. In the Line Style pane, in the Width box, enter 1.5 pt.Drag the second arc left on the slide until the two middle yellow adjustment diamonds are lined up with the left edge of the slide. On the Home tab, in the Drawing group, click Arrange, point to Align, and then do the following:Click Align to Slide.Click Align Middle.Select the second arc. On the Home tab, in the Clipboard group, click the arrow under Copy, and then click Duplicate. Select the third arc. Under Drawing Tools, on the Format tab, in the Size group, do the following:In the Shape Height box, enter 6.86”.In the ShapeWidth box, enter 9.98”.On the Home tab, in the bottom right corner of the Drawing group, click the Format Shape dialog box launcher. In the Format Shape dialog box, click Line Color in the left pane, select Gradient line in the Line Color pane, and then do the following: In the Type list, select Linear.Click the button next to Direction, and then click Linear Down (first row, second option from the left).Under Gradient stops, click Add gradient stop or Remove gradient stop until two stops appear in the slider.Also under Gradient stops, customize the gradient stops that you added as follows:Select the first stop in the slider, and then do the following:In the Position box, enter 0%.Click the button next to Color, and then under Theme Colors click Blue, Accent 1, Lighter 40%(fourth row, fifth option from the left).In the Transparency box, enter 77%.Select the second stop in the slider, and then do the following: In the Position box, enter 100%.Click the button next to Color, click More Colors, and then in the Colors dialog box, on the Custom tab, enter values for Red: 208, Green: 215, Blue: 222.In the Format Shape dialog box, in the Line Style pane, in the Transparency box, enter 90%.Also in the Format Shape dialog box, click Line Style in the left pane. In the Line Style pane, in the Width box, enter 4.25 pt. On the Home tab, in the Drawing group, click Arrange, point to Align, and then do the following:Click Align to Slide.Click Align Left. Drag the third arc left on the slide until the two middle yellow adjustment diamonds are lined up with the left edge of the slide. Drag the third arc vertically as needed to position it slightly above the second arc on the slide. To reproduce the background on this slide, do the following: Right-click the slide background area, and then click Format Background. In the Format Background dialog box, click Fill in the left pane, select Gradient fill in the Fill pane, and then do the following:In the Type list, select Linear.Click the button next to Direction, and then click Linear Up (second row, second option from the left). In the Angle box, enter 270⁰.Under Gradient stops, click Add gradient stop or Remove gradient stop until four stops appear in the sliderAlso under Gradient stops, customize the gradient stops that you added as follows:Select the first stop in the slider, and then do the following:In the Position box, enter 0%.Click the button next to Color, click More Colors, and then in the Colors dialog box, on the Custom tab, enter values for Red: 167, Green: 185, Blue: 197.Select the second stop in the slider, and then do the following: In the Position box, enter 30%.Click the button next to Color, and then under Theme Colors click White, Background 1 (first row, first option from the left).Select the third stop in the slider, and then do the following: In the Position box, enter 70%.Click the button next to Color, and then under Theme Colors click White, Background 1 (first row, first option from the left).Select the fourth stop in the slider, and then do the following: In the Position box, enter 100%.Click the button next to Color, click More Colors, and then in the Colors dialog box, on the Custom tab, enter values for Red: 167, Green: 185, Blue: 197.
  • #24 Half-circle picture with accent arcs(Basic)To reproduce the shape effects on this slide, do the following:On the Home tab, in the Slides group, click Layout, and then click Blank. On the Home tab, in the Drawing group, click Shapes, and then under Basic Shapes, click Arc (third row, 12th option from the left). On the slide, drag to draw an arc.Select the arc. Under Drawing Tools, on the Format tab, in the Size group, do the following:In the Shape Height box, enter 7.5”.In the Shape Width box, enter 7.5”.Drag the right yellow diamond adjustment handle to the bottom of the slide to create a half-circle. Under Drawing Tools, on the Format tab, in the bottom right corner of the Shape Styles group, click the Format Shape dialog box launcher. In the Format Shape dialog box, click Fill in the left pane. In the Fill pane, select Pictureor texture fill, and then under Insert from, click File. In the Insert Picture dialog box, select a picture, and then click Insert. Also in the Format Shape dialog box, in the Fill pane, under Insert from, select Tile picture as texture. Also in the Format Shape dialog box, click Line Color in the left pane, and then select No line in the Line Color pane. Also in the Format Shape dialog box, click Shadow in the left pane, and then do the following in the Shadow pane: Click the button next to Presets, and then under Inner click Inside Diagonal Top Right (first row, third option from the left).In the Transparency box, enter 70%.In the Blur box, enter 20 pt.In the Distance box, enter 20 pt. Drag the half-circle to the left until the two middle yellow adjustment diamonds are lined up with the left edge of the slide. On the Home tab, in the Drawing group, click Arrange, point to Align, and then do the following:Click Align to Slide.Click Align Middle. Select the arc. On the Home tab, in the Clipboard group, click the arrow under Copy, and then click Duplicate. Select the second arc. Under Drawing Tools, on the Format tab, in the Size group, do the following:In the Shape Height box, enter 6.79”.In the Shape Width box, enter 10.03”.On the Home tab, in the bottom right corner of the Drawing group, click the Format Shape dialog box launcher. In the Format Picture dialog box, click Fill in the left pane, and then in the Fill pane, select No fill. Also in the Format Shape dialog box, click Line Color in the left pane. In the Line Color pane, select Solid line and then do the following:Click the button next to Color, and then under Theme Colors click White, Background 1 (first row, first option from the left).In the Transparency box, enter 50%.Also in the Format Shape dialog box, click Line Style in the left pane. In the Line Style pane, in the Width box, enter 1.5 pt.Drag the second arc left on the slide until the two middle yellow adjustment diamonds are lined up with the left edge of the slide. On the Home tab, in the Drawing group, click Arrange, point to Align, and then do the following:Click Align to Slide.Click Align Middle.Select the second arc. On the Home tab, in the Clipboard group, click the arrow under Copy, and then click Duplicate. Select the third arc. Under Drawing Tools, on the Format tab, in the Size group, do the following:In the Shape Height box, enter 6.86”.In the ShapeWidth box, enter 9.98”.On the Home tab, in the bottom right corner of the Drawing group, click the Format Shape dialog box launcher. In the Format Shape dialog box, click Line Color in the left pane, select Gradient line in the Line Color pane, and then do the following: In the Type list, select Linear.Click the button next to Direction, and then click Linear Down (first row, second option from the left).Under Gradient stops, click Add gradient stop or Remove gradient stop until two stops appear in the slider.Also under Gradient stops, customize the gradient stops that you added as follows:Select the first stop in the slider, and then do the following:In the Position box, enter 0%.Click the button next to Color, and then under Theme Colors click Blue, Accent 1, Lighter 40%(fourth row, fifth option from the left).In the Transparency box, enter 77%.Select the second stop in the slider, and then do the following: In the Position box, enter 100%.Click the button next to Color, click More Colors, and then in the Colors dialog box, on the Custom tab, enter values for Red: 208, Green: 215, Blue: 222.In the Format Shape dialog box, in the Line Style pane, in the Transparency box, enter 90%.Also in the Format Shape dialog box, click Line Style in the left pane. In the Line Style pane, in the Width box, enter 4.25 pt. On the Home tab, in the Drawing group, click Arrange, point to Align, and then do the following:Click Align to Slide.Click Align Left. Drag the third arc left on the slide until the two middle yellow adjustment diamonds are lined up with the left edge of the slide. Drag the third arc vertically as needed to position it slightly above the second arc on the slide. To reproduce the background on this slide, do the following: Right-click the slide background area, and then click Format Background. In the Format Background dialog box, click Fill in the left pane, select Gradient fill in the Fill pane, and then do the following:In the Type list, select Linear.Click the button next to Direction, and then click Linear Up (second row, second option from the left). In the Angle box, enter 270⁰.Under Gradient stops, click Add gradient stop or Remove gradient stop until four stops appear in the sliderAlso under Gradient stops, customize the gradient stops that you added as follows:Select the first stop in the slider, and then do the following:In the Position box, enter 0%.Click the button next to Color, click More Colors, and then in the Colors dialog box, on the Custom tab, enter values for Red: 167, Green: 185, Blue: 197.Select the second stop in the slider, and then do the following: In the Position box, enter 30%.Click the button next to Color, and then under Theme Colors click White, Background 1 (first row, first option from the left).Select the third stop in the slider, and then do the following: In the Position box, enter 70%.Click the button next to Color, and then under Theme Colors click White, Background 1 (first row, first option from the left).Select the fourth stop in the slider, and then do the following: In the Position box, enter 100%.Click the button next to Color, click More Colors, and then in the Colors dialog box, on the Custom tab, enter values for Red: 167, Green: 185, Blue: 197.
  • #25 Half-circle picture with accent arcs(Basic)To reproduce the shape effects on this slide, do the following:On the Home tab, in the Slides group, click Layout, and then click Blank. On the Home tab, in the Drawing group, click Shapes, and then under Basic Shapes, click Arc (third row, 12th option from the left). On the slide, drag to draw an arc.Select the arc. Under Drawing Tools, on the Format tab, in the Size group, do the following:In the Shape Height box, enter 7.5”.In the Shape Width box, enter 7.5”.Drag the right yellow diamond adjustment handle to the bottom of the slide to create a half-circle. Under Drawing Tools, on the Format tab, in the bottom right corner of the Shape Styles group, click the Format Shape dialog box launcher. In the Format Shape dialog box, click Fill in the left pane. In the Fill pane, select Pictureor texture fill, and then under Insert from, click File. In the Insert Picture dialog box, select a picture, and then click Insert. Also in the Format Shape dialog box, in the Fill pane, under Insert from, select Tile picture as texture. Also in the Format Shape dialog box, click Line Color in the left pane, and then select No line in the Line Color pane. Also in the Format Shape dialog box, click Shadow in the left pane, and then do the following in the Shadow pane: Click the button next to Presets, and then under Inner click Inside Diagonal Top Right (first row, third option from the left).In the Transparency box, enter 70%.In the Blur box, enter 20 pt.In the Distance box, enter 20 pt. Drag the half-circle to the left until the two middle yellow adjustment diamonds are lined up with the left edge of the slide. On the Home tab, in the Drawing group, click Arrange, point to Align, and then do the following:Click Align to Slide.Click Align Middle. Select the arc. On the Home tab, in the Clipboard group, click the arrow under Copy, and then click Duplicate. Select the second arc. Under Drawing Tools, on the Format tab, in the Size group, do the following:In the Shape Height box, enter 6.79”.In the Shape Width box, enter 10.03”.On the Home tab, in the bottom right corner of the Drawing group, click the Format Shape dialog box launcher. In the Format Picture dialog box, click Fill in the left pane, and then in the Fill pane, select No fill. Also in the Format Shape dialog box, click Line Color in the left pane. In the Line Color pane, select Solid line and then do the following:Click the button next to Color, and then under Theme Colors click White, Background 1 (first row, first option from the left).In the Transparency box, enter 50%.Also in the Format Shape dialog box, click Line Style in the left pane. In the Line Style pane, in the Width box, enter 1.5 pt.Drag the second arc left on the slide until the two middle yellow adjustment diamonds are lined up with the left edge of the slide. On the Home tab, in the Drawing group, click Arrange, point to Align, and then do the following:Click Align to Slide.Click Align Middle.Select the second arc. On the Home tab, in the Clipboard group, click the arrow under Copy, and then click Duplicate. Select the third arc. Under Drawing Tools, on the Format tab, in the Size group, do the following:In the Shape Height box, enter 6.86”.In the ShapeWidth box, enter 9.98”.On the Home tab, in the bottom right corner of the Drawing group, click the Format Shape dialog box launcher. In the Format Shape dialog box, click Line Color in the left pane, select Gradient line in the Line Color pane, and then do the following: In the Type list, select Linear.Click the button next to Direction, and then click Linear Down (first row, second option from the left).Under Gradient stops, click Add gradient stop or Remove gradient stop until two stops appear in the slider.Also under Gradient stops, customize the gradient stops that you added as follows:Select the first stop in the slider, and then do the following:In the Position box, enter 0%.Click the button next to Color, and then under Theme Colors click Blue, Accent 1, Lighter 40%(fourth row, fifth option from the left).In the Transparency box, enter 77%.Select the second stop in the slider, and then do the following: In the Position box, enter 100%.Click the button next to Color, click More Colors, and then in the Colors dialog box, on the Custom tab, enter values for Red: 208, Green: 215, Blue: 222.In the Format Shape dialog box, in the Line Style pane, in the Transparency box, enter 90%.Also in the Format Shape dialog box, click Line Style in the left pane. In the Line Style pane, in the Width box, enter 4.25 pt. On the Home tab, in the Drawing group, click Arrange, point to Align, and then do the following:Click Align to Slide.Click Align Left. Drag the third arc left on the slide until the two middle yellow adjustment diamonds are lined up with the left edge of the slide. Drag the third arc vertically as needed to position it slightly above the second arc on the slide. To reproduce the background on this slide, do the following: Right-click the slide background area, and then click Format Background. In the Format Background dialog box, click Fill in the left pane, select Gradient fill in the Fill pane, and then do the following:In the Type list, select Linear.Click the button next to Direction, and then click Linear Up (second row, second option from the left). In the Angle box, enter 270⁰.Under Gradient stops, click Add gradient stop or Remove gradient stop until four stops appear in the sliderAlso under Gradient stops, customize the gradient stops that you added as follows:Select the first stop in the slider, and then do the following:In the Position box, enter 0%.Click the button next to Color, click More Colors, and then in the Colors dialog box, on the Custom tab, enter values for Red: 167, Green: 185, Blue: 197.Select the second stop in the slider, and then do the following: In the Position box, enter 30%.Click the button next to Color, and then under Theme Colors click White, Background 1 (first row, first option from the left).Select the third stop in the slider, and then do the following: In the Position box, enter 70%.Click the button next to Color, and then under Theme Colors click White, Background 1 (first row, first option from the left).Select the fourth stop in the slider, and then do the following: In the Position box, enter 100%.Click the button next to Color, click More Colors, and then in the Colors dialog box, on the Custom tab, enter values for Red: 167, Green: 185, Blue: 197.