
Recommended
More Related Content
What's hot
What's hot (20)
Viewers also liked
Viewers also liked (16)
Similar to Screenshots of documentary process
Similar to Screenshots of documentary process (20)
More from samuelnolan
More from samuelnolan (20)
Recently uploaded
Recently uploaded (20)
Screenshots of documentary process
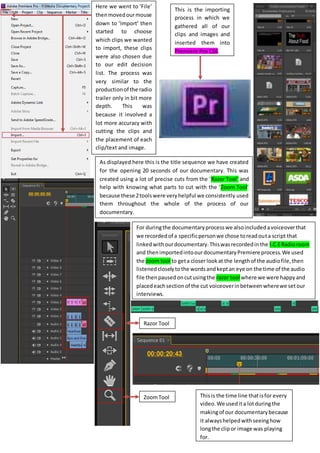
- 1. This is the importing process in which we gathered all of our clips and images and inserted them into Premiere Pro CS6. Here we went to ‘File’ thenmovedourmouse down to ‘Import’ then started to choose which clips we wanted to import, these clips were also chosen due to our edit decision list. The process was very similar to the productionof the radio trailer only in bit more depth. This was because it involved a lot more accuracy with cutting the clips and the placement of each clip/text and image. As displayed here this is the title sequence we have created for the opening 20 seconds of our documentary. This was created using a lot of precise cuts from the ‘Razor Tool’ and help with knowing what parts to cut with the ‘Zoom Tool’ because these 2toolswere veryhelpful we consistently used them throughout the whole of the process of our documentary. Razor Tool ZoomTool For duringthe documentaryprocesswe alsoincludedavoiceoverthat we recordedof a specificpersonwe chose toreadouta script that linkedwithourdocumentary.Thiswasrecordedinthe I.C.ERadioroom and thenimportedintoourdocumentaryPremiere process.We used the zoom tool to geta closerlookat the lengthof the audiofile,then listenedcloselytothe wordsandkeptan eye on the time of the audio file thenpausedoncutusingthe razor tool where we were happyand placedeachsectionof the cut voiceoverinbetweenwherewe setour interviews. Thisis the time line thatisfor every video.We usedita lotduringthe makingof our documentarybecause it alwayshelpedwithseeinghow longthe clipor image was playing for.
- 2. For our title sequence we changedthe colourof the filteron the clipfor a more dramatic flair,thisbeingbecause black signifies asbeingapast tense/olderfilter. As displayedbelowthe blackandwhite clipthe difference in filter.We didthisbydouble clickingonthe clipwe wantedto put thiseffectonanda rectangularshaped box/panel appearednexttoour clipinthe right handcorner of premiere pro. It showeduse these choices.We clickedonvideoeffects bar and all these optionscame up.We clickedonwhere is said‘Black& White’anditshowna little filledbox with‘FX’ inside. Thisthengave the clipwe wanteda Black& White filter. We did this on 4 clips for our title/opening sequence. Whenwe came tooaddinga text box intoour documentarywe pressed‘Ctrl + T’ inorder to create a title box.Thatgave use the option to rename itincase we feltitwas easierwhenfindingwhatwe were lookingfor.We didnot rename any of the title files.Thiswasbecause theywere number1-23. It alsogave us an opportunitytochange any otherfeaturesof eachtitle we addedbutwe didnotfeel itwas necessarytodo so.
- 3. Thisparticularpart of the documentary was whenwe wantedthe supermarket logos/badgestoappearonthe screen whenthe voiceovermentionedtheir name.Thiswe had to importand drag the file overtothe positionandthen hoverthe mouse overwhicheverfile (logo/badge)we wantedtomove or change the time it stayedonscreenfor and thenwaitforthis redsymbol/tool to appearautomatically,butbefore clickingitand movingitwe hadto use the zoom tool to geta more accurate readingandthenclickthe red symbol/tool anddragthe image toa size whichfitinwiththe timingof that logo/badgesname andhow longit stayedonscreenfor. There were certainclips that we had that we only wanted for the purpose of their audio. Thiscomplicatedthing because we then had to place eachclipwe didn’twantedtosee on a specifictrackthat didn’t interfere with any of the other clips/images. For if we ever neededmore trackswe would just right click on the space above the previous track and then this would appear. We had 9 tracks in total which was one of the most that our media department has seen in a while. We feltthatthe more tracks, the easier it was to hide the viewing of certain clips that would allow us to only hear the audio from that clip. To hide the clip we didn’t want to see we wouldsimplyjustfindthe trackit was on, check no other clips were on that track that we wanted to make sure were included in the documentary, and then click the little box with the eye inside. As shownhere,the videoviewinghasbeenhidden, but the audioisstill there.Thiswasveryhandyto be able to choose betweenviewingthe clipand lettingthe audio be heard. We layeredimages and clips on top of each other on different tracks as showninthe screenshotto the left. It took a lot of time to cut, plan and place where the each part of this sequence would go. The audio was possibly the hardest one because of having to listen to clip and decide where aboutitwouldgo forsome of itbecause sectionsof the voiceover wouldof beenable tobe placedanywhere onthe documentarybecause it included a lot to be said.
- 4. One of the trickiest software’s we used to create a specific effect on our title itself was ‘Adobe After Effects’.We wantedtomake our title fade infroma lowopacityto a highone.Thisinvolvedplottingout key points of the fading process and changing the Opacity levels from low to high. We had to use YouTube tutorials to help because we could not fully understand it. Afterfinallycompletingthe constructionof the documentaryitendeduplookinglikethis.