NO1 Top Black Magic Specialist In Lahore Black magic In Pakistan Kala Ilam Ex...
Unit 32 diary
1. Unit 32 Diary
7th November 2012
What I hope to achieve today: I hope to have started on my TV ident in adobe after effects
this includes standard background, text, and timeline set-up.
What I actually achieved this lesson:
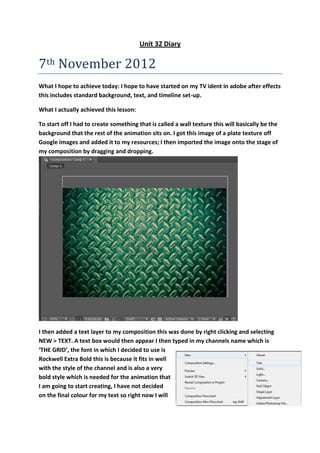
To start off I had to create something that is called a wall texture this will basically be the
background that the rest of the animation sits on. I got this image of a plate texture off
Google images and added it to my resources; I then imported the image onto the stage of
my composition by dragging and dropping.
I then added a text layer to my composition this was done by right clicking and selecting
NEW > TEXT. A text box would then appear I then typed in my channels name which is
‘THE GRID’, the font in which I decided to use is
Rockwell Extra Bold this is because it fits in well
with the style of the channel and is also a very
bold style which is needed for the animation that
I am going to start creating, I have not decided
on the final colour for my text so right now I will
2. keep it at a basic white colour.
I then went ahead of my sqeduele and added a blur and
glow effect to my text making it look really nice and flashy
and will in turn fit in with the animation, a little bit more of
tweaking will be needed on the text but I will do that in my
spare time to just get it right, to add a glow effect I needed
to first click on the layer of text which selects it and then go
to EFFECTS > STYLISE > GLOW a box would then appear
showing all the different values for tweaking. I Changed the
intensity of the glow to 50% to stand out and become eye
catching to the viewer. The option for the blur effect uses
the same process and is located under EFFECT > BLUR &
SHARPEN > LENS BLUR another box opened and this
allowed me to change values to what suited me.
The end result of the changes I have made look something
like this;
3. 14th November 2012
What I hope to achieve today: I hope to add lighting to my ident, start on creating motion and
adding shadow.
What I have achieved this lesson:
In today lesson I started off by adding lighting to my ident this is done by right clicking and clicking
on new light this then opens these options onto the stage;
In these settings everything is kept at its
defaults as tweaking it any more can create
problems for me further into the project. The
only option that I tweaked was ticking the box
‘Casts Shadows’, this makes the whole
animation look a lot better as it is played and
adds more depth and atmospheric feel to the
ident. Below is how the light tool is used on the
ident it is primarily created to add the sense of
a 3D feel and making it seem more
professionally done, the atmosphere that you
get by just looking at the image is a sort of dark
spooky feel, example being walking through the
streets at night and seeing the street lightings
being beamed into one spot while the rest is in
complete darkness. The look of this ident could
also be associated with crime.
4. To create shadows on my ident I would have to tweak an option in the layers of the background
and the text, this would in turn add a better effect to the lighting. To do this I needed to click on
my text layer which selects it and then clicking on the drop down button on the layer which brings
something like this up;
I then needed to click on the drop down on material options and setting Casts Shadows to ‘ON’ I
would do this on both the text layer and the background layer. After selecting this no shadows
were appearing this is because I then needed to drag out the shadows on the ident this was done
by selecting the background layer and dragging it out using the X,Y,Z tool, once this was done the
shadows then appeared on the ident thus making it look more 3D. The ident looks like this;
21st November 2012
What I hope to achieve today: I will add the camera tool to my ident to create motion.
What I have achieved this lesson:
To add a camera to the ident I needed to first add it onto my layers this is done by selecting LAYER
> NEW > CAMERA, it will then come up with a box looking like this;
5. Everything should be left at its default so you just click on ‘OK’ then I needed to change how the
camera works on the ident I did this by going to Unified camera tool and changing it to orbit
camera tool which is located in the top left of the screen it should look like this;
Now that I have the camera in the position I want it to be in I now have to create motion, the way
in which I create motion is to first put the camera tool into a position that I think will look
appropriate I then had to insert a key frame into the timeline on the starting position, then I had
to drag the slider on the timeline to 6 seconds and create yet another key frame, this would then
add a tween that would link the two key frames together and create a basic animation.
After this had been done I decided that the
overall look of the ident didn’t really suit the
style that the channel was looking for, so I
decided to make a quick change to the
background, this was done by changing the
simulation to CC Star Burst that is found in the
effects part of the software, this changed the
grid background into moving animated stars
that zoom past the title, I thought this looked
a lot better and gave me more inspiration to
make this look a lot more better.
6. 28th November 2012
What I hope to achieve today: Expand on my new idea for the grid ident.
What I have achieved this lesson:
Now that I had created the first part of my ident I then had to add in the second part which would
broadcast the shows times, names etc. I first started off by creating a new composition which was
done by simply creating a new composition, I then have to add a black solid form for the
background of the second part of the ident, this was simply done by going to LAYER > NEW >
SOLID I made the solid black in colour. I then had to add another animation to the ident, this
animation was called Particle systems II and made a sort of spark effect. I had now finished my
ident. Text for the second part of the ident would be entered in a video editor to save a lot of
time, and make it easier to manage. But I also added the title and the channel heading as it would
look less blurry on the final product
.