#StandardsGoals for 2024: What’s new for BISAC - Tech Forum 2024
Creating media for a blog
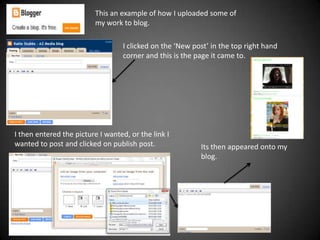
1. This an example of how I uploaded some of
my work to blog.
I clicked on the ‘New post’ in the top right hand
corner and this is the page it came to.
I then entered the picture I wanted, or the link I
wanted to post and clicked on publish post. Its then appeared onto my
blog.
2. To make my billboard poster I used the green
screens. This is so I could add any background
to it and make the picture look however I want
it to.
I then used Photoshop to edit my picture, like
setting the black background and zooming in on
Aneesa. I then just went to publisher and added
the words.
I then just added
the logo in and the
rest of the features
such as days and
times. This is based
on the existing
poster I used.
(already on blog)
3. I used the codes and
conventions of existing front
I then did the same for my
covers (on blog) and created
magazine cover. A few
my own cover and then saved
different pictures were taken
it as a picture. Later that day I
but we decided on this one
posted the finishing product
as it seemed a lot clearer and
on my blog
got the story across
I made sure it really
resembled a real I added in other pictures
magazine, to make it from other groups and put
look more realistic them on as extra stories
4. To make the last bit of my trailer, the title card, I had to use some features of
existing products and used them to base mine on it.
I did this by using the Desktop
feature on the Mac and copying the
features of the existing title card
This made sure that I had all the
conventions of the real soap opera’s
and made sure my soap was as
realistic as it could be.
5. When using the editing tools on the mac’s i had to use a
number of the tools such as:
6. Using imovie
This is how it first came up when I uploaded the footage. It just had all the filming
we had done in order, and it was then ready for me to change and make into my
own trailer footage.
7. But then I swapped it and put it in the order that I needed
it to be on the bottom part.
As I said in Q1 I slowed down the pace of the I then moved the curser toward the
screenings by double clicking on it and this little turtle image at it became slower
box came up
I then added in my track beneath it. I did this by
using iTunes and adding my track into it.
But in order to have the music in I need to use the
technique called ‘Ducking’ so that you could hear
the dialogue of the piece.
8. While creating my work I added in the
fades in and out to add effect to the
beginning.
To use the fades I went to the right hand side of
the screen and clicked on this icon, that looks
like a little letter.
When I clicked on it this box came up and then I
could choose from the different effects I could use. I
chose the fade to white effect on mine as I think it fit
really well.