SlideShare a Scribd company logo
1 of 1
Measuring and mark out starfish shape<br />The Date: 10th January 2011<br />What You Did: Draw a circle in the middle of the plywood and then cut the plywood to 95 x 95 x 5, after cut the plywood to 95 x 95 x 5, cut it to circle shape. <br />3886200416560Changes To Your Plan: This week I supposed to measure and mark out the product’s base. I think I can measure and mark out the product’s base in this week, because it is not a really difficult job to do.<br />Emotion: While making my product, I feel really fun that I can start making my product. The cutting the plywood was little bit hard, but I enjoyed making it.<br />What Next: Measure and mark out the product’s base.<br />          Cut the plywood to 95 x 95 x 5.<br />          Cut the plywood to circle shape.<br />Areas of Interaction and Learner Profiles: I think I was well balanced. <br />Why: The reason why I think like this is because it was really fun to start making my product and I really enjoyed making my product.<br />

More Related Content

Similar to Measuring and mark out starfish shape

Gluing the starfish’s arms
Gluing the starfish’s armsGluing the starfish’s arms
Gluing the starfish’s armsmotorwan
 
Gluing the starfish’s arms4
Gluing the starfish’s arms4Gluing the starfish’s arms4
Gluing the starfish’s arms4motorwan
 
Cutting the starfish shape side4
Cutting the starfish shape side4Cutting the starfish shape side4
Cutting the starfish shape side4motorwan
 
Check and sanding the sides before gluing3
Check and sanding the sides before gluing3Check and sanding the sides before gluing3
Check and sanding the sides before gluing3motorwan
 
Check and sanding the sides before gluing2
Check and sanding the sides before gluing2Check and sanding the sides before gluing2
Check and sanding the sides before gluing2motorwan
 
Cube bracelet powerpoint
Cube bracelet powerpointCube bracelet powerpoint
Cube bracelet powerpointstuartwoodhall
 
Thomas white research folder
Thomas white research folderThomas white research folder
Thomas white research foldertommmer
 
Check sides and sanding before stick them1
Check sides and sanding before stick them1Check sides and sanding before stick them1
Check sides and sanding before stick them1motorwan
 
Gluing the starfish’s arms2
Gluing the starfish’s arms2Gluing the starfish’s arms2
Gluing the starfish’s arms2motorwan
 
Mini company report
Mini company reportMini company report
Mini company reportAideenG
 
Sanding and cutting the product
Sanding and cutting the productSanding and cutting the product
Sanding and cutting the productmotorwan
 
Stand and Deliver H4D Stanford 2016
Stand and Deliver H4D Stanford 2016Stand and Deliver H4D Stanford 2016
Stand and Deliver H4D Stanford 2016Stanford University
 
Cutting and sanding my product
Cutting and sanding my productCutting and sanding my product
Cutting and sanding my productmotorwan
 
3. fmp production experiments(1)
3. fmp production experiments(1) 3. fmp production experiments(1)
3. fmp production experiments(1) celina smith
 
Unit 30 l05 simpson
Unit 30 l05 simpsonUnit 30 l05 simpson
Unit 30 l05 simpsonjoliver1994
 
9 Inspirational Lessons from Steve Jobs
9 Inspirational Lessons from Steve Jobs9 Inspirational Lessons from Steve Jobs
9 Inspirational Lessons from Steve JobsNotion Technologies
 
Achievement
AchievementAchievement
Achievementamrianah
 

Similar to Measuring and mark out starfish shape (20)

Gluing the starfish’s arms
Gluing the starfish’s armsGluing the starfish’s arms
Gluing the starfish’s arms
 
Gluing the starfish’s arms4
Gluing the starfish’s arms4Gluing the starfish’s arms4
Gluing the starfish’s arms4
 
Cutting the starfish shape side4
Cutting the starfish shape side4Cutting the starfish shape side4
Cutting the starfish shape side4
 
Check and sanding the sides before gluing3
Check and sanding the sides before gluing3Check and sanding the sides before gluing3
Check and sanding the sides before gluing3
 
Check and sanding the sides before gluing2
Check and sanding the sides before gluing2Check and sanding the sides before gluing2
Check and sanding the sides before gluing2
 
Cube bracelet powerpoint
Cube bracelet powerpointCube bracelet powerpoint
Cube bracelet powerpoint
 
Thomas white research folder
Thomas white research folderThomas white research folder
Thomas white research folder
 
Check sides and sanding before stick them1
Check sides and sanding before stick them1Check sides and sanding before stick them1
Check sides and sanding before stick them1
 
Gluing the starfish’s arms2
Gluing the starfish’s arms2Gluing the starfish’s arms2
Gluing the starfish’s arms2
 
Mini company report
Mini company reportMini company report
Mini company report
 
Sanding and cutting the product
Sanding and cutting the productSanding and cutting the product
Sanding and cutting the product
 
Stand and Deliver H4D Stanford 2016
Stand and Deliver H4D Stanford 2016Stand and Deliver H4D Stanford 2016
Stand and Deliver H4D Stanford 2016
 
7. evaluation(3)
7. evaluation(3)7. evaluation(3)
7. evaluation(3)
 
Cutting and sanding my product
Cutting and sanding my productCutting and sanding my product
Cutting and sanding my product
 
3. fmp production experiments(1)
3. fmp production experiments(1) 3. fmp production experiments(1)
3. fmp production experiments(1)
 
Bradley lao computer
Bradley lao computer Bradley lao computer
Bradley lao computer
 
Unit 30 l05 simpson
Unit 30 l05 simpsonUnit 30 l05 simpson
Unit 30 l05 simpson
 
9 Inspirational Lessons from Steve Jobs
9 Inspirational Lessons from Steve Jobs9 Inspirational Lessons from Steve Jobs
9 Inspirational Lessons from Steve Jobs
 
Achievement
AchievementAchievement
Achievement
 
Process journal
Process journalProcess journal
Process journal
 

More from motorwan

Painting my product
Painting my productPainting my product
Painting my productmotorwan
 
Painting my product
Painting my productPainting my product
Painting my productmotorwan
 
Measuring and mark out starfish sides
Measuring and mark out starfish sidesMeasuring and mark out starfish sides
Measuring and mark out starfish sidesmotorwan
 
Mario's adventure
Mario's adventureMario's adventure
Mario's adventuremotorwan
 
Chapter+9+ +reading+comprehension+questions
Chapter+9+ +reading+comprehension+questionsChapter+9+ +reading+comprehension+questions
Chapter+9+ +reading+comprehension+questionsmotorwan
 
Chapter+10+ +reading+comprehension+questions
Chapter+10+ +reading+comprehension+questionsChapter+10+ +reading+comprehension+questions
Chapter+10+ +reading+comprehension+questionsmotorwan
 

More from motorwan (6)

Painting my product
Painting my productPainting my product
Painting my product
 
Painting my product
Painting my productPainting my product
Painting my product
 
Measuring and mark out starfish sides
Measuring and mark out starfish sidesMeasuring and mark out starfish sides
Measuring and mark out starfish sides
 
Mario's adventure
Mario's adventureMario's adventure
Mario's adventure
 
Chapter+9+ +reading+comprehension+questions
Chapter+9+ +reading+comprehension+questionsChapter+9+ +reading+comprehension+questions
Chapter+9+ +reading+comprehension+questions
 
Chapter+10+ +reading+comprehension+questions
Chapter+10+ +reading+comprehension+questionsChapter+10+ +reading+comprehension+questions
Chapter+10+ +reading+comprehension+questions
 

Measuring and mark out starfish shape

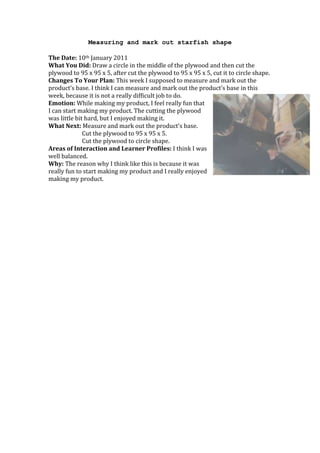
  • 1. Measuring and mark out starfish shape<br />The Date: 10th January 2011<br />What You Did: Draw a circle in the middle of the plywood and then cut the plywood to 95 x 95 x 5, after cut the plywood to 95 x 95 x 5, cut it to circle shape. <br />3886200416560Changes To Your Plan: This week I supposed to measure and mark out the product’s base. I think I can measure and mark out the product’s base in this week, because it is not a really difficult job to do.<br />Emotion: While making my product, I feel really fun that I can start making my product. The cutting the plywood was little bit hard, but I enjoyed making it.<br />What Next: Measure and mark out the product’s base.<br /> Cut the plywood to 95 x 95 x 5.<br /> Cut the plywood to circle shape.<br />Areas of Interaction and Learner Profiles: I think I was well balanced. <br />Why: The reason why I think like this is because it was really fun to start making my product and I really enjoyed making my product.<br />