1. LIGHT METAL AGE
Introduction
I
t has been widely accepted that the finite element
method (FEM) is a powerful numerical tool for the
design of extrusion processes and dies, which so far
has mainly relied on the expertise of highly expe-
rienced designers and costly plant trials. The extruded
shapes of light alloys typically have a complex geometry
and thin profiles, which necessitate large billet area re-
duction. Sharp corners are also commonplace in the die
structure. These issues pose tough challenges for numeri-
cal analysis.
To model the extrusion process with the FEM, three for-
mulations can be used. The transient updated Lagrang-
ian (UL) formulation, where the FEM mesh is attached
to the deforming billet, is able to capture the material
flow in a very intuitive way. Runtimes can be long, but
this method can produce some results that are difficult
or impossible to obtain from other simulation methods.
Some available results include: material splitting over the
bridge and merging in the welding chamber for a hollow
extrudate, front end formation, curling or twisting of the
entire extrudate, and complete load vs. stroke behavior.
Parallel computing can speed up UL simulations. The
steady state (SS) Eulerian approach, in which the mesh
is fixed in space, is fast but can not provide any transient
information and the thermal-mechanical stationarity
may not be well established in reality. The ALE (Arbitrary
Lagrangian Eulerian) approach falls somewhere between
the other two methods. It is efficient for this class of prob-
lems,1,2
since the frequent remeshing inevitable in UL can
be eliminated. Also, some of the shortcomings of the SS
approach can also be circumvented since the procedure
is incremental in nature.
This paper discusses the recent advances in the com-
mercial code DEFORM-3D for extrusion modeling. DE-
FORM-3D can model all three of the approaches men-
tioned, but recent efforts have been focused on the im-
provement of the ALE formulation. This development
is intended to provide an efficient numerical tool for ex-
trusion processes, as well as a dedicated template for the
preparation of the input data. To validate the code, an in-
dustrial example with a hollow profile and several welds
was simulated using the three approaches in DEFORM-
3D, and the results are compared with the experiments.
The flow stress testing and the extrusion experiment are
also described.
For further discussions of the three different formula-
tions, as well as the general procedure of the ALE ap-
proach, please refers to an earlier paper.2
This paper
summarizes the ALE methodologies for extrusion. An
extrusion example used to demonstrate the UL, ALE,
and SS methods is given. Finally, comparisons between
the FEM predictions and the actual process are made to
validate the approaches and demonstrate the capability
of the system.
ALE Formulation and Procedure
The ALE method is an attempt to combine the advan-
tages of both the Eulerian and Lagrangian formulations.
It was first introduced by Hirt, et al.,3
and Donea, et al.,4
in
modeling the solid-fluid interaction. It was subsequently
applied to problems of solid mechanics with large defor-
mation.5
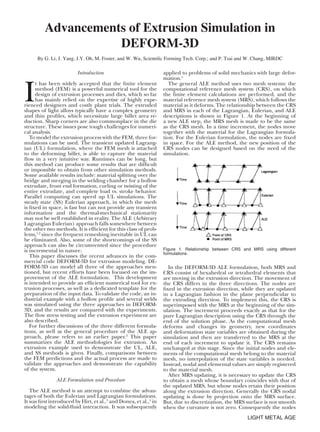
The general ALE method uses two mesh systems: the
computational reference mesh system (CRS), on which
the finite element calculations are performed, and the
material reference mesh system (MRS), which follows the
material as it deforms. The relationship between the CRS
and MRS in each of the Lagrangian, Eulerian, and ALE
descriptions is shown in Figure 1. At the beginning of
a new ALE step, the MRS mesh is made to be the same
as the CRS mesh. In a time increment, the nodes move
together with the material for the Lagrangian formula-
tion. For the Eulerian formulation, the nodes are fixed
in space. For the ALE method, the new position of the
CRS nodes can be designed based on the need of the
simulation.
Advancements of Extrusion Simulation in
DEFORM-3D
By G. Li, J. Yang, J.Y. Oh, M. Foster, and W. Wu, Scientific Forming Tech. Corp.; and P. Tsai and W. Chang, MIRDC
In the DEFORM-3D ALE formulation, both MRS and
CRS consist of hexahedral or tetrahedral elements that
are moving in the extrusion direction. The movement of
the CRS differs in the three directions. The nodes are
fixed in the extrusion direction, while they are updated
in a Lagrangian fashion in the plane perpendicular to
the extruding direction. To implement this, the CRS is
superimposed with the MRS at the beginning of the sim-
ulation. The increment proceeds exactly as that for the
pure Lagrangian description using the CRS through the
end of the solution phase. As the computational mesh
deforms and changes its geometry, new coordinates
and deformation state variables are obtained during the
simulation and then are transferred to the MRS at the
end of each increment to update it. The CRS remains
unchanged at this stage. Since the initial nodes and ele-
ments of the computational mesh belong to the material
mesh, no interpolation of the state variables is needed.
Instead, nodal and elemental values are simply registered
to the material mesh.
After MRS updating, it is necessary to update the CRS
to obtain a mesh whose boundary coincides with that of
the updated MRS, but whose nodes retain their position
along the extrusion direction. Generally the CRS nodal
updating is done by projection onto the MRS surface.
But, due to discretization, the MRS surface is not smooth
when the curvature is not zero. Consequently the nodes
Figure 1. Relationship between CRS and MRS using different
formulations.
2. LIGHT METAL AGE
cannot be moved on the surfaces without destroying the
original shape of the surface. To deal with this problem,
a spline surface on the MRS mesh is generated. Figure
2 shows a surface mesh around a CRS node before the
update. The new position of the CRS node is projected
onto this spline surface.
(2)
Where εn+1
is the convected strain with respect to the
CRS. The variable L
ε is the material strain and Nr
is the
total number of the surfaces Γ between this element, with
volume V, and the contiguous elements, whose strain is
denoted by the superscript c
. Also required for the calcu-
lation is
(3)
As pointed out by Rodriguez-Feran, et al., the time step
∆t should not be too large as to bring a particle to cross
an entire element at the speed of the convective velocity
c. Figure 3 shows some examples of ALE simulations. The
profiles were designed to show the capability of predict-
ing extrudate distortion.
Industrial Example
An industrial extrusion profile used for this simulation
is shown in Figure 4. Since the profile has a plane of sym-
metry, only one half was used in the simulation. The ma-
terial was AA 6061 with an initial billet temperature of
460°C and a ram speed of 33.3 mm/sec. In the die design,
there were three mandrels (for the half model) attached
to the die body with bridges to form the three holes. Dur-
ing extrusion, the aluminum flows over the bridges into
the port holes, where it splits and then merges together
in the welding chamber. As a result, there are seven weld-
ing seams in the half extrudate.
The updated CRS and MRS are no longer superim-
posed at this point. However, after the updated CRS is
obtained from the updated MRS, the latter can be dis-
carded. The simulation of the next incremental step uses
the updated CRS and finishes with a new updated MRS.
With this ALE mesh design and updating scheme, a sta-
ble contact definition between the billet and the dies is
maintained.
State Variable Update: In the ALE procedure, it is neces-
sary to update the state variables when mapping them
from the MRS to the CRS. Theoretically, the convection
of the state variables, say, the effective strain, is based on:
(1)
Figure 2. A CRS node projection on the MRS surface.
Difficulty arises when calculating the gradient terms of
the elemental state variables, as they are defined at the
integration point(s) of each element and are therefore
only piecewise continuous. Two approaches can be found
in the literature: interpolation and convection. The in-
terpolation method updates the nodal coordinates as
well as the state variables in the MRS, and then maps the
state variables to the CRS.6
The convection method solves
Eq. (1) to update the state variables. The Godunov-type
update proposed by Rodriguez-Feran, et al.,7
belonging
to the second group, is used in this work. To obtain the
effective strain of a particular element with respect to the
CRS, a surface integration containing a flux is consid-
ered by:
Figure 3: ALE simulation examples. Top Row: T-shaped; Bottom Row: step-shaped.
Figure 4. Industrial extrusion profile.
Steady State Simulation: An FEM mesh was created
based on the shape derived from the die geometries.
It was assumed that the material completely filled up
the die cavities and the welds were formed so the ex-
truded section was an integral one. Varying element
sizes were used in different regions, with the finest
elements defined around the die orifices (Figure 5).
3. LIGHT METAL AGE
In this way, the deformation details were captured more
accurately and the computation resources were utilized
more effectively.
When setting up the simulation, the flow stresses were
first input from an existing material library. The friction
factor at the interface between the billet and container
was set to 1, while 0.4 was used on the die surface and
bearing channel. The SS simulation was run until the de-
formation reached a steady state solution. At that time,
nodal velocities, temperatures, and elemental strains of
the billet were obtained. The extrudate distortion was
also calculated. Due to the bulky profile shape and the
appropriate bearing design, no significant distortion was
found in the results. The predicted extrusion load was
181.2 SI tons at the billet length of 160 mm, which was
lower than the experimental results. Upon investigation,
it was found that the flow stress data was not accurate.
Flow stress testing was performed, and the predicted load
using the new flow stress data was 336 SI tons.
Updated Lagrangian Simulation: The updated Lagrang-
ian simulation was run from the beginning of the extru-
sion process, with the starting workpiece being an unde-
formed 160 mm tall cylindrical billet. The same material
and processing conditions described below for the extru-
sion experiment were used in the simulation.
Figure 6 shows the stages of the UL simulation. At the
start of the process, the billet was compressed in the con-
tainer and the five legs were extruded. The outer legs
were longer than the inner leg at this point. These five
legs then entered the welding chamber where the four
outer flows converged. During this process, the flow of
these outer legs was impeded and the inner leg was al-
lowed to freely extrude. For this reason, the central leg
Figure 9(a) shows the load on the ram as a function
of ram stroke. The load is relatively constant at the start
of the process when the legs are freely extruding. As the
material gets to the welding chamber, the load increases
significantly. This simulation was run to the point shown
in Figure 6(d). At this point, the extrudate shape has
almost reached its steady-state shape. At the end of the
simulation, the load has leveled off at ~285 SI tons. Fig-
ure 9(b) compares the experimental and UL simulated
extrusion loads. Given the experimental loads of 220 SI
tons (100 mm billet) and 350 SI tons (200 mm billet),
the simulated load of 285 SI tons (160 mm billet) is quite
reasonable. It is noted that billet lengths in the UL simu-
lation and experiment are different since the actual billet
length was not decided at the time of the simulation.
Incremental ALE Simulation: The ALE simulation was run
with the same mesh system as used in the SS simulation.
Figure 10 shows the predicted shape after running 1,000
steps. As with the steady state result, no significant dis-
tortion was found in the predicted extrudate shape. The
predicted effective strain is shown in Figure 11 and the
predicted temperature distribution is shown in Figure
12. A load of 146 SI tons was predicted in the half model
simulation. Figure 9(a) shows that the corresponding full
model load of 292 SI tons matches well with the load pre-
dicted at the end of the UL simulation.
Flow Stress Test and Extrusion Experiment
Flow Stress Test: A Gleeble-3500 was used to get accurate
flow stress curves for AA 6061. The specimens had an OD
Figure 6. Stages of the UL extrusion simulation: (a) initial billet, (b)
extrusion of legs, (c) material in welding chamber, (d) final extrudate
formation.
ended up longer than the outer four. The press load in-
creased substantially as the welding chamber filled, and
the extrudate began to form. The internal ribs were the
final feature of the cross-section to form as the extrudate
came out of the die.
In an updated Lagrangian extrusion simulation, the
workpiece mesh deforms and extrudes through the dies.
Due to the extensive deformation at the die corners,
remeshing of the workpiece was a common occurrence.
Self-contact of the merging flows in the welding cham-
ber also contributed to remeshing. When the four outer
flows had essentially merged in the welding chamber, the
self-contacting surfaces between the flows were manually
removed to speed up the simulation (Figures 7-8).
Figure 7. Cross-section showing weld seams in extrudate.
Figure 8. These self-contacting weld seams were manually removed
to speed up the simulation.
Figure 5. FEM mesh used for the SS/ALE simulations.
4. LIGHT METAL AGE
Figure 9. Load prediction: (a) comparison of three DEFORM
formulations, (b) comparison between DEFORM and experimental
results.
Figure 10. Extrudate shape prediction (ALE).
Figure 11. Effective strain prediction (ALE).
Figure 12. Temperature prediction (ALE).
Table I. Gleeble testing conditions.
Figure 13. 350-ton forward extrusion press
of 8 mm and a length of 12 mm. Testing conditions are
shown in Table I. The flow stress curves obtained from
the tests were functions of temperature, strain, and strain
rate. These curves were imported into DEFORM-3D for
use in the simulations.
Extrusion Experiment: An extrusion experiment was per-
formed for comparison with the simulated results. A 350-
ton forward extrusion press was used (Figure 13). Table
II shows the experimental conditions. Two initial billet
lengths were used in the experiment. The maximum
load for the 100 mm billet was 220 SI tons, while the max
load for the 200 mm billet was 350 SI tons. The billet
length directly affects the friction with the container wall.
Often, shorter billets are preferred in real applications
in order to control the load, temperature distribution,
quality, etc. Figures 14 and 15 are photos of the extrudate
taken in the experiment. The slightly burgeoning shape
is seen at the front end, and the welding lines are clear.
The cross-section was quite uniform when it reached
steady state extrusion.
5. LIGHT METAL AGE
Comparison and Discussion
Figure 9 shows that the three simulation approaches
(SS, ALE, and UL) show good agreement with one an-
other with regard to steady state load prediction. Figure
10 confirms that the predicted load correlates well with
the loads obtained from the extrusion experiments. This
good correlation between simulated and experimental
loads shows the importance of using accurate flow stress
input data.
The UL approach has been proven to be a valid tool
in providing detailed material flow information in extru-
sion such as the front-end formation and the weld seam
evolution. At the front end of the simulated extrudate,
the central leg is longer than the surrounding profile,
which matches the observation in experiment. The bur-
geoning shape of the surrounding profile at the front-
end can also be seen in the simulation results. With the
self-contact techniques, the merge of the material coun-
ter-flows can be modeled and the weld strength can be
tracked, although in this simulation the self-contact was
removed after some remeshing to speed up the simula-
tion. The capability to provide the material flow details
of this method shows its potential in the analysis of flow-
induced extrusion defects.
The ALE approach has been improved to more accu-
rately capture the free surface deformation of the extru-
date. Since no remeshing is needed, design changes to
the bearing channel can be efficiently simulated to help
minimize extrudate distortion. In terms of the simula-
tion time, the SS simulation took less than two hours (us-
ing a single core on AMD Athlon 64x2 dual core), the
ALE took ten hours (Xeon 5160 using four out of the
six cores), and the UL took 126 hours (Intel Core i7 920
using four cores).
In this paper, the advantages of FEM technique in ac-
curately predicting extrusion loads and deformed extru-
date have been demonstrated and validated by an indus-
trial extrusion example. Future effort will include more
validations, and further improvement in the areas of the
user friendliness, computational efficiency, and coupling
of micro-structure and thermal-mechanical models.
Editor’s Note: For more information, contact G. Li by email at:
gli@deform.com.
References
1. Belytschko, F., W.K. Liu, and B. Moran, Nonlinear Fi-
nite Elements for Continuous and Structures, John Wiley &
Sons. 2000.
2. Li, G., W. Wu, P. Chigurupati, J. Fluhrer, and S. An-
dreoli, “Recent Advancement of Extrusion Simulation in
DEFORM-3D,” Latest Advances in Extrusion Technology
and Simulation in Europe, Bologna, Italy, 2007.
3. Hirt, C., A. Amsden, and J. Cook, “An arbitrary La-
grangian-Euleriancomputingmethodforallflowspeeds,”
Journal of Computational Physics, 14/3:227-253, 1974.
4. Donea, J., P. Fasoli-Stella, and S. Giuliana, “Lagrang-
ian and Eulerian finite element techniques for transient
fluid-structure interaction problem,” Transactions of 4th
International Conference on SMIR, pp. 1-12, 1977.
5. Haber, R., “A mixed Eulerian-Lagrangian displace-
ment model for large deformation analysis inb solid me-
chanics,” Computer Methods in Applied Mechanics and Engi-
neering, 43:277-292, 1984.
6. Zienkiewicz, O.C. and J.Z. Zhu, “The Superconver-
gent Patch Recovery (SPR) and adaptive finite element,”
Computer Methods in Applied Mechanics and Engineering,
101:207-224, 1992.
7. Rodriguez-Feran, A., F.M. Casadei, and A. Huerta,
“ALE stress update for transient and quasistatic,” Interna-
tional Journal for Numerical Methods in Engineering, l.41:241-
262, 1998.
.
.
Figure 15. Surface of steady state extrusion.
Figure 14. Front end of extrusion.
Table II. Extrusion experimental conditions.