Using Microsoft Excel5 Lists
•
1 like•507 views

The document describes Excel's features for working with lists, including sorting lists by column, filtering lists to show only certain rows, and using subtotals to automatically count and total values in columns. It provides step-by-step exercises demonstrating how to use the sort, filter, and subtotal functions on a sample music chart list.
![Using Microsoft Excel Working with Lists
Selecting lists
Any area containing no blank rows or columns will be recognised by Excel as a list. When you want
to manipulate a list, Excel will assume that the list continues until a blank row or column is found.
For that reason it is usually not necessary to select an entire list. It is normally sufficient to select a
single cell and let Excel determine the boundaries of the list, since it will usually find the whole list
fine - as long as the list contains no blank rows or columns. In fact, you are usually better off if you
don’t try to manually select the list since you may accidentally miss some of it.
In the following exercise, we will see how well Excel can detect a region.
Exercise 1. Selecting a region
1) Open your Grades.xls file.
2) Click on a cell anywhere inside the main table (for example
D10).
Because there are no blank rows or columns within this table, Excel
will recognise it as being one region.
3) From the Edit menu select Go To... (or press [Ctrl][G] ). The find
dialog will appear as shown to the left.
4) Click the Special button. The Go To Special dialog will appear as
shown to the right.
5) From the special options, click Current
region.
6) Click OK. The whole table should now be selected.
When you are working with lists, Excel will automatically select the
surrounding region in a similar way.
Tip When you need to select a region you can also use the keyboard
shortcut – [Ctrl][*] (or [Ctrl][Shift][8] ). Try it now!
© Stephen O’Neil 2005 Page 2 Of 8 www.oneil.com.au/pc](data:image/gif;base64,R0lGODlhAQABAIAAAAAAAP///yH5BAEAAAAALAAAAAABAAEAAAIBRAA7)
Recommended
More Related Content
Similar to Using Microsoft Excel5 Lists
Similar to Using Microsoft Excel5 Lists (20)
More from Jack Frost
More from Jack Frost (20)
Recently uploaded
Recently uploaded (20)
Using Microsoft Excel5 Lists
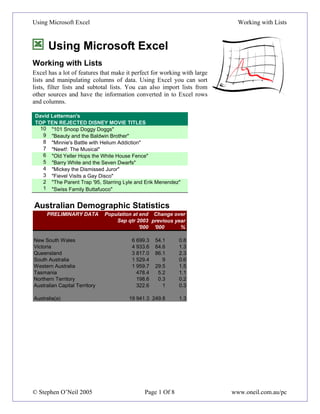
- 1. Using Microsoft Excel Working with Lists Using Microsoft Excel Working with Lists Excel has a lot of features that make it perfect for working with large lists and manipulating columns of data. Using Excel you can sort lists, filter lists and subtotal lists. You can also import lists from other sources and have the information converted in to Excel rows and columns. David Letterman's TOP TEN REJECTED DISNEY MOVIE TITLES 10 "101 Snoop Doggy Doggs" 9 "Beauty and the Baldwin Brother" 8 "Minnie's Battle with Helium Addiction" 7 "Newt!: The Musical" 6 "Old Yeller Hops the White House Fence" 5 "Barry White and the Seven Dwarfs" 4 "Mickey the Dismissed Juror" 3 "Fievel Visits a Gay Disco" 2 "The Parent Trap '95, Starring Lyle and Erik Menendez" 1 "Swiss Family Buttafuoco" Australian Demographic Statistics PRELIMINARY DATA Population at end Change over Sep qtr 2003 previous year '000 '000 % New South Wales 6 699.3 54.1 0.8 Victoria 4 933.6 64.6 1.3 Queensland 3 817.0 86.1 2.3 South Australia 1 529.4 9 0.6 Western Australia 1 959.7 29.5 1.5 Tasmania 478.4 5.2 1.1 Northern Territory 198.6 0.3 0.2 Australian Capital Territory 322.6 1 0.3 Australia(a) 19 941.3 249.8 1.3 © Stephen O’Neil 2005 Page 1 Of 8 www.oneil.com.au/pc
- 2. Using Microsoft Excel Working with Lists Selecting lists Any area containing no blank rows or columns will be recognised by Excel as a list. When you want to manipulate a list, Excel will assume that the list continues until a blank row or column is found. For that reason it is usually not necessary to select an entire list. It is normally sufficient to select a single cell and let Excel determine the boundaries of the list, since it will usually find the whole list fine - as long as the list contains no blank rows or columns. In fact, you are usually better off if you don’t try to manually select the list since you may accidentally miss some of it. In the following exercise, we will see how well Excel can detect a region. Exercise 1. Selecting a region 1) Open your Grades.xls file. 2) Click on a cell anywhere inside the main table (for example D10). Because there are no blank rows or columns within this table, Excel will recognise it as being one region. 3) From the Edit menu select Go To... (or press [Ctrl][G] ). The find dialog will appear as shown to the left. 4) Click the Special button. The Go To Special dialog will appear as shown to the right. 5) From the special options, click Current region. 6) Click OK. The whole table should now be selected. When you are working with lists, Excel will automatically select the surrounding region in a similar way. Tip When you need to select a region you can also use the keyboard shortcut – [Ctrl][*] (or [Ctrl][Shift][8] ). Try it now! © Stephen O’Neil 2005 Page 2 Of 8 www.oneil.com.au/pc
- 3. Using Microsoft Excel Working with Lists Manipulating Lists Exercise 2. Sort a list using toolbar icons 1) Open the file Music Charts.xls This list contains five columns. Each column contains a heading. Excel will assume that the first row in the list contains column headings and will not move them during the sorting process. 2) The first step in sorting the list is to click on a cell inside the column we want to sort by. In this instance, we want to sort the list in order of artists so click on a cell anywhere in the Artist column (column C). 3) On the Excel standard toolbar, there are two icons for sorting a list. Sort the list in ascending order Sort the list in descending order 4) Click the Sort Ascending icon . The list will be sorted in alphabetical order by Artist. 5) Click the Sort Descending icon to sort the list in the other direction. 6) Click in other columns and use the sort icons to try sorting the list by different columns. 7) Click in the Pos. column (column A), and click the Sort Ascending icon so that the list will once again be sorted by position from top to bottom. © Stephen O’Neil 2005 Page 3 Of 8 www.oneil.com.au/pc
- 4. Using Microsoft Excel Working with Lists Exercise 3. Sorting a list using the sort options Excel provides additional options for sorting a list that aren’t available on the toolbar. 1) Click anywhere inside the music charts list. 2) From the Data menu choose Sort. The first options allow you to sort a list by more than one column. For example, if you choose to sort a list by artist, you may also want songs by the same artist to be sorted by their titles. You can do this by specifying more than one Sort by column (You can also do this when sorting with the icons by sorting first by the Title column and then the Artist column). 3) Click on the first Sort by box. A list of the column headings in your table will appear. Choose Artist in the list. Make sure that Ascending is selected next to the list. 4) Below that Sort By list is a Then by list. Choose TITLE from that list. 5) Click OK to complete the sort. Note At the bottom of the Sort window is an option about header rows. If your list has more than one column, Excel will assume the first row contains headings. If there is only one column it won’t. You can use this option to specify to excel whether there are headings or not. © Stephen O’Neil 2005 Page 4 Of 8 www.oneil.com.au/pc
- 5. Using Microsoft Excel Working with Lists Exercise 4. Filtering a list Filtering a list allows you to temporarily hide rows in the list so that only certain information will be visible when the list is viewed of printed. For example, you may want to filter the list so that only the top 10 songs or showing or filter the list so that only songs by a certain artist are showing. Like sorting, when filtering a list, Excel will automatically select a region so it is only necessary to select a single cell within the list. 1) Select a cell inside your Music Charts list. 2) From the Data menu choose Filter and then Auto Filter. Some arrows will appear next to each column heading. These arrows can be used to filter the list. 3) Click the arrow to the right of the Artist heading. A list of the artists in the list will appear. 4) Select Britney Spears. The list will be filtered to show only songs from this artist. Also, the arrow next to artist will turn blue to indicate that this column has been filtered. 5) Click the Artist arrow again and select (All). The whole list will be displayed once again. Note Filtering more than one column at a time will reduce the number of results you will get. 6) Click the arrow next to Pos. Choose (Top 10...). 7) If we leave the options as they are we will get the songs with position numbers 91 to 100 since they are the highest numbers. We actually want the lowest numbers (1 to 10). Change the Top option to Bottom. Leave the number as 10 and leave Items as it is (this can be changed to get the top 10% instead of top 10 items). 8) Click OK to complete the filter. The top 10 items will now be shown. They may not be in the right order but at least you know how to sort them now right? You can continue working with the table without any problems while the filter arrows are showing but if you want to remove them, they are turned off the same way they are turned on. 9) From the Data menu choose Filter and then Auto Filter. The arrows will be turned off and any current filters will be removed. © Stephen O’Neil 2005 Page 5 Of 8 www.oneil.com.au/pc
- 6. Using Microsoft Excel Working with Lists Exercise 5. Subtotals Excel can automatically create totals and subtotals for information in your list. This is best done if the list is already sorted by the column you want it grouped by. E.g. in our music charts table, we will use subtotals to count the number of songs for each artist so make sure your list is still sorted in order of artist. 1) Click anywhere within the list. Remember Excel can automatically select the boundaries of the region if you select a single cell within the region. 2) Make sure the list is still sorted in order of artist. 3) From the Data menu choose Subtotals. 4) Make sure the options are as shown above. I.e. At each change in: should be set to Artist since that is the column we want to total. Use function: should be Count since we want to count the songs for each artist. Add subtotal to: should be Cat No since that’s the column we want to the totals to appear under. 5) Click OK to complete the subtotal. © Stephen O’Neil 2005 Page 6 Of 8 www.oneil.com.au/pc
- 7. Using Microsoft Excel Working with Lists Note the numbers 1-3 to the left of the sheet (circled in the above picture). These are a type of filter. 6) Click the number 2 button. The list will be filtered so you see the subtotals without the individual songs. 7) Click the number 1 button and you will only see the grand total. 8) Click the number 3 button and you will see all records and totals. Next to each subtotal you will also see a – sign (shown to the right). 9) Click on a – sign and the songs next to it will be hidden with only the subtotal remaining. The – sign will become a + sign. 10) Click the + sign to show the songs again. When you no longer want the subtotals you can remove them from the subtotals options 11) From the Data menu choose Subtotals. 12) Click the button to remove the subtotals. Your table will now be back to normal. © Stephen O’Neil 2005 Page 7 Of 8 www.oneil.com.au/pc
- 8. Using Microsoft Excel Working with Lists Exercise 6. Using a form for data entry Creating and editing a list involves a lot of typing. Some people are quite comfortable working with large amounts of information in a list layout. Others, however, find it a lot easier to work with the information with the help of a form. Excel can automatically create a data entry form based on the column headings in the list. 1) Click on a cell within the list so Excel can select the region. 2) From the Data menu select Form. A form appears that allows you to view the information from the list one record at a time. To move to the next record, click Find Next, press your ↓ key or click the on the scrollbar. You can also press the Page Down key to move 10 records at a time. To move to the previous record, click Find Prev, press your ↑ key or click the on the scrollbar. You can also press the Page Up key to move 10 records at a time. 3) Move through the records to find the song A LITTLE LESS CONVERSATION by Elvis Vs JXL. 4) Change the artist name to Elvis Vs Junkie XL. 5) Click on Close and this change will be made on the sheet. 6) From the Data menu select Form. 7) Click Criteria. This allows you to use filters within the form. 8) In the Artist field, type shakira. 9) Browse through the records. Only songs by Shakira will show. 10) Click Criteria again. 11) Click Clear to clear the criteria. 12) Browse through the records and they will all be showing again. 13) Click New. 14) Add the details for a new song (you can make it up). 15) Click Close and the song will be added to the bottom of the list, using the formatting from the list. © Stephen O’Neil 2005 Page 8 Of 8 www.oneil.com.au/pc