Unleash Your Potential - Namagunga Girls Coding Club
First i took the colour from the photo using the paint brush tool and colour effect
1. First I took the colour from the photo using the paint brush tool and colour effect. I choose to take
all the colour out of the image so I could re-insert colour to specific parts I wanted.
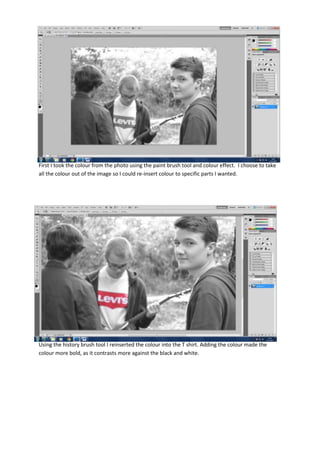
Using the history brush tool I reinserted the colour into the T shirt. Adding the colour made the
colour more bold, as it contrasts more against the black and white.
2. I used the history brush tool again to add colour to Christians eyes. Didn’t want the red to be the
only colour in my photograph so I decided to colour Chrisians eyes too to make my photograph more
interesting.
This is the original uneditied photograph. I felt this was abit gloomy, so the first aspect I wanted to
change was the brightness.
3. I increased the brightness of the photograph. This made my image look less bleak and more visually
appealing, however I disliked the shades of colours as they had become too light.
I then used the colour saturation effect, to make this as my final product. This made the colours
darker without lowering the brightness, giving my photograph the look I wanted.