COC 3 - Setup Computer Systems
•
35 likes•15,210 views

Computer System Servicing NC 2 - COC 3 Checklist

Recommended
Recommended
More Related Content
What's hot
What's hot (20)
Similar to COC 3 - Setup Computer Systems
Similar to COC 3 - Setup Computer Systems (20)
More from Danilo Anos
Recently uploaded
Recently uploaded (20)
COC 3 - Setup Computer Systems
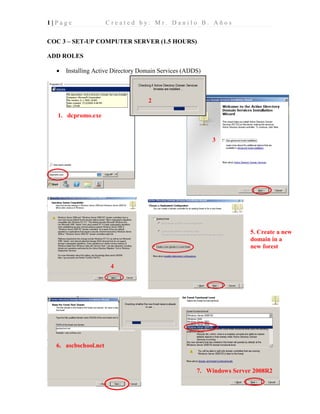
- 1. 1 | P a g e C r e a t e d b y : M r . D a n i l o B . A ñ o s COC 3 – SET-UP COMPUTER SERVER (1.5 HOURS) ADD ROLES • Installing Active Directory Domain Services (ADDS) 1. dcpromo.exe 2 3 4 5. Create a new domain in a new forest 6. ascbschool.net 7. Windows Server 2008R2
- 2. 2 | P a g e C r e a t e d b y : M r . D a n i l o B . A ñ o s • Installing Domain Name Services (DNS) 1. DNS Server 2. Yes 3. Yes 4 5. ascb@123 6 7 8 9
- 3. 3 | P a g e C r e a t e d b y : M r . D a n i l o B . A ñ o s To check if your Roles have been added: • Installing Direct Host Control Protocol (DHCP) 1
- 4. 4 | P a g e C r e a t e d b y : M r . D a n i l o B . A ñ o s 2 3. DHCP Server 4 5. Check DHCP Server 6
- 5. 5 | P a g e C r e a t e d b y : M r . D a n i l o B . A ñ o s 7. ascbschool.net Click Validate 8 9. Click Add 10. Scope
- 6. 6 | P a g e C r e a t e d b y : M r . D a n i l o B . A ñ o s 11 12. Disable DHCPv6 13. Use current credentials 14. Install
- 7. 7 | P a g e C r e a t e d b y : M r . D a n i l o B . A ñ o s • Installing File Services 1. Add Roles 2 3
- 8. 8 | P a g e C r e a t e d b y : M r . D a n i l o B . A ñ o s CREATING USER ACCOUNT Server Side: P a g e | 8 1. Start > Administrative Tools > Active Directory Users and Computers 2. R. Click domain/forest/FDQN > New > Organizational Unit (OU) 3. Name your OU
- 9. 9 | P a g e C r e a t e d b y : M r . D a n i l o B . A ñ o s 4. Your OU is created 6. R. Click your OU > New > User 5. Fill-up info for your 1st user. Note: remember your user logon name 7. Check 2nd & 3rd boxes Password: ascb@123 8. Finish 9. Created 1st User
- 10. 10 | P a g e C r e a t e d b y : M r . D a n i l o B . A ñ o s • Logging in First User Client Side: 1. Proceed to Client PC R. Click Network icon>Properties>Change Adapter Settings 2. Click Use the following DNS Server. Preferred DNS Server: Input the IP Address of your Server PC Note: Each PC has different IP Address See: Adapter Settings>Status>Details in Server PC 3. R. Click My Computer > Properties > Advance System Settings> Computer Name Tab> Change> Input your domain “ascbschool. net”
- 11. 11 | P a g e C r e a t e d b y : M r . D a n i l o B . A ñ o s 4. Input your First User, User name and Password. dan ******** 3. Windows Security is asking for First users, username and password Correct Settings Error because of wrong Settings 5. Welcome to ascbschool.net domain Click OK 6. Restart Now
- 12. 12 | P a g e C r e a t e d b y : M r . D a n i l o B . A ñ o s Once the Client has been restarted. Click Switch User> Other User> input your First User Account REMOTE DESKTOP USING FIRST USER Server Side Remote Configuration: 5 1. R. Click My Computer > Properties 2. Remote Settings
- 13. 13 | P a g e C r e a t e d b y : M r . D a n i l o B . A ñ o s Client Side Remote Configuration: 3. Select 2nd Option: Allow connections from computers running any version of Remote Desktop. 2. R. Click My Computer > Properties 1. Remote Settings
- 14. 14 | P a g e C r e a t e d b y : M r . D a n i l o B . A ñ o s Once Remote Settings was clicked. Client was asking for Server’s permission. Username and Password. Remote the Server 3. Asking for username and password: User: administrator Password: ascb@123 1. Run Remote Desktop Connection Start > Remote Desktop Connection 2. Click Options 3. Computer: IP of the Server: 192.168.0.101 User name: administrator
- 15. 15 | P a g e C r e a t e d b y : M r . D a n i l o B . A ñ o s Client Side PC (Logged in with First User: dan) Controlling the Server Interface/Function Server PC will Log-off 4. Asking for administrator password. Password: ascb@123 5. Click yes.
- 16. 16 | P a g e C r e a t e d b y : M r . D a n i l o B . A ñ o s • CREATING 2ND USER USING CLIENT PC (REMOTTED SERVER) 1. Active Directory Users and Computers 2. Click your OU (CSS) This is 1st user
- 17. 17 | P a g e C r e a t e d b y : M r . D a n i l o B . A ñ o s 3. R. Click OU (CSS) New > User 3. Fill-up Info. 4.. Input Password Check 2nd and 3rd boxes This is your 2nd User (Merlyn)
- 18. 18 | P a g e C r e a t e d b y : M r . D a n i l o B . A ñ o s Challenge: Log-in 2nd user in NETBOOK. Use the Wifi Device Challenge: Do the Remote Desktop process again using Netbook. FOLDER REDIRECTION Create a Folder in Drive C: name your folder as Redirection Share your Redirection Folder with 2 Types of Sharing. Share with: 1. Open Server Local Drive C:. Create Folder name as Redirection 1. Click Find People
- 19. 19 | P a g e C r e a t e d b y : M r . D a n i l o B . A ñ o s 2. Type Authentic Users or Type Au then click Check Names It will automatically input Authentic Users 3. Click the inverted Triangle at Authentic users > Select Read/Write 4. Done
- 20. 20 | P a g e C r e a t e d b y : M r . D a n i l o B . A ñ o s Advanced Sharing: 1. R. Click > Properties 2. Click Advance Sharing 3. Check Share this folder Click Permissions 4. Click Add Button
- 21. 21 | P a g e C r e a t e d b y : M r . D a n i l o B . A ñ o s Apply > OK Apply > OK 5. Input Authentic users > OK 6. Click/Select Authentic Users > Check all boxes in Allow Apply > OK 7. Done
- 22. 22 | P a g e C r e a t e d b y : M r . D a n i l o B . A ñ o s • Profile Settings your First User 1. Click Your OU “CSS” > R. Click First User “Danilo” > Properties 2. Go to Profile Tab > Connect to > Select H: > Input: SERVERRedirection%userna me%
- 23. 23 | P a g e C r e a t e d b y : M r . D a n i l o B . A ñ o s Once Apply button is clicked. Automatically 1st user account name will replace the %username% (dan) Press OK. Testing if your path: SERVERRedirectiondan is active. Go to Server PC: Local Drive C: • Proceed to Client PC (First User) Run cmd.exe Type/enter gpupdate/force
- 24. 24 | P a g e C r e a t e d b y : M r . D a n i l o B . A ñ o s Log off your Client PC (1st User) Log in your 1st User, then Check My Computer and see Local Drive H:
- 25. 25 | P a g e C r e a t e d b y : M r . D a n i l o B . A ñ o s • Group Policy Management 1. Start > Administrative Tools > Select your OU “CSS” 2. R. Click OU > Create a GPO in this domain 3. Name your GPO “Redirect Desktop” 4. R. Click your created GPO > Edit
- 26. 26 | P a g e C r e a t e d b y : M r . D a n i l o B . A ñ o s 5. User Configuration > Windows Settings > Desktop > Properties 6. Select Basic – Redirect everyone’s folder to the same location 7. Root Path: SERVERRedirection Apply>OK
- 27. 27 | P a g e C r e a t e d b y : M r . D a n i l o B . A ñ o s • Proceed to Client PC (First User) Run cmd.exe Type gpupdate/force Ok to logoff? Input y then press enter. - Client PC will log-off - Log-in again First User
- 28. 28 | P a g e C r e a t e d b y : M r . D a n i l o B . A ñ o s Testing if your Folder Redirection Object has been applied. At Client PC (First User) > Create a folder at desktop Check your Server PC. Local Drive C: Redirection Folder Open the desktop folder to remove security issues. 1. Create Folder in PC at Desktop “Sample by Danilo” Local Disk C: Redirection>dan>Desktop
- 29. 29 | P a g e C r e a t e d b y : M r . D a n i l o B . A ñ o s Apply > OK Re open again your Desktop Folder
- 30. 30 | P a g e C r e a t e d b y : M r . D a n i l o B . A ñ o s Files/Folders from your First User PC will be redirected to your Server PC Local Drive C: RedirectiondanDesktop CHALLENGE: REDIRECT YOUR 2ND USER AT DESKTOP. Files from 1st User will appear on server’s PC Local C: Redirection>dan>Desktop