More Related Content
Similar to Exchange outlook2007setup
Similar to Exchange outlook2007setup (20)
Exchange outlook2007setup
- 1. Copyright © 2008 Document Authors. Some Rights Reserved.
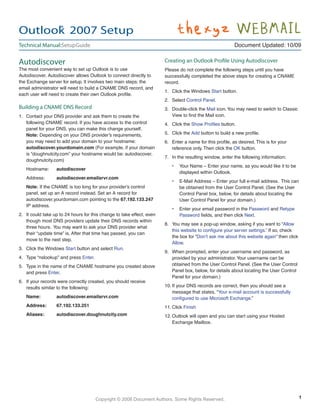
Autodiscover
The most convenient way to set up Outlook is to use
Autodiscover. Autodiscover allows Outlook to connect directly to
the Exchange server for setup. It involves two main steps: the
email administrator will need to build a CNAME DNS record, and
each user will need to create their own Outlook profile.
Building a CNAME DNS Record
1. Contact your DNS provider and ask them to create the
following CNAME record. If you have access to the control
panel for your DNS, you can make this change yourself.
Note: Depending on your DNS provider’s requirements,
you may need to add your domain to your hostname:
autodiscover.yourdomain.com (For example, if your domain
is “doughnutcity.com” your hostname would be: autodiscover.
doughnutcity.com)
Hostname: autodiscover
Address: autodiscover.emailsrvr.com
Note: If the CNAME is too long for your provider’s control
panel, set up an A record instead. Set an A record for
autodiscover.yourdomain.com pointing to the 67.192.133.247
IP address.
2. It could take up to 24 hours for this change to take effect, even
though most DNS providers update their DNS records within
three hours. You may want to ask your DNS provider what
their “update time” is. After that time has passed, you can
move to the next step.
3. Click the Windows Start button and select Run.
4. Type “nslookup” and press Enter.
5. Type in the name of the CNAME hostname you created above
and press Enter.
6. If your records were correctly created, you should receive
results similar to the following:
Name: autodiscover.emailsrvr.com
Address: 67.192.133.251
Aliases: autodiscover.doughnutcity.com
Creating an Outlook Profile Using Autodiscover
Please do not complete the following steps until you have
successfully completed the above steps for creating a CNAME
record.
1. Click the Windows Start button.
2. Select Control Panel.
3. Double-click the Mail icon.You may need to switch to Classic
View to find the Mail icon.
4. Click the Show Profiles button.
5. Click the Add button to build a new profile.
6. Enter a name for this profile, as desired. This is for your
reference only. Then click the OK button.
7. In the resulting window, enter the following information:
• Your Name – Enter your name, as you would like it to be
displayed within Outlook.
• E-Mail Address – Enter your full e-mail address. This can
be obtained from the User Control Panel. (See the User
Control Panel box, below, for details about locating the
User Control Panel for your domain.)
• Enter your email password in the Password and Retype
Password fields, and then click Next.
8. You may see a pop-up window, asking if you want to “Allow
this website to configure your server settings.” If so, check
the box for “Don’t ask me about this website again” then click
Allow.
9. When prompted, enter your username and password, as
provided by your administrator.Your username can be
obtained from the User Control Panel. (See the User Control
Panel box, below, for details about locating the User Control
Panel for your domain.)
10. If your DNS records are correct, then you should see a
message that states, “Your e-mail account is successfully
configured to use Microsoft Exchange.”
11. Click Finish
12. Outlook will open and you can start using your Hosted
Exchange Mailbox.
Outlook®
2007 Setup
Document Updated: 10/09Technical Manual:SetupGuide
1
- 2. Copyright © 2008 Document Authors. Some Rights Reserved.
Creating an Outlook Profile Using the Auto-Configuration
Tool
Though we encourage customers to use Autodiscover to set
up Outlook, some customers may prefer to download and run a
personalized PRF file.
To locate the customized PRF file, each user will need to log into
the User Control Panel, using their email address and password.
(To locate the URL for your domain’s User Control Panel, the
email administrator will need to log into the Administrative Control
Panel and select Support / Exchange. Locate and copy the link
for the User Control Panel.)
1. If you are running Outlook, be sure to close it. After closing
Outlook, press Ctrl + Alt + Delete to launch your Windows
Task Manager. If you see outlook.exe in the list, select it and
click the End Task button. This ensures that Outlook is not
running, since sometimes third-party Outlook plug-ins do not
shut down properly.
2. Log into the User Control Panel, using your email address
and password.
3. Click the Download Your Outlook Profile link.
4. Click the Save button and save the file to your C: drive.
5. Click the Windows Start button, and select Run.
6. Type the following in the command line:
outlook.exe /importPRF c:<username>.prf
You will need to replace “c:<username>.prf” with the exact
path and name of the .prf file you downloaded above.
7. Click the OK button.
8. Outlook will launch automatically.You may encounter a
warning popup window. Click the Yes button. (Running the
PRF configuration file will not delete any of your existing email
or your profiles.)
9. When prompted, enter your username and password, as
provided by your administrator.Your username can be
obtained from the User Control Panel. (See the User Control
Panel box, on Page 1, for details about locating the User
Control Panel for your domain.)
You may need to enter your username and password more
than once throughout this process, as Outlook sets up your
mailbox for the first time.
10. Click the OK button.You will now have full access to your
mailbox through Outlook. Though you’ll be prompted twice
for your email address and password information during this
initial setup, future logins should only require you to enter than
information one time.
2