SlideShare a Scribd company logo
1 of 2
Download to read offline
12’ x 12’ Frame Tent Directions
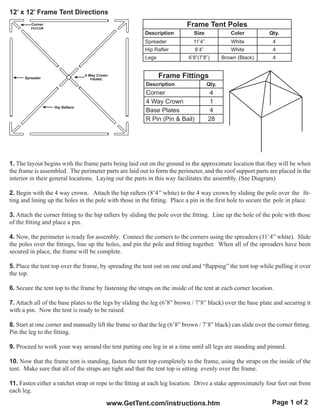
         Corner
         F01COR
                                                                          Frame Tent Poles
                                                         Description         Size              Color         Qty.
                                                         Spreader            11’4”             White           4
                                                         Hip Rafter           8’4”             White           4
                                                         Legs              6’8”(7’8”)       Brown (Black)      4


      Spreader
                                4 Way Crown
                                  F064WC
                                                                Frame Fittings
                                                         Description                 Qty.
                                                         Corner                       4
                                                         4 Way Crown                  1
                  Hip Rafters
                                                         Base Plates                  4
                                                         R Pin (Pin & Bail)          28


1. The layout begins with the frame parts being laid out on the ground in the approximate location that they will be when
the frame is assembled. The perimeter parts are laid out to form the perimeter, and the roof support parts are placed in the
interior in their general locations. Laying out the parts in this way facilitates the assembly. (See Diagram)

2. Begin with the 4 way crown. Attach the hip rafters (8’4’’ white) to the 4 way crown by sliding the pole over 	the fit-
ting and lining up the holes in the pole with those in the fitting. Place a pin in the first hole to secure the 	pole in place.
	
3. Attach the corner fitting to the hip rafters by sliding the pole over the fitting. Line up the hole of the pole with those
of the fitting and place a pin.

4. Now, the perimeter is ready for assembly. Connect the corners to the corners using the spreaders (11’4” white). Slide
the poles over the fittings, line up the holes, and pin the pole and fitting together. When all of the spreaders have been
secured in place, the frame will be complete.

5. Place the tent top over the frame, by spreading the tent out on one end and “flapping” the tent top while pulling it over
the top.

6. Secure the tent top to the frame by fastening the straps on the inside of the tent at each corner location.

7. Attach all of the base plates to the legs by sliding the leg (6’8” brown / 7’8” black) over the base plate and securing it
with a pin. Now the tent is ready to be raised.

8. Start at one corner and manually lift the frame so that the leg (6’8” brown / 7’8” black) can slide over the corner fitting.
Pin the leg to the fitting.

9. Proceed to work your way around the tent putting one leg in at a time until all legs are standing and pinned.

10. Now that the frame tent is standing, fasten the tent top completely to the frame, using the straps on the inside of the
tent. Make sure that all of the straps are tight and that the tent top is sitting evenly over the frame.

11. Fasten either a ratchet strap or rope to the fitting at each leg location. Drive a stake approximately four feet out from
each leg.

                                           www.GetTent.com/instructions.htm                                   Page 1 of 2
12’ x 12’ Frame Tent Directions

12. Attach the anchoring device (ratchets or ropes) to the stakes at each leg location.

- Ratchets- turn the 6” loop at the end of the ratchet inside out and pull the strap through the loop to create a noose and
pull tight over the stake. Take the strap from the tent and pull it through the reel bars slot of the ratchet (ratchet buckle
needs to have handle facing upward at all time) and pull the strap back towards the tent approximately 1 ½ feet. Hold the
strap at this point with one hand and begin to crank the ratchet handle back and forth with the other hand until the reel
bars have turned at least 2 times, this eliminates the chance of slippage. Repeat at all leg locations

- Ropes- use a Double Loop Clove Hitch Knot - grip the rope in your left hand approximately 8’ down from the 	 r o m -
                                                                                                                    g
met, at this point, take your right hand and create a loop (approximately 6”) with the excess rope and place it in your left
hand. Repeat and create another loop and place on the right side of the previous loop (should have 2 and half loops in
your left hand). Take the right loop and pull it up and over so it is now on the left side. Now place both loops over the
stake and pull tight with the excess rope. Repeat at all leg locations.

13. The tent top should now be complete! If sidewalls are desired, unroll the sidewalls between the stakes and the side
poles around the perimeter of the tent. Starting at a side pole, clip the sidewall snap hooks to the rope line that is attached
to the tent top.


                                  Why two sets of holes in frame fittings?
Two holes are located in each protrusion of almost every frame tent fitting. The first hole (furthest from the center of the
fitting) is for the pin that holds the pole in place. The second pin (located closest to the center of the fitting) is an alignment
hole. When a pin is placed in this alignment hole, it prevents the frame pole from moving to far.

1.	     Insert the pin in the hole closest to the center of the fitting (alignment hole).
2.	     Slide the pole on the protrusion until it meets the pin.
3.	     Rotate the pole until the holes on the pole and fitting is aligned properly.
4.	     Insert the pin through the pole and fitting.
5.	     Remove the first pin (the alignment pin).


  If you have any questions, please contact Celina Tents support department at:
                                              support@celinatent.com
                                          1-866-GET-TENT /419-586-3610
                                                 www.GetTent.com                                                 Page 2 of 2

More Related Content

What's hot

12 x 20 Frame Tent Installation Instructions
12 x 20 Frame Tent Installation Instructions12 x 20 Frame Tent Installation Instructions
12 x 20 Frame Tent Installation Instructionscelinatent
 
10 x 20 Frame Tent Installation Instructions
10 x 20 Frame Tent Installation Instructions10 x 20 Frame Tent Installation Instructions
10 x 20 Frame Tent Installation Instructionscelinatent
 
10 x 30 Frame Tent Installation Instructions
10 x 30 Frame Tent Installation Instructions 10 x 30 Frame Tent Installation Instructions
10 x 30 Frame Tent Installation Instructions celinatent
 
F-F-Fiddle Assembly Instructions
F-F-Fiddle Assembly InstructionsF-F-Fiddle Assembly Instructions
F-F-Fiddle Assembly Instructionsdsp39
 
F-F-Fiddle Assembly Instructions
F-F-Fiddle Assembly InstructionsF-F-Fiddle Assembly Instructions
F-F-Fiddle Assembly Instructionsdsp39
 
Basic ShoreMaster Kit Dock Instruction
Basic ShoreMaster Kit Dock InstructionBasic ShoreMaster Kit Dock Instruction
Basic ShoreMaster Kit Dock InstructionKurt Welch
 

What's hot (6)

12 x 20 Frame Tent Installation Instructions
12 x 20 Frame Tent Installation Instructions12 x 20 Frame Tent Installation Instructions
12 x 20 Frame Tent Installation Instructions
 
10 x 20 Frame Tent Installation Instructions
10 x 20 Frame Tent Installation Instructions10 x 20 Frame Tent Installation Instructions
10 x 20 Frame Tent Installation Instructions
 
10 x 30 Frame Tent Installation Instructions
10 x 30 Frame Tent Installation Instructions 10 x 30 Frame Tent Installation Instructions
10 x 30 Frame Tent Installation Instructions
 
F-F-Fiddle Assembly Instructions
F-F-Fiddle Assembly InstructionsF-F-Fiddle Assembly Instructions
F-F-Fiddle Assembly Instructions
 
F-F-Fiddle Assembly Instructions
F-F-Fiddle Assembly InstructionsF-F-Fiddle Assembly Instructions
F-F-Fiddle Assembly Instructions
 
Basic ShoreMaster Kit Dock Instruction
Basic ShoreMaster Kit Dock InstructionBasic ShoreMaster Kit Dock Instruction
Basic ShoreMaster Kit Dock Instruction
 

Viewers also liked

Panimoalan ajankohtaiset asiat huhtikuu 2015
Panimoalan ajankohtaiset asiat huhtikuu 2015Panimoalan ajankohtaiset asiat huhtikuu 2015
Panimoalan ajankohtaiset asiat huhtikuu 2015Panimoliitto
 
John Weller Photography: Last Ocean Story
John Weller Photography: Last Ocean StoryJohn Weller Photography: Last Ocean Story
John Weller Photography: Last Ocean Storyguimera
 
【国立大学法人 福島大学】平成20年環境報告書
【国立大学法人 福島大学】平成20年環境報告書【国立大学法人 福島大学】平成20年環境報告書
【国立大学法人 福島大学】平成20年環境報告書env74
 
Living in Freedom | A Sermon for Epiphany from Matthew 5:1-20
Living in Freedom | A Sermon for Epiphany from Matthew 5:1-20Living in Freedom | A Sermon for Epiphany from Matthew 5:1-20
Living in Freedom | A Sermon for Epiphany from Matthew 5:1-20Steve Thomason
 
Women and Youth affairs @ICOB
Women and Youth affairs @ICOBWomen and Youth affairs @ICOB
Women and Youth affairs @ICOBRania H
 
Massace at wounded knee notes
Massace at wounded knee notesMassace at wounded knee notes
Massace at wounded knee notesbkayser
 
Lecture 2 blogging
Lecture 2   bloggingLecture 2   blogging
Lecture 2 bloggingrskslides
 
Poetry figurative_language (1)
Poetry  figurative_language (1)Poetry  figurative_language (1)
Poetry figurative_language (1)am00la
 
Fundamental Teachings of Islam Part-2( किबाब का नाम – इस्लाम की बुन्यादी बा...
Fundamental Teachings  of Islam  Part-2( किबाब का नाम – इस्लाम की बुन्यादी बा...Fundamental Teachings  of Islam  Part-2( किबाब का नाम – इस्लाम की बुन्यादी बा...
Fundamental Teachings of Islam Part-2( किबाब का नाम – इस्लाम की बुन्यादी बा...Ahmed@3604
 
Fundamental Research Corp. Update on Commerce Resources Corp. (TSXv: CCE)
Fundamental Research Corp. Update on Commerce Resources Corp. (TSXv: CCE)Fundamental Research Corp. Update on Commerce Resources Corp. (TSXv: CCE)
Fundamental Research Corp. Update on Commerce Resources Corp. (TSXv: CCE)Commerce Resources Corp. (TSXv:CCE)
 
Inventor Poszter
Inventor PoszterInventor Poszter
Inventor Posztergrgly
 
Amendment Notes
Amendment NotesAmendment Notes
Amendment Notesbkayser
 
I Apopsi Tou Kosmou Apo Aeroplano S
I Apopsi Tou Kosmou Apo Aeroplano SI Apopsi Tou Kosmou Apo Aeroplano S
I Apopsi Tou Kosmou Apo Aeroplano Sguestf555a8b
 
Steps to Create a Social Media Marketing Strategy for Your Business
Steps to Create a Social Media Marketing Strategy for Your BusinessSteps to Create a Social Media Marketing Strategy for Your Business
Steps to Create a Social Media Marketing Strategy for Your BusinessJocelyn Murray
 

Viewers also liked (17)

Panimoalan ajankohtaiset asiat huhtikuu 2015
Panimoalan ajankohtaiset asiat huhtikuu 2015Panimoalan ajankohtaiset asiat huhtikuu 2015
Panimoalan ajankohtaiset asiat huhtikuu 2015
 
John Weller Photography: Last Ocean Story
John Weller Photography: Last Ocean StoryJohn Weller Photography: Last Ocean Story
John Weller Photography: Last Ocean Story
 
【国立大学法人 福島大学】平成20年環境報告書
【国立大学法人 福島大学】平成20年環境報告書【国立大学法人 福島大学】平成20年環境報告書
【国立大学法人 福島大学】平成20年環境報告書
 
Living in Freedom | A Sermon for Epiphany from Matthew 5:1-20
Living in Freedom | A Sermon for Epiphany from Matthew 5:1-20Living in Freedom | A Sermon for Epiphany from Matthew 5:1-20
Living in Freedom | A Sermon for Epiphany from Matthew 5:1-20
 
Review tar
Review tarReview tar
Review tar
 
Women and Youth affairs @ICOB
Women and Youth affairs @ICOBWomen and Youth affairs @ICOB
Women and Youth affairs @ICOB
 
Massace at wounded knee notes
Massace at wounded knee notesMassace at wounded knee notes
Massace at wounded knee notes
 
Lecture 2 blogging
Lecture 2   bloggingLecture 2   blogging
Lecture 2 blogging
 
Poetry figurative_language (1)
Poetry  figurative_language (1)Poetry  figurative_language (1)
Poetry figurative_language (1)
 
Fundamental Teachings of Islam Part-2( किबाब का नाम – इस्लाम की बुन्यादी बा...
Fundamental Teachings  of Islam  Part-2( किबाब का नाम – इस्लाम की बुन्यादी बा...Fundamental Teachings  of Islam  Part-2( किबाब का नाम – इस्लाम की बुन्यादी बा...
Fundamental Teachings of Islam Part-2( किबाब का नाम – इस्लाम की बुन्यादी बा...
 
RME Deck
RME DeckRME Deck
RME Deck
 
Fundamental Research Corp. Update on Commerce Resources Corp. (TSXv: CCE)
Fundamental Research Corp. Update on Commerce Resources Corp. (TSXv: CCE)Fundamental Research Corp. Update on Commerce Resources Corp. (TSXv: CCE)
Fundamental Research Corp. Update on Commerce Resources Corp. (TSXv: CCE)
 
Inventor Poszter
Inventor PoszterInventor Poszter
Inventor Poszter
 
Amendment Notes
Amendment NotesAmendment Notes
Amendment Notes
 
I Apopsi Tou Kosmou Apo Aeroplano S
I Apopsi Tou Kosmou Apo Aeroplano SI Apopsi Tou Kosmou Apo Aeroplano S
I Apopsi Tou Kosmou Apo Aeroplano S
 
Ttt
TttTtt
Ttt
 
Steps to Create a Social Media Marketing Strategy for Your Business
Steps to Create a Social Media Marketing Strategy for Your BusinessSteps to Create a Social Media Marketing Strategy for Your Business
Steps to Create a Social Media Marketing Strategy for Your Business
 

Similar to 12 x 12 Frame Tent Installation Instructions

Solar cooker installation
Solar cooker installationSolar cooker installation
Solar cooker installationPrabhat Kumar
 
Build instructions Homeslice Tower ver 070514
Build instructions   Homeslice Tower ver 070514Build instructions   Homeslice Tower ver 070514
Build instructions Homeslice Tower ver 070514Jeff Vetterick
 
Victory rig
Victory rigVictory rig
Victory rigJLRev
 
How to Make and Wire a Lamp
How to Make and Wire a LampHow to Make and Wire a Lamp
How to Make and Wire a Lampmedo41
 
소형베틀도면
소형베틀도면소형베틀도면
소형베틀도면Seongwon Kim
 
4. How to build shed roof rafters
4. How to build shed roof rafters4. How to build shed roof rafters
4. How to build shed roof raftersicreatablesseo
 
Double Braid EyeSplice
Double Braid EyeSpliceDouble Braid EyeSplice
Double Braid EyeSpliceJeffery Flower
 
Mitra Stats Project Final
Mitra Stats Project FinalMitra Stats Project Final
Mitra Stats Project Finalshonabunch1
 
A rope shackle with a cover
A rope shackle with a coverA rope shackle with a cover
A rope shackle with a coverDavid Ramer
 
How To Change The String on a 5-15 String Kantele
How To Change The String on a 5-15 String KanteleHow To Change The String on a 5-15 String Kantele
How To Change The String on a 5-15 String KanteleArja Kastinen
 
접이식 자가제작 베틀제작 도면
접이식 자가제작 베틀제작 도면접이식 자가제작 베틀제작 도면
접이식 자가제작 베틀제작 도면Seongwon Kim
 
apeluri ieftine internationale
apeluri ieftine internationaleapeluri ieftine internationale
apeluri ieftine internationalezobcornel
 
Make a fan with a vacuum cleaner
Make a fan with a vacuum cleanerMake a fan with a vacuum cleaner
Make a fan with a vacuum cleanerDealing
 

Similar to 12 x 12 Frame Tent Installation Instructions (20)

Solar cooker installation
Solar cooker installationSolar cooker installation
Solar cooker installation
 
Build instructions Homeslice Tower ver 070514
Build instructions   Homeslice Tower ver 070514Build instructions   Homeslice Tower ver 070514
Build instructions Homeslice Tower ver 070514
 
Victory rig
Victory rigVictory rig
Victory rig
 
How to Make and Wire a Lamp
How to Make and Wire a LampHow to Make and Wire a Lamp
How to Make and Wire a Lamp
 
Build-It: Bicycle Hacksaw
Build-It: Bicycle HacksawBuild-It: Bicycle Hacksaw
Build-It: Bicycle Hacksaw
 
소형베틀도면
소형베틀도면소형베틀도면
소형베틀도면
 
Construção de Violões
Construção de ViolõesConstrução de Violões
Construção de Violões
 
4. How to build shed roof rafters
4. How to build shed roof rafters4. How to build shed roof rafters
4. How to build shed roof rafters
 
Fasteners po 2
Fasteners po 2Fasteners po 2
Fasteners po 2
 
Double Braid EyeSplice
Double Braid EyeSpliceDouble Braid EyeSplice
Double Braid EyeSplice
 
Cadeira de jardin
Cadeira de jardinCadeira de jardin
Cadeira de jardin
 
Measuring device
Measuring deviceMeasuring device
Measuring device
 
Mitra Stats Project Final
Mitra Stats Project FinalMitra Stats Project Final
Mitra Stats Project Final
 
Hope Wire Woven Necklace Tutorial
Hope  Wire Woven Necklace Tutorial Hope  Wire Woven Necklace Tutorial
Hope Wire Woven Necklace Tutorial
 
A rope shackle with a cover
A rope shackle with a coverA rope shackle with a cover
A rope shackle with a cover
 
How To Change The String on a 5-15 String Kantele
How To Change The String on a 5-15 String KanteleHow To Change The String on a 5-15 String Kantele
How To Change The String on a 5-15 String Kantele
 
접이식 자가제작 베틀제작 도면
접이식 자가제작 베틀제작 도면접이식 자가제작 베틀제작 도면
접이식 자가제작 베틀제작 도면
 
apeluri ieftine internationale
apeluri ieftine internationaleapeluri ieftine internationale
apeluri ieftine internationale
 
Make a fan with a vacuum cleaner
Make a fan with a vacuum cleanerMake a fan with a vacuum cleaner
Make a fan with a vacuum cleaner
 
Break down bow
Break down bowBreak down bow
Break down bow
 

More from celinatent

40 x 300 Pole Tent Installation Instructions
40 x 300 Pole Tent Installation Instructions40 x 300 Pole Tent Installation Instructions
40 x 300 Pole Tent Installation Instructionscelinatent
 
40 x 280 Pole Tent Installation Instructions
40 x 280 Pole Tent Installation Instructions40 x 280 Pole Tent Installation Instructions
40 x 280 Pole Tent Installation Instructionscelinatent
 
40 x 260 Pole Tent Installation Instructions
40 x 260 Pole Tent Installation Instructions40 x 260 Pole Tent Installation Instructions
40 x 260 Pole Tent Installation Instructionscelinatent
 
40 x 240 Pole Tent Installation Instructions
40 x 240 Pole Tent Installation Instructions40 x 240 Pole Tent Installation Instructions
40 x 240 Pole Tent Installation Instructionscelinatent
 
40 x 220 Pole Tent Installation Instructions
40 x 220 Pole Tent Installation Instructions40 x 220 Pole Tent Installation Instructions
40 x 220 Pole Tent Installation Instructionscelinatent
 
40 x 200 Pole Tent Installation Instructions
40 x 200 Pole Tent Installation Instructions40 x 200 Pole Tent Installation Instructions
40 x 200 Pole Tent Installation Instructionscelinatent
 
40 x 180 Pole Tent Installation Instructions
40 x 180 Pole Tent Installation Instructions40 x 180 Pole Tent Installation Instructions
40 x 180 Pole Tent Installation Instructionscelinatent
 
40 x 160 Pole Tent Installation Instructions
40 x 160 Pole Tent Installation Instructions40 x 160 Pole Tent Installation Instructions
40 x 160 Pole Tent Installation Instructionscelinatent
 
40 x 140 Pole Tent Installation Instructions
40 x 140 Pole Tent Installation Instructions40 x 140 Pole Tent Installation Instructions
40 x 140 Pole Tent Installation Instructionscelinatent
 
40 x 120 Pole Tent Installation Instructions
40 x 120 Pole Tent Installation Instructions40 x 120 Pole Tent Installation Instructions
40 x 120 Pole Tent Installation Instructionscelinatent
 
40 x 100 Pole Tent Installation Instructions
40 x 100 Pole Tent Installation Instructions40 x 100 Pole Tent Installation Instructions
40 x 100 Pole Tent Installation Instructionscelinatent
 
40 x 80 Pole Tent Installation Instructions
40 x 80 Pole Tent Installation Instructions40 x 80 Pole Tent Installation Instructions
40 x 80 Pole Tent Installation Instructionscelinatent
 
40 x 60 Pole Tent Installation Instructions
40 x 60 Pole Tent Installation Instructions40 x 60 Pole Tent Installation Instructions
40 x 60 Pole Tent Installation Instructionscelinatent
 
40 x 40 Pole Tent Installation Instructions
40 x 40 Pole Tent Installation Instructions40 x 40 Pole Tent Installation Instructions
40 x 40 Pole Tent Installation Instructionscelinatent
 
30 x 255 Pole Tent Installation Instructions
30 x 255 Pole Tent Installation Instructions30 x 255 Pole Tent Installation Instructions
30 x 255 Pole Tent Installation Instructionscelinatent
 
30 x 210 Pole Tent Installation Instructions
30 x 210 Pole Tent Installation Instructions30 x 210 Pole Tent Installation Instructions
30 x 210 Pole Tent Installation Instructionscelinatent
 
30 x 195 Pole Tent Installation Instructions
30 x 195 Pole Tent Installation Instructions30 x 195 Pole Tent Installation Instructions
30 x 195 Pole Tent Installation Instructionscelinatent
 
30 x 180 Pole Tent Installation Instructions
30 x 180 Pole Tent Installation Instructions30 x 180 Pole Tent Installation Instructions
30 x 180 Pole Tent Installation Instructionscelinatent
 
30 x 165 Pole Tent Installation Instructions
30 x 165 Pole Tent Installation Instructions30 x 165 Pole Tent Installation Instructions
30 x 165 Pole Tent Installation Instructionscelinatent
 
30 x 150 Pole Tent Installation Instructions
30 x 150 Pole Tent Installation Instructions30 x 150 Pole Tent Installation Instructions
30 x 150 Pole Tent Installation Instructionscelinatent
 

More from celinatent (20)

40 x 300 Pole Tent Installation Instructions
40 x 300 Pole Tent Installation Instructions40 x 300 Pole Tent Installation Instructions
40 x 300 Pole Tent Installation Instructions
 
40 x 280 Pole Tent Installation Instructions
40 x 280 Pole Tent Installation Instructions40 x 280 Pole Tent Installation Instructions
40 x 280 Pole Tent Installation Instructions
 
40 x 260 Pole Tent Installation Instructions
40 x 260 Pole Tent Installation Instructions40 x 260 Pole Tent Installation Instructions
40 x 260 Pole Tent Installation Instructions
 
40 x 240 Pole Tent Installation Instructions
40 x 240 Pole Tent Installation Instructions40 x 240 Pole Tent Installation Instructions
40 x 240 Pole Tent Installation Instructions
 
40 x 220 Pole Tent Installation Instructions
40 x 220 Pole Tent Installation Instructions40 x 220 Pole Tent Installation Instructions
40 x 220 Pole Tent Installation Instructions
 
40 x 200 Pole Tent Installation Instructions
40 x 200 Pole Tent Installation Instructions40 x 200 Pole Tent Installation Instructions
40 x 200 Pole Tent Installation Instructions
 
40 x 180 Pole Tent Installation Instructions
40 x 180 Pole Tent Installation Instructions40 x 180 Pole Tent Installation Instructions
40 x 180 Pole Tent Installation Instructions
 
40 x 160 Pole Tent Installation Instructions
40 x 160 Pole Tent Installation Instructions40 x 160 Pole Tent Installation Instructions
40 x 160 Pole Tent Installation Instructions
 
40 x 140 Pole Tent Installation Instructions
40 x 140 Pole Tent Installation Instructions40 x 140 Pole Tent Installation Instructions
40 x 140 Pole Tent Installation Instructions
 
40 x 120 Pole Tent Installation Instructions
40 x 120 Pole Tent Installation Instructions40 x 120 Pole Tent Installation Instructions
40 x 120 Pole Tent Installation Instructions
 
40 x 100 Pole Tent Installation Instructions
40 x 100 Pole Tent Installation Instructions40 x 100 Pole Tent Installation Instructions
40 x 100 Pole Tent Installation Instructions
 
40 x 80 Pole Tent Installation Instructions
40 x 80 Pole Tent Installation Instructions40 x 80 Pole Tent Installation Instructions
40 x 80 Pole Tent Installation Instructions
 
40 x 60 Pole Tent Installation Instructions
40 x 60 Pole Tent Installation Instructions40 x 60 Pole Tent Installation Instructions
40 x 60 Pole Tent Installation Instructions
 
40 x 40 Pole Tent Installation Instructions
40 x 40 Pole Tent Installation Instructions40 x 40 Pole Tent Installation Instructions
40 x 40 Pole Tent Installation Instructions
 
30 x 255 Pole Tent Installation Instructions
30 x 255 Pole Tent Installation Instructions30 x 255 Pole Tent Installation Instructions
30 x 255 Pole Tent Installation Instructions
 
30 x 210 Pole Tent Installation Instructions
30 x 210 Pole Tent Installation Instructions30 x 210 Pole Tent Installation Instructions
30 x 210 Pole Tent Installation Instructions
 
30 x 195 Pole Tent Installation Instructions
30 x 195 Pole Tent Installation Instructions30 x 195 Pole Tent Installation Instructions
30 x 195 Pole Tent Installation Instructions
 
30 x 180 Pole Tent Installation Instructions
30 x 180 Pole Tent Installation Instructions30 x 180 Pole Tent Installation Instructions
30 x 180 Pole Tent Installation Instructions
 
30 x 165 Pole Tent Installation Instructions
30 x 165 Pole Tent Installation Instructions30 x 165 Pole Tent Installation Instructions
30 x 165 Pole Tent Installation Instructions
 
30 x 150 Pole Tent Installation Instructions
30 x 150 Pole Tent Installation Instructions30 x 150 Pole Tent Installation Instructions
30 x 150 Pole Tent Installation Instructions
 

Recently uploaded

KLINIK BATA Jual obat penggugur kandungan 087776558899 ABORSI JANIN KEHAMILAN...
KLINIK BATA Jual obat penggugur kandungan 087776558899 ABORSI JANIN KEHAMILAN...KLINIK BATA Jual obat penggugur kandungan 087776558899 ABORSI JANIN KEHAMILAN...
KLINIK BATA Jual obat penggugur kandungan 087776558899 ABORSI JANIN KEHAMILAN...Cara Menggugurkan Kandungan 087776558899
 
2023 - Between Philosophy and Practice: Introducing Yoga
2023 - Between Philosophy and Practice: Introducing Yoga2023 - Between Philosophy and Practice: Introducing Yoga
2023 - Between Philosophy and Practice: Introducing YogaRaphaël Semeteys
 
Exploring Stoic Philosophy From Ancient Wisdom to Modern Relevance.pdf
Exploring Stoic Philosophy From Ancient Wisdom to Modern Relevance.pdfExploring Stoic Philosophy From Ancient Wisdom to Modern Relevance.pdf
Exploring Stoic Philosophy From Ancient Wisdom to Modern Relevance.pdfMindful Wellness Journey
 
communication-skills-training-excerpt.pdf
communication-skills-training-excerpt.pdfcommunication-skills-training-excerpt.pdf
communication-skills-training-excerpt.pdfErmiyas33
 
March 2023 Recommendations for newsletter
March 2023 Recommendations for newsletterMarch 2023 Recommendations for newsletter
March 2023 Recommendations for newsletterssuserdfec6a
 
Social Learning Theory presentation.pptx
Social Learning Theory presentation.pptxSocial Learning Theory presentation.pptx
Social Learning Theory presentation.pptxumef01177
 
SIKP311 Sikolohiyang Pilipino - Ginhawa.pptx
SIKP311 Sikolohiyang Pilipino - Ginhawa.pptxSIKP311 Sikolohiyang Pilipino - Ginhawa.pptx
SIKP311 Sikolohiyang Pilipino - Ginhawa.pptxStephenMino
 
Emotional Freedom Technique Tapping Points Diagram.pdf
Emotional Freedom Technique Tapping Points Diagram.pdfEmotional Freedom Technique Tapping Points Diagram.pdf
Emotional Freedom Technique Tapping Points Diagram.pdfaprilross605
 
February 2024 Recommendations for newsletter
February 2024 Recommendations for newsletterFebruary 2024 Recommendations for newsletter
February 2024 Recommendations for newsletterssuserdfec6a
 

Recently uploaded (9)

KLINIK BATA Jual obat penggugur kandungan 087776558899 ABORSI JANIN KEHAMILAN...
KLINIK BATA Jual obat penggugur kandungan 087776558899 ABORSI JANIN KEHAMILAN...KLINIK BATA Jual obat penggugur kandungan 087776558899 ABORSI JANIN KEHAMILAN...
KLINIK BATA Jual obat penggugur kandungan 087776558899 ABORSI JANIN KEHAMILAN...
 
2023 - Between Philosophy and Practice: Introducing Yoga
2023 - Between Philosophy and Practice: Introducing Yoga2023 - Between Philosophy and Practice: Introducing Yoga
2023 - Between Philosophy and Practice: Introducing Yoga
 
Exploring Stoic Philosophy From Ancient Wisdom to Modern Relevance.pdf
Exploring Stoic Philosophy From Ancient Wisdom to Modern Relevance.pdfExploring Stoic Philosophy From Ancient Wisdom to Modern Relevance.pdf
Exploring Stoic Philosophy From Ancient Wisdom to Modern Relevance.pdf
 
communication-skills-training-excerpt.pdf
communication-skills-training-excerpt.pdfcommunication-skills-training-excerpt.pdf
communication-skills-training-excerpt.pdf
 
March 2023 Recommendations for newsletter
March 2023 Recommendations for newsletterMarch 2023 Recommendations for newsletter
March 2023 Recommendations for newsletter
 
Social Learning Theory presentation.pptx
Social Learning Theory presentation.pptxSocial Learning Theory presentation.pptx
Social Learning Theory presentation.pptx
 
SIKP311 Sikolohiyang Pilipino - Ginhawa.pptx
SIKP311 Sikolohiyang Pilipino - Ginhawa.pptxSIKP311 Sikolohiyang Pilipino - Ginhawa.pptx
SIKP311 Sikolohiyang Pilipino - Ginhawa.pptx
 
Emotional Freedom Technique Tapping Points Diagram.pdf
Emotional Freedom Technique Tapping Points Diagram.pdfEmotional Freedom Technique Tapping Points Diagram.pdf
Emotional Freedom Technique Tapping Points Diagram.pdf
 
February 2024 Recommendations for newsletter
February 2024 Recommendations for newsletterFebruary 2024 Recommendations for newsletter
February 2024 Recommendations for newsletter
 

12 x 12 Frame Tent Installation Instructions

  • 1. 12’ x 12’ Frame Tent Directions Corner F01COR Frame Tent Poles Description Size Color Qty. Spreader 11’4” White 4 Hip Rafter 8’4” White 4 Legs 6’8”(7’8”) Brown (Black) 4 Spreader 4 Way Crown F064WC Frame Fittings Description Qty. Corner 4 4 Way Crown 1 Hip Rafters Base Plates 4 R Pin (Pin & Bail) 28 1. The layout begins with the frame parts being laid out on the ground in the approximate location that they will be when the frame is assembled. The perimeter parts are laid out to form the perimeter, and the roof support parts are placed in the interior in their general locations. Laying out the parts in this way facilitates the assembly. (See Diagram) 2. Begin with the 4 way crown. Attach the hip rafters (8’4’’ white) to the 4 way crown by sliding the pole over the fit- ting and lining up the holes in the pole with those in the fitting. Place a pin in the first hole to secure the pole in place. 3. Attach the corner fitting to the hip rafters by sliding the pole over the fitting. Line up the hole of the pole with those of the fitting and place a pin. 4. Now, the perimeter is ready for assembly. Connect the corners to the corners using the spreaders (11’4” white). Slide the poles over the fittings, line up the holes, and pin the pole and fitting together. When all of the spreaders have been secured in place, the frame will be complete. 5. Place the tent top over the frame, by spreading the tent out on one end and “flapping” the tent top while pulling it over the top. 6. Secure the tent top to the frame by fastening the straps on the inside of the tent at each corner location. 7. Attach all of the base plates to the legs by sliding the leg (6’8” brown / 7’8” black) over the base plate and securing it with a pin. Now the tent is ready to be raised. 8. Start at one corner and manually lift the frame so that the leg (6’8” brown / 7’8” black) can slide over the corner fitting. Pin the leg to the fitting. 9. Proceed to work your way around the tent putting one leg in at a time until all legs are standing and pinned. 10. Now that the frame tent is standing, fasten the tent top completely to the frame, using the straps on the inside of the tent. Make sure that all of the straps are tight and that the tent top is sitting evenly over the frame. 11. Fasten either a ratchet strap or rope to the fitting at each leg location. Drive a stake approximately four feet out from each leg. www.GetTent.com/instructions.htm Page 1 of 2
  • 2. 12’ x 12’ Frame Tent Directions 12. Attach the anchoring device (ratchets or ropes) to the stakes at each leg location. - Ratchets- turn the 6” loop at the end of the ratchet inside out and pull the strap through the loop to create a noose and pull tight over the stake. Take the strap from the tent and pull it through the reel bars slot of the ratchet (ratchet buckle needs to have handle facing upward at all time) and pull the strap back towards the tent approximately 1 ½ feet. Hold the strap at this point with one hand and begin to crank the ratchet handle back and forth with the other hand until the reel bars have turned at least 2 times, this eliminates the chance of slippage. Repeat at all leg locations - Ropes- use a Double Loop Clove Hitch Knot - grip the rope in your left hand approximately 8’ down from the r o m - g met, at this point, take your right hand and create a loop (approximately 6”) with the excess rope and place it in your left hand. Repeat and create another loop and place on the right side of the previous loop (should have 2 and half loops in your left hand). Take the right loop and pull it up and over so it is now on the left side. Now place both loops over the stake and pull tight with the excess rope. Repeat at all leg locations. 13. The tent top should now be complete! If sidewalls are desired, unroll the sidewalls between the stakes and the side poles around the perimeter of the tent. Starting at a side pole, clip the sidewall snap hooks to the rope line that is attached to the tent top. Why two sets of holes in frame fittings? Two holes are located in each protrusion of almost every frame tent fitting. The first hole (furthest from the center of the fitting) is for the pin that holds the pole in place. The second pin (located closest to the center of the fitting) is an alignment hole. When a pin is placed in this alignment hole, it prevents the frame pole from moving to far. 1. Insert the pin in the hole closest to the center of the fitting (alignment hole). 2. Slide the pole on the protrusion until it meets the pin. 3. Rotate the pole until the holes on the pole and fitting is aligned properly. 4. Insert the pin through the pole and fitting. 5. Remove the first pin (the alignment pin). If you have any questions, please contact Celina Tents support department at: support@celinatent.com 1-866-GET-TENT /419-586-3610 www.GetTent.com Page 2 of 2