SlideShare a Scribd company logo
10’ x 30’ Frame Tent Directions
                                                                          Frame Tent Poles
                                                           Description          Size           Color       Qty.
                            Spreader                       Spreader             9’4”           White        9
                                                           Hip Rafter        6’10”             Green        4
                                                           Rafter            4’11”             Green        4
                                         Top
                                       Spreader
                                                           Top Spreader         4’4”           White        2
                                                           Legs            6’8”(7’8”)       Brown(Black)    8
                                   Side Tee
                                       F02ST
                   Rafter

                                                               Frame Fittings
                                                           Description             Qty.
                                 Ridge Crown
                                       F08RC
                                                           Corner                       4
                                                           3 Way Crown                  2
                                                           Side Tee                     4
                                  3 Way Crown
                                       F073WC              Ridge Crown                  2
               Hip Rafter
                                                           Base Plates                  8
                       Corner
                       F01COR
                                                           R Pin (Pin & Bail)          62


1. The layout begins with the frame parts being laid out on the ground in the approximate location that they will be when
the frame is assembled. The perimeter parts are laid out to form the perimeter, and the roof support parts are placed in the
interior in their general locations. Laying out the parts in this way facilitates the assembly. (See Diagram)

2. Begin with the 3 way crown. Attach the hip rafters (6’10’’ green) to one of the 3 way crown by sliding the pole over
the fitting and lining up the holes in the pole with those in the fitting. Place a pin in the first hole to secure the pole in
place.

3. Attach a top spreader (4’4” white) to the 3 way crown. Attach the top spreader to a ridge crown. Attach 2 rafters (4’11”
green) to the ridge crown. Attach a spreader (9’4” white) from the ridge crown to another ridge crown. Now attach 2
rafters to the ridge crown. Attach a top spreader from the ridge crown to the other 3 way crown and repeat step 2.

4. Attach the corner fitting to the hip rafter and the side tees to the rafter by sliding the pole over the fitting. Line up the
hole of the pole with those of the fitting and place a pin.

5. Now, the perimeter is ready for assembly. Connect all the corners to the side tees using the spreaders (9’4”
white). Slide the poles over the fittings, line up the holes, and pin the pole and fitting together. When all 	of the spread-
ers have been secured in place, the frame will be complete.

6. Place the tent top over the frame, by spreading the tent out on one end and “flapping” the tent top while pulling it over
the top.

7. Secure the tent top to the frame by fastening the straps on the inside of the tent at each corner location.

8. Attach all of the base plates to the legs by sliding the leg (6’8” brown / 7’8” black) over the base plate and securing it
with a pin. Now the tent is ready to be raised.

9. Start at one corner and manually lift the frame so that the leg (6’8” brown / 7’8” black) can slide over the corner fitting.
Pin the leg to the fitting.

10. Proceed to work your way around the tent putting one leg in at a time until all legs are standing and pinned.

11. Now that the frame tent is standing, fasten the tent top completely to the frame, using the straps on the inside of the
tent. Make sure that all of the straps are tight and that the tent top is sitting evenly over the frame.

                                                  www.GetTent.com/instructions.htm                              Page 1 of 2
10’ x 30’ Frame Tent Directions

12. Fasten either a ratchet strap or rope to the fitting at each leg location. Drive a stake approximately four feet out from
each leg.

13. Attach the anchoring device (ratchets or ropes) to the stakes at each leg location.

- Ratchets- turn the 6” loop at the end of the ratchet inside out and pull the strap through the loop to create a noose and
pull tight over the stake. Take the strap from the tent and pull it through the reel bars slot of the ratchet (ratchet buckle
needs to have handle facing upward at all time) and pull the strap back towards the tent approximately 1 ½ feet. Hold the
strap at this point with one hand and begin to crank the ratchet handle back and forth with the other hand until the reel
bars have turned at least 2 times, this eliminates the chance of slippage. Repeat at all leg locations.

- Ropes- use a Double Loop Clove Hitch Knot - grip the rope in your left hand approximately 8’ down from the grommet,
at this point, take your right hand and create a loop (approximately 6”) with the excess rope and place it in your left hand.
Repeat and create another loop and place on the right side of the previous loop (should have 2 and half loops in your left
hand). Take the right loop and pull it up and over so it is now on the left side. Now place both loops over the stake and
pull tight with the excess rope. Repeat at all leg locations.

14. The tent top should now be complete! If sidewalls are desired, unroll the sidewalls between the stakes and the side
poles around the perimeter of the tent. Starting at a side pole, clip the sidewall snap hooks to the rope line that is attached
to the tent top.


                                 Why two sets of holes in frame fittings?
Two holes are located in each protrusion of almost every frame tent fitting. The first hole (furthest from the center of the
fitting) is for the pin that holds the pole in place. The second pin (located closest to the center of the fitting) is an align-
ment hole. When a pin is placed in this alignment hole, it prevents the frame pole from moving to far.

1.	     Insert the pin in the hole closest to the center of the fitting (alignment hole).
2.	     Slide the pole on the protrusion until it meets the pin.
3.	     Rotate the pole until the holes on the pole and fitting is aligned properly.
4.	     Insert the pin through the pole and fitting.
5.	     Remove the first pin (the alignment pin).


  If you have any questions, please contact Celina Tents support department at:
                                             support@celinatent.com
                                         1-866-GET-TENT /419-586-3610
                                                www.GetTent.com                                                Page 2 of 2

More Related Content

What's hot

Manual de serviço shadow 750 00 x6b-meg-001 ignicao
Manual de serviço shadow 750   00 x6b-meg-001 ignicaoManual de serviço shadow 750   00 x6b-meg-001 ignicao
Manual de serviço shadow 750 00 x6b-meg-001 ignicao
Thiago Huari
 
Stihl MS 171 Chainsaw Service Repair Manual
Stihl MS 171 Chainsaw Service Repair ManualStihl MS 171 Chainsaw Service Repair Manual
Stihl MS 171 Chainsaw Service Repair Manual
ufjjdfjjskekmd
 
Manual de serviço moto fazer 250
Manual de serviço   moto fazer 250Manual de serviço   moto fazer 250
Manual de serviço moto fazer 250williammagalhaes
 
12 x 24 Frame Tent Installation Instructions
12 x 24 Frame Tent Installation Instructions12 x 24 Frame Tent Installation Instructions
12 x 24 Frame Tent Installation Instructions
celinatent
 
Instructions | Primary Arms SLX8 1-8x24 SFP
Instructions | Primary Arms SLX8 1-8x24 SFPInstructions | Primary Arms SLX8 1-8x24 SFP
Instructions | Primary Arms SLX8 1-8x24 SFP
Optics-Trade
 
Case 1150 l crawler dozer service repair manual
Case 1150 l crawler dozer service repair manualCase 1150 l crawler dozer service repair manual
Case 1150 l crawler dozer service repair manual
ujjdfjkskdme
 
162537_1_EN1.pdf
162537_1_EN1.pdf162537_1_EN1.pdf
162537_1_EN1.pdf
NestorLuisJimenezSaa
 
Cbx 250 twister catalogo de pecas
Cbx 250 twister   catalogo de pecasCbx 250 twister   catalogo de pecas
Cbx 250 twister catalogo de pecasDarlan Diego
 
Preventive Maintenance Manual.pdf
Preventive Maintenance Manual.pdfPreventive Maintenance Manual.pdf
Preventive Maintenance Manual.pdf
EzequielAlmada8
 
Manual de serviço cbr600 f(1) (~1997) rodadian
Manual de serviço cbr600 f(1) (~1997) rodadianManual de serviço cbr600 f(1) (~1997) rodadian
Manual de serviço cbr600 f(1) (~1997) rodadianThiago Huari
 
Manual de serviço cb600 f hornet diagrama
Manual de serviço cb600 f hornet diagramaManual de serviço cb600 f hornet diagrama
Manual de serviço cb600 f hornet diagramaThiago Huari
 
Manaul de serviço ms cbx250 (2006) 00 x6b-kpf-003 09. embreagem
Manaul de serviço ms cbx250 (2006)   00 x6b-kpf-003 09. embreagemManaul de serviço ms cbx250 (2006)   00 x6b-kpf-003 09. embreagem
Manaul de serviço ms cbx250 (2006) 00 x6b-kpf-003 09. embreagemThiago Huari
 
Manual de serviço shadow 750 00 x6b-meg-001 cabecote-valvulas
Manual de serviço shadow 750   00 x6b-meg-001 cabecote-valvulasManual de serviço shadow 750   00 x6b-meg-001 cabecote-valvulas
Manual de serviço shadow 750 00 x6b-meg-001 cabecote-valvulas
Thiago Huari
 
Manual de serviço cargotod cabecote
Manual de serviço cargotod cabecoteManual de serviço cargotod cabecote
Manual de serviço cargotod cabecoteThiago Huari
 
Manual de serviço ms nx 4 falcon - 00 x6b-mcg-002 transmis
Manual de serviço ms nx 4 falcon - 00 x6b-mcg-002 transmisManual de serviço ms nx 4 falcon - 00 x6b-mcg-002 transmis
Manual de serviço ms nx 4 falcon - 00 x6b-mcg-002 transmis
Thiago Huari
 
Hyster f004 (s80 xm bcs) forklift service repair manual
Hyster f004 (s80 xm bcs) forklift service repair manualHyster f004 (s80 xm bcs) forklift service repair manual
Hyster f004 (s80 xm bcs) forklift service repair manual
fjskekfkemm
 
Manual tratotor esteira d8 t
Manual tratotor esteira d8 tManual tratotor esteira d8 t
Manual tratotor esteira d8 t
Eder Ribeiro
 
Posicionadores samson
Posicionadores samsonPosicionadores samson
Posicionadores samson
pmx
 

What's hot (20)

Manual de serviço shadow 750 00 x6b-meg-001 ignicao
Manual de serviço shadow 750   00 x6b-meg-001 ignicaoManual de serviço shadow 750   00 x6b-meg-001 ignicao
Manual de serviço shadow 750 00 x6b-meg-001 ignicao
 
Tabela de Manutenção
Tabela de ManutençãoTabela de Manutenção
Tabela de Manutenção
 
Stihl MS 171 Chainsaw Service Repair Manual
Stihl MS 171 Chainsaw Service Repair ManualStihl MS 171 Chainsaw Service Repair Manual
Stihl MS 171 Chainsaw Service Repair Manual
 
Manual de serviço moto fazer 250
Manual de serviço   moto fazer 250Manual de serviço   moto fazer 250
Manual de serviço moto fazer 250
 
12 x 24 Frame Tent Installation Instructions
12 x 24 Frame Tent Installation Instructions12 x 24 Frame Tent Installation Instructions
12 x 24 Frame Tent Installation Instructions
 
Instructions | Primary Arms SLX8 1-8x24 SFP
Instructions | Primary Arms SLX8 1-8x24 SFPInstructions | Primary Arms SLX8 1-8x24 SFP
Instructions | Primary Arms SLX8 1-8x24 SFP
 
Case 1150 l crawler dozer service repair manual
Case 1150 l crawler dozer service repair manualCase 1150 l crawler dozer service repair manual
Case 1150 l crawler dozer service repair manual
 
162537_1_EN1.pdf
162537_1_EN1.pdf162537_1_EN1.pdf
162537_1_EN1.pdf
 
Cbx 250 twister catalogo de pecas
Cbx 250 twister   catalogo de pecasCbx 250 twister   catalogo de pecas
Cbx 250 twister catalogo de pecas
 
Preventive Maintenance Manual.pdf
Preventive Maintenance Manual.pdfPreventive Maintenance Manual.pdf
Preventive Maintenance Manual.pdf
 
Manual de serviço cbr600 f(1) (~1997) rodadian
Manual de serviço cbr600 f(1) (~1997) rodadianManual de serviço cbr600 f(1) (~1997) rodadian
Manual de serviço cbr600 f(1) (~1997) rodadian
 
Manual de serviço cb600 f hornet diagrama
Manual de serviço cb600 f hornet diagramaManual de serviço cb600 f hornet diagrama
Manual de serviço cb600 f hornet diagrama
 
Brochura580M
Brochura580MBrochura580M
Brochura580M
 
Manaul de serviço ms cbx250 (2006) 00 x6b-kpf-003 09. embreagem
Manaul de serviço ms cbx250 (2006)   00 x6b-kpf-003 09. embreagemManaul de serviço ms cbx250 (2006)   00 x6b-kpf-003 09. embreagem
Manaul de serviço ms cbx250 (2006) 00 x6b-kpf-003 09. embreagem
 
Manual de serviço shadow 750 00 x6b-meg-001 cabecote-valvulas
Manual de serviço shadow 750   00 x6b-meg-001 cabecote-valvulasManual de serviço shadow 750   00 x6b-meg-001 cabecote-valvulas
Manual de serviço shadow 750 00 x6b-meg-001 cabecote-valvulas
 
Manual de serviço cargotod cabecote
Manual de serviço cargotod cabecoteManual de serviço cargotod cabecote
Manual de serviço cargotod cabecote
 
Manual de serviço ms nx 4 falcon - 00 x6b-mcg-002 transmis
Manual de serviço ms nx 4 falcon - 00 x6b-mcg-002 transmisManual de serviço ms nx 4 falcon - 00 x6b-mcg-002 transmis
Manual de serviço ms nx 4 falcon - 00 x6b-mcg-002 transmis
 
Hyster f004 (s80 xm bcs) forklift service repair manual
Hyster f004 (s80 xm bcs) forklift service repair manualHyster f004 (s80 xm bcs) forklift service repair manual
Hyster f004 (s80 xm bcs) forklift service repair manual
 
Manual tratotor esteira d8 t
Manual tratotor esteira d8 tManual tratotor esteira d8 t
Manual tratotor esteira d8 t
 
Posicionadores samson
Posicionadores samsonPosicionadores samson
Posicionadores samson
 

Similar to 10 x 30 Frame Tent Installation Instructions

10 x 20 Frame Tent Installation Instructions
10 x 20 Frame Tent Installation Instructions10 x 20 Frame Tent Installation Instructions
10 x 20 Frame Tent Installation Instructions
celinatent
 
12 x 20 Frame Tent Installation Instructions
12 x 20 Frame Tent Installation Instructions12 x 20 Frame Tent Installation Instructions
12 x 20 Frame Tent Installation Instructions
celinatent
 
8 x 16 Frame Tent Installation Instructions
8 x 16 Frame Tent Installation Instructions8 x 16 Frame Tent Installation Instructions
8 x 16 Frame Tent Installation Instructions
celinatent
 
8 x 12 Frame Tent Installation Instructions
8 x 12 Frame Tent Installation Instructions8 x 12 Frame Tent Installation Instructions
8 x 12 Frame Tent Installation Instructions
celinatent
 
8 x 10 Frame Tent Installation Instructions
8 x 10 Frame Tent Installation Instructions8 x 10 Frame Tent Installation Instructions
8 x 10 Frame Tent Installation Instructions
celinatent
 
10 x 10 Frame Tent Installation Instructions
10 x 10 Frame Tent Installation Instructions10 x 10 Frame Tent Installation Instructions
10 x 10 Frame Tent Installation Instructions
celinatent
 
15 x 15 Frame Tent Installation Instructions
15 x 15 Frame Tent Installation Instructions15 x 15 Frame Tent Installation Instructions
15 x 15 Frame Tent Installation Instructions
celinatent
 
12 x 12 Frame Tent Installation Instructions
12 x 12 Frame Tent Installation Instructions12 x 12 Frame Tent Installation Instructions
12 x 12 Frame Tent Installation Instructions
celinatent
 
8 x 8 Frame Tent Setup Directions
8 x 8 Frame Tent Setup Directions8 x 8 Frame Tent Setup Directions
8 x 8 Frame Tent Setup Directions
celinatent
 
Victory rig
Victory rigVictory rig
Victory rigJLRev
 
How to Make and Wire a Lamp
How to Make and Wire a LampHow to Make and Wire a Lamp
How to Make and Wire a Lamp
medo41
 
Construção de Violões
Construção de ViolõesConstrução de Violões
Construção de Violões
Gabriel Vandresen
 
Mitra Stats Project Final
Mitra Stats Project FinalMitra Stats Project Final
Mitra Stats Project Finalshonabunch1
 
Solar cooker installation
Solar cooker installationSolar cooker installation
Solar cooker installationPrabhat Kumar
 
4. How to build shed roof rafters
4. How to build shed roof rafters4. How to build shed roof rafters
4. How to build shed roof rafters
icreatablesseo
 
Cadeira de jardin
Cadeira de jardinCadeira de jardin
Cadeira de jardin
Aguinaldo Oliveira
 
Double Braid EyeSplice
Double Braid EyeSpliceDouble Braid EyeSplice
Double Braid EyeSpliceJeffery Flower
 
F-F-Fiddle Assembly Instructions
F-F-Fiddle Assembly InstructionsF-F-Fiddle Assembly Instructions
F-F-Fiddle Assembly Instructions
dsp39
 
소형베틀도면
소형베틀도면소형베틀도면
소형베틀도면
Seongwon Kim
 
Build instructions Homeslice Tower ver 070514
Build instructions   Homeslice Tower ver 070514Build instructions   Homeslice Tower ver 070514
Build instructions Homeslice Tower ver 070514
Jeff Vetterick
 

Similar to 10 x 30 Frame Tent Installation Instructions (20)

10 x 20 Frame Tent Installation Instructions
10 x 20 Frame Tent Installation Instructions10 x 20 Frame Tent Installation Instructions
10 x 20 Frame Tent Installation Instructions
 
12 x 20 Frame Tent Installation Instructions
12 x 20 Frame Tent Installation Instructions12 x 20 Frame Tent Installation Instructions
12 x 20 Frame Tent Installation Instructions
 
8 x 16 Frame Tent Installation Instructions
8 x 16 Frame Tent Installation Instructions8 x 16 Frame Tent Installation Instructions
8 x 16 Frame Tent Installation Instructions
 
8 x 12 Frame Tent Installation Instructions
8 x 12 Frame Tent Installation Instructions8 x 12 Frame Tent Installation Instructions
8 x 12 Frame Tent Installation Instructions
 
8 x 10 Frame Tent Installation Instructions
8 x 10 Frame Tent Installation Instructions8 x 10 Frame Tent Installation Instructions
8 x 10 Frame Tent Installation Instructions
 
10 x 10 Frame Tent Installation Instructions
10 x 10 Frame Tent Installation Instructions10 x 10 Frame Tent Installation Instructions
10 x 10 Frame Tent Installation Instructions
 
15 x 15 Frame Tent Installation Instructions
15 x 15 Frame Tent Installation Instructions15 x 15 Frame Tent Installation Instructions
15 x 15 Frame Tent Installation Instructions
 
12 x 12 Frame Tent Installation Instructions
12 x 12 Frame Tent Installation Instructions12 x 12 Frame Tent Installation Instructions
12 x 12 Frame Tent Installation Instructions
 
8 x 8 Frame Tent Setup Directions
8 x 8 Frame Tent Setup Directions8 x 8 Frame Tent Setup Directions
8 x 8 Frame Tent Setup Directions
 
Victory rig
Victory rigVictory rig
Victory rig
 
How to Make and Wire a Lamp
How to Make and Wire a LampHow to Make and Wire a Lamp
How to Make and Wire a Lamp
 
Construção de Violões
Construção de ViolõesConstrução de Violões
Construção de Violões
 
Mitra Stats Project Final
Mitra Stats Project FinalMitra Stats Project Final
Mitra Stats Project Final
 
Solar cooker installation
Solar cooker installationSolar cooker installation
Solar cooker installation
 
4. How to build shed roof rafters
4. How to build shed roof rafters4. How to build shed roof rafters
4. How to build shed roof rafters
 
Cadeira de jardin
Cadeira de jardinCadeira de jardin
Cadeira de jardin
 
Double Braid EyeSplice
Double Braid EyeSpliceDouble Braid EyeSplice
Double Braid EyeSplice
 
F-F-Fiddle Assembly Instructions
F-F-Fiddle Assembly InstructionsF-F-Fiddle Assembly Instructions
F-F-Fiddle Assembly Instructions
 
소형베틀도면
소형베틀도면소형베틀도면
소형베틀도면
 
Build instructions Homeslice Tower ver 070514
Build instructions   Homeslice Tower ver 070514Build instructions   Homeslice Tower ver 070514
Build instructions Homeslice Tower ver 070514
 

More from celinatent

40 x 300 Pole Tent Installation Instructions
40 x 300 Pole Tent Installation Instructions40 x 300 Pole Tent Installation Instructions
40 x 300 Pole Tent Installation Instructions
celinatent
 
40 x 280 Pole Tent Installation Instructions
40 x 280 Pole Tent Installation Instructions40 x 280 Pole Tent Installation Instructions
40 x 280 Pole Tent Installation Instructions
celinatent
 
40 x 260 Pole Tent Installation Instructions
40 x 260 Pole Tent Installation Instructions40 x 260 Pole Tent Installation Instructions
40 x 260 Pole Tent Installation Instructions
celinatent
 
40 x 240 Pole Tent Installation Instructions
40 x 240 Pole Tent Installation Instructions40 x 240 Pole Tent Installation Instructions
40 x 240 Pole Tent Installation Instructions
celinatent
 
40 x 220 Pole Tent Installation Instructions
40 x 220 Pole Tent Installation Instructions40 x 220 Pole Tent Installation Instructions
40 x 220 Pole Tent Installation Instructions
celinatent
 
40 x 200 Pole Tent Installation Instructions
40 x 200 Pole Tent Installation Instructions40 x 200 Pole Tent Installation Instructions
40 x 200 Pole Tent Installation Instructions
celinatent
 
40 x 180 Pole Tent Installation Instructions
40 x 180 Pole Tent Installation Instructions40 x 180 Pole Tent Installation Instructions
40 x 180 Pole Tent Installation Instructions
celinatent
 
40 x 160 Pole Tent Installation Instructions
40 x 160 Pole Tent Installation Instructions40 x 160 Pole Tent Installation Instructions
40 x 160 Pole Tent Installation Instructions
celinatent
 
40 x 140 Pole Tent Installation Instructions
40 x 140 Pole Tent Installation Instructions40 x 140 Pole Tent Installation Instructions
40 x 140 Pole Tent Installation Instructions
celinatent
 
40 x 120 Pole Tent Installation Instructions
40 x 120 Pole Tent Installation Instructions40 x 120 Pole Tent Installation Instructions
40 x 120 Pole Tent Installation Instructions
celinatent
 
40 x 100 Pole Tent Installation Instructions
40 x 100 Pole Tent Installation Instructions40 x 100 Pole Tent Installation Instructions
40 x 100 Pole Tent Installation Instructions
celinatent
 
40 x 80 Pole Tent Installation Instructions
40 x 80 Pole Tent Installation Instructions40 x 80 Pole Tent Installation Instructions
40 x 80 Pole Tent Installation Instructions
celinatent
 
40 x 60 Pole Tent Installation Instructions
40 x 60 Pole Tent Installation Instructions40 x 60 Pole Tent Installation Instructions
40 x 60 Pole Tent Installation Instructions
celinatent
 
40 x 40 Pole Tent Installation Instructions
40 x 40 Pole Tent Installation Instructions40 x 40 Pole Tent Installation Instructions
40 x 40 Pole Tent Installation Instructions
celinatent
 
30 x 255 Pole Tent Installation Instructions
30 x 255 Pole Tent Installation Instructions30 x 255 Pole Tent Installation Instructions
30 x 255 Pole Tent Installation Instructions
celinatent
 
30 x 210 Pole Tent Installation Instructions
30 x 210 Pole Tent Installation Instructions30 x 210 Pole Tent Installation Instructions
30 x 210 Pole Tent Installation Instructions
celinatent
 
30 x 195 Pole Tent Installation Instructions
30 x 195 Pole Tent Installation Instructions30 x 195 Pole Tent Installation Instructions
30 x 195 Pole Tent Installation Instructions
celinatent
 
30 x 180 Pole Tent Installation Instructions
30 x 180 Pole Tent Installation Instructions30 x 180 Pole Tent Installation Instructions
30 x 180 Pole Tent Installation Instructions
celinatent
 
30 x 165 Pole Tent Installation Instructions
30 x 165 Pole Tent Installation Instructions30 x 165 Pole Tent Installation Instructions
30 x 165 Pole Tent Installation Instructions
celinatent
 
30 x 150 Pole Tent Installation Instructions
30 x 150 Pole Tent Installation Instructions30 x 150 Pole Tent Installation Instructions
30 x 150 Pole Tent Installation Instructions
celinatent
 

More from celinatent (20)

40 x 300 Pole Tent Installation Instructions
40 x 300 Pole Tent Installation Instructions40 x 300 Pole Tent Installation Instructions
40 x 300 Pole Tent Installation Instructions
 
40 x 280 Pole Tent Installation Instructions
40 x 280 Pole Tent Installation Instructions40 x 280 Pole Tent Installation Instructions
40 x 280 Pole Tent Installation Instructions
 
40 x 260 Pole Tent Installation Instructions
40 x 260 Pole Tent Installation Instructions40 x 260 Pole Tent Installation Instructions
40 x 260 Pole Tent Installation Instructions
 
40 x 240 Pole Tent Installation Instructions
40 x 240 Pole Tent Installation Instructions40 x 240 Pole Tent Installation Instructions
40 x 240 Pole Tent Installation Instructions
 
40 x 220 Pole Tent Installation Instructions
40 x 220 Pole Tent Installation Instructions40 x 220 Pole Tent Installation Instructions
40 x 220 Pole Tent Installation Instructions
 
40 x 200 Pole Tent Installation Instructions
40 x 200 Pole Tent Installation Instructions40 x 200 Pole Tent Installation Instructions
40 x 200 Pole Tent Installation Instructions
 
40 x 180 Pole Tent Installation Instructions
40 x 180 Pole Tent Installation Instructions40 x 180 Pole Tent Installation Instructions
40 x 180 Pole Tent Installation Instructions
 
40 x 160 Pole Tent Installation Instructions
40 x 160 Pole Tent Installation Instructions40 x 160 Pole Tent Installation Instructions
40 x 160 Pole Tent Installation Instructions
 
40 x 140 Pole Tent Installation Instructions
40 x 140 Pole Tent Installation Instructions40 x 140 Pole Tent Installation Instructions
40 x 140 Pole Tent Installation Instructions
 
40 x 120 Pole Tent Installation Instructions
40 x 120 Pole Tent Installation Instructions40 x 120 Pole Tent Installation Instructions
40 x 120 Pole Tent Installation Instructions
 
40 x 100 Pole Tent Installation Instructions
40 x 100 Pole Tent Installation Instructions40 x 100 Pole Tent Installation Instructions
40 x 100 Pole Tent Installation Instructions
 
40 x 80 Pole Tent Installation Instructions
40 x 80 Pole Tent Installation Instructions40 x 80 Pole Tent Installation Instructions
40 x 80 Pole Tent Installation Instructions
 
40 x 60 Pole Tent Installation Instructions
40 x 60 Pole Tent Installation Instructions40 x 60 Pole Tent Installation Instructions
40 x 60 Pole Tent Installation Instructions
 
40 x 40 Pole Tent Installation Instructions
40 x 40 Pole Tent Installation Instructions40 x 40 Pole Tent Installation Instructions
40 x 40 Pole Tent Installation Instructions
 
30 x 255 Pole Tent Installation Instructions
30 x 255 Pole Tent Installation Instructions30 x 255 Pole Tent Installation Instructions
30 x 255 Pole Tent Installation Instructions
 
30 x 210 Pole Tent Installation Instructions
30 x 210 Pole Tent Installation Instructions30 x 210 Pole Tent Installation Instructions
30 x 210 Pole Tent Installation Instructions
 
30 x 195 Pole Tent Installation Instructions
30 x 195 Pole Tent Installation Instructions30 x 195 Pole Tent Installation Instructions
30 x 195 Pole Tent Installation Instructions
 
30 x 180 Pole Tent Installation Instructions
30 x 180 Pole Tent Installation Instructions30 x 180 Pole Tent Installation Instructions
30 x 180 Pole Tent Installation Instructions
 
30 x 165 Pole Tent Installation Instructions
30 x 165 Pole Tent Installation Instructions30 x 165 Pole Tent Installation Instructions
30 x 165 Pole Tent Installation Instructions
 
30 x 150 Pole Tent Installation Instructions
30 x 150 Pole Tent Installation Instructions30 x 150 Pole Tent Installation Instructions
30 x 150 Pole Tent Installation Instructions
 

Recently uploaded

Collocation thường gặp trong đề thi THPT Quốc gia.pdf
Collocation thường gặp trong đề thi THPT Quốc gia.pdfCollocation thường gặp trong đề thi THPT Quốc gia.pdf
Collocation thường gặp trong đề thi THPT Quốc gia.pdf
ngochaavk33a
 
CHUYÊN ĐỀ READING ÔN THI HSG THPT HAY.docx
CHUYÊN ĐỀ READING ÔN THI HSG THPT HAY.docxCHUYÊN ĐỀ READING ÔN THI HSG THPT HAY.docx
CHUYÊN ĐỀ READING ÔN THI HSG THPT HAY.docx
ngochaavk33a
 
SOCIOLOGY PPT. SOCIAL SECURITY POWER POINT
SOCIOLOGY PPT. SOCIAL SECURITY POWER POINTSOCIOLOGY PPT. SOCIAL SECURITY POWER POINT
SOCIOLOGY PPT. SOCIAL SECURITY POWER POINT
ssuser8d5e2d1
 
Ethical_dilemmas_MDI_Gurgaon-Business Ethics Case 1.pptx
Ethical_dilemmas_MDI_Gurgaon-Business Ethics Case 1.pptxEthical_dilemmas_MDI_Gurgaon-Business Ethics Case 1.pptx
Ethical_dilemmas_MDI_Gurgaon-Business Ethics Case 1.pptx
TANMAYJAIN511570
 
ÔN TẬP CỤM THÀNH NGỮ TIẾNG ANH CỰC HAY.docx
ÔN TẬP CỤM THÀNH NGỮ TIẾNG ANH CỰC HAY.docxÔN TẬP CỤM THÀNH NGỮ TIẾNG ANH CỰC HAY.docx
ÔN TẬP CỤM THÀNH NGỮ TIẾNG ANH CỰC HAY.docx
ngochaavk33a
 
UNIVERSAL HUMAN VALUES- Harmony in the Nature
UNIVERSAL HUMAN VALUES- Harmony in the NatureUNIVERSAL HUMAN VALUES- Harmony in the Nature
UNIVERSAL HUMAN VALUES- Harmony in the Nature
Chandrakant Divate
 
Program Your Destiny eBook - Destiny University.pdf
Program Your Destiny eBook - Destiny University.pdfProgram Your Destiny eBook - Destiny University.pdf
Program Your Destiny eBook - Destiny University.pdf
Michael Herlache, MBA
 

Recently uploaded (7)

Collocation thường gặp trong đề thi THPT Quốc gia.pdf
Collocation thường gặp trong đề thi THPT Quốc gia.pdfCollocation thường gặp trong đề thi THPT Quốc gia.pdf
Collocation thường gặp trong đề thi THPT Quốc gia.pdf
 
CHUYÊN ĐỀ READING ÔN THI HSG THPT HAY.docx
CHUYÊN ĐỀ READING ÔN THI HSG THPT HAY.docxCHUYÊN ĐỀ READING ÔN THI HSG THPT HAY.docx
CHUYÊN ĐỀ READING ÔN THI HSG THPT HAY.docx
 
SOCIOLOGY PPT. SOCIAL SECURITY POWER POINT
SOCIOLOGY PPT. SOCIAL SECURITY POWER POINTSOCIOLOGY PPT. SOCIAL SECURITY POWER POINT
SOCIOLOGY PPT. SOCIAL SECURITY POWER POINT
 
Ethical_dilemmas_MDI_Gurgaon-Business Ethics Case 1.pptx
Ethical_dilemmas_MDI_Gurgaon-Business Ethics Case 1.pptxEthical_dilemmas_MDI_Gurgaon-Business Ethics Case 1.pptx
Ethical_dilemmas_MDI_Gurgaon-Business Ethics Case 1.pptx
 
ÔN TẬP CỤM THÀNH NGỮ TIẾNG ANH CỰC HAY.docx
ÔN TẬP CỤM THÀNH NGỮ TIẾNG ANH CỰC HAY.docxÔN TẬP CỤM THÀNH NGỮ TIẾNG ANH CỰC HAY.docx
ÔN TẬP CỤM THÀNH NGỮ TIẾNG ANH CỰC HAY.docx
 
UNIVERSAL HUMAN VALUES- Harmony in the Nature
UNIVERSAL HUMAN VALUES- Harmony in the NatureUNIVERSAL HUMAN VALUES- Harmony in the Nature
UNIVERSAL HUMAN VALUES- Harmony in the Nature
 
Program Your Destiny eBook - Destiny University.pdf
Program Your Destiny eBook - Destiny University.pdfProgram Your Destiny eBook - Destiny University.pdf
Program Your Destiny eBook - Destiny University.pdf
 

10 x 30 Frame Tent Installation Instructions

  • 1. 10’ x 30’ Frame Tent Directions
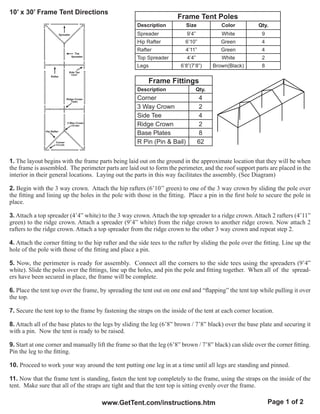
 Frame Tent Poles Description Size Color Qty. Spreader Spreader 9’4” White 9 Hip Rafter 6’10” Green 4 Rafter 4’11” Green 4 Top Spreader Top Spreader 4’4” White 2 Legs 6’8”(7’8”) Brown(Black) 8 Side Tee F02ST Rafter Frame Fittings Description Qty. Ridge Crown F08RC Corner 4 3 Way Crown 2 Side Tee 4 3 Way Crown F073WC Ridge Crown 2 Hip Rafter Base Plates 8 Corner F01COR R Pin (Pin & Bail) 62 1. The layout begins with the frame parts being laid out on the ground in the approximate location that they will be when the frame is assembled. The perimeter parts are laid out to form the perimeter, and the roof support parts are placed in the interior in their general locations. Laying out the parts in this way facilitates the assembly. (See Diagram) 2. Begin with the 3 way crown. Attach the hip rafters (6’10’’ green) to one of the 3 way crown by sliding the pole over the fitting and lining up the holes in the pole with those in the fitting. Place a pin in the first hole to secure the pole in place. 3. Attach a top spreader (4’4” white) to the 3 way crown. Attach the top spreader to a ridge crown. Attach 2 rafters (4’11” green) to the ridge crown. Attach a spreader (9’4” white) from the ridge crown to another ridge crown. Now attach 2 rafters to the ridge crown. Attach a top spreader from the ridge crown to the other 3 way crown and repeat step 2. 4. Attach the corner fitting to the hip rafter and the side tees to the rafter by sliding the pole over the fitting. Line up the hole of the pole with those of the fitting and place a pin. 5. Now, the perimeter is ready for assembly. Connect all the corners to the side tees using the spreaders (9’4” white). Slide the poles over the fittings, line up the holes, and pin the pole and fitting together. When all of the spread- ers have been secured in place, the frame will be complete. 6. Place the tent top over the frame, by spreading the tent out on one end and “flapping” the tent top while pulling it over the top. 7. Secure the tent top to the frame by fastening the straps on the inside of the tent at each corner location. 8. Attach all of the base plates to the legs by sliding the leg (6’8” brown / 7’8” black) over the base plate and securing it with a pin. Now the tent is ready to be raised. 9. Start at one corner and manually lift the frame so that the leg (6’8” brown / 7’8” black) can slide over the corner fitting. Pin the leg to the fitting. 10. Proceed to work your way around the tent putting one leg in at a time until all legs are standing and pinned. 11. Now that the frame tent is standing, fasten the tent top completely to the frame, using the straps on the inside of the tent. Make sure that all of the straps are tight and that the tent top is sitting evenly over the frame. www.GetTent.com/instructions.htm Page 1 of 2
  • 2. 10’ x 30’ Frame Tent Directions 12. Fasten either a ratchet strap or rope to the fitting at each leg location. Drive a stake approximately four feet out from each leg. 13. Attach the anchoring device (ratchets or ropes) to the stakes at each leg location. - Ratchets- turn the 6” loop at the end of the ratchet inside out and pull the strap through the loop to create a noose and pull tight over the stake. Take the strap from the tent and pull it through the reel bars slot of the ratchet (ratchet buckle needs to have handle facing upward at all time) and pull the strap back towards the tent approximately 1 ½ feet. Hold the strap at this point with one hand and begin to crank the ratchet handle back and forth with the other hand until the reel bars have turned at least 2 times, this eliminates the chance of slippage. Repeat at all leg locations. - Ropes- use a Double Loop Clove Hitch Knot - grip the rope in your left hand approximately 8’ down from the grommet, at this point, take your right hand and create a loop (approximately 6”) with the excess rope and place it in your left hand. Repeat and create another loop and place on the right side of the previous loop (should have 2 and half loops in your left hand). Take the right loop and pull it up and over so it is now on the left side. Now place both loops over the stake and pull tight with the excess rope. Repeat at all leg locations. 14. The tent top should now be complete! If sidewalls are desired, unroll the sidewalls between the stakes and the side poles around the perimeter of the tent. Starting at a side pole, clip the sidewall snap hooks to the rope line that is attached to the tent top. Why two sets of holes in frame fittings? Two holes are located in each protrusion of almost every frame tent fitting. The first hole (furthest from the center of the fitting) is for the pin that holds the pole in place. The second pin (located closest to the center of the fitting) is an align- ment hole. When a pin is placed in this alignment hole, it prevents the frame pole from moving to far. 1. Insert the pin in the hole closest to the center of the fitting (alignment hole). 2. Slide the pole on the protrusion until it meets the pin. 3. Rotate the pole until the holes on the pole and fitting is aligned properly. 4. Insert the pin through the pole and fitting. 5. Remove the first pin (the alignment pin). If you have any questions, please contact Celina Tents support department at: support@celinatent.com 1-866-GET-TENT /419-586-3610 www.GetTent.com Page 2 of 2